title: Initial Configuration Utility sidebar_label: Configuration description: Guide to using the Recovery Configuration Utility for RSAT Extension registration, database configuration, and licensing information.
Configuration Utility
On installing Recovery for Active Directory, the Recovery Configuration Utility is installed on the same server. This utility is used to register the RSAT Extension on the Recovery Application Server.
To launch the Recovery Configuration Utility, double-click the Recovery_Config.exe executable at the
following location in the Recovery for Active Directory installation directory:
...Netwrix\Recovery for Active Directory\Recovery_Config.exe
The Recovery Configuration Utility window has options to:
- Register/unregister the RSAT Extension on the Recovery Application Server
- Update the Recovery for Active Directory database information
- View product licensing information
Register/Unregister the RSAT Extension
The RSAT Extension is an MMC snap-in that can be installed on domain joined machines. It extends the Active Directory Users and Computers (ADUC) console with Recovery for Active Directory specific right-click options for object rollback and recovery. Included in this extension is a Recycle Bin for restoring deleted objects. Consider the following:
- The RSAT Extension is automatically installed with the Recovery for Active Directory installation package on the Recovery Application Server. The local Extension must be registered on the server to enable the rollback and restore options in ADUC.
- The Extension can be manually installed on a remote server where ADUC is installed. The Extension connects to the Recovery Application Server using the server name or IP address you provide while installing the Extension on the remote machine. See the Install the RSAT Extension topic for additional information.
Register the RSAT Extension
You must register the RSAT Extension on the Recovery Application Server to add the Rollback and Restore options to the ADUC console.
Follow the steps to register the RSAT Extension.
Step 1 – On the Recovery Configuration Utility window, click the Register button to register the RSAT Extension. On registration, the following message is displayed and the button changes to Unregister.

Step 2 – Click OK.
Unregister the RSAT Extension
Unregistering the RSAT Extension will remove the Rollback and Restore options from the Active Directory Users and Computers console.
Follow the steps to unregister the RSAT Extension.
Step 1 – On the Recovery Configuration Utility window, click the Unregister button to unregister the RSAT Extension. The following message is displayed and the button changes to Register.

Step 2 – Click OK.
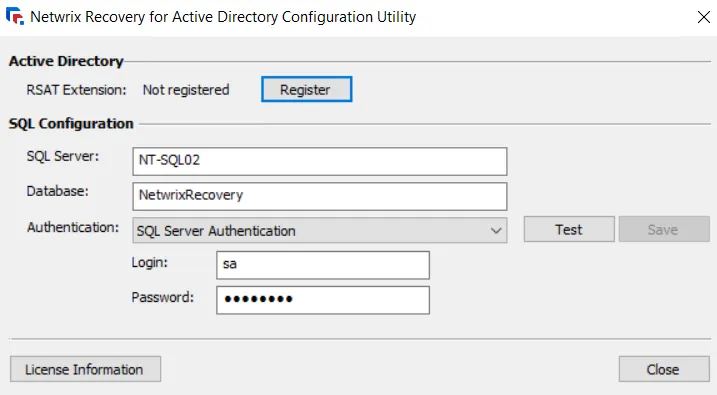
View SQL Configurations
The Recovery Configuration Utility window displays the following information for SQL configuration:
- SQL Server – The fully-qualified DNS location name or IP address of the SQL Server machine that hosts the Recovery for Active Directory database
- Database – The name of the Recovery for Active Directory database on the server
- Authentication – Choose between Windows Authentication or SQL Server Authentication credentials. If SQL Server Authentication is selected, provide the login credentials for the provisioned account in the Login and Password fields.
- Test – Click the Test button to verify the authentication connection
- Save – After making any changes, click the Save button to save the configuration
To update the password for the SQL server service account, see the Update SQL Server Service Account Password topic.
View License Information
On the Recovery Configuration Utility window, click the License Information button to open the License Information window that displays the validity of the Recovery for Active Directory license, its type, and expiration date.
First Launch
To launch the Recovery Console, either:
- Click the desktop icon
- Type
http:/localhost:3005in a web browser and press Enter
First Login
On the first login to the Recovery Console, use the credentials configured on the Administrator Role page during installation. This account has the Administrator role needed to manage the application. If a group is used, any account with membership to this group can login.
Follow the steps to login to Recovery for Active Directory.
Step 1 – Launch the Recovery Console. The Log in page is displayed.
Step 2 – Log in with credentials configured on the Administrator Role page of the Recovery for Active Directory Setup wizard during installation. See the Install the Application topic for additional information on the administrator role. The username must be entered in the following format:
- Domain\Username
Step 3 – Click Log in.
Once logged in, the first step is to configure a domain. See the Domain Backup Configuration Page topic for additional information.
The administrator must also add users who can access the application. Once these users have access, see the Log into the Recovery Console topic for information on accessing and signing into the Recovery Console.