Add Service Account
Follow the steps to add a service account to the console.
Step 1 – Navigate to the Configuration > Service Accounts page.
Step 2 – In the Service Account list, click the Plus icon.
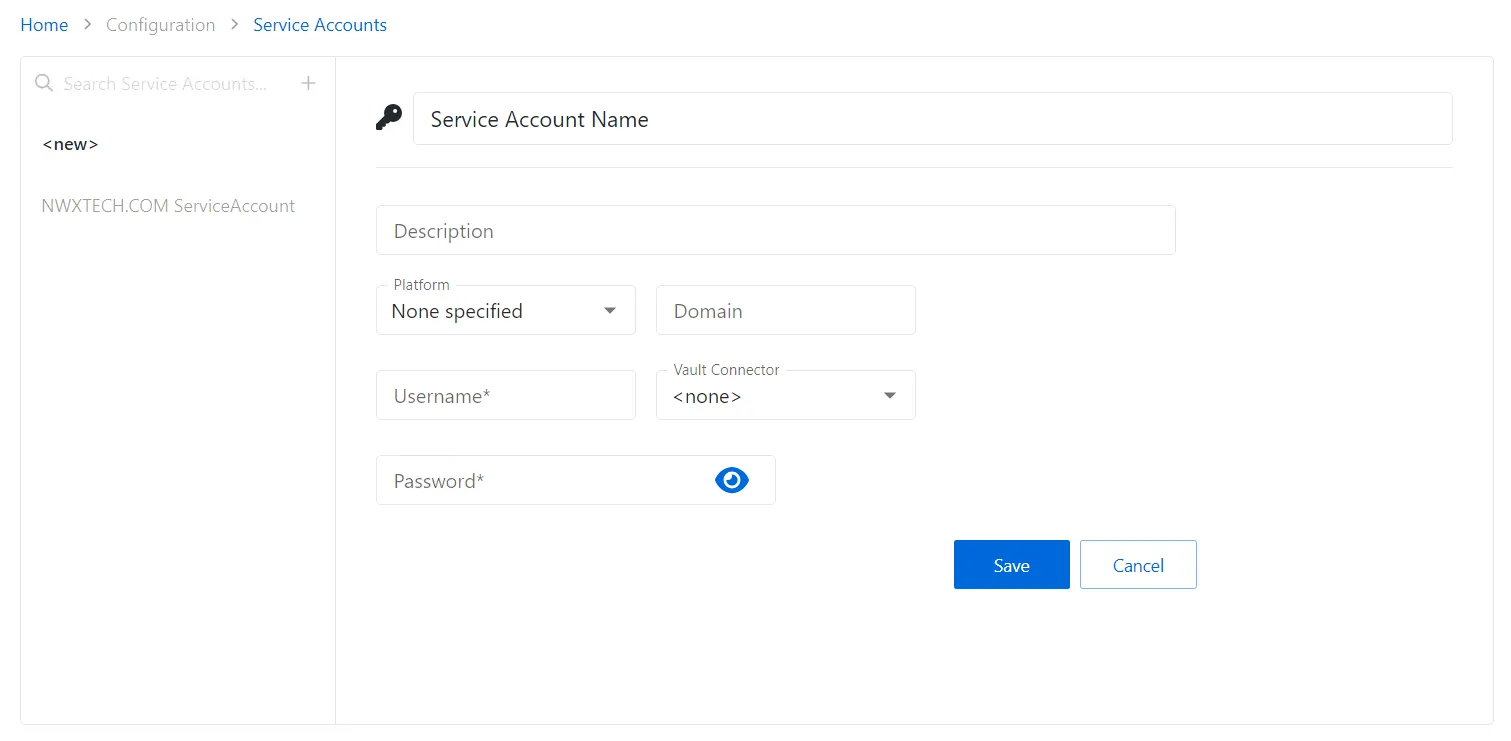
Step 3 – Enter the applicable information. See the Service Accounts Page section for detailed descriptions of the fields.
- For service accounts checked out through a vault connector, select a previously added vault connector from the drop-down list. See the Bring Your Own Vault (BYOV) Integration topic for additional information.
Step 4 – Click Save to create the new service account.
The new service account is added to the Service Accounts list.
Service Accounts Page
The Service Accounts page is accessible from the Navigation pane under Configuration. It shows the configured service accounts required by Privilege Secure services.

The pane on the left side of the page displays a list of the configured service accounts. This pane has the following features:
- Search — Searches the table or list for matches to the search string. When matches are found, the table or list is filtered to the matching results.
- Green + button — Create a new service account. See the Add Service Account topic for additional information.
- Trashcan icon — Deletes the service account. Icon appears when activity is hovered over. A confirmation window will display.
The selected service account details display at the top of the main pane:
-
Name — Displays the name of the account
-
Description — Description of the policy
-
Platform — Displays the type of platform, which defines the resource
-
Domain — Displays the domain name for the account. This field does not apply to Microsoft Entra ID platforms.
-
Address — Displays the CyberArk address. This field only applies to CyberArk vault connectors.
-
Username — Displays the name of the credential. This field does not apply to Microsoft Entra ID platforms.
-
App ID — Displays the globally unique identifier for the targeted app registered in the Active Directory tenant. This field only applies to Microsoft Entra ID platforms. See the Microsoft Entra ID App Registration for additional information.
-
Elevation Command — Displays the elevation mechanism for the host, such as: sudo, pbrun, pmrun, dzdo, etc.. This field only applies to Linux platforms.
-
Vault Connector — Displays the name of the assigned vault connector. See the Bring Your Own Vault (BYOV) Integration topic for additional information.
-
Authentication:
-
Enable Password — Temporarily elevates the Service Account to
Privileged EXECmode, allowing the account to manage the users and privileges required by Privilege Secure workflows on Cisco resources. The Enable Password can be used with any existing user account on the Cisco device (privilege level 1 - 15). This field only applies to Cisco platforms. -
Authentication Method — Displays the method by which a service account is authenticated. This field only applies to Linux platforms.
- Password — Use a password to use for authentication
- SSH Certificate — Use an SSH certificate to use for authentication
- SSH Certificate and Password — Use both a password and an SSH certificate to use for authentication
-
Password — Contains the service account password. The Eye icon can be used to view the password. This field does not apply to Microsoft Entra ID platforms.
-
Private Key — Displays a private key to use in conjunction with a passphrase. This field only applies to Linux platforms with SSH Certificate or SSH Certificate and Password authentication methods are selected.
-
SSH Passphrase — Displays an SSH passphrase to use for authentication. This field only applies to Linux platforms with SSH Certificate or SSH Certificate and Password authentication methods are selected.
-
App Secret — Displays the security token for the targeted app registered in the tenant. This field only applies to Microsoft Entra ID platforms. See the Microsoft Entra ID App Registration for additional information.
-
Safe — Displays the CyberArk safe where the login account is stored. This field only applies to CyberArk vault connectors.
-
Folder — Displays the CyberArk folder where the login account is stored. This field only applies to CyberArk vault connectors.
-
Library — Displays the library where the login account is stored. This field only applies to HashiCorp vault connectors.
-
If any of these settings are modified, Save and Cancel buttons are displayed. Click Save to commit the modifications. Click Cancel to discard the modifications.
Th "Service Account is Managed by Privilege Secure when the account has been configured to be managed by the application. See the Credentials Page topic for additional information.