Access Review Assistant
The Access Review Assistant creates a comprehensive display of permissions and profiles for a selected Object, User, or Profile / PermissionSet. The results can be exported to Excel. The Access Review Assistant feature is available with the Intelligent Change Enablement and Enterprise Compliance licenses.
Run the scanners before you perform comparisons to ensure you have the latest data.
There are three Access Assistance search types:
- Search By Object
- Search By User
- Search By Profile / Permission Set
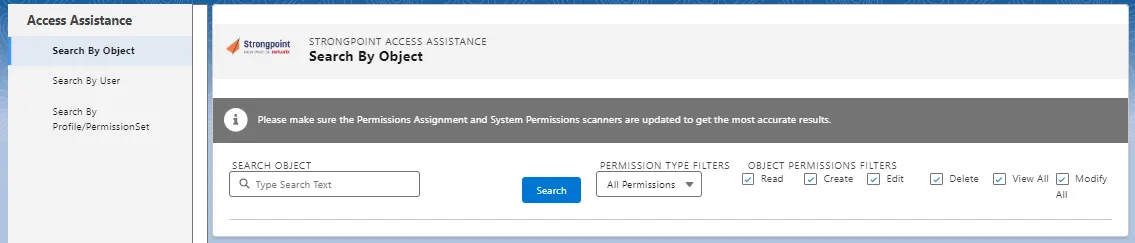
Search By Object
-
Select Tools > Access Review Assistant from the Netwrix Dashboard page. Click the expansion indicator u to expand the Access Assistance panel. Make sure Search By Object is selected.
-
Start typing the name of the Search Object. You can pick your object from the displayed completion list.
-
Set the Permission Type Filters: All Permissions, Permission Set, Permission Set Group, or Profile.
-
Set the Object Permissions Filters: Create, Edit, Read, Delete, View All, and Modify All.
-
Click Search.
-
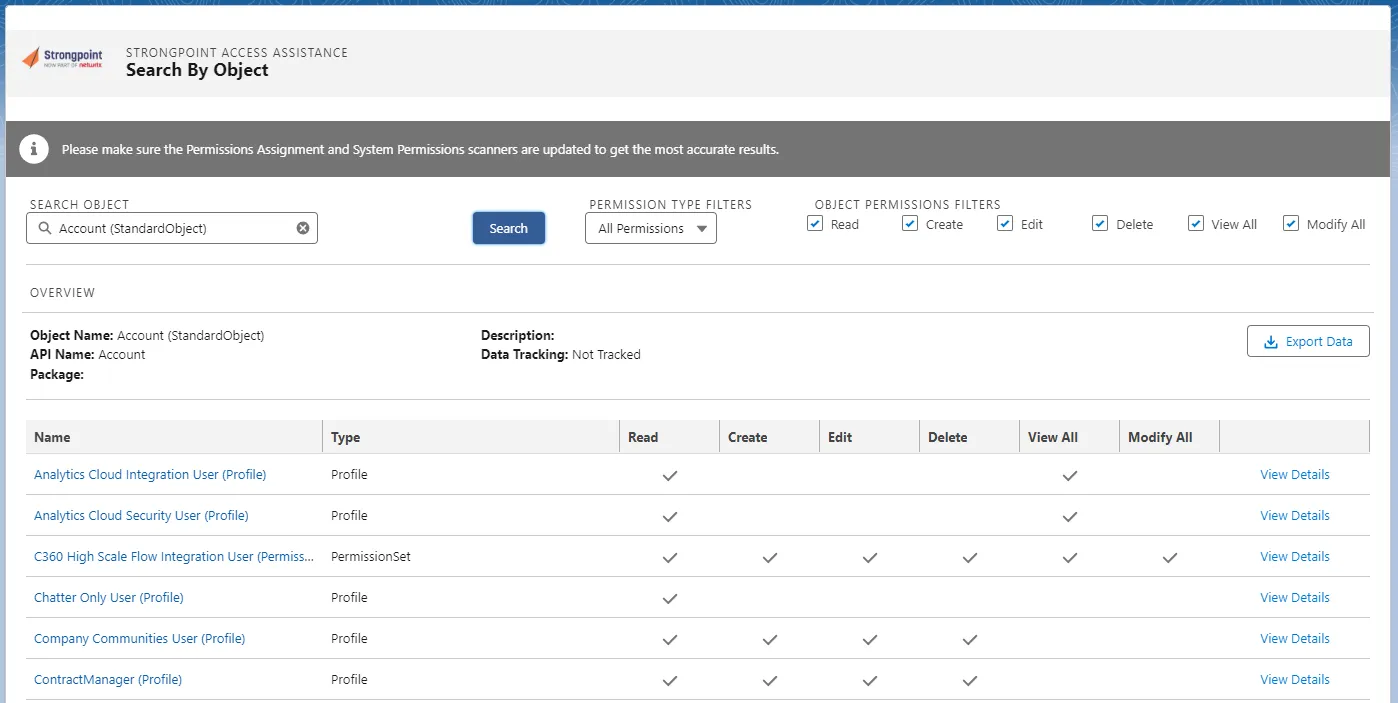
Click View Details to see System Permissions and User Assignments for the object.


-
Review the permissions and users for the object.
-
Click Export Data to create an Excel file containing the comparison. The StrongpointObjectPermissionsExport (#).xlsx file is saved to your default download directory.
Search By User
-
Select Tools > Access Review Assistant from the Netwrix Dashboard page. Click the expansion indicator u to expand the Access Assistance panel. Make sure Search By User is selected.

-
Start typing the user name. Pick from the completion list.
-
Click Search.
-
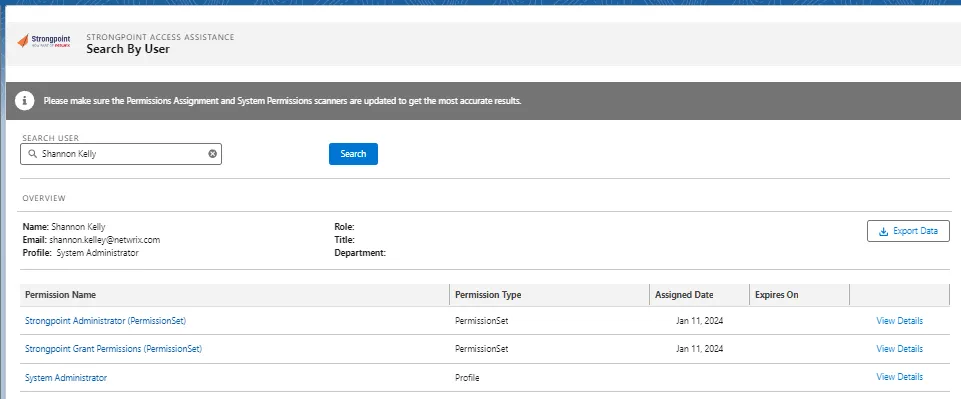
Click View Details to see System Permissions and User Assignments for the permission.
-
Review the permissions for the user.
-
Click Export Data to create an Excel file containing the comparison. The StrongpointUserPermissionsExport (#).xlsx file is saved to your default download directory.
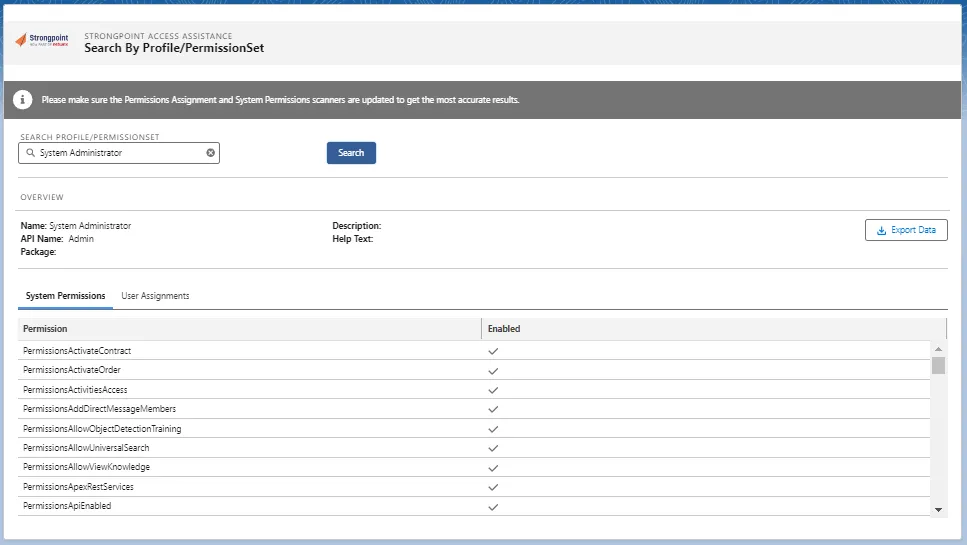
Search By Profile / Permission Set
-
Select Tools > Access Review Assistant from the Netwrix Dashboard page. Click the expansion indicator u to expand the Access Assistance panel. Make sure Search By Profile / Permission Set is selected.

-
Start typing the Profile / Permission Set name. Pick from the completion list.
-
Click Search.
-
Review the System Permissions and User Assignments.
-
Click Export Data to create an Excel file containing the comparison. The StrongpointPermissionsExport (#).xlsx file is saved to your default download directory.
User Activity
The User Login Activity creates a comprehensive display of user activity for the past 60 days. It can be run for all users or a selected user. The data can be used to ensure continuity of roles prior to deactivating a user.
The User Login Activity feature is available with the Intelligent Change Enablement and Enterprise Compliance licenses.
Run the scanners before you perform comparisons to ensure you have the latest data.
Select Tools > User Activity from the Netwrix Dashboard page.
There is a collapsible menu pane available. Click the u arrow on the left to expand/collapse the menu. Refer to Package Usage for details on the Package Usage tool.
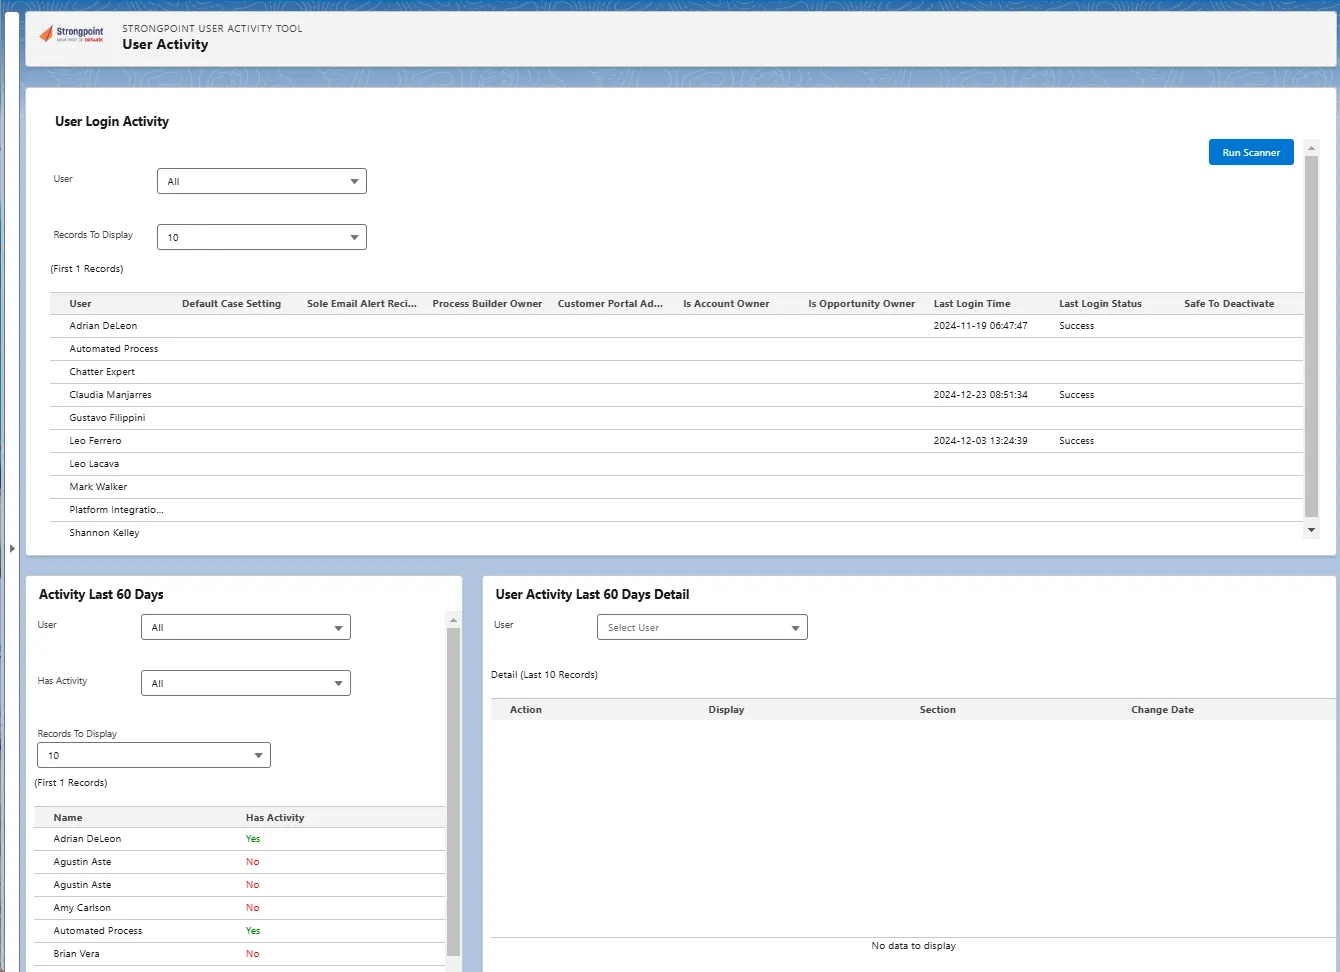
User Login Activity
Displays key details for All users or a selected user:
- Default Case Setting
- Sole Email Alert Recipient
- Process Builder Owner
- Customer Portal Admin
- Is Account Owner
- Is Opportunity Owner
- Last Login Time
- Last Login Status
- Safe to Deactivate
Activity Last 60 Days
Displays Yes or No for All users or a selected user. The display can be filtered by Has Activity: All, Yes, or No.
User Activity Last 60 Days Detail
- Select a User.
- Click Export to Excel. The StrongpointUserActivityHistoryDetail (#).xlsx file is saved to your default download directory.
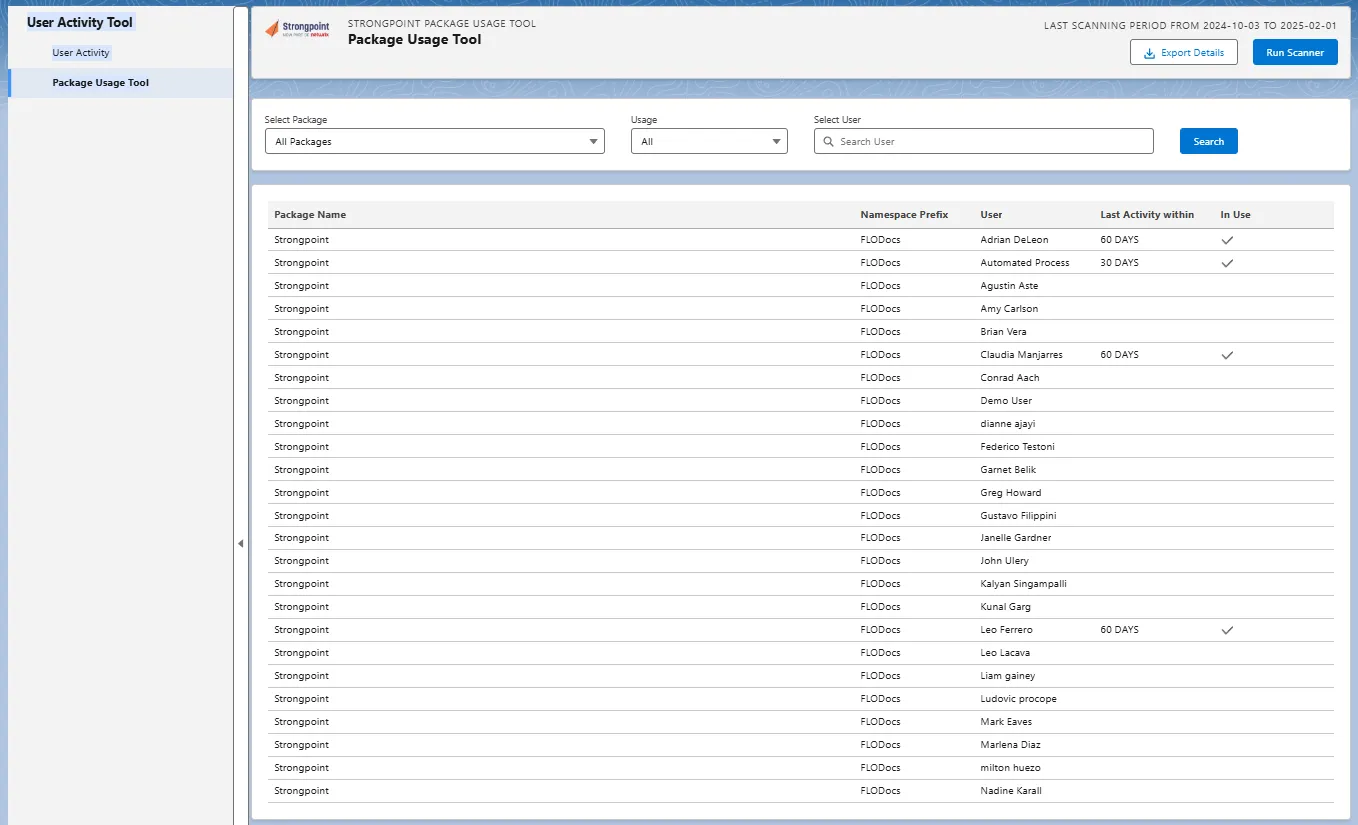
Package Usage
The Package Usage tool provides administrators real-time insights into the usage and allocation of additional product licenses across the organization. This tool enables them to identify potential cost savings. Used in conjunction with the existing User Activity tool, it provides a comprehensive overview of who is accessing the environment and for what purpose.
The Package Usage tool is available with the Intelligent Change Enablement and Enterprise Compliance licenses.
Run the scanners first to ensure you have the latest data.
Once you have run the scanner, you filter and export the data:
- Filter by package
- Filter by usage
- Filter by user
- Export results to Excel
To open the Package Usage tool:
-
Select Tools > User Activity from the Netwrix Dashboard page.
-
Click the arrow in the left margin to expand the menu pane.
-
Click Package Usage Tool in the menu.
-
Click Run Scanner to ensure you have the latest data.
You can filter by package, usage and user. Use Export Details to generate a .xlsx file.
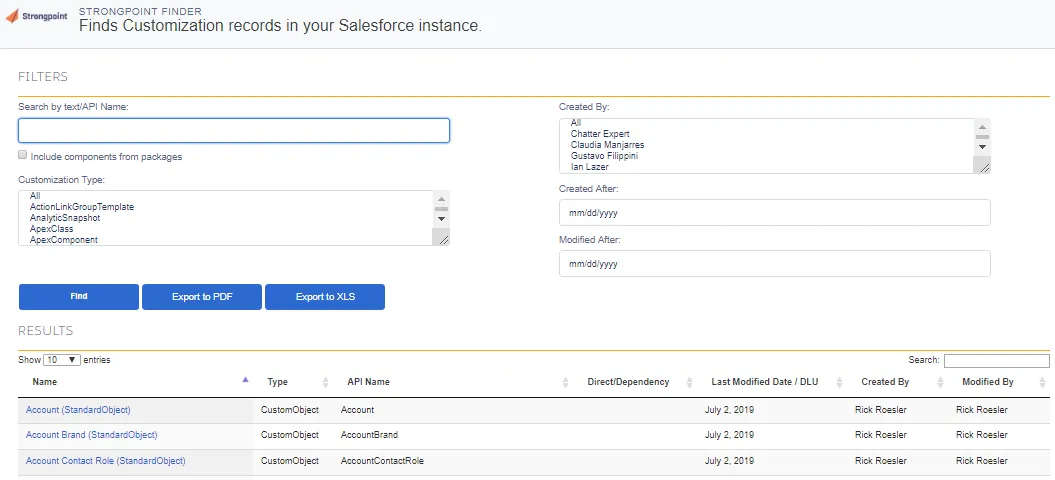
Finder
Platform Governance for Salesforce's Finder searches and finds standard and customized objects created by the scanner.
To use the Finder:
- Open Netwrix Dashboard > Tools > Finder
- Enter the Filters information for your search.
- Click Find.
The Results are displayed. Click on the linked Name to view details about each record.
Use the Export to XLS option to export your results to an XLS file where you can sort, reorder, and analyze your information using the full power of Excel. You can then update your records using Salesforce tools like Import Wizard and Data Loader to save time and effort.
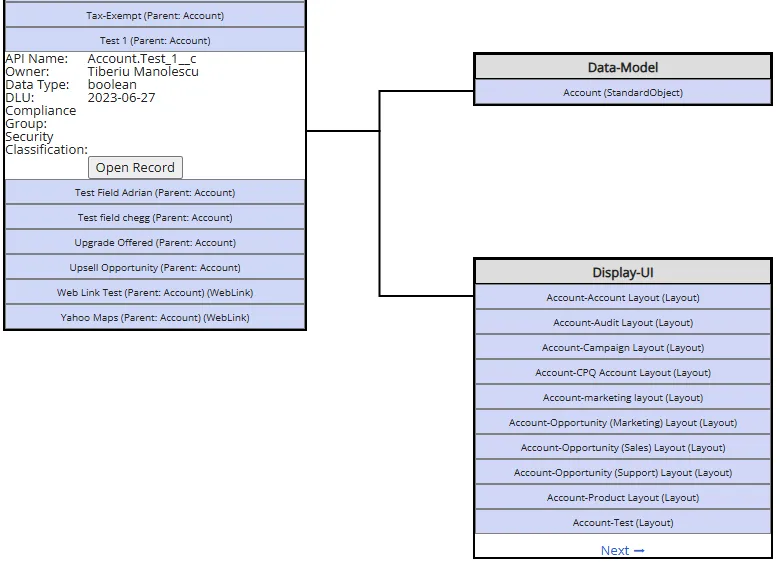
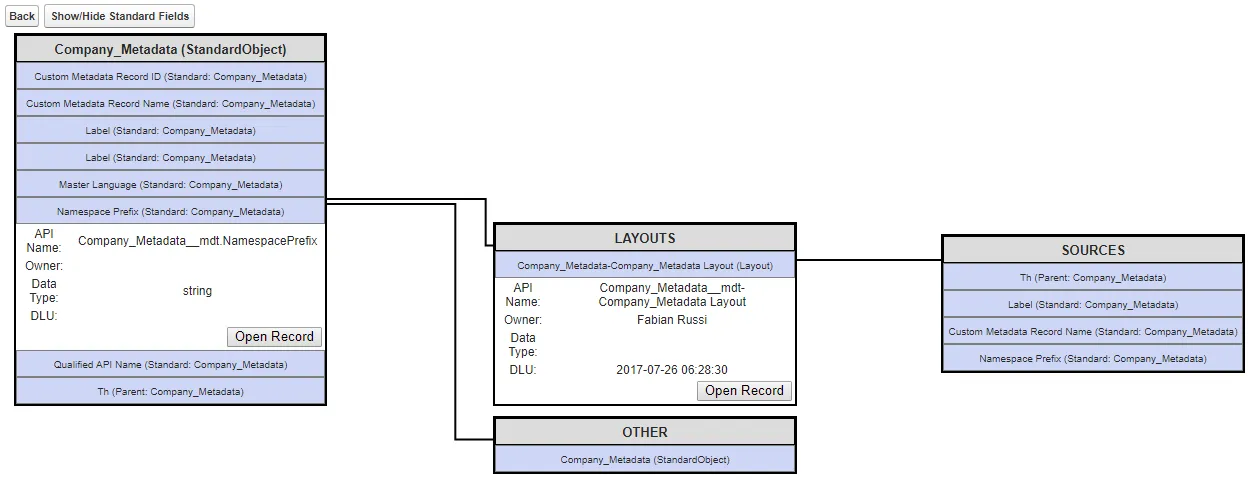
Dependency Relationship Diagram
Platform Governance for Salesforce's Dependency Relationship Diagram (DRD) displays objects, customizations and their relationships and dependencies including scripts, reports and workflows in a graphical diagram.
To use the entity diagram:
- Open Netwrix Dashboard > Tools > Dependency Relationship Diagram
- Select the object to view.
- The diagram displays the object and customizations under it. Use Show/Hide Standard Fields to toggle the display of Standard Fields for easier searching of non-standard fields.
- Click on any item to expand the graphical representation of objects, dependencies and associated relationships. If there are more than 10 entries, a Next option is available at the end to expand the results. Next loads the next 10 entries, Back loads the previous list.
- Click Open Record to open the customization record for the item.
Here is an example showing the Next feature for Account (StandardObject) > Test 1 (Parent:Account).