Running the Spider
The first time the spider is run the entire account is scanned. Subsequent spider runs scan the changes since the last run.
The Strongpoint tab is only available to Administrators unless you specifically add it to other roles. Refer to Setting Access and Permissions for more information.
You must keep this window open for the spider to complete. Do not change roles or accounts during this process.
To run the spider:
-
Log in as an Administrator. NetSuite security standards require an active Administrator login to execute some of the spider’s tasks.
-
Open Strongpoint > Tools > Strongpoint Spider.
-
Select ReSpider All Records - SLOW from Update or ReSpider if available.
-
Click Start Spider. While the spider is running, you must do the following:
- Keep the Spider tab open. If you close it, start it again.
- Keep your NetSuite session active.
- Remain logged in as an Administrator.
The gears spin during this part of the spider run. It can take between 45-60 minutes to complete. When finished, the gears stop spinning and Spider Finished is displayed below the Start Spider button. You can close the tab when finished. The spider continues to work in the background to document your account.
If you are not sure the spider completed successfully:
- Open Strongpoint > Strongpoint Support > Installation Settings
- Click Print.
- Print to a PDF file.
- Email the file and any questions to your Customer Success Manager.
Wait for the Scheduled Scripts to Run
Platform Governance for NetSuite's scheduled scripts run to document the connections between customizations. This phase takes 3 to 5 days to complete. The scripts automatically stop processing after 10 minutes and reschedule themselves based on queue priority to enable other scripts to run.
If you track the progress of the scripts, you may see that they fail occasionally. The script will reschedule itself, skip and flag the record that caused the fail. This is normal functionality and any issues that arise are captured during the data validation phase.
Confirm the Spider is Complete
Open Strongpoint > Strongpoint Support > Installation Settings and review the Spider Status tab to confirm the Last Completed Spider shows a date.
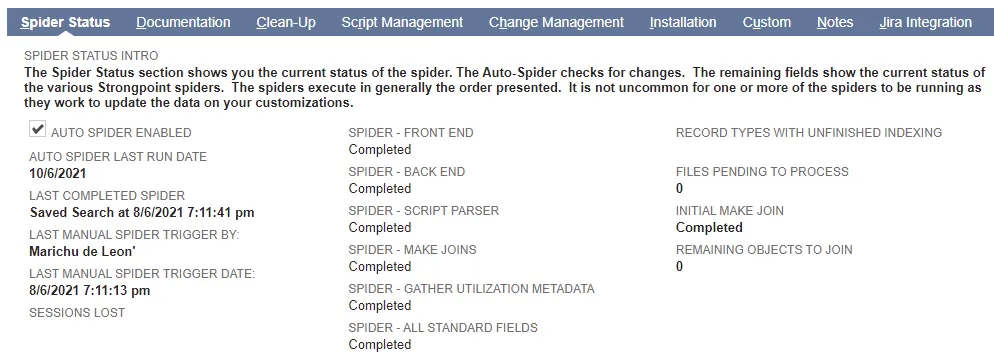
- Strongpoint Record Server Side Spider Scheduled Script is no longer running.
- Strongpoint Search Customization to Make Join (By Join Proc) should not have any results. If there are items in the results, it indicates the Strongpoint Make Joins Script is still running.
Validate the Data and ReSpider
There are very large differences between NetSuite accounts. The automated algorithms may not catch everything during the first pass. Platform Governance for NetSuite has a variety of tools to validate the data.
- Open Strongpoint > Support > Installation Settings
- Click View
- Review the Recommendation column for any Customization Types labeled ReSpider This Record or Run DeDuplicate. You can click on the column head to change the sort order, or use the record counter on the right side of the table to view additional pages. Note the Customization Types so you can ReSpider them.
- Review the Documented Record Count looking for any 0 (zero) values. Note the Customization Types so you can ReSpider them. No action is required if the value is blank.
- Open Strongpoint > Tools > Strongpoint Spider
- Select ReSpider All Records - SLOW from Update or ReSpider
- Select the Record Types you noted. Use Ctrl-Click to select multiple record types. You do not want to start over by ReSpidering the entire account. You can also enter an optional Name Filter: entering all of part of the customization name to focus the spider. You can use the % wildcard to search with the given name.
- Click Start Spider. Customization and Records processed information is displayed when the spider completes.
If some of the Data Validation searches return a result, it does not mean there is a problem. In most cases if there are many results for any given search, you can fix this by ReSpidering the record type with the issue.
ReSpidering
You can ReSpider your account at any time.
- Open Strongpoint > Tools > Strongpoint Spider
- Select Update Only - FAST from Update or ReSpider
- Select one or more record types that have an issue. You can also enter an optional Name Filter: entering all of part of the customization name to focus the spider. You can use the % wildcard to search with the given name. Here are the record types:
Custom Entity Fields Mass Updates User Roles Custom CRM Fields Suitelet Custom Report Custom Body Fields RESTlet Bundle Custom Column Fields User Event Script Online Customer Form Custom Item Fields Scheduled Script Custom Record Forms Custom Item Options Client Script Group Item Number Fields Mass Update Script Subsidiary Other Fields Portlet Script Department Custom Lists Custom Workflow Action Class Custom Records Bundle Installation Script Location Custom Record Fields Map/Reduce Script Custom Segment Custom Entry Forms Plug-In Email Template Custom Transaction Forms Script Deployments Custom Advanced PDF/HTML Template Searches Workflow
- Click Start Spider. Customization and Records processed information is displayed when the spider completes.
Saving a Status Report
If you are working with a consultant who needs to see the results of this view:
- Open Strongpoint > Support > Installation Settings
- Click View
- Click Print and save it as a PDF.
- Email the pdf file to the consultant.
Spider Schedule
The 2.0 back-end spiders are scheduled to run once a day. These back-end spiders are only available for fully scriptable customization types. Customization metadata and changes are only evaluated once a day when the spiders run. If there are multiple record changes within the day, separate change logs are created for each change to capture system notes and audit trails.
Here is the schedule for each customization type.
| Spider | New Schedule | Previous Schedule |
| Negative Search | Once a day, Off peak | Every 8 hours |
| Search | Once a day, Off peak | Every 3 hours if a change is detected |
| Negative Deployment | Once a day, Off peak | Every time a change is detected |
| Script Deployment | Once a day, Off peak | Every 8 hours |
| Negative Workflow | Once a day, Off peak | Every time a change is detected |
| Workflow | Once a day, Off peak | Every 8 hours |
| Role | Once a day, Regular | Once a day |
| Custom Record/Custom Field | Once a day, Regular | Every 6 hours |
| Standard Record/Custom Field | Once a day, Regular | Every 6 hours |
| Custom List | Once a day, Regular | Once a day |
| Subsidiary / Department / Class / Location | Once a day, Regular | Once a day |
| Custom Segment | Once a day, Regular | Once a day |
| Email Template | Once a day, Regular | Once a day |
| Form Level Script | Once a day, Regular | Once a day |
| Generic Negative Spider (for each type) | Once a day, Regular | Once a day |
All other deployed back-end spiders continue to run once a day.
If a schedule is set through the Configuration and Stats page, scheduled spiders run at that time.
Otherwise they are run once per day.
Spiders that run during off peak hours begin running at the hour set on the script deployment, or
5:00 pm based on the company timezone if not set.
Negative Spiders are run sequentially.
Next Step: Setting Up the AutoSpider and Alerts