Description
PingCastle Enterprise is a tool designed to improve and follow the Active Directory overall security level. This software has been developed to be compatible with most of the possible existing configurations. The goal (when the tool was created) was not to aim for perfection, but to provide reliable data to present the situation to the management, thus improving over time.
Requirements
System Specifications
The Operating systems supported are:
-
For PingCastle scanning functions:
- All operating systems starting from Windows 2000 or subsequent
-
For PingCastle Enterprise:
-
All operating systems starting from Windows 10 22H2 / Windows 2012 (with extended security updates) or subsequent, where the asp.net 8.0 is supported
-
On demand, it is possible to include any operating systems, including Linux, if it is supported by asp.net core 8.0
-
See the Windows Lifecycle Fact Sheet for details regarding each Windows release lifecycle.
See the .NET 8.0 Supported Operating System documentation here.
Database
PingCastle Enterprise is using a database to store its data.
The current supported databases are:
- Any supported editions of SQL Server (including SQL Server Express)
- Any database supported by "Entity Framework Core 2" (SQLite, MySQL, ...) may be supported on demand. Please contact us for more information.
External System Dependencies
PingCastle Basic and PingCastle Professional require "dotnet framework 2.0" or subsequent versions.
PingCastle Enterprise is using the "asp.net core 8.0 framework" still relying on "dotnet standard 2.0".
- It is recommended to not expose web application but to use reverse proxy like IIS, Apache2 or Nginx.
Third party authentication system
PingCastle Basic and PingCastle Professional relies on the Windows account to perform scans and do not use third party authentication system.
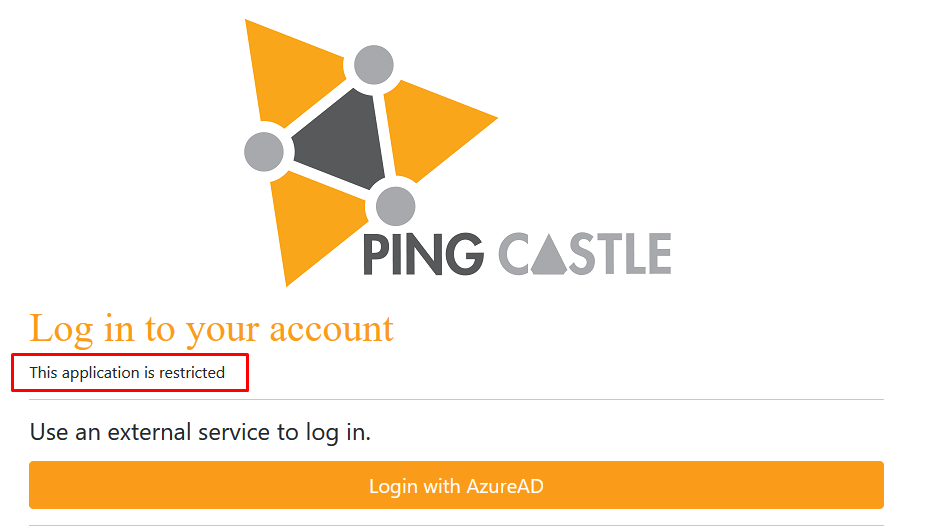
PingCastle Enterprise supports authentication with third party systems on demand. OpenID is supported and provides authentication with services like Azure AD, Okta, ...
License
PingCastle Enterprise is licensed based on the number of domains managed and has licenses available up to unlimited. The number of domains include subdomains of a forest.
- The number of Domain Controllers are not used for licensing, only domains.
Enterprise licenses are bundled in packs of 10 domains, up to 60, with an unlimited license thereafter.
Example
If you have consto.com with two subdomains called uk.consto.com and us.consto.com, then you would require the 10-domain licensing pack.
Architecture
PingCastle is using a distributed architecture.
The PingCastle Basic / Pro can be considered as a stand alone agent. The program executes an assessment of the Active Directory and produces a report. This report is in two forms: a xml file and a html file. These two files provide two representations of the same data. By default the .xml file is being filtered to remove potential private data such as account name from this collected data. This filter can be deactivated by running the program with the flag --level Full.
Then the data contained in the xml file is pushed into PingCastle Enterprise directly via the API, or indirectly via an indirect import such as email. In this case the data may be encrypted to ensure the confidentiality of the data.
Then the PingCastle Enterprise provide the services around the data and store it in the database.
Quick Installation
PingCastle Enterprise supports a setup where the requirements and manipulations have been minimized. This scenario is recommended for tests but not in production because all IIS and SQL Server upgrade mechanisms are not supported.
Requirements
It requires:
-
IIS being installed (it is a Windows component)
-
An SQL database such as SQL Express being installed
-
The asp.net core 8.0 "Hosting Bundle" available at:
https://dotnet.microsoft.com/en-us/download/dotnet/8.0
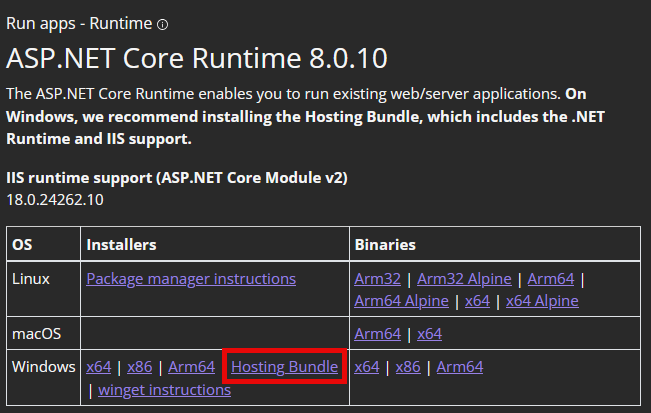
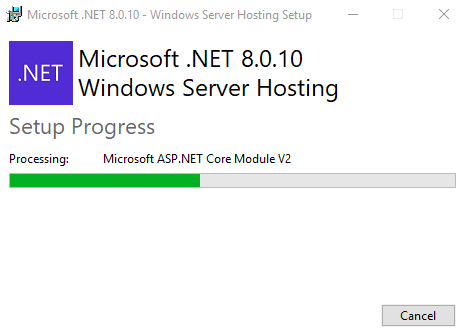
- IIS should be installed before the ASP.NET 8.0 Hosting Bundle. If not, then the Hosting Bundle installation may be required to be repaired.
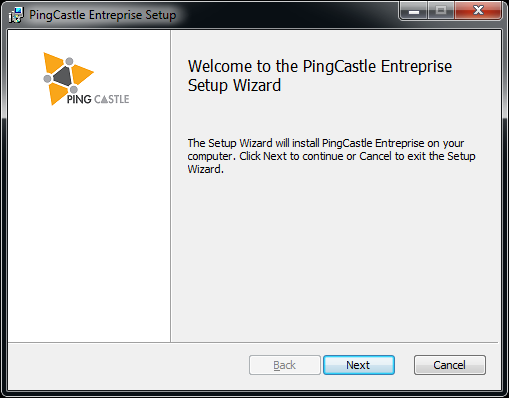
Procedure
The MSI file guides the installation of the software:
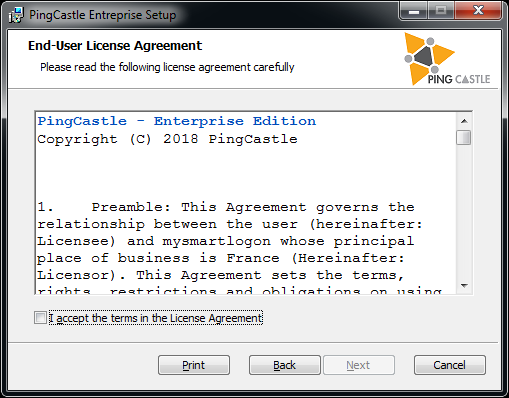
Once the license terms are accepted, the software requires a license key which should have been distributed alongside the MSI files.
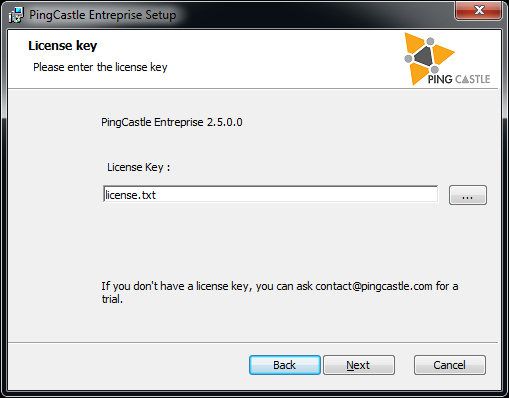
- If the license key is missing, reach out PingCastle support
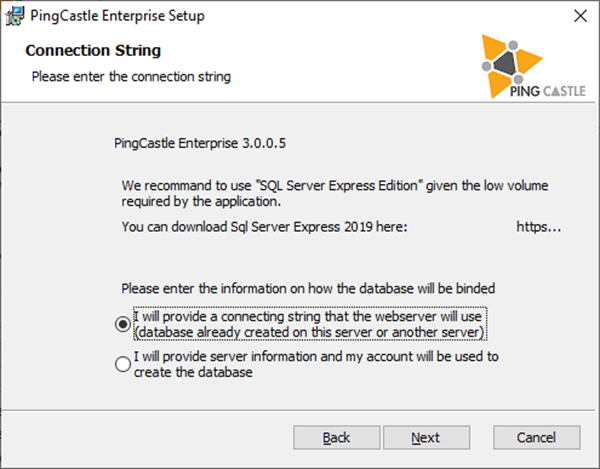
There are two options to configure the database:
-
Using a connection string provided directly by the user
-
Using a connection to a database: it implies the software will create the database on behalf of the user
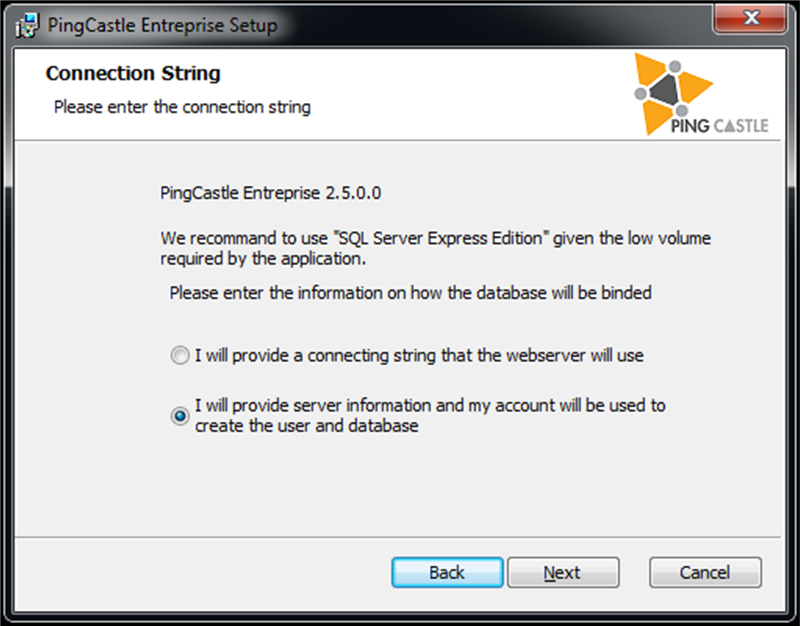
Option which creates the database:
Option with the direct connection string:
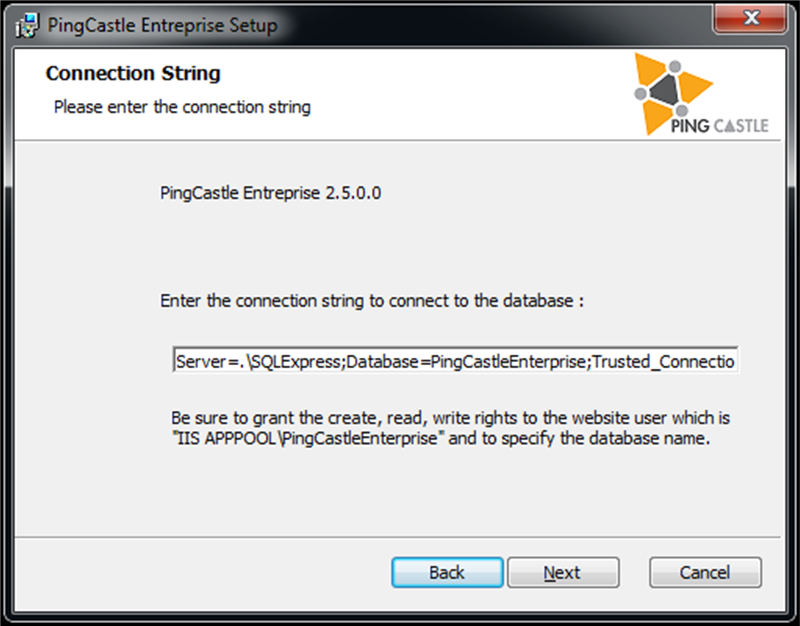
The setup configures automatically the website, the database, the application and if the database is being created, grant the permission to the database to IIS (application pool)
- When the software is removed, the setup DOES NOT remove the database.
Various options
Custom login message
You can define a custom message at the login page. You have to use the custom option "customLoginMessage".
For example:

The login page becomes:
Please note that the setting push RAW html without escaping. The expected html is using the bootstrap css styles. Also due to the CSP protection, you cannot inject custom CSS or JAVASCRIPT.
Post Installation - Scheduler
Quick installation
PingCastle allows the possibility to the administrator of the application to schedule scans. It is useful when the solution is installed in a central forest and the need is to scan all child domains.
By default, PingCastle is running as a limited user. It cannot access the network nor modify system settings. To use the scheduler, permissions need to be changed.
The easiest way is to change the user from Application to LocalSystem.
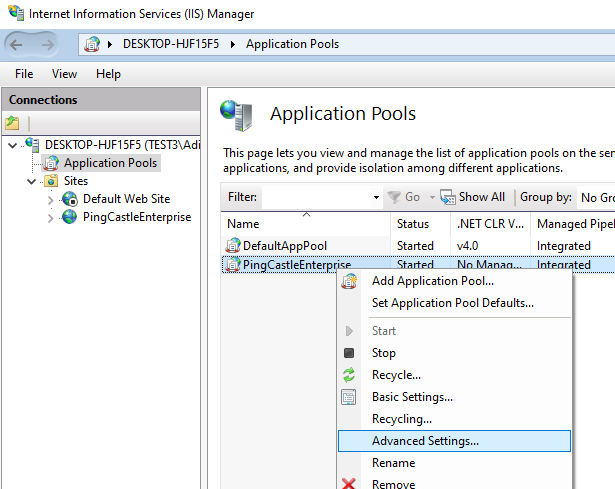
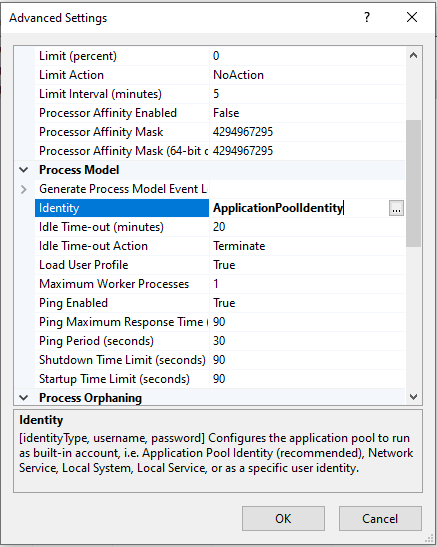
Open the IIS console and go to the application pools settings. Go to advanced settings.
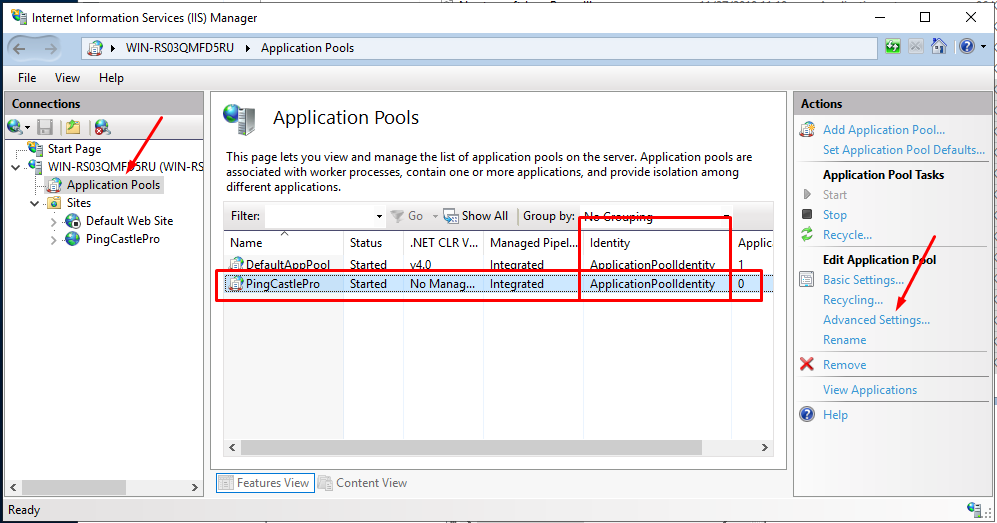
Find the Identity setting and change ApplicationPoolIdentity to LocalSystem.


Then restart the application pool.
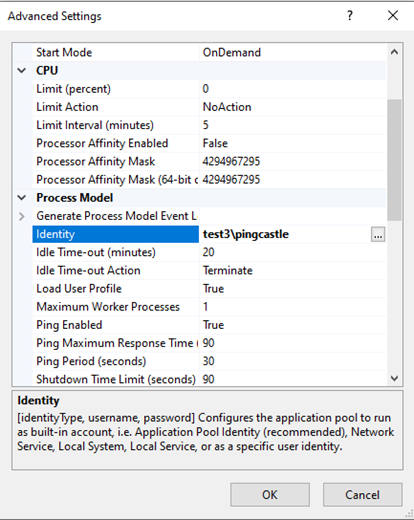
If you are using a custom identity for the application pool (to access a database hosted in another server), you have to promote this user as local admin. This is a Windows restriction of the permission model and the access to the task scheduler cannot be delegated.
Custom installation
Note: PingCastle is using behing the hood a folder named "PingCastle" in the task scheduler. We will use the COM api as it exposes the security descriptor -- which is not the case of the native PowerShell APIL
If you want PingCastle to be able to start or stop tasks but not being able to edit them (it requires that the account is local admin), you need to delegate the permission to start and run tasks. You can perform the following actions as admin in powershell:
# connect to the task scheduler service

$scheduleObject = New-Object -ComObject schedule.service

$scheduleObject.connect()

$rootFolder = $scheduleObject.GetFolder("")

$PingCastleFolder = $rootFolder.GetFolder("PingCastle")

$PingCastleFolder.GetTasks(1) | Foreach-Object {

$sddl = $_.GetSecurityDescriptor(1+2+4+8)

# add full control to the task

$sddl += "(A;S-1-XXX-XXX-XXX;FA;;;SY)"

$_.SetSecurityDescriptor($sddl, 0)

}
- ;S-1-XXX-XXX-XXX need to be replaced by the SID of the account running the PingCastle web application.
Task edition
Tasks can be modified outside of the PingCastle application. To be listed here, the application checks that this is a weekly schedule on one selected day and that the action is matching classical command line options. That means that --server can be modified, or additional parameters added (for example --log-console). The identity running the scheduled task can also be modified (default is system)
However if the task is edited within the web application, customization will be overwritten.
Custom installation
PingCastle Enterprise can be installed like a classic asp.net core application.
That means copy all the files in a directory, configure the proxy (IIS, apache, Nginx), prepare a database and configure the application.
Hosting
The application does work on any infrastructure supported by the asp.net core 8.0 middleware.
Microsoft has procedures to install the dotnet core 2 framework:
Linux installation
Windows installation
Microsoft has procedures to setup the hosting of the application that are referenced bellow:
-
Host ASP.NET Core on Windows with IIS
-
Host ASP.NET Core on Linux with Nginx
-
Host ASP.NET Core on Linux with Apache
- Upload quota may be changed to allow large file upload in the Interoperability mode
For IIS, please note that by default a "Default Web Site" is installed and may conflict with the PingCastle Enterprise application.
The solution is to stop the default website and configure it to not start automatically.
Database
Configuring the backup of the database is under the responsibility of the customer.
PingCastle Enterprise requires a user account on this database. By default, PingCastle Enterprise creates the tables at the initial run and can add or modify existing tables when a software update is designed. If this default pattern is used, the database user MUST be owner of the database.
PingCastle Enterprise supports limited privileges on the database (only read / modify / delete data is required) on demand. In this case, a Sql script is provided to apply database change before a software update is applied.
When run on IIS, PingCastle run in an application pool which needs to be granted privileges on the database. Note that the application pool is using a special Windows account which needs to be created manually.
The following SQL can grant these permissions:
If not Exists (select loginname from master.dbo.syslogins

where loginname = 'IIS APPPOOL\PingCastleEnterprise')

Begin

CREATE LOGIN [IIS APPPOOL\PingCastleEnterprise] FROM WINDOWS;

End

use PingCastleEnterprise;

exec sp_addrolemember 'db_owner', 'IIS
APPPOOL\PingCastleEnterprise';
Here is for example some commands for PostGres on Ubuntu 17:
sudo apt-get install postgresql postgresql-contrib

sudo /etc/init.d/postgresql start
Note: by default no password for the user postgres
sudo -u postgres createuser pingcastle

sudo -u postgres psql
alter user pingcastle with password 'pingcastle';

sudo -u postgres createdb -O pingcastle pingcastle
- On PostGres the collation (sort) does not take some special characters in account, which puts the [Default] container at different position that the start of the list of entities
Using a Database Hosted on Anther Server
Configure SQL Server with a local DB account
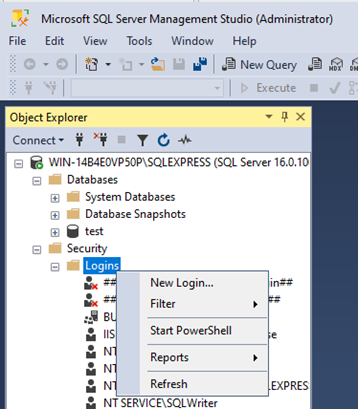
You first need to create a local account inside Sql Server.
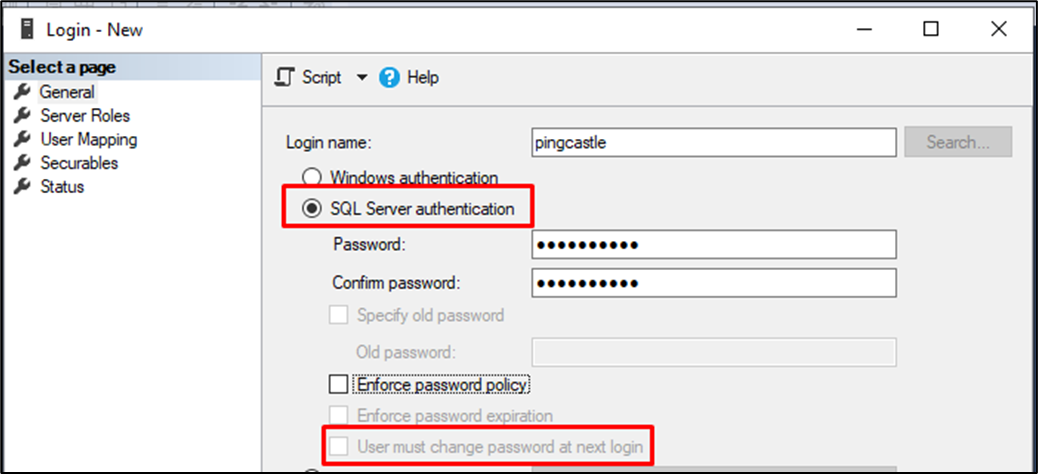
Select SQL Server authentication.
Be sure to uncheck "user must change password at the next login" as PingCastleEnterprise does not support password rotation. (you can change later the password inside the application.Production.json file)
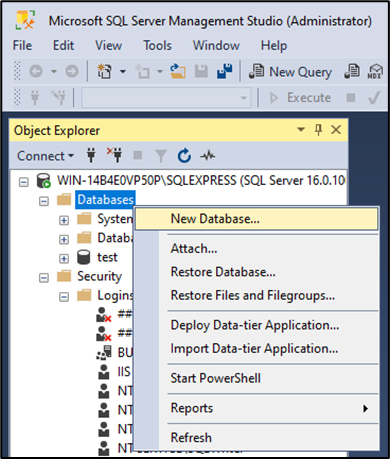
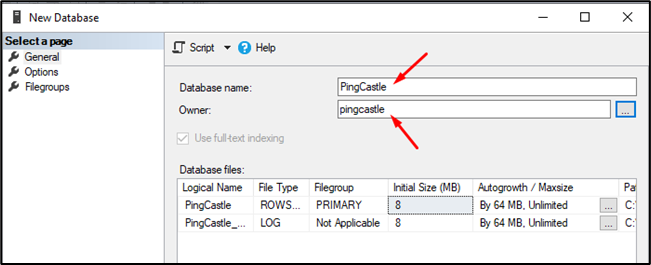
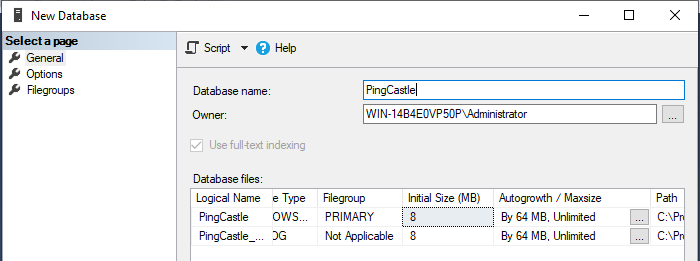
Then create a database
Do not forget to set the owner as the user you created before.
You should verify that the credentials and that the server is available before going further.
In SQL Server configuration, a typical mistake is to use tcp connection. TCP/IP needs to be enabled manually in SQL Server as it is disabled by default.
At the installation step, indicate that you want to use an ad-hoc connection string.
Specify the following:
Server=tcp:server.fqdn.com;Database=PingCastle;User Id=pingcastle;password=pingcastle;Trusted_Connection=True;MultipleActiveResultSets=true
Unfortunately, the server will not create the database at the installation time. You will discover any issue at the first run. Dont forget to check the event log to have the full error message. You can change the connection string after the installation by editing the file appsettings.production.json. Do not forget that special characters may need to be escaped as they are located inside a json string.

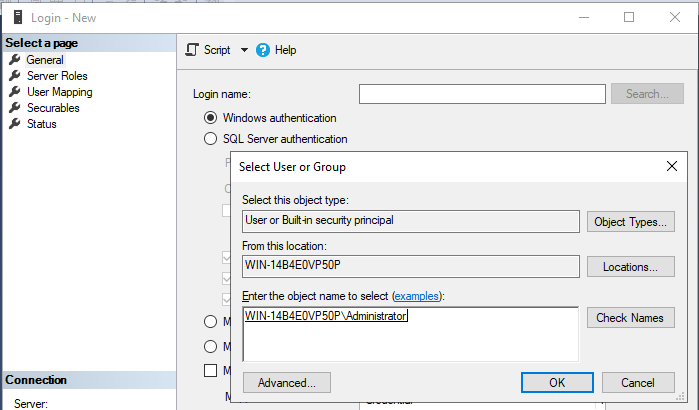
Configure SQL Server with an Active Directory user
You need to first create this Windows user.
You have to create a new Windows login. Go to create a new login.
Then select the Windows user you created.
You can then create a database with the Windows user as the owner of the database:
At the installation step, indicate that you want to use an ad-hoc connection string.
Specify the following:
Server=tcp:server.fqdn.com;Database=PingCastle;Trusted_Connection=True;MultipleActiveResultSets=true
The installation will continue.
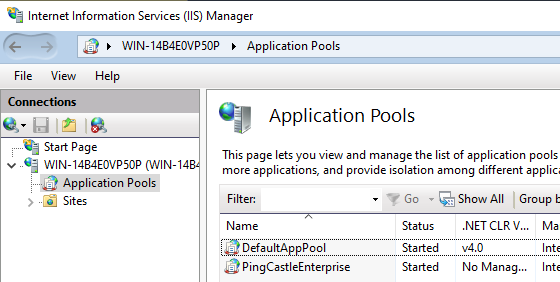
After the installation, another steep need to be done: you need to
change the Application Pool identity.
Go to IIS and select the application pool. Go to the advanced settings
Go to Identity and select the custom user account:
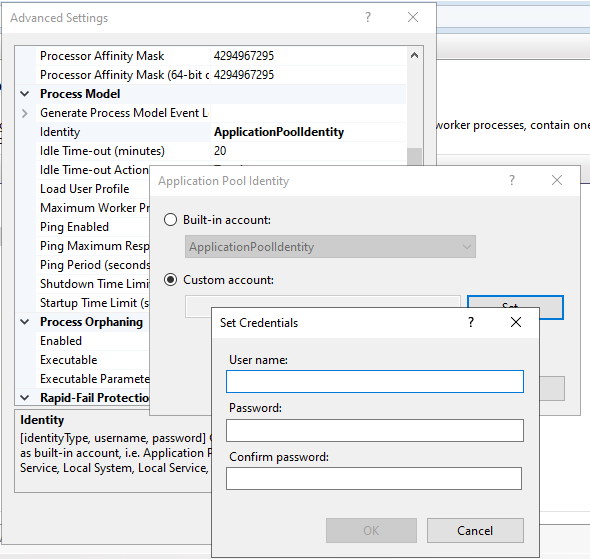
Restart IIS.
Configuration of PingCastle Enterprise
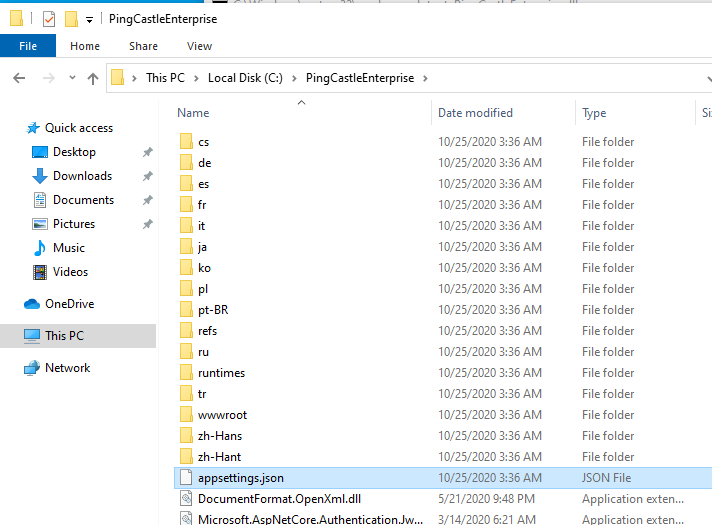
The settings are located in the appsettings.json located at the root of the application folder.
Two settings are needed for the application: the database and the license information.
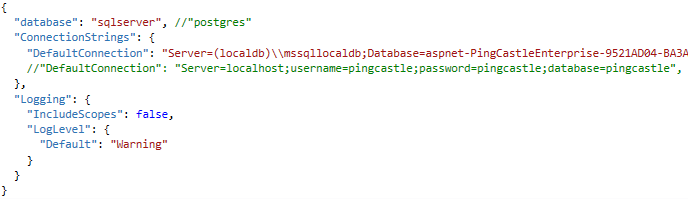
To change the database type, change the "database" settings. Currently the following values are supported:
-
sqlserver
-
postgres
To connect to the database a "connection string" must be used and provided in the "DefaultConnection" parameter.
- The connection string are stored in json and must be properly escaped like "\" into "\\". Same for double quotes.
For the license, the parameter is stored in the "License" setting.
Here are some connection string examples:
Sql Local DB
"Server=(localdb)\\mssqllocaldb;Database=aspnet-PingCastleEnterprise-9521AD04-BA3A-41DC-A454-F2BD464E9391;Trusted_Connection=True;MultipleActiveResultSets=true"
PostGres
"DefaultConnection":
"Server=localhost;username=pingcastle;password=pingcastle;database=pingcastle"
Authentication when accessing PingCastle Enterprise
PingCastle supports:
-
stand alone authentication (default)
-
Active Directory Authentication
-
OpenID
-
Header authentication
-
SAML2 authentication
Configure active directory authentication
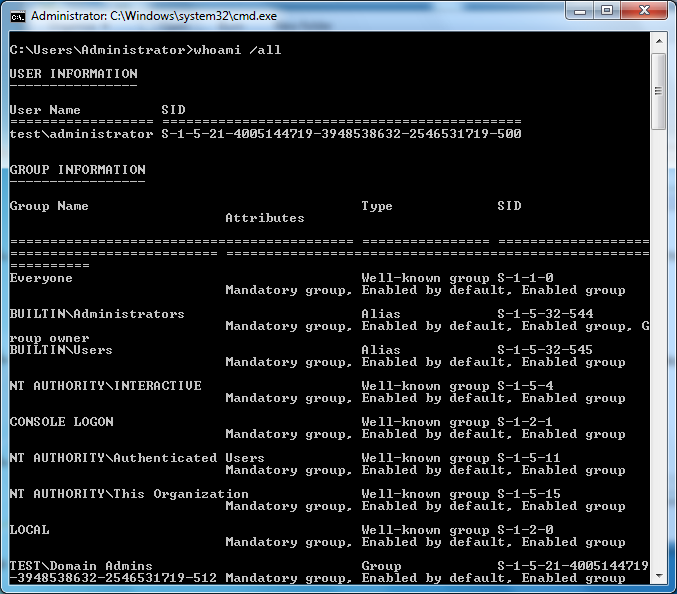
The asp.net core middleware requires IIS to provide the authentication layer. As a consequence, the application do not access directly the Active Directory and is not able to query the authentication system.
PingCastle relies only on Security Identifier (SID) to verify if the user is granted access or not. The list of group SID that a user is granted access is displayed with the command "whoami /all". A SID match the form S-1-XXXXX.
First, be sure that the Windows authentication package is installed. It is not part of the default installation of IIS.
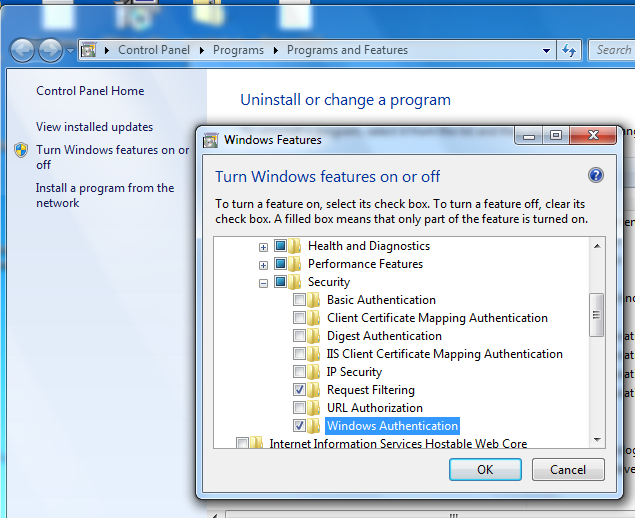
Close and reopen the IIS console: you should see an authentication option.
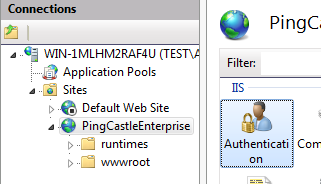
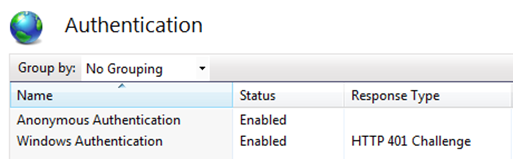
Keep enabled the anonymous authentication and enable the Windows authentication.
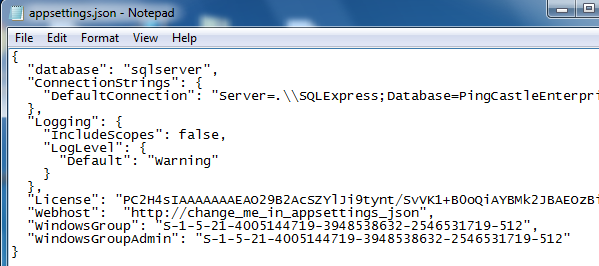
Edit the appsettings.json file in the PingCastle Directory and add a WindowsGroup and WindowsGroupAdmin parameter containing the SID of the group mapping the membership. Do not forget to add a comma at the end of the previous line to have a valid json file.
If you want to remove a user if it does not belong to the WindowsGroup at its next connection, you can set the parameter RemoveUserIfNotInWindowsGroupAnymore to true. Please note that the solution cannot proactively know if the user has been removed from this group. If notifications have been enabled, they will continue unless the account is removed despite the fact the account may have been disabled in the Active Directory.
Also Windows does not provide an email address when creating the account. As a consequence, it is set to a known value disabling it.
If you want to hide the internal accounts, you can set the following property ("disablePasswordLogon") in the appsettings.json file.
![]()
This setup affect all the pages for authentication, which implies that API calls will need in addition to their API key a Windows account.
- In this case, the web.config file should be edit to restrict this NTLM authentication to the page WindowsAuth using the <location> directive, as incidated on https://docs.microsoft.com/en-us/iis/manage/configuring-security/understanding-iis-url-authorization
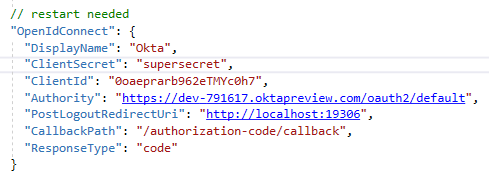
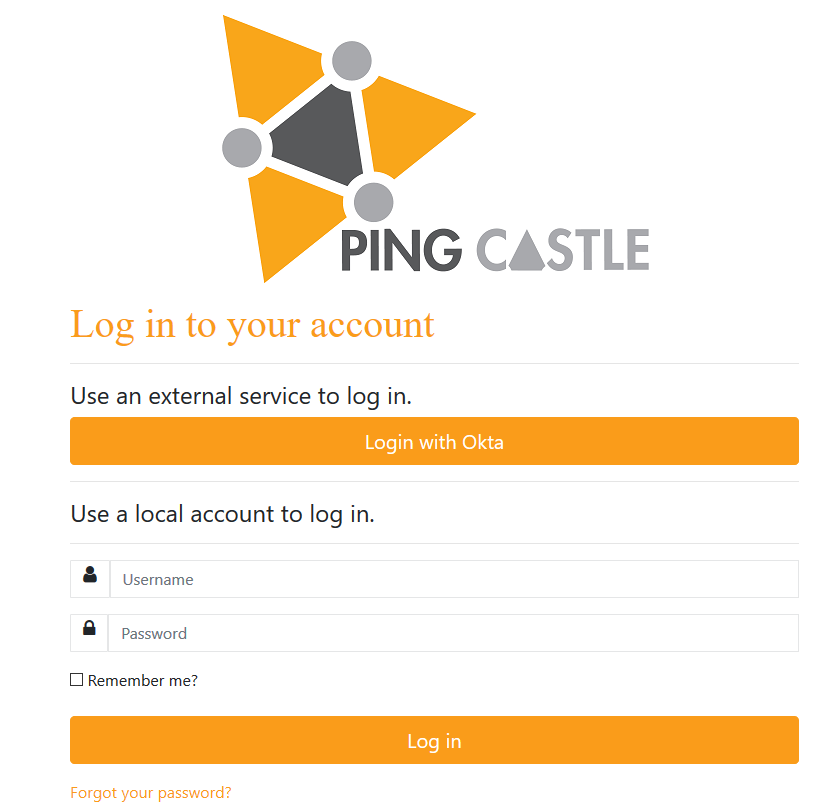
Configure OpenID Authentication
PingCastle Enterprise supports natively OpenID authentication. It is using the asp.net core API whose configuration file is defined here. The proxy settings rely on the current user proxy configuration (which can be defined using netsh for IIS running as SYSTEM). Here is how to configure OpenID in practice.
The following section needs to be added to the appsettings.json files.
Except the PostLogoutRedirecUrl which is set to the PingCastle Enterprise website url, all parameters are dependent of the OpenID provider.
If you need to specify a scope, you can enter it with the form
"Scope":["openid", "myotherscope"],
If you want to hide the internal accounts, you can set the following property in the appsettings.json file.

Configure AzureAD authentication as OpenID
Connect to https://portal.azure.com to go to "App registrations". Then register an application.
Select redirectUri as Web and set the URL that the browser will go to.
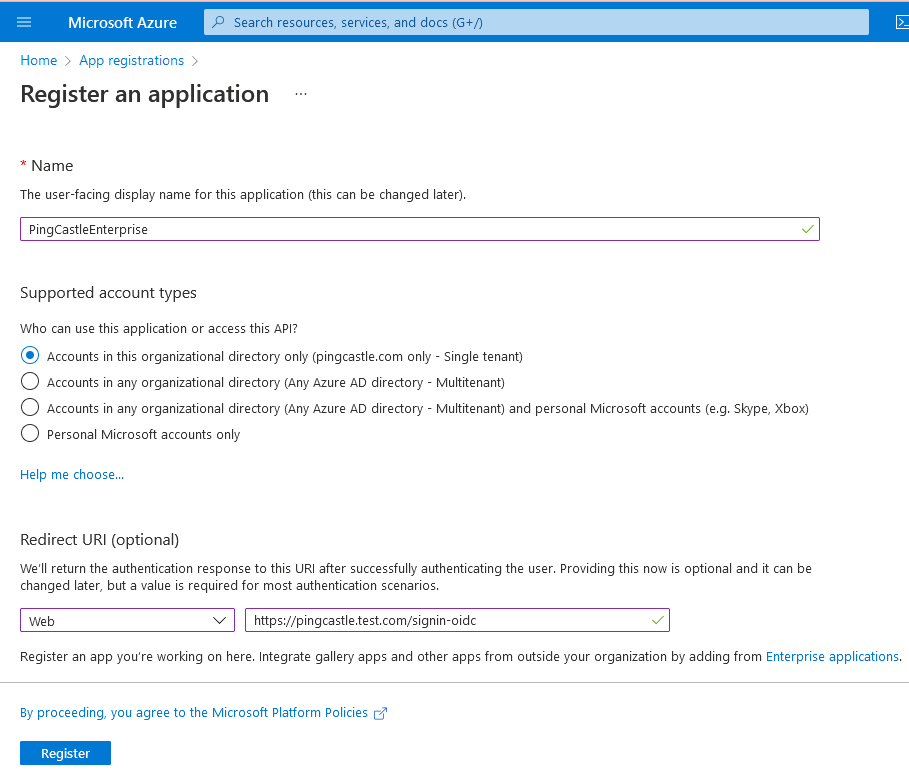
Be sure the URL ends with : signin-oidc
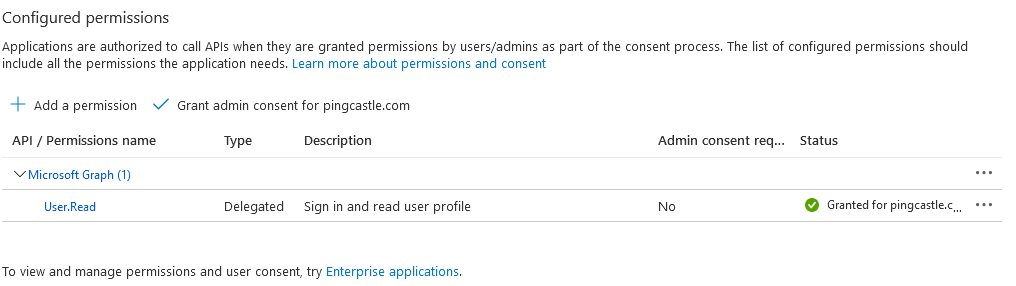
Then go to the permissions page:
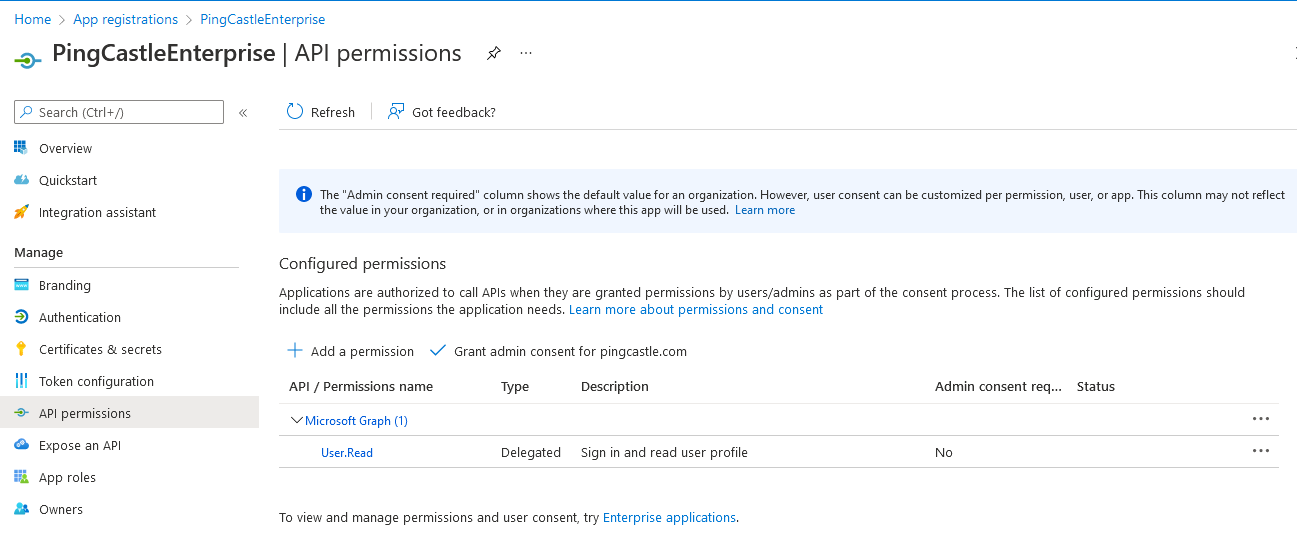
Clic on "Grant admin consent for " the application

After the action, the Status is changed
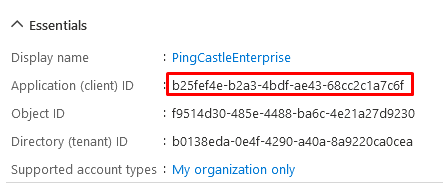
Once this is created, you have to note the ClientID and the Tenant Id as below:
Last step: You have to go to the Authentication tab and enable ID tokens:

You have to adjust the OpenID configuration located in appsettings.json to the following one:
"OpenIdConnect": {

"DisplayName": "AzureAD",

"ClientId": "<ClientID>",

"Authority": "https://login.microsoftonline.com/<tenant-id>/",

}
Configure header authentication
You need to edit the appsettings.json file.
Add a setting named authenticationHeader which will define is a user is already authenticated.
If it is the case, when the login page is browsed, the application look if this header is set. If it is set, it considers the user as authaticated. Example using the header named PingCastleAuth.
![]()
Please note that the PingCastle application must be isolated by a reverse proxy that will prohibit non authenticated user to set their own header and thus bypass the authentication mechanism.
If you want to hide the internal accounts, you can set the following property in the appsettings.json file.
![]()
Configure SAML2 authentication
If you want to hide the internal accounts, you can set the following property in the appsettings.json file.
![]()
PingCastle Enterprise supports natively SAML2 authentication.
PingCastle is using behind the scenes the component ITfoxtec Identity SAML 2.0. The advanced and explicit configuration settings documentation can be found here. The proxy settings rely on the current user proxy configuration (which can be defined using netsh for IIS running as SYSTEM).
Easy configuration
This option requires that the IdP can be accessed directly by the server. This may conflict with one premise deployment where the server is isolated by a proxy or a firewall.
The following section needs to be added to the appsettings.json files.

You need to gather the IdPMetataUrl of your provider and setup the
Issuer which is the audience defined.
You may set other options such as SignatureAlgorithm,
AudienceRestricted, or RevocationMode to tune the Identity Provider
behavior.
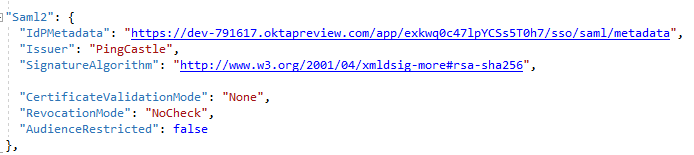
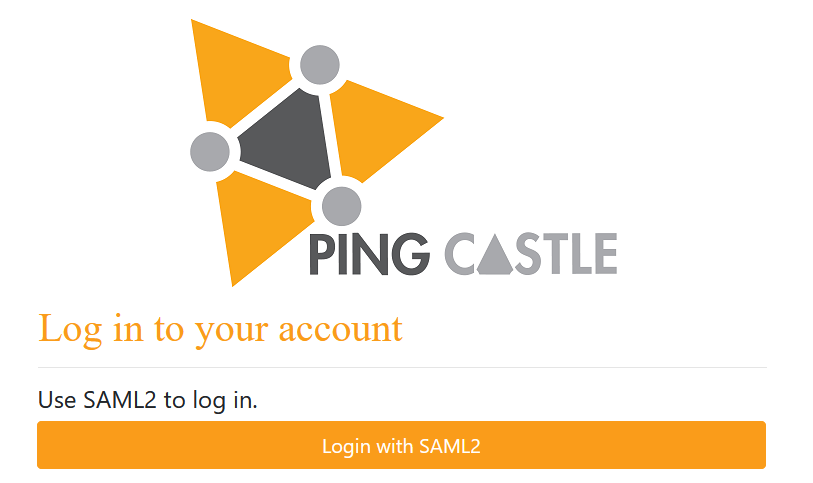
Here an example of configuration with Okta:
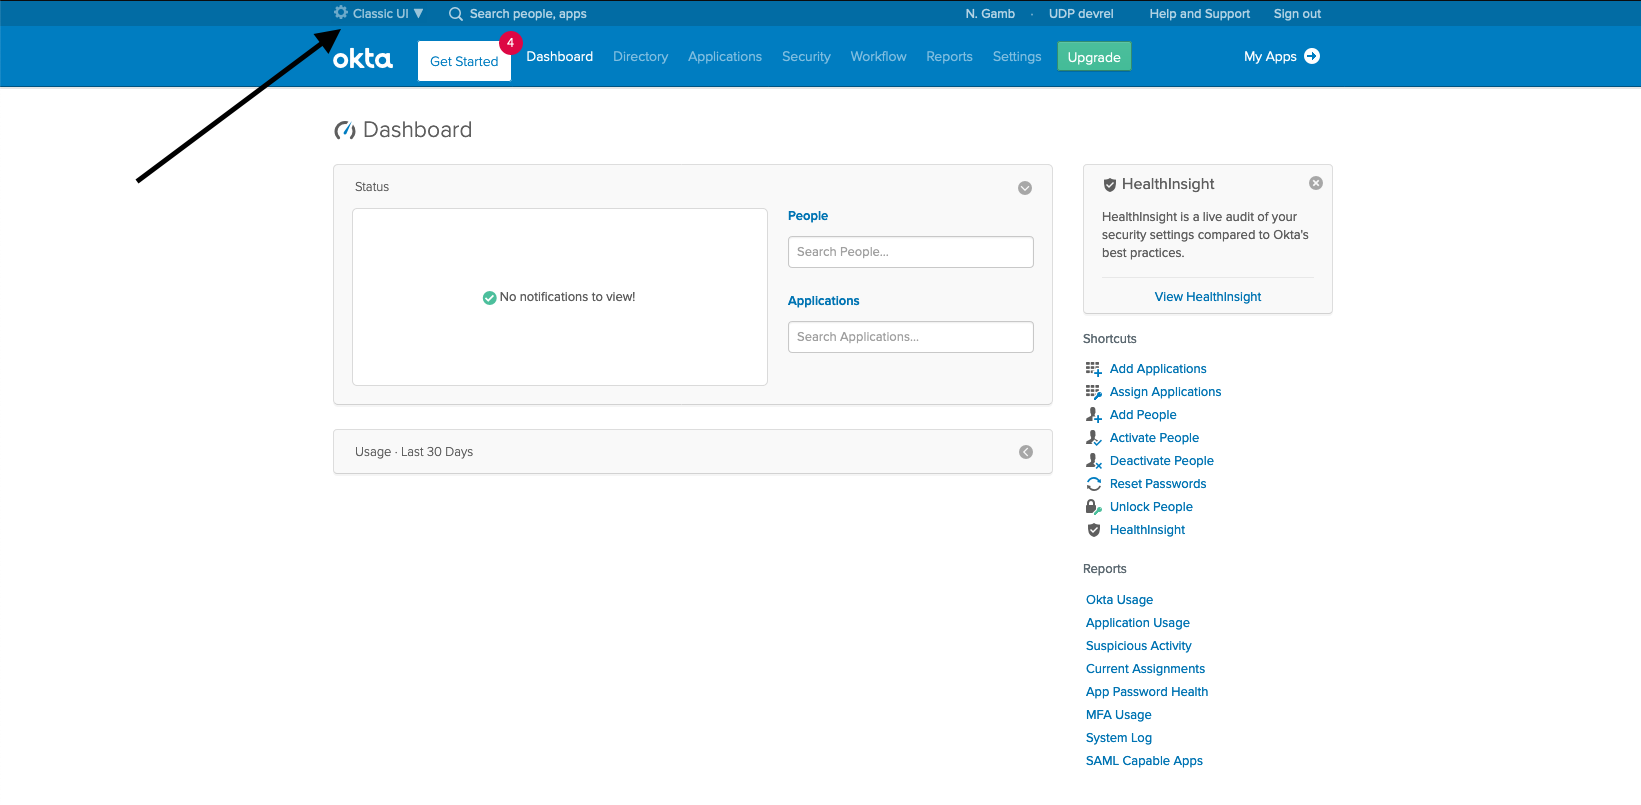
Log in to your Okta tenant, switch to the admin portal, and switch to the classic UI if you are in the developer UI.
Click Applications, Add Application, Create New App, and select the SAML 2.0 radio button before clicking Create.
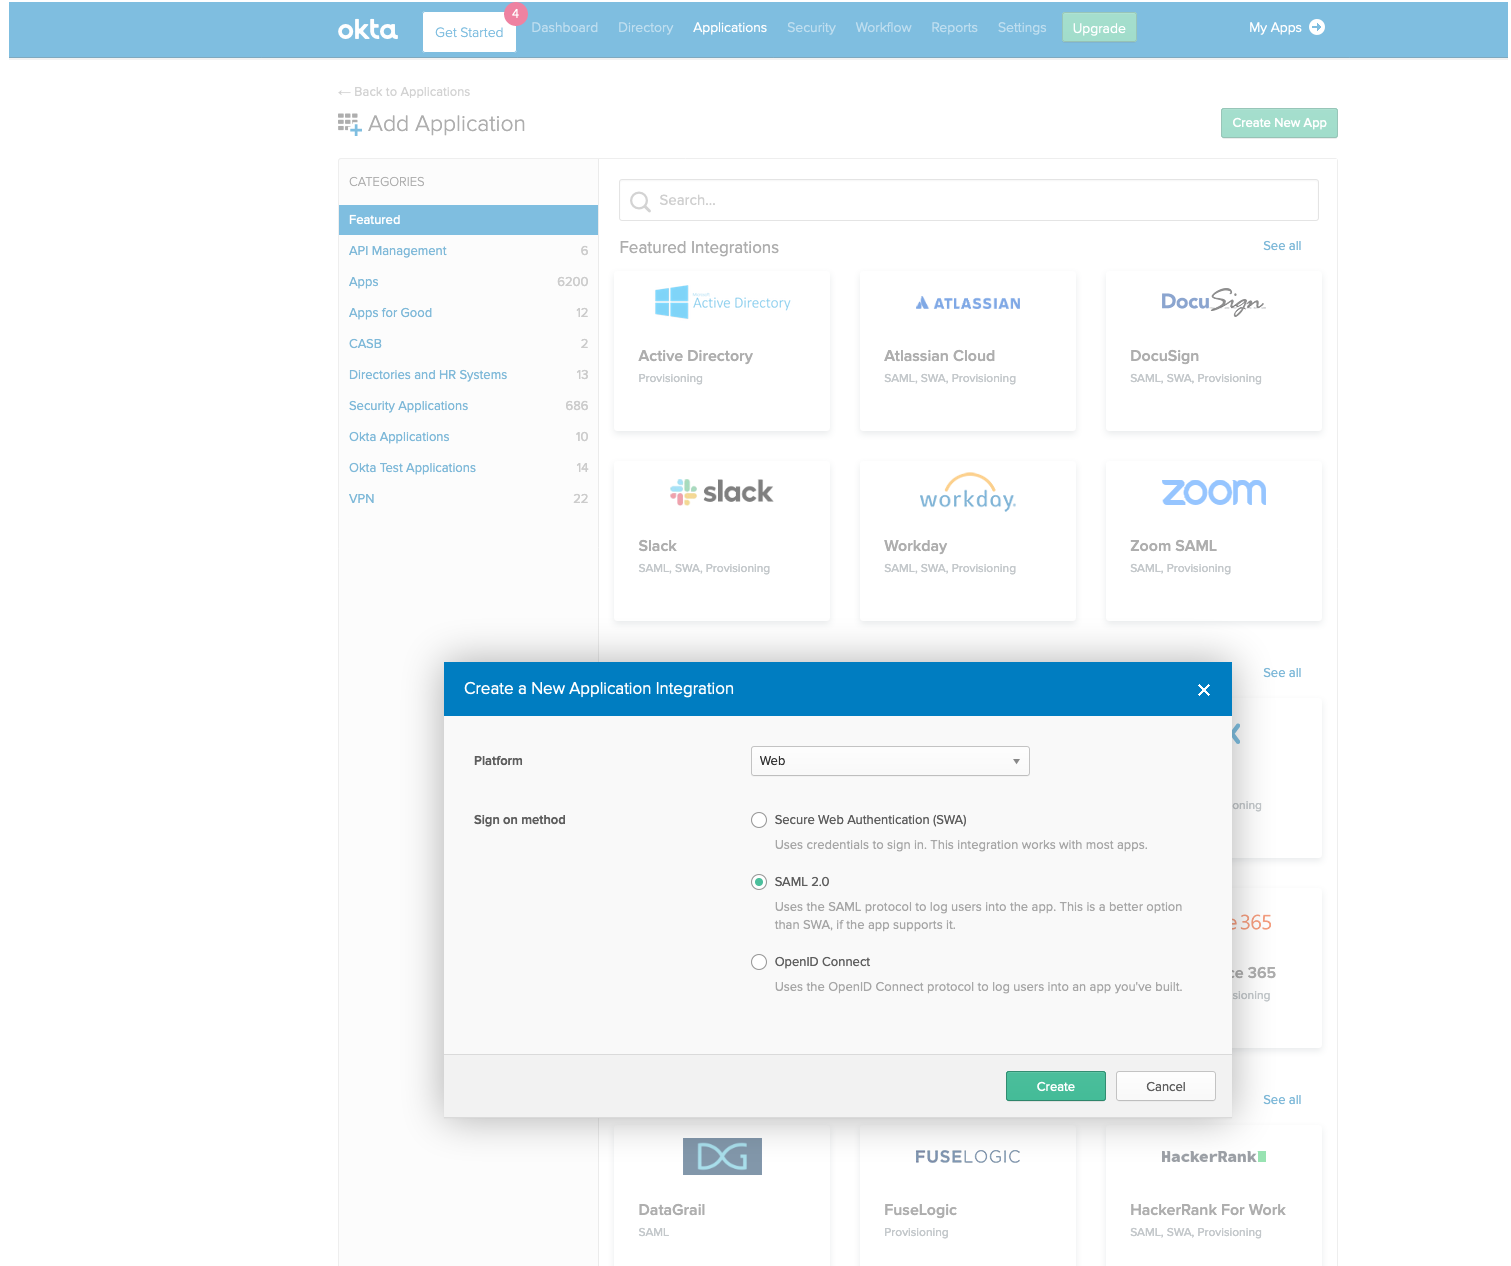
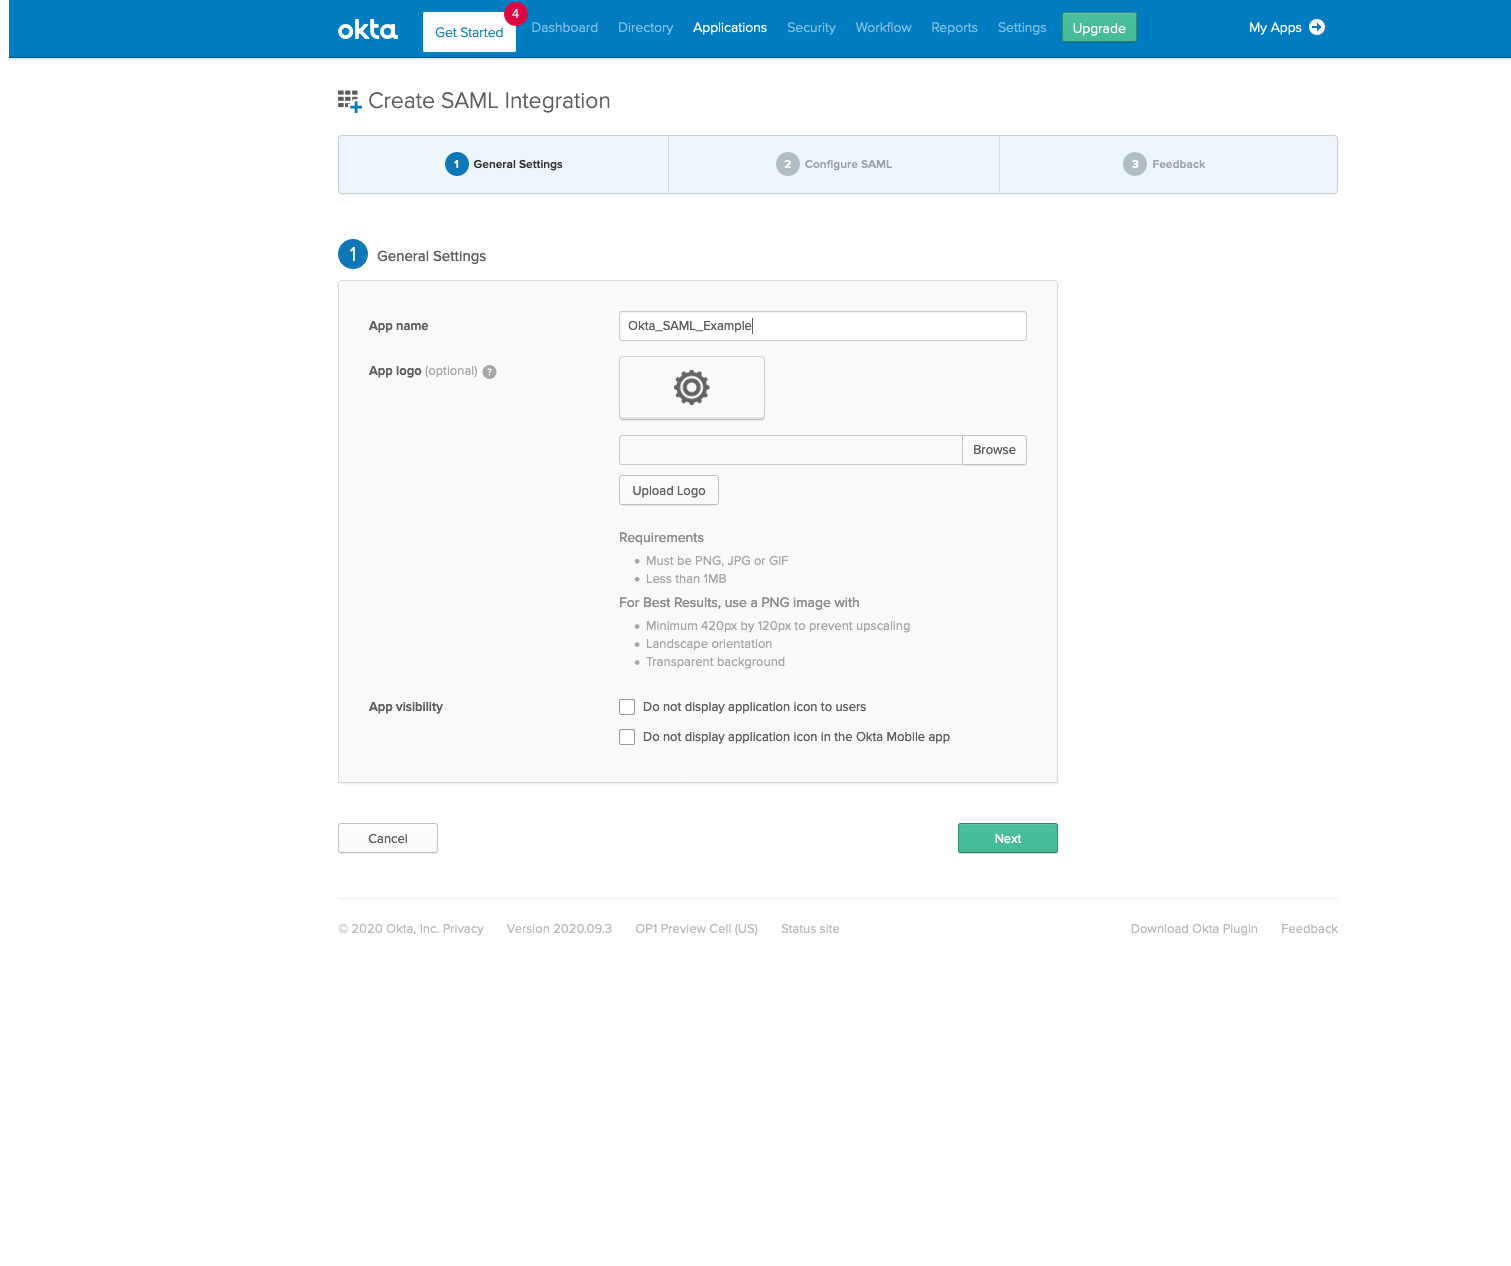
Give your app a name and click Next.
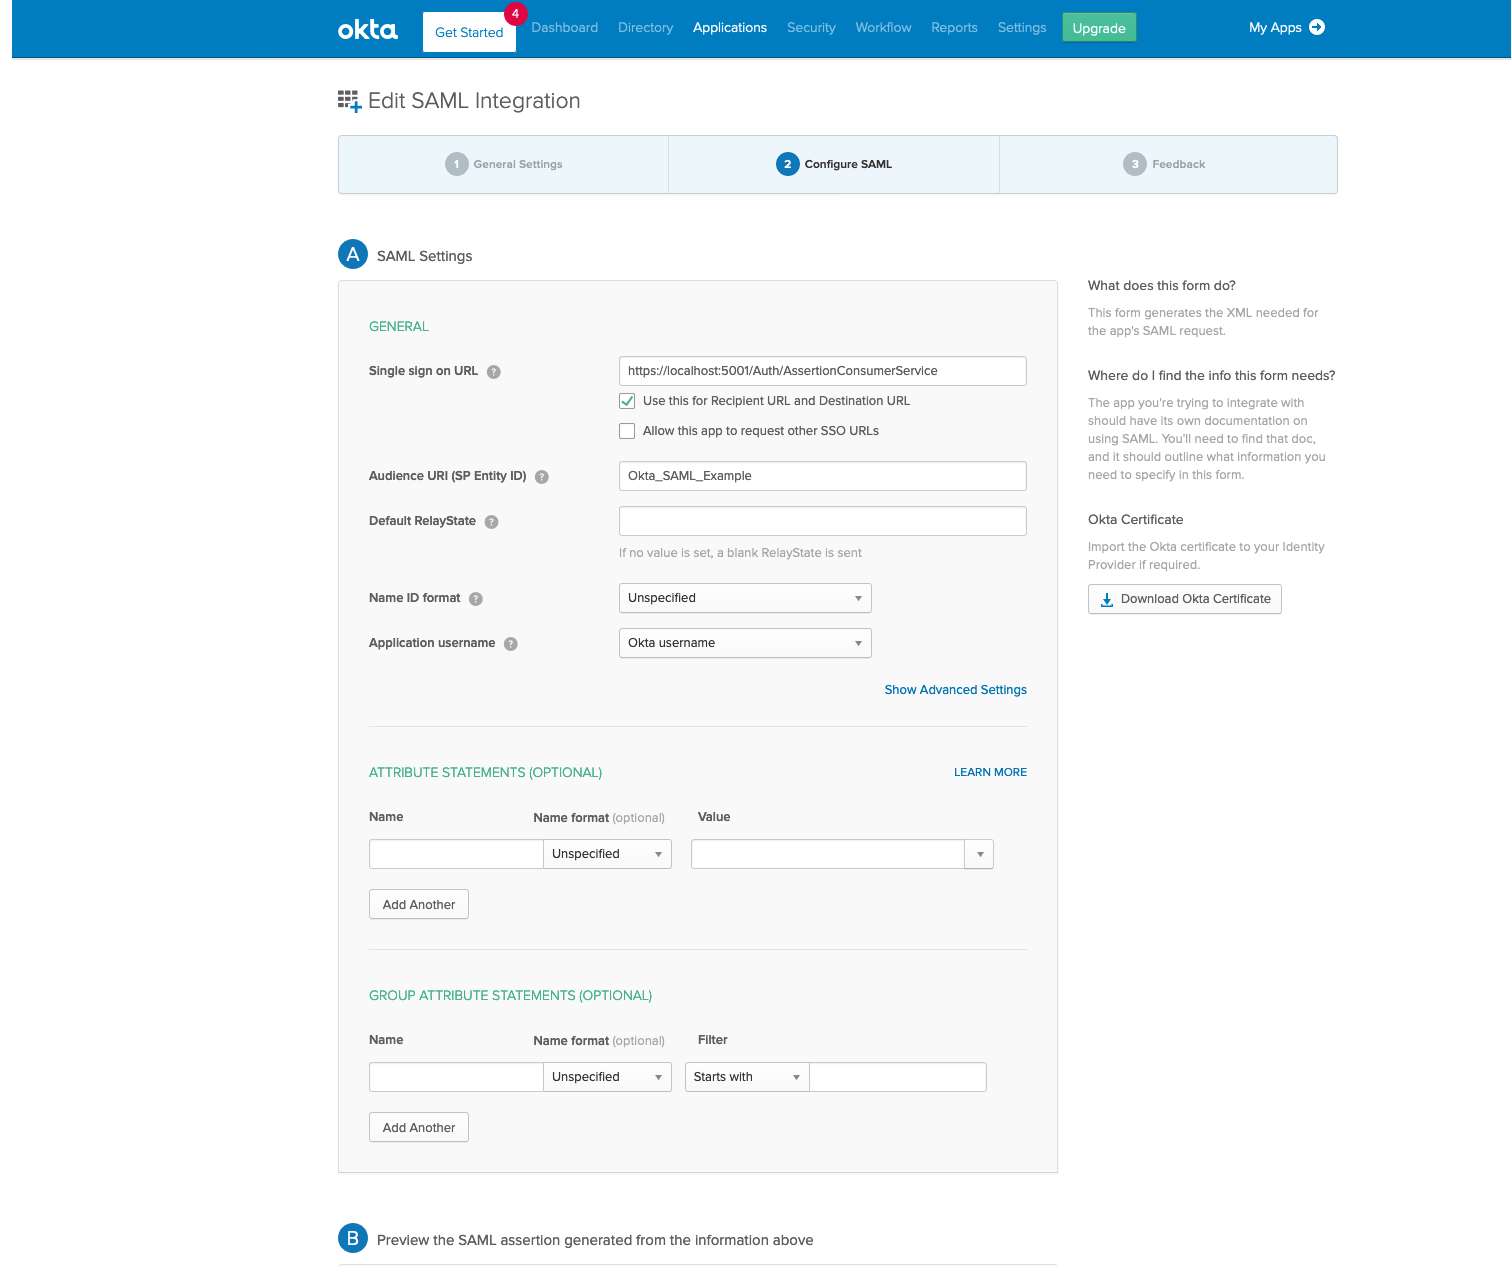
In Single Sign on URL, enter https://yourPingCastleServer/Saml2/AssertionConsumerService
In Audience URI, enter PingCastle or the value that will be used in the "Issuer" setting.
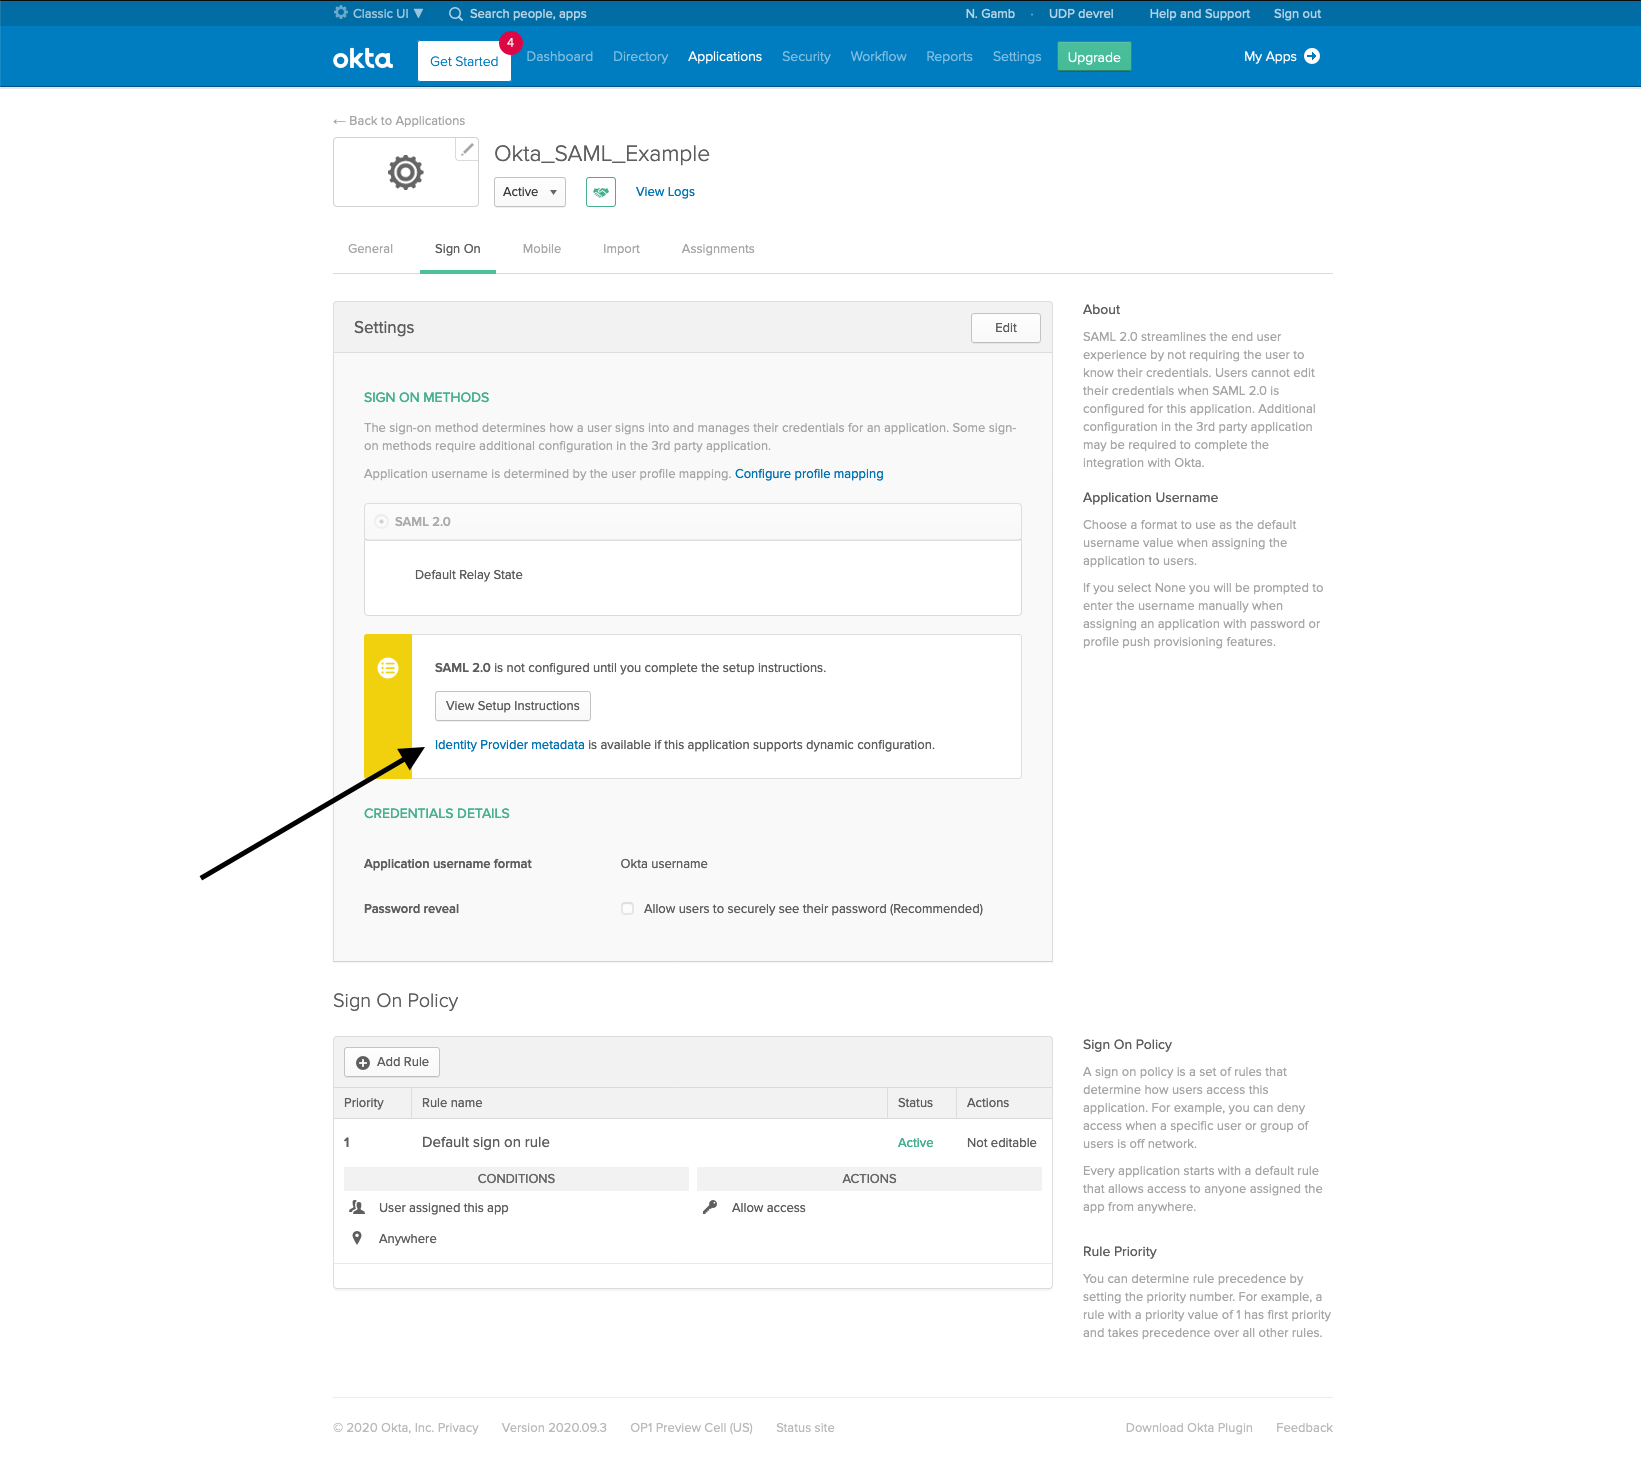
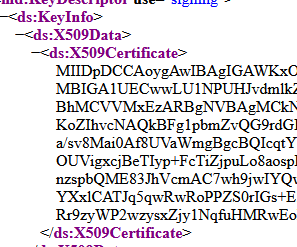
Once the configuration is set, locate the IdP metadata url.
This is the link pointed in the image below.
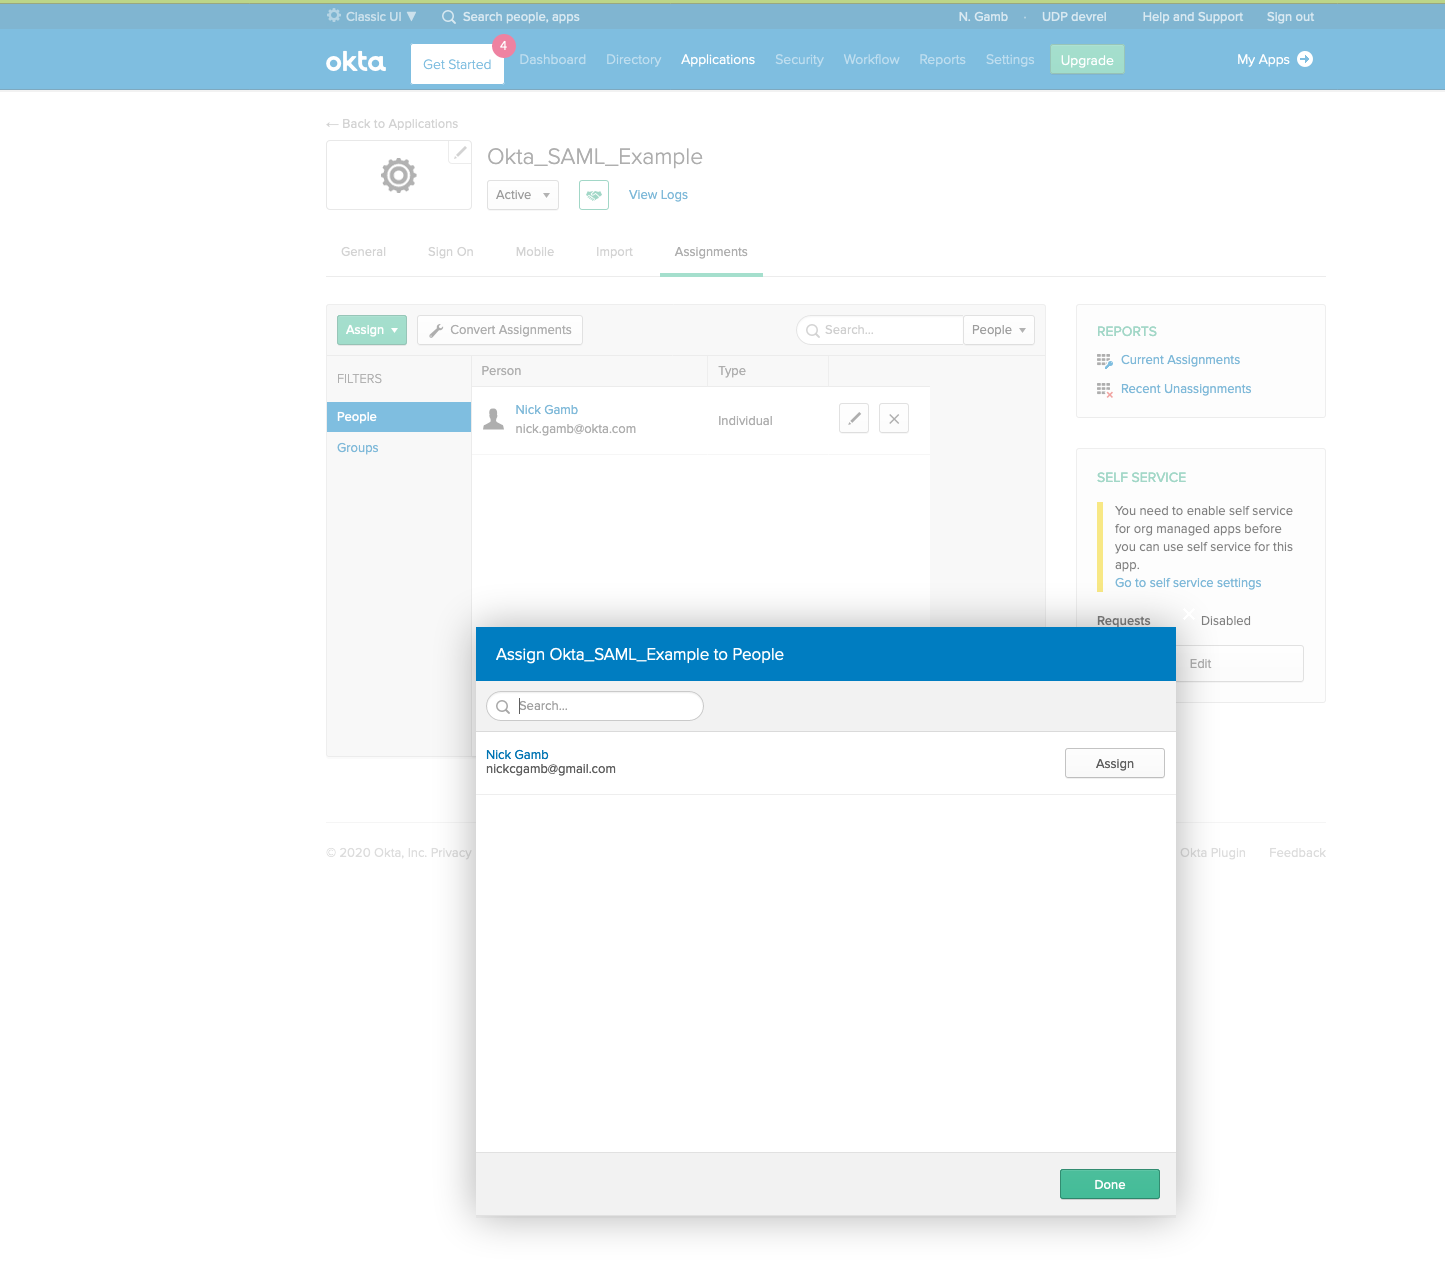
Last, you'll need to make sure that your user is allowed to use this app in Okta. Click on the Assignments tab, click the Assign button, and click Assign to People.
Click the Assign button next to your user, and then click Save and Go Back.
Once these values have been saved and the application restarted, a new SAML2 option will be available on the login screen.
You are now ready to use SAML2 as authentication.
Advanced configuration
To remove the need for the IdP metadata query to the remote server, the saml configuration can be set manually. For this procedure, we follow the same set of steps to configure the Idp, with the example of Okta above.
The following configuration need to be set.

First, the IdPMetadata attribute is not used anymore.
The AllowedIssuer is the issuer ID set by the remote Idp. It is the top value set in the Idp Metadata manually downloaded:

Then the SingleSignOnDestination need to be set. it can be found in the IdP Metadata

Then the certificate need to be set. It is the base64 encoding of a real certificate. It can be seen also in the metadata:
The configuration relies on the ITFoxTec SAML2 provider and thus, advanced settings can be seen here
ADFS
When using ADFS, the well known configuration is:
"Saml2": {

"Issuer": "https://xxx/Saml2/Login",

"IdPMetadata":
"https://xxx/FederationMetadata/2007-06/FederationMetadata.xml"

},
Note: you can customize the "SAML2" name in the login page by setting the field DisplayName in the Saml2 section in the configuration file to the value you want.
Configure Client certificate authentication
The first step is to configure the webserver to require a client certificate when establishing the SSL connection. It requires SSL (aka a https access).
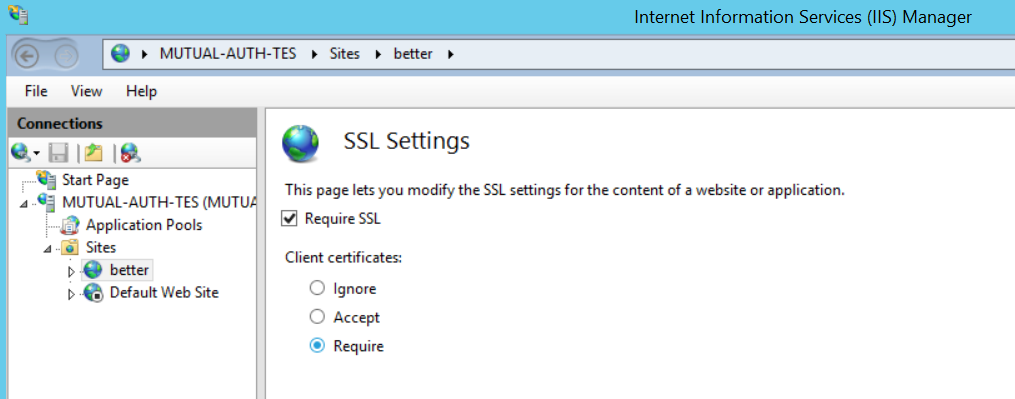
The server server will then request a certificate each time the website is accessed.
- The PingCastle recommendation is to either set to accept to allow the API access, or to setup another virtual host in order to have an API access without a certificate request.
Please note that if a setting is changed, the browser should be closed and opened again to avoid the connection cache reuse.
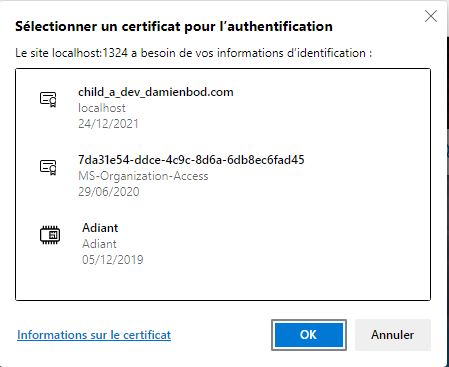
To be enabled for authentication in PingCastle, the setting CertificateAuth must be set to true. In this case, each time the page /Account/Login is visited, the application will evaluate if the webserver sent a certificate. Then the certificate will be evaluated to verify it is trusted (chain building, online verification) and map it to a user account.
Note: if no CRL or OCSP endpoint is available on all certificate, or if they cannot be joined, the verification will have to be turned OFF using the setting CertificateAuthNoRevocation.
![]()
To map a user account, the program will extract the Dns Name of the certificate (the first CN= part without the CN=), then the UPN which can be found in the SubjectAlternateName section. If no match is available, the program tries to extract the RFC email found in the SAN area. It tries then to find a user whose email address is the one found in the certificate.
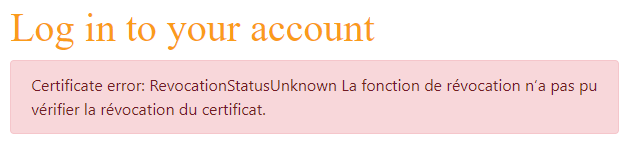
If the certificate cannot be recognized, an error message will be shown:
To be able to login into the application, a user account must be created using the attribute explained above (login matching the subject in the dns form). Please note that no password needs to be submitted.
PingCastle requires a configuration to be able to send emails.
It is located in the appsettings.json file.

The Email is the address used to send email,.
The login and password is the credential use to connect to the smtp server. This is not mandatory.
The host and port is the address of the smtp server.
The email functionality is used to send password reset request and send notification such as weekly reports.
Azure hosting
PingCastle Enterprise is known to work with Azure. But the Ping Castle company does not provide support for installation using Azure Hosting. The company supports only application bug fixes. This is up to the customer to provide the Blueprint and an Azure architect or Azure experts to perform the installation. The instructions below are only indicative.
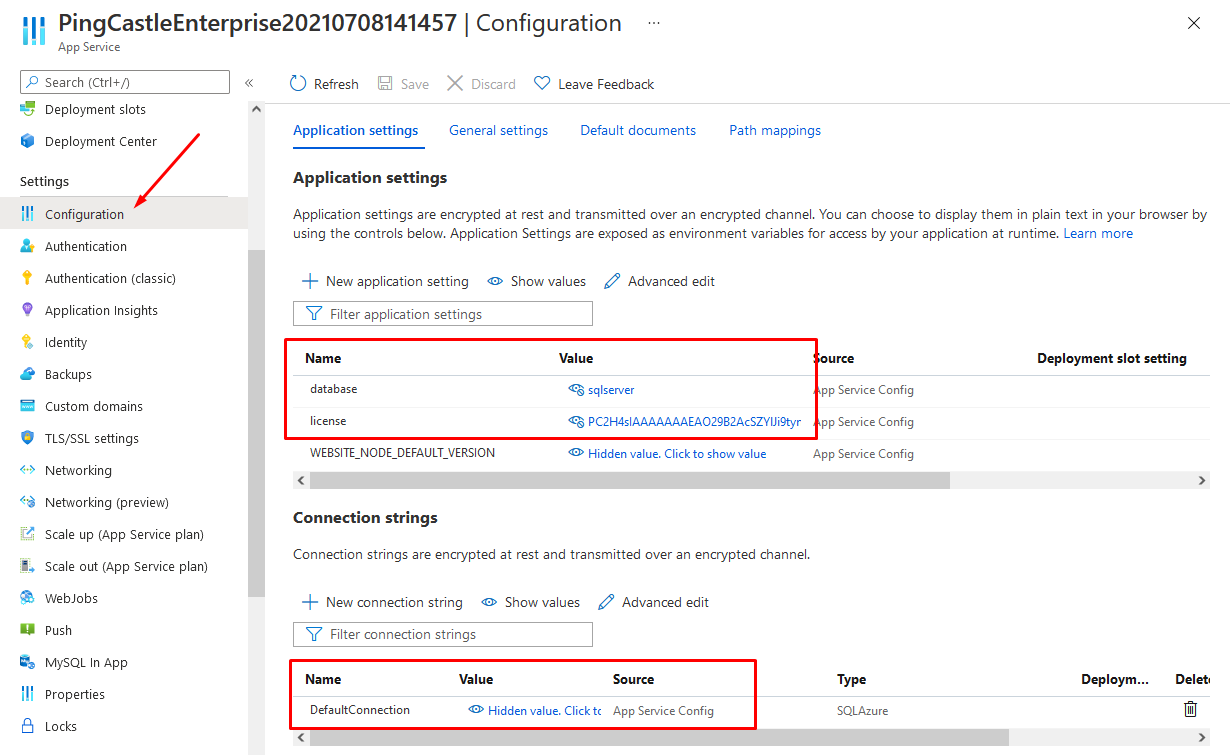
In that case a manage application must be created and a database. Then the configuration of the application needs to be replicated into the Azure Configuration page.
The minimal required fields to be configured are: database, license and the connection string, named as "DefaultConnection".
To deploy the files on the webserver you'll need the azure cli
You can use the following command line to do it.
az webapp deploy --resource-group <group-name> --name <app-name> --src-path <zip-package-path>
Do not forget to use the command az webapp to see the application that you create. Although see https://docs.microsoft.com/en-us/azure/app-service/deploy-zip?tabs=cli for more information.
- Beware that depending on the Azure configuration, additional steps may be required.
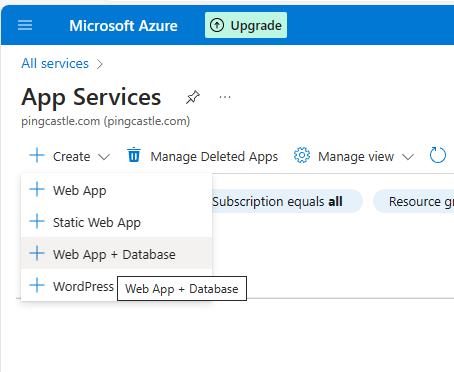
Here is the review of actions to build a running app. First create an App Service.
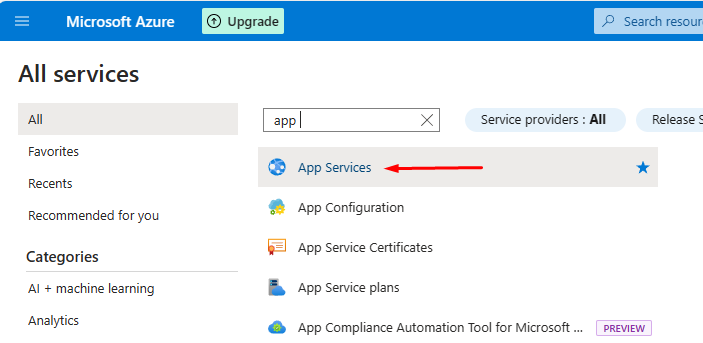
A template can be used to build both at same time web app and database

Beware that on this case, Azure built automatically a docker file. That means that Configuration (usually provided using appsettings and displayed here as Environment variables, are not embedded into the image)
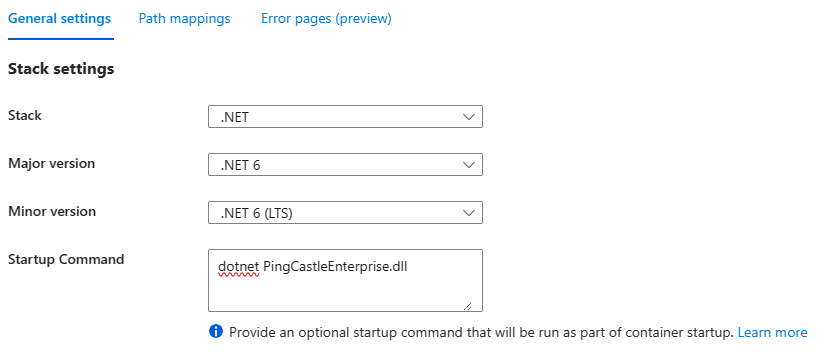
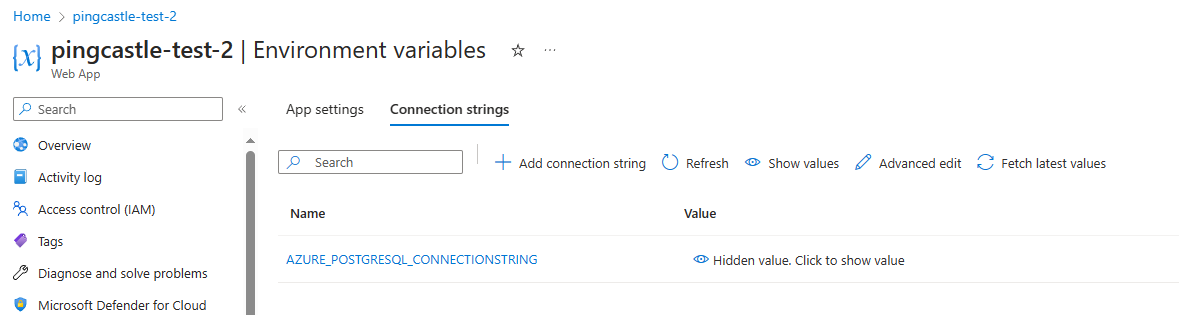
You will need to edit this manually on the server side.
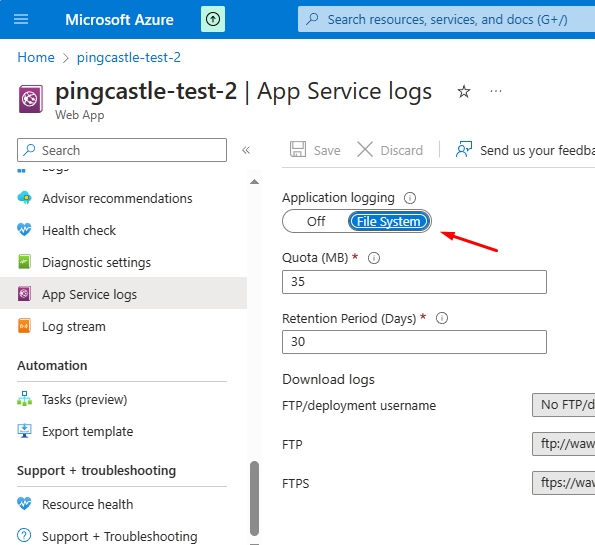
To debug the application startup, you have to enable the App Service Logs.
You can then see the log stream:
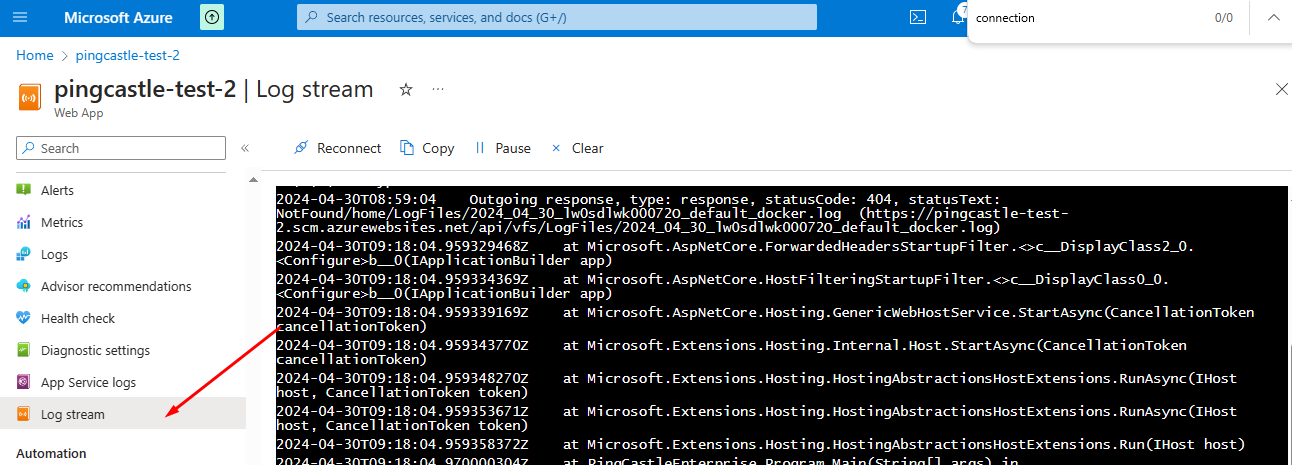
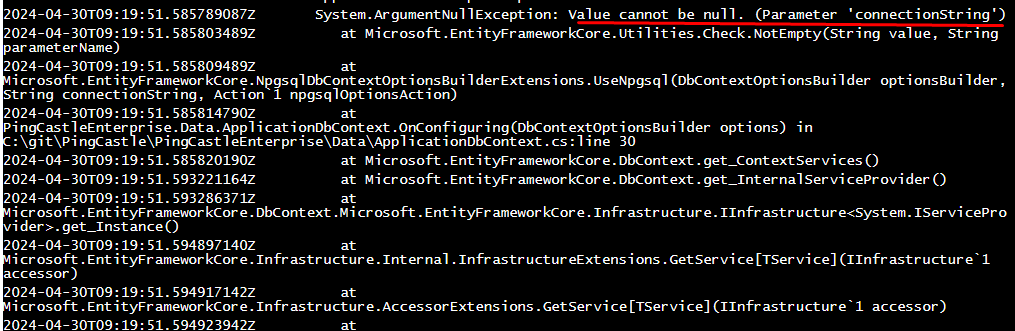
In the example below, the connectionString has not been found (because docker does not forward it). It will need to be fixed before the application can start.
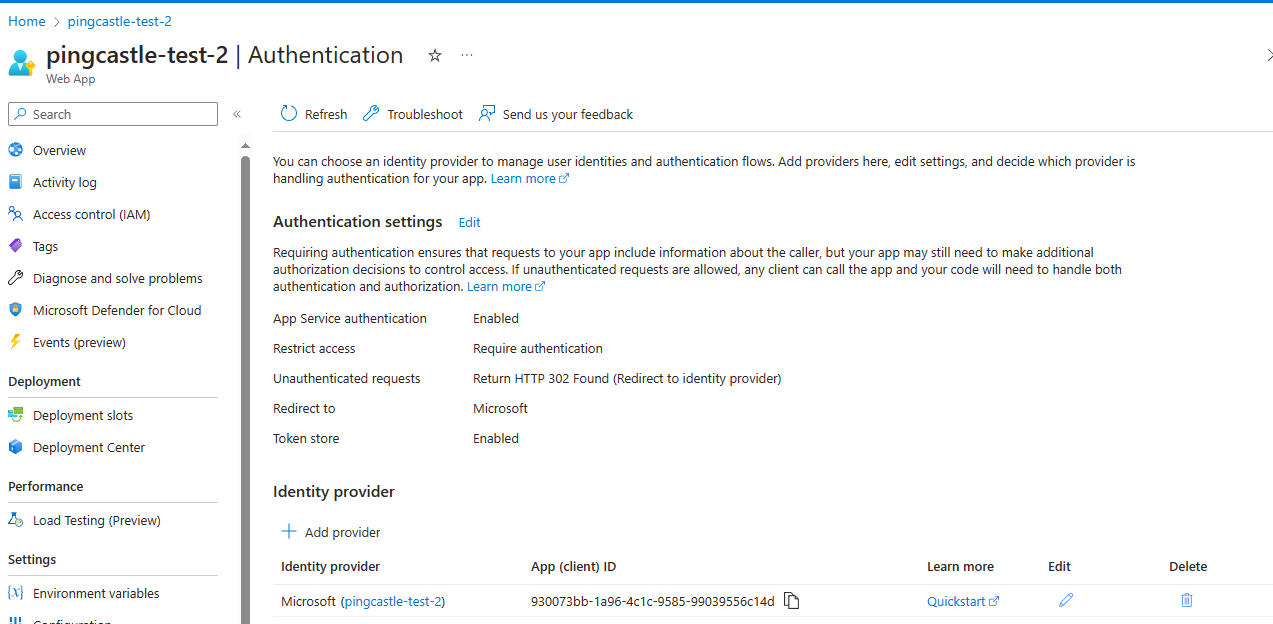
Also since the May 2024 release of PingCastle Enterprise, the application can read the user token, allowing to configure AAD that way:
Initial startup
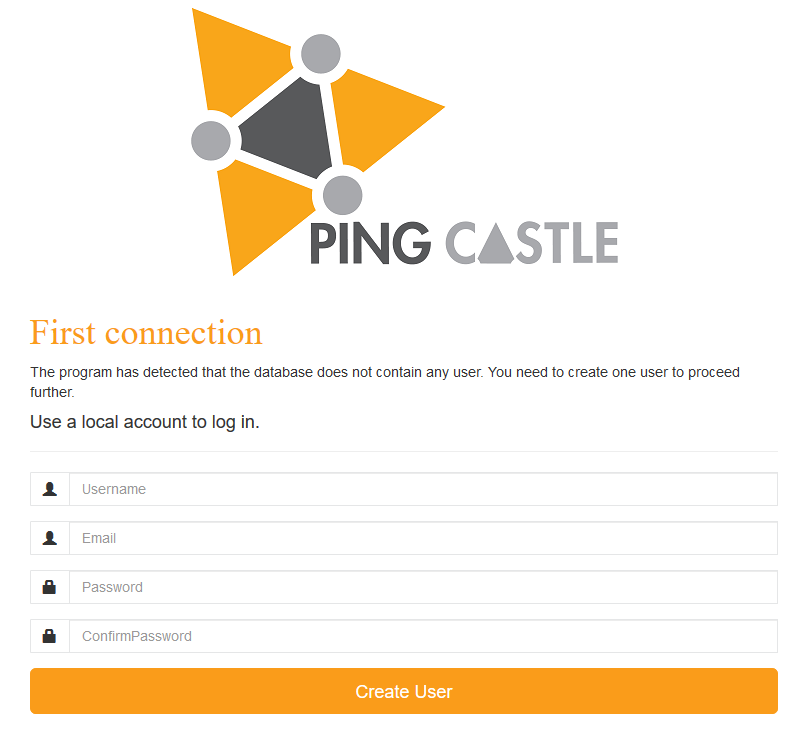
At the first run of the application, the database is created. If there is an error with the database (missing right, invalid connection string) or hosting, the next screen will not be displayed.
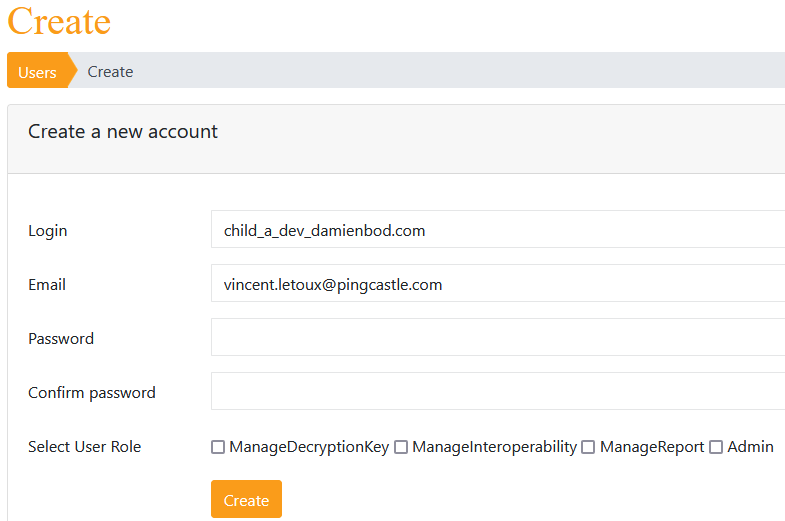
For security reasons, there is no default account or password.
When there is no user configured in the application, a special screen is shown to create the first user. This user is given the "Admin" role.
Initial configuration
For more details please see the user documentation.
Entities
PingCastle configures by default an entity named "Default". It is the entity where Auto Created domains are assigned.
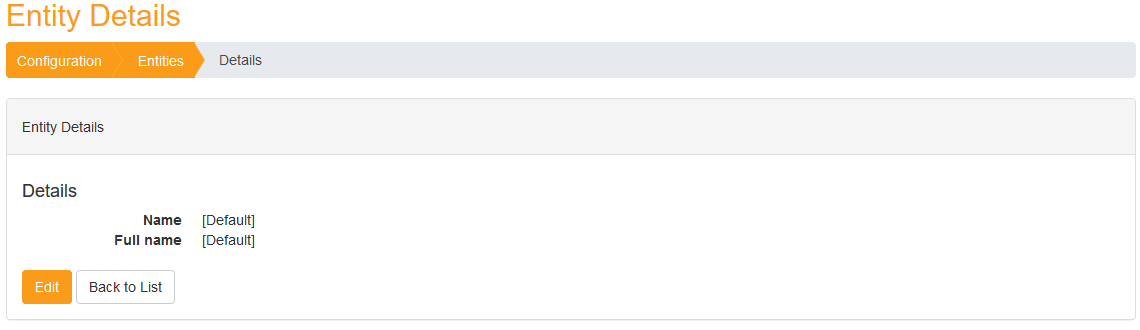
You can created other entities and by setting a parent, built a hierarchy.
To start quickly, you can use the Advanced -> Interoperability feature to edit a base hierarchy using an Excel file.
This Excel file is the same used in the PingCastleReporting tool.
Encryption
PingCastle Enterprise comes by default with the PingCastle default encryption key.
If you decided to add a custom ciphering key, you can add it in Advanced -> Decryption.
Bulk Import of existing reports
You can import existing report using the bulk import functionality of the Advanced -> Interoperability menu.
Agents
You can configure PingCastle program to send their report to the program.
You need to setup an API key for an agent using the Advanced -> Agent feature.
Then use the command switches --api-endpoint <endpoint> and
--api-key <key> in the health check mode.
You can upload existing reports stored in the current directory with the command:
pingcastle.exe --upload-all-reports --api-endpoint https://endpoint.com --api-key abdsnhvdsklLksf
PingCastle "agent" deployment
To avoid any hole in security architecture, it was chosen to not run PingCastle scans from the web application. That means that the local domains have to push their information into PingCastle Enterprise.
Program
It is recommended to run the latest official version of PingCastle. The PingCastle.exe program delivered in the same directory than the PingCastleEnterprise is suitable for use.
Please note that PingCastle Enterprise support to run the PingCastle audit program at a higher or lower version. If new features have been added, they will not be visible unless the PingCastle Enterprise program is updated, but no data will be lost in the mean time.
Schedule
The best way to schedule it is to run your own scheduler. Indeed, you may have purchase a batch product which is looking for failure or dependencies.
As an alternative, there is the documentation at the last page of PingCastle documentation (the audit program) to run it using the Windows scheduler.
The recommended frequency is every week, using a normal user account (not privileged) running on a batch server (not a DC).
Command
You need to create an API key with the upload right (the "Agent" page as admin).
You need to test the command line before scheduling it.
The typical command line is:
PingCastle --healthcheck (optional --server <other domain>) --level Full --api-endpoint https://youservername --api-key yourapikey
The typical pitfalls are enabling TLS1.2 for the server but not installing the TLS1.2 client package on the server running the audit.
Synchronization feature
PingCastle Enterprise supports a synchronization mode to implement a security zone model (used within the Defense). Ony domains are synchronized (no AzureAD).
PingCastle Enterprise high trust
PingCastle Enterprise high trust
PingCastle Enterprise low trust
PingCastle audits
This enable to have consolidations of reports while the reports details are kept limited.
The data synchronized between High trust and low trust instances are:
-
the status of the domain (active, removed, ...)
-
the content of the report, based on a level filter (Full = no filter ; Normal = recomputed for Full report, as is for normal report, Light = stripped from Normal and Full, etc)
The following data is not synchronized: exceptions, action plans, maturity changes, etc.
Configuration
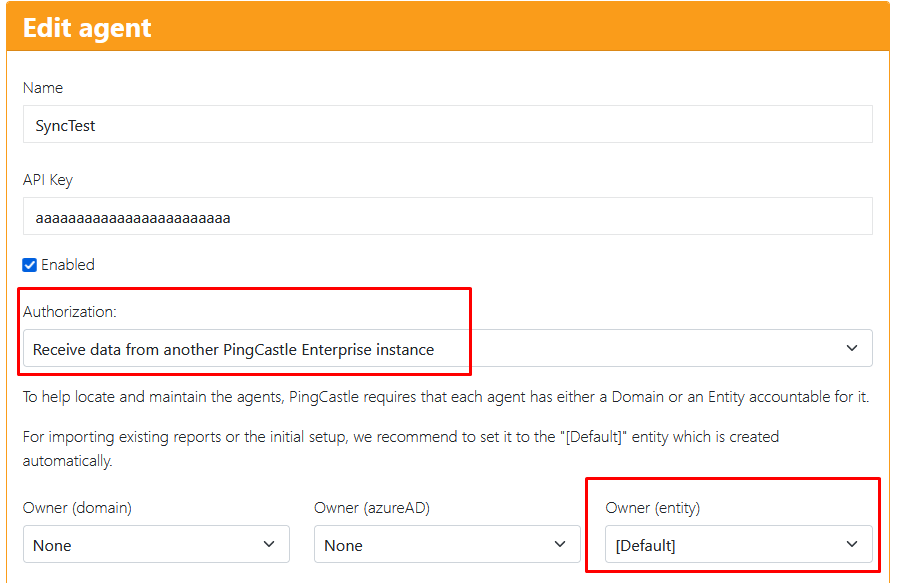
You need to configure server side an API key with the synchronization right.
Please note that you need to assign the Agent to an entity. It is not allowed to assign it to a domain as the entity will be used as a root to assign the new forwarded domains.
On the client side, you need to edit the appsettings file to indicate this credential and also other information.
You need to add a "Sync" section at the root of the file (do not forget to add the comma for a previous or a next section as this is a json file).
Specify the Uri as the FQDN of the recipient and the API key.
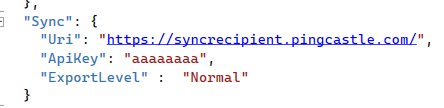
The export level is the one defined with the classic PingCastle Agent. If information has to be removed, the data will be recomputed (this can lead to a loss of information in case the instance is processing a more recent report). If the level does not need to be restricted, the information will be forwarded as is. If the version of the report is more recent, no information will be lost.

Synchronization patterns
Ping Castle Enterprise will try to receive from the higher instance the license at startup. If it cannot be retrieved, it will use the local configured license.
Ping Castle Enterprise will Sync a domain if the domain is edited, or if the sync button is pressed.
The Sync will is shown if the sync link is configured AND if the user has the ability to edit the domain.When a Sync is done, the domain properties (Status, ...) will be sync but also the past reports.
To avoid loading the older reports at each change, the information about the latest audit is shared with the lower instance. This instances can choose to upload only missing reports.
If a domain is created by a user locally, it will be synchronized. However, if it is removed locally -- and this is allowed because no reports are present - , the application will try to remove it on the higher instance. Please note that it cannot be removed if reports already exist, so this remove request may be denied silently.
You can also force the synchronization of all domains in the Interoperability page.

Synchronization patterns at import time
To ensure that the license is enforced, before importing a new report in the lower instance, this instance will contact the higher instance to make sure that the report does not create domains above the license limit. If there is a temporary network issue, this check will not be performed. If the check denies the import, the report will not be imported, and the error will be notified.
Once this check is done, the import is done on the lower instance. Then the report is sync at the higher instance. If there is any network issue at this moment, the error will be ignored (but report in the logs if they are enabled).
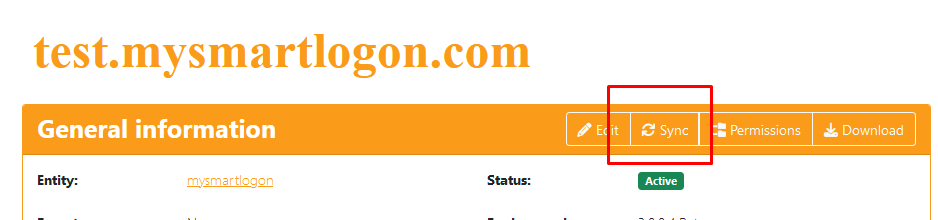
Connection tests
To ensure the connection is well configured, you can Sync a domain using the button described above.
If there is an error, it will be displayed as an exception.
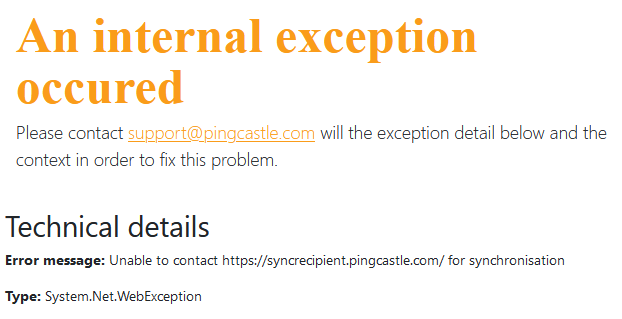
Beware: the detail of the error may be described in an inner exception described below. In this case, this is a DNS issue as the host cannot be found.

Troubleshooting
We recommend starting the application manually to view any problem such as:
-
TCP port already used
-
connection string invalid
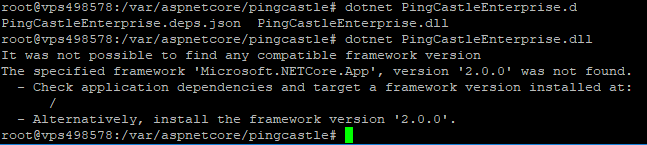
The method to run the application manually is to run the command:
dotnet.exe PingCastleEnterprise.dll
(dotnet.exe is stored by default on c:\program files\dotnet)
Additionnally, you can choose to open the application on the network by specifying the --server.urls parameter:
dotnet.exe PingCastleEnterprise.dll --server.urls=http://*:8080
However, if there is a permission problem in the database, this method won't display an error because the database will be connected under the user context and not the system context. Typically on Windows, the IIS service connect under IIS APPPool\AppName. We recommend to look at the following page to grant right to the application pool account on Sql Server:
Then depending on the platform additional logs can be stored.
On Windows, the web.config file at the root can be edited to generate debug logs. The event viewer is also a place where debugging data can be stored.
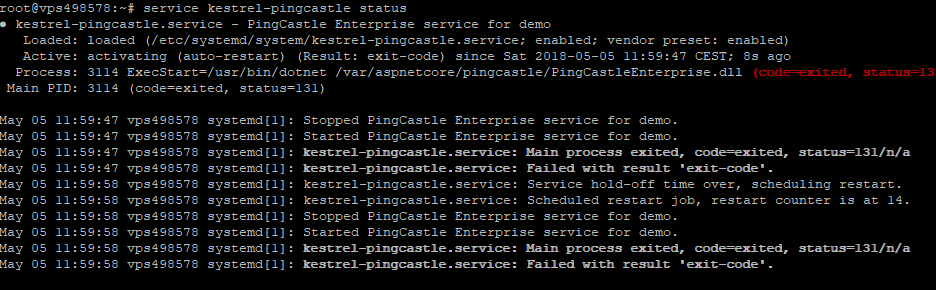
On Linux, the command service <name-of-service> status can indicate if
the service is running or not. If an error prohibit the start of the
service, the log is shown.
When no log is available, the program can be run manually outside of the service scope to have a more detailed error message.
Example:
Here are a couple of well-known errors, their description and their solution
Incorrect version of the asp.net core middleware
Here are the messages displayed when running under a service:
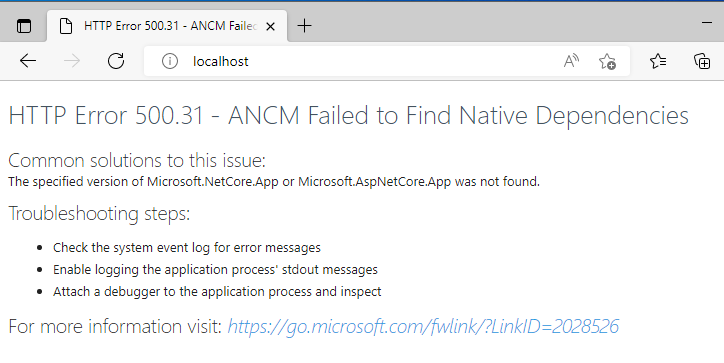
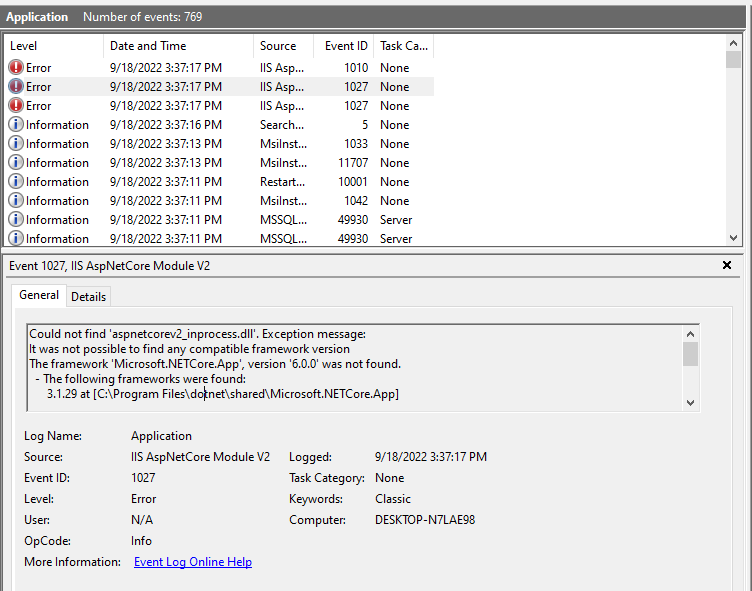
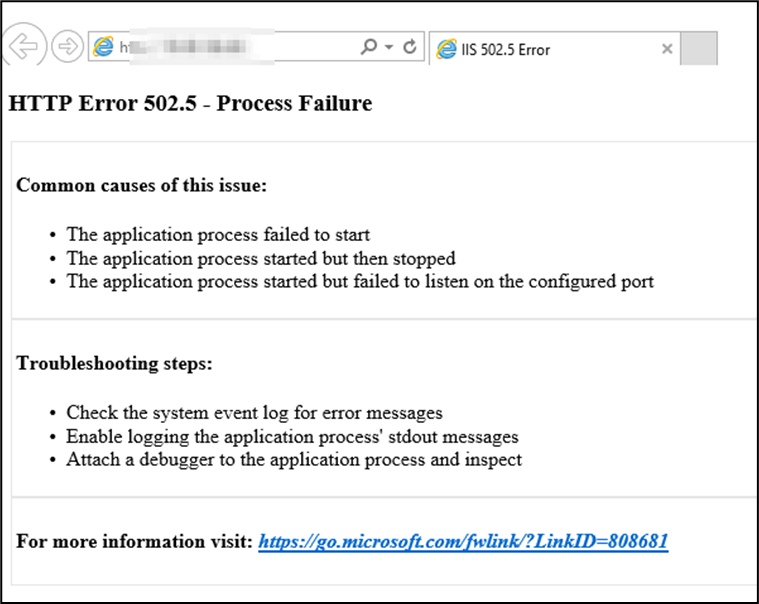
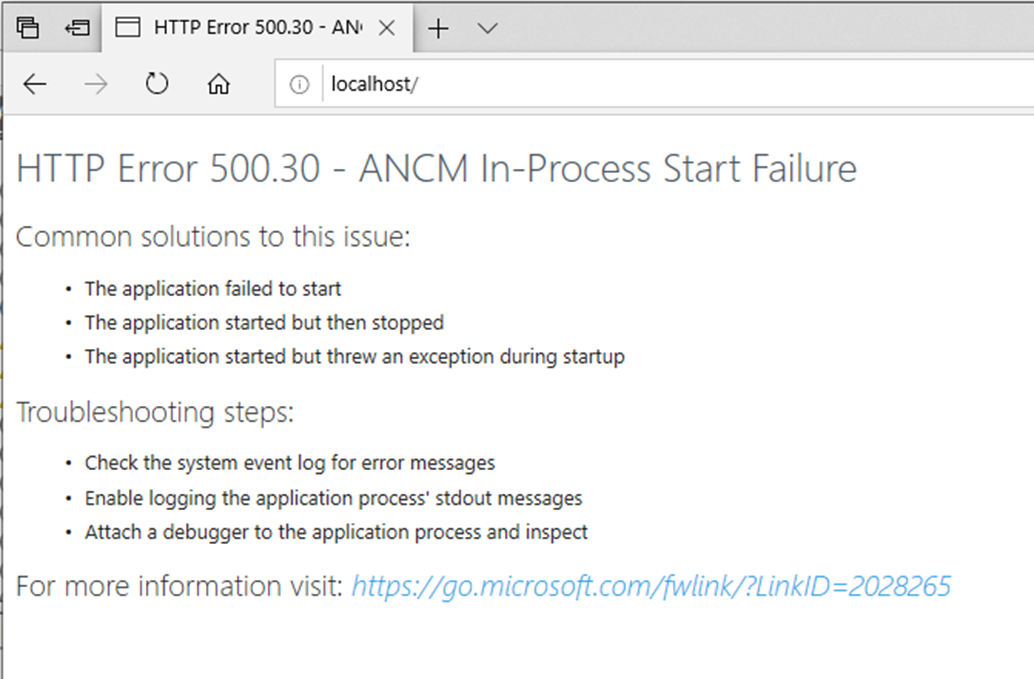
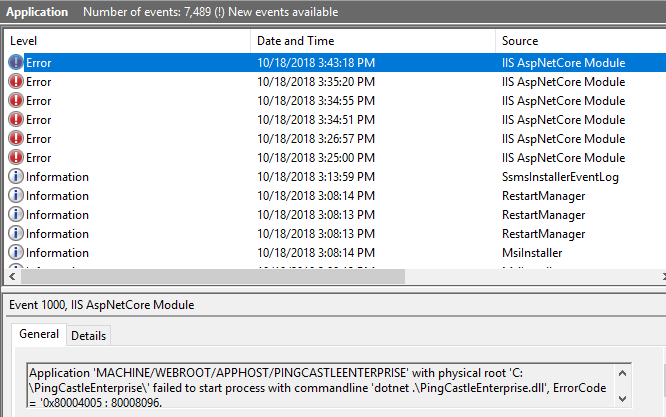
And the message when running on the command line:
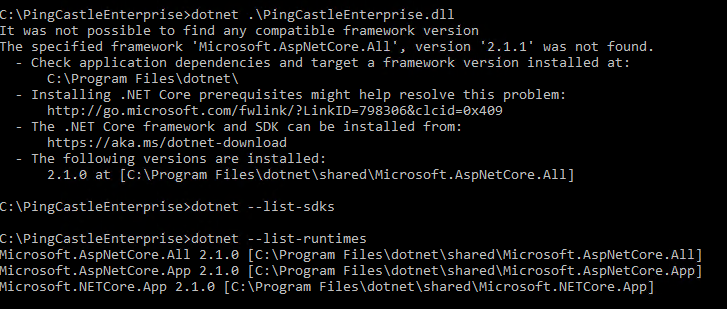

Solution:
identify the correct version of the framework and install it. Do not forget to install the IIS middleware is you are installing on IIS.
Note: the last error was related to the missing KB KB2533623
Missing web.config
If the web.config is missing or if it does not load the .net module, like in this example,
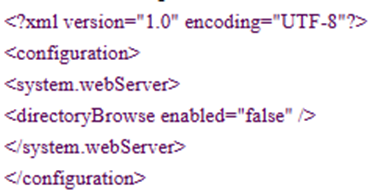
The webserver will process the program as normal file. The url to login will be displayed as a 404 error.

The solution is to copy the web.config from our download website and to replace the existing one.
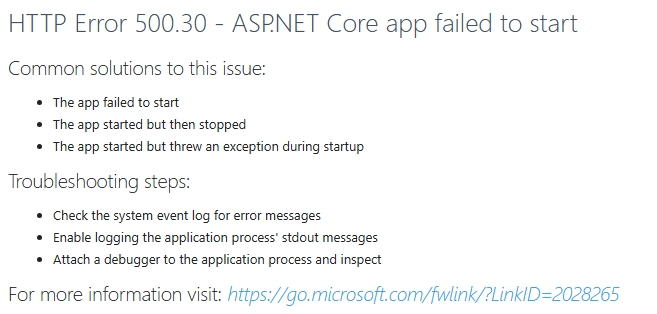
Error at the application startup
When the application is unable to start, the following message are shown:

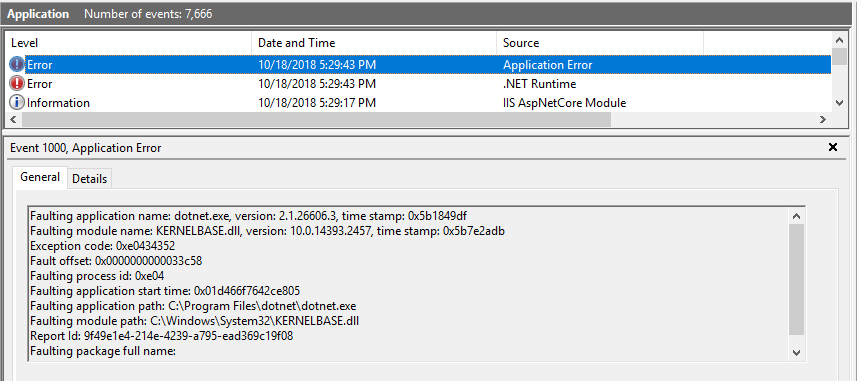
A more detailed message are shown in the event log or directly on the command line:
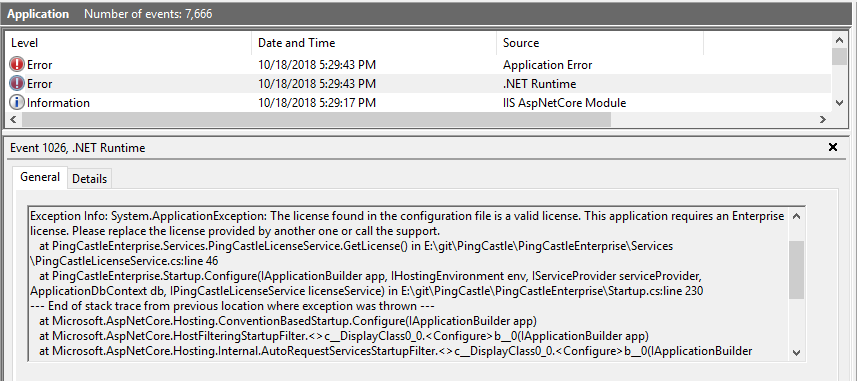
In this case, the license was invalid and need to be replaced in the file appsettings.json.
Accurate permissions on the database
When the database doesn't contain the table needed, the application tries to create them. If the permissions are not granted, a message will be generated and the application will not be able to start.
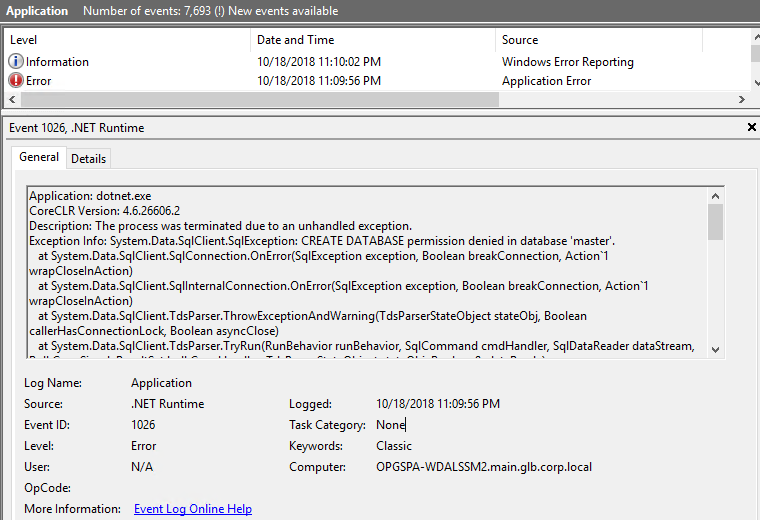
Solution:
Grant the right to create tables in the database or run a SQL script to create this table. This script is available on demand.
Do not forget that the inability to create table can be seen of a symptom of a lack of permissions. The inability to add or remove records in the database will prohibit the use of the application.
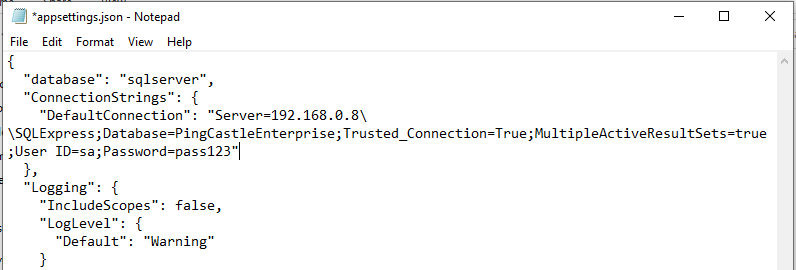
If you are running PingCastle from another SQL Server, the default identity used by the application pool will not be granted access.
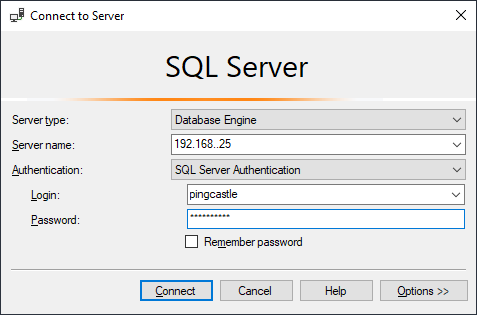
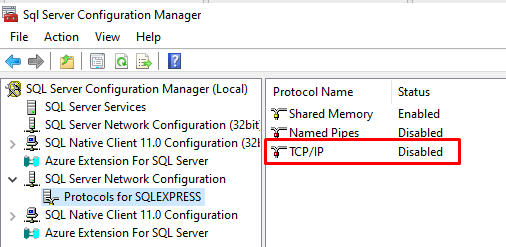
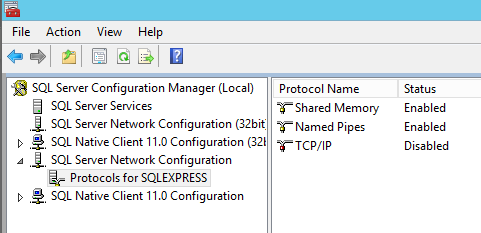
Be sure you are able to connect from another computer than your SQL database server. Indeed, by default you have a firewall preventing remote connection and that the database may not be exposed. Be sure that it is available through TCP. (in the following case, remote access is forbidden because TCP/IP is disabled)
You have 2 solutions to grant PingCastle an identity allowed on SQL Server:
changing the application pool identity to match an active directory user which are granted permissions to the database
You can use a SQL Server local account and specify its login password in the connection string
Edit the application.setting file and locate the connection string. Then
add ;User ID=sa;Password=pass123
Enable Debug Logging
Follow the steps to enable debug logging.
-
Log in to the PingCastle Enterprise Server.
-
Locate the appsettings.json file.
-
This is usually located at: C:\PingCastleEnterprise
-
Edit the Appsettings.json file so the Logging Section looks like the example below:
"Logging": {
"IncludeScopes": false,
"LogLevel": {
"Default": "Debug",
"System": "Information",
"Microsoft": "Information"
}
}
- From the same directory, open the web.config file and edit the aspNetCore tag so stdoutLogEnabled=true.
Example
<aspNetCore processPath="dotnet"
arguments=".\PingCastleEnterprise.dll" stdoutLogEnabled="true"
stdoutLogFile=".\logs\stdout" hostingModel="InProcess" />
-
Open PowerShell as Administrator and type in IISRESET to restart the web services.
-
Log in and perform actions in the PingCastle Enterprise web portal. Check C:\PingCastleEnterprise\logs\ to ensure logs are being written.
Emergency procedures
If there are no more administrator available (password forgotten or having left the company), PingCastle can be set in the Initialization mode again to set a new administrator password.
Open the database and open the table AspNetUsers. Locate the
account, for example using its email, and delete the associated line.


At the next login, the application will detect that there is no more administrator configured in the application and will switch to the initialization view to create one.
All other data such as users, domains or reports will not be deleted from the database.