To do for Administration
Conditions for using the Basic view
The Basic view allows end users to easily manage their passwords in Netwrix Password Secure without any training or prior knowledge. In order to ensure proper operation, the administration has to make a few preparations first. This will be further discussed in the following.
NOTE: To make the Basic view transition as easy and smooth as possible for the user, the administration can orient towards this checklist.
Relevant rights and settings
This section lists the rights and settings the user needs to work with the Basic view. The administration can adjust these rights and settings at its own discretion.
Rights
| User right | Chapter |
|---|---|
| Can add individual passwords in the basic view | |
| Can close tab of own organisational unit in the basic view |
Settings
| Settings | Chapter |
|---|---|
| Include subordinated organisational units in the basic view | |
| Start web application in basic view on next login | |
| Display kind of passwords in the basic view | |
| Switch logo view on mouse over in the basic view |
Password Management in the Basic view
There are several ways to provide/create passwords in the Basic view.
Predefined passwords
Predefined passwords have already been created on the FullClient. Basic view users must at least obtain the right to read a record in order to use the password.

Creating passwords via applications
In order to use applications on the Basic view, the administration must first create them on the FullClient. By clicking on the application, the end user can easily generate secure passwords. To be able to use the application, the user needs at least the authorization to read.
Further information on this topic can be found in the chapter Applications.

Creating passwords via applications without applications
Please consider the following rights and settings so that Basic view users can create new passwords.
User rights:
- Can create individual passwords in the Basic view
Setting:
Default form Otherwise, no form can be assigned to the new password.
- Add right to the organisational unit of the user
The Basic view
What is the Basic view about?
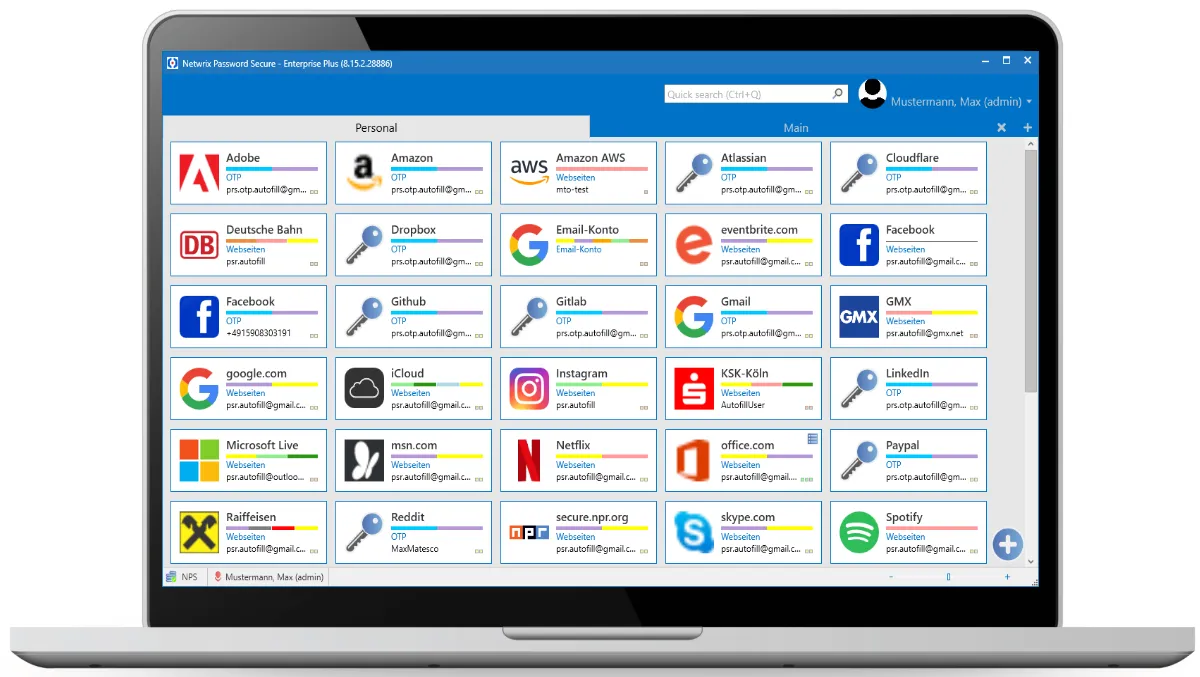
The Basic view is a lean tool for every end user. It guarantees quick and easy access to the daily needed passwords. Although the Basic view has a limited range of functions, it can be operated intuitively and without previous knowledge or training by any user. The Basic view is designed for up to 50 passwords. The Basic view introduces to professional password management. It is also the ideal tool for the daily handling of passwords.
Requirements & required rights
You don’t need any special permission to use the Basic view. However, the handling of the Basic views can be set via rights and settings. Read more in chapter To do for Administration.
Installation
The Basic view is installed directly with the Web Application, so you don’t need any special installation. For further information, visit the chapterInstallation Client
Checklist of the Basic view
Checklist for setting the Basic view
This checklist helps the administrator in setting the Basic view. To work smoothly with the Basic view, the following points must be observed:
- Select form
The stored form must cover all required field types. At least required: Text, username, password, URL
- Set display of the Basic view or Advanced view
The setting Display passwords in Basic view & display passwords in Advanced view allows you to configure the display of both clients. The passwords can be displayed with an icon, logo or in text form.
- Are users in the right organisational unit?
Check if the user is in the correct organisational unit. The add right to the organisational unit is also required so that users can create passwords in the Basic view.
- Define user as Basic view user
You can either define the user directly as Basic view user. This works by changing the user type accordingly. Alternatively, you can activate the setting Start Basic view at next login. This will prompt the user to log in to the Basic view.

- Add default applications (optional)
It is advised to create the applications, which shall be stored as passwords, beforehand.
Password management
Creating passwords
This chapter deals with the main functionality of Basic view, namely the secure storage and management of passwords. It should be noted that a password can be stored in different ways.
NOTE: The required settings and rights are given by the in-house administration. Further information can be found here: To do for the administration
Create with application
Prerequisite: An existing application is available. It does not matter whether this is an SSO, web, RDP, or SSH application.

NOTE: Managing and creating the corresponding applications is the responsibility of the in-house administration. How to create an application can be read here and in the following chapters.
Clicking on the existing application opens a window that asks for the user name and password.

Once these fields are filled in, the record is created.

Now the record can be opened by clicking on the corresponding tile.
Create without application
Alternatively, it is also possible to create a data set without an application.
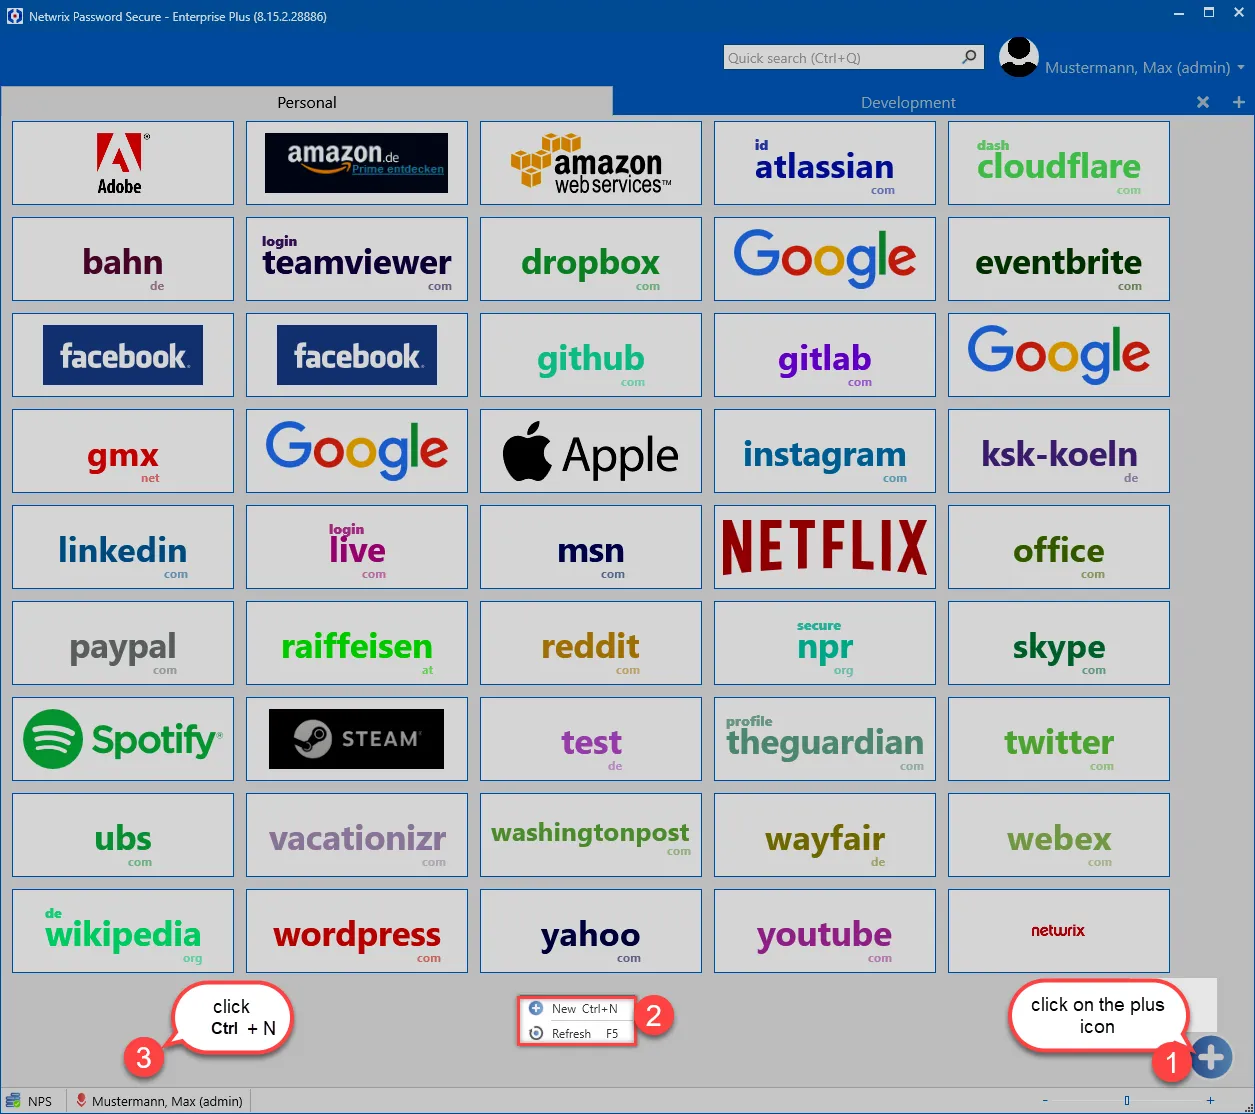
By clicking on the + symbol or right click ->New or CTRL+N a new window opens. In this window, the information relevant for the stored form is entered in the Password tab. It is also possible to assign the data record to each organizational unit to which the creating user is authorized. It does not matter in which tab the user is located. If a rights template is defined for the selected organizational unit, then this template will take effect at this point. It is also possible to define one or more corresponding tags for the data set.
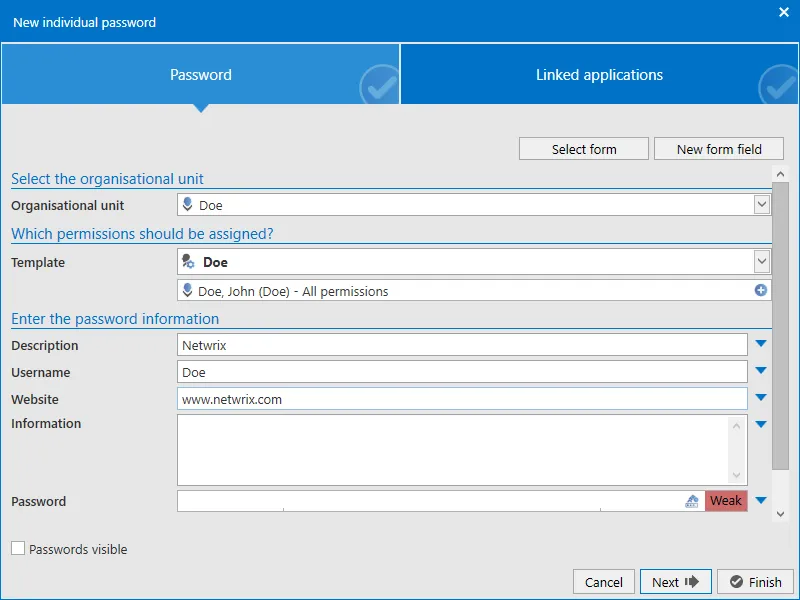
In the next step, an application can be added to the newly created data record, if one already exists. To do this, go to the Linked Applications tab.
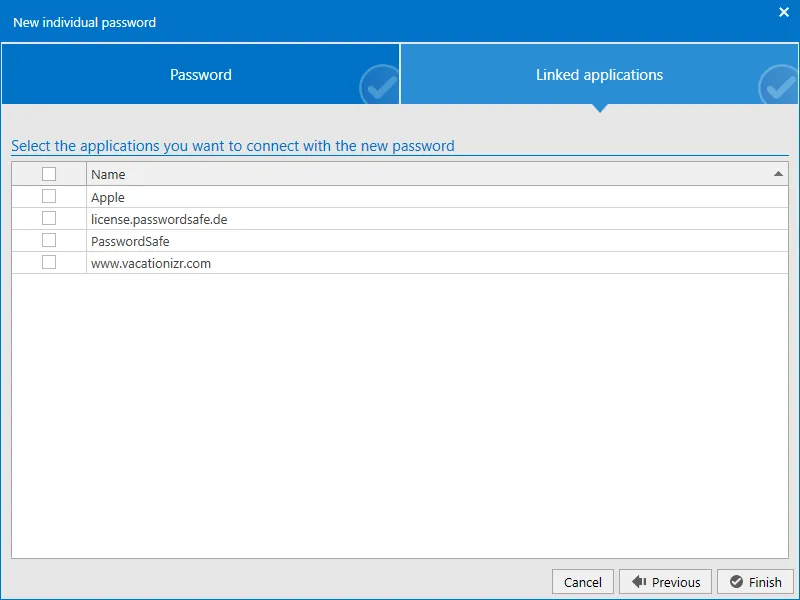
Then the whole process is completed by clicking the "Finish" button.

Changing and deleting passwords
In order to change or delete passwords you should stay on the corresponding tile with the mouse cursor. The control button will appear.
When you click the button, you will be offered the "Edit" and "Delete" options, among others.

Start and Login
Starting the Web application
To start the Basic view, the Web application must be started first.
As soon as the login mask appears, the login data of the corresponding user are entered there. It is essential to ensure that the variant set up by the administrator is used. There are several options for this:
local user:
e.g. administrator (user name administrator)

AD User:
There are 2 possibilities here:
-
username like the local user (e.g. administrator)
-
domain and username (e.g. nps\administrator)
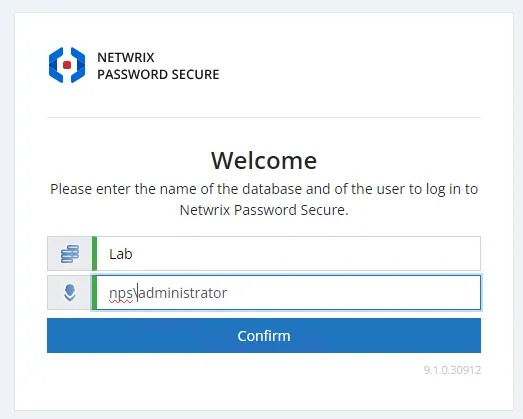
CAUTION: Please ask your administrator if you are not sure which login details apply to you!
Change to the web view of the Basic view
As soon as the login was successful, you are now either:
- directly in the web view of the Basic view, because the user is a Basic view user.
or
- in the Web Application. To switch from the Web Application to the Basic view web view, you have to click on your profile name. There you will be offered the option "Switch to the Basic view".

The Basic view web view is in no way inferior to the Basic view. The same functions are given except for the download of the favicons (icon, symbol or logo used by web browsers to mark a website in a recognizable way).

View
The view of the Basic view
The Basic view interface is arranged in tiles. If a logo/icon has been stored for a password in the image management, this can optionally be displayed with the associated data record. If the logo of the password is not available, a reduced Outlook view is displayed.
- view of a Basic view button with stored logo

- view of a Basic view button without logo, but with deposited web address

- view of a Basic view button without stored web address/logo

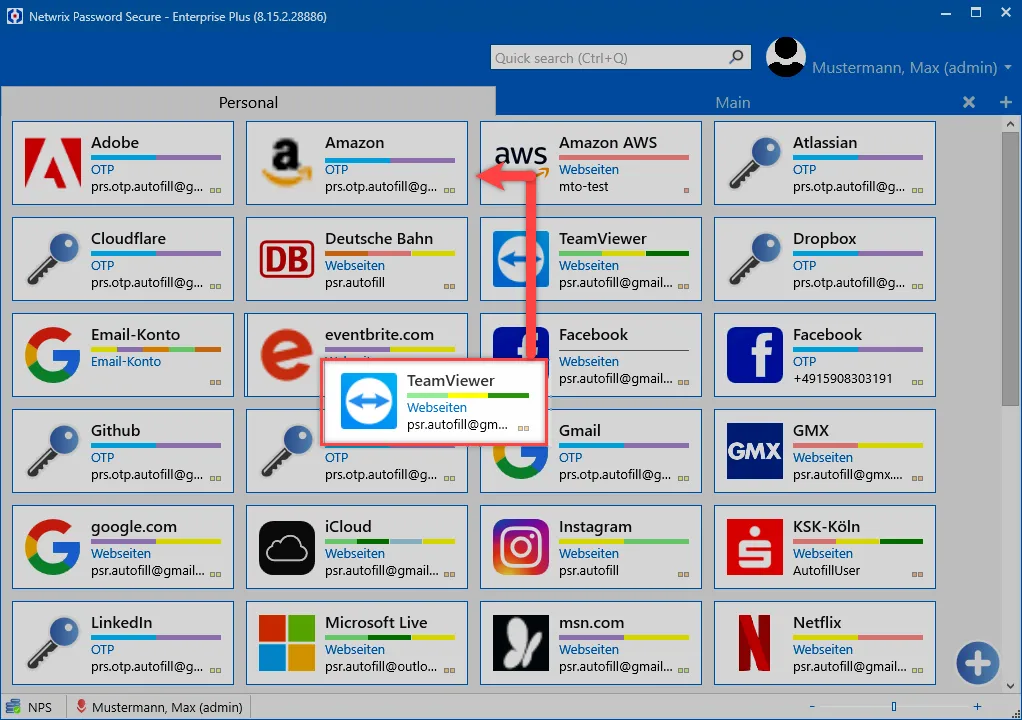
Click on the tile to open the application.
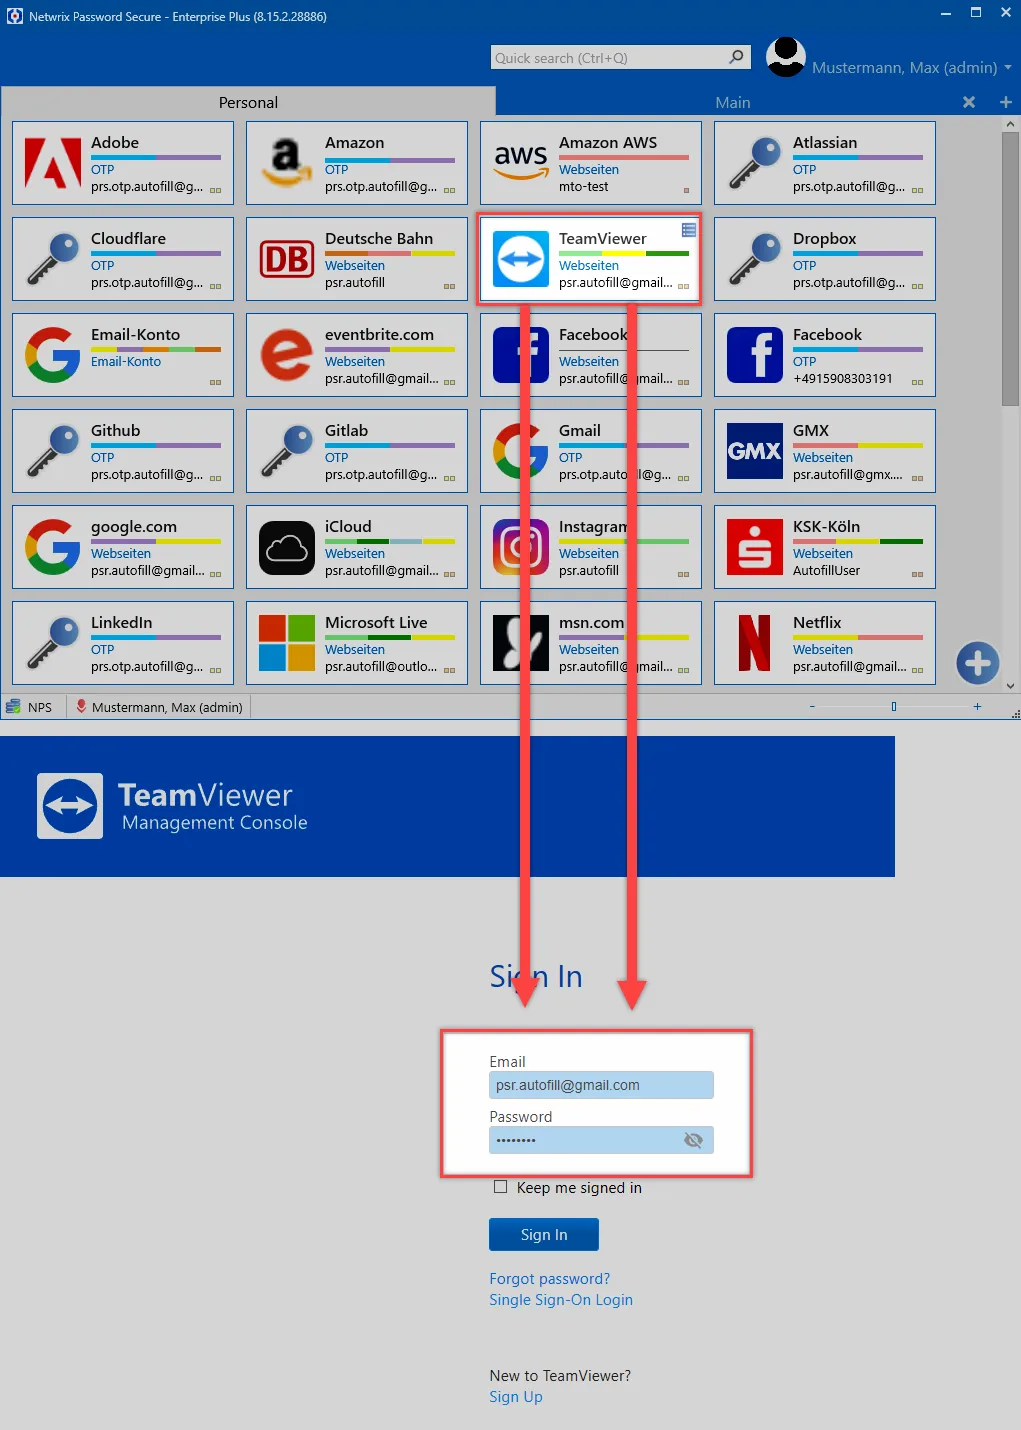
The tiles can be dragged and dropped to the desired position
Mouseover
As with add-ons, the control button is displayed as soon as you hover the mouse over the corresponding elements. This process is known as "mouseover".

When you click the button, the following options become visible:
- -New (A new record can be created.)
- -Edit (The selected record can be edited.)
- Move (The selected record can be moved to another organisational unit)
- Move to bin (the selected record can be deleted.)
- -Copy username (the username of the selected record will be copied to the clipboard).
- -Copy password (the password of the selected record will be copied to the clipboard).
- Typing assistance (Use this view to easily type out passwords)
- -Refresh (The record will be updated.)
You can only perform the above operations if you are sufficiently authorized. Please point this out to your in-house administrator if this is not the case for you.
CAUTION: You can only execute the mentioned operations if you are sufficiently authorized. Please point this out to your in-house administrator if this is not the case for you.
Image management
Usually, the setup of logos/icons in the image management is done by the in-house administration. You can learn more about this in the FullClient Image management documentation.