Creating new passwords
What does creating new passwords/records mean?
Saving a record/password stores information in the MSSQL database. This process is started in the Passwords module for the client. It is accessed either via the icon in the ribbon, using the keyboard shortcut "CTRL + N" or via the context menu that is accessed using the right mouse button in list view. The next step is to select a suitable form that will open in a modal window.
Requirements
The following 2 user rights are required:
- Can add new passwords
- Display password module
Selecting a form
When creating a new record, it is possible to select from all the forms for which the logged-in user has the required permissions. To make the selection process as easy as possible, a preview of the form fields included in the form is shown on the right hand side.
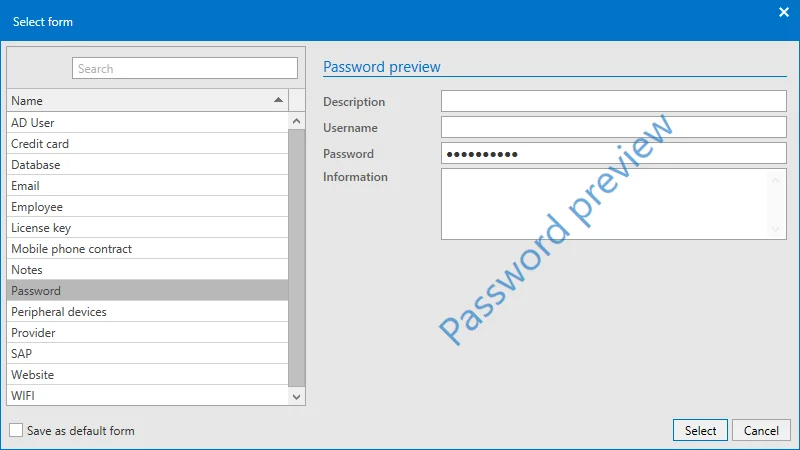
In this example, you can see that the "Password" form marked on the left contains three form fields "Name", "User name" and "Password". Forms thus act as templates according to which their information is saved. (Management of the forms including issuing permissions and editing existing forms is covered in a separate section)
Entering data
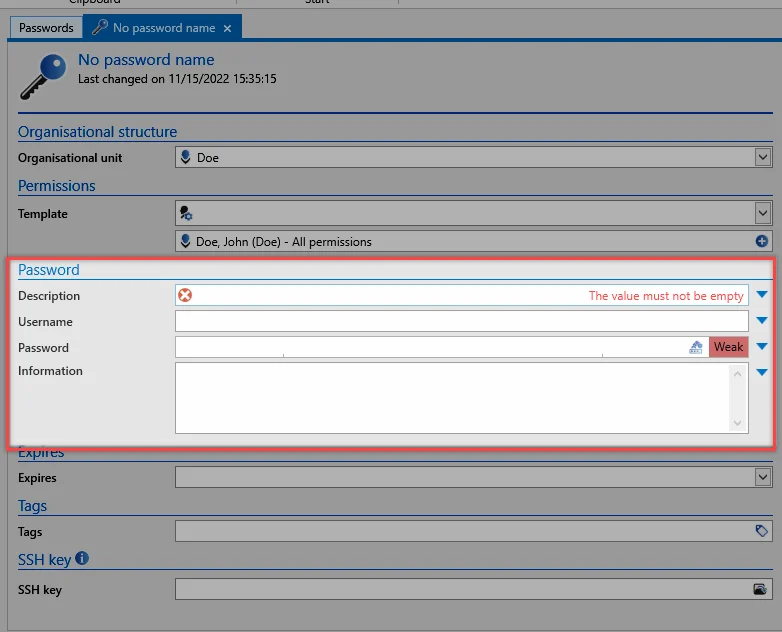
The window for creating a new record always open in a separate tab. As can be seen below, the corresponding form fields for the previously selected form can now be filled. Password fields deserve special mention here because they can be handled differently based on password rules. The record can be saved via the ribbon when all fields have been filled.
Validity and tags
Irrespective of the selected form, it is always possible to define the validity and tags for a record. Both values are optional.
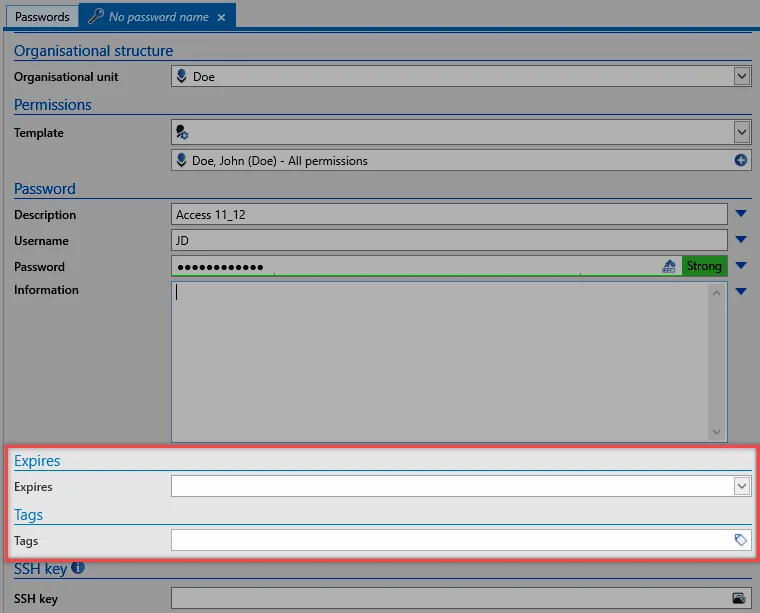
- The validity defines an end date until which the record is valid. This information can be evaluated e.g. in the logbook or in reports. It is thus possible to create a list of all expired passwords for a user or an authorized entity. However, it is not possible to limit the usability of expired passwords for security reasons.
- Tags are freely definable properties of records that can be used as search criteria. This also allows thematically linked information to be grouped together.
Setting permissions for new records
In principle, there are various approaches for setting permissions for newly created records. All of them have already been described in the Authorization concept section. It is important to note here that manual setting of permissions is only possible after saving a record. Automatic permissions are set before the record is saved. In this context, the selection of the organisational structure and the permissions for a record are important aspects.
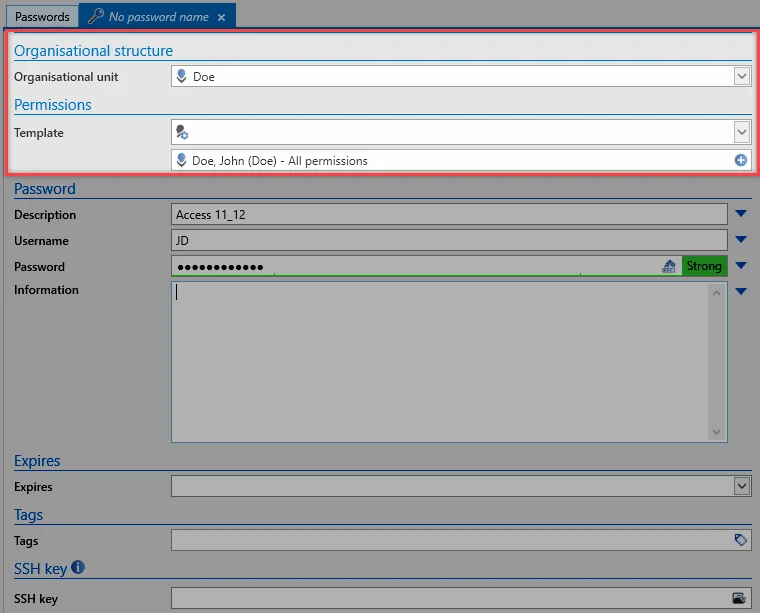
- Manual setting of permissions: If you want to manually set permissions for the record, select the organisational structure in which the record should be saved. After saving the record, the permissions can be manually amended via the permissions tab in the ribbon. If you only want to create a personal record for which no other user will receive permissions, simply select your own organisational structure and conclude the process with "save" via the ribbon.
NOTE: If any kind of automatic permissions have been activated for the selected OU, this will always be prioritized.
CAUTION: Even when creating private records, inheritance of permissions based on the logged-in user can also be activated as an option. This option is described in a separate section.
NOTE: The user right Allow sharing of personal passwords can be used to define that personal passwords cannot be released to other users.
Automatic setting of permissions: Automatic setting of permissions is carried out before the record is saved. Irrespective of whether predefined rights or rights inheritance is being used, the configuration is always carried out in the organisational structure or permissions area. Saving the record thus completes the process for creating the password including the issuing of permissions.
Passwords
What are passwords?
In Netwrix Password Secure v8, the data record with the passwords represents the central data object. The Passwords module provides administrators and users with central access to the passwords for the purpose of handling this sensitive data that requires protection. Search filters in combination with color-highlighted tags enable very focussed work. Various approaches can be used to help apply the desired permissions to objects. Furthermore, the ergonomic structure of the module helps all users to use Netwrix Password Secure in an efficient and targeted manner.
![]()
Prerequisite
The following user right is required for adding new passwords:
- Can add new passwords
Module-specific ribbon functions
The ribbon offers access to all possible actions relevant to the situation at all times. Especially within the "Passwords" module, the ribbon plays a key role due to the numerous module-specific functions. General information on the subject of the ribbon is available in the relevant section. The module-specific ribbon functions will be explained below.

New
- New password: New passwords can be added via this icon in the ribbon, via the context menu that is accessed using the right mouse button and via the shortcut (Ctrl + N). The next step is to select a suitable form.
- Open: Opens the object marked in list view and provides further information about the record in the reading pane.
- Delete: Deletes the object marked in list view. A log file entry is created (see logbook).
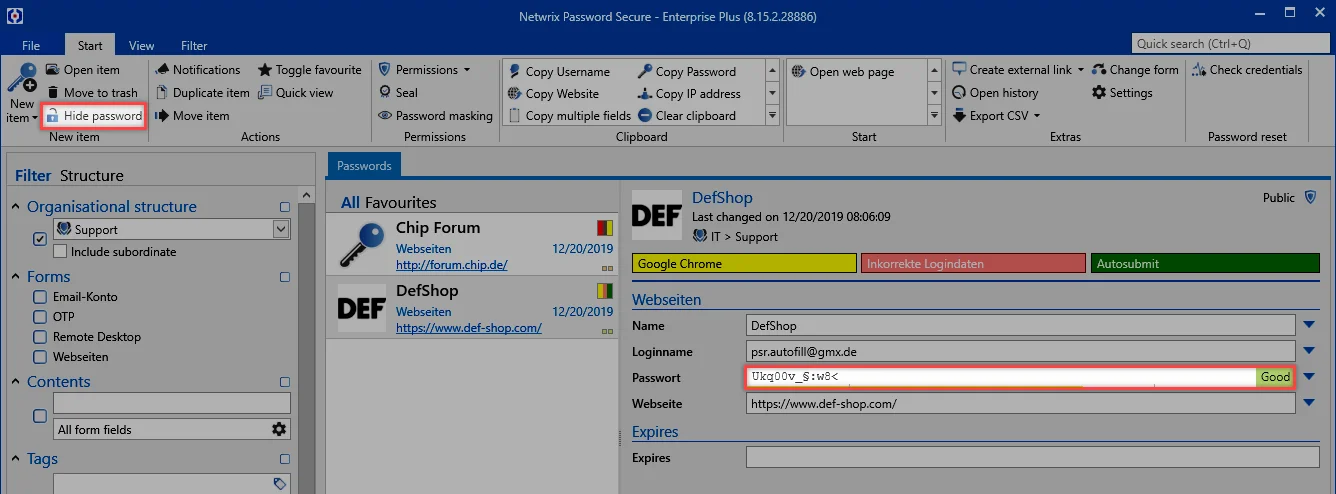
- Reveal: The function Reveal can be used for all records that have a password field. The passwords in the reading pane will be revealed. In the example, the passwords have been revealed and can be hidden again with the Hide button.
Actions
- Notifications: Defining notifications enables a constant flow of information about any type of interaction. The issuing of notifications is carried out in the module designed for this purpose.
- Duplicate: Duplicating creates an exact copy of the record in a new tab.
- Move: Moves the record marked in list view to another organisational structure.
- Toggle Favorite: The selected record is marked as a favorite. It is possible to switch between all records and favorites at any time.
- Quick view: A modal window opens for the selected record for 15 seconds and displays all available information including the value of the password.
- Notifications: A list of all configured notifications
Permissions
-
Permissions: The drop-down menu can be used to set both password permissions and also form field permissions. This method only allows the manual setting of permissions for data (see
authorization concept)
-
Password masking: Masking passwords that need to be protected from unauthorized users is an important feature of the security concept in Netwrix Password Secure.
-
Seal: The multi-eye principle in Netwrix Password Secure is covered in its own section. Seals.
Clipboard
The clipboard is a key element in the ribbon. This only exists in the "Passwords" module. Clicking on the desired form field for a record in the ribbon will copy it to the clipboard.
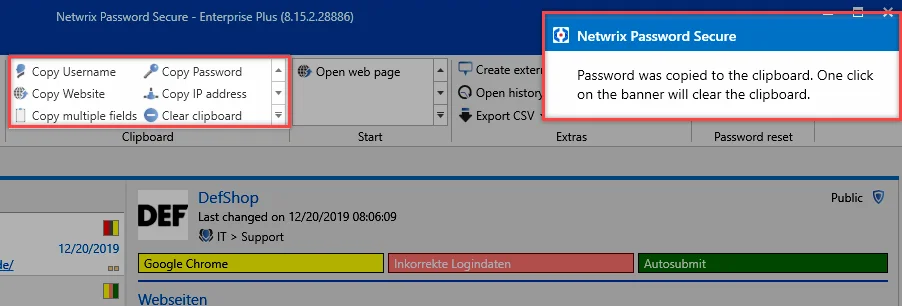
The message in the style of the "Balloon Tips" in Windows shows that the password has now been saved in the clipboard for 300 seconds. (Note: the time until the clipboard is cleared is 60 seconds by default. In the present case, this has been adjusted via the user settings.)
Start
Conveniently working with passwords is only possible via the efficient usage of automated accesses via RDP, SSH, general Windows applications or websites. This makes it possible to dispense with (unsecure) entries via "copy & paste".
- Open web page: If an URL is saved in the record, this menu option can be used to directly open it.
- Applications: If applications have been linked to records, they can be directly opened via the "start menu".
Extras
- Create external link: This option creates an external link for the record marked in list view. A number of different options can be selected:

CAUTION: If several sessions are opened on a client, an external link is always called in the first session.
- History: This icon opens the history for those records selected in list view in a new tab. Due to the comprehensive recording of historical versions of passwords, it is now possible to compare several versions with one another.
- Print: This option can be used to open the print function.
- Export: It is possible to export all the selected records and also the data defined by the filter to a .csv file.
- Change form: It is possible to change the form used for individual records. "Mapping" of the previous form fields can be directly carried out in the process.
- Settings: The password settings are described in a separate section.
NOTE: The password module is based on the module of the same name in the Web Application. Both modules have a different scope and design. However, they are almost identical to use.
Create a New Entry from Scratch
Follow the steps to create a new entry from scratch.
Step 1 – First, click Create new password on the upper left in Netwrix Password Secure.

Step 2 – A form will open. Now choose the form you need, such as "Website," on the upper right. See the form drop-down list in the screenshot below.
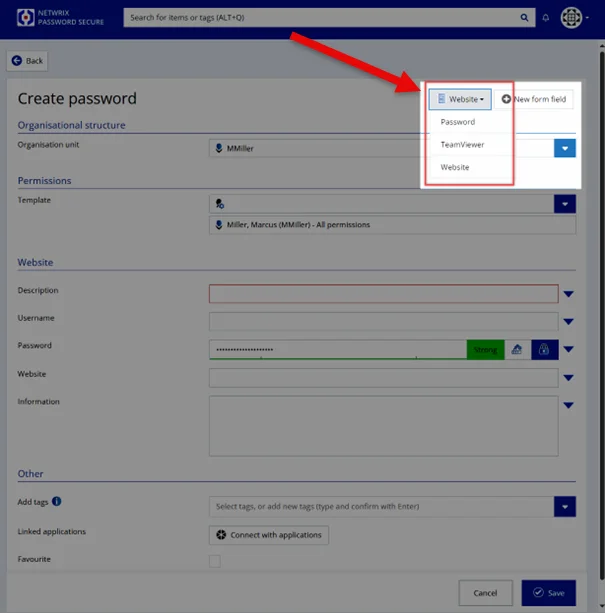
Step 3 – Let`s fill out the website form in this example.
- Choose the organization unit you want to save the password in like the department.
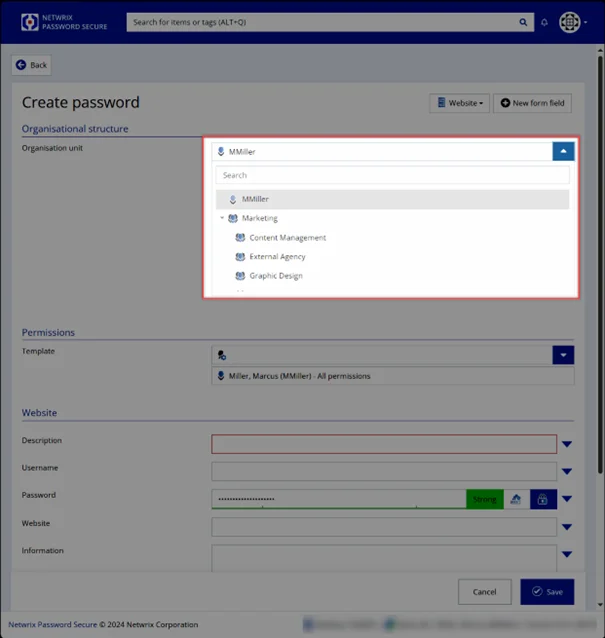
- Choose a permission template to define who else can see your password.
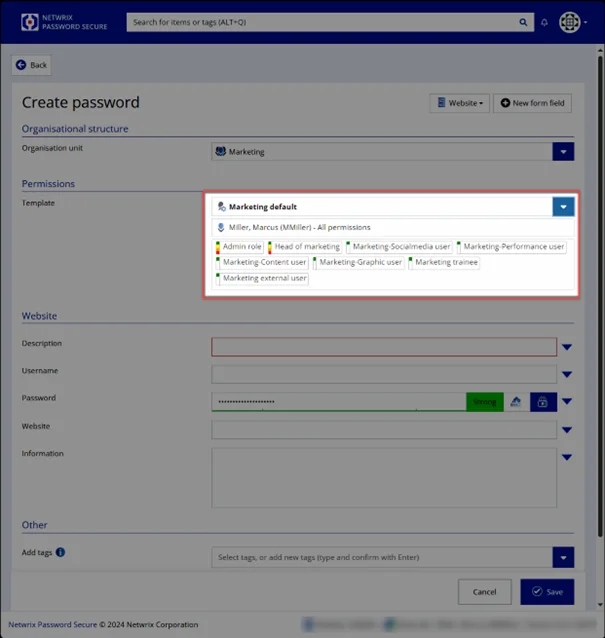
- Set a description for your stored password.

- Enter the username or email address needed for login.
- Enter the password manually or use the password generator by clicking on the button in the middle (high number). The password generator will open.
NOTE: To learn more about the generating of passwords, see the Clean up Your Passwords topic for additional information.
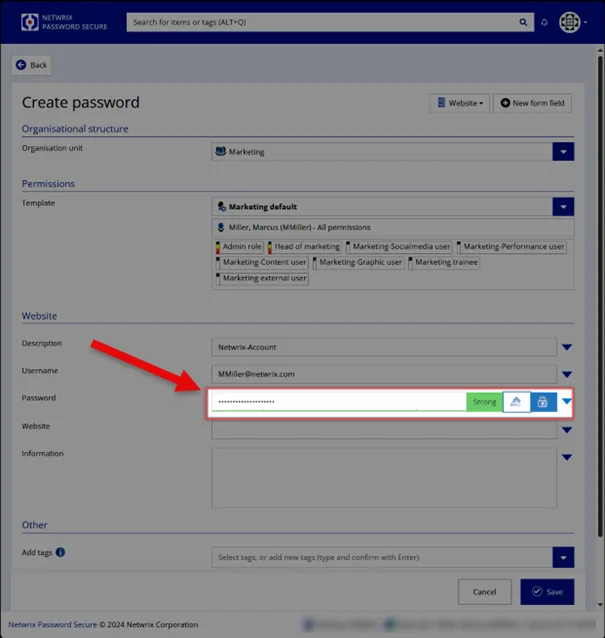
NOTE: By clicking on the lock icon right to the password generator, you can mask and unmask your password.
- Enter the website URL that leads to the login.
- Add one or more tags to categorize your password and find it easier (i.e., "HR" or "Internet").
Step 4 – Click Save, and you are done!
Getting Started for End Users
It is time to set up your new password management solution Netwrix Password Secure! The process won't take too long, but you should allow yourself a little time to get to know the product. As when it comes to your IT security, it's important to make sure you get it right. Below is a step-by-step guide to setting up a password manager and leading you through the first few steps.
How to Log In
Where can I find my username and password?
You can find your login data in the email provided by your administrator. This email also contains the following information:
- Link to the Netwrix Password Secure Web Application
- How to login
- Information about your browser extension
- Bookmark of Netwrix Password Secure