Password Policy Client
The Password Policy Client reduces user frustration and password related helpdesk calls by helping users to choose a compliant password. You do not have to install the Password Policy Client to use Password Policy Enforcer, but the Similarity Rule is only enforced if the PPC is installed.
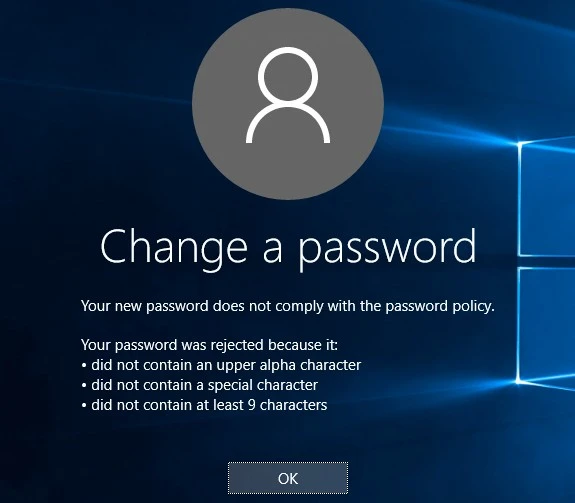
The PPC helps users to choose a compliant password by explaining the password policy to them, and by telling them why their password was rejected. If the PPC is not installed, then users will see the default Windows error message when their password is rejected.
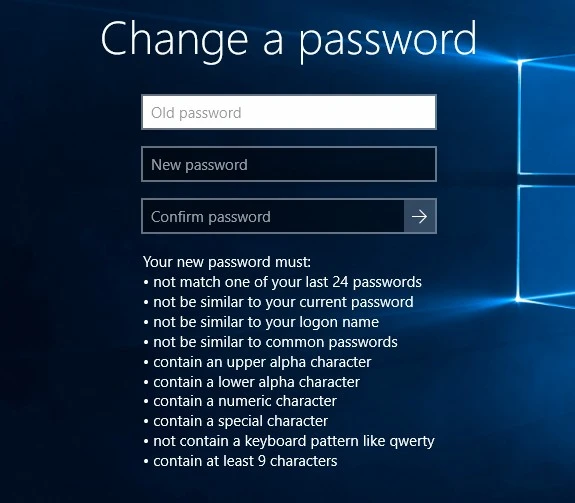
The PPC displays the password policy during a password change so that users can see the policy while they choose their password. The PPC also displays a detailed rejection message to explain why a password was rejected. Both these messages are customizable.
NOTE: The Password Policy Client does not modify any Windows system files. It also does not send passwords or password hashes over the network.
Installing the PPC
The Password Policy Client is compatible with Windows XP, Vista, 7, 8, and 10. It is also compatible with Windows Server 2003, 2008, 2012, 2016, and 2019. The Password Policy Client can be used with Remote Desktop Services on these operating systems.
System Requirements
- Windows XP, Vista, 7, 8, 8.1, or 10.
- Windows Server 2003, 2003 R2, 2008, 2008 R2, 2012, 2012 R2, 2016, or
-
- One Megabyte free disk space.
- 256 Kilobytes free RAM (per session if using Remote Desktop Services).
You can install the PPC manually by running the Password Policy Enforcer installer (PPE912.exe) and choosing the Express Setup option if you only need to install it on a few computers. If you have many computers, then follow the instructions below to perform an automated installation with Group Policy, or use your regular software distribution tool to do the same.
Create a Distribution Point
A distribution point can either be a UNC path to a server share, or a DFS (Distributed File System) path. You can use the distribution point you created earlier for Password Policy Enforcer to distribute the PPC. See the Automated Installation (Advanced Setup) topic for additional information.
If you did not create a distribution point for Password Policy Enforcer, then create one now.
Follow the steps below to create a PPC distribution point.
Step 1 – Log on to a server as an administrator.
Step 2 – Create a shared network folder to distribute the files from.
Step 3 – Give the Domain Computers security group read access to the share, and limit write access to authorized personnel only.
Copy PPECIt912.msi into the Distribution Point
Follow the steps below to copy the .msi file into the distribution point.
Step 1 – Start the Password Policy Enforcer installer (PPE912.exe).
Step 2 – Read the license agreement, and then click Yes if you accept all the license terms and conditions.
Step 3 – Select the Advanced option, then click Next.
Step 4 – Right-click the PPEClt912.msi icon, click Copy, and then paste the file into the distribution point.
Step 5 – Give the Domain Computers security group read access to the PPEClt912.msi file in the distribution point.
Step 6 – Click Finish.
Create a Group Policy Object
Follow the steps below to create a group policy object.
Step 1 – Start the Group Policy Management Console (gpmc.msc).
Step 2 – Expand the forest and domain items in the left pane.
Step 3 – Right-click the domain root node in the left pane, and then click Create a GPO in this domain, and Link it here....
Step 4 – Enter Password Policy Client in the provided field, then press ENTER.
Edit the Group Policy Object
Follow the steps below to edit a group policy object.
Step 1 – Right-click the Password Policy Client GPO, then click the Edit... edit.
Step 2 – Expand the Computer Configuration, Policies, and Software Settings items in the left pane.
Step 3 – Right-click the Software installation item, then select New > Package....
Step 4 – Enter the full UNC path to PPEClt912.msi in the Open dialog box.
NOTE: You must enter a UNC path so that other computers can access this file over the network.
For example, \\file server\distribution point share\PPEClt912.msi
Step 5 – Click Open.
Step 6 – Select the Assigned deployment method, then click OK.
Step 7 – Close the Group Policy Management Editor.
Complete the Installation
Restart each computer to complete the installation. Windows installs the Password Policy Client during startup.
Testing the PPC
Test the Password Policy Client by logging on to a computer and pressing the CTRL + ALT + DEL keys and clicking the Change a password item. If you do not see the password policy, it could be because a Password Policy Enforcer policy has not been assigned to you, or because the firewall rules have not been created.
NOTE: The Password Policy Client does not store or send passwords or password hashes over the network. An attacker cannot determine user passwords by sniffing the communication protocol. The protocol is also encrypted by default for additional protection.
Creating Firewall Rules for the PPC
You may need to create firewall rules for the Password Policy Client if your domain controllers are running a software (host) firewall, or if the PPC and PPS communicate through a firewall. Firewall rules are not necessary for local policies because the PPC and PPS are on the same computer.
Windows Firewall
If Windows Firewall is enabled on your domain controllers, then you must create a port exception to allow connections to the Password Policy Server. Windows Firewall is enabled by default on Windows Server 2008 and later.
Follow the steps below to create the port exception on all domain controllers.
Step 1 – Use the Group Policy Management Console (gpmc.msc) to display the GPOs linked to the Domain Controllers OU.
Step 2 – Right-click the Password Policy Enforcer GPO, and then click Edit....
NOTE: You need to create the GPO if you chose the Express Setup option.
Step 3 – Expand the Computer Configuration, Policies, Administrative Templates, Network, Network Connections, and Windows Firewall items.
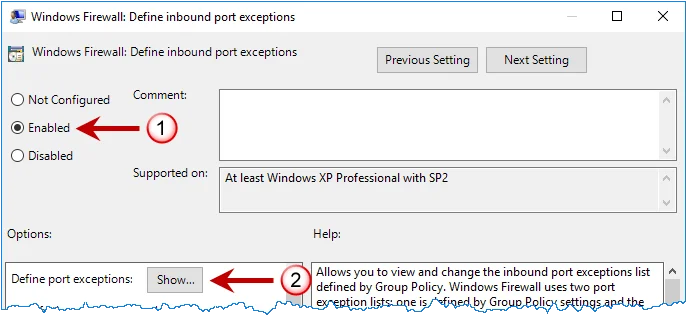
Step 4 – Click Domain Profile in the left pane then double-click Windows Firewall: Define inbound port exceptions in the right pane.

Step 5 – Select the Enabled option, and then click Show....
Step 6 – Select the Enabled option, and then click Show....

Step 7 – Click OK until you return to the Group Policy Management Editor.
Step 8 – Close the Group Policy Management Editor.
Other Firewalls
Use the information on this page to create appropriate rules for your firewall that allow the Password Policy Client and Password Policy Server to communicate through the firewall.
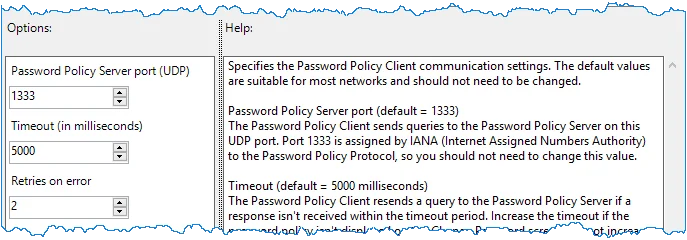
The Password Policy Client initiates a request by sending a datagram with the following attributes to the Password Policy Server:
| Attribute | Result |
|---|---|
| Protocol | EDP |
| Source Address | Client Computer IP address |
| Source Port | Any |
| Destination address | Domain controller IP address |
| Destination port | 1333 |
The Password Policy Server responds by sending a datagram with the following attributes back to the Password Policy Client:
| Attribute | Result |
|---|---|
| Protocol | EDP |
| Source Address | Client Computer IP address |
| Source Port | Any |
| Destination address | Domain controller IP address |
| Destination port | 1333 |
NOTE: If your firewall performs Stateful Packet Inspection, then only create a rule for the request datagram as the firewall will automatically recognize and allow the response datagram.
Customizing PPC Messages
The Password Policy Client displays three messages to help users choose a password:
- The Password Policy message is shown as the user changes their password. This message explains the password policy to the user.
- The Rejection Reason message is shown if a password does not comply with the Password Policy Enforcer password policy. This message tells the user why their password was rejected.
- The Generic Rejection message is shown if Password Policy Enforcer does have a specific reason for the rejection, generally because the password does not comply with the Windows password policy.
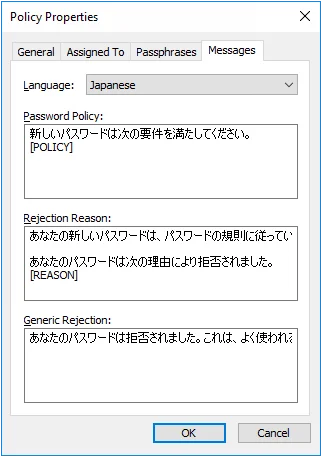
PPC Message Components
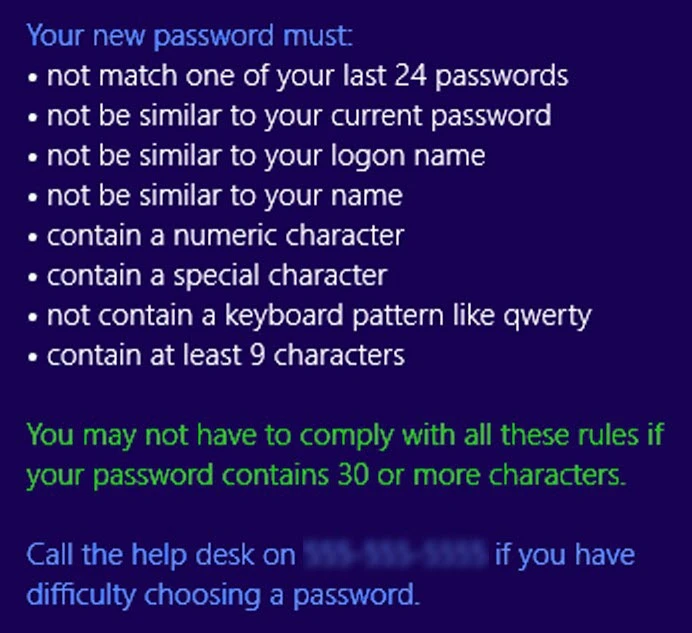
PPC messages are built using templates, macros, and inserts. The image below shows a sample policy message with the template in blue, a macro in green, and policy inserts in white.
Customizing Message Templates
Each Password Policy Enforcer password policy has three message templates, one for each of the PPC messages.
Follow the steps below to edit a policy's message templates.
Step 1 – Click the Policies item to display the Policies view.
Step 2 – Click the desired policy in the right pane of the management console.
Step 3 – Click Properties in the right pane of the management console.
Step 4 – Click the Messages tab.
Step 5 – Choose a language from the Language drop-down list.
Step 6 – Edit the message templates in the Password Policy, Rejection Reason, and Generic Rejection text boxes.
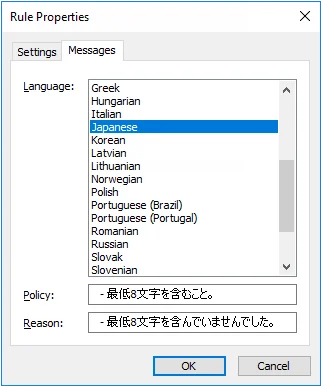
Customizing Rule Inserts
Rule inserts allow the Password Policy and Rejection Reason messages to display the most appropriate information for each user. Most Password Policy Enforcer rules have a Policy and Reason insert. The Policy insert is used by the [POLICY] macro, and the Reason insert is used by the [REASON] macro.
Follow the steps below to edit a rule's inserts.
Step 1 – Click the Policies item to display the Policies view.
Step 2 – Double-click the desired policy in the right pane of the management console.
Step 3 – Double-click the desired rule to display the Rule Properties page.
Step 4 – Click the Messages tab.
Step 5 – Choose a language from the Language list.
Step 6 – Edit the rule inserts in the Policy and Reason text boxes.
NOTE: Use the \n escape sequence to start a new line in a message template or rule insert (PPC V5.1 and later). Inserts and lines starting with two or more spaces, a minus, and a space are shown with a bullet to the left (PPC V8.0 and later).
Multilingual Messages
The Password Policy Client initially displays all messages in English, but you can configure it to display messages in 30 other languages.
Follow the steps below to configure PPC for another language.
Step 1 – Configure message templates for the new language (see Customizing Message Templates above).
Step 2 – Configure rule inserts for each enabled rule (see Customizing Rule Inserts above).
The Password Policy Client uses the Windows client language settings to determine which language to display.
NOTE: You do not have to create a Password Policy Enforcer policy for each language. Each policy can have messages defined in multiple languages.
Configuring the PPC
The Password Policy Client is self-configuring and does not require manual configuration in most cases. You may need to manually configure the PPC if:
- You want to install it in a disabled state to be enabled later.
- You want to change the display settings for small screens.
- The PPC displays policy messages in the wrong language.
- The default communication settings are not suitable (for example, if you change the default PPS Port).
Password Policy Enforcer includes an administrative template to help configure the PPC. You can use Active Directory GPOs to configure many computers, or the Local Group Policy Editor to configure one computer. The PPC configuration is stored in the HKLM\SOFTWARE\Policies\ANIXIS\Password Policy Client\ registry key.
Install the PPC Administrative Template
Follow the steps below to install the PPC administrative template.
Step 1 – Use the Group Policy Management Console (gpmc.msc) to display the GPOs linked at the domain level.
NOTE: If you are not using Active Directory, then open the Local Group Policy Editor (gpedit.msc) and skip step 2.
Step 2 – Right-click the Password Policy Client GPO, then click the Edit... button.
NOTE: You need to create the GPO if you installed the PPC manually.
Step 3 – Expand the Computer Configuration item.
Step 4 – Expand the Policies item, if visible.
Step 5 – Right-click the Administrative Templates item, then click the Add/Remove Templates... button.
Step 6 – Click Add... and then browse to the Password Policy Enforcer installation folder (\Program Files (x86)\Password Policy Enforcer)
Step 7 – Select PPEClt.adm, then click Open.

Step 8 – Click Close.
Configure the Password Policy Client
Follow the steps below to configure the Password Policy Client.
Step 1 – Use the Group Policy Management Console (gpmc.msc) to display the GPOs linked at the domain level.
NOTE: If you are not using Active Directory, then open the Local Group Policy Editor (gpedit.msc) and skip step 2.
Step 2 – Right-click the Password Policy Client GPO, and then click the Edit... button.
NOTE: You need to create the GPO if you installed the PPC manually.
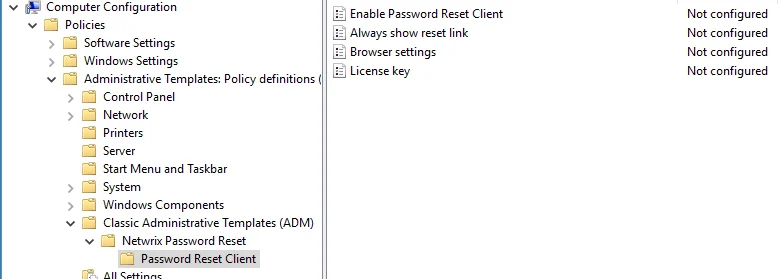
Step 3 – Expand the Computer Configuration, Policies (if vsible), Administrative Templates, Classic Administrative Templates (ADM), Password Policy Enforcer, and Password Policy Client items.
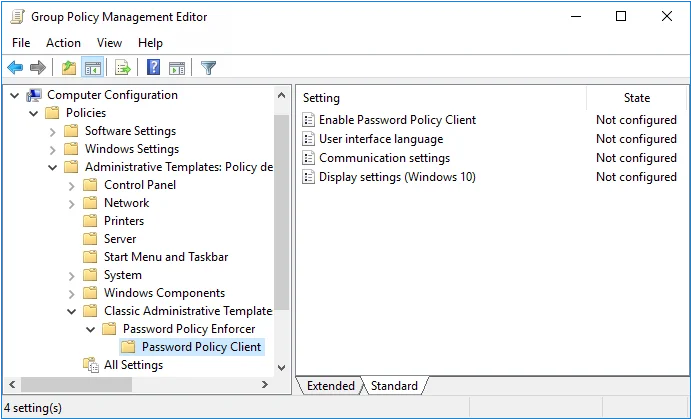
Step 4 – Double-click one of the settings in the right pane, and then configure the available options.
NOTE: Information about each option is shown in the Help box.
Step 5 – Click OK.
Step 6 – Close the Group Policy Management Editor.
If you are using an Active Directory GPO to configure the PPC, then the configuration is applied to all computers in the domain. This does not happen immediately. You can force an immediate refresh of Group Policy on the local computer with this command: gpupdate /target:computer
Changing the Default Settings
The Windows 10 Change Password screen has less space for the Password Policy message than earlier Windows versions. Users may need to scroll to see the message if their screen is small, or if their computer is set to use large fonts.
The Password Policy Client for Windows 10 maximizes the available screen space by hiding non-essential user interface elements on small screens. It can also display the Password Policy message in a message box to draw attention to the password policy.
You can change the default display settings to control which user interface elements are hidden, and the point at which they are hidden. The display of the Password Policy message box is also configurable.
Follow the steps below to change the default display settings for the Password Policy Client on Windows 10.
Step 1 – Use the Group Policy Management Console (gpmc.msc) to display the GPOs linked at the domain level.
NOTE: If you are not using Active Directory, then open the Local Group Policy Editor (gpedit.msc) and skip step 2.
Step 2 – Right-click the Password Policy Client GPO, then click the Edit... button.
Step 3 – Expand the Computer Configuration, Policies (if visible), Administrative Templates, Classic Administrative Templates (ADM), Password Policy Enforcer, and Password Policy Client items.
Step 4 – Double-click the Display settings (Windows 10) setting in the right pane of the Group Policy Management Editor.
NOTE: Information about each option is shown in the Help box.
Password Reset Client
The Password Reset Client allows users to securely reset their password or unlock their account from the Windows Logon and Unlock Computer screens. Users click Reset Password to access the Password Reset system.

NOTE: The Password Reset Client does not modify any Windows system files.
Installing the PRC
The Password Reset Client is designed to run on Windows XP to Windows 10, and Server 2003 to Server 2019. The PRC is compatible with Remote Desktop Services on these operating systems. Support for Windows XP and Server 2003 is depreciated because the PRC uses Internet Explorer for page rendering, and Internet Explorer 8 has very limited support for HTML5. Send an e-mail to support@netwrix.com if you need to use the Password Reset Client with these older operating systems.
System Requirements
- Windows Vista, 7, 8, 8.1, or 10.
Windows Server 2008, 2008 R2, 2012, 2012 R2, 2016, or 2019.
Windows XP, Server 2003, or 2003 R2 (depreciated). - 1 Megabyte free disk space.
- 128 Kilobytes free RAM (per session if using Remote Desktop Services).
You can install the PRC manually if you only have a few computers, but it is easier to perform an automated installation if you have many computers. Follow the instructions below to perform an automated installation with Group Policy.
Create a Distribution Point
A distribution point can either be a UNC path to a server share, or a DFS (Distributed File System) path. Organizations with large, multi-site networks should use DFS as it offers fault tolerance and load sharing. To create a PRC distribution point:
Step 1 – Log on to a server as an administrator.
Step 2 – Create a shared network folder to distribute the files from.
Step 3 – Give the Domain Computers security group read access to the share, and limit write access to authorized personnel only.
Step 4 – Copy APRClt323.msi into the distribution point folder.
NOTE: APRClt323.msi is in the Client folder below the APR Server's installation folder.
(\Program Files\ANIXIS Password Reset\ by default).
Step 5 – Give the Domain Computers security group read access to the APRClt323.msi file in the distribution point.
Create a Group Policy Object
Step 1 – Start the Group Policy Management Console (gpmc.msc).
Step 2 – Expand the forest and domain items in the left pane.
Step 3 – Right-click the domain root node in the left pane, and then click Create a GPO in this domain, and Link it here...
Step 4 – Enter Password Reset Client, then press ENTER.
Edit the Group Policy Object
Step 1 – Right-Click the Password Reset Client GPO, then click the Edit... button.
Step 2 – Expand the Computer Configuration, Policies, and Software Settings items in the left pane.
Step 3 – Right-Click the Software installation item, and then select New > Package.
Step 4 – Enter the full UNC path to APRClt323.msi in the Open dialog box.
NOTE: You must enter a UNC path so that other computers can access this file over the network. For example, \file server\distributionpointshare\APRClt323.msi
Step 5 – Click Open.
Step 6 – Select the Assigned deployment method, then click OK.
Step 7 – Close the Group Policy Management Editor.
Complete the Installation
Restart each computer to complete the installation. Windows installs the Password Reset Client during startup. The computer may restart itself automatically to complete the installation.
NOTE: Computers with Fast Logon Optimization enabled may not install the Password Reset Client during the first restart. These computers perform a background refresh of Group Policy, and will install the client on the first restart after the refresh. Microsoft article 305293 has more information about the Fast Logon Optimization feature.
Configuring the PRC
You must install an Active Directory administrative template to configure the Password Reset Client. The administrative template only has to be installed once.
Install PRC Administrative Template
Follow the steps below to install the PRC administrative template.
Step 1 – Use the Group Policy Management Console (gpmc.msc) to display the GPOs linked at the domain level.
Step 2 – Right-click the Password Reset Client GPO, and then click the **Edit...**button.
Step 3 – Expand the Computer Configuration item.
Step 4 – Expand the Policies item if it is visible.
Step 5 – Right-click the Administrative Templates item, and then click Add/Remove Templates...
Step 6 – Click Add... and then browse to the Client folder below the Password Reset Server's
installation folder. (\Program Files\ANIXIS Password Reset\ by default).
Step 7 – Select APRClt.adm, and then click Open.

Step 8 – Click Close.
Configure the PRC
Follow the steps below to configure the Password Reset Client.
Step 1 – Use the Group Policy Management Console (gpmc.msc) to display the GPOs linked at the domain level.
Step 2 – Right-click the Password Reset Client GPO, then click the Edit... button.
Step 3 – Expand the Computer Configuration, Policies (if it exists), Administrative Templates, Classic Administrative Templates (ADM), ANIXIS Password Reset, and Password Reset Client items.
Step 4 – Double-click the Browser settings item in the right pane of the Group Policy Management Editor.
Step 5 – Select the Enabled option.

Step 6 – Enter the desired Width and Height of the PRC browser window.
NOTE: Set the Width and Height to 0 to have the PRC calculate an appropriate size.
Step 7 – Enter the Start address (URL) of the Password Reset system. The URL should point to the Password Reset menu or reset page.
NOTE: See the Help box for more information.
Step 8 – Enter a Restricted path (URL) to stop users from following links to other sites from the Password Reset Client browser.
Step 9 – Click OK.
Step 10 – Close the Group Policy Management Editor.
The new PRC configuration is applied to all computers in the domain. This does not happen immediately, as Windows takes some time to apply the changes to Group Policy. You can force an immediate refresh of Group Policy on the local computer with the following command: gpupdate /target:computer
The Password Reset Client only opens URLs with .dll, .htm, and .html extensions. URLs without a filename are not opened. The PRC also blocks some page content, including audio and video files, ActiveX controls and Java applets. Send an e-mail to support@netwrix.com if you need to change the default filename and content restrictions.
CAUTION: Users may follow links to untrusted sites if the Password Reset user interface or server error pages contain external links. This is a security risk because the Password Reset Client runs under the context of the local system account. Specify a restricted path to stop users from following links to other sites from the Password Reset Client. The start address and restricted path should both begin with https://
NOTE: The Enable Password Reset Client, Always show reset link, and Dialog attachment
delay are automatically set by the Password Reset Client, and are normally left in their default
(Not configured) state.
The administrative template contains detailed information about all the PRC configuration settings.
This information is shown on the Help box. The Help box is shown after you double-click one
of the configuration settings in the right pane.
Licensing the PRC
Follow the steps below to add a license key to the PRC configuration.
Step 1 – Open the Configuration Console and install your license key.
Step 2 – Start the Registry Editor (regedit.exe).
Step 3 – Expand the HKEY_LOCAL_MACHINE, SOFTWARE, ANIXIS, ANIXIS Password Reset, and 3.0 registry keys.
Step 4 – Double-click the LicenseKey value, and then copy the entire license key to the clipboard.
Step 5 – Use the Group Policy Management Console (gpmc.msc) to display the GPOs linked at the domain level.
Step 6 – Right-click the Password Reset Client GPO, then click the Edit... button.
Step 7 – Expand the Computer Configuration, Policies (if it exists), Administrative Templates, Classic Administrative Templates (ADM), ANIXIS Password Reset, and Password Reset Client items.
Step 8 – Double-click the License key item in the right pane of the Group Policy Management Editor.
Step 9 – Select the Enabled option.
Step 10 – Click inside the License key text box, then paste the license key.
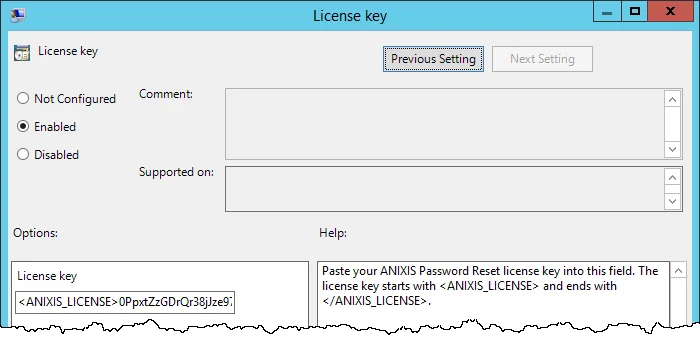
Step 11 – Click OK.
Step 12 – Close the Group Policy Management Editor.
The license key is applied to all computers in the domain. This does not happen immediately, as
Windows takes some time to apply the changes to Group Policy. You can force an immediate refresh of
Group Policy on the local computer with the following command: gpupdate /target:computer