Working with the Database
The APR Server stores user and event information in a database. The default database is Microsoft SQL Server Compact, an embedded version of SQL Server. The benefits of using SQL Server Compact include:
- No manual installation or configuration required.
- No maintenance apart from database. See the Backing up the Database topic for additional information.
- Fast and lightweight.
- Free to use.
Despite these benefits, there are some disadvantages to using an embedded database. The benefits of using SQL Server include:
- Remote access to the database from the Data Console and other applications.
- Improved availability if SQL Server is configured for high availability.
- Increased security.
See solutions to these disadvantages in the Moving to SQL Server topic.
Backing up the Database
The database should be backed up regularly. The instructions below are for a SQL Server Compact database. If using SQL Server, then use your backup software to backup the database.
Follow the steps below for the recommended backup procedure.
Step 1 – Close the Data Console if it is open.
Step 2 – Stop the ANIXIS Password Reset service.
Step 3 – Copy the database files to a local or network disk.
Step 4 – Start the ANIXIS Password Reset service.
Step 5 – Copy the database files to another device.
The database files (apr.sdf and aprlog.sdf) are in the Password Reset Server's installation folder by default, but the location is configurable. The following commands create copies of the files with a .bak extension. Copy the .bak files to another device, and run the backup script daily.
net stop "ANIXIS Password Reset"
copy /Y "c:\program files\anixis password reset\apr.sdf" "c:\program files\anixis password reset\apr.bak"
copy /Y "c:\program files\anixis password reset\aprlog.sdf" "c:\program files\anixis password reset\aprlog.bak"
net start "ANIXIS Password Reset"
NOTE: Change the paths above if the database files are in a different folder. See the Database topic for more information.
Restoring database from backup
Follow the steps below to restore the database files from a backup.
Step 1 – Restore apr.bak and aprlog.bak from the backup device.
Step 2 – Close the Data Console if it is open.
Step 3 – Stop the ANIXIS Password Reset service.
Step 4 – Copy apr.bak over apr.sdf, and aprlog.bak over aprlog.sdf.
Step 5 – Start the ANIXIS Password Reset service.
CAUTION: apr.sdf contains hashes of the user answers. The hashes are salted and encrypted to protect them from attack, but you should still ensure that this file and all backup copies are stored securely.
Moving to SQL Server
Some planning is needed before moving the database to SQL Server. A trial run on a lab network is recommended. You can run the Data Copy wizard more than once if you cannot complete the move on the first attempt. A move back to SQL Server Compact is also possible.
Create the Database
Your database administrator needs to set up the SQL Server database. The instructions below are an overview of the procedure, they are not step-by-step instructions. APR V3.23 has been tested with SQL Server 2012 to 2019.
Follow the instructions below for an overview of the procedure.
Step 1 – Create an SQL Server database.
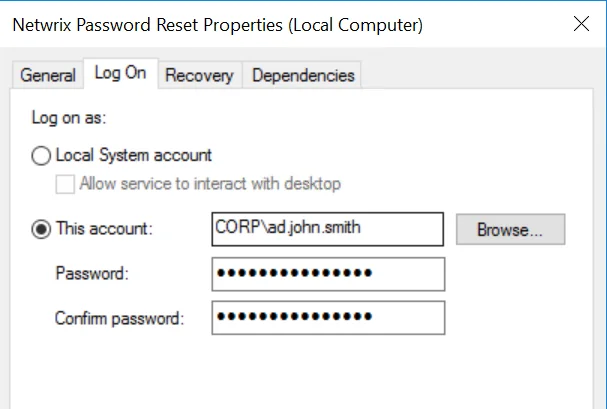
Step 2 – Create an SQL Server login for the Password Reset service account, and configure it for Windows authentication. To identify the service account, open services.msc, double-click the Password Reset service, and then click the Log On tab. Password Reset logs on to SQL Server with this account.

Step 3 – Create an SQL Server user, and map it to the service account login.
Step 4 – Add the SQL Server user to the db_datareader, db_datawriter, and db_ddladmin server roles for the database.
Your database administrator also needs to grant access to the users that will use the Data Console. These users only need to be added to the db_datareader server role, and they can be denied access to the VerificationCode and EnrollRecord columns in the Usr table. The user running the Data Copy wizard also needs to be added to the db_datawriter and db_ddladmin server roles.
Additional permissions can be set for users of the Data Console after the tables are created. Grant the DELETE privilege on the Usr table to users who are allowed to delete user records. Deny all privileges on the VerificationCode and EnrollRecord columns in the User table as they are not used by the Data Console.
Create the Tables and Copy the Data
The Data Copy wizard creates the database tables and copies the data to SQL Server. You must run the wizard even if the SQL Server Compact database is empty. Data in the destination database is deleted before it is copied from the source database.
Follow the steps below to create the tables and copy the data.
Step 1 – Open the Configuration Console.
Step 2 – Click the General tab.
Step 3 – Click Copy Data... to open the Data Copy wizard.
Step 4 – Click Copy from SQL Compact to SQL Server.
Step 5 – Check the path to the SQL Server Compact database files. If the default path is incorrect, then click Browse..., choose a path, and then click OK.
Step 6 – Click Next.
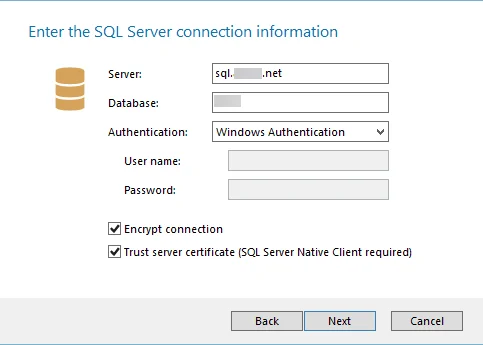
Step 7 – Set the SQL Server connection settings for the Data Copy wizard. You can set different connection settings for the service account later. The Username and Password are only needed if SQL Server Authentication is selected. The user must be in the db_datareader, db_datawriter, and db_ddladmin SQL Server roles. Encrypt connection should be selected to protect user information, and Trust server certificate must be selected if SQL Server is using a self-signed certificate. SQL Server uses a self-signed certificate if a trusted certificate is not installed. The SQL Server Native Client must be installed if Trust server certificate is selected.

Step 8 – Click Next.
Step 9 – Check the summary information, and then click Start.
Step 10 – Wait for the wizard to finish, and then click Close.
Configure Netwrix Password Reset to Connect to SQL Server
Configure Password Reset to connect to SQL Server immediately after copying the data. If the cutover is delayed, then run the Data Copy wizard again to update the SQL Server database with the latest data. To configure Password Reset to connect to SQL Server:
Step 1 – Open the Configuration Console.
Step 2 – Click the General tab.
Step 3 – Click Change...
Step 4 – Select the SQL Server option.
Step 5 – Type the server name in the Server text box. Use [server]\[instance] to connect
to a named instance.
Step 6 – Type the database name in the Database text box.
Step 7 – Select the Encrypt connection option to encrypt the connection to SQL Server. This option should be selected to protect user information.
Step 8 – Select the Trust server certificate option if SQL Server is using a self-signed certificate. SQL Server uses a self-signed certificate if a trusted certificate is not installed. Password Reset cannot connect to SQL Server with a self-signed certificate if this option is not selected. The SQL Server Native Client must be installed if Trust server certificate is selected.
Step 9 – Click OK, and then click Apply.
Step 10 – Restart the Password Reset service. If the service does not start, then check the database connection options and the SQL Server login, user, and server roles configured earlier. You can change the database back to SQL Server Compact while you troubleshoot the issue.
Other Tasks
Open the Data Console and set your SQL Server connection options. You will need to enter a password every time you open the Data Console if SQL Server Authentication is selected. The Data Console executable and help file (APRDC.exe and APR.chm) can be copied to the computers of other users who will use the Data Console.
Delete the two SQL Server Compact database files (apr.sdf and aprlog.sdf) after cutting over to SQL Server. These files will soon contain outdated information, and leaving them on the server is an unnecessary security risk. Also ensure that the SQL Server database is backed up regularly.