Messages
Each Password Policy Enforcer password policy has multiple message templates, one for each of the Password Policy Client messages.
-
Password Policy – Displays the password policy guidelines on clients that have the Netwrix Password Policy Enforcer Client installed.
-
[POLICY] – Customize the text for the active rules.
-
[LIVE_POLICY] – Password Policy Client (10.2 and above) messages can be configured to display live feedback for the active rules to users as they enter their passwords. This feature enables users to see if their passwords meet the requirements of the policy set by the organization. Here is an example of a live policy message.
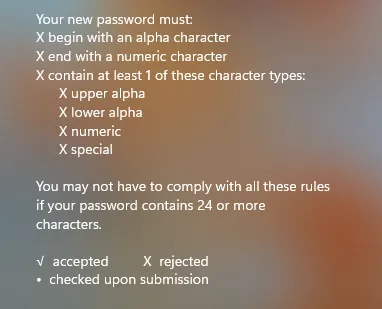
NOTE: Start each custom message with two spaces, a hypen, and a space before your message so the X and checks can appear for the rule. For example: " - Include an upper case alpha character." The quotes are only there to illustrate the message.
-
Rejection Reason – Displays why an intended password was rejected on clients that have the Netwrix Password Policy Enforcer Client installed
-
Generic Rejection – Displays if Password Policy Enforcer does not have a specific reason for the rejection, generally because the password does not comply with the Windows password policy
Step 1 – Open the Configuration Console:
Click Start > Netwrix Password Policy Enforcer > PPE Configuration
or
Double click the PPE Configuration desktop shortcut.
Step 2 – Click on a policy name to open the policy configuration page.
Step 3 – Open the Messages tab.

Step 4 – Select the message language from the drop-down list. You can set messages for multiple languages. You do not have to create a Password Policy Enforcer policy for each language. To set multiple languages, pick one, edit the message templates. Select another language, and edit the message templates. Repeat for each language you want to implement. The correct message is displayed to users based on their selected language.
Step 5 – Edit the message templates in the Password policy, [POLICY], [LIVE_POLICY], Rejection Reason, and Generic rejection messages for any of the components you want to use.
Step 6 – Insert the macros into your message. Click Macro and pick one to insert it.

Step 7 – Click Save and review your changes in the Preview area. Click Save f you edit the message.
NOTE: If you do not see the Preview, contact your network administrator to set up the firewall to allow Password Policy Enforcer to communicate.