Non-Conforming Assignments
The Compute Role Model Task is able to detect from synchronized data a list of non-conforming or missing resources/entitlements for every identity. That is one of Identity Manager's most powerful governance features, provided you have a full role model configured.
Build the conforming assignment list
The first step is building the conforming assignment list, as explained in the
Conforming Assignments . This list (list A)
includes the assignments that perfectly comply with the role model/assignment policy.
Build the existing assignment list
The second step is building the existing assignment list (list B), as explained in
the Existing Assignments every synced resource can be
translated into a role assignment following the assignment rules "in reverse".
Compare both lists
We can now compare both lists to find out if the managed systems really comply with the decided upon assignment policy.
For every assignment from list B representing resources from the synced data:
- There is a rule path from the identity attribute to the resource provisioning order in the role
model. The assignment was expected, it can be found in list
A. - There is no rule path from the identity attribute to the resource provisioning order in the role
model. The assignment was unexpected, it is not in list
Aor it is in listAbut not with exactly the same property values.
The "unexpected" (or non-conforming) assignments can be for example orphan accounts. Sometimes, the account itself should indeed exist according to the rules, but its attribute values are "unexpected", contradicting scalar rules.
Non-conforming accounts are presented in the reconciliation screens: from the role point-of-view in the role reconciliation screen and from the resource point-of-view in the resource reconciliation screen.
They need human confirmation to be either kept or destroyed.
For every assignment from list A representing expected assignments:
- There is an exact match in list
B. The managed system complies with the assignment policy for this resource. - There is no match in list
B: the managed system doesn't comply with the assignment policy. The resource is missing (the account is missing).
Missing accounts are presented in the provisioning review for validation before provisioning.
Identity Manager will never delete data without having a user's confirmation first. That is the reason why these variations from the ideal aren't fixed automatically but submitted for review.
Some users might wonder how they can perform governance if they don't have automated rules. Certification can help. By reviewing (even manually) the entitlement landscape, non-conforming account proliferation can be contained.
This feature is the final touch of the sync-fulfill-verify loop that makes Identity Manager so efficient. It is exactly like a closed-loop control system with a feedback loop: perturbations, in the form of modifications in a managed system that don't go through Identity Manager first, trigger a reaction. This reaction uses the role model to suggest a fix. This is the only way for the state of the entitlement landscape to tend towards the ideal standards described by the rules.
Automate the Review of Non-conforming Assignments
How to automate the review of non-conforming assignments through automation rules. See the Review Non-conforming Assignments and Automation Rule topics for additional information.
Overview
Non-conforming assignments can't be reviewed entirely automatically because this type of review sometimes needs the intervention of a knowledgeable user. However, automation rules can help by making automatic decisions (in place of the reviewer) on assignments that need to be reviewed after a given waiting period.
This type of rule is useful for example, when integrators intend to:
- Decline all non-conforming assignments after X days to avoid accumulation. The waiting time can be null if they need to delete non-conforming assignments as soon as they are detected;
- Automatically approve or decline discretionary requests if there is no validation after X days;
- Send notifications to validators before declining or approving pending approval assignments;
- Get information in order to deactivate an AD account if it hasn't been used in the past X days, before deleting it.
Integrators must show caution with pending approval assignments because this type of rule could short-circuit the whole approval process.
Participants and Artifacts
This operation should be performed in cooperation with managers who know the organization and their team's entitlements.
| Input | Output |
|---|---|
| Mastered non-conforming assignment review (required) Categorized accounts (optional) | Automated assignment review |
See the Review Non-conforming Assignments and Categorize Resources topics for additional information.
Create an Automation Rule
Create an automation rule by proceeding as follows:

Step 1 – On the home page in the Configuration section, click on Access Rules.

Step 2 – In the dropdown menu at the top left, choose the entity type to which the future rule will be applied.
![]()
Step 3 – Click on the Automations tab and on the addition button at the top right corner.
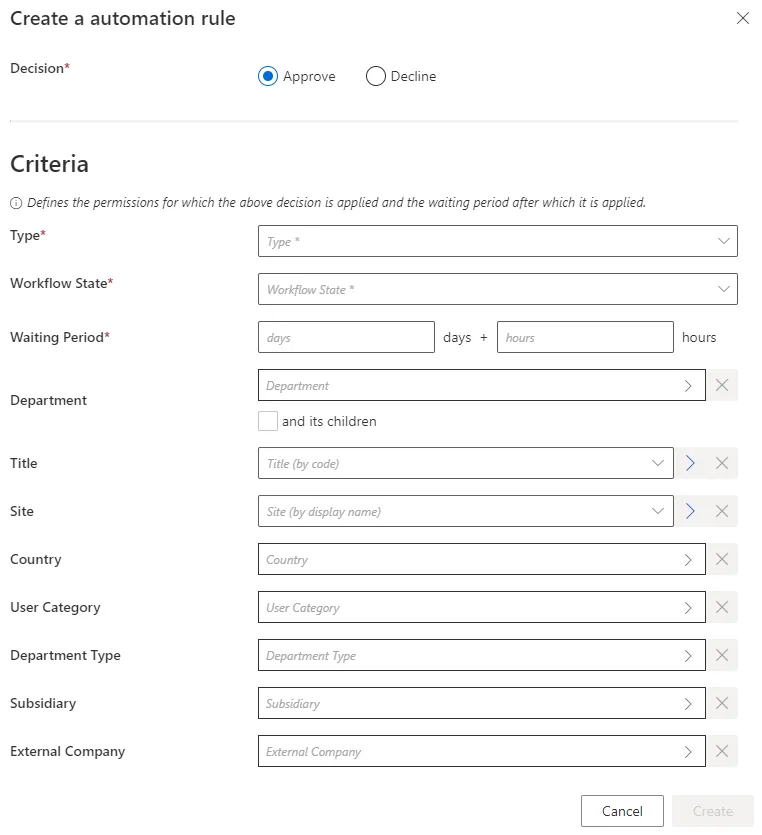
Step 4 – Fill in the fields.
- Decision — Action to be taken on the described assignments.
- Criteria — Conditions that, if met, trigger the rule.
Currently, the criteria are used to match the context of an assignment and not the user data.
For example, if a single role is assigned based on a specific Department, then the context of the assignment has the information about the Department. In that case, an automation rule having in its dimensions that given Department will match this assignment and could Deny/Accept it. - However, if a single role is assigned without any context on the Department (for example, a manual assignment with no parameter on the role), the automation rule will never match this assignment.
- NOTE: No context will never be present for non-conforming or pre-existing roles
- Type — Assignment type concerned by the new rule. Once filled, a new field is displayed to select precisely an object from the existing objects belonging to this type.
- Workflow State — Workflow state of the assignments that need a decision.
- Waiting Period — Time period since the last change in the assignments' workflow states.
Remember, in a nutshell, this rule applies Decision to all assignments of Type (and matching all criteria), whose workflow state has been set to Workflow State for more than Waiting Period.
Impact of Modifications
A modification in an automation rule doesn't impact the assignments affected by the previous version of the rule.
Verify Review Automation
In order to verify the process:
Step 1 – On the Role Review or Role Reconciliation screen, spot an entitlement assignment.
Step 2 – Create an automation rule matching said assignment.

Step 3 – Compute the role model through the complete job on the Job Execution page.
Step 4 – Check on the Role Review page that the assignment's workflow state changed according to the rule's settings.

Any role affected by an automation rule shows a specific message on the Role Review page.
Review Non-conforming Assignments
How to review non-conforming assignments, i.e. approve or decline the suggestions made by Identity Manager after every synchronization. The aim is to handle the differences between the values from the managed systems and those computed by Identity Manager's role model.
Overview
Integrators must review three main types of non-conforming entitlement assignments:
- Non-conforming roles: Identity Manager finds roles assigned to users in the managed systems that no rule in the role model can justify.
- Unreconciled properties: Identity Manager's role model computes property values that are different from the values in the managed systems.
- Unauthorized accounts: no rule from the role model can justify their actual assignment to an identity.
Unreconciled properties, unauthorized accounts and non-conforming roles are part of Non-Conforming Assignments. The global aim of the review is to handle the gaps between the Existing Assignments (real values) and the Conforming Assignments (theoretical values computed by Identity Manager from the role model rules).
A high number of non-conforming assignments can come from an issue in configuration rules.
Non-conforming roles and unauthorized accounts can be mass reviewed through Automate the Review of Non-conforming Assignments. See the Automate the Review of Non-conforming Assignments topic for additional information.
Participants and Artifacts
This operation should be performed in cooperation with application owners who are in charge of applications' entitlements (technical side), and/or managers who know their team's entitlements (functional side).
| Input | Output |
|---|---|
| Provision (required) | Complying assignments |
Pre-existing assignments vs. non-conforming assignments
The assignments specified as non-conforming during the very first execution of the role model are called pre-existing assignments. Pre-existing assignments are tagged differently from other non-conforming assignments by the Save Pre-Existing Access Rights Task because they can indicate that:
- The rules are not optimal yet.
- Data in the managed system needs more cleanup.
Obviously, pre-existing assignments can also prove to be exceptions to the rules, like non-conforming assignments, and need to be validated as such.
Review Non-conforming Assignments
While there can be dependencies between the review of non-conforming roles and unreconciled properties, there are no absolute requirements regarding the sequential order of the non-conforming assignment review:
- Review Reconcile a Role .
- Review Reconcile a Property .
- Review an Unauthorized Account .
Manage Risks can be defined to highlight the most sensitive accounts/permissions, in order to establish a priority order in the review of non-conforming assignments.
Reconcile a Property
How to review unreconciled properties. The aim is to handle the differences between the property values from the managed systems and those computed by Identity Manager according to Create a Provisioning Rule .
Overview
Unreconciled properties are considered as non-conforming assignments because Identity Manager's role model has computed property values that are different from the values in the managed systems.
Property reconciliation with role reconciliation
For some managed systems, roles are tightly linked to navigation properties.
For example, the AD hosts groups for various applications, and a role is assigned through a group membership. An entitlement can be assigned to an identity by adding said identity's DN to the
memberproperty of the appropriate group. Identity Manager translates it by editing the identity'smemberOfproperty with the new group.
In this case, when a role is assigned in the managed system without an existing rule that justifies the role, then new items appear on the Role Reconciliationand the Resource Reconciliation screens.
In the case of the AD example, consider that we want to assign a specific role in SAP. Then, we find the corresponding group in the AD and add the identity's DN to its
memberproperty.The result is a new item on the Role Reconciliation screen for said SAP role, plus an item on the Resource Reconciliation screen for the new
memberOfproperty for said identity.If the identity didn't have an AD account yet, then it is automatically created, and the item on the Resource Reconciliation screen displays also a modification of the
accountExpiresproperty.
As roles and navigation properties are technically bonded together, their reviews are linked too:
- If the role is reviewed (approved/declined), then the corresponding property is automatically reconciled accordingly.
- If the property is reviewed (approved/declined), then the corresponding role is automatically
reviewed too, its workflow state transitioned to
Manual(if approved) orCancellation(if declined, then a deprovisioning order is sent).
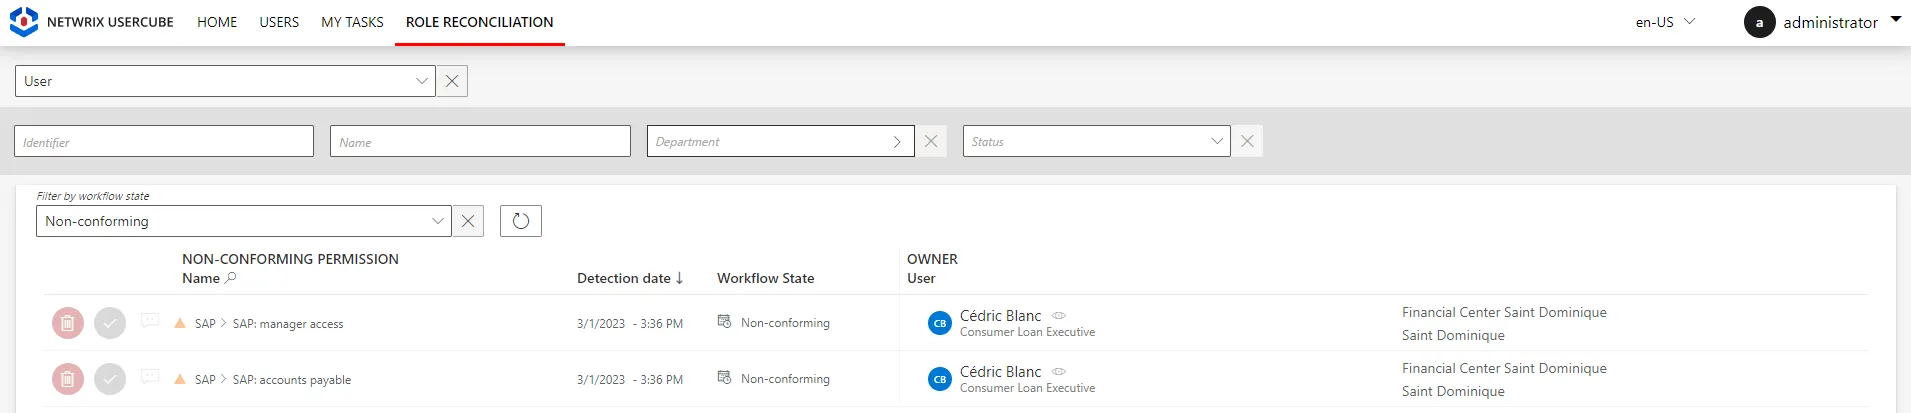
So let's say we add
Cedric Blancto the list of members of the SAP groupsSG_APP_SAP_1andSG_APP_SAP_211. Then, after the next synchronization, Identity Manager displays one item for each role on the Role Reconciliation screen, and one item for all changes in the AD account on the Resource Reconciliation screen:


Participants and Artifacts
This operation should be performed in cooperation with application owners in charge of applications' entitlements.
| Input | Output |
|---|---|
| Provision (required) | Complying properties |
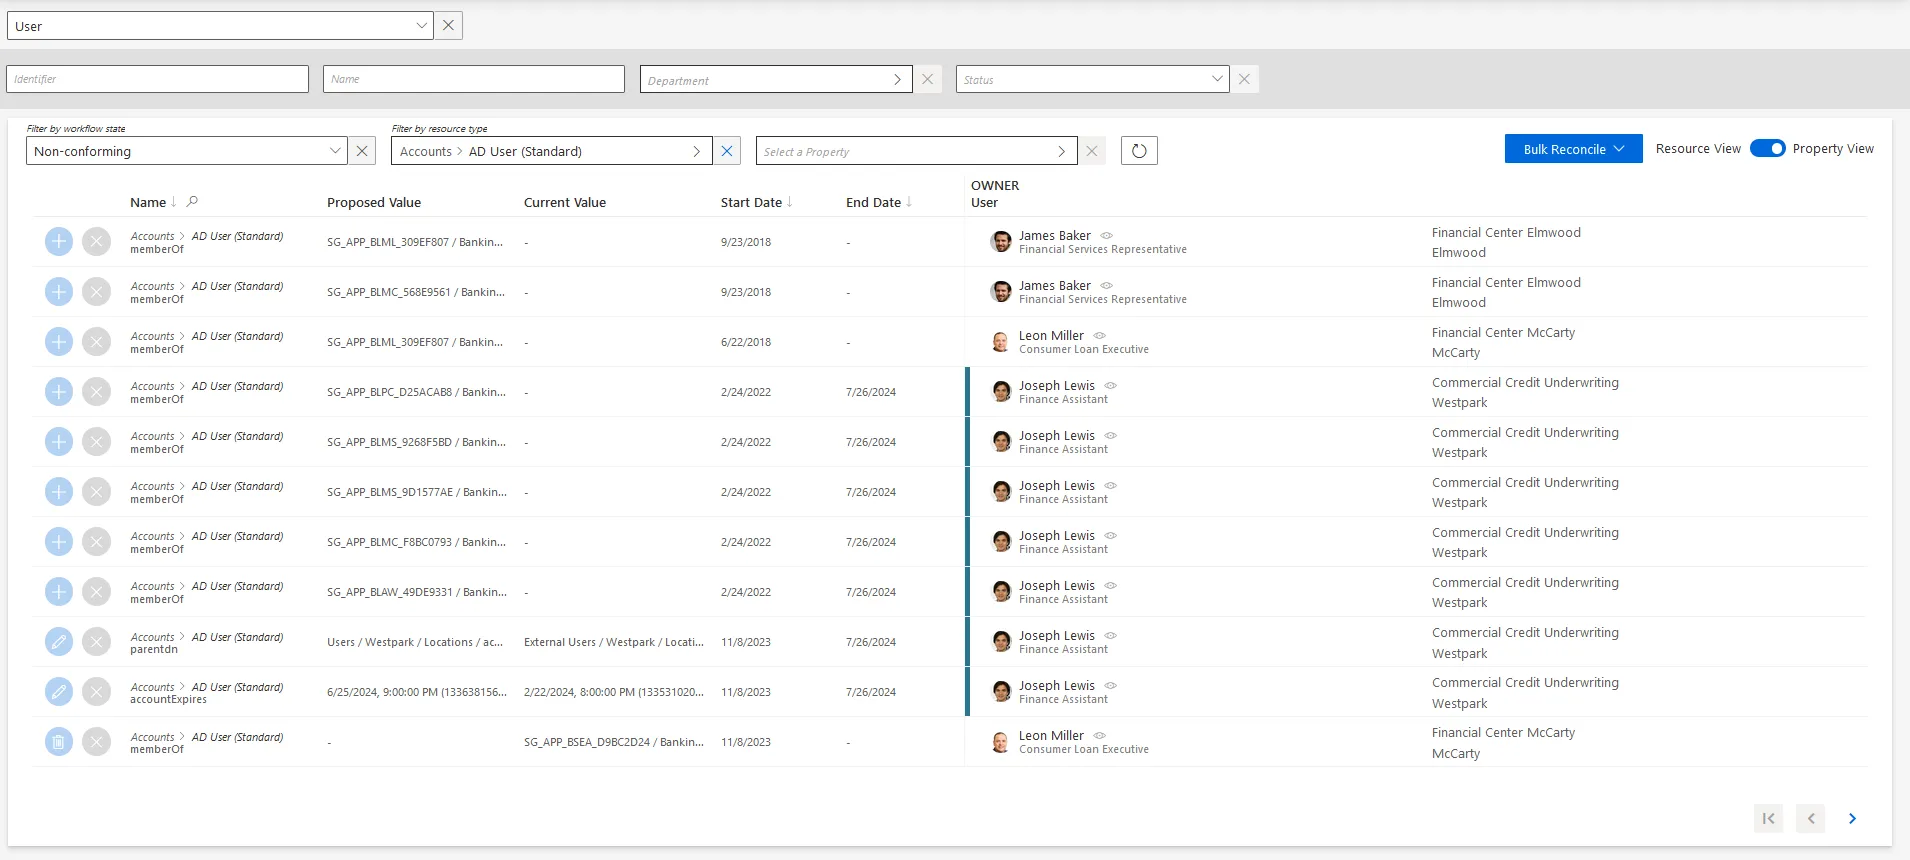
Review an Unreconciled Property
Review an unreconciled property by proceeding as follows:
-
Ensure that the task for the computation of the role model was launched recently, through the complete job on the Job Execution page
Or through the connector's overview page, Jobs > Compute Role Model.

-
Get to the Resource Reconciliation page, accessible from the corresponding section on the home page.

-
Select
Unreconciled propertiesas aWorkflow State.
-
Choose the default resource view or the property view with the top right toggle. See the Reconcile a Property topic for additional information.
-
Select a property to review.
In the following example, the user
Nicolas Faureis the owner of a given resource, here a nominative SAB account associated with his email address. In the Resource Properties to be Verified frame, there is one unreconciled property that happens to beGroup.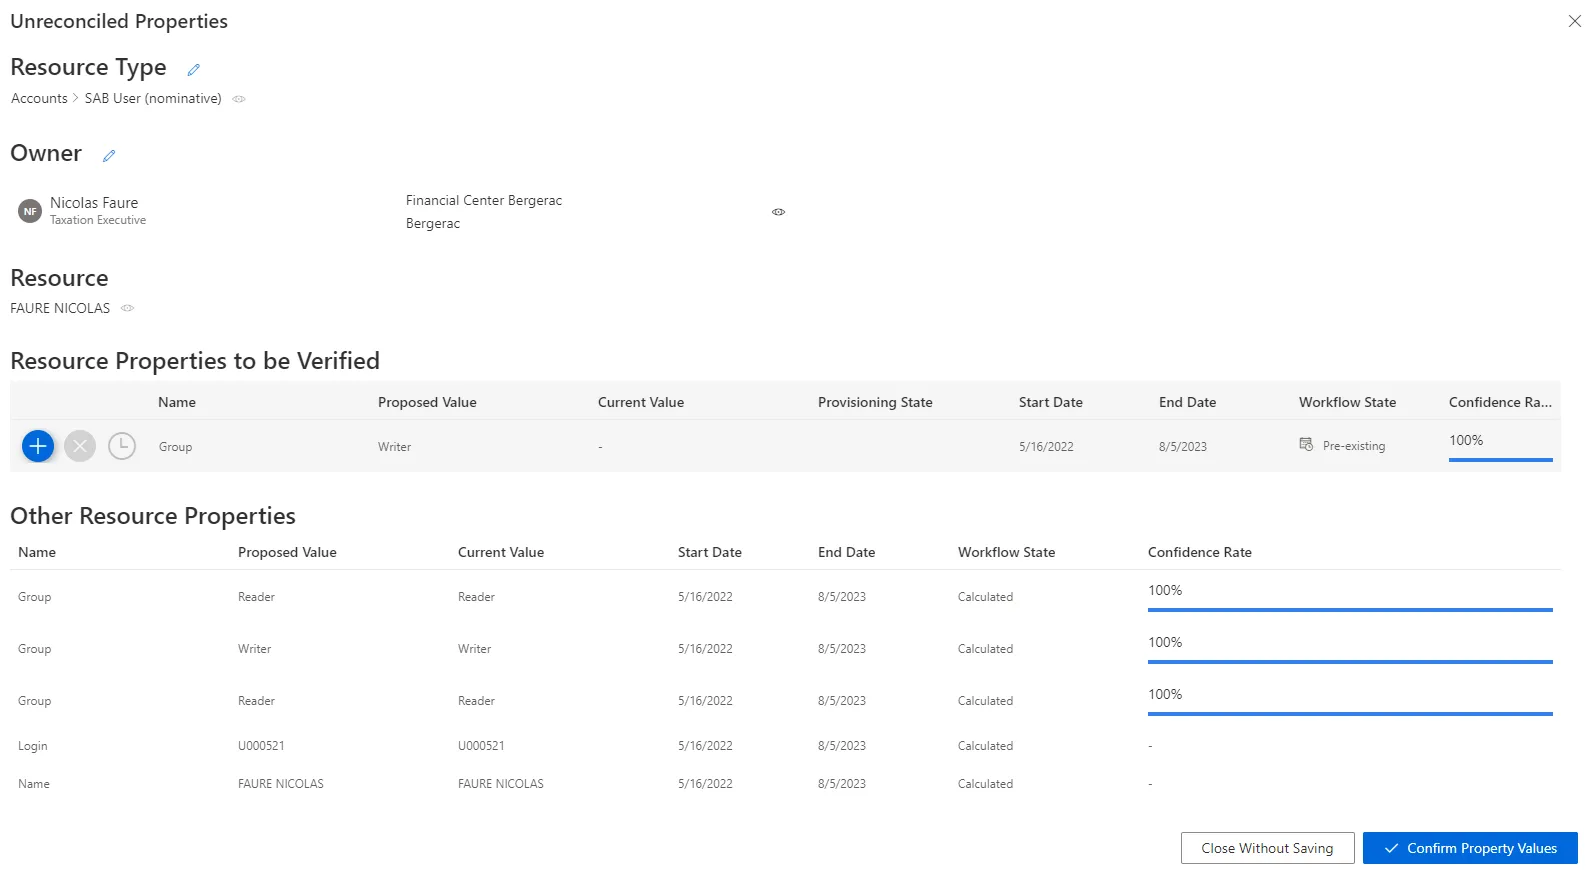
Name: unreconciled property name.Proposed Value: value proposed by Identity Manager.Current Value: value currently in the managed system.Provisioning State: provisioning state.Start Date: date for the beginning of the property value existence.End Date: date for the end of the property value existence.
The Other Resource Properties frame shows the complying properties associated with the resource.
-
Choose one of the three possibilities to verify the property:
Decisions must be made with caution as they cannot be undone.
-
Either click on the approval icon to update the property with the proposed value. It discards the whole property history.


Automatic changes are essential for frequently-changing attributes. However, saving history information can sometimes be important for some attributes such as logins and emails.
-
Or click on the decline icon to not update the property and keep the resource value. In the future, this property will no longer be changed automatically.

Retaining manual control of changes for sensitive data (i.e.
SAMAccountName) can be of interest. Identity Manager won't be able to change this data and the service account manager will avoid authentication errors. It can be interesting to keep manual some sensitive data changes likeSAMAccountNamefor example, so that Identity Manager does not change it and the service account manager does not risk problems in authentication. -
Or click on the postponement icon to delay the decision. An unreconciled property is ignored by Identity Manager, and therefore cannot be modified.

-
-
Click on Confirm Property Values.
-
Trigger provisioning by launching, on the appropriate connector's overview page, Jobs > Generate Provisioning Orders, then, after this first task is done, Jobs > Fulfill.
Use property view
By default, non-conforming assignments are listed by resource. It is possible to click on a resource and then access the list of all unreconciled properties for said resource.
It can be helpful to have the non-conforming assignments regrouped by property, as some of the
changes can be similar, so very likely to be validated by the same user. This is why a property view
can be enabled by clicking on the Property View toggle at the top right corner.
Once enabled, select a resource type to display all unreconciled properties linked to said resource type. In addition, select a property to display only the unreconciled properties linked to said resource type and property.
The review process is the same with both views. However with property view, reviewers don't click on a given line, but choose a decision directly on the left of the property line.
In addition, using property view enables bulk reconciliation to approve the proposed values or keep the current values for several resources simultaneously.
![]()
Verify Property Reconciliation
In order to verify the process, check that the changes you ordered appear on the corresponding user's page in the directory.
Reconcile a Role
How to review non-conforming permissions, i.e. approve or decline the role suggestions made by Identity Manager after every synchronization. The aim is to handle the differences between the navigation values from the managed systems and those computed by Identity Manager according to the role catalog.
Overview
Non-conforming roles are considered as non-conforming assignments because no rule from Identity Manager's model can justify their actual assignment to an identity.
Role reconciliation with property reconciliation
For some managed systems, roles are tightly linked to navigation properties.
For example, the AD hosts groups dedicated to various applications, and a role is assigned through group membership. An entitlement can be assigned to an identity by adding said identity's DN to the
memberproperty of the appropriate group. Identity Manager translates it by editing the identity'smemberOfproperty with the new group.
In this case, when a role is assigned in the managed system without an existing rule that justifies the role, then new items appear on the Role Reconciliationand the Resource Reconciliation screens.
In the case of the AD example, consider that we want to assign a specific role in SAP. Then, we find the corresponding group in the AD and add the identity's DN to its
memberproperty.The result is a new item on the Role Reconciliation screen for said SAP role, plus an item on the Resource Reconciliation screen for the new
memberOfproperty for said identity.If the identity didn't have an AD account yet, then it is automatically created, and the item on the Resource Reconciliation screen displays also a modification of the
accountExpiresproperty.
As roles and navigation properties are technically bonded together, their reviews are linked too:
- If the role is reviewed (approved/declined), then the corresponding property is automatically reconciled accordingly.
- If the property is reviewed (approved/declined), then the corresponding role is automatically
reviewed too, its
Entitlement Assignment
workflow state transitioned to
Manual(if approved) orCancellation(if declined, then a deprovisioning order is sent).
So let's say we add
Cedric Blancto the list of members of the SAP groupsSG_APP_SAP_1andSG_APP_SAP_211. Then, after the next synchronization, Identity Manager displays one item for each role on the Role Reconciliation screen, and one item for all changes in the AD account on the Resource Reconciliation screen:
Participants and Artifacts
This operation should be performed in cooperation with managers who know their team's expected entitlements.
| Input | Output |
|---|---|
| Provision (required) | Complying roles |
Review a Non-conforming Permission
Review a non-conforming permission by proceeding as follows:
-
Ensure that the Compute Role Model Task was launched recently, through the complete job on the Job Execution page
Or through the connector's overview page, Jobs > Compute Role Model.
-
On the home page, click on the entity type that you want to manage in the Role Reconciliation section, to get to the non-conforming permissions page.

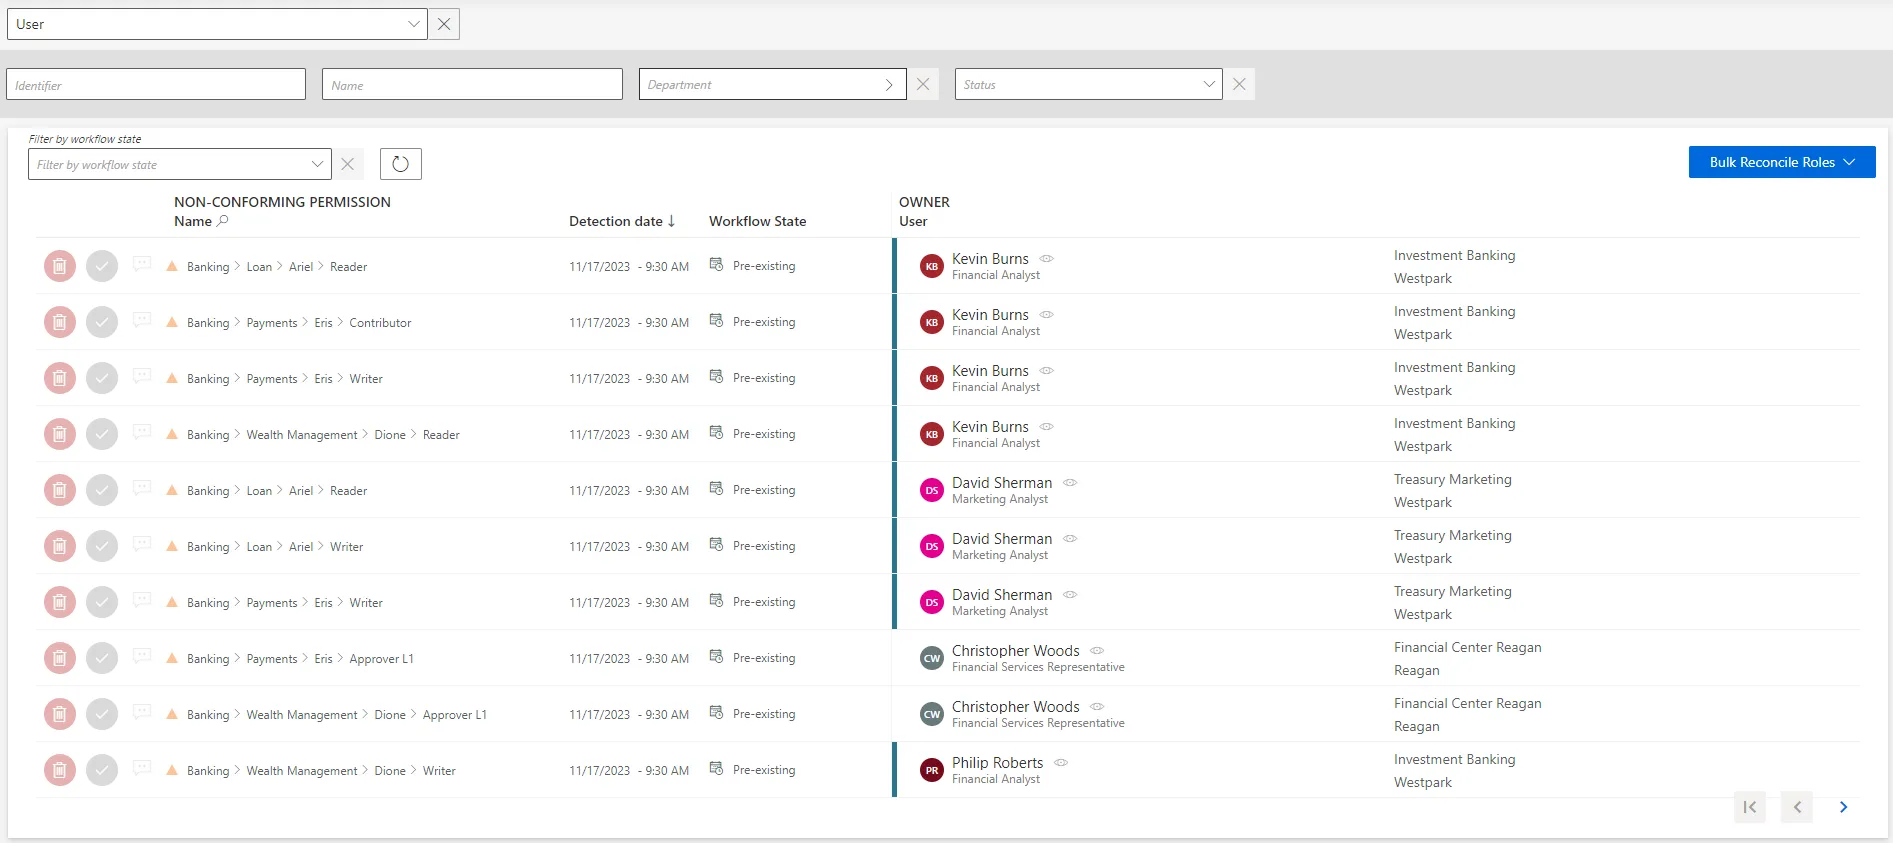
Each non-conforming permission can be commented by clicking on the corresponding icon.

-
Choose one of the two possibilities to verify the permission:
Contrary to resources, reviewed roles are then displayed on the Role Review page accessible from the home page, and can be reviewed again.
- Either click on the approval icon to keep the non-conforming permission.

- Or click on the decline icon to delete the non-conforming permission.

-
Trigger provisioning by launching, on the appropriate connector's overview page, Jobs > Generate Provisioning Orders, then, after this first task is done, Jobs > Fulfill. See the Provision topic for additional information.
Use bulk provisioning
Several roles can be reconciled simultaneously by clicking on Bulk Reconcile Roles.
![]()
Verify Role Reconciliation
In order to verify the process, check that the changes you ordered appear on the corresponding user's View Permissions tab.

Review an Unauthorized Account
How to remediate unauthorized accounts. The aim is to review the accounts whose assignments don't comply with the rules of the role model.
Overview
Unauthorized accounts are considered as non-conforming assignments because no rule from Identity Manager's model can justify their actual assignment to an identity.
Participants and Artifacts
This operation should be performed in cooperation with application owners in charge of applications' entitlements.
| Input | Output |
|---|---|
| Provision (required) | Complying accounts |
Review an Unauthorized Account
Review an unauthorized account by proceeding as follows:
-
Ensure that the Compute Role Model Task was launched recently, through the complete job on the Job Execution page:
Or through the connector's overview page, Jobs > Compute Role Model.
-
Get to the Resource Reconciliation page, accessible from the corresponding section on the home page.
-
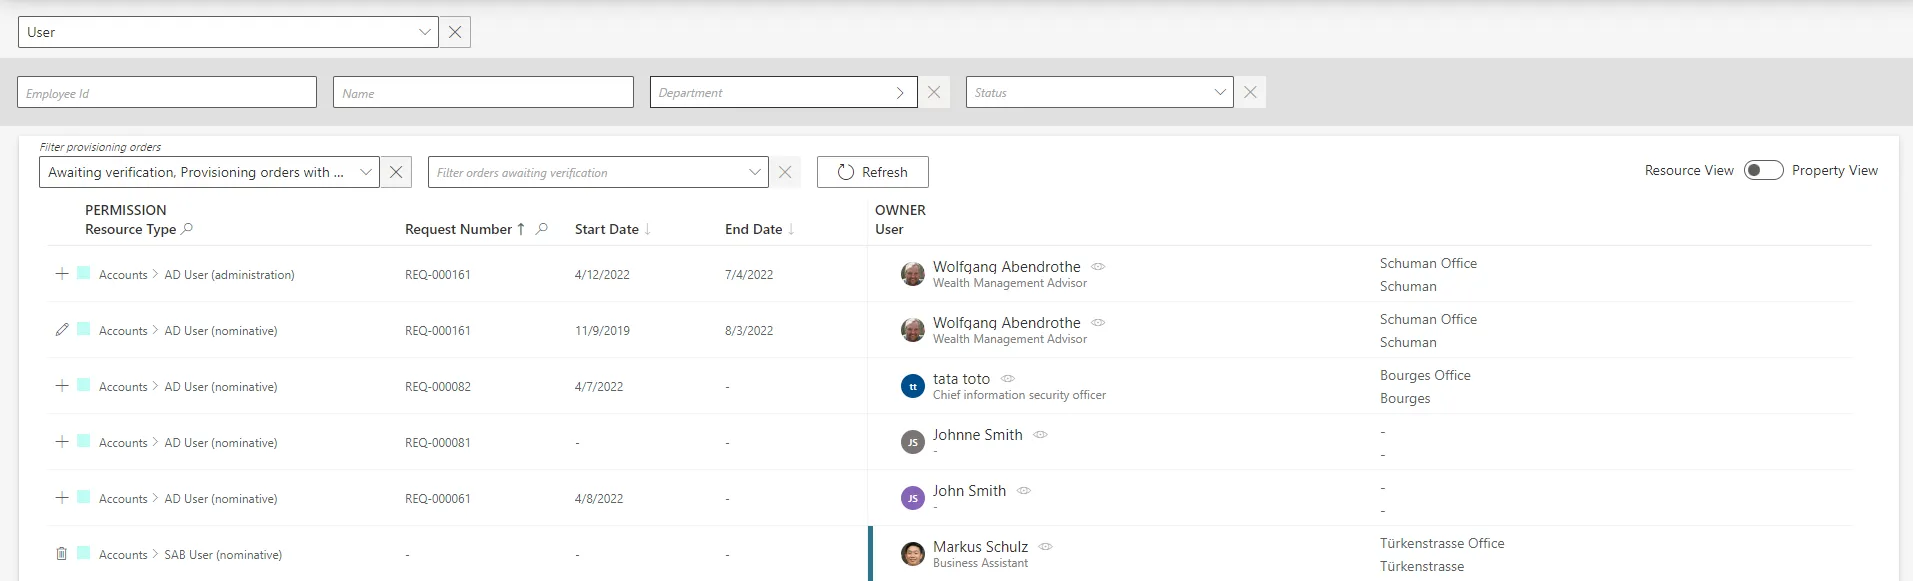
Select
Unauthorized accountas theWorkflow State. Orphaned accounts appear with no owner.
-
Choose the default resource view or the property view with the top right toggle.
-
Click on the line of an account with an owner.
In the following example, the nominative LDAP account linked to the resource
U40897 / Internal Users / acme / comhas the ownerMaxime Guillotwith an 80% confidence rate.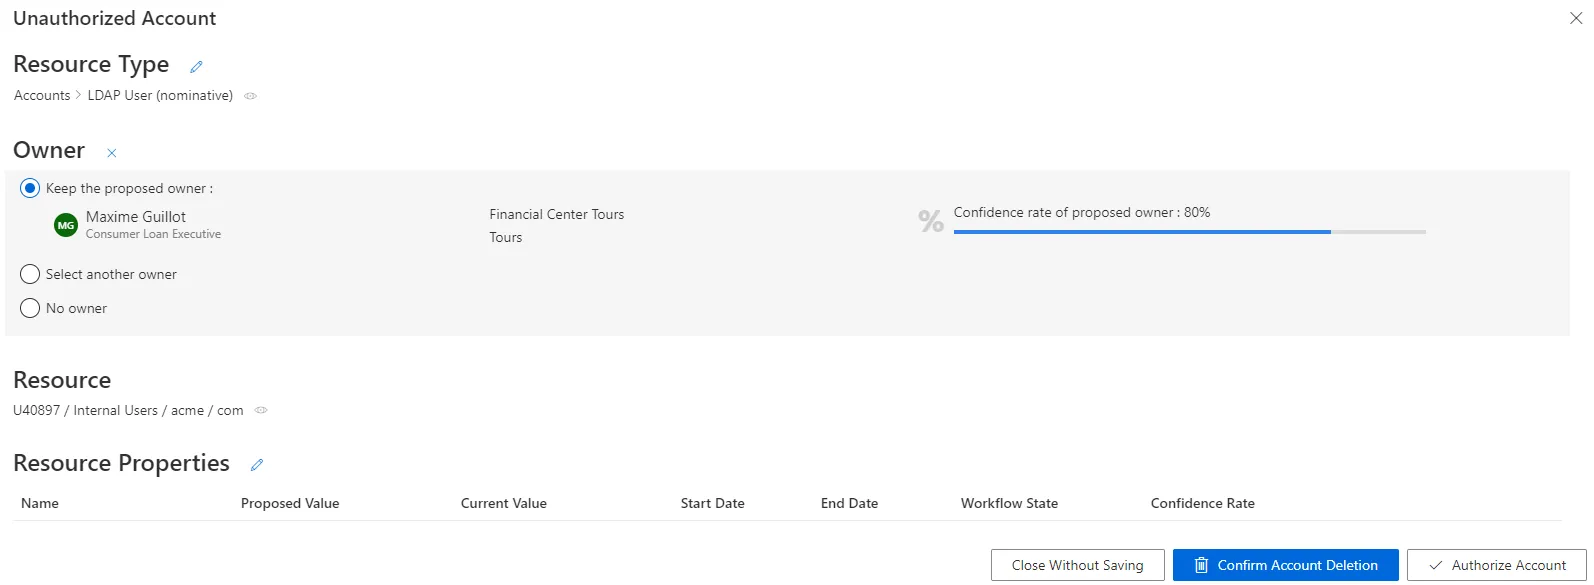
The displayed confidence rate means that a rule actually assigned the account to the identity, but with a confidence rate too low to imply full automatic assignment. Approval will be required. See the Classify Resources topic for additional information.
The Resource Properties frame shows all the properties of the resources. They can be updated by clicking on the edit button. See the Reconcile a Property topic for additional information.

-
Select the appropriate decision.
Decisions must be made with caution as they cannot be undone.
-
Click on Confirm Account Deletion or Authorize Account according to the previous decision.
-
Trigger the Provision by launching, on the appropriate connector's overview page, Jobs > Generate Provisioning Orders, then, after this first task is done, Jobs > Fulfill.
Use property view
By default, non-conforming assignments are listed by resource. It is possible to click on a resource and then access the list of all unreconciled properties for said resource.
It can be helpful to have the non-conforming assignments regrouped by property, as some of the
changes can be similar, so very likely to be validated by the same user. This is why a property view
can be enabled by clicking on the Property View toggle at the top right corner.
Once enabled, select a resource type to display all unreconciled properties linked to said resource type. In addition, select a property to display only the unreconciled properties linked to said resource type and property.
The review process is the same with both views. However with property view, reviewers don't click on a given line, but choose a decision directly on the left of the property line.
In addition, using property view enables bulk reconciliation to approve the proposed values or keep the current values for several resources simultaneously.
![]()
Bulk keeping non-authorized accounts, by clicking on Bulk Reconcile then Approve Current Values, does not approve their unreconciled properties which will still be displayed on this screen.
Verify Review
In order to verify the process, check that the changes you ordered appear on the corresponding user's View Permissions tab.