Provisioning
See how to anticipate changes due to provisioning thanks to Thresholds .
See how to implement and perform Provision.
Create a Provisioning Rule
How to define scalar rules, navigation rules and/or query rules to compute and provision target resources values from source resources values. See the Resource Type topic for additional information.
Overview
Categorize Resources led to the grouping of resources into resource types (classification), and the establishment of source-to-target relationships between these resources (correlation).
Sources are usually identities, and targets are usually accounts from the managed systems.
Here, we are going to compute the values of scalar and navigation properties for the target resources used in entitlement management, based on source resources. We are going to Provision these properties, i.e. write them to the managed system.
The right tools for the job are provisioning rules: scalar rules, navigation rules, query rules.
These provisioning rules are designed to:
- retrieve the input data in source objects;
- compute the output value for target objects;
- provision the corresponding properties in the managed system with the computation result.
Another kind of provisioning rule is called resource type rule. Instead of computing existing properties, resource type rules create automatically target resources to be owned by given source resources (identities).
In testing mode, the impacted resource types can be configured to block provisioning, by adding a mandatory review before actually writing to the managed system. See the Create a Resource Type topic for additional information.
Participants and Artifacts
For a given managed system, integrators may need the help of the application owner who knows the application users, entitlements and data model.
| Input | Output |
|---|---|
| Categorization (required) | Scalar rules Navigation rules Query rules |
See the Categorize Resources topic for additional information.
Create Provisioning Rules
- Create Resources type rules to automatically create resources.
- Compute a Scalar Property to compute scalar properties;
- Create navigation and/or query rules to compute navigation properties.
Netwrix Identity Manager (formerly Usercube) recommends creating/modifying/deleting provisioning rules using simulations in order to anticipate changes. See the Perform a Simulation topic for additional information.
Next Steps
Once provisioning rules are created, integrators can start to Create Roles in the Role Catalog .
Compute a Navigation Property
How to define navigation rules and/or query rules to compute and provision the values of navigation properties for target resources based on source resources. See the Resource Type topic for additional information.
Overview
Sources are usually identities, and targets are usually accounts from the managed systems.
Here, we are going to compute the values of navigation properties for the target resources used in entitlement management, based on source resources. See the Define Navigation Properties topic for additional information. We are going to provision these properties, i.e. write them to the managed system. See the Provision topic for additional information.
The right tools for the job are navigation and query rules.
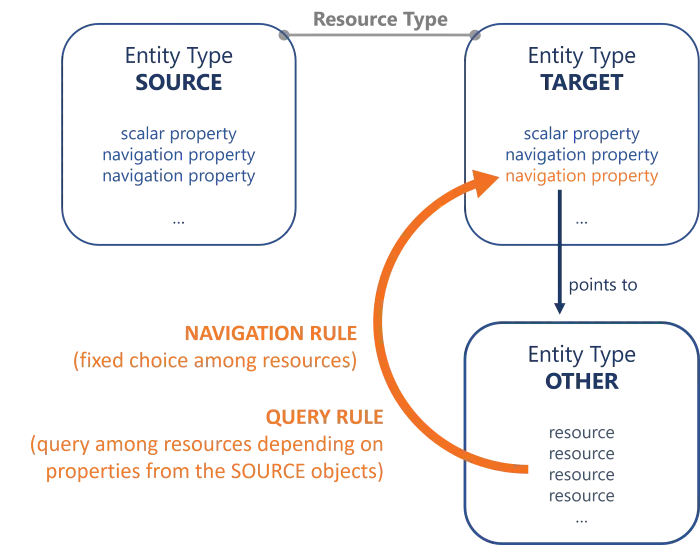
A navigation property's value can be computed by a navigation rule or a query rule, assigning a given resource from the entity type pointed by the navigation property (which can be the target entity type itself). Let's call this entity type the "other" one.
- A Navigation rule assigns a fixed resource, which is chosen from among the "other" entity type's resources during the rule's creation. The assigned resource is the same for all impacted accounts. Use a navigation rule when a given resource must be assigned, regardless of users' attributes.
- A Query rule assigns a resource from the "other" entity type too. However, the resource is chosen according to a query via a C# expression with conditions, based on the attributes of the source objects (usually users). Hence, contrary to a navigation rule, a query rule can assign a different resource for each impacted account, based on the attributes of the account's owner. Use a query rule when there is the need to use variables from among users' attributes to select the resource to assign.
A navigation rule could add the AD group
SG_APP_SQLto thememberOfnavigation property to all AD nominative accounts provided that the user has the single roleSQL Server Administration.
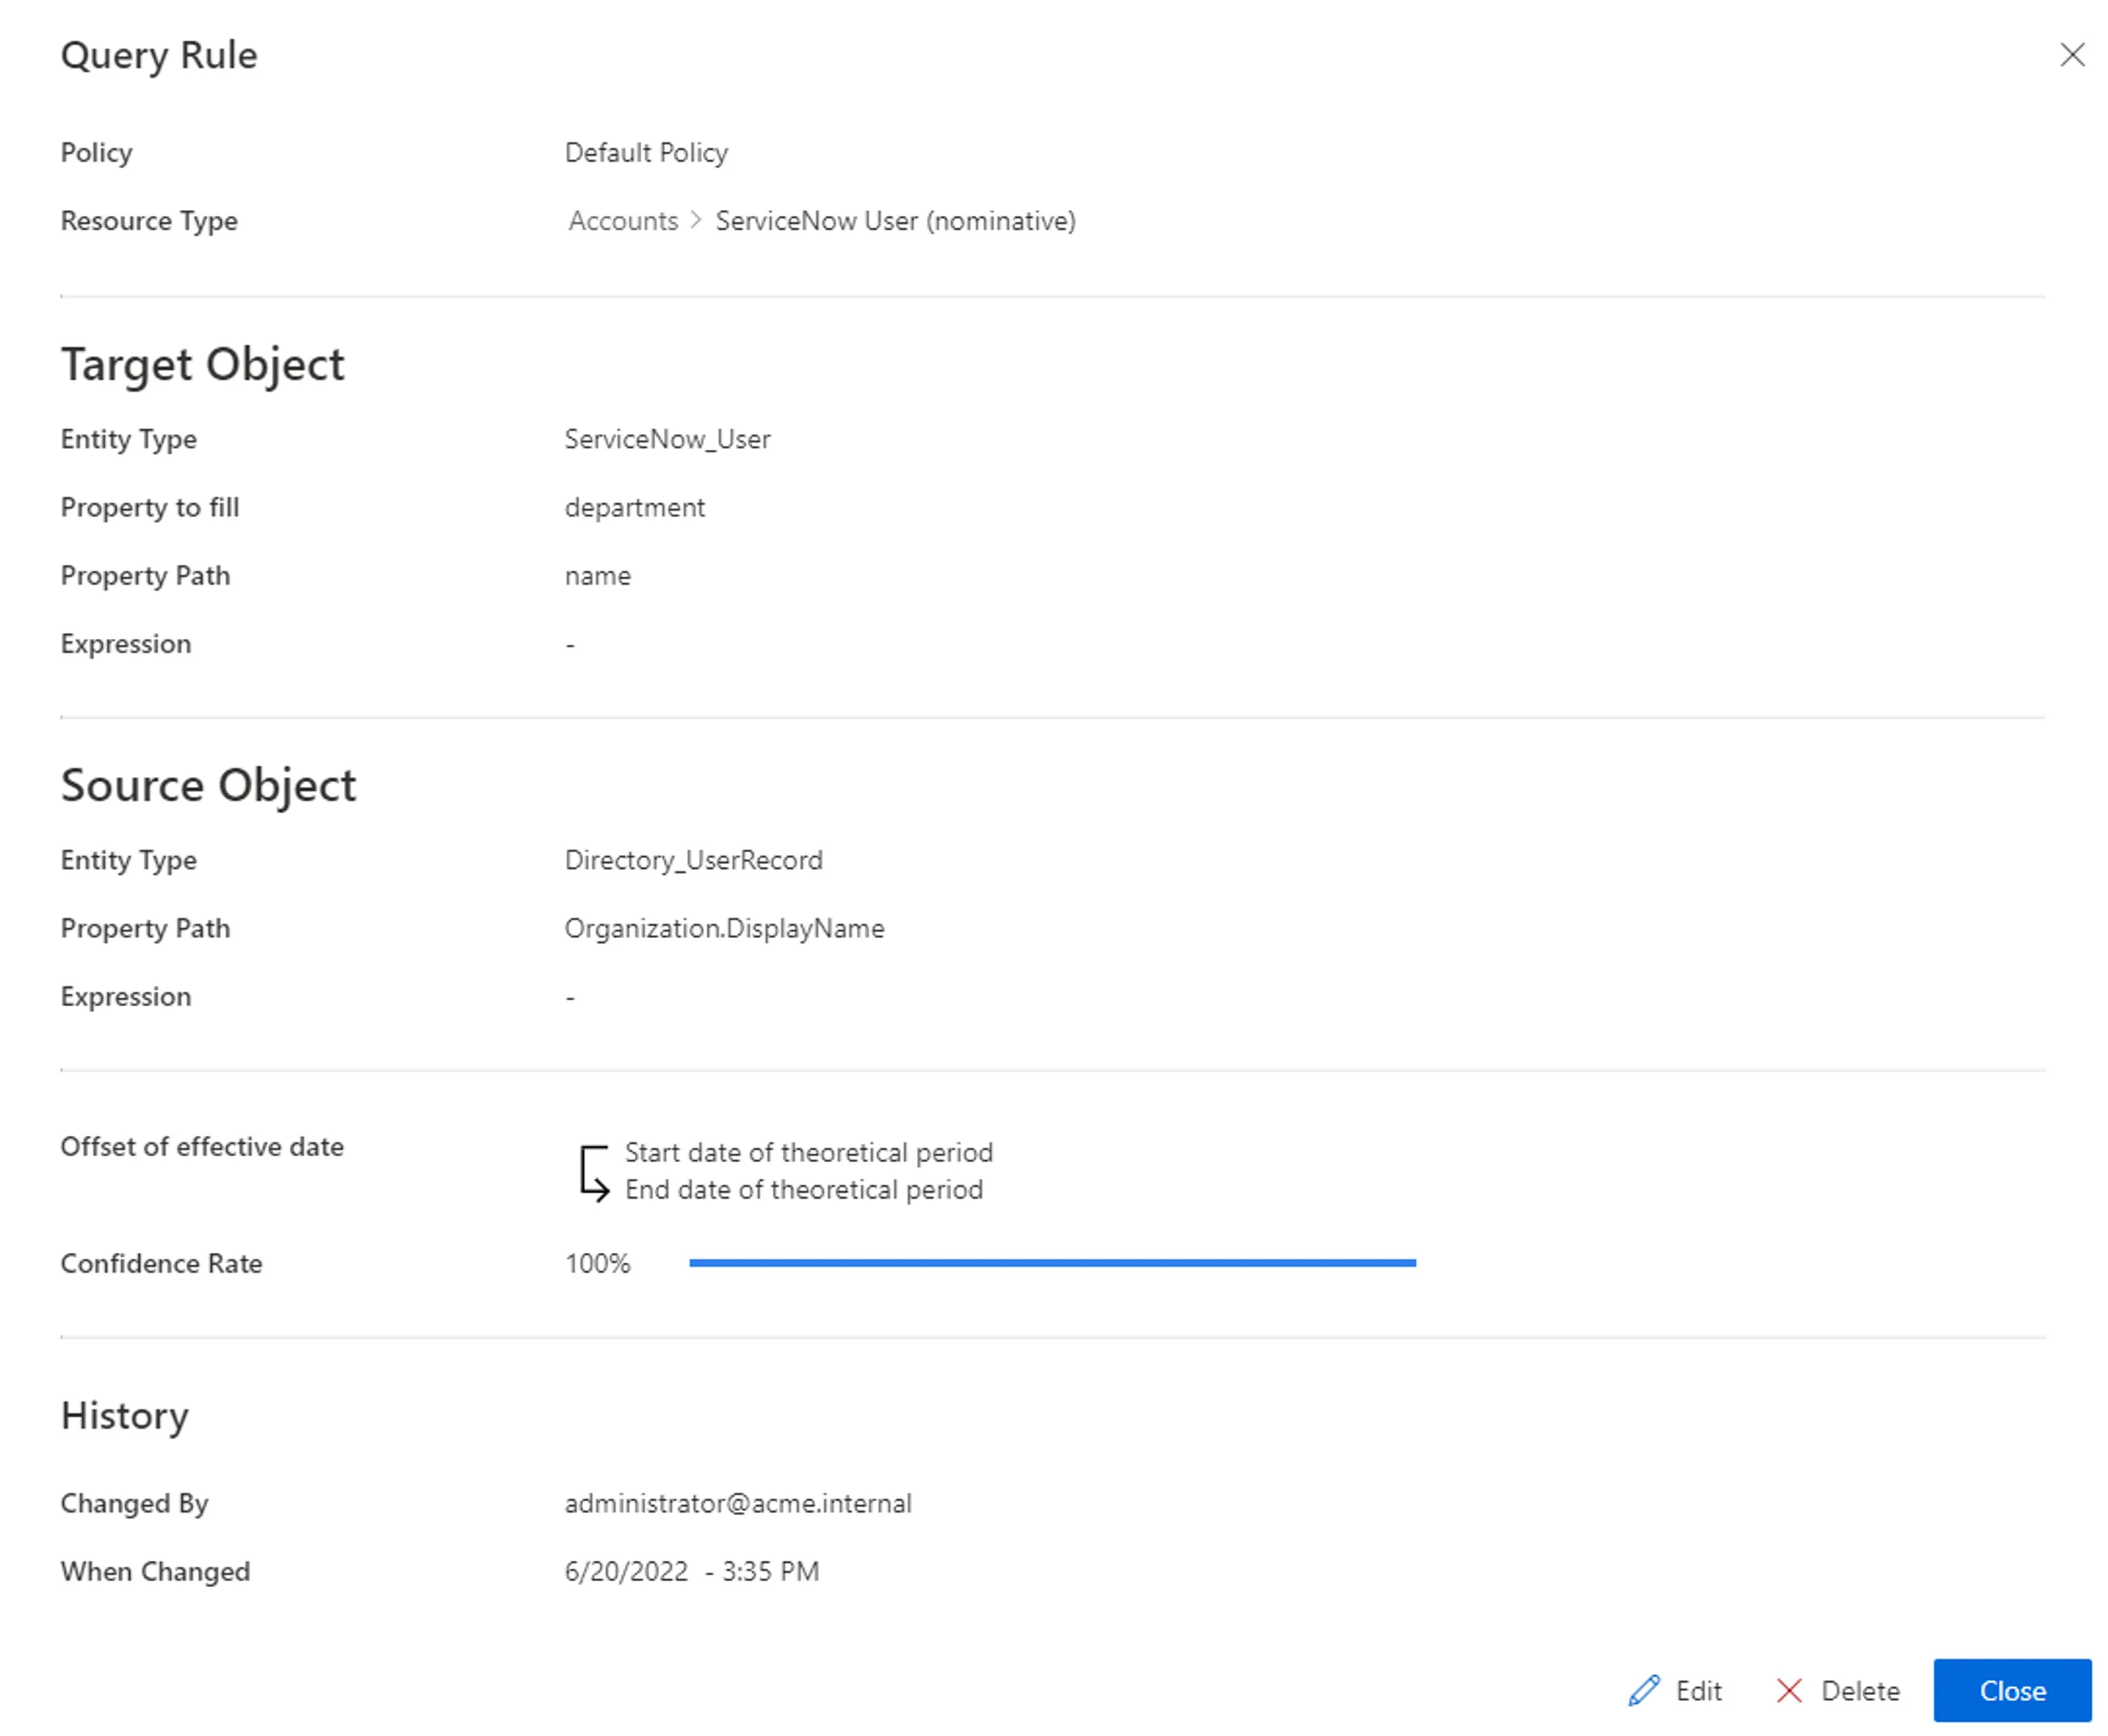
A query rule could compute the value of the
departmentnavigation property for ServiceNow nominative accounts (entity typeServiceNow_User), with a query from among resources from theServiceNow_Departmententity type, where the name of the resource would match the display name of the organization specified for the user (owner of the ServiceNow account).We need here to query the
ServiceNow_Departmententity type in order to find the right department to update the value ofdepartment, which is specific to each ServiceNow account.Thus, each user owning a ServiceNow account will see the value of
departmentin their account updated with the resource fromServiceNow_Departmentwhich corresponds to the department specified for this user.
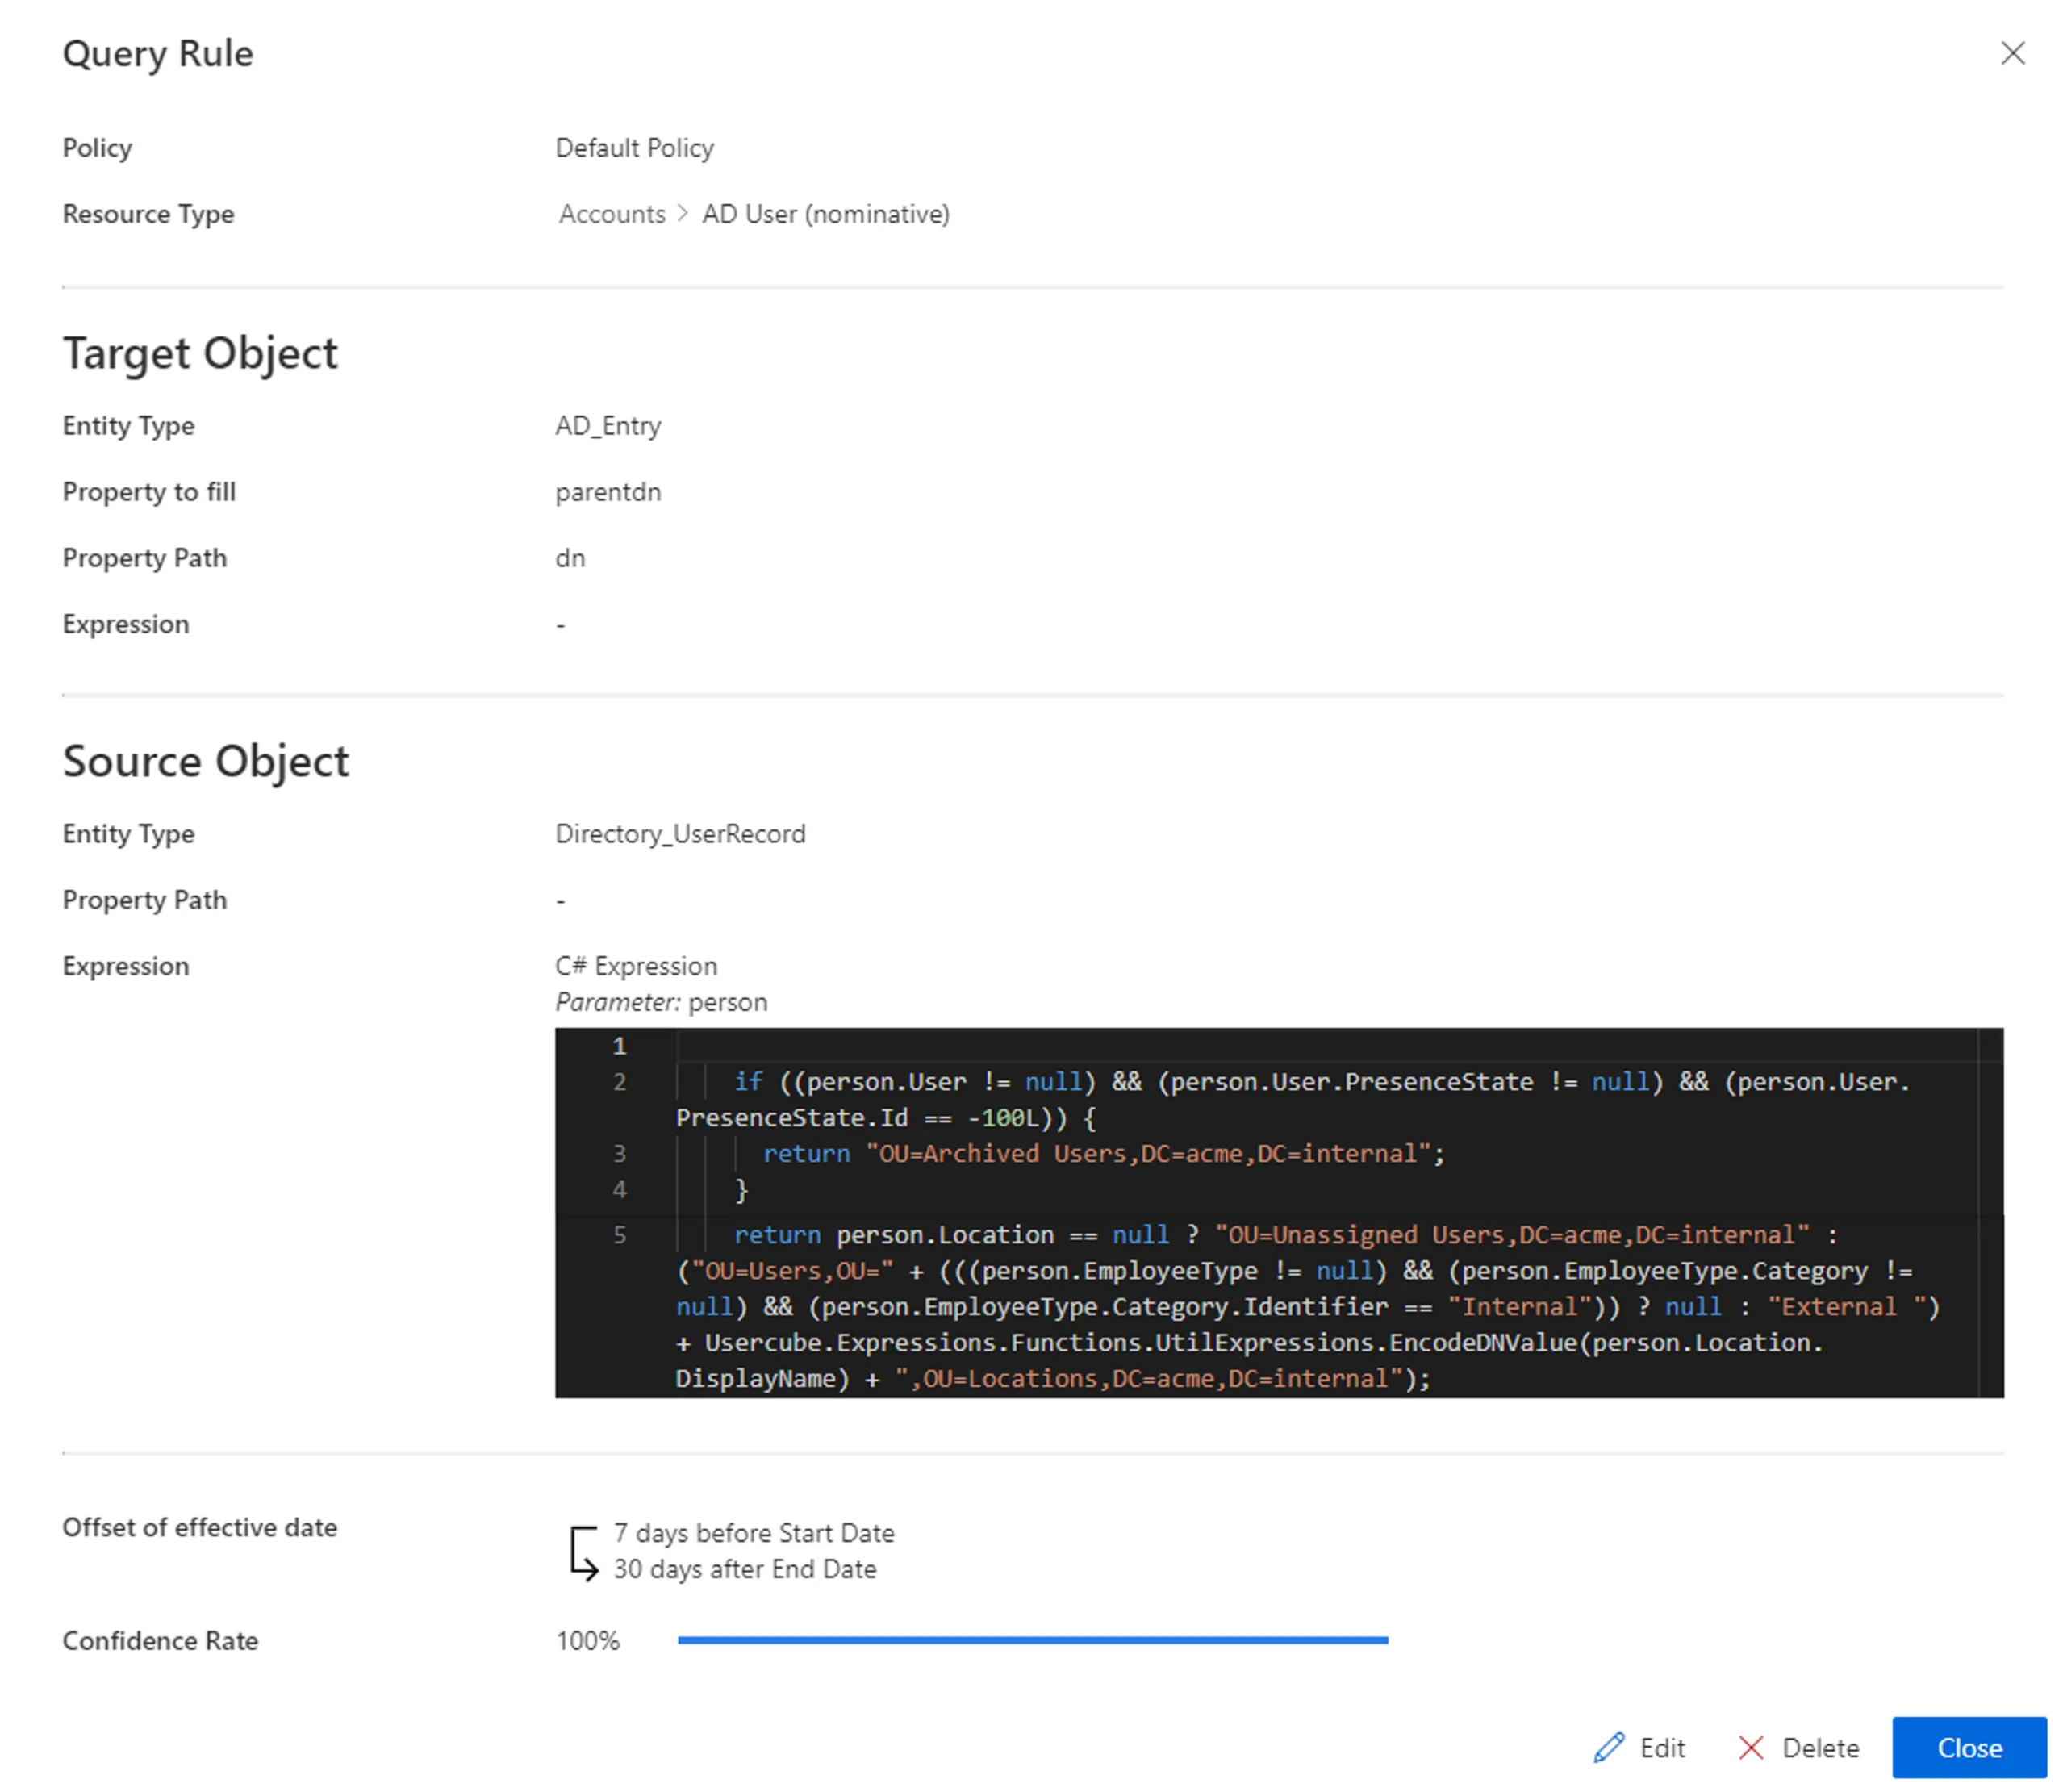
Another query rule could compute the
parentdnattribute for AD nominative accounts, with a query from among AD entries, where thednattribute of the resource would match a complex expression based on the user's (owner of the AD account) presence state, employee type, location, etc.We need here to query the
AD - Entryentity type in order to find the right dn to update the value ofparentdn, which is specific to each AD nominative account.Thus, each AD nominative account will have the value of its
parentdnset according to its owner's attributes (presence state, employee type, location, etc.).
The application of a navigation rule can depend on the assignment of a single role, and/or user dimensions. See the Create Roles in the Role Catalog topic for additional information on the assignment of a single role and Conforming Assignments topic for additional information on dimensions.
A query rule does not use criteria as it is designed to compute a given navigation property for all existing resources in a given resource type. However, in case of several query rules on a same property, the application of a query rule depends on its confidence rate and the corresponding priority it receives compared to other query rules. See the Classify Resources topic for additional information.
While both navigation and query rules compute navigation properties, the value of one navigation property should be computed by either navigation or query rules, not both.
In Identity Manager, a navigation property has two "sides", one for each linked element.
For example in the AD, the group membership of a user is represented by the properties member for
groups (containing a list of users) and memberOf for users (containing a list of groups).
However, some managed systems only have one of these two sides.
The AD only uses member from among groups' properties. Users do not have a memberOf property. As
Identity Manager uses and links both sides, it is able to "translate" the information, so that the
corresponding navigation property, which actually exists in the managed system, is modified by the
navigation/query rule.
Identity Manager assigns an entitlement to a user by assigning a group-membership to an account.
Thus we can create a navigation rule which adds a group to the memberOf property of given
accounts. Identity Manager will update the member property of groups accordingly (in Identity
Manager), and then provision the member property of said groups in the AD, adding the impacted
accounts.
A navigation rule will trigger the creation of a target resource for all impacted source resources (so all users), which are not yet correlated with a resource of this resource type.
NOTE: A query rule does not create resources, and only computes the navigation properties of existing resources.
Guidelines
Follow these guidelines when configuring navigation properties.
Expression code must not contain too much data
Once configured, a rule is a complicated object to modify. Therefore, you must keep business data in the resource and out of the expression. It is easier to change data than to change a rule.
For example, consider an organization that manages email addresses according to the site with
.frfor France and.befor Belgium.A working option could be to write an expression with a condition
ifon the site to assign the domain name. However, if the organization expands and needs to consider an additional country, then the rule requires change in the expression code.A better solution is to change the identity data model by adding a field
Domain Nameto describe the objectSite, and to be used in the rule expression. In this case, if there is an additional country, then a new field is added in the data model forSiteandDomain Name. Thus, the rule expression remains simple by using the new objects, for exampleEmail = FirstName + "." + LastName + "@" + Company + "." + DomainName.
Priority between navigation/query rules
When creating navigation and query priorities, follow these rules:
- Several rules computing the same property with different criteria should not coexist;
- The only reason to have several rules to compute a single property is when changing the property value over time, via time offsets. See the Resource Type topic for additional information.
Participants and Artifacts
For a given managed system, integrators may need the help of the application owner who knows the application users, entitlements and data model. See the Categorize Resources topic for additional information.
| Input | Output |
|---|---|
| Categorization (required) | Navigation rules Query rules |
Create a Navigation Rule
Fill an entity type with a navigation rule by proceeding as follows:
Step 1 – Click on Access Rules on the home page in the Configuration section.

Step 2 – In the dropdown menu at the top left, choose the source entity type for the future navigation rule.

Step 3 – Click on the Navigations tab and on the addition button at the top right corner.
![]()
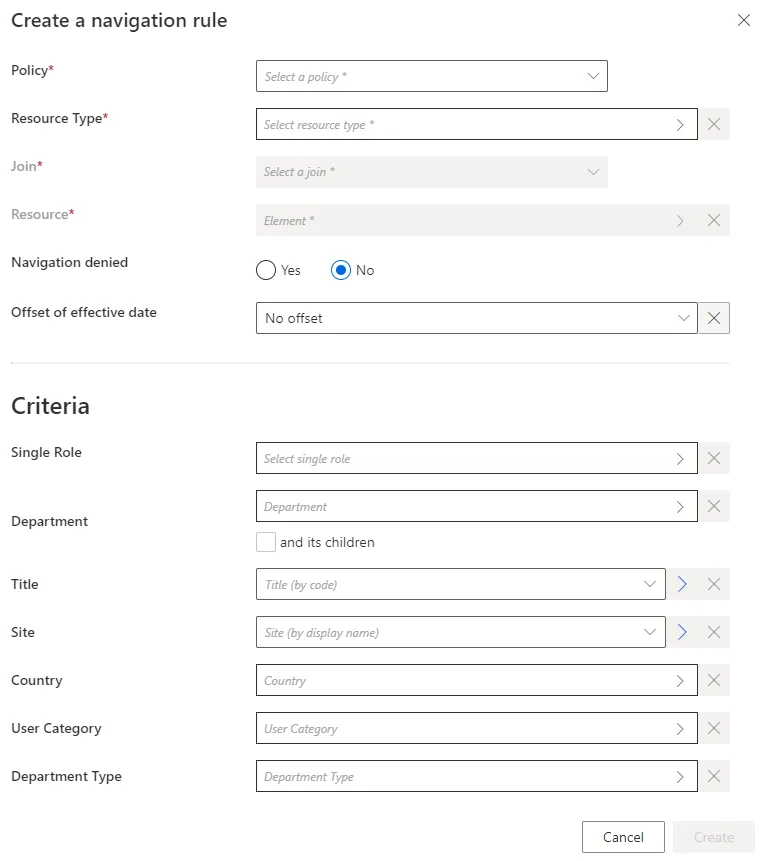
Step 4 – Fill in the fields.
-
Join: navigation property from the target entity type, whose value is to be impacted. -
Resource: resource from the entity type pointed by theJoin, which is to be added to theJoinproperty. -
Navigation denied: option that forbids the resource assignment. -
Offset of effective date: time period that defines the actual effective date for property computation according to the value's start and/or end date.For example, account activation and deactivation can be managed according to the start and/or end dates.
-
Criteria: conditions that, if met, trigger the rule application.
Our example would look like:
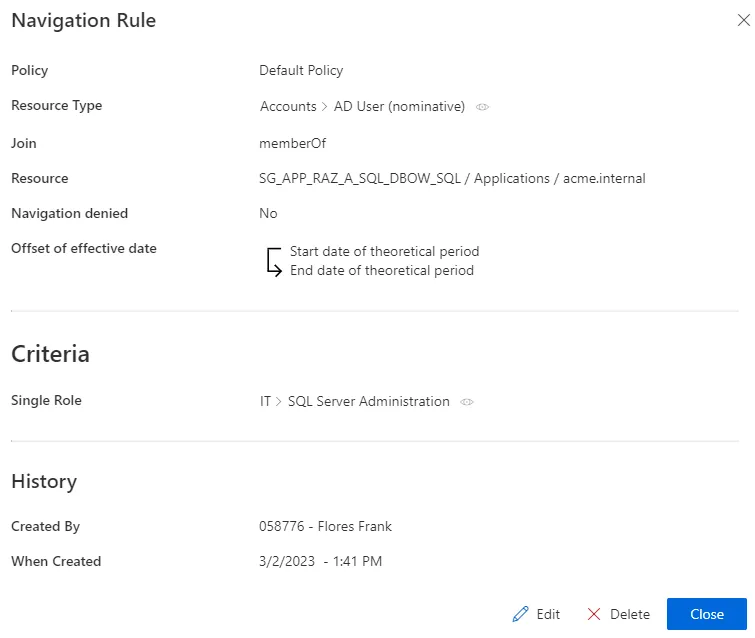
Step 5 – Click on Create and see a line added on the rules page.
The navigation rule is now configured and can be found in the Access Rules tab.
Create a Query Rule
Fill an entity type with a query rule by proceeding as follows:
Step 1 – Click on Access Rules on the home page in the Configuration section.
Step 2 – In the dropdown menu at the top left, choose the source entity type for the future query rule.
Step 3 – Click on the Queries tab and on the addition button at the top right corner.
![]()
Fill in the fields.

Once the Resource Type is provided, more fields appear.
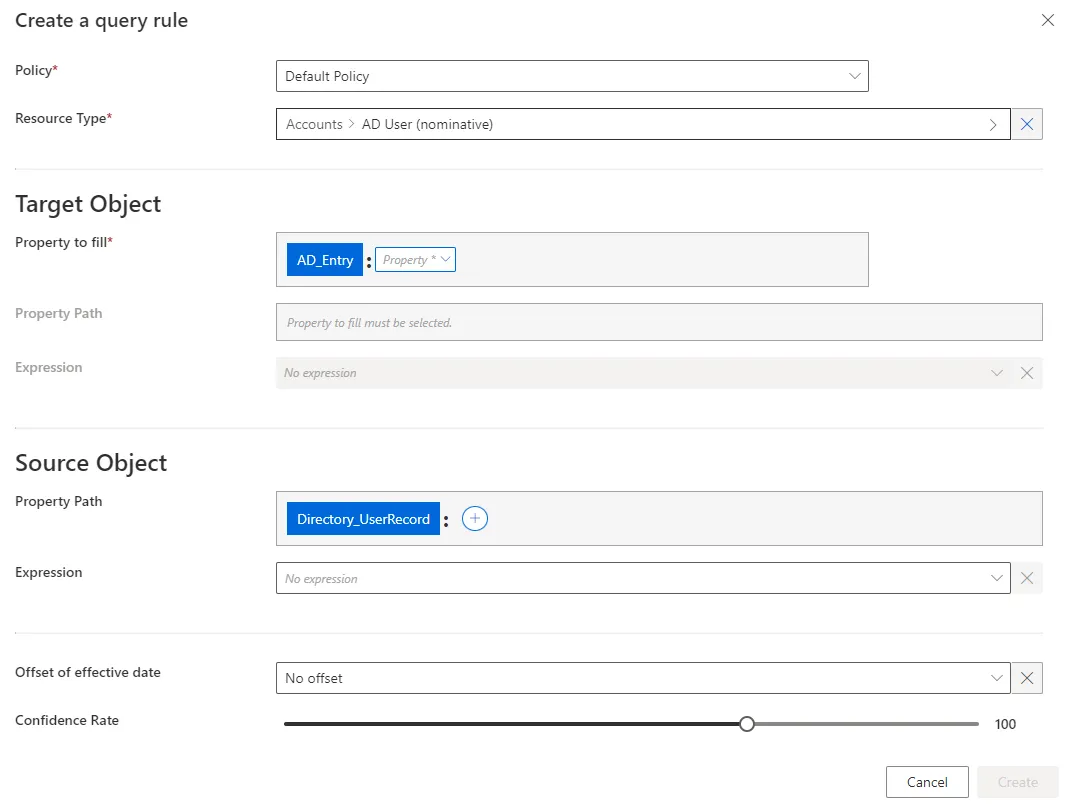
- Target Object >
Property to fill: navigation property from the target entity type, whose value is to be impacted. - Target Object: property (or expression of properties) from the entity type pointed by the
Property to fill, which will be the value of theProperty to fillif it matches the source object. Can be defined by a property path and/or an expression. See the Expressions topic for additional information. - Source Object: property (or expression of properties) from the source entity type. Can be defined by a property path and/or an expression. See the Expressions topic for additional information.
Offset of effective date: time period that defines the actual effective date according to the value's start and/or end date. An offset of effective date can be useful for some attributes. For example, account activation and deactivation can be managed according to the start and/or end dates.Confidence Rate: rate expressing the confidence in this link, and its priority order. See the Classify Resources topic for additional information.
Our examples would look like:
Click on Create and see a line added on the rules page.
Impact of Modifications
Any modification in a navigation or query rule is taken into account when launching the role model computation task, in the Resource Types frame of the corresponding connector's overview page, via Jobs > Compute Role Model.

This task applies the rules and computes new properties. Therefore, if a given rule's criterion is modified, then all corresponding assignments are computed again. If a resource was created automatically for an identity through a navigation rule (and its criteria), and if the user's criteria do not comply with the new version of the rule, then the corresponding resource is automatically deleted.
A modification in a provisioning rule can trigger the removal of a resource only on the Identity Manager side. There are several barriers to cross before said resource is removed from the managed system.
Simulations are available in order to anticipate the changes induced by a creation/modification/deletion in navigation and query rules. See the Perform a Simulation topic for additional information.
Verify Rule Creation
In order to verify the process:
Step 1 – On the corresponding connector's overview page, in the Resource Types frame click on Jobs > Compute Role Model to apply all rules.
Review unauthorized accounts (on the Resource Reconciliation screen) and roles (on the Role Reconciliation screen) to help check query rules: if there are numerous properties to be reconciled following the same pattern, then there may be a rule that needs to be changed.
Step 2 – On the corresponding connector's overview page, in the Resource Types frame click on Jobs > Compute Role Model to apply all rules.
Step 3 – Review unauthorized accounts (on the Resource Reconciliation screen) and roles (on the Role Reconciliation screen) to help check query rules: if there are numerous properties to be reconciled following the same pattern, then there may be a rule that needs to be changed.
See the Review an Unauthorized Account and the Reconcile a Role topics for additional information.
Compute a Scalar Property
How to define scalar rules to compute and provision the values of scalar properties for target resources based on source resources. See the Resource Type topic for additional information.
Overview
Sources are usually identities, and targets are usually accounts from the managed systems.
Here, we are going to compute the values of scalar properties for the target resources used in entitlement management, based on source resources. See the Create an Entity Type topic for additional information. We are going to provision these properties, i.e. write them to the managed system. See the Provisiontopic for additional information.
The right tools for the job are scalar rules.
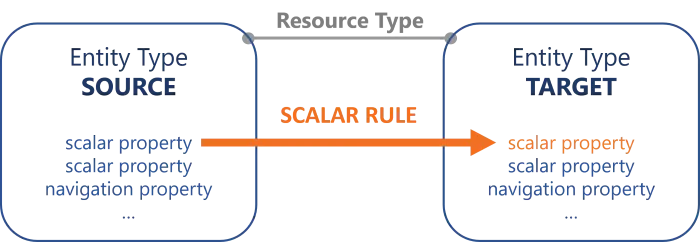
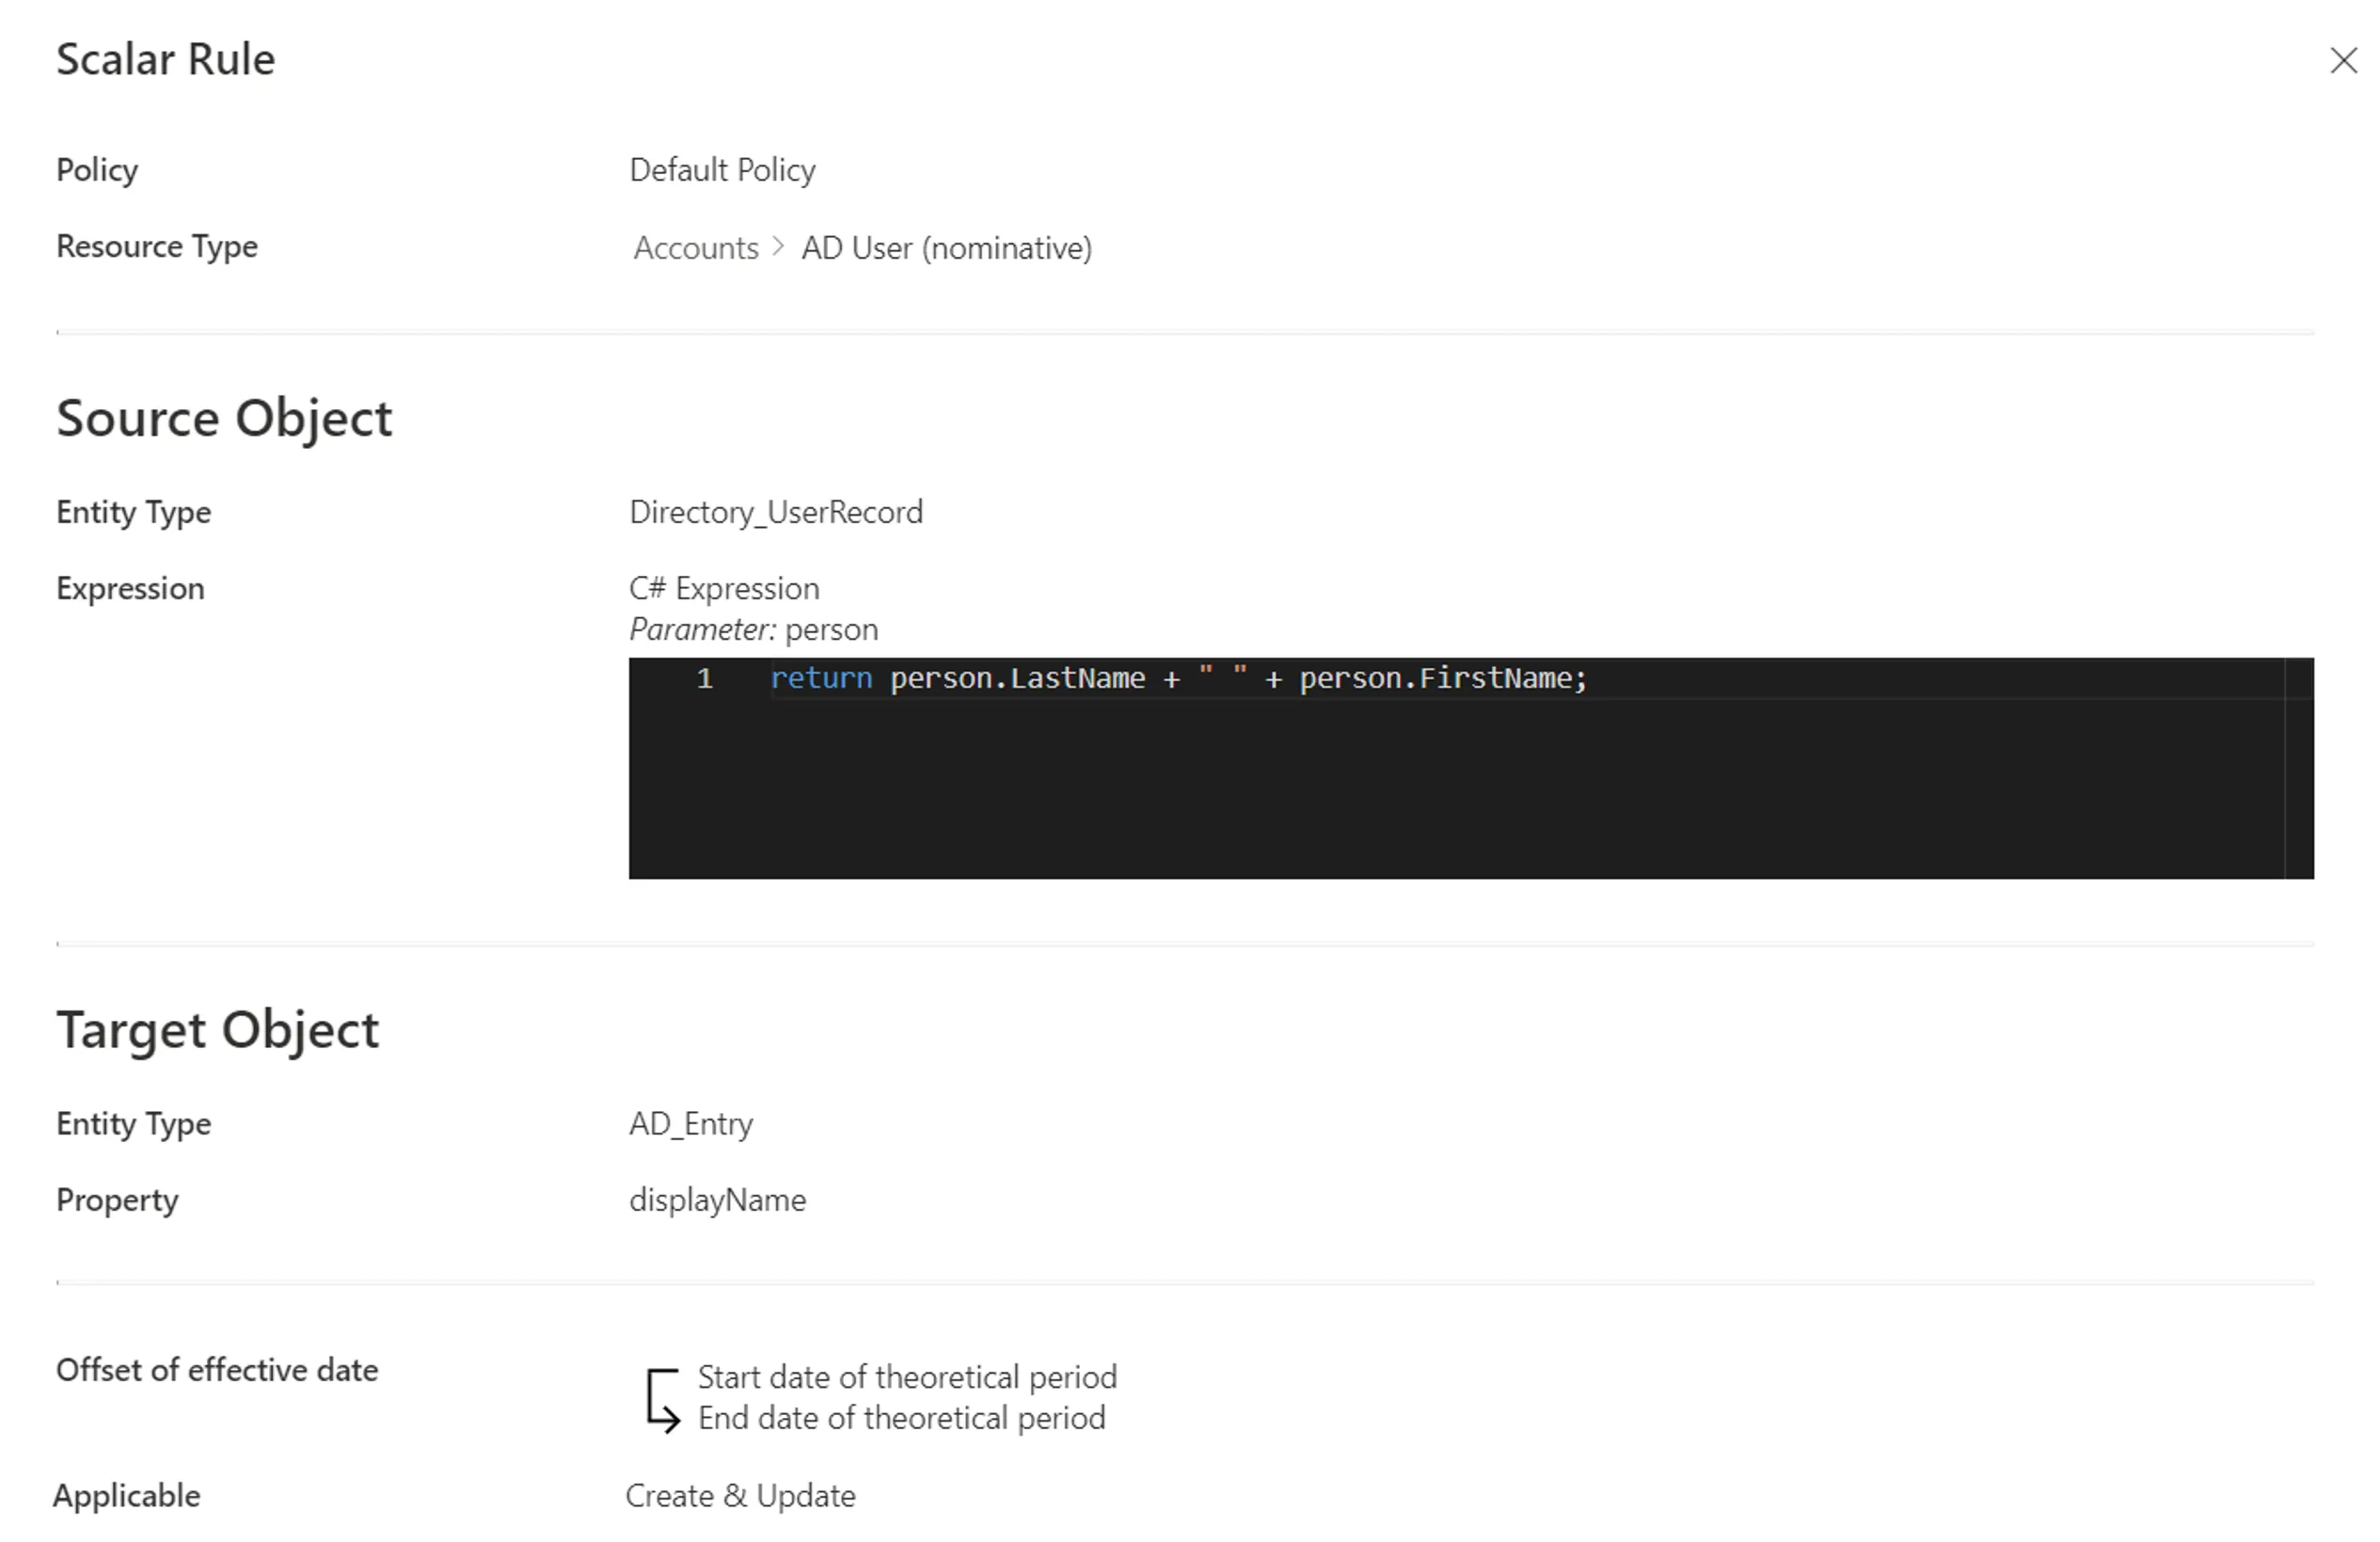
A scalar property's value can be computed by a scalar rule, based on at least one scalar property from the source entity type, possibly writing a C# expression.
A scalar rule could define the scalar property displayName of nominative AD accounts based on its owner's name with the expression:
return person.LastName + " " + person.FirstName;
The application of a scalar rule can depend on the assignment of a single role. See the Create Roles in the Role Catalog topic for additional information.
Sometimes we create in Identity Manager properties which are not directly linked to any real property in the managed system. A scalar rule on this kind of property will not find a property to provision in the managed system, and thus will not produce any result.
For example, we may need to create in the AD the property isUnused (to spot unused accounts) with a C# expression based on other properties from the same entity type. These properties, such as accountExpires and lastLogonTimestamp, are each linked to a property from the AD, while isUnused is for Identity Manager's use only. This scalar property isUnused does not exist in the AD, thus will never be provisioned to the AD, and thus will not be computed by a scalar rule.
Also some properties, like lastLogonTimestamp in the AD or identifiers from ServiceNow, must be changed only by their application. Identity Manager can/must not change these properties, thus no provisioning rule is appropriate for them.
A scalar rule using a single role as criterion will trigger the creation of a target resource for all impacted source resources (so all users), which are not yet correlated with a resource of this resource type.
Without a criterion, a scalar rule does not create resources, and only computes the scalar properties of existing resources.
Guidelines
Expression code must not contain too much data
Once configured, a rule is a complicated object to modify. Therefore, you must keep business data in the resource and out of the expression. It is easier to change data than to change a rule.
For example, consider an organization that manages email addresses according to the site with .fr for France and .be for Belgium.
A working option could be to write an expression with a condition if on the site to assign the domain name. However, if the organization expands and needs to consider an additional country, then the rule requires change in the expression code.
A better solution is to change the identity data model by adding a field Domain Name to describe the
object Site, and to be used in the rule expression. In this case, if there is an additional country,
then a new field is added in the data model for Site and Domain Name. Thus, the rule expression
remains simple by using the new objects, for example
Email = FirstName + "." + LastName + "@" + Company + "." + DomainName.
Priority between scalar rules
A scalar rule with a role as a criterion has a higher priority than a rule without a role criterion.
For example, consider the situation where we want the login <A> for users with the single role
<RA>, and the login <B> for the others. In this case, we can write two distinct scalar rules
where the first one has the role <RA> as a criterion. This rule will be applied before the other.
Other than that, there should not be more than one rule meant to provision a given property on a given time period.
It means that:
- Several rules computing the same property with different criteria should not coexist;
- The only reason to have several rules to compute a single property is when changing the property value over time, via time offsets.
Participants and Artifacts
For a given managed system, integrators may need the help of the application owner who knows the application users, entitlements and data model.
| Input | Output |
|---|---|
| Categorization (required) | Scalar rules |
See the Categorize Resources topic for additional information.
Create a Scalar Rule
Fill an entity type with a scalar rule by proceeding as follows:
Step 1 – Click on Access Rules on the home page in the Configuration section.
Step 2 – In the dropdown menu at the top left, choose the source entity type for the future scalar rule.
![]()
Step 3 – Click on the Scalars tab and on the addition button at the top right corner.

Step 4 – Fill in the fields.
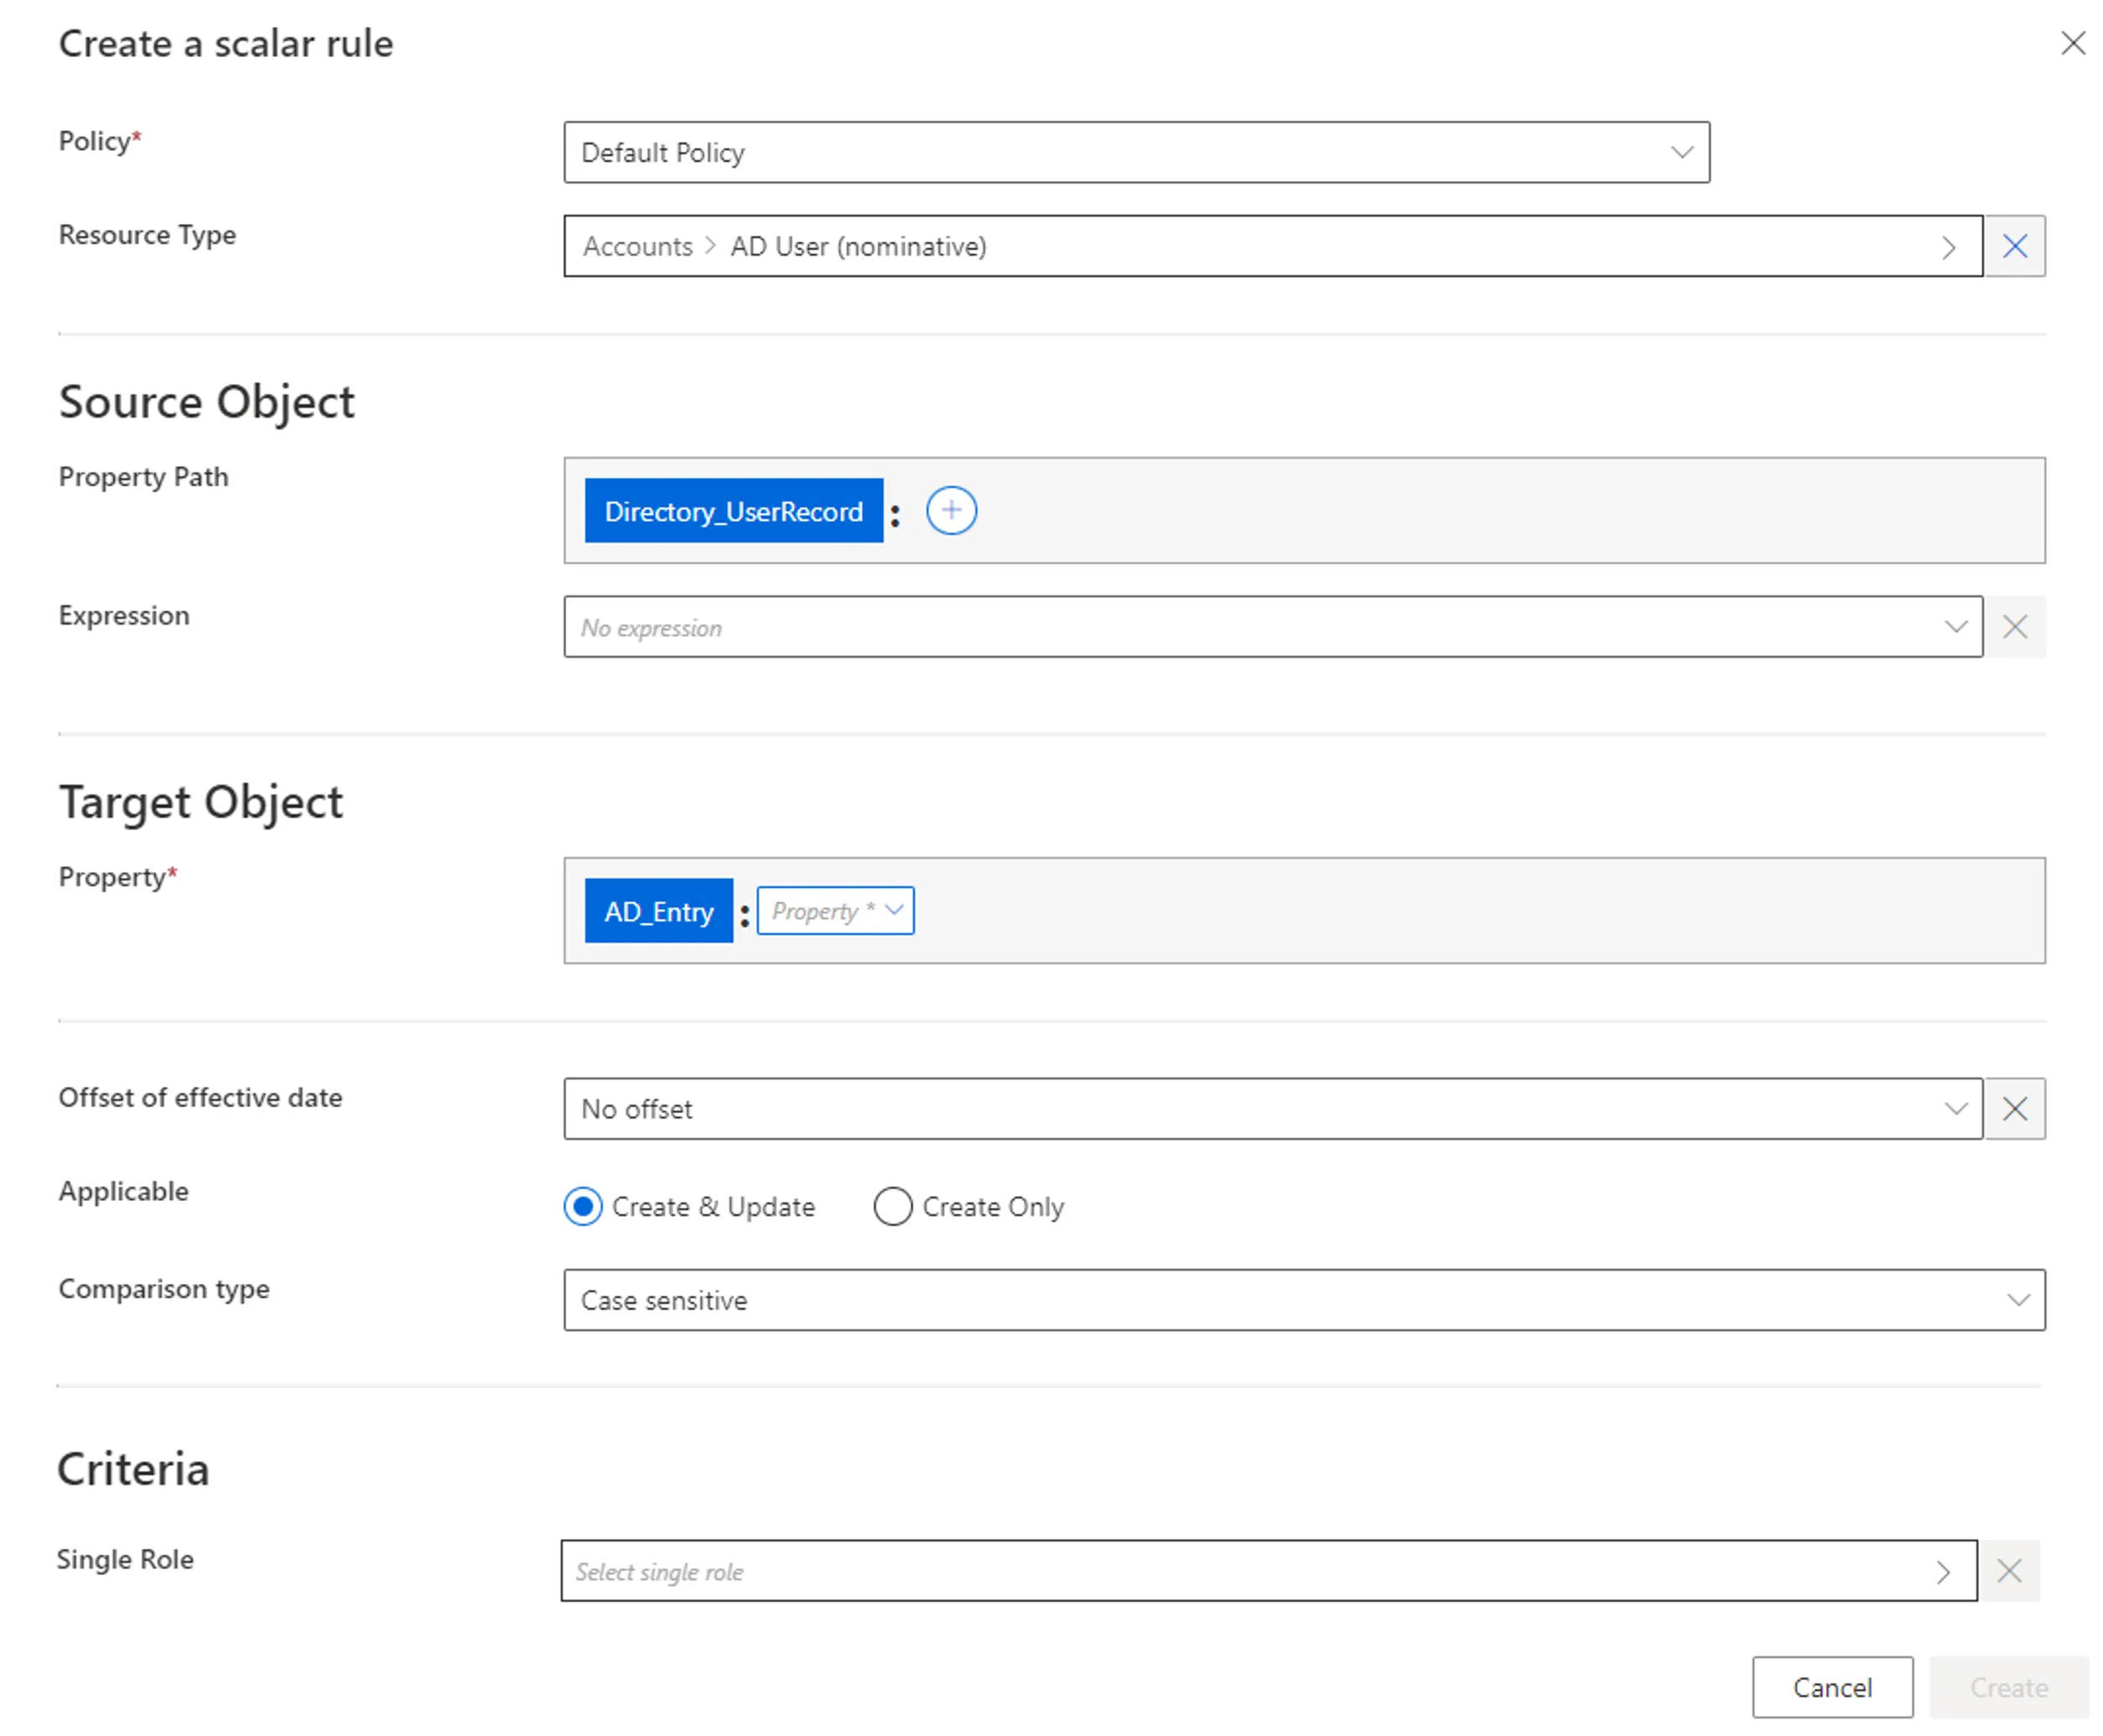
Once the Resource Type is provided, more fields appear.
-
Source Object: Scalar property (or expression of scalar properties) from the source entity type, which constitutes the input for the computation of the target object. Can be defined by a property path and/or an expression.
-
Target Object: Scalar property from the target entity type, whose value is to be impacted.
-
Offset of effective date: Time period that defines the actual effective date for property computation according to the value's start and/or end date.
For example, account activation and deactivation can be managed according to the start and/or end dates.
-
Applicable: Create & Update to use this computation to both provision the managed system and synchronize the property back to Identity Manager; Create Only to use this computation to only provision the managed system and ignore this property during synchronization, this way the property can never be displayed as non-conforming.
Create Only is usually set to adapt the configuration to the constraints of the managed system, when Identity Manager does not retrieve and/or update the property value.
For example, consider a system, that we want to connect to Identity Manager (let's call it SYST) using a title property. Consider also that SYST needs to be provisioned with the value of title, but does not allow any other system to retrieve said value.
In this case, we use Create Only so that Identity Manager sends the adequate provisioning order upon creation, and then is able to change the provisioning state to Executed without synchronization. If any changes impact that Scalar Property value the workflow state will be modified to PolicyApprovedWithChanges meaning that the policy value is not equal to the external system's value and that will not be provisioned.
-
Comparison type: Comparison type between the value of the target object computed by the rule and its value from the managed system. Non-conforming values are displayed on the Provisioning Review screen.
-
Criteria: Conditions that, if met, trigger the rule application.
Our example would look like:
Step 5 – Click on Create and see a line added on the rules page.
Impact of Modifications
Any modification in a scalar rule is taken into account when launching the role model computation task, in the Resource Types frame of the corresponding connector's overview page, via Jobs > Compute Role Model.
This task applies the rules and computes new properties. Therefore, if a given rule's criterion is modified, then all corresponding assignments are computed again. If a resource was created automatically for an identity through a scalar rule (and its single role criterion), and if the user's criteria do not comply with the new version of the rule, then the corresponding resource is automatically deleted.
A modification in a provisioning rule can trigger the removal of a resource only on the Identity Manager side. There are several barriers to cross before said resource is removed from the managed system.
Simulations are available in order to anticipate the changes induced by a creation/modification/deletion in scalar rules. See the Perform a Simulation topic for additional information.
Verify Rule Creation
In order to verify the process:
Step 1 – On the corresponding connector's overview page, in the Resource Types frame click on Jobs > Compute Role Model to apply all rules.
Step 2 – Review unreconciled properties on the Resource Reconciliation screen to help check scalar rules: if there are numerous properties to be reconciled following the same pattern, then there may be a rule that needs to be changed. See the Reconcile a Property topic for additional information.
Once the steps completed the process is verified.
Create Resources
How to define Resource Type rules to create new (target) resources for given users, computing and provisioning their properties based on source resources.
Overview
Sources are usually identities, and targets are usually accounts from the managed systems.
Here, we are going to create target resources and assign them to given users. We are going to Provision these resources, i.e. write them to the managed system.
The right tools for the job are resource type rules.
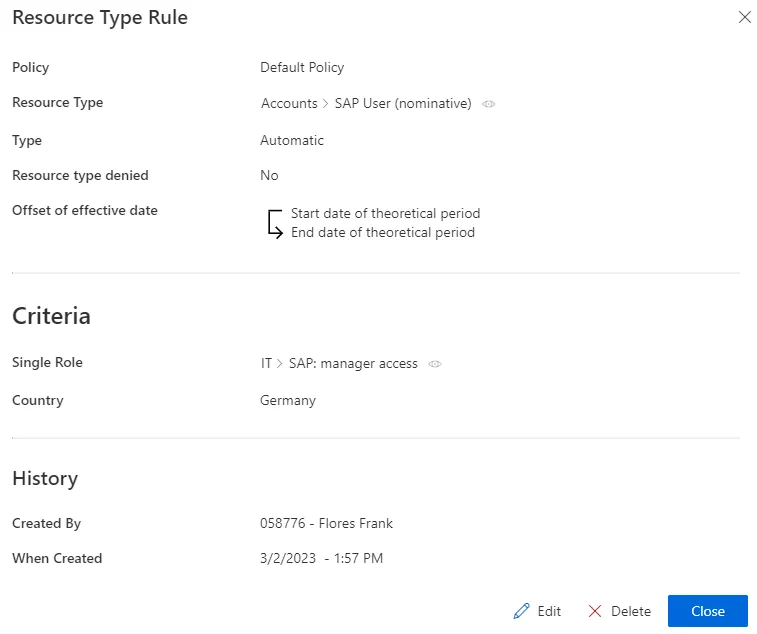
The application of a resource type rule can depend on the assignment of a single role, and/or user dimensions.
A resource type rule could assign a SAP account to users working in Germany, and who already have the role
SAP: manager access.
Participants and Artifacts
For a given managed system, integrators may need the help of the application owner who knows the application users, entitlements and data model.
| Input | Output |
|---|---|
| Categorization (required) | Resource type rules |
See the Categorize Resources topic for additional information.
Create a Resource Type Rule
Create a resource type rule by proceeding as follows:
-
Click on Access Rules on the home page in the Configuration section.
-
In the dropdown menu at the top left, choose the source entity type for the future scalar rule.
-
Click on the Resource Types tab and on the addition button at the top right corner.

-
Fill in the fields.

Resource Type: resource type to be automatically assigned.Type: assignment type that can be:Suggestedso that the resource type is listed among suggested permissions in the permission basket of users matching the criteria during an entitlement request, suggested assignments must be selected manually to be requested; orAutomaticso that the resource type is automatically assigned to users matching the criteria; orAutomatic but with validationso that the resource type is listed in the permission basket of new workers, these assignments can still be modified.Resource type denied: option that forbids the assignment.Offset of effective date: time period that defines the actual effective date for resource creation/deletion according to the value's start and/or end date.- Criteria: conditions that, if met, trigger the resource creation.
Our example would look like:
-
Click on Create and see a line added on the rules page.
Impact of Modifications
Any modification in a resource type rule is taken into account when launching the role model computation task, in the Resource Types frame of the corresponding connector's overview page, via Jobs > Compute Role Model.
This task applies the rules and computes new assignments. Therefore, if a given rule's criterion is modified, then all corresponding assignments are computed again. If a resource was created automatically for an identity by a resource type rule, and if the user's criteria do not comply with the new version of the rule, then the corresponding resource is automatically deleted.
A modification in a resource type rule can trigger the removal of a resource only on the Identity Manager side. There are several barriers to cross before said resource is removed from the managed system: first before the creation of an Assigned Resource Type in Identity Manager's database, and again before the actual action in the managed system.
In our example, let's say that we replace the country criterion
GermanywithFrance. Consider a user who had a SAP account assigned through this rule. Now that the country criterion has changed, our user working in Germany would be deprived of their account.
Simulations are available in order to anticipate the changes induced by a creation/modification/deletion in resource type rules.
Verify Rule Creation
In order to verify the process, start by checking the rule's details on the Access Rules page. Then, you can:
-
Select a test user in the directory, accessible from the home page.

-
Create a resource type rule involving an account that said user doesn't already have, based on criteria which the selected user satisfies.
-
Trigger the computation of the role model by clicking, on the corresponding connector's overview page, in the Resource Types frame, on Jobs > Compute Role Model to apply all rules.
-
See the new account in the user's View Permissions tab.

If the type rule uses a single role as a criterion, and the user has said role, then both the resource type and the role will be displayed in the user's permissions, but only if the role is related to a Compute a Navigation Property . Otherwise, only the resource type will be visible.
Provision
How to write to an externally managed system.
A word about terminology — Let's clarify the concept of writing to a managed system.
There are two notions involved:
- Fulfillment — writing to a managed system, manually or automatically
- Provisioning — writing automatically as provisioning is automated fulfillment
But in everyday conversation, in the interface and in this documentation, we use the term provisioning instead of fulfillment.
Overview
When modeling your connectors, you had to decide what data you wanted Identity Manager to manage within the external systems. You configured your connectors, and among other things you chose the appropriate connections and packages, to manage identities and their entitlements by writing directly to the managed systems. This is done through said connectors' provisioning capabilities. See the Model the Data and Create a Connection topics for additional information.
When changes are performed on identity data, entitlements or the role model inside Identity Manager, provisioning orders are generated in order to actually write said changes to the external systems. These changes can be written automatically or manually. Manual provisioning is used to involve humans and make them act on the external systems, instead of Identity Manager. Automatic provisioning is used to minimize human intervention and trust Identity Manager with role model enforcement in external systems. See the Provision Manually and Provision Automatically topics for additional information.
Provisioning states
Identity Manager handles provisioning by assigning a provisioning state to assignment requests.
Here is the list of provisioning states and their description:
| Provisioning state | Description |
|---|---|
| 0—None | Used for Identity Manager's internal computation. |
| 1—Pending | The order is ready for provisioning but not sent to the agent. |
| 2—Transmitted | The agent has collected this order but no feedback has been received yet. |
| 3—Errored | The agent returned errors. |
| 4—Verified | The order is provisioned in the synchronized data. |
| 5—Awaiting Approval | The order is blocked until a review is performed. |
| 6—Inactive | The order is blocked as it is considered as useless (order in the past). |
| 7—Error | The role model threw an exception while evaluating the order. |
| 8—Executed | The agent returned OK. |
These states are detailed with their transitions on the individual pages specific to provisioning review, manual provisioning and automated provisioning. See the Entitlement Assignment and Review Provisioning topics for additional information.
Provisioning review
For security purposes, provisioning orders sometimes need to be reviewed before being propagated to the managed system. Then, a user with the right entitlements accesses the Provisioning Review page. Users can either approve provisioning orders that will then be unblocked and finally propagated, or they can decline orders that will subsequently be ignored. See the Configure a User Profile topic for additional information.
The review prior to the provisioning of entitlement assignments is usually performed based on the resource type of given identities. For example, the assignment of sensitive entitlements will require a review before being provisioned, whereas basic rights can be assigned at once. Therefore, resources must be carefully classified beforehand. See the Classify Resources topic for additional information.
Participants and Artifacts
This operation should be performed in cooperation with the staff in charge of managed systems.
| Input | Output |
|---|---|
| Connector's data model (required) Classified resources (required) Provisioning Rules (required) Role catalog (required) | Provisioned system |
See the Model the Data , Classify Resources , Create a Provisioning Rule , and Create Roles in the Role Catalog topics for additional information.
Perform Provisioning
In order to perform the provisioning you have to:
- Choose whether to adjust your resource types to implement provisioning review
- Choose whether to adjust your connections to implement manual and/or automated provisioning
Verify Provisioning
In order to verify the process:
Step 1 – Select a test user in the directory, accessible from the home page.
Step 2 – Follow the manual assignment workflow to make a change in one of their entitlements, which involves the type of provisioning that you want to test.
Step 3 – Check the provisioning state of the requested entitlement at every step, in the user's View Permissions tab.
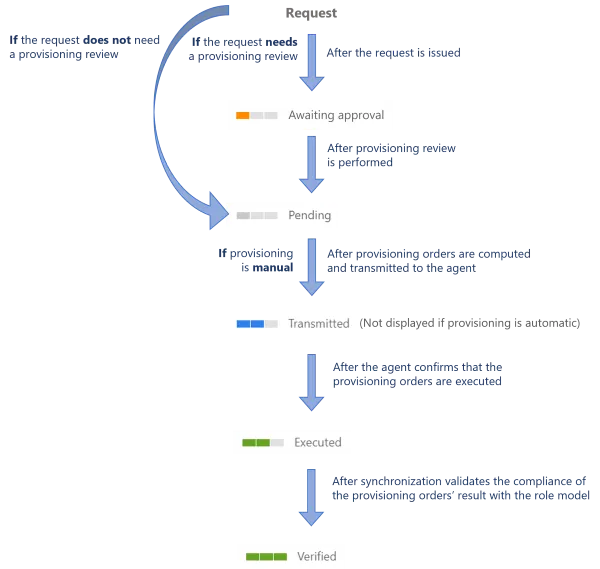
Whether your provisioning workflows trigger provisioning review, or whether they trigger manual or automated provisioning, below is the global state schema.
Provision Manually
How to use Identity Manager to manually write to the managed systems.
Overview
In the lifecycle of a resource (entitlement assignment, resource creation, resource update, etc.), manual provisioning is used to make humans intervene and act on the external systems, instead of Identity Manager.
Provisioning states
In its lifecycle, an assignment request goes through the following provisioning states:
Participants and Artifacts
This operation should be performed in cooperation with the staff in charge of managed systems as write permissions are required.
| Input | Output |
|---|---|
| Review Provisioning (required) Manual provisioning through Create a Connection (required) | Updated managed systems |
Implement Manual Provisioning
Manual provisioning is performed through a connection using the
Manual Ticket .
Besides, for a resource to be manually provisioned, the corresponding resource type must be
configured with the manual connection set to Provisioning Connection in the Fulfill Settings.
Perform Manual Provisioning
Perform manual provisioning by proceeding as follows:
-
Ensure that the task to compute or generate provisioning orders was launched after the request (or the provisioning review, if any), through the complete job in the Job Execution page.

-
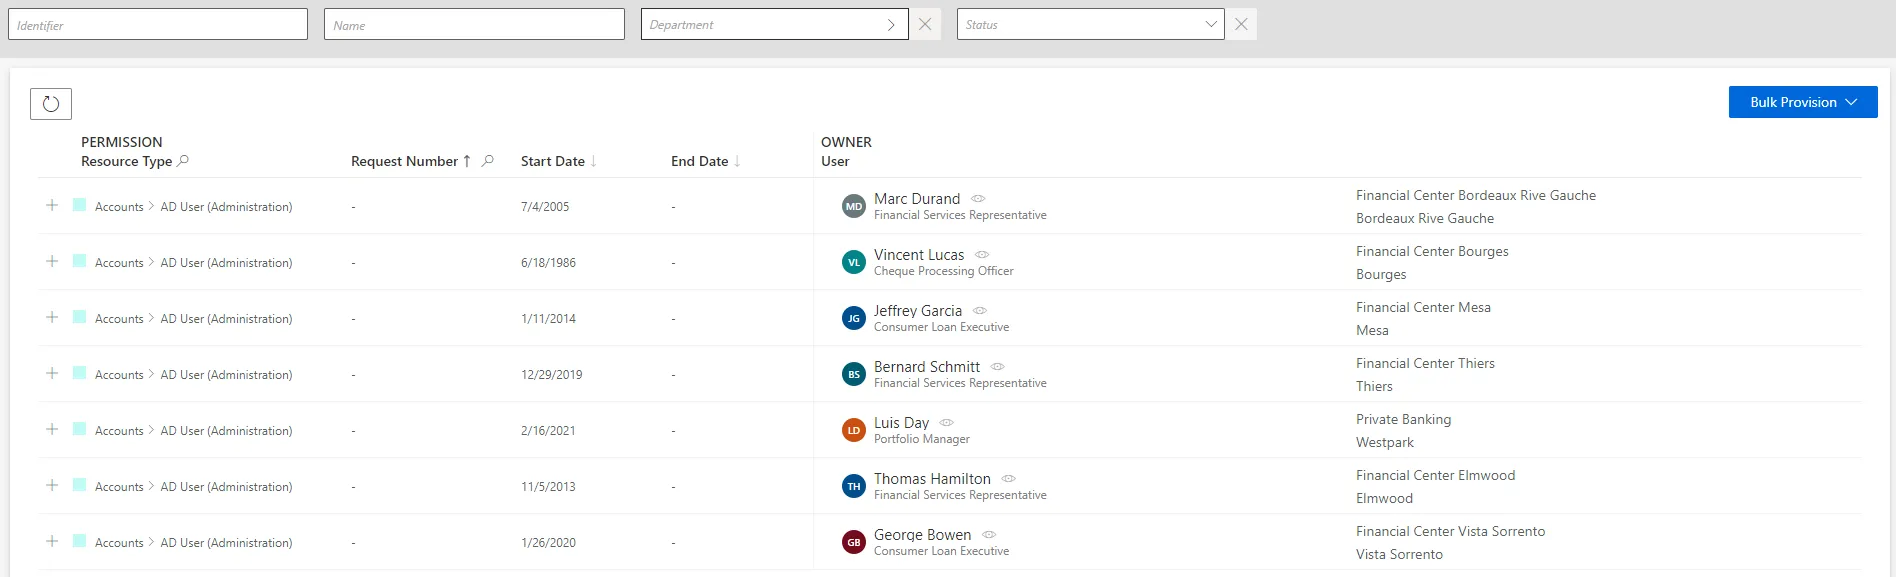
Access the manual provisioning orders page by clicking on the entity type that you want to manage in the Manual Provisioning section.

-
Choose a line to handle the corresponding provisioning order.
-
Creation, edition and deletion orders follow the same process: read Identity Manager's suggestions and create, edit or delete the appropriate resource directly in the managed system (outside Identity Manager).
-
Choose to confirm or report an error.
Use bulk provisioning
Several orders can be provisioned simultaneously by clicking on Bulk Provision.

Verify Manual Provisioning
In order to verify the process:
-
Select a test user in the directory, accessible from the home page.
-
Follow the workflow through Request Entitlement Assignment to make a change in one of their permissions, which involves manual provisioning.
-
Perform manual provisioning and check the provisioning state of the requested entitlement at every step, in the user's View Permissions tab.
- Check in your managed system that the change was effectively made.
Provision Automatically
How to make Identity Manager automatically write to the managed systems.
Overview
In the lifecycle of a resource (entitlement assignment, resource creation, resource update, etc.), automated provisioning is used to minimize human intervention and trust Identity Manager with role model enforcement in external systems.
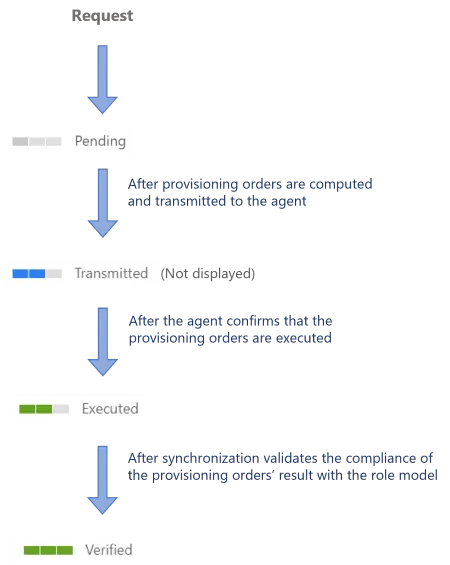
Provisioning states
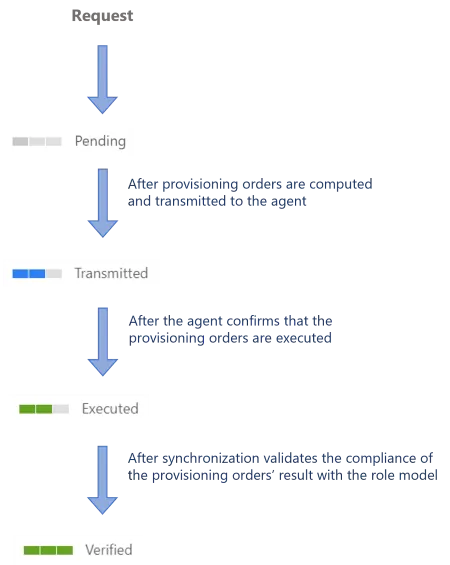
In an assignment request's lifecycle, provisioning automation implies skipping the Transmitted
state as Identity Manager no longer waits for a user to make changes anymore. For this reason, an
assignment request goes through the following provisioning states:
Participants and Artifacts
At this point, integrators should have all the elements they need to operate.
| Input | Output |
|---|---|
| Review Provisioning (required) Automated provisioning to Create a Connection (required) | Updated managed systems |
Implement Automated Provisioning
automated provisioning is performed through a connection using a References: Packages for fulfilling external systems.
Perform Automated Provisioning
There is no procedure to perform automated provisioning, for it is automatic and thus handled by Identity Manager in daily jobs.
Make sure that the task used to compute and generate provisioning orders was launched after the request (or the provisioning review, if any), through the complete job in the Job Execution page.
Verify Automated Provisioning
In order to verify the process:
-
Select a test user in the directory, accessible from the home page.
-
Follow the manual assignment workflow through Request Entitlement Assignment to make a change in one of their permissions, which involves automated provisioning.
-
Perform automated provisioning and check in Identity Manager that the change was effectively made.
Review Provisioning
How to review provisioning orders before generation.
Overview
For security purposes, provisioning orders sometimes need to be reviewed before being computed and actually generated. Then, a user with the right permissions accesses the Provisioning Review page. They can either approve provisioning orders that will then be computed, generated and finally ready for actual provisioning, or they can decline orders that will subsequently be ignored. See the Configure a User Profile topic for additional information.
Provisioning states
In an assignment request's lifecycle, provisioning review adds a few steps between the moment when the request is issued and when provisioning orders are computed:

Participants and Artifacts
This operation should be performed in cooperation with the staff in charge of managed systems.
| Input | Output |
|---|---|
| Create a Provisioning Rule (required) Create Roles in the Role Catalog (required) | Provisioning orders |
Implement Provisioning Review
Provisioning review is configured for a given resource type. Therefore, you can decide to force the review of provisioning orders when you Create a Resource Type . You can choose to:
- Set the number of required approvals by a
Manage Role Officers , via the
Approval Workflowoption. - Enable a technical approval by the application owner, via the
Block provisioning ordersoption.
Provisioning review can also be triggered when a fulfillment error occurs. See the Identity Management topic for additional information.
Review Provisioning Orders
Review provisioning orders by proceeding as follows:
-
On the home page, click on the entity type that you want to manage in the Provisioning Review section.


-
Click on a line to access details and handle addition, association, update or deletion orders.
Once reviewed, provisioning orders are to be executed by Identity Manager during the next Fulfill task, accessible from the corresponding connector's overview page, in the Resource Types frame.
Automatic provisioning orders are directly executed, while manual provisioning orders are listed on the Manual Provisioning page.
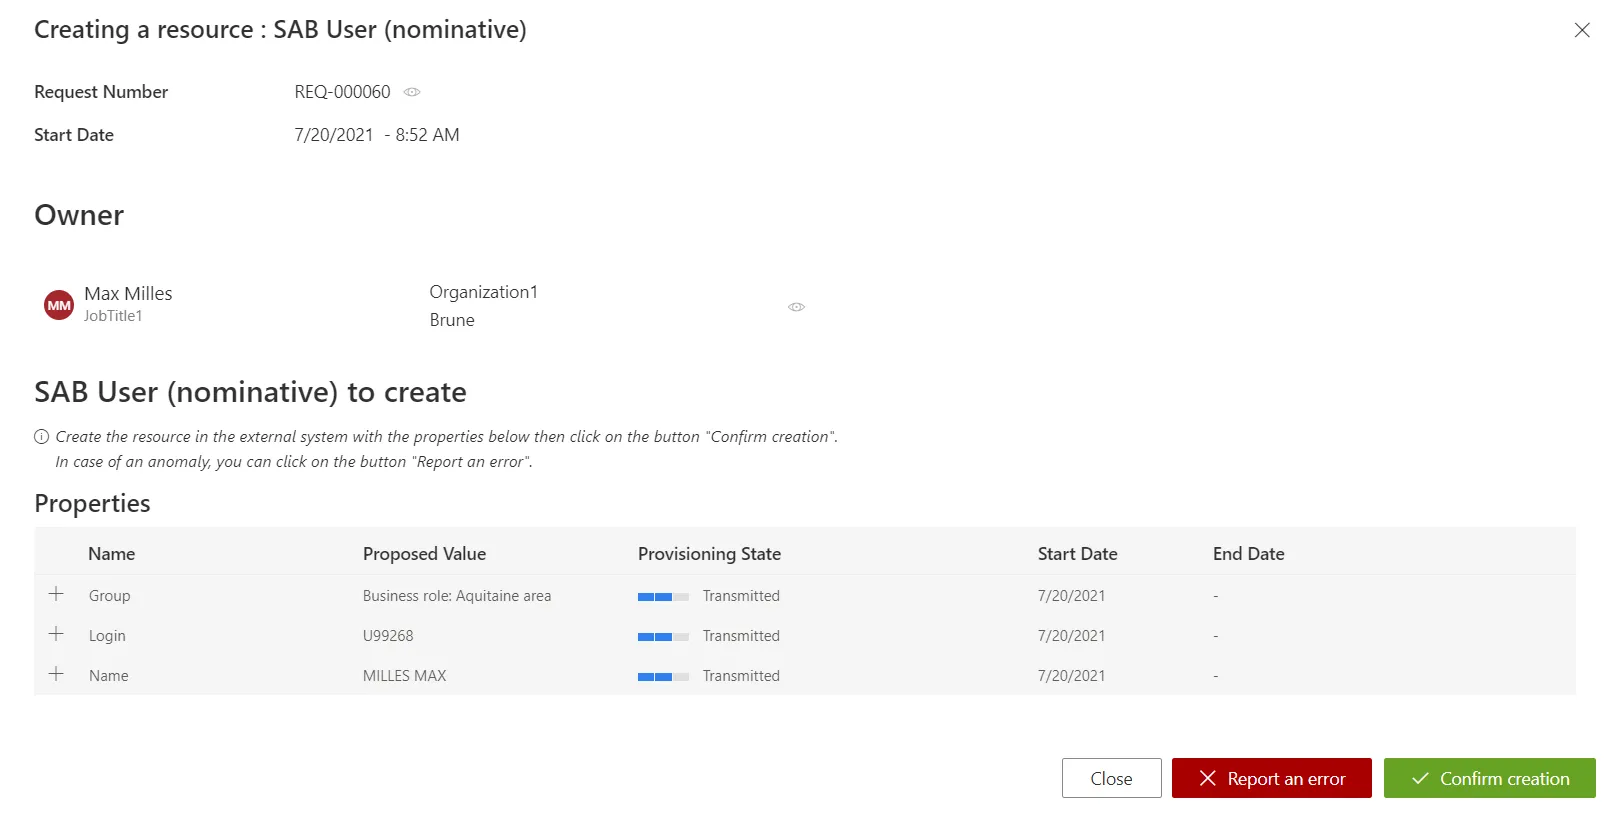
Handle an addition order
Identity Manager shows all the properties of the new resource to be created:
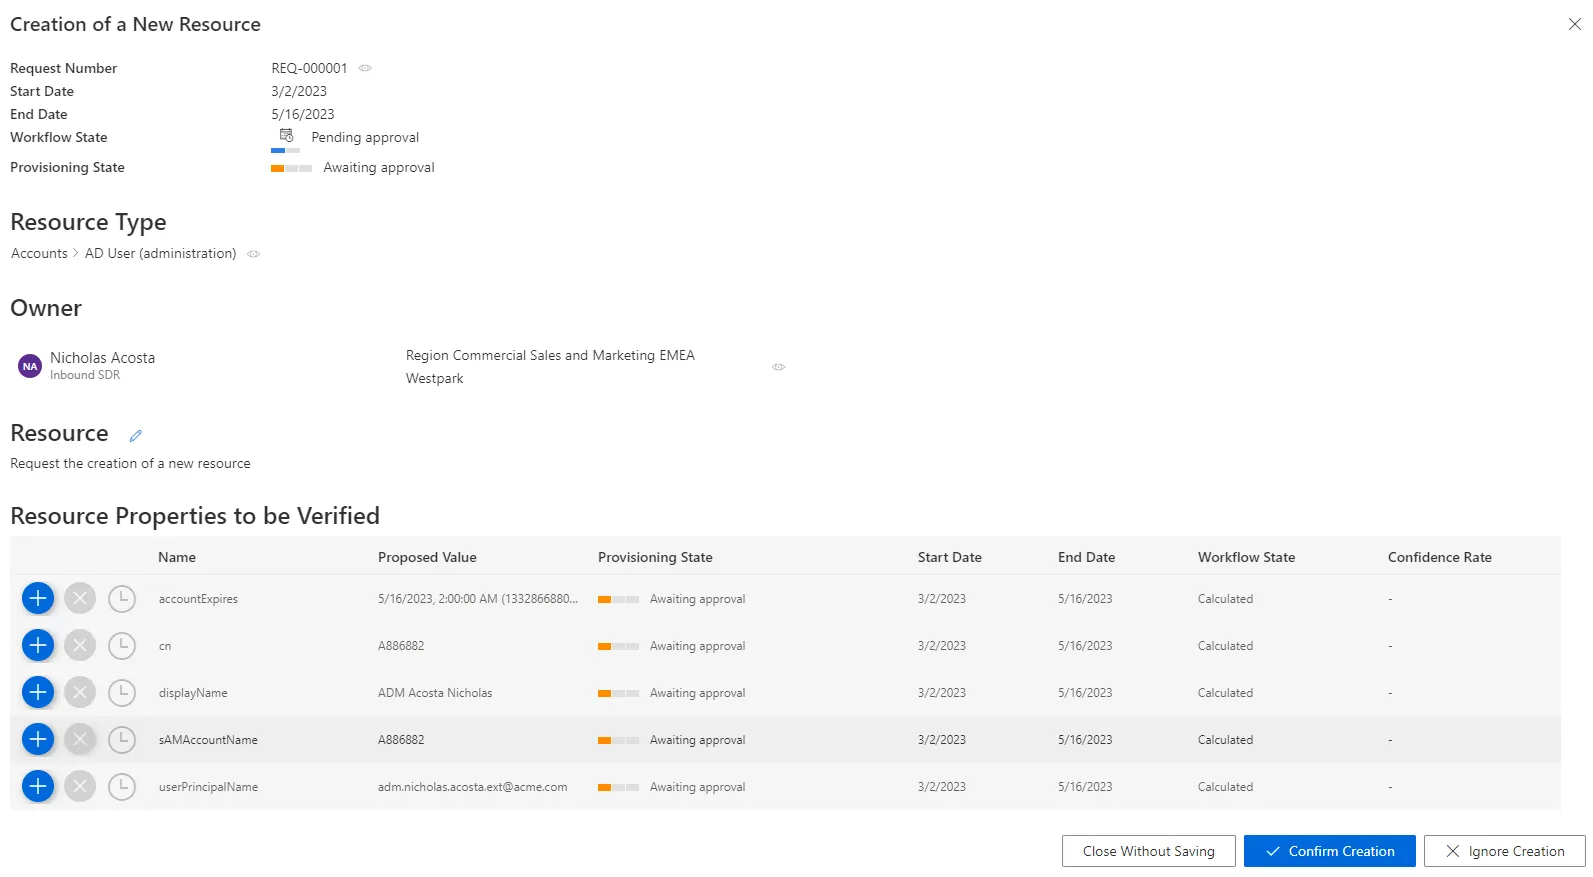
Proposed Value: value proposed by Identity Manager.- Entitlement Assignment
Start Date: date for the beginning of the property value existence.End Date: date for the end of the property value existence.Workflow State: describes the origin or approval state of an assignment.Confidence Rate: rate expressing the confidence in the corresponding query rule.
See the Entitlement Assignment and Create a Provisioning Rule topics for additional information.
Handle an addition order by proceeding as follows:
-
For all resource properties to be verified, choose one of the possibilities:
- Either click on the approval icon to order the property creation with the proposed value.

- Or click on the decline icon to refuse the property creation.

- Or click on the postponement icon to delay the decision.

-
Choose to confirm or ignore the creation.
Handle an association order
Identity Manager displays a given owner and a given resource to be associated with a given Classify Resources and all resource properties to be verified:

Confidence rate of proposed resource: rate expressing the confidence in this Correlate Resources .Proposed Value: value proposed by Identity Manager.Current Value: value currently in the managed system.Provisioning StateStart Date: date for the beginning of the property value existence.End Date: date for the end of the property value existence.Workflow State: describes the origin or approval state of an assignment.Confidence Rate: rate expressing the confidence in the corresponding query rule.
See the Entitlement Assignment and Create a Provisioning Rule topics for additional information.
Handle an association order by proceeding as follows:
-
For all resource properties to be verified, choose one of the possibilities:
-
Either click on the approval icon to validate the proposed property value.


-
Or click on the decline icon to refuse the property association.
-
Or click on the postponement icon to delay the decision.
-
-
Choose to confirm or deny the association.
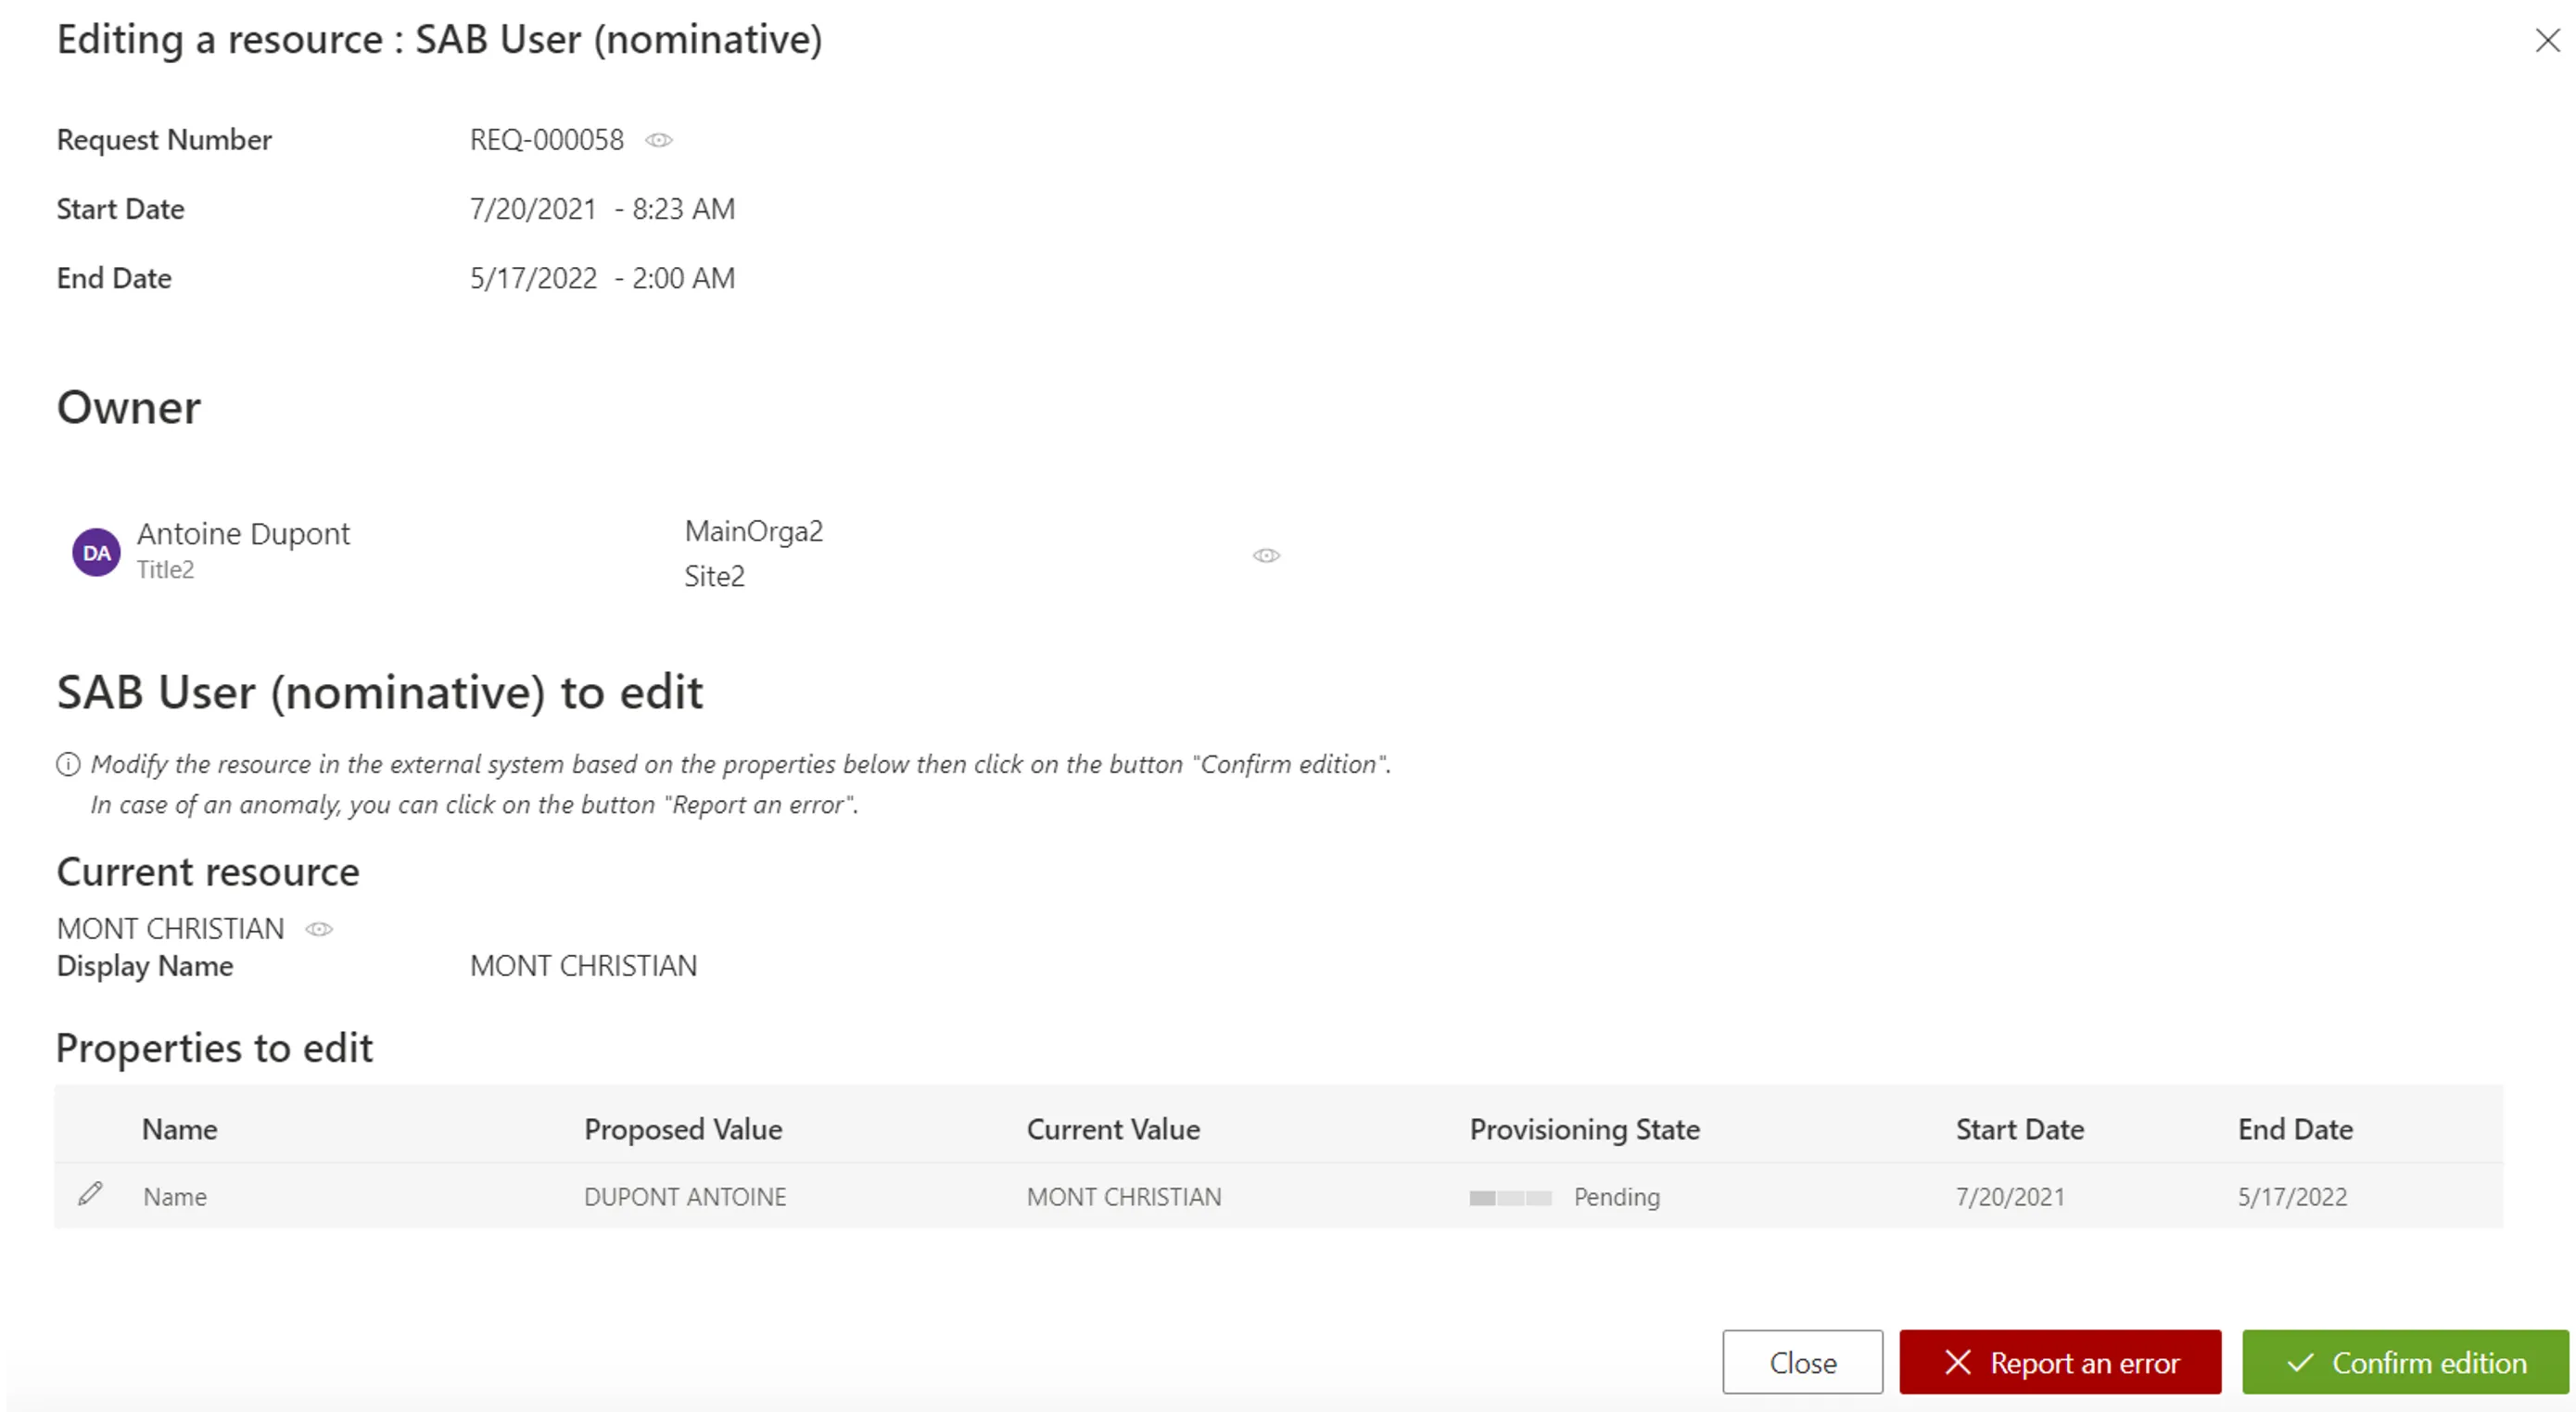
Handle an update order
Identity Manager shows a given resource and all resource properties to be verified:
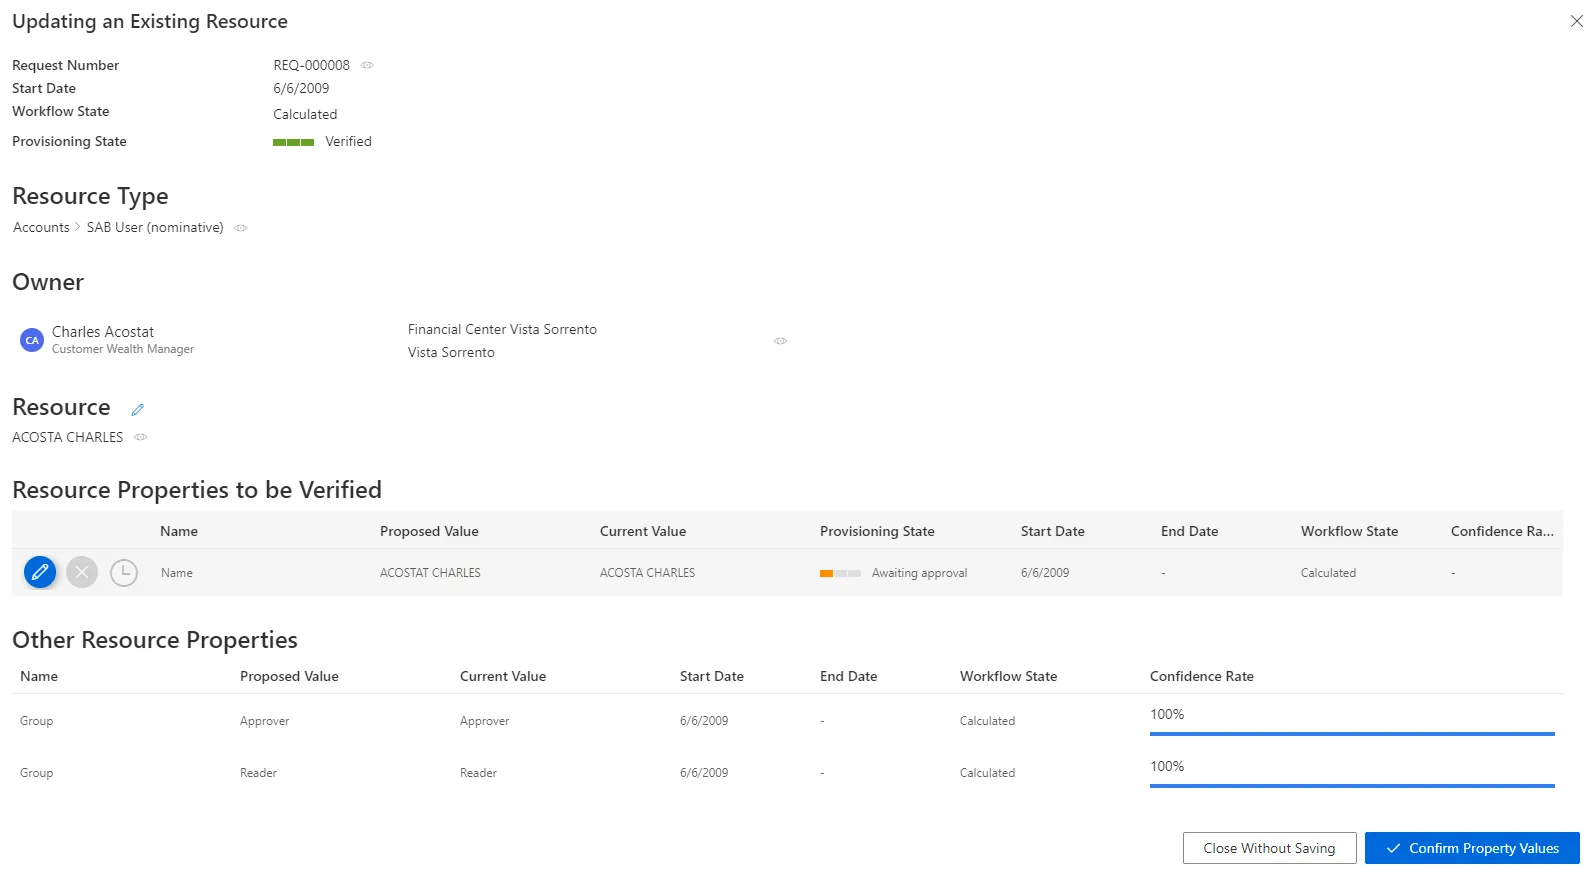
Proposed Value: value proposed by Identity Manager.Current Value: value currently in the managed system.Provisioning StateStart Date: date for the beginning of the property value existence.End Date: date for the end of the property value existence.Workflow State: describes the origin or approval state of an assignment.Confidence Rate: rate expressing the confidence in the corresponding query rule.
See the Entitlement Assignment and Create a Provisioning Rule topics for additional information.
Handle an update order by proceeding as follows:
-
For all resource properties to be verified, choose one of the possibilities:
-
Either click on the approval icon to order the property update with the proposed value.
-
Or click on the decline icon to refuse the property update.
-
Or click on the postponement icon to delay the decision.
-
-
Click on Confirm Property Values.
Handle a deletion order
Identity Manager shows a given owner and their resources to be deleted:
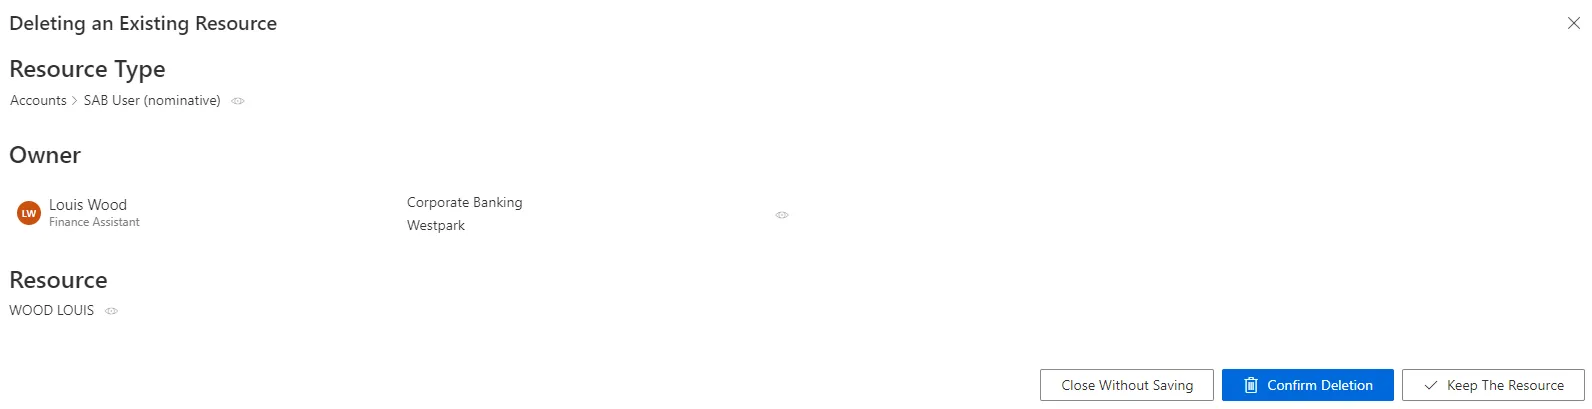
Handle a deletion order by choosing either to confirm the deletion or to keep the resource.
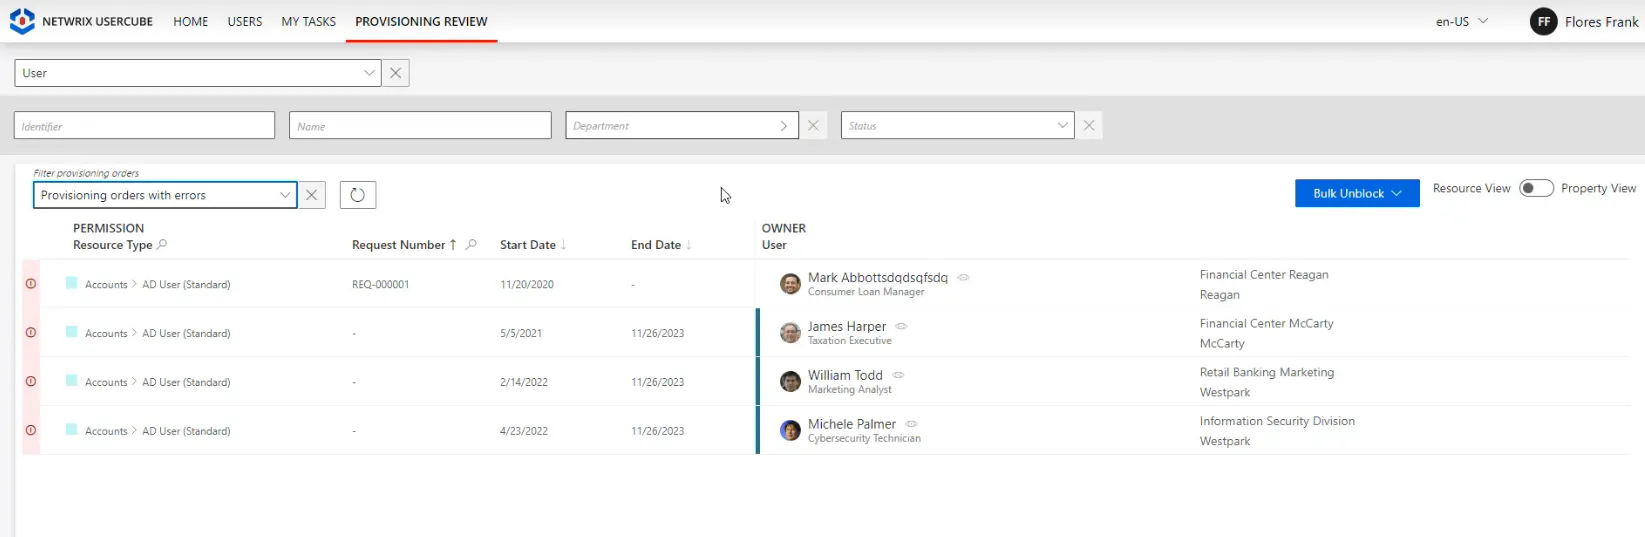
Use property view
By default, provisioning orders are listed by resource. It is possible to click on a resource and then access the list of all provisioning orders for that resource.
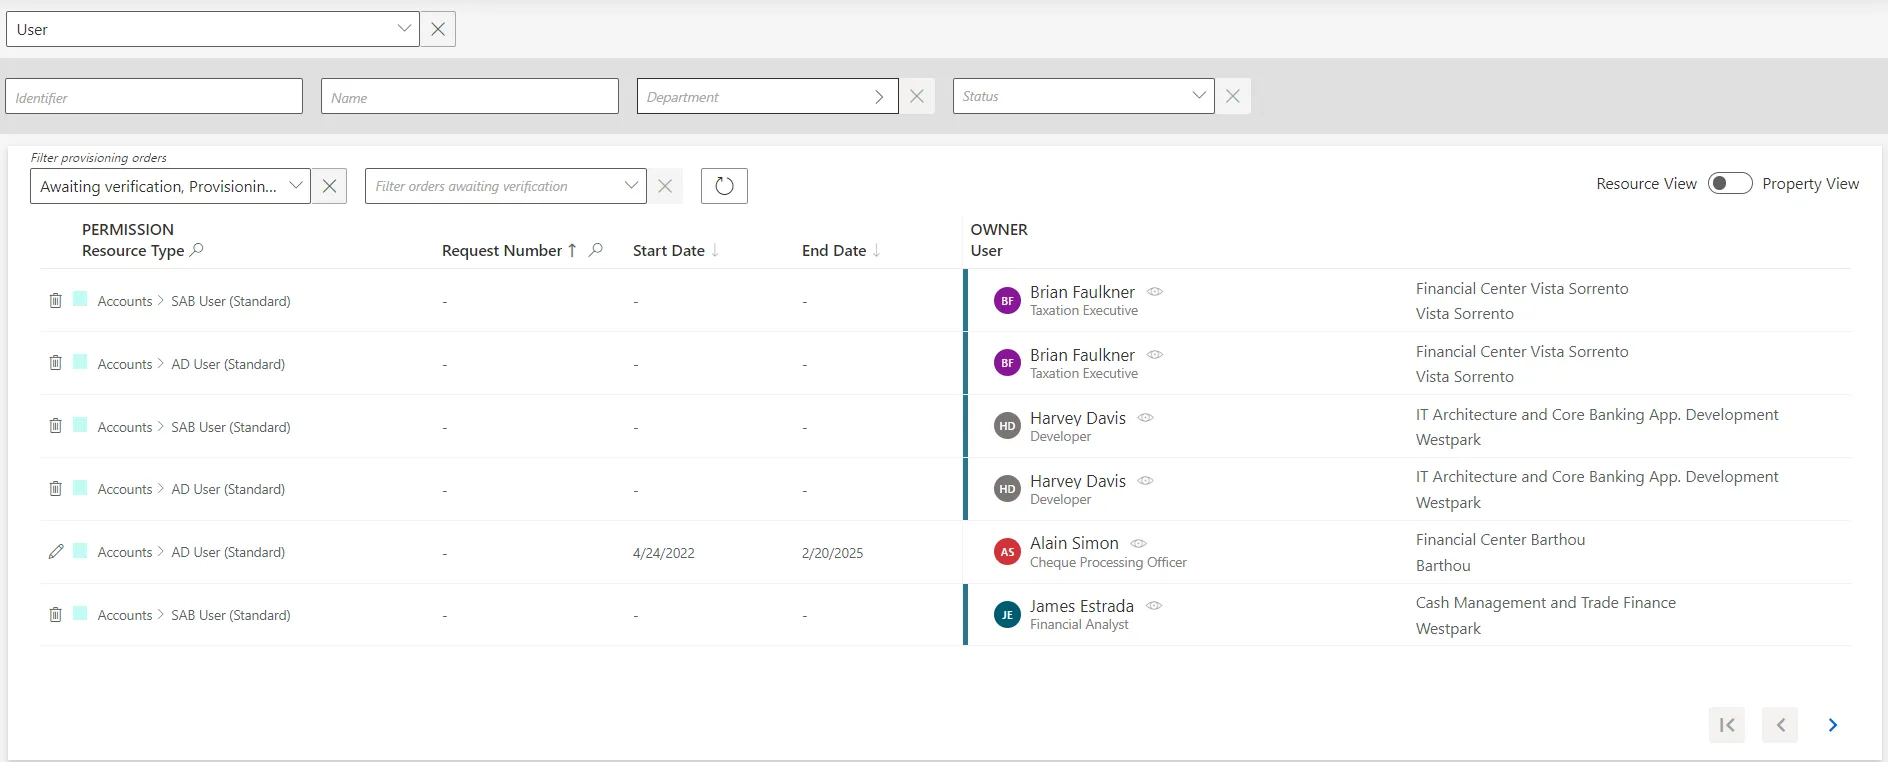
In addition, using resource view enables bulk unblocking for provisioning orders with errors.
It can be helpful to have the provisioning orders regrouped by property, as some of the changes can
be similar, so very likely to be validated by the same user. This is why a property view can be
enabled by clicking on the Property View toggle at the top right corner.
Once enabled, select a resource type to display all provisioning orders linked to that resource type. In addition, select a property to display only the provisioning orders linked to these resource type and property.
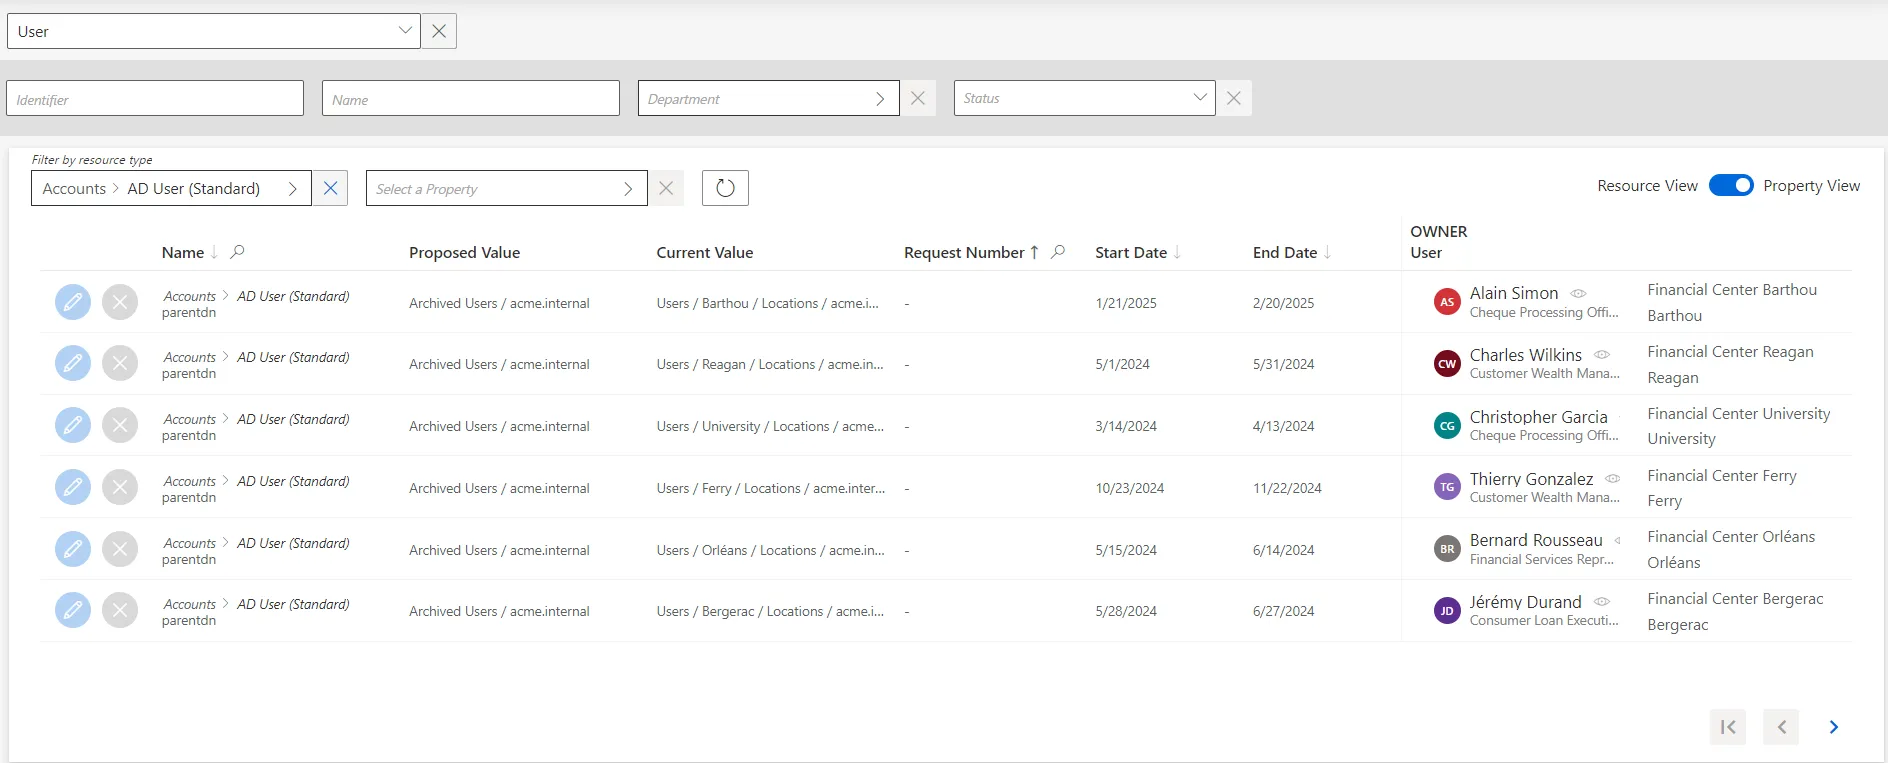
The review process is similar on both views. However with property view, reviewers don't click on a given line, but choose a decision directly on the left of the property line.
Verify Provisioning Review
In order to verify the process:
-
Select a test user in the directory, accessible from the home page.
-
Follow the Request Entitlement Assignment workflow to make a change in one of their permissions, which involves provisioning review.
-
Check that the provisioning state is
Pendingin the user's View Permissions tab. -
Click on Jobs > Fulfill on the corresponding connector's overview page, in the Resource Types frame, to execute the provisioning orders.
-
The orders using automated provisioning should be automatically handled with their state switching to
Executed, while those using manual provisioning should appear on the Manual Provisioning page with their state switching toTransmitted.