Identity Management
Identity management is about creating a repository of identities (all kinds of identities) along with the entitlements that they need to work. One of the main purposes of an IGA tool is to help create the identity repository, and to keep it up-to-date with identities' lifecycles within the company.
"Identities' lifecycles" mean any Joiners, Movers and Leavers (JML) process, i.e. staff changes, i.e. any user's onboarding, position modification and offboarding.
See the Identity Repository topic for additional information. See the Identity Lifecycle: Joiners, Movers and Leavers topic for additional information on how Identity Manager handles the Joiners, Movers and Leavers (JML) process.
Identities in Identity Manager are mostly humans, both internal and external workers, but can also be applications, bots, service accounts, or anything.
Identities are stored in the database as Resources , which helps with Identity Manager's internal mechanisms, for example to modelize identities with Entity Model types.
Additional interesting parts of identity management are:
- the synchronization of identity changes through several repositories, for example both Identity Manager and the AD;
- the provisioning of identity properties directly to the connected systems, based on the computation of the Role Model .
See the Synchronization topic for additional information.
See the Provisioning topic for additional information.
Create the Workforce Repository
How to initiate the repository for workforce identities by loading identities into Identity Manager with the right attributes.
Overview
Loading the digital identities into Identity Manager is the very first task you have to perform, once you installed the development environment.
The identity repository is supposed to contain the list of all kinds of identities in the company. Each identity will be represented by a set of properties that are to be used in the calculations for entitlement assignments.
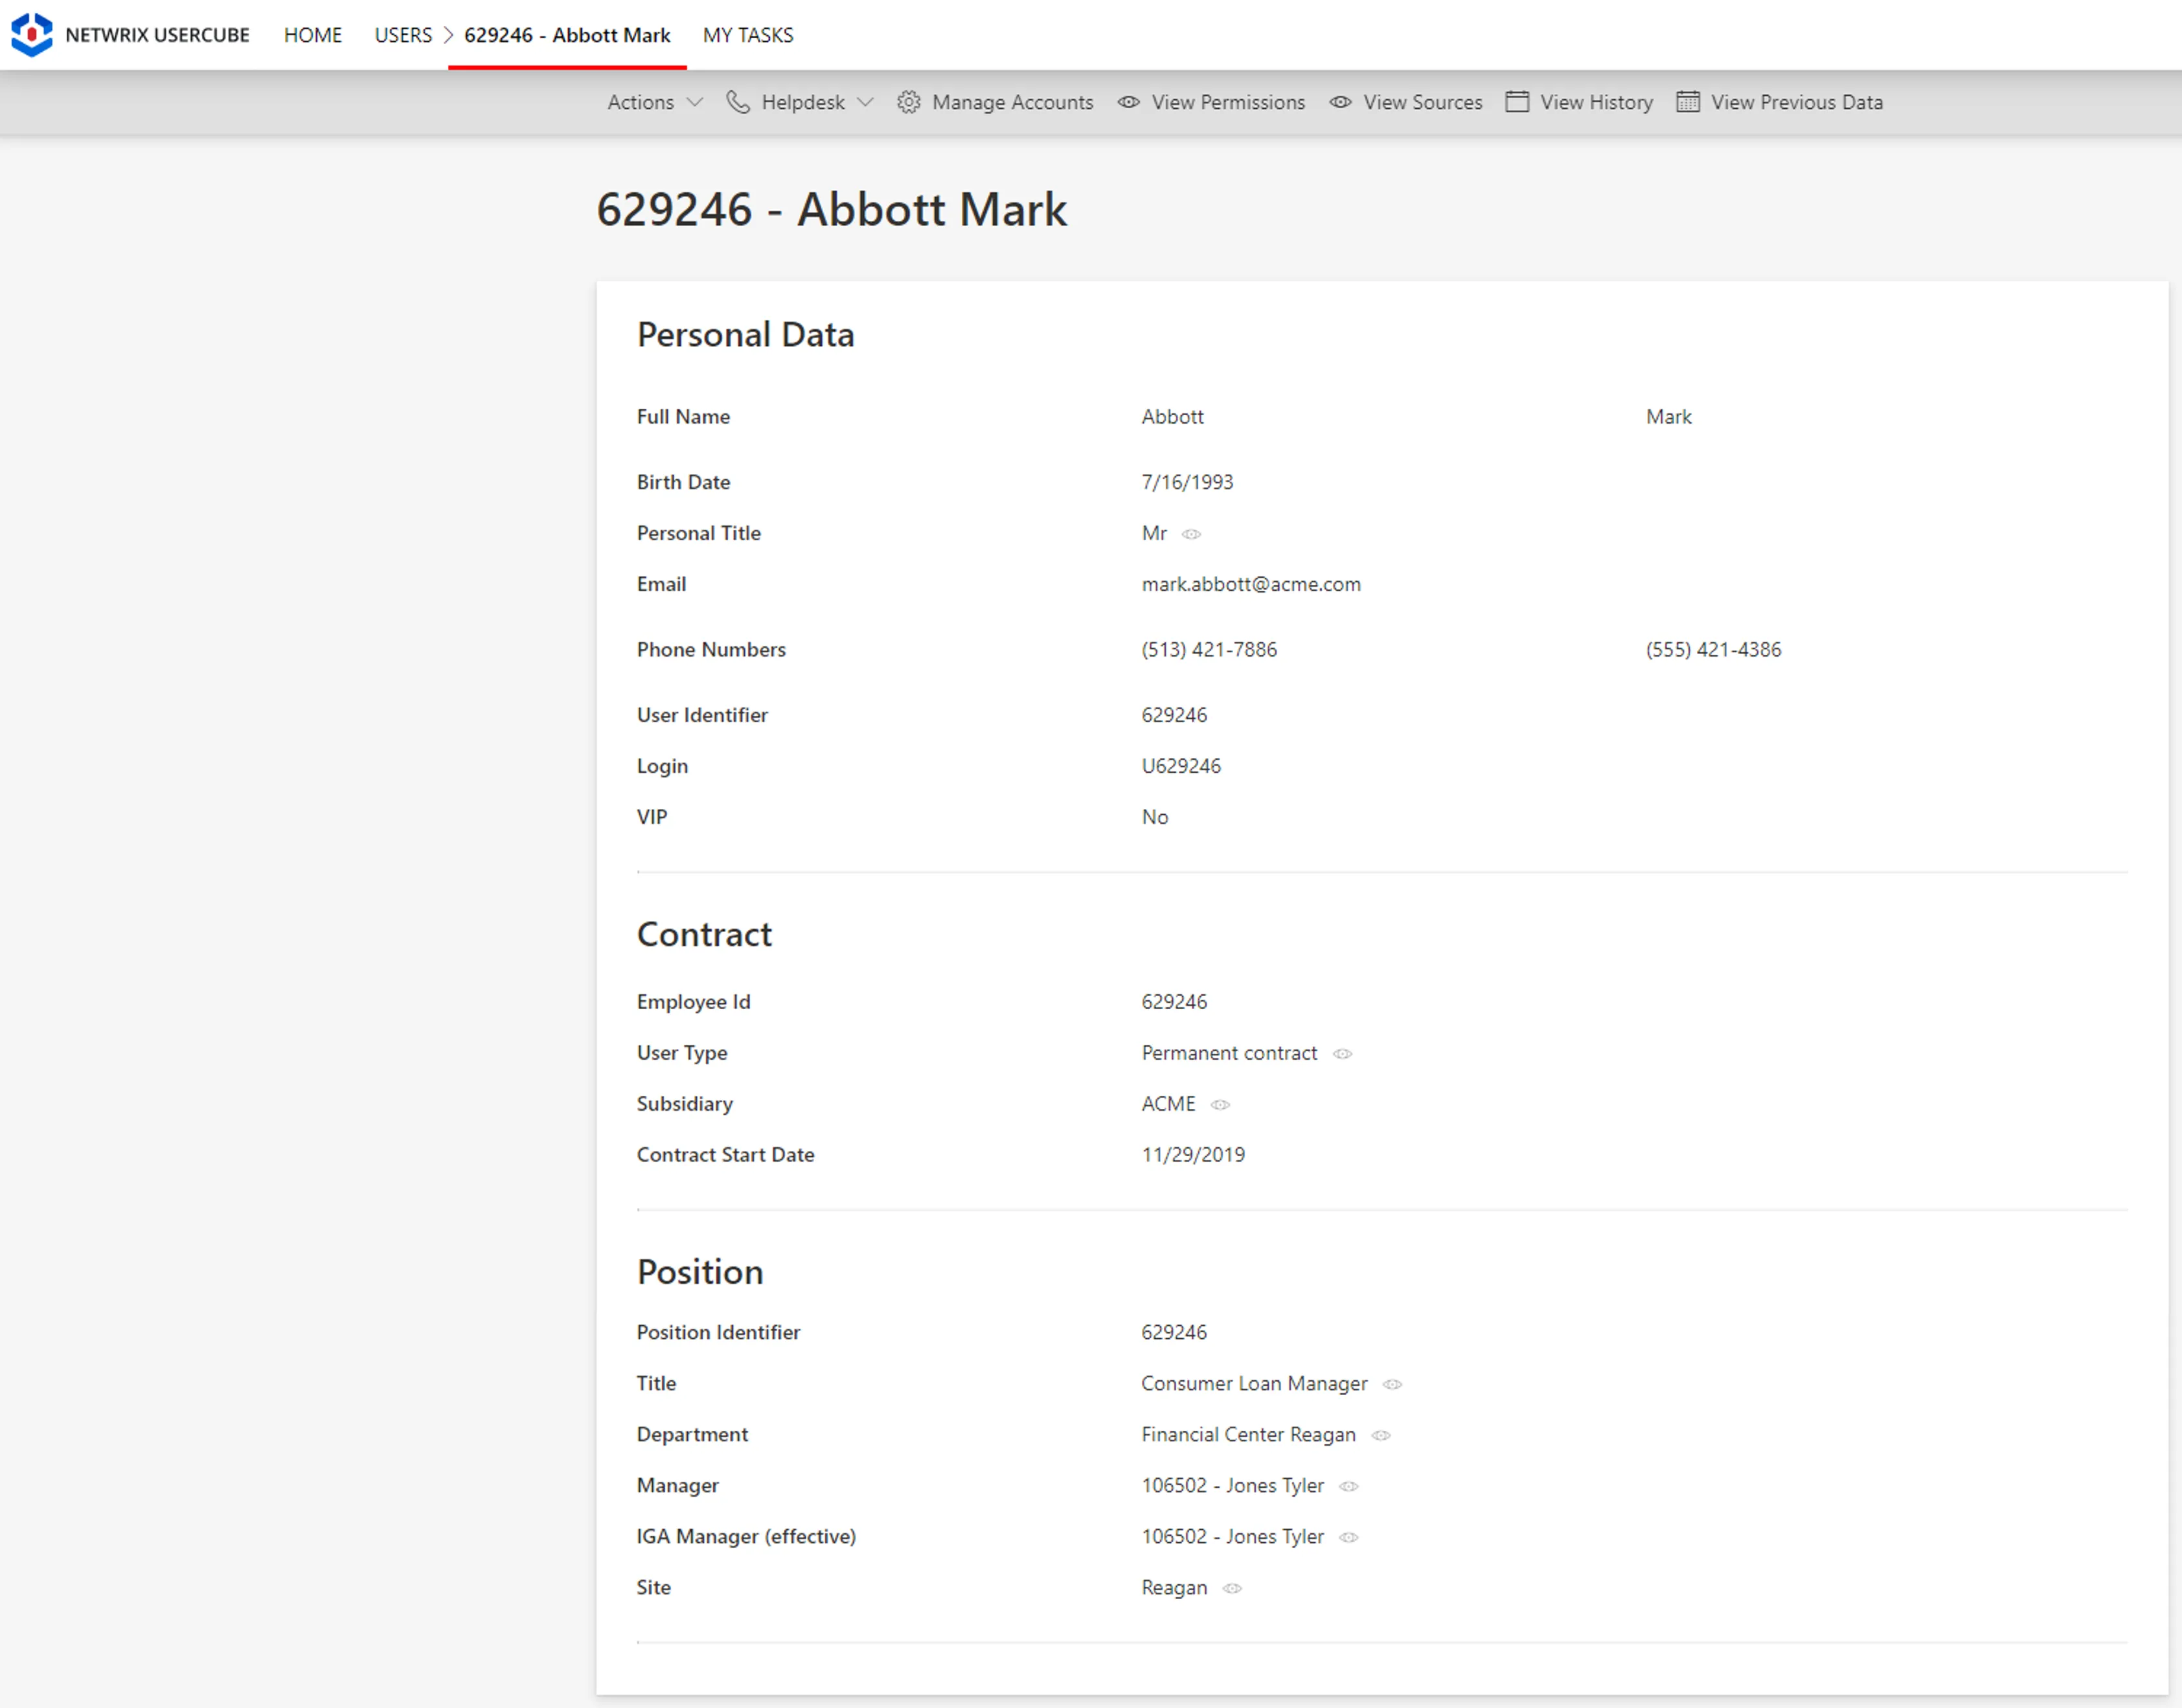
For example, a user can be represented by an identifier and linked to their position which includes the user's employee id, last name and first name, email, user type, organization, etc.
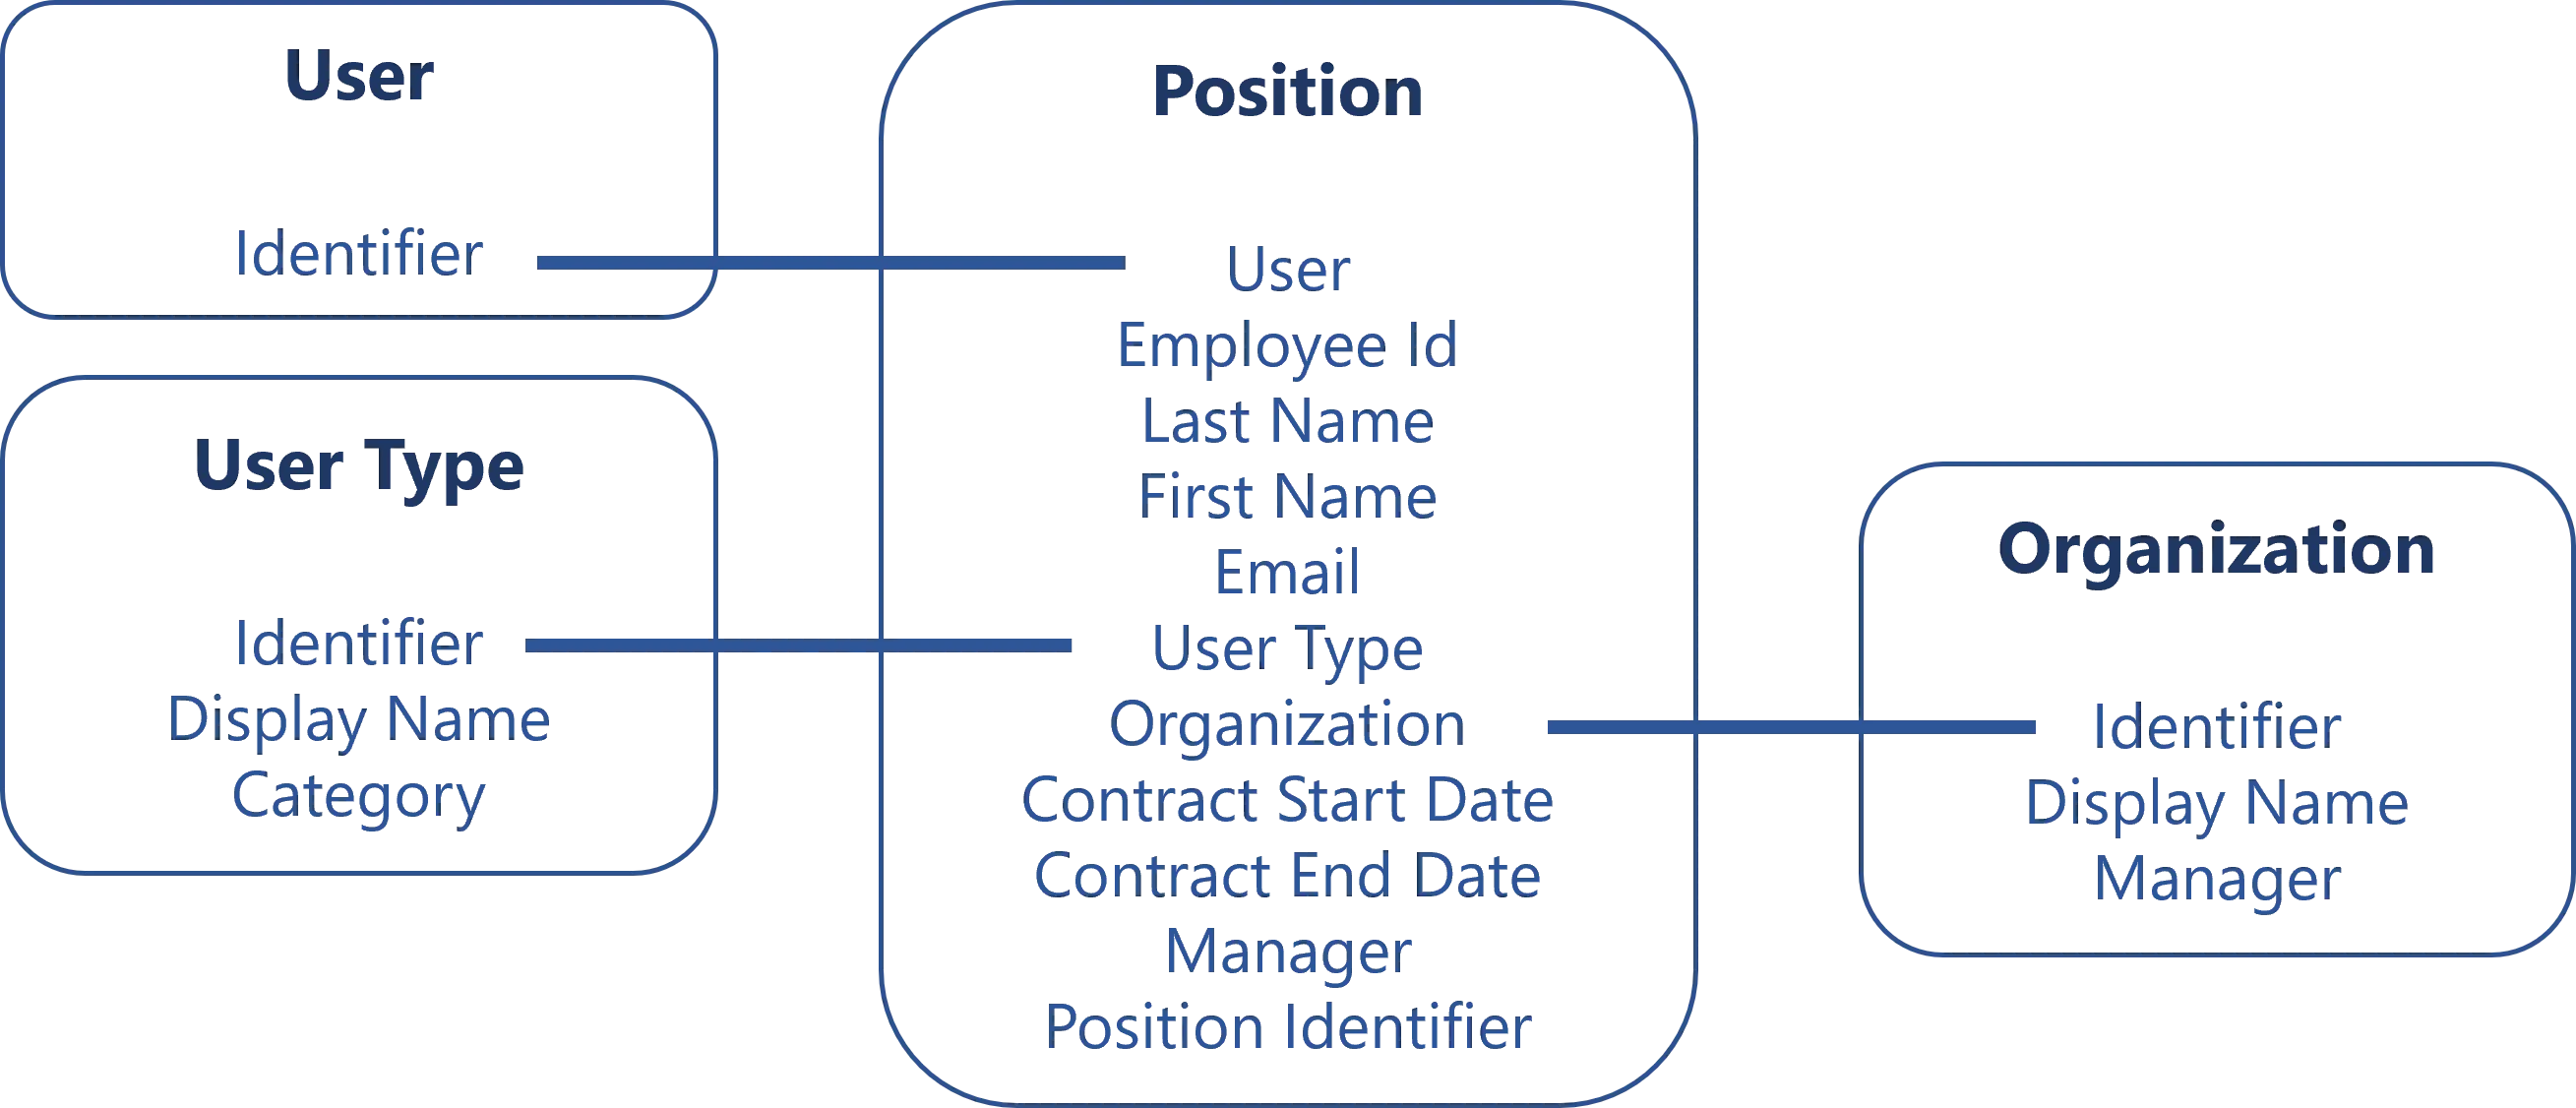
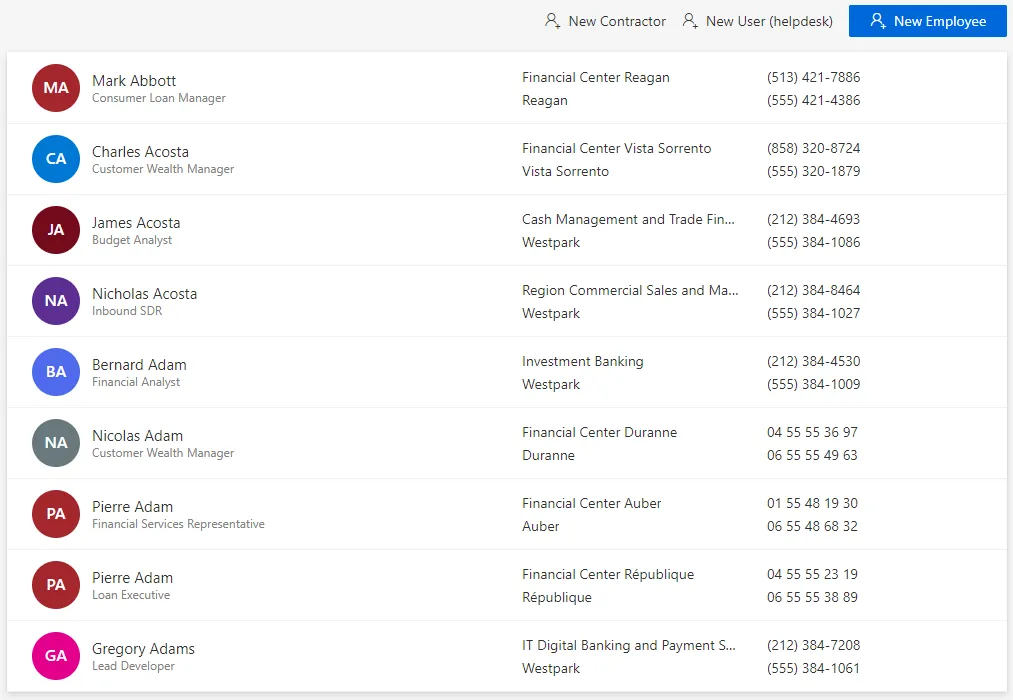
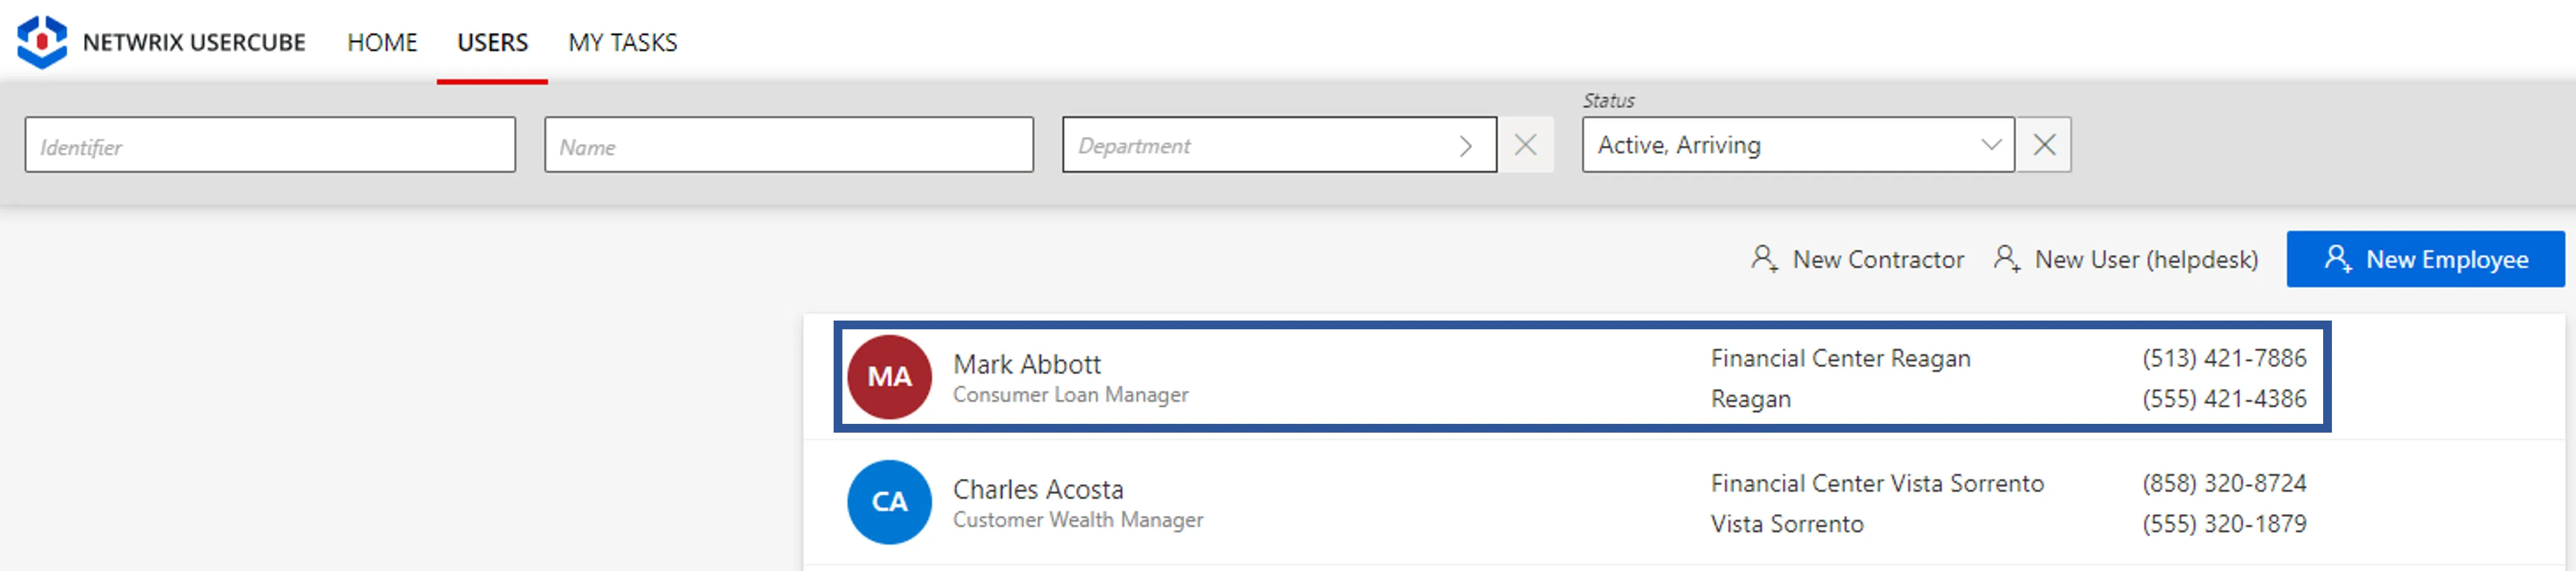
In Identity Manager, the identity repository can look like the following:
See the Identity Repository topic for additional information..
The initial workforce repository is going to be the first version of a comprehensive repository containing all users in the organization. This repository is crucial in setting up the identity lifecycle management features and managing assignments of entitlements.
Creation strategy for the workforce repository
In a nutshell, Identity Manager has made it as easy as a copy-paste from employee and contractor HR files into an MS Excel file.
Special properties generation
First, you have to choose rules about how email, login, and internal identifiers are going to be built for new identities, and for existing identities who do not have these unique properties yet.
Organizational model creation
Then, you are going to need a model of the organization's structure where the identities fit in. This model is supposed to provide valuable information for automation and governance features later.
The model is where you are going to identify for example the type of identities you want to manage (such as employees and contractors), the hierarchical relationships between them, the geographical areas they work in, and so on.
Identity Manager has already built a template model for you, in the form of an Excel file. This basic model is customizable and will be adaptable to most organizations. You can customize it simply by writing information from your organization into said Excel file.
Even if you have more specific or exotic needs that aren't met by this model, it is still a good starting point and a good way to quickly start delivering value. We recommend that you start building your project using this model, identify its limits along the way, and enhance it down the road to make it fit your needs more accurately.
Organizational model filling
Then, you write down the actual identities information, still using the same Excel file, using data from HR extractions or other records of contractors and temporary workers. As simple as a copy-paste.
The data you are going to load is analyzed by the engine and some simplifications will be suggested.
HR synchronization is not enough:
Another way of handling a part of the initial data loading is to set up an automated synchronization of HR data with Identity Manager.
While it seems to be a good idea, it poses a few problems. Among them:
- a specific IT infrastructure is required and its implementation is likely to delay the project's progress;
- HR data usually misses crucial information (for example contractor data) and is rarely up to date early enough to be really useful.
Hence, in order to rather focus on awaited IGA activities, we choose to build the first iteration of the project upon a manual data upload to create the initial workforce repository. .
Participants and Artifacts
Integrators may need the help of the HR department and its assistants who know the organization in order to get the identity and organizational data. After the initial loading, the HR department can review the data to confirm its accuracy.
| Input | Output |
|---|---|
| IdentityManagerServer (required) Organizational chart (required)) HR data (required) Third-party staff data (optional) | Initial workforce repository |
Create the Workforce Repository
Create the workforce repository by proceeding as follows:
- Configure Unique Property Generation for all users, pre-existing and new, who do not have them yet.
- Load Identities to Identity Manager to Identity Manager based on the recommended attributes from the provided organizational model Template Description.
- Adjust the Workforce Data Model following Identity Manager's suggestions.
- Continue with the next steps of this guide, and come back later to fill the organizational model with additional data.
Next Steps
Once the initial identities are loaded, integrators can start the User Profile configuration. See the Configure a User Profile topic for additional information.
From there you will be able to keep your repository up to date:
- concerning identity data through workflows;
- concerning the data model
The initial identities loading also enables:
- HR connector creation.
Configure Unique Property Generation
How to configure Identity Manager to generate unique identifiers, mails and logins for any user who does not have them already.
Overview
All users need to:
- be uniquely identifiable through an identifier, for example in order to link all accounts to their owners;
- have a reserved unique email address, even if they do not need a mailbox;
- have a unique login that can be used as a seed for all users' accounts.
For each unique property, Identity Manager provides a set of generation rules. You are free to choose the most adequate method regarding your actual approach.
An identifier/email/login suffix can be specified later according to users' contract types, when
loading identities through an Excel template. See the
Load Identities to Identity Manager topic for additional
information.
For example, contractors can get -ext added automatically to their email addresses.
The unicity checks performed for identifiers/emails/logins do not consider prefixes nor suffixes.
For example, john.doe@acme.com and john.doe-ext@acme.com cannot exist simultaneously.
Participants and Artifacts
Integrators may need the help of the HR department to understand the actual approach of the organization to compute these unique properties.
| Input | Output |
|---|---|
| IdentityManagerServer (required) | Generation rules for unique properties |
See the Install the Development Environment topic for additional information.
Configure Unique Property Generation
Configure the generation of unique properties by proceeding as follows:
-
On the home page, click on Settings in the Configuration section.

-
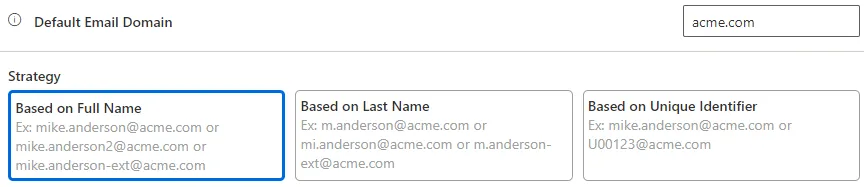
On the Workforce > Identifiers, Mails & Logins page, you can follow Identity Manager's instructions to configure the generation of a unique identifier for new workers (if needed), based on one of the available options.

-
Based on Full Name: replaces all diacritics by the non-accentuated variants; removes all special characters; can add a separator between the first name and the last name if needed (such as.most often); in case of homonyms, appends a sequence number to the full name. -
Based on Last Name: uses the first letter of the first name; in case of homonyms, uses more letters of the first name up to the whole first name; in case of homonyms still, appends a sequence number to the full name. -
Random Number: uses a random number with a default prefix which is used when no specific prefix is specified on the user's contract type.Netwrix Identity Manager (formerly Usercube) recommends using random numbers, as they have the advantage of not containing any personal information nor giving any hint about the users' seniority.
-
Sequence: uses a sequence with a default prefix which is used when no specific prefix is configured on the user's contract type.
-
-
Follow Identity Manager's instructions to configure the generation of a unique email address for all users (who do not have one), based on one of the available options.
-
Based on Full Name: replaces all diacritics by the non-accentuated variants; removes all special characters; can add a separator between the first name and the last name if needed (such as.most often); in case of homonyms, appends a sequence number to the full name. -
Based on Last Name: uses the first letter of the first name; in case of homonyms, uses more letters of the first name up to the whole first name; in case of homonyms still, appends a sequence number to the full name. -
Based on Unique Identifier: uses a combination of the unique identifier (defined on the same page) and the email domain.No matter the strategy:
- the default email domain is used when no specific domain is specified on the user's subsidiary;
- emails are generated in a way that lets users keep their email address, even if they move from contractors to employees, or change to another subsidiary.
-
-
Follow Identity Manager's instructions to configure the generation of a unique login for new workers (who do not have one), based on one of the available options.

Based on Email: uses the local part of the email, i.e. before@.Based on Full Email: uses the full email.Based on Unique Identifier: uses the unique identifier (defined on the same page) prepended with the default prefix when no specific prefix is specified on the user's contract type.
-
Click on the Save icon at the top.

-
Click on the Reload button to apply the recent changes to the application.

Verify Property Generation
In order to verify the process, add a fictitious employee through the workflows from the UI.

Verify in the directory that the employee's sheet displays the expected values for the configured unique properties.

Load Identities to Identity Manager
How to load identities into Identity Manager for the first time using a basic data model in the form of a template MS Excel file.
Overview
Loading the digital identities into Identity Manager is the very first task you have to perform, once you installed the development environment.
The initial workforce repository is going to be the first version of a comprehensive directory containing all users in the organization. This directory is crucial in setting up the identity lifecycle management features and managing assignments of entitlements.
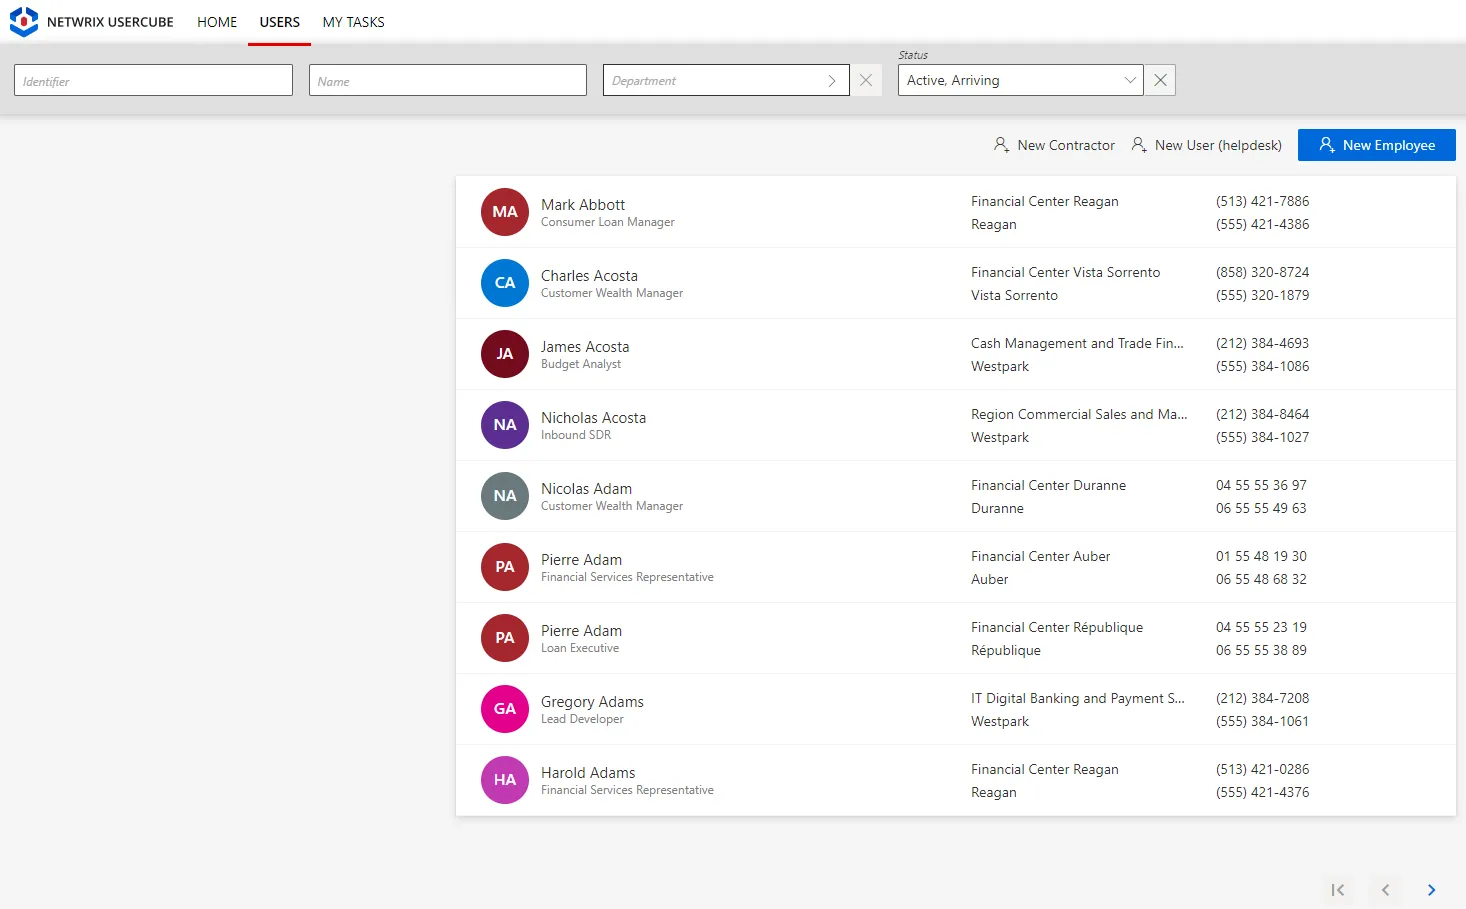
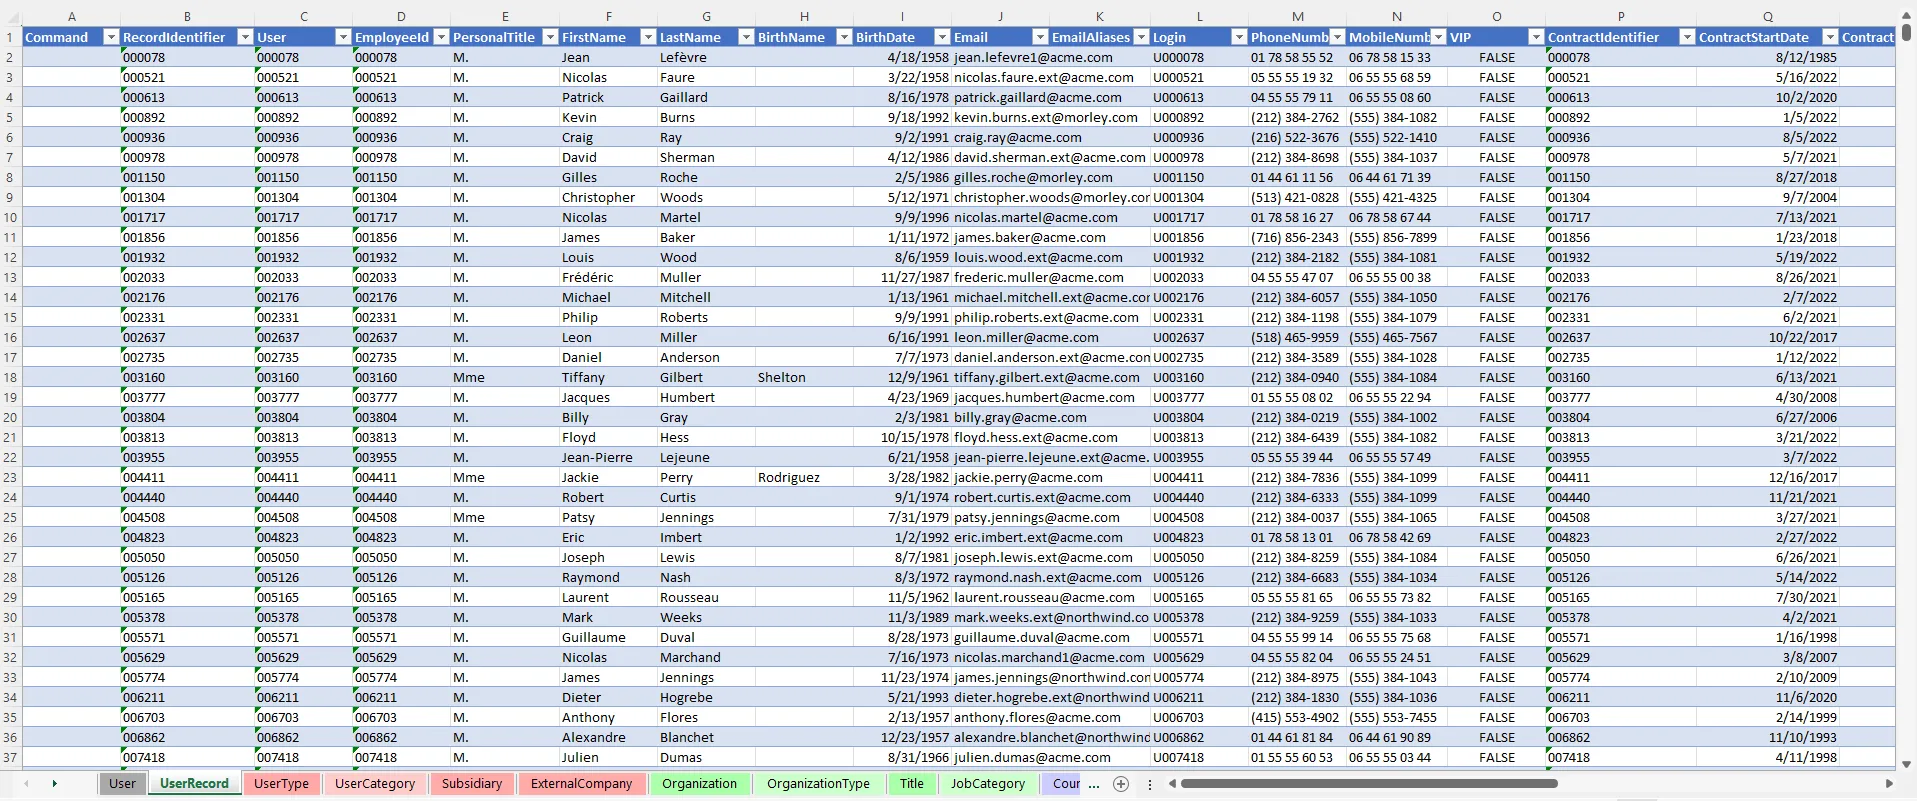
Identity Manager contains a template model, downloadable as an Excel file. Below is an example of a
part of the UserRecord tab, used in Identity Manager's demo:
Useful data
Not all data is useful for identity governance and administration. Thus, to start designing the repository, you must be aware of which data is necessary and which is unhelpful. Useful data is the data that:
-
needs to be provisioned to the managed applications;
For example, if you need to provision users' phone numbers in a given application, then you should fill in the workforce repository's
Phone Numberproperty. -
is needed to manage identities' lifecycles;
For example, consider that internal employees must be managed by HR officers only, then you'll need to identify whether users are internal employees or external contractors. Then you should make sure that you fill an
Employee Typeproperty with at least two values: one for internal employees, and one for external contractors. -
is needed to automatically grant permissions.
For example, if a user's position title ("manager" for instance), defines what users currently do, and thus what permissions they need, then you should make sure to fill in a property storing the position's title in the workforce repository.
Participants and Artifacts
Integrators may need the help of the HR department who knows the organization in order to get the identity and organizational data. After the initial loading, the HR department can review the data to confirm its accuracy.
| Input | Output |
|---|---|
| IdentityManagerServer (required) HR data (required) Third-party staff data (optional) | Initial workforce repository |
See the Install the Development Environment topic for additional information
Load Identities
Load identities for the first time by proceeding as follows:
-
On the home page, click on Settings in the Configuration section.
-
On the Workforce > Data Upload page, download the empty Excel template.

-
Collect identity and organizational data.
If you don't know where to start, identities most often include long-term employees, temporary employees (such as interns and temps) and external contractors. The template contains a
UserTypetab that lists all the types of workers that you want to include, i.e. the usual identities listed just before, but also partners, clients, even applications.Workforce should include obviously all current workers, but also incoming workers, and those who left the organization in the past XXX (time period defined by the rules of the security officer). It is interesting to have past workers in order to understand the process and ensure that they are supposed to be orphaned. See the Review Orphaned and Unused Accounts topic for additional information.
Employees
The workers that are directly employed by the organization usually have their data stored in the HR system.
Contractors
Often third-party workers like contractors are not part of the HR system. Then, there are a few possible solutions to get their data:
- through purchasing department if it doesn't imply any personal data security breach;
- manually with knowledgeable people, for example department managers and assistants;
- through a filter on data from available directories, for example on the email address if it
contains a specific string like
.ext@; - through an Active Directory extraction with a filter on an attribute that works with a specific part, for example on the employee identifier.
-
Fill said template with the data you collected.
The Excel file contains several tabs which organize data, but not all tabs and columns are mandatory. You can find more details about the Template Description. Below are the minimum recommended attributes (mandatory in orange):

Click here to download a template example.
Every object (so every tab) of the directory must have a key, which is an attribute:
- unique, i.e. designed to uniquely identify an object/resource, one key can't be shared;
- immutable, i.e. must not change during the whole lifecycle of the object/resource, even for renaming for example;
- consistent, i.e. identical everywhere the object/resource is specified.
Among other things, a consistent key allows identities to use the same login in all applications. A consistent key is also essential to form the link between identities and the other objects (organizations, titles, etc.).
Create your initial workforce repository with only recommended attributes.
As we aim to quickly enable Identity Governance and Administration (IGA) actions (like the review of orphaned and unused accounts, or access certification, etc.), Netwrix Identity Manager (formerly Usercube) recommends loading identities with only necessary data. The model can be completed later.
Moreover, Identity Manager's Query module can help gather data from other systems.
For example, let's say that contractors' phone numbers are found only in the AD. Then we can wait for the connection of Identity Manager to the AD, and finally use the Query module to collect missing data. In this case:
- Upload the
Directory.xlsxfile with only recommended data, validate and synchronize as explained on this page. - Connect the AD, synchronize AD data, update correlation and classification. See the Categorize Resources topic for additional information.
- Follow the usual query procedure to request phone numbers from the AD.
- Ensure you display a key (for example
EmployeeIdoremail) to master the order of the displayed data. - Download the report.
- Copy the report's columns one by one to paste them into the Directory.xlsx file.
- Synchronize directory data.
-
Back on the Workforce > Data Upload page, upload the filled Excel file to the server in order to feed the data back to Identity Manager.

The latest uploaded file overwrites the previous one.
-
Click on Verify and Synchronize to check the file's consistency and import its data into Identity Manager.

Now you are able to view users' pages in the directory.
Verify Identities Loading
In order to validate the process:
-
Check manually a sample in the user directory accessible from the home page. You should verify at least your own sheet and the sheets for your hierarchy.
-
Check that every organization includes a manager. Organizations are accessible from the department directory on the home page.


If the system contains many organizations, then it is also possible to list each organization with its manager through the Query module.
-
Create reports with indicators on the number of workers per type or per organization for example (through Identity Manager's predefined reports, the Query module or Power BI), in order to ensure that Identity Manager's content sticks to reality.
See the Generate Reports topic for additional information.
Template Description
Description of the MS Excel template for the creation of the identities repository.
Click here to download a template example.
All tabs contain a column Command only used at a later stage to modify (massively) identity data.
See the
Update Identities in Bulk
topic for additional information.
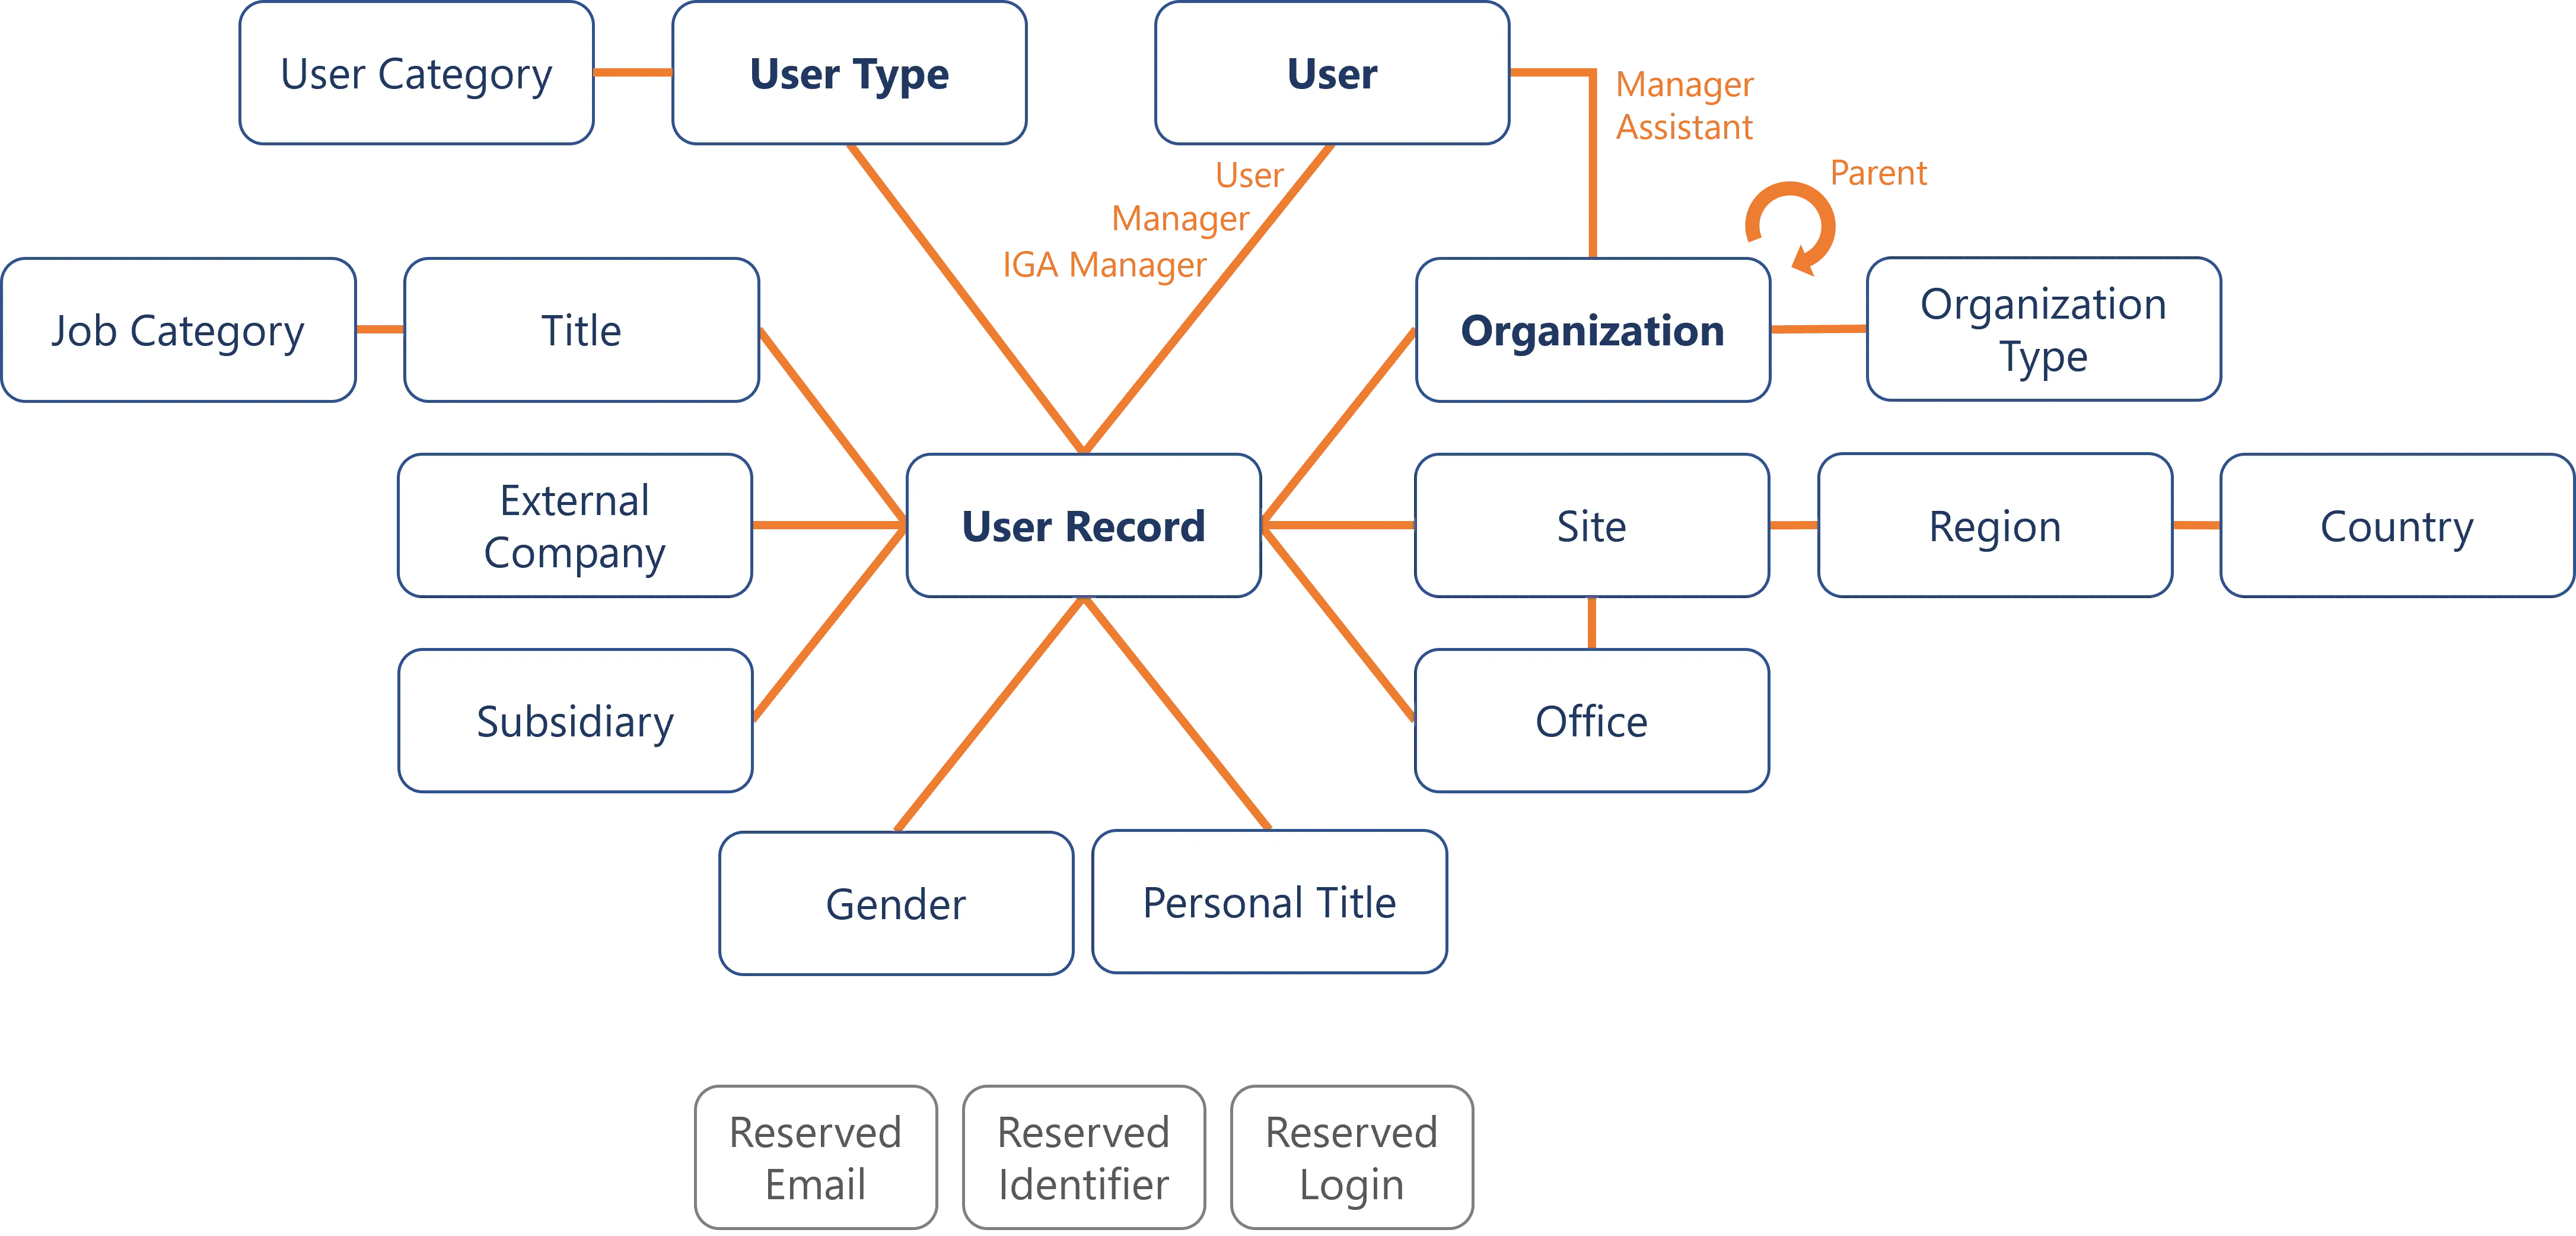
User - Required
An identity is split into two parts, the first one being the parent resource called User which
represents the user's identity card. It contains the few attributes which shall not change during
the identity's lifecycle. See the
Identity Management topic for
additional information.
| Attribute | Type | Description |
|---|---|---|
| Identifier (required) | String | |
| ConsentPhotoUsage (optional) | Boolean | |
| IsDraft (optional) | Boolean |
UserRecord - Required
An identity is split into two parts, the second one being the one or several child resources called
UserRecord which represent the user's positions. Records belong to users and help materialize:
- several positions at once;
- validity periods for positions/assignments unrelated to the user itself;
- position changes.
In other words, records represent the lifecycle of a user inside the company, i.e. multiple contracts, mutation, etc.
Thus, the UserRecord tab usually holds users' information that might change over time, while the
User tab groups all records of a given user around its identifier.
| Attribute | Type | Description |
|---|---|---|
| RecordIdentifier (recommended) | String | Identifier of the Records. See the Position Change via Records . Note: it can be the same as PositionIdentifier when users can have no more than one contract simultaneously. Note: required when using records. |
| User (required) | ForeignKey | Identifier from the User tab. |
| EmployeeId (recommended) | String | |
| Gender (optional) | ForeignKey | Identifier from the Gender tab. |
| PersonalTitle (optional) | ForeignKey | Identifier from the Personal Title tab. |
| FirstName (recommended) | String | |
| LastName (recommended) | String | |
| BirthName (optional) | String | |
| BirthDate (optional) | DateTime | |
| Email (recommended) | String | |
| EmailAliases (optional) | String | Outdated, or any other email address associated with the user. This is used to prevent the re-assignment of a previously used address. |
| Login (optional) | String | |
| PhoneNumber (optional) | String | |
| MobileNumber (optional) | String | |
| VIP (optional) | Boolean | True to specify that the user is special/important. |
| ContractIdentifier (required) | String | |
| ContractStartDate (required) | DateTime | Start date of the user's contract in the company. |
| ContractEndDate (recommended for permanent contracts, required for fixed-term contracts) | DateTime | End date of the user's contract in the company. |
| AccessesExpirationDate (optional) | DateTime | Date when the user will be deprived of their access rights. |
| UserType (required) | ForeignKey | Identifier from the User Type tab. |
| Subsidiary (optional) | ForeignKey | Identifier from the Subsidiary tab. |
| ExternalCompany (optional) | ForeignKey | Identifier from the External Company tab. |
| PositionIdentifier (required) | String | |
| PositionStartDate (optional) | DateTime | |
| PositionEndDate (optional) | DateTime | |
| Organization (recommended) | ForeignKey | Identifier from the Organization tab. |
| Manager (recommended) | String | Line manager. Identifier from the User tab. |
| IGAManager (optional) | String | Validator of IGA requests. Identifier from the User tab. |
| JobTitle (optional) | String | |
| Title (optional) | ForeignKey | Identifier from the Title tab. |
| Site (optional) | ForeignKey | Identifier from the Site tab. |
| Office (optional) | ForeignKey | Identifier from the Office tab. |
| OfficeNumber (optional) | String | |
| IsMainPosition (optional) | Boolean | |
| Suspended (optional) | Boolean | |
| StartDate (optional) | DateTime | Start date of the record, used for changes that aren't related to contract and position information, for example a scheduled name change. |
| EndDate (optional) | DateTime | End date of the record, used for changes that aren't related to contract and position information, for example a scheduled name change. |
See the Template Description topic for additional information.
Recommendations:
- There is no absolute need for a unique identifier, because Identity Manager can compute one in the next steps.
- Be aware of the difference between a hierarchical manager and an IGA manager who approves entitlement requests. They aren't necessarily the same person.
UserType - Required
User types represent users' contract types, such as permanent contract, fixed term contract, interim, contractor, trainee, etc.
| Attribute | Type | Description |
|---|---|---|
| Identifier (required) | String | |
| DisplayName (recommended) | String | |
| Category (required) | ForeignKey | Identifier from the User Category tab. |
| EmailSuffix (optional) | String | Suffix to concatenate to the email string (immediately before the @ character). |
| IsExternal (required) | Boolean | |
| LoginPrefix (optional) | String | |
| LoginSuffix (optional) | String | |
| UniqueIdentifierPrefix (optional) | String | |
| UniqueIdentifierRangeEnd (optional) | Int32 | Used to partition users' identifiers. For example, UniqueIdentifierRangeEnd set to 9999 means that no unique identifier should be greater than 9999. |
| UniqueIdentifierRangeStart (optional) | Int32 | Used to partition users' identifiers. For example, UniqueIdentifierRangeStart set to 1000 means that no unique identifier should be less than 1000. |
| UniqueIdentifierSuffix (optional) | String |
UserCategory
Categories constitute an additional layer to organize users who can be sorted by types and then further by categories, and categories can be transverse or not.
| Attribute | Type | Description |
|---|---|---|
| Identifier (required) | String | |
| DisplayName (recommended) | String |
Subsidiary
| Attribute | Type | Description |
|---|---|---|
| Identifier (required) | String | |
| DisplayName (recommended) | String | |
| EmailDomain (optional) | String |
ExternalCompany
Including external workers into the workforce repository requires listing external companies.
| Attribute | Type | Description |
|---|---|---|
| Identifier (required) | String | |
| DisplayName (recommended) | String |
Organization
A company is divided into organizations, also called departments, such as the board of directors, corporate banking, call center, USA operations, France operations, treasury, etc.
| Attribute | Type | Description |
|---|---|---|
| Identifier (required) | String | |
| DisplayName (recommended) | String | |
| Manager (recommended) | ForeignKey | Identifier from the User tab. |
| Assistant (optional) | ForeignKey | Identifier from the User tab. |
| Parent (optional) | ForeignKey | Identifier of another organization. |
| Type (optional) | ForeignKey | Identifier from the Organization Type tab. |
OrganizationType
Organizations can be categorized into organization types, if relevant.
| Attribute | Type | Description |
|---|---|---|
| Identifier (required) | String | |
| DisplayName (recommended) | String |
Title
Each position can be represented by a title which names said position, such as architect, CEO, purchasing manager, recruiter, etc.
| Attribute | Type | Description |
|---|---|---|
| Identifier (required) | String | |
| DisplayName (recommended) | String | |
| JobCategory (optional) | ForeignKey | Identifier from the Job Category tab. |
JobCategory
| Attribute | Type | Description |
|---|---|---|
| Identifier (required) | String | |
| DisplayName (recommended) | String |
Country
| Attribute | Type | Description |
|---|---|---|
| Identifier (required) | String | |
| DisplayName (recommended) | String | |
| ISOCode (optional) | String |
Region
| Attribute | Type | Description |
|---|---|---|
| Identifier (required) | String | |
| DisplayName (recommended) | String | |
| Country (optional) | ForeignKey | Identifier from the Country tab. |
Site
All positions specify a working site.
| Attribute | Type | Description |
|---|---|---|
| Identifier (required) | String | |
| DisplayName (recommended) | String | |
| Name (optional) | String | |
| StreetNumber (optional) | Int32 | |
| StreetName (optional) | String | |
| StreetType (optional) | String | |
| Floor (optional) | Int32 | |
| PostalCode (optional) | Int32 | |
| City (optional) | String | |
| Region (optional) | ForeignKey | Identifier from the Region tab. |
| PreferredLanguage (optional) | String | |
| TimeZone (optional) | Int32 | |
| Latitude (optional) | Int64 | |
| Longitude (optional) | Int64 | |
| Url (optional) | String |
Office
| Attribute | Type | Description |
|---|---|---|
| Identifier (required) | String | |
| DisplayName (recommended) | String | |
| Site (recommended) | ForeignKey | Identifier from the Site tab. |
PersonalTitle
| Attribute | Type | Description |
|---|---|---|
| Identifier (required) | String | |
| DisplayName (recommended) | String |
Gender
| Attribute | Type | Description |
|---|---|---|
| Identifier (required) | String | |
| DisplayName (recommended) | String |
ReservedEmail
| Attribute | Type | Description |
|---|---|---|
| Description (recommended) | String | |
| Value (required) | String |
ReservedIdentifier
| Attribute | Type | Description |
|---|---|---|
| Description (recommended) | String | |
| Value (required) | String |
ReservedLogin
| Attribute | Type | Description |
|---|---|---|
| Description (recommended) | String | |
| Value (required) | String |
Update Identity Data
How to perform modifications in the identity repository, to manage onboarding, offboarding and position changes.
This part is not about changing the data model, but data itself.
Overview
After the identity repository is initiated, you will need to modify it for many possible reasons. Among them:
- update all identities with new attributes because you didn't have the required information during the repository creation, or because it wasn't a priority for you then;
- perform onboarding: add new identities as new workers arrive in the company;
- modify identities' attributes to fix existing errors, or to reflect a real change in users' data, or model a position change;
- remove identities' attributes, as they are no longer required to manage entitlements;
- perform offboarding: remove identities with all their attributes, as users leave the company.
Participants and Artifacts
Integrators are able to perform an identity update if they master the new data.
| Input | Output |
|---|---|
| Identity repository (required) New identity data (required) | Updated identity repository |
See the Create the Workforce Repository topic for additional information.
Modify Identity Data
Modify identity data by proceeding as follows, according to the changes to be made:
- either update data individually by using predefined workflows in the UI; See the Update an Individual Identity topic for additional information.
- or perform a same change on several identities simultaneously by using Identity Manager's predefined workflow in the UI; See the Update Identities in Bulk topic for additional information.
- or update data on a massive scale by uploading an external file into Identity Manager, as an incremental version of the identity repository.
Update an Individual Identity
How to manage onboarding, position changes and offboarding through the UI, for a single identity.
This part is not about changing the data model, but data itself.
Overview
Individual changes in identity data can be handled using Identity Manager's predefined workflows to:
- declare a new identity (for an internal as well as an external worker);
- act on existing identities, including modify their data, manage their contract and/or positions, suspend all accounts linked to them, or reactivate them, repair some data, or delete these identities.
Participants and Artifacts
A given user's data can be updated occasionally by their manager, but most often by the HR department.
| Input | Output |
|---|---|
| Identity repository (required) New identity data (required) | Updated identity repository |
See the Create the Workforce Repository topic for additional information.
Declare a New Identity
Declare a new worker by proceeding as follows:
-
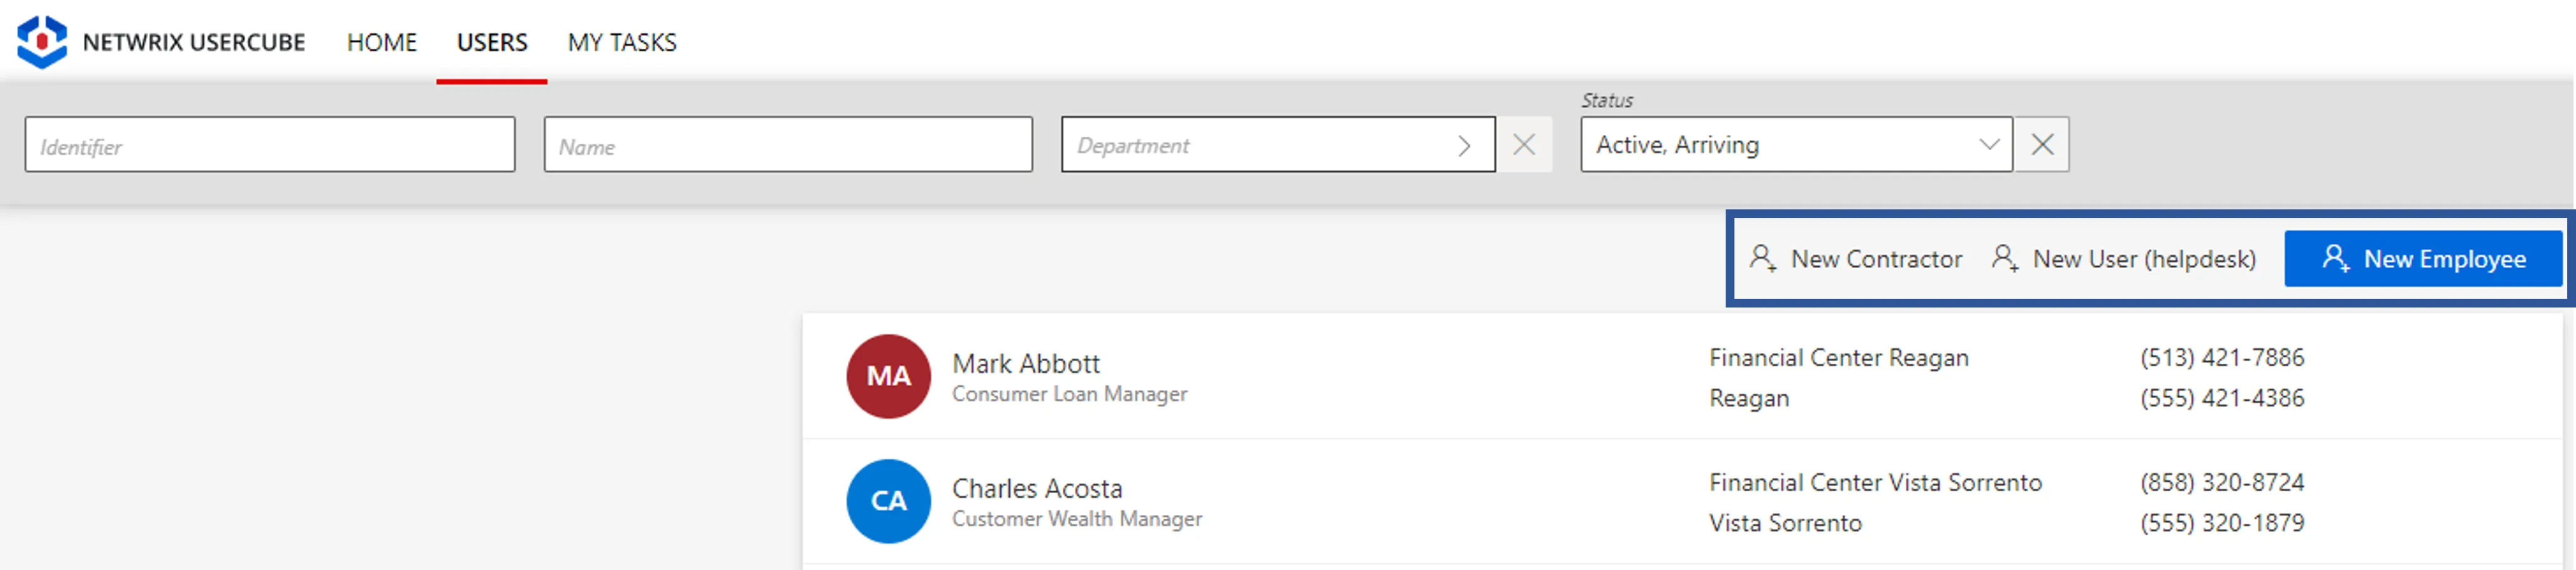
Access the user directory from the home page.
-
According to the type of the user to be declared, click on the corresponding button.
-
Follow the workflow's instructions to fill the form with the user's data, choose the user's entitlements from your role catalog and send the request. See the Create Roles in the Role Catalog topic for additional information.
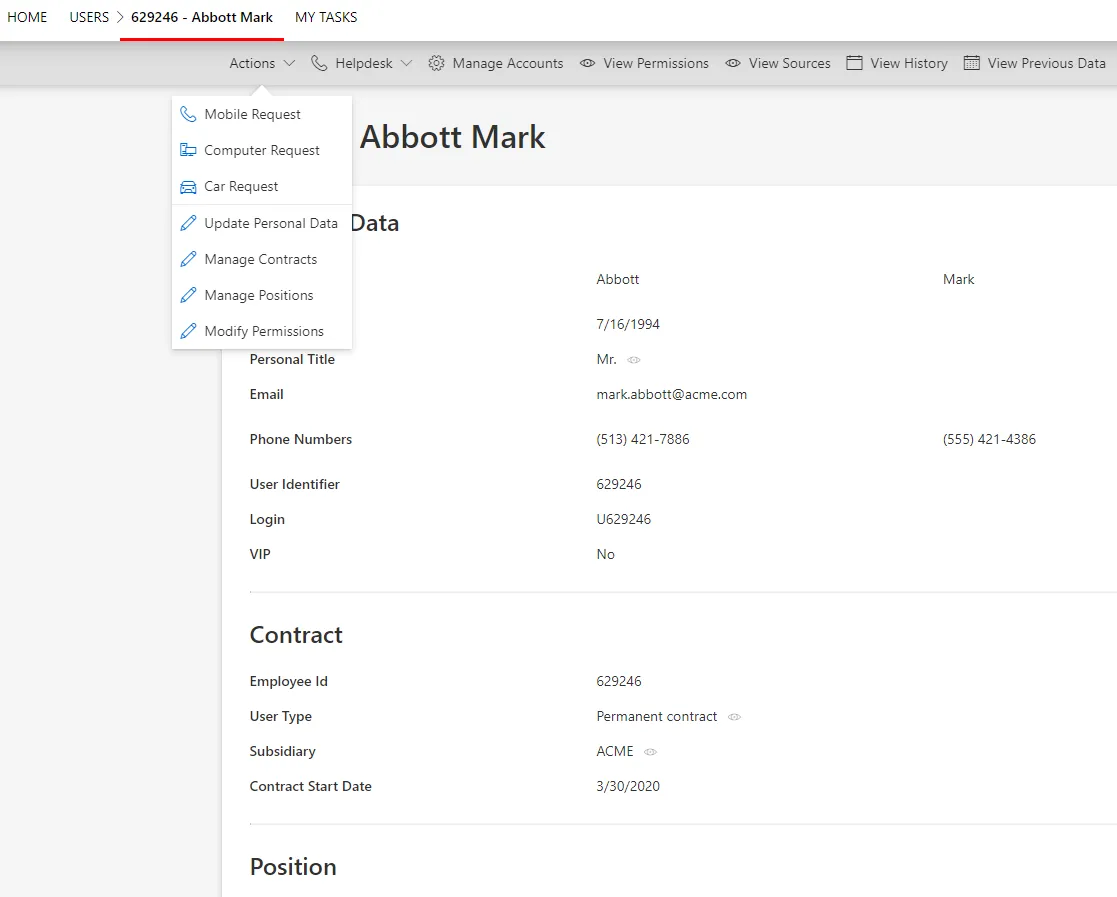
Act on an Existing Identity
Act on an existing identity by proceeding as follows:
-
Access the user directory from the home page.
-
Click on the user to be modified.
-
Click on Actions or Helpdesk to select the action to perform.
-
Follow the workflow's instructions.
If the workflow has been configured in this way, the update request may require a review. In this case, sending the request triggers the display of said request on the My Tasks screen for the reviewer, while the state of the request is pending. In this case, the requested updates will be displayed in Identity Manager only after the request has been reviewed.

Verify Data Update
In order to verify the process, check that the right data is displayed in the directory for the involved user.
Update Identities in Bulk
How to perform a mass change in identity data, by uploading an incremental version of the identity repository.
This part is not about changing the data model, but data itself.
Here we describe the incremental update of identities, but the update of any other File/CSV works the same.
Overview
When the number of changes gets high, identity data update through the UI becomes tedious. Therefore, Identity Manager offers the possibility to fill a predefined file with data to be modified, in order to perform all changes simultaneously.
Data update can be performed in complete mode or incremental mode.
Participants and Artifacts
Identity data can be updated most often in cooperation with the HR department.
| Input | Output |
|---|---|
| Identity repository (required) New identity data (required) | Updated identity repository |
See the Create the Workforce Repository topic for additional information.
Update Data in Complete Mode
Mass update identity data (in complete mode) by proceeding as follows:
-
Access the directory connector from Connectors on the home page, in the Configuration section.

-
On the connector's page, choose the connection corresponding to identities.
-
In the connection's settings, download the Excel template full of the data from your database.

-
Update the data that needs change.
-
Ensure that the field
Path (Complete mode)is filled with the path of the source file. -
Click on Upload and choose the file you modified with new data.

-
Click on Check Connection to verify the path.

-
Click on Save & Close.
-
Back on the connector's page, launch synchronization. See the Synchronize Data topic for additional information.
Be cautious about thresholds.
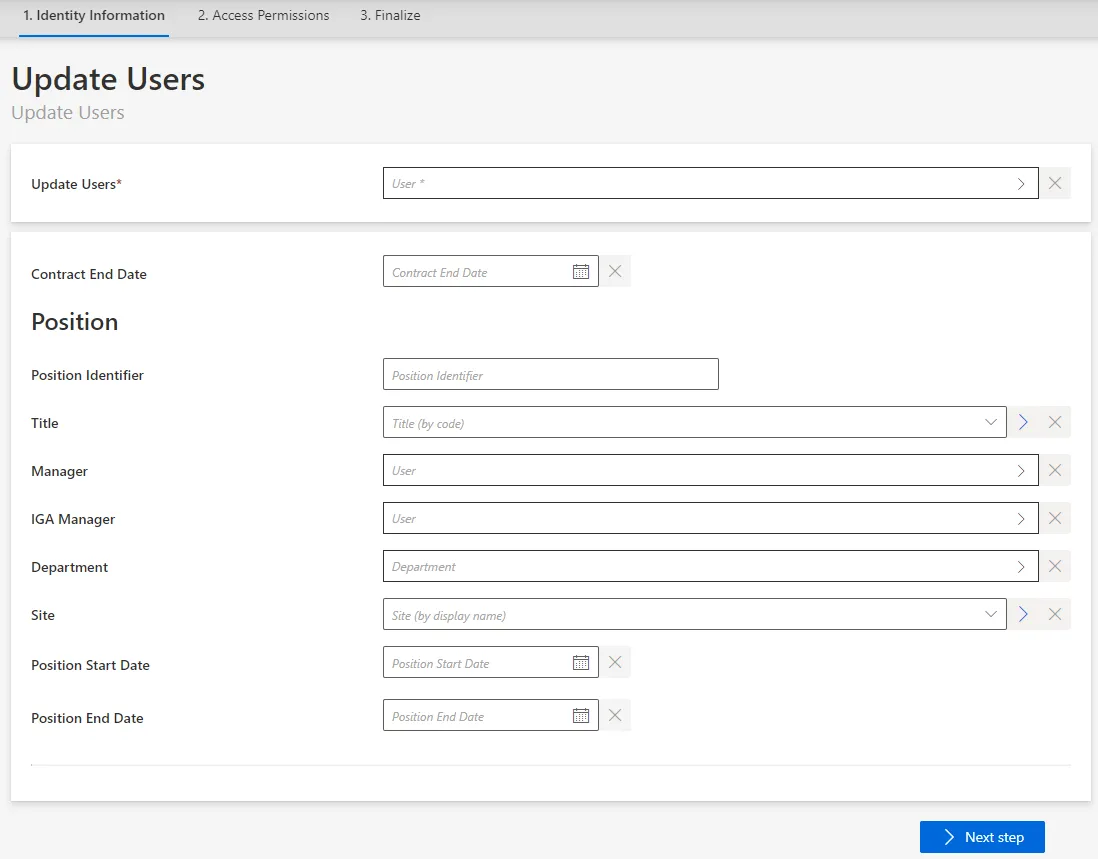
Update Data in Incremental Mode
Mass update identity data (in incremental mode) by proceeding as follows:
-
Access the directory connector from Connectors on the home page, in the Configuration section.
-
On the connector's page, choose the connection corresponding to identities.
-
In the connection's settings, download the empty Excel template.

-
Fill only the data to be modified, specify the unique identifier for each entry (for correlation purposes), and fill the column
Command, which can take a few available inputs:-
Addto incorporate new attributes; -
Modifyto change existing attributes;Attributes can be emptied using the value
NULL_NULL. -
Deleteto remove attributes from the datamodel;Instead of using
Delete, you can scan the data model to exclude unused attributes. See the Create the Workforce Repository topic for additional information. -
Mergeto input an identity's data and modify the corresponding attributes if said identity already exists, create a new identity otherwise.For example, if a few users switch working sites, then the modification is performed by filling the file only with said users' identifiers and new sites. Fill the column
CommandwithModify. The rest will not be changed.
-
-
Ensure that the field
Path (Incremental mode)is filled with the path of the source file. -
Click on Upload and choose the file you modified with new data.
-
Click on Check Connection to verify the path.
-
Click on Save & Close.
-
Back on the connector's page, launch synchronization. See the Synchronize Data topic for additional information.
Be cautious about thresholds.
Verify Data Update
In order to verify the process:
-
Check manually a sample in the
Userdirectory accessible from the home page. You should verify at least your own sheet and the sheets for your hierarchy. -
Check that every organization still has a manager. Organizations are accessible in the
Departmentdirectory accessible from the home page.If the system contains many organizations, then it is also possible to list them with their managers through the Query module.
-
Create reports with indicators on the workers number per type or per organization for example (through Identity Manager' predefined reports, the Query module or Power BI), in order to ensure that Identity Manager's content sticks to reality. See the Generate Reports topic for additional information.
Update Multiple Identities
How to perform a same change in data for several identities simultaneously.
This part is not about changing the data model, but data itself.
Overview
When a same change is needed by a high number of users, then Identity Manager provides a UI workflow to perform this change for all selected identities simultaneously.
For example, if a whole department in the company is moved to a new working site, then all users working in said department must have their
Siteattribute updated.
Participants and Artifacts
Given users' data can be updated occasionally by their managers, but most often by the HR department.
| Input | Output |
|---|---|
| Identity repository (required) New identity data (required) | Updated identity repository |
See the Create the Workforce Repository topic for additional information.
Update
Perform multiple updates by proceeding as follows:
-
Click on Multiple Updates, accessible from the directory on the home page.

-
Follow the workflow's instructions to perform the change, assign new entitlements if needed, and send the request.
If the workflow has been configured in this way, the update request may require a review. In this case, sending the request triggers the display of said request on the My Tasks screen for the reviewer, while the state of the request is pending. In this case, the requested updates will be displayed in Identity Manager only after the request has been reviewed.
Verify Data Update
In order to verify the process:
-
Check manually a sample in the
Userdirectory accessible from the home page. You should verify at least your own sheet and the sheets assigned to your hierarchy. -
Check that every organization still has a manager. Organizations are accessible in the
Departmentdirectory on the home page.If the system contains numerous organizations, it is also possible to list them with their managers through the Query module.
-
Create reports with indicators, for example, on the number of workers per type or per organization (through Identity Manager's predefined reports, the Query module or Power BI), to ensure that Identity Manager's content sticks to reality. See the Generate Reports topic for additional information.