Network Configuration
Identity Manager's network technical configuration includes:
- Database connection
- Managed systems connection
- Synchronization and fulfillment processes
- End-user authentication
- Logging
Introduction
Configuration settings are saved in configuration files or in the host system's environment variables.
Configuration settings are detailed further in the following sections:
- Server configuration, including connection to the database and end-user authentication. See the Server Configuration topic for additional information.
- Agent configuration, including connection to the managed systems. See the Agent Configuration topic for additional information.
- Monitoring, indicating how to set up monitoring for Identity Manager. See the Monitoring topic for additional information.
Write Settings
How to write settings for the network configuration.
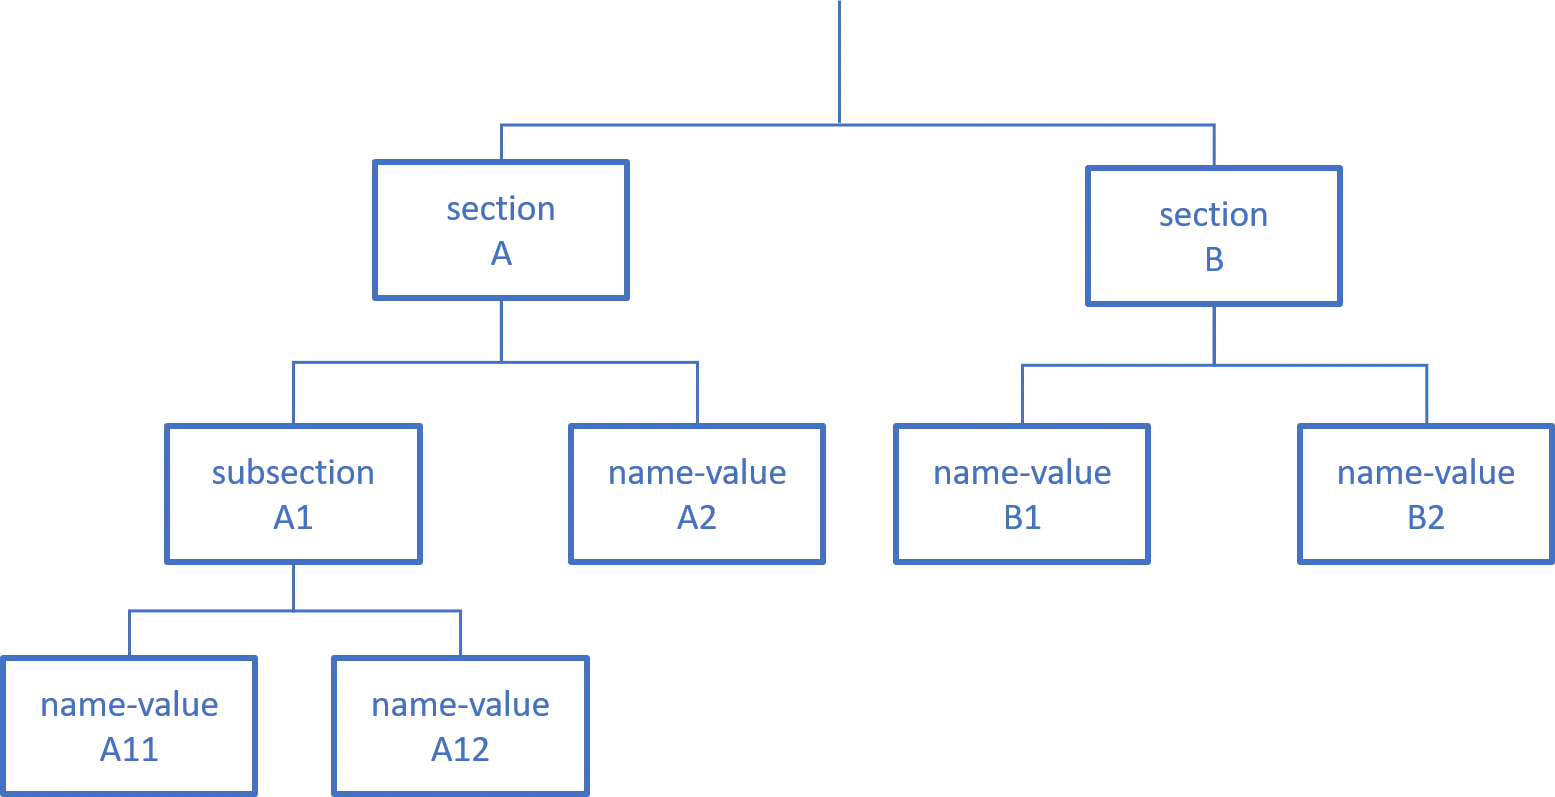
Sets, sections and values
Configuration setting values are organized by functionality into three sets:
- The Server's appsettings set gathers general-purpose settings for the Server (including database connection and end-user authentication). See the Server Configuration topic for additional information.
- The Agent's appsettings set gathers general-purpose settings for the Agent executable process. See the Application Settings topic for additional information.
- The appsettings.agent set gathers settings for the Agent's connection to the managed systems. See the appsettings.agent topic for additional information.
Each set can be seen as a tree-like structure where leaves are a name-value pair: the name of the setting and the value of the setting.
Within a Configuration Set Tree, settings are organized into meaningful sections which can be further organized into subsections, leading to a tree-like structure where sections are nodes. For example, settings involving end-user authentication are gathered in the Authentication section, containing another subsection for every authentication method such as OpenId or OAuth.
This means that every setting value either belongs to the settings root node or to a section, itself belonging to a parent section.
Configuration files
Settings can be written as json objects stored in .json files in the Server or Agent working
directory.
Relevant files for the Server can be found in the Server working directory:
appsettings.json
Relevant files for the Agent can be found in its working directory:
appsettings.jsonappsettings.agent.jsonappsettings.encrypted.agent.jsonappsettings.cyberArk.agent.json
Each setting file is organized into several sections as shown in the Sets, Sections and values diagram. See the Architecture topic for additional information.
Each section's name matches a top level attribute of the file's json object.
The section content is written as the matching attribute's value which can be broken down into a set of setting attributes and subsection attributes.
Each subsection can then be broken down into more setting attributes and deeper nested subsections.
Code attributes enclosed with <> need to be replaced with a custom value before entering the
script in the command line.
settings.example.json
{
   "sectionA": {
       "subsectionnameA1":{
            "settingnameA11":"settingA11value",
            "settingnameA12":"settingA12value"
       },
       "settingnameA2": "settingvalueA2",
        },
   "sectionB": {
       "settingnameB1": "settingB1value",
       "settingnameB2": "settingB2value"
   }
}
In Integrated-agent mode, agent configuration is written to the Server's appsettings.json file.
See the Overview topic for additional information.
Reminder
The backslash character \ is an escape character in a JSON file. An error will appear when parsing
the JSON file if the backslash is followed by a non-escapable character. To use a backslash in a
string, it must be escaped by another backslash.
In this example, the value for the attribute Password will be parsed as <pass\word>:
Code attributes enclosed with <> need to be replaced with a custom value before entering the
script in the command line.
{
    "Password": "<pass\\word>"
}
Environment variables
Alternatively, settings can be stored as environment variables on Identity Manager's host system.
Each setting value is stored as the value of an environment variable whose name is the concatenation of all the ancestor sections and the setting name separated by __ (two underscores).
Here is an example showing how to construct a setting environment variable name from its matching
json file.
Code attributes enclosed with <> need to be replaced with a custom value before entering the
script in the command line.
{
    "Scheduler": {
        "Enabled": true,
        "LockFilePath": "../Temp/scheduler.lock"
    },
    "Swagger": {
        "Enabled": true
    }
}
The name becomes SchedulerEnabled, SchedulerLockFilePath and Swagger__Enabled.
Manage Several Environments
How to manage several network environments.
Using files
Every setting value can be overwritten to fit a specific environment.
The environment within which Identity Manager runs is set by the system environment variable ASPNETCORE_ENVIRONMENT. The default value is Production. Usual examples include Development, Staging, and Production.
To overwrite setting values for a specific environment, one can write environment-specific configuration files.
For every appsettings.<xxx>.json file, an appsettings.<xxx>.<environment>.json can be created
where <environment> is the name of the relevant environment matching the ASPNETCORE_ENVIRONMENT
value.
The appsettings.<xxx>.<environment>.json file has the exact same section/attribute/subsection
shape as the main appsettings file.
Identity Manager's configuration will be the result of merging both files.
Should a setting be written in both files, Identity Manager will use the
appsettings.<xxx>.<environment>.json value.
Leveraging this priority mechanism is how one can override a setting value to match a particular environment. Another mechanism can be used: using environment variables.
Using environment variables
Setting values can also be stored as environment variables on Identity Manager's host system. Environment-variables-stored setting values have priority over json-file-stored setting values. Here is how to use this mechanism to handle multiple environments.
In the web.config file, an <environmentVariable> element in the node <configuration> >
<system.webServer> > <aspNetCore> > <environmentVariables> is used to set a setting value for
the application.
Configuration stages
Configuration encompasses:
- The Server configuration with a connection to the database and end-user authentication. See the Server Configuration topic for additional information.
- The Agent configuration with a connection to the managed systems. See the Agent Configuration topic for additional information.
- The Logger configuration. See the Monitoring topic for additional information.
Various XML Settings
This section describes Identity Manager's Settings available in the applicative configuration. Those are mandatory.
ConfigurationVersion
This setting is used to track the current configuration version.
<ConfigurationVersionSetting Version="5.0.0" Description="Demo IdentityManager" />
- Version defines the configuration version.
- Description describes this version in detail.
- Misc misc.
AppDisplay
This setting is used to customize the application display.
<AppDisplaySetting PrimaryColor="#009597" SecondaryColor="#00553F" ApplicationName="Usercube" LogoFile="Images/logo.webp" FaviconFile="Images/favicon.ico" />
- PrimaryColor defines the primary color.
- SecondaryColor defines the secondary color.
- BannerColor defines the banner (header displaying logo and navigation bar) color.
- BannerTextColor defines the banner text color.
- ApplicationName defines the application name.
- LogoFile defines the logo path. Concerning the logo, for an ideal result, the following ratio should be used: 5:1.
- LogoMimeType defines the logo mime type.
- FaviconFile defines the favicon path.
- FaviconMimeType defines the favicon mime type.
- FullNameSeparator defines the full name separator (default value is
�). - DisableProvisioningCounters disables the counters related to the provisioning screens (Role
Review, Provisioning Review, Role Reconciliation, Resource Reconciliation and
Manual Provisioning - default value is
false).
CustomLinks
This setting enables the configuration of custom links that let the user navigate to a custom static HTML page. Only two CustomLinkSetting can be configured.
The example below defines two custom links accessible through the URLs "your-Identity Manager-domain/LegalNotice" and "your-Identity Manager-domain/TermsOfService", each showing the content of the corresponding HTML file depending on the currently selected language.
<CustomLink1Setting Url="/LegalNotice" Path_L1="LegalNotice_en.html" Path_L2="LegalNotice_fr.html" /> <CustomLink2Setting Url="/TermsOfService" Path_L1="TermsOfService_en.html" Path_L2="TermsOfService_fr.html" />
- Url_(required)_ defines the url address from which to access the custom page.
- PathL1(required)_ defines the path (from the configuration root) to the HTML file to be
rendered depending on the currently selected language in the user interface (
Path_L1toPath_L16are available). OnlyPath_L1is required. While navigating to a custom link, if no HTML path was defined for the current language, thenPath_L1is taken as default.
To be displayed correctly, images should be embedded in the HTML files as Base64 images using the
src attribute like this : <img src="data:image/png;base64,iVBORw0...=" />. You can easily
convert your images using this Base64 Image Encoder.
To navigate to the custom links from the user interface, NETWRIX recommends configuring a MenuItem
with a URI value matching the custom link URL. The following example defines two menu items,
accessible from the user account tab in the top right corner of the interface, that allows the user
to navigate to the defined URI addresses.
<MenuItem Identifier="UserMenu_CustomLink1" DisplayName_L1="Legal Notice" DisplayName_L2="Mentions l�gales" IconCode="List" URI="/LegalNotice" ParentMenuItem="UserMenu" /> <MenuItem Identifier="UserMenu_CustomLink2" DisplayName_L1="Terms of Service" DisplayName_L2="Conditions d'utilisation" IconCode="List" URI="/TermsOfService" ParentMenuItem="UserMenu" />

DashboardItemNumber
Some sections on the dashboard contain multiple links. These links are quick links with counters to the review page filtered by entity type. The links are sorted by entity type priority.
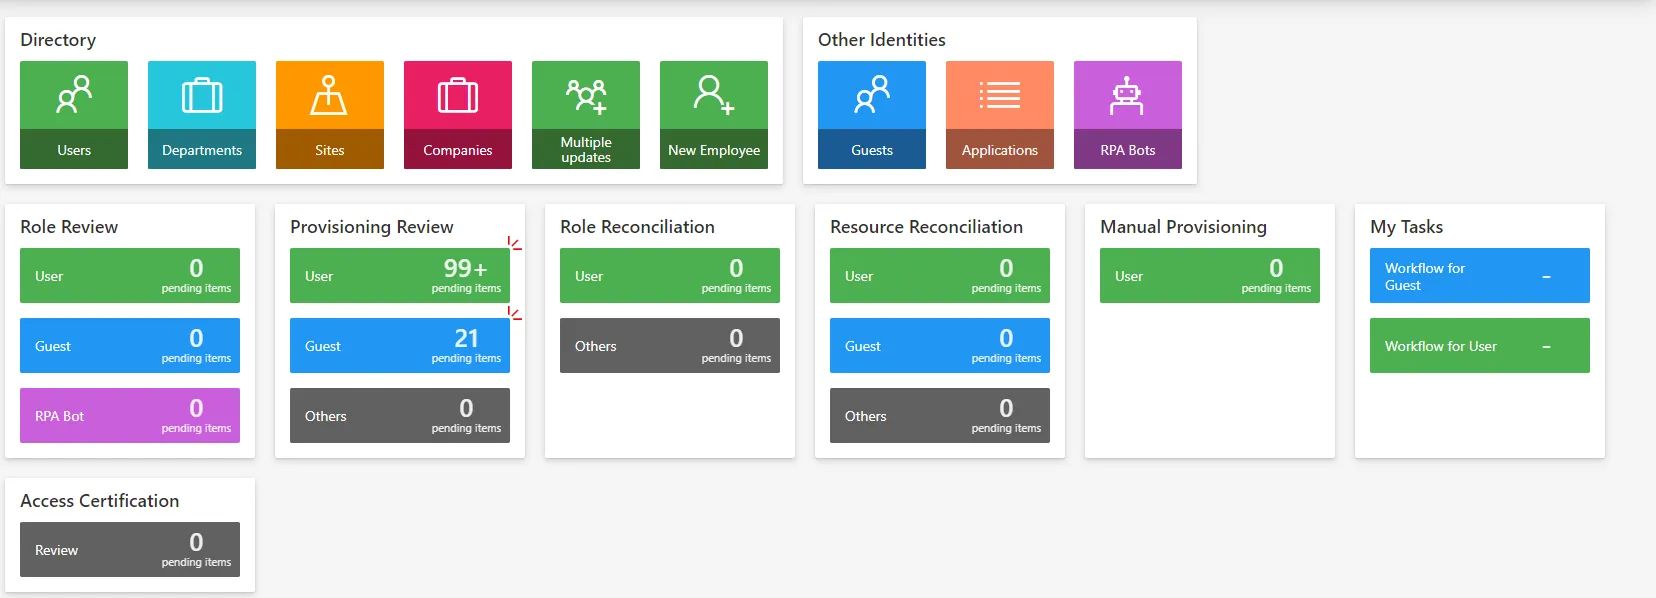
By default, 3 links are displayed. If more than 3 entity type links exist, a link "Others" is displayed with the concatenation of remaining counters.
This setting is used to customize the number of links to displayed on each section.
The max number of links to display is 5.
<DashboardItemNumberSetting RoleReviewSection="2" ProvisioningReviewSection="5" RoleReconciliationSection="2" ResourceReconciliationSection="2" MyTasksSection="4" ManualProvisioningSection="2" />
- RoleReviewSection defines the number of links to display in the "Role Review" section.
- ProvisioningReviewSection defines the number of links to display in the "Provisioning Review" section.
- RoleReconciliationSection defines the number of links to display in the "Role Reconciliation" section.
- ResourceReconciliationSection defines the number of links to display in the "Resource Reconciliation" section.
- ManualProvisioningSection defines the number of links to display in the "Manual Provisioning" section.
- MyTasksSection defines the number of links to display in the "My Tasks" section.
SelectUserByIdentityQueryHandler
This attribute matches an end-user with a resource from the unified resource repository.
Authorization mechanisms within Identity Manager rely on assigning Profiles to an identity-resource that stands for the end-user digital identity.
To that end, and end-user authentication credentials are linked to such an identity-resource using the following pattern:
- Authentication credentials are retrieved;
- Authentication credentials are trimmed using the AfterToken and/or BeforeToken attributes;
- The trimmed result is matched against the ResourceIdentityProperty of resources with an EntityType OwnerEntityType;
- The matching resource found is used to find a profile and authorization for that digital identity.
Attributes
-
ResourceIdentityProperty is the identity-resource property supposed to match the authentication login used by the end-user.
-
OwnerEntityType is the entity type of the resources used to store digital identities within Identity Manager.
-
BeforeToken_(optional)_ defines the first character used to trim the authentication login.
-
AfterToken_(optional)_ defines the second character used to trim the authentication login.
The trimmed result is the content of the authentication login between AfterToken and BeforeToken. If BeforeToken is empty, trimmed result is everything after AfterToken. If AfterToken is empty, trimmed result is everything before BeforeToken.
-
ResourceDisplayNameProperty is the property used for displaying login data at the top right of the application.
-
OwnerPhotoTagProperty defines the photo property for Identity Manager users.
Example
The following example links the authentication credentials of an end-user to its matching resource of EntityType Directory_User.
In this example, authentication has been set up using
End-User Authentication. In that case,
the login used by the end-user is in the form DOMAIN/userName.
The AfterToken attribute parses the DOMAIN/userName string into userName.
The parsed result userName is compared with AD_Entry:sAMAccountName property value of
Directory_User resources.
The matching Directory_User resource is the resource that stands for the end-user identity within Identity Manager.
<SelectUserByIdentityQueryHandlerSetting
    ResourceIdentityProperty="AD_Entry:sAMAccountName"
    ResourceDisplayNameProperty="AD_Entry:displayName"
    OwnerPhotoTagProperty="Directory_User:PhotoTag"
    OwnerEntityType="Directory_User"
    AfterToken="\"/>
SelectPersonasByFilterQueryHander
This setting is used to filter the entity type used by authentication mechanism.
<SelectPersonasByFilterQueryHanderSetting ResourceDisplayNameProperty="AD_Entry:displayName" PersonTypeFilterProperty="AD_Entry:objectCategory" PersonTypeFilter="Person" />
- ResourceDisplayNameProperty represents the display property.
- OwnerPhotoTagProperty defines the photo tag property.
- PersonTypeFilterProperty defines the filter property.
- PersonTypeFilter defines the filter value.
- MailProperty defines the mail property.
SelectAllPerformedByAssociationQueryHandler
This setting enables task delegation to a group of people.
<SelectAllPerformedByAssociationQueryHandlerSetting RootEntityType="AD_Entry" Binding="member" />
- RootEntityType indicates the entity type on which the delegation is applied.
- Binding defines the binding used to get the list of identities to delegate to.
NB: In order for delegation to work, users that are part of the delegate group must have at least one assigned profile
Scheduling CleanDataBase
If the default value for the Task CleanDataBase needs to be overridden, define this setting:
<SchedulingCleanDataBaseSetting Timeout="2" CronTabExpression="* */2 * * *"/>
Timeout: Defines the maximum time a Job or Task can wait after the last run.CronTabExpression: Define the cron to launch the CleanDatabase Job.
7. Password Generation Setting
It is possible to override some aspects of the password generation (used in password reset features) using the following setting:
<PasswordGenerationSetting AllowedSymbolChars="*@!^-_" />
AllowedSymbolChars: A string containing the list of symbol chars to be used in the generated password. The default value is :!;.,?()[]-_&%$+{}@