Create Menu Items
After creating a workflow as for the EntityTypes, is mandatory to create the MenuItems to create the Navigation to this Workflow.
Create menu items for a workflow in a resource entity list
To add a link to an entity's workflow displayed under the search bar on the visualization page of the entity's resource list you need to create a menu containing the different workflows and put a link to the entity's searchBar as below.
The first MenuItem is the main action displayed on the right.
The other MenuItems are displayed from left to right.
<SearchBar EntityType="Directory_User" Menu="Menu_Search_Directory_User" SearchBarDesignElement="Inline"> <Criterion Binding1="MainRecord.EmployeeId" PlaceHolderText_L1="Employee Id" PlaceHolderText_L2="Matricule" InputType="Auto" ColumnSize="2" /> <Criterion Binding1="MainRecord.LastName" InputType="Auto" ColumnSize="2" /> <Criterion Binding1="MainRecord.FirstName" InputType="Auto" ColumnSize="2" /> <Criterion Binding1="MainRecord.Organization" PlaceHolderText_L1="Department" PlaceHolderText_L2="D�partement" InputType="Auto" ColumnSize="2" /> <Criterion Binding1="PresenceState" InputType="ComboboxMultiSelection" ColumnSize="2" DefaultValue="-101;-102" Operator="Equal" /> <Criterion Binding1="MainRecord.Location" PlaceHolderText_L1="Site" PlaceHolderText_L2="Site" InputType="Auto" ColumnSize="2" IsVisibleInAdvancedView="true" /> <Criterion Binding1="MainRecord.Company" PlaceHolderText_L1="Company" PlaceHolderText_L2="Soci�t�" InputType="Auto" ColumnSize="2" IsVisibleInAdvancedView="true" /> <Criterion Binding1="MainRecord.Title" PlaceHolderText_L1="Title" PlaceHolderText_L2="Fonction" InputType="Auto" ColumnSize="2" IsVisibleInAdvancedView="true" /> <Criterion Binding1="MainRecord.EmployeeType.Category" PlaceHolderText_L1="User Type" PlaceHolderText_L2="Cat�gorie de collaborateur" InputType="Auto" ColumnSize="2" IsVisibleInAdvancedView="true" /> </SearchBar> <MenuItem Identifier="Menu_Search_Directory_User" DisplayName_L1="Menu"> <MenuItem Identifier="Menu_Search_Directory_User_StartInternal" DisplayName_L1="New Employee" DisplayName_L2="Entr�e d'un interne" IconCode="AddFriend" Workflow="Directory_User_StartInternal" /> <MenuItem Identifier="Menu_Search_Directory_User_StartExternal" DisplayName_L1="New Contractor" DisplayName_L2="Entr�e d'un externe" IconCode="AddFriend" Workflow="Directory_User_StartExternal" /> <MenuItem Identifier="Menu_Search_Directory_User_AdvancedStartInternal" DisplayName_L1="New Multi-Positions User" DisplayName_L2="Entr�e multipostes" IconCode="AddFriend" Workflow="Directory_User_AdvancedStartInternal" /> <MenuItem Identifier="Menu_Search_Directory_User_Helpdesk_Start" DisplayName_L1="New User (helpdesk)" DisplayName_L2="Entr�e (support)" IconCode="AddFriend" Workflow="Helpdesk_Directory_User_Start" /> </MenuItem>
This XML element gives the following result:

Create menu items for a workflow in a resource view
In the resource view it is also possible to create links to different workflows.
These workflows will manipulate the selected resource in the view.
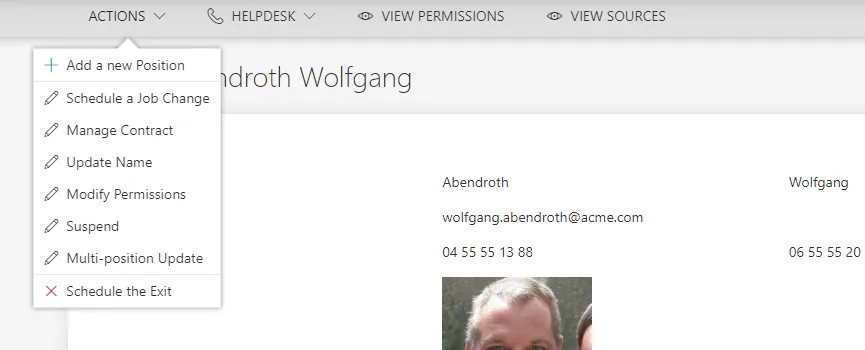
<ResourceViewRecordEntityForm Identifier="Directory_User_View" EntityType="Directory_User" Menu="Menu_Directory_User" RecordProperty="Directory_User:Records" RecordStartProperty="Directory_UserRecord:ContractStartDate" RecordEndProperty="Directory_UserRecord:ContractEndDate" RecordFilter="All" IsDefaultViewForm="true"> <MainControl OutputType="LayoutContainer"></MainControl> <RecordControl OutputType="TransformImport" EmbeddedForm="Directory_UserRecord_View" /> <RecordItemControl OutputType="TransformImport" EmbeddedForm="Directory_UserRecord_ViewPosition" /> <RecordUniqueItemControl OutputType="TransformImport" EmbeddedForm="Directory_UserRecord_ViewPosition" /> </ResourceViewRecordEntityForm> <MenuItem Identifier="Menu_Directory_User" DisplayName_L1="Menu"> <MenuItem Identifier="Menu_Directory_User_Changes" DisplayName_L1="Actions" DisplayName_L2="Actions"> <MenuItem Identifier="Menu_Directory_User_Changes_Add" DisplayName_L1="Section"> <MenuItem Identifier="Menu_Directory_User_Changes_AddRecord" DisplayName_L1="Add a new Position" DisplayName_L2="Ajouter un poste" IconCode="Add" Workflow="Directory_User_AddRecord" /> <MenuItem Identifier="Menu_Directory_User_Changes_AddContract" DisplayName_L1="Add a new Contract" DisplayName_L2="Ajouter un contrat" IconCode="Add" Workflow="Directory_User_AddContract" /> </MenuItem> <MenuItem Identifier="Menu_Directory_User_Changes_Update" DisplayName_L1="Section"> <MenuItem Identifier="Menu_Directory_User_Changes_ChangePosition" DisplayName_L1="Schedule a Job Change" DisplayName_L2="Mouvement � date" IconCode="Edit" Workflow="Directory_User_ChangePosition" /> <MenuItem Identifier="Menu_Directory_User_Changes_ManageContract" DisplayName_L1="Manage Contract" DisplayName_L2="Gestion du contrat" IconCode="Edit" Workflow="Directory_User_ManageContract" /> <MenuItem Identifier="Menu_Directory_User_Changes_ChangeName" DisplayName_L1="Update Name" DisplayName_L2="Changer le nom" IconCode="Edit" Workflow="Directory_User_ChangeName" /> <MenuItem Identifier="Menu_Directory_User_Changes_ResourcesUpdate" DisplayName_L1="Modify Permissions" DisplayName_L2="Demander des droits" IconCode="Edit" Workflow="Directory_User_ResourcesUpdate" /> <MenuItem Identifier="Menu_Directory_User_Changes_Suspend" DisplayName_L1="Suspend" DisplayName_L2="Suspendre" IconCode="Edit" Workflow="Directory_User_Suspend" /> <MenuItem Identifier="Menu_Directory_User_AdvancedUpdate" DisplayName_L1="Multi-position Update" DisplayName_L2="Modification multipostes" IconCode="Edit" Workflow="Directory_User_AdvancedUpdate" /> </MenuItem> <MenuItem Identifier="Menu_Directory_User_Changes_Directory_User_End" DisplayName_L1="Schedule the Exit" DisplayName_L2="Planifier le d�part" IconCode="Cancel" Workflow="Directory_User_End" /> </MenuItem> <MenuItem Identifier="Menu_Directory_User_Helpdesk" DisplayName_L1="Helpdesk" DisplayName_L2="Support" IconCode="Phone"> <MenuItem Identifier="Menu_Directory_User_Helpdesk_Update" DisplayName_L1="Section"> <MenuItem Identifier="Menu_Directory_User_Helpdesk_FixRecord" DisplayName_L1="Repair Data (helpdesk)" DisplayName_L2="Corriger des donn�es (support)" IconCode="Edit" Workflow="Helpdesk_Directory_User_FixRecord" /> </MenuItem> <MenuItem Identifier="Menu_Directory_User_Helpdesk_Delete" DisplayName_L1="Section"> <MenuItem Identifier="Menu_Directory_User_Helpdesk_Directory_User_Delete" DisplayName_L1="Delete User (helpdesk)" DisplayName_L2="Supprimer (support)" IconCode="Cancel" Workflow="Helpdesk_Directory_User_Delete" /> </MenuItem> </MenuItem> </MenuItem>
This XML element gives the following result:

Customize Display Tables
This part shows how to define a custom way to display entity types' data.
Table
This display table with DisplayTableDesignElement set to table will display the list of resources as a simple table filled with several columns.
Code attributes enclosed with <> need to be replaced with a custom value before entering the
script in the command line.
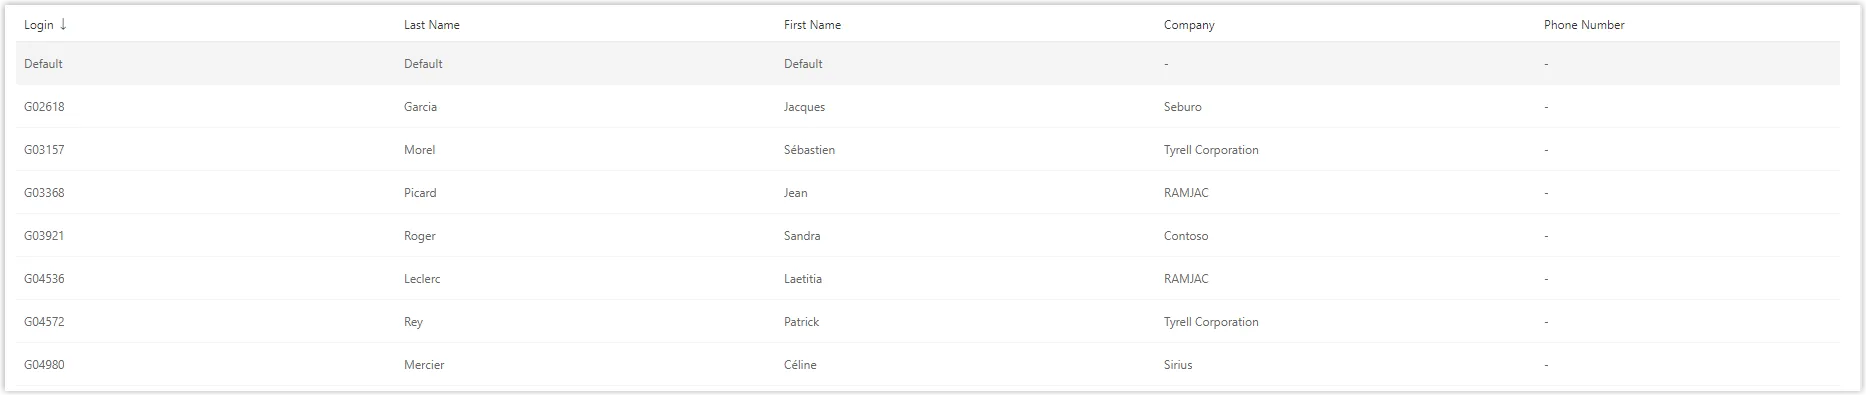
<DisplayTable Identifier="Referentiel_Guest" DisplayTableDesignElement="table" EntityType="Referentiel_Guest" IsEntityTypeDefault="true"> <Column CanBeFiltered="true" DisplayBinding="Referentiel_Guest:Login" IsDisplayInSummaryView="true" IsResizable="true" IsSortable="true" /> <Column CanBeFiltered="true" DefaultSortPriority="0" DisplayBinding="Referentiel_Guest:LastName" IsDisplayInSummaryView="true" IsResizable="true" IsSortable="true" /> <Column CanBeFiltered="true" DisplayBinding="Referentiel_Guest:FirstName" IsDisplayInSummaryView="true" IsResizable="true" IsSortable="true" /> <Column CanBeFiltered="false" DisplayBinding="Referentiel_Guest:PhoneNumber" DisplayName_L1="Telephone" IsDisplayInSummaryView="true" IsResizable="true" IsSortable="true" /> </DisplayTable>
Here is the visualization of this display table on the interface:
Ergonomically, it is recommended to hide the search symbol in a column header (in a list displayed
like a table) if a criterion linked to this column is already displayed in a search bar. This avoids
filter duplication. Thus, the CanBeFiltered property can be deleted in the Column argument.
Resource Table
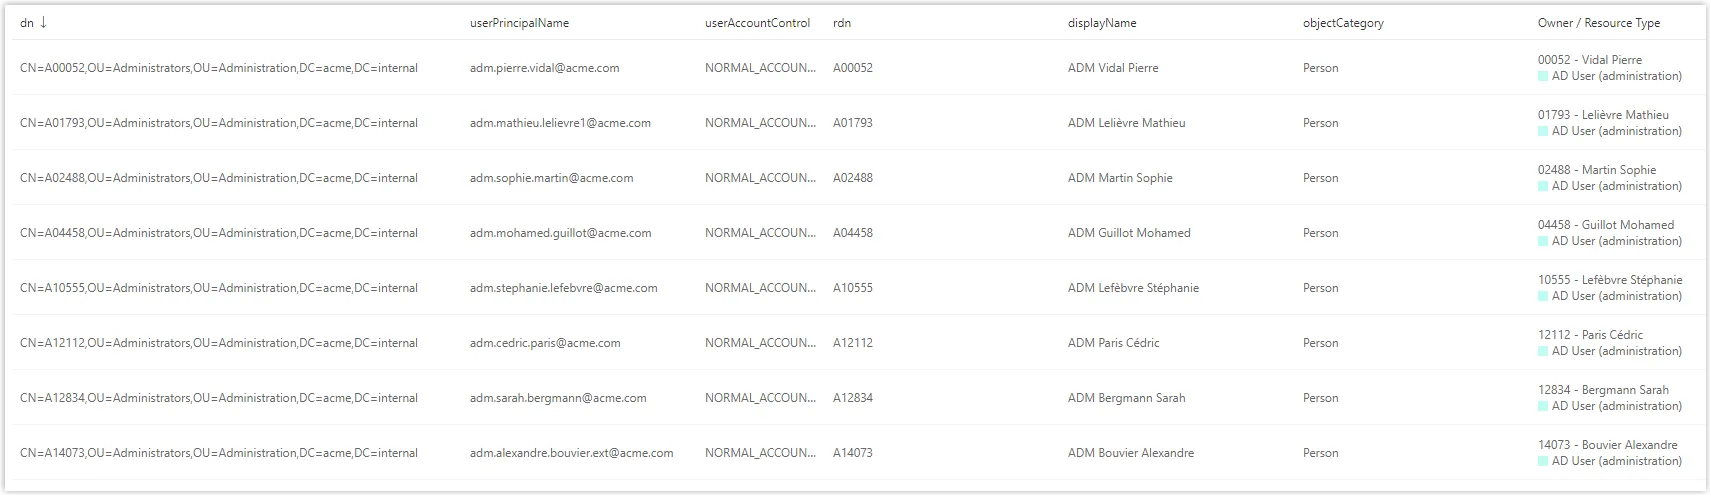
The property DisplayTableDesignElement set to resourcetable allows you to create a table similar to the display table with DisplayTableDesignElement set to table but adds a column containing the owner of the resource.
Code attributes enclosed with <> need to be replaced with a custom value before entering the
script in the command line.
<DisplayTable Identifier="AD_Entry" EntityType="AD_Entry" DisplayTableDesignElement="resourcetable" IsEntityTypeDefault="true"> <Column DefaultSortPriority="1" DisplayBinding="dn" IsDisplayInSummaryView="true" IsResizable="true" IsSortable="true" CanBeFiltered="true" ColumnSize="4" /> <Column DisplayBinding="userPrincipalName" IsDisplayInSummaryView="true" IsResizable="true" IsSortable="true" CanBeFiltered="true" ColumnSize="2" /> <Column DisplayBinding="userAccountControl" IsDisplayInSummaryView="true" IsResizable="true" IsSortable="true" CanBeFiltered="true" ColumnSize="1" /> <Column DisplayBinding="rdn" IsDisplayInSummaryView="true" IsResizable="true" IsSortable="true" CanBeFiltered="true" ColumnSize="2" /> <Column DisplayBinding="displayName" IsDisplayInSummaryView="true" IsResizable="true" IsSortable="true" CanBeFiltered="true" ColumnSize="2" /> <Column DisplayBinding="objectCategory" IsDisplayInSummaryView="true" IsResizable="true" IsSortable="true" CanBeFiltered="true" ColumnSize="2" /> </DisplayTable>
Here is the visualization of this resource table on the interface:
Display Table with Tiles
.
Instead of creating a table, it is possible to create tiles to give another rendering of the user
interface. It is therefore necessary to create the different tiles first. After creating the tiles,
they must be imported into the display table with DisplayTableDesignElement set to list. Display
tables with other values of DisplayTableDesignElement cannot display tiles.
See the Tile topic for additional information.
Remember, if the display table uses tiles, then you can't use bindings.
Code attributes enclosed with <> need to be replaced with a custom value before entering the
script in the command line.
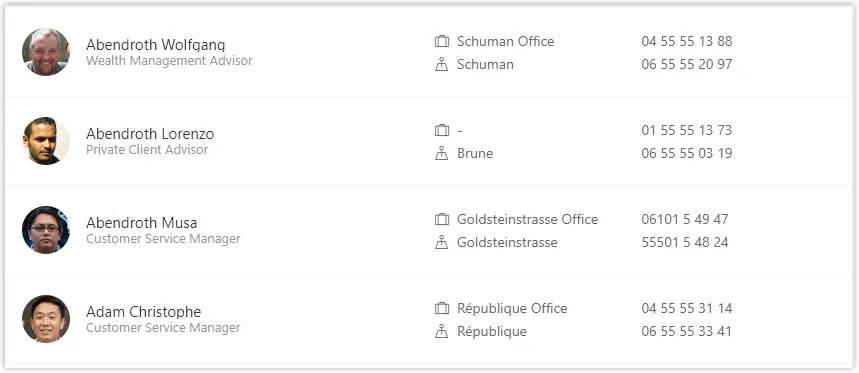
<Tile Identifier="Directory_User_Tile1" DisplayName_L1="User: first/last name" DisplayName_L2="Collaborateur : nom, prenom" EntityType="Directory_User" TileDesignElement="picture-text"> <Item Binding="MainRecord.FirstName" LineDisplayOrderIndicator="1" LineNumber="2" /> <Item Binding="MainRecord.LastName" LineDisplayOrderIndicator="2" LineNumber="2" /> <Item Binding="MainRecord.Title.DisplayName" LineNumber="3" /> <Item Binding="Id" LineNumber="5" /> <Item Binding="PhotoTag" LineNumber="6" /> </Tile> <Tile Identifier="Directory_User_Tile2" DisplayName_L1="User: dep/loc" DisplayName_L2="Collaborateur : orga/site" EntityType="Directory_User" TileDesignElement="inline data-icon"> <Item Binding="MainRecord.Organization.DisplayName" LineNumber="1" /> <Item Binding="MainRecord.Location.DisplayName" LineNumber="2" /> </Tile> <Tile Identifier="Directory_User_Tile3" DisplayName_L1="User: contact" DisplayName_L2="Collaborateur : contact" EntityType="Directory_User" TileDesignElement="inline data-icon"> <Item Binding="MainRecord.PhoneNumber" LineNumber="1" /> <Item Binding="MainRecord.MobileNumber" LineNumber="2" /> </Tile> <DisplayTable Identifier="Directory_User" EntityType="Directory_User" DisplayTableDesignElement="list" IsEntityTypeDefault="true"> <Column DefaultSortPriority="1" ColumnSize="6" IsDisplayInSummaryView="true" SortBinding="MainRecord.LastName" Tile="Directory_User_Tile1" /> <Column ColumnSize="3" IsDisplayInSummaryView="true" Tile="Directory_User_Tile2" /> <Column ColumnSize="3" Tile="Directory_User_Tile3" /> </DisplayTable>
Here is the visualization of this display table on the interface:
See the Display Table topic for additional information.
Customize Forms
This guide shows how to define a custom way to display the input fields to be filled in a given workflow.
See the Form topic for additional information.
Create a View Template for Entities Using Scaffoldings
Two scaffoldings generate the view, the display table and the rights to access the entity's resources.
- View Template : Creates the display table, the default view and access rights to the entity.
- View Template Adaptable : Creates the entity view (designElement = ResourceTable), the report and the rights for a given profile.
These scaffoldings are not enough to access resources. You must add a menu item to define the navigation in the view in the user interface.
Create an Entity View
To create the entity view, you must manipulate a Form.
The view form doesn't give access to the view in the interface or the rights to access the interface.
The following elements must be in place:
To create the view, you can manipulate one or more forms. The example below shows how to create a view from several different forms. This will allow you to reuse some forms in workflows.
    <Form Identifier="View_Referentiel_Guest_PersonnalData_Base" EntityType="Referentiel_Guest">        <Control DisplayName_L1="Perosnnal Data" OutputType="LayoutFieldset">            <Control DisplayName_L1="Complete Name" OutputType="LayoutRowset">                <Control Binding="LastName" IsRequired="true"/>                <Control Binding="FirstName" IsRequired="true"/>            </Control>            <Control Binding="Mail" ColumnSize="8" IsRequired="true"/>            <Control Binding="PhoneNumber" ColumnSize="8" />        </Control>    </Form>    <Form Identifier="View_Referentiel_Guest_AdditionalData_Base" EntityType="Referentiel_Guest">        <Control DisplayName_L1="Additional information" OutputType="LayoutFieldset">            <Control Binding="Contact" />            <Control Binding="StartDate" />            <Control Binding="EndDate" />        </Control>    </Form>    <Form Identifier="View_Referentiel_Guest_Base" EntityType="Referentiel_Guest" FormType="ResourceViewEntity" Menu="View_Referentiel_Guest"
        IsDefaultViewForm="true">        <Control OutputType="TransformImport" EmbeddedForm="View_Referentiel_Guest_PersonnalData_Base" />        <Control OutputType="TransformImport" EmbeddedForm="View_Referentiel_Guest_AdditionalData_Base" />    </Form>
It is also possible to create only one form that contains all the information:
<Form Identifier="View_Directory_Guest" EntityType="Directory_Guest" FormType="ResourceViewEntity" Menu="View_Directory_Guest" IsDefaultViewForm="true"> <Control DisplayName_L1="Personal Data" DisplayName_L2="Informations personnelles" OutputType="LayoutFieldset"> <Control DisplayName_L1="Full Name" DisplayName_L2="Nom complet" OutputType="LayoutRowset"> <Control Binding="LastName" /> <Control Binding="FirstName" /> </Control> <Control Binding="Mail" ColumnSize="8" /> <Control Binding="PhoneNumber" ColumnSize="8" /> </Control> <Control DisplayName_L1="Additional Data" DisplayName_L2="Informations compl�mentaires" OutputType="LayoutFieldset"> <Control Binding="Contact" /> <Control Binding="Company" /> <Control Binding="StartDate" /> <Control Binding="EndDate" /> <Control Binding="Comments" /> </Control> </Form>
Create an Entity View Using Records
Some entities may have entity records. To view the entity in question with all the records attached to it, it is necessary to fill in forms that will load the record data as well as forms for the parent entity.
The view form doesn't give access to the view in the interface or the rights to access it.
The following elements must be in place:
In the example below, the view form will display all records. To change the filter on the record display, you must change the Form.
    <Form Identifier="Referentiel_UserRecord_View" EntityType="Referentiel_UserRecord">        <Control DisplayName_L1="Personal Data" OutputType="LayoutFieldset">            <Control Binding="LastName" IsReadOnly="true"/>            <Control Binding="FirstName" IsReadOnly="true"/>        </Control>        <Control DisplayName_L1="Country" OutputType="LayoutFieldset">            <Control Binding="Country" IsReadOnly="true"/>        </Control>        <Control DisplayName_L1="Contract" OutputType="LayoutFieldset">            <Control Binding="Supervisor" IsReadOnly="true" />            <Control Binding="Category" IsReadOnly="true"/>            <Control Binding="ContractStartDate" IsReadOnly="true"/>            <Control Binding="ContractEndDate" IsReadOnly="true"/>        </Control>    </Form>    <Form Identifier="Referentiel_UserRecord_ViewPosition" EntityType="Referentiel_UserRecord">        <Control DisplayName_L1="Poste" OutputType="LayoutFieldset">            <Control Binding="Site" />            <Control Binding="Service" />            <Control Binding="StartDate" />            <Control Binding="EndDate" />        </Control>    </Form>    <Form Identifier="Referentiel_User_ViewManagement" EntityType="Referentiel_User">        <Control DisplayName_L1="Management" OutputType="LayoutFieldset">            <Control Binding="Guests" />            <Control Binding="ManagedPeople" />        </Control>    </Form>    <Form Identifier="Referentiel_User_View" EntityType="Referentiel_User" FormType="ResourceViewRecordEntity"
      Menu="Menu_Referentiel_User" RecordProperty="Referentiel_User:Records" IsDefaultViewForm="true"
      RecordStartProperty="Referentiel_UserRecord:StartDate" RecordEndProperty="Referentiel_UserRecord:EndDate" RecordFilter="All" >        <Control OutputType="TransformImport" EmbeddedForm="Referentiel_User_ViewManagement" />        <Control OutputType="TransformImport" EmbeddedForm="Referentiel_UserRecord_View" />        <Control OutputType="TransformImport" EmbeddedForm="Referentiel_UserRecord_ViewPosition" />    </Form>
The record filter not only changes the display options of the record, but also changes the display of the rights associated with this record.
Customize Search Bars
This guide shows how to define a custom way to search from a list of a given entity type's properties.
See the Search Bar topic for additional information.
Default Search Bar
To search on a resource list for an entity, you must enter a SearchBar tag for the given entity.
<SearchBar EntityType="Directory_User" Menu="Menu_Search_Directory_User" SearchBarDesignElement="Inline"> <Criterion Binding1="MainRecord.EmployeeId" PlaceHolderText_L1="Employee Id" PlaceHolderText_L2="Matricule" InputType="Auto" ColumnSize="2" /> <Criterion Binding1="MainRecord.LastName" InputType="Auto" ColumnSize="2" /> <Criterion Binding1="MainRecord.FirstName" InputType="Auto" ColumnSize="2" /> <Criterion Binding1="MainRecord.Organization" PlaceHolderText_L1="Department" PlaceHolderText_L2="D�partement" InputType="Auto" ColumnSize="2" /> <Criterion Binding1="PresenceState" InputType="ComboboxMultiSelection" ColumnSize="2" /> <Criterion Binding1="MainRecord.Location" PlaceHolderText_L1="Site" PlaceHolderText_L2="Site" InputType="Auto" ColumnSize="2" IsVisibleInAdvancedView="true" /> <Criterion Binding1="MainRecord.Company" PlaceHolderText_L1="Company" PlaceHolderText_L2="Soci�t�" InputType="Auto" ColumnSize="2" IsVisibleInAdvancedView="true" /> <Criterion Binding1="MainRecord.Title" PlaceHolderText_L1="Title" PlaceHolderText_L2="Fonction" InputType="Auto" ColumnSize="2" IsVisibleInAdvancedView="true" /> <Criterion Binding1="MainRecord.EmployeeType.Category" PlaceHolderText_L1="User Type" PlaceHolderText_L2="Cat�gorie de collaborateur" InputType="Auto" ColumnSize="2" IsVisibleInAdvancedView="true" /> </SearchBar>
Here is the visualization of this searchbar on the interface:

Ergonomically, it is recommended to hide the search symbol in a column header (in a list displayed
like a table) if a criterion linked to this column is already displayed in a searchbar. This avoids
filter duplication. Thus, the <CanBeFiltered> property can be deleted in the <Column> argument
in the display table.
Create Default Filters
To add a default filter, you must add both of the following properties to a Search Bar:
- DefaultValue
- Operator
<Criterion Binding1="PresenceState" InputType="ComboboxMultiSelection" ColumnSize="2" DefaultValue="-101;-102" Operator="Equal" />
Here is the visualization of this criterion on the interface:

Search Bar Menu
Each menu item is a link to an entity's workflow displayed under the search bar on the visualization page of the entity's resource list.
See the Create Menu Items topic for additional information
Import Product Translations into Identity Manager
This topic shows how to import product translations into Identity Manager. A product translation means a translation of a Identity Manager's component, for example a button display message, not the translation of a configured component.
JSON Translation File
The translations are given to Identity Manager in a JSON file, through the configuration deployment tool. This section first explains how to write the JSON file, then how to use it with the deployment tool.
JSON translation file format
Example with the translation keysaccessCertificationReview.recommendation.manuallyAuthorized,
app.common.button.create.label and app.common.labels.whenCreated:
Code attributes enclosed with <> need to be replaced with a custom value before entering the
script in the command line.
{
    "accessCertificationReview.recommendation.manuallyAuthorized": "<Manually authorized>",
    "app.common.button.create.label": "<Create>",
    "app.common.labels.whenCreated": "<Request Date>"
}
The JSON file must only contain string properties: no object, array or number.
The properties' name must match the wanted translation keys.
Find the translation keys
A translation key is an identifier for a given translation: Identity Manager uses those keys to find the translation it needs in the interface.
To find these keys, go on Netwrix Portal , download the SDK of your product version and unzip the folder.
The Translations folder contains two JSON files: en-US.json and fr-FR.json. These files both contain all the translation keys and respectively contain English (US) and french translations.
The configuration tool throws an error only when the format is wrong, not the keys: if you do not write correct keys, the file will be imported anyway without a warning. Netwrix strongly recommends to copy paste the keys from the JSON files in Translations.
Key overriding
There is no need to rewrite all the keys if you do not want to modify all the translations: in your JSON file, put only the keys of the translations you need to modify.
For languages other than french and English (US), when you do not override a given translation, Identity Manager uses the English (US) one.
JSON translation file name
Product translations must be linked to a defined Language in the configuration. For example:
Code attributes enclosed with <> need to be replaced with a custom value before entering the
script in the command line.
<Language Code="en-US" IndicatorNumber="1" JsonPath="translation.en-US.json" />
A translation file must be named: translation.language code.json.
For example, for en-US, the translation file must be named translation.en-US.json.
Use the Configuration Tool to Import the JSON Translation File
Place the JSON file described in the previous part in your XML configuration folder: you can place it anywhere in it, but the root is recommended.
Deploy your configuration as usual but add the --product-translation argument to your command line.
The custom product translations are now imported and usable by Identity Manager.
Export the Translation File
If you need to export the custom product translations of your languages, export your configuration
as usual but add the --export-translation argument to your command line.
It will generate the translation files at the root of your XML configuration folder.