EasyVista
This connector exports and fulfills users from/to an EasyVista-compliant system.
This page is about EasyVista .

Overview
EasyVista is an IT Service Manager that provides a service to organize IT resources in a company by using tickets. This allows users to manage projects, materials and teams through a customizable interface.
Prerequisites
Implementing this connector requires:
- Reading first the appsettings.agent topic;
- An EasyVista account with reading/writing permissions on the target instance;
- A view to be created in EasyVista for each type of entity to export.
Export
This connector exports a list of users, with their attributes specified in the connector's configuration, to CSV files.
It can also export any custom entity, provided that a view exists for it in EasyVista.
Configuration
This process is configured through a
Connection in the UI and/or
the XML configuration, and in the appsettings.agent.json > Connections section:
appsettings.agent.json
{
  ...
  "Connections": {
    ...
    "<ConnectionIdentifier>": {
      ...
    }
  }
}
The identifier of the connection and thus the name of the subsection must:
- be unique.
- not begin with a digit.
- not contain
<,>,:,",/,\,|,?,*and_.
For example:
appsettings.agent.json
{
"Connections": {
...
"ExportEasyVista": {
"Server": "https://easy-vista.instance.com/",
"Account": "11111",
"Login": "username",
"Password": "userPassword",
"ExportSettingsOptions": {
"Profiles": "https://easy-vista.instance.com/api/v1/11111/internalqueries?queryguid={019B0523-F1C4-4G84-AA04-47BA16F16EB2}&filterguid={Z8A61D04-EZEC-42F1-A3E1-E9E09654BE68}&viewguid={2740V37A-A0ZC-4E50-A1F1-CF0987B9EFEA}"
}
}
}
}
The ExportSettingsOptions attribute is necessary only if custom entities are exported. It is not
required if only the users are exported.
Besides, "Profiles" is used here as an example and corresponds to a name to identify the exported
entities.
Setting attributes
| Name | Details |
|---|---|
| Server required | Type String Description URI of the server to connect to. |
| Account required | Type String Description Account to use to connect to the EasyVista instance. |
| Login required | Type String Description Username to use to connect to the EasyVista instance. |
| Password required | Type String Description Password to use to connect to the EasyVista instance. |
| --- | --- |
| ExportSettingsOptions optional | Type List Description List of entities to retrieve from the EasyVista instance. Note: for any customized entity to be exported, this argument must contain its REST API URL. Get REST API URLs Access the relevant view in EasyVista and click on ... > Rest API Url to copy the URL. For example:  |
Output details
This connector is meant to generate to the Application Settings export output folder:
- a CSV file, named
<connectionIdentifier>_Employees.csv, with one column for each property having aConnectionColumnand each property without it but used in an entity association; - a CSV file for each customized entity, named
<connectionIdentifier>_<EntityName>.csv.
For example, with the following entity type mapping for employees:
<EntityType Identifier="EasyVista_User" DisplayName_L1="EasyVista User"> <Property Identifier="lastName" DisplayName_L1="lastName" TargetColumnIndex="0" Type="String" /></EntityType><EntityTypeMapping Identifier="EasyVista_User" Connector="ExportEasyVista" ConnectionTable="EasyVistaExport_Employees"> <Property Identifier="lastName" ConnectionColumn="last_name" /></EntityTypeMapping>And the following entity type mapping for profiles:
EntityType Identifier="EasyVista_Profiles" DisplayName_L1="EasyVista Profiles" Property Identifier="NAME_EN" DisplayName_L1="NAME_EN" TargetColumnIndex="23" Type="String" Type="String" IsKey="true" //EntityTypeEntityTypeMapping Identifier="EVProfiles" Connector="ExportEasyVista" ConnectionTable="EasyVistaExport_Profiles" Property Identifier="PROFILE_GUID">>>> ><<<<<<ConnectionColumn="PROFILE_GUID" IsPrimaryKey="true" / Property Identifier="NAME_EN" ConnectionColumn="NAME_EN" IsPrimaryKey="true" /></EntityTypeMapping>Then we will have
C:/UsercubeContoso/Sources/EasyVistaExport_Employees.csvas follows:EasyVistaExport_Employees.csv
last_name
Talma Bart
Tanner Carol
Taverner David
Taylor Eric
Telemann Franck
Thomson Georges
...Then we will have
C:/UsercubeContoso/Sources/EasyVistaExport_Profiles.csvas follows:EasyVistaExport_Profiles.csv
NAME_EN, PROFILE_GUID
Administration {value of the PROFILE_GUID}
LOB Manager {value of the PROFILE_GUID}
Product Team {value of the PROFILE_GUID}
Project Manager {value of the PROFILE_GUID}
...
Users created from the API are retrieved by Identity Manager only after a complete synchronization.
Fulfill
The EasyVista connector writes to EasyVista to create, archive (delete from Identity Manager's point of view) and update employees, initiated manually through the UI or automatically by Evaluate Policy
Configuration
Same as for export, fulfill is configured through connections.
For example:
appsettings.agent.json
{
...
"Connections": {
...
"FulfillEasyVista": {
"Server": "https://easy-vista.instance.com/",
"Account": "11111",
"Login": "username",
"Password": "userPassword"
}
}
}
Setting attributes
| Name | Details |
|---|---|
| Server required | Type String Description URI of the server to connect to. |
| Account required | Type String Description Account to use to connect to the EasyVista instance. |
| Login required | Type String Description Username to use to connect to the EasyVista instance. |
| Password required | Type String Description Password to use to connect to the EasyVista instance. |
Output details
This connector can:
-
Create and update employees and their profiles, but is limited by API limitations;
In particular, this connector cannot set dates nor the
employee_idproperty. -
Archive employees, i.e. set the
CONTRACT_END_DATEto the date of the fulfill execution.This action is performed when Identity Manager fulfills a provisioning order with a
Deletedchange type.
Authentication
Password reset
See the appsettings.agent topic to find out more on how to configure password reset settings.
Credential protection
Data protection can be ensured through:
-
Connection , configured in the
appsettings.encrypted.agent.jsonfile; -
Connection safe;
-
A CyberArk's AAM Credential Providers able to store EasyVista's
Login,Password,AccountandServer.
EasyVista Ticket
This connector opens tickets in EasyVista for manual provisioning.
This page is about EasyVista Ticket .

Overview
EasyVista is an IT Service Manager that provides a service to organize IT resources in a company by using tickets. This allows users to manage projects, materials and teams through a customizable interface.
This connector focuses on the creation of EasyVista tickets for editing manually EasyVista resources.
Prerequisites
Implementing this connector requires:
- Reading first the appsettings.agent;
- An EasyVista account with reading/writing permissions on the target instance.
Export
This connector exports some of EasyVista entities, see the export capabilities of the EasyVista connector. Some entities cannot be exported.
Fulfill
This connector writes to EasyVista to create incident and request tickets containing information to create, update or delete a resource. It does not create a resource directly.
Once created, the ticket is managed in EasyVista, not in Identity Manager.
When the ticket is closed or canceled, Identity Manager updates the Entitlement Assignment of the resource accordingly.
See the fulfill capabilities of the EasyVista connector.
For example:
appsettings.agent.json
"EasyVistaManual": {
"Server": "https://example.easyvista.com/",
"Login": "username",
"Password": "password",
"Account": "11111"
},
Authentication
Password reset
See the appsettings.agent topic to find out more on how to configure password reset settings.
Credential protection
Data protection can be ensured through:
-
RSA Encryption , configured in the
appsettings.encrypted.agent.jsonfile; -
An Connection safe;
-
a CyberArk's AAM Credential Providers able to store EasyVista's
Login,Password,AccountandServer.
Home Folder
This connector exports home folders' content.
This page is about Home Folders .

Overview
Home Folders, also called Home Directory, is a user-dedicated storage area where users' personal files can be accessed. In general, a home folder is private so only its owner and administrators can access it. Moreover, the folders are often centralized because they are located on a network server. It allows making backups regularly and easily accessing the folders.
Prerequisites
Implementing this connector requires:
- reading first how to Set, View, Change, or Remove Special Permissions and check the File and Folder Permissions list;
- an account with at least the special permission Read on all home folders in order to be able to export them.
Export
This connector exports all the home folders to a CSV file.
This connector performs only complete export, not incremental.
Configuration
This process is configured through a
Connection in the UI and/or
the XML configuration, and in the appsettings.agent.json > Connections section:
appsettings.agent.json
{
  ...
  "Connections": {
    ...
    "<ConnectionIdentifier>": {
      ...
    }
  }
}
The identifier of the connection and thus the name of the subsection must:
- be unique.
- not begin with a digit.
- not contain
<,>,:,",/,\,|,?,*and_.
For example:
appsettings.agent.json
{
...
"Connections": {
...
"HomeFolderExport": {
"InputDirectories": [
"C:/ContosoFolder",
"C:/ContosoFolder2",
],
"Domain": "Windows",
"Interactive": true,
"Login": "Contoso",
"Password": "ContOso$123456789"
}
}
}
Setting attributes
| Name | Details |
|---|---|
| InputDirectories required | Type String List Description List of the directories that contain the home folders to be exported. |
| Domain optional | Type String Description Domain of the account used to access the home folders. |
| Interactive default value: False | Type Boolean Description True to set the authentication as interactive. False to set it batch. See Microsoft's documentation for more details. |
| --- | --- |
| Login optional | Type String Description Login of the account used to access the files and folders. Note: when not specified and Password neither, then the account running Identity Manager will be used. Note: if Domain is null, then Login must be set in the User Principal Name (UPN) format. |
| Password optional | Type String Description Password of the account used to access the files and folders. Note: when not specified and Login neither, then the account running Identity Manager will be used. |
Output details
This connector is meant to generate a CSV file, named <connectionIdentifier>.csv, to the
Connection folder, with the
following columns:
- Command: empty for now, as the connector performs only complete export.
- Name: name of the home folder.
For example, when exporting with a connection named
HomeFolderExport, then the output file will be namedHomeFolderExport.csvand will look like:HomeFolderExport.csv
Command,Name
...
Fulfill
There are no fulfill capabilities for this connector.
Authentication
Password reset
This connector does not reset passwords.
Credential protection
Data protection can be ensured through:
-
Connection , configured in the
appsettings.encrypted.agent.jsonfile; -
An Connection safe;
-
Connection able to store Home Folder's
LoginandPassword.
JSON
This connector generates JSON files for each provisioning order.
This page is about JSON

The documentation is not yet available for this page and will be completed in the near future.
LDIF
This connector exports entries from an LDIF file.
This page is about LDIF .

Overview
The LDAP Data Interchange Format (LDIF) is a standard plain text data interchange format for representing LDAP (Lightweight Directory Access Protocol) directory content and update requests. LDIF conveys directory content as a set of records, one record for each object (or entry). It also represents update requests, such as Add, Modify, Delete, and Rename, as a set of records, one record for each update request.
Prerequisites
Implementing this connector requires no particular prerequisites.
Export
This connector generates a CSV file from an input LDIF file containing entries to be exported.
Configuration
This process is configured through a
Connection in the UI and/or
the XML configuration, and in the appsettings.agent.json > Connections section:
appsettings.agent.json
{
  ...
  "Connections": {
    ...
    "<ConnectionIdentifier>": {
      ...
    }
  }
}
The identifier of the connection and thus the name of the subsection must:
- be unique.
- not begin with a digit.
- not contain
<,>,:,",/,\,|,?,*and_.
For example:
appsettings.agent.json
{
...
"Connections": {
...
"LdifExport": {
"LDIFFile": "C:/UsercubeContoso/Contoso/contoso.ldif",
"FilterAttribute": "objectClass",
"FilterValues": "user organizationalUnit",
"Attributes": [ "dn", "objectClass", "cn", "SAMAccountName", "Name", "userprincipalname" ],
"LdifEncoding": "UTF-8",
}
}
}
Setting attributes
| Name | Details |
|---|---|
| LDIFFile required | Type String Description Path of the LDIF input file. |
| FilterAttribute required | Type String Description Property from the connector's configuration whose value is to be compared with the values from FilterValues, in order to filter the entries to export. |
| FilterValues required | Type String Description List of values to be compared with the value of FilterAttribute, in order to filter the entries to export. Identity Manager will export only the entries matching the filter. Note: multiple values must be separated by white spaces. |
| Attributes required | Type String List Description List of properties from the connector's configuration to be exported. |
| LdifEncoding default value: UTF-8 | Encoding of the file. See the list of available encodings. |
Output details
This connector is meant to generate to the
Connection folder a CSV file
named LdifExport.csv, with the following columns:
LdifExport.csv
Command,dn,objectClass,cn,SAMAccountName,Name,userprincipalname
Insert,value1,value2,...,valueN
Fulfill
There are no fulfill capabilities for this connector.
Authentication
Credential protection
This connector has no credential attributes, and therefore does not use Connection , nor a Connection Vault.
Still, data protection can be ensured through an Connection safe.
Microsoft Exchange
This connector exports mailboxes from a Microsoft Exchange instance.
This page is about Microsoft Exchange .

Overview
Microsoft Exchange Server is Microsoft's email, calendar, contact, scheduling and collaboration platform. It is deployed on the Windows Server operating system (OS) for business use. This connector uses Exchange Server PowerShell (Exchange Management Shell) to export databases and mailboxes.
Prerequisites
Implementing this connector requires:
- a Microsoft Exchange Server 2010, or later. See here Exchange Server 2016's requirements;
- installing Windows PowerShell. See how to connect to Exchange servers using remote PowerShell.
Export
This connector exports
mailboxes
and
mailbox databases.
Two CSV files are generated, one with the
mailbox properties
(like Database, EmailAddresses, ServerName , etc.) and the other with
mailbox database properties
(like Name, Server, Mounted, etc.). These properties are explicitly part of the PowerShell
script used by Identity Manager.
Configuration
This process is configured through a
Connection in the UI and/or
the XML configuration, and in the appsettings.agent.json > Connections section:
appsettings.agent.json
{
  ...
  "Connections": {
    ...
    "<ConnectionIdentifier>": {
      ...
    }
  }
}
The identifier of the connection and thus the name of the subsection must:
- be unique.
- not begin with a digit.
- not contain
<,>,:,",/,\,|,?,*and_.
For example:
appsettings.agent.json
{
...
"Connections": {
...
"MicrosoftExchangeExport": {
"AuthType": "Kerberos",
"Server": "http://mailbox01.contoso.com/PowerShell/"
}
}
}
Setting attributes
| Name | Details |
|---|---|
| Server required | Type String Description Address of the Exchange Server used by the remote PowerShell: http://<ServerFQDN>/PowerShell/ where <ServerFQDN> is the fully qualified domain name of the Exchange server, like mailbox01.contoso.com. |
PowerShellScriptPath default value: {your usercube path}/Runtime/Export-Exchange.ps1 | Type String Description Path of the export script file. |
Output details
This connector is meant to generate the following files:
-
<connectionIdentifier>_mailboxes.csvwith the following columns:<connectionIdentifier>_databases.csv
Command,Database,EmailAddresses,UseDatabaseRetentionDefaults,RetainDeletedItemsUntilBackup,DeliverToMailboxAndForward,ExchangeGuid,ExchangeUserAccountControl,ForwardingAddress,ForwardingSmtpAddress,IsMailboxEnabled,ProhibitSendQuota,ProhibitSendReceiveQuota,RecoverableItemsQuota,RecoverableItemsWarningQuota,CalendarLoggingQuota,IsResource,IsLinked,IsShared,SamAccountName,AntispamBypassEnabled,ServerName,UseDatabaseQuotaDefaults,UserPrincipalName,WhenMailboxCreated,IsInactiveMailbox,AccountDisabledIsDirSynced,Alias,OrganizationalUnit,DisplayName,MaxSendSize,MaxReceiveSize,PrimarySmtpAddress,RecipientType,RecipientTypeDetails,Identity,IsValid,Name,DistinguishedName,Guid,ObjectCategory,WhenChangedUTC,WhenCreatedUTC,ObjectState
Insert,value1,value2,...,valueNFor example, we could have
C:/UsercubeContoso/Temp/ExportOutput/MicrosoftExchangeExport_mailboxes.csv.See more details on mailbox properties in Microsoft's documentation.
-
<connectionIdentifier>_databases.csvwith the following columns:<connectionIdentifier>_databases.csv
Command,Name,Server,Mounted,ObjectCategory,Guid,WhenChangedUTC,WhenCreatedUTC,ObjectState
Insert,value1,value2,...,valueNSee more details on mailbox database properties in Microsoft's documentation.
-
<connectionIdentifier>_cookie.binwhich stores the time of the last successful export, thus allowing incremental processes.
The CSV files are stored in the Connection folder, and the cookie file in the Export Cookies folder.
Fulfill
This connector can create, update or delete mailboxes' addresses (PrimarySmtpAddress, ProxyAddress) and mailbox databases.
As it works via a PowerShell script. See the PowerShellProv topic for additional information.
Identity Manager's PowerShell script can be found in the SDK in
Usercube.Demo/Scripts/Fulfill-Exchange.ps1.
See the PowerShellProv topic for additional information.
Authentication
Authentication Type
This connector uses Kerberos authentication when trying to connect with the Exchange Server.
Password reset
This connector does not reset passwords.
Credential protection
Data protection can be ensured through:
-
Connection , configured in the
appsettings.encrypted.agent.jsonfile; -
An Connection safe;
-
A Connection able to store Microsoft Exchange's
Server.
This kind of credential protection can be used only for the export process.
The fulfill process' credentials can be protected by following the instructions for the PowerShellProv connector. See the PowerShellProv topic for additional information
OData
This connector exports and fulfills data from/to an OData instance.
This page is about OData .

Overview
OData (Open Data Protocol) comply with ISO/IEC and OASIS standards. This protocol defines the best approaches for using RESTful APIs. OData helps you focus on your business logic while building RESTful APIs without having to worry about the various approaches to define request and response headers, status codes, HTTP methods, URL conventions, media types, payload formats, query options, etc.
Prerequisites
Implementing this connector requires reading first the appsettings documentation.
Identity Manager's service is based on OData RFC.
Export
This connector extracts all entity sets with all the information needed to rebuild them. This is based on the connector's metadata.
Configuration
This process is configured through a
Connection in the UI and/or
the XML configuration, and in the appsettings.agent.json > Connections section:
appsettings.agent.json
{
  ...
  "Connections": {
    ...
    "<ConnectionIdentifier>": {
      ...
    }
  }
}
The identifier of the connection and thus the name of the subsection must:
- be unique.
- not begin with a digit.
- not contain
<,>,:,",/,\,|,?,*and_.
For example:
appsettings.agent.json
{
...
"Connections": {
...
"ODataExport": {
"Server": "https://YourODataService.com/",
"Login": "login",
"Password": "password"
}
}
}
Setting attributes
| Name | Details |
|---|---|
| Server required | Type String Description URL of the data system. |
| Login optional | Type String Description Login to connect to the system. |
| Password optional | Type String Description Password to connect to the system. |
| BearerToken optional | Type String Description Token to authenticate to the system. |
| ClientId optional | Type String Description Id to connect to the system via OpenId. |
| ClientSecret optional | Type String Description Password to connect to the system via OpenId. |
| AuthenticationUrl optional | Type String Description URL to request the authentication via OpenId. |
XML configuration requirements
This connector requires from the XML configuration:
- An
Entity Type Mapping :
- with the same identifier as the related entity type;
- related to the right connector;
- related to a connection table named
<Connection>_<ODataEntitySet>; - with properties whose connection columns represent the property's path in the entity, see the configuration example below;
- An
Entity Association Mapping :
- with the same identifier as the related entity association;
- with its
Column1in the formatUsercubeNav_<NavigationProperty>:<PropertyKey>for the related property in the association; - with its
Column2in the format<NavigationProperty>Of:<PropertyKey>for the related property in the association; - related to a connection table named
<Connection>_<ODataEntitySet>_<NavigationProperty>.
The information contained in the entity types and entity associations does not impact the export.
Output details
This connector is meant to generate to the Connection folder one CSV file for each entity set provided in the connector's configuration.
The files' column headers come from the entity type mapping's ConnectionColumn properties.
If the connection column describes a sub-property, then the name should have the following pattern:
{property}:{sub-property}. The character ":" should not be used in other situations.
For example: <EntityType Identifier="OData_People" DisplayName_L1="People"><Property Identifier="UserName" DisplayName_L1="User name" Type="String" /><Property Identifier="FamilyName" DisplayName_L1="Family name" Type="String" /></EntityType>
```EntityTypeMapping Identifier=OData Connector=OData ConnectionTable=OData_People\>\<""""\>\<""""\>\<\>
Note that we have here ```UserName``` which is a single property, and ```FamilyName``` which is a sub-property of ```Name```, hence the name ```Name:FamilyName``` as the ```ConnectionColumn```.
RACF
This connector exports users and profiles from a RACF file.
This page is about RACF .
![]()
Overview
Resource Access Control Facility (RACF) is a security program from IBM OS/390 used to protect users' resources by controlling their accesses. The RACF connector exports the information saved by RACF about users, groups and access authorities.
Prerequisites
Implementing this connector requires the input file to be in the RACF format, but it can have any extension.
Export
This connector extracts the information found in a RACF file and transforms it into CSV files in Identity Manager format.
Be aware that Identity Manager supports only the RACF records represented by the following codes:
- 0100; 0120; 0101; 0102 (groups);
- 0200; 0203 (users);
- 0500; 0503 (general resources).
Configuration
This process is configured through a
Connection in the UI and/or
the XML configuration, and in the appsettings.agent.json > Connections section:
appsettings.agent.json
{
  ...
  "Connections": {
    ...
    "<ConnectionIdentifier>": {
      ...
    }
  }
}
The identifier of the connection and thus the name of the subsection must:
- be unique.
- not begin with a digit.
- not contain
<,>,:,",/,\,|,?,*and_.
The following example reads RACF data from the
C:/UsercubeContoso/RacfFile.csviso-8859-1 file and exports it to CSV files in Identity Manager format:appsettings.agent.json
{
...
"Connections": {
...
"RACF": {
"Path": "C:/UsercubeContoso/RacfFile.csv",
"Encoding": "iso-8859-1",
}
}
}
Setting attributes
| Name | Details |
|---|---|
| Path required | Type String Description Path of the RACF file to be exported. |
| --- | --- |
| Encoding default value: UTF-8 | Type String Description Encoding of the input file. See the list of available encodings. |
Output details
This connector is meant to generate to the
Connection folder one CSV
file per record type (0100, 0200, etc.), named <connectionIdentifier>_<type>.csv.
For example, consider an export with a connection named
ExportRacf, and a source file containing the record types 0100, 0120, 0203. Then we will have three output files namedExportRacf_0100.csv,ExportRacf_0120.csvandExportRacf_0203.csv.
Fulfill
There are no fulfill capabilities for this connector.
Authentication
Password reset
This connector does not reset passwords.
Credential protection
This connector has no credential attributes, and therefore does not use Connection , nor a Connection .
Still, data protection can be ensured through an Connection safe.
SAP ERP 6.0 and SAP S4/HANA
This connector exports and fulfills users and roles from/to an SAP ERP 6.0 or SAP HANA instance.
This page is about ERP/SAP ERP 6.0.

Overview
The SAP Enterprise Resource Planning (SAP ERP) software incorporates the core business processes of an organization, such as finance, production, supply chain services, procurements, human resources (HR), etc. The SAP ERP connector exports and fulfills data from/to an SAP ERP 6.0 system.
Prerequisites
Implementing this connector requires:
- Reading first the appsettings documentation; See the appsettings.agent topic for additional information.
- An ASE or HANA database with a service account, as a database administrator
- A service account, as a SAP user with at least the roles for user management
- The prerequisites for reading should be set up
- The prerequisites for writing should be set up
ASE or HANA database with a service account, as a database administrator
To connect to the SAP database using SSH, use the following commands:
Code attributes enclosed with <> need to be replaced with a custom value before entering the
script in the command line.
su sybaba
isql -S <database (ABA is the default value)> -U<administrator's login> -P<administrator's password> -X
For example:
Code attributes enclosed with <> need to be replaced with a custom value before entering the
script in the command line.
isql -S ABA -Usapsso -PV1H#M$4JIgU$qd -X
Service account, as a SAP user with at least the roles for user management
Create a login for Identity Manager's service account with at least reading access on user management tables by using a command from the table below:
| Table | Usage |
|---|---|
| USR02 | Users table |
| AGR_USERS | Links between Users and Roles |
| AGR_TEXTS | Roles labels according to the language |
| USER_ADDR | |
| AGR_1016 AGR_PROF | Links between Profiles and Roles |
| USR10 | Profiles tables |
| USR11 | Profiles labels |
| AGR_DEFINE | Roles table |
| AGR_AGRS | Composition links |
| USGRP | Groups table |
| USGRPT | Groups labels |
| UST04 | Links between Users and Profiles |
| UST10C | Links between Profiles and Sub-profiles |
| AGR_TCODES | Links between Roles and Transactions |
| T002 | Languages codes |
For example:
Code attributes enclosed with <> need to be replaced with a custom value before entering the
script in the command line.
execute sp_addlogin <login>, <password>, <database (ABA is the default value)>go use ABA go execute sp_adduser <login>go grant select on ABA.SAPSR3.USR02 to usercube grant select on ABA.SAPSR3.AGR_USERS to usercube grant select on ABA.SAPSR3.USER_ADDR to usercube grant select on ABA.SAPSR3.AGR_1016 to usercube grant select on ABA.SAPSR3.USR10 to usercube grant select on ABA.SAPSR3.USR11 to usercube grant select on ABA.SAPSR3.AGR_AGRS to usercube grant select on ABA.SAPSR3.USGRP to usercube grant select on ABA.SAPSR3.UST04 to usercube grant select on ABA.SAPSR3.AGR_TCODES to user grant select on ABA.SAPSR3.T002 to usercube Go
Set up the prerequisites for reading
To set up the prerequisites for reading follow the steps below.
Step 1 – Copy the DLL Sap.Data.Hana.Core.v2.1.dll into the Runtime of Identity Manager.
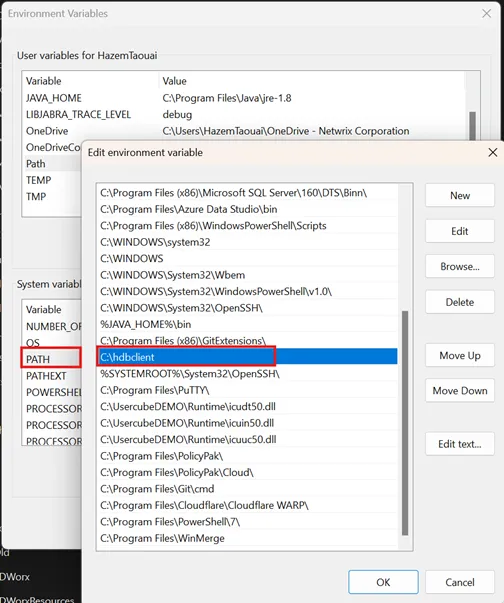
Step 2 – Unzip the "hdbclient.zip" archive to C: drive and add the path to the Path environment variables.
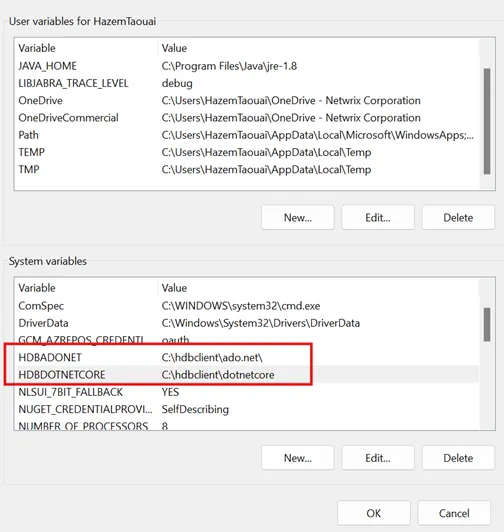
Step 3 – Create environment variables: HDBADOTNET=C:\hdbclient\ado.net and
HDBADOTNETCORE=C:\hdbclient\dotnetcore.
Set up the prerequisites for writing
NOTE: Make sure the Read prerequisites are configured first.
Step 1 – Copy the provided DLL sapnwrfc.dl into the Runtime of Identity Manager.
Step 2 – Unzip the dotnet86.zip archive to C:\dotnetx86.
Step 3 – Copy the DLLs icudt50.dll, icuin50.dll and icuuc50.dll into the Runtime of Identity
Manager.
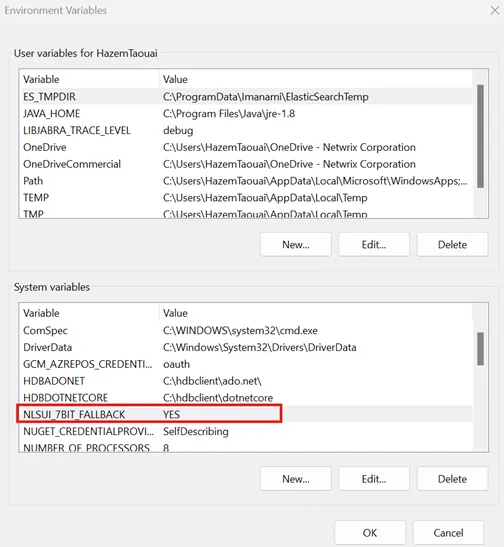
Step 4 – Disable DLLs search by adding the environment variable NLSUI_7BIT_FALLBACK=YES.
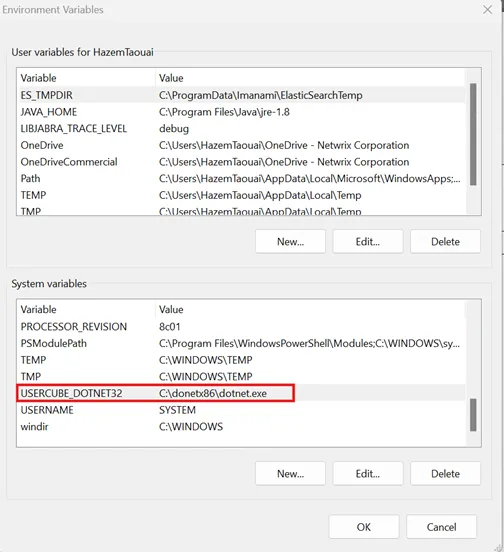
Step 5 – Add new environment variable USERCUBE_DOTNET32 containing the path to dotnetx86
(e.g.: C: \donetx86\dotnet.exe).
Export
This connector extracts users, roles, profiles, profile memberships, role memberships and groups from an SAP ERP instance, and writes the output to CSV files.
Configuration
This process is configured through a connection in the UI and/or the XML configuration, and in the appsettings.agent.json > Connections section. See the Connection topic for additional information.
Code attributes enclosed with <> need to be replaced with a custom value before entering the
script in the command line.
appsettings.agent.json
{
  ...
  "Connections": {
    ...
    "<ConnectionIdentifier>": {
      ...
    }
  }
}
Remember, the identifier of the connection and thus the name of the subsection must:
- Be unique
- Not begin with a digit.
- Not contain <, >, :, /, , |, ?, *, and _.
For example:
Code attributes enclosed with <> need to be replaced with a custom value before entering the
script in the command line.
appsettings.agent.json
{
    ...
    "Connections": {
        ...
        "SAPExportFulfillment": {
            "Server": "serverUrl",
            "AseLogin": "login",
            "AsePassword": "password",
            "Instance": "sapInstance",
            "Port": "4242",
            "Client": "123",
            "Language": "fr"
        }
    }
}
| Name | Type | Description |
|---|---|---|
| IsHana default value: false | Boolean | True to connect to an S/4 HANA instance instead of an ERP 6.0. |
| AseLogin required | String | Login to connect to SAP ASE. |
| AsePassword required | String | Password to connect to SAP ASE. |
| Client required | String | Client id of SAP. |
| Instance required | String | Instance of the SAP database. |
| Language required | String | SAP language. |
| Port required | String | Port of the SAP ERP server. |
| Server required | String | URL of the SAP ERP server. |
Output details
This connector is meant to generate to the ExportOutput folder the following files:
- SAPExportFulfillment_users.csv;
- SAPExportFulfillment_roles.csv;
- SAPExportFulfillment_usersroles.csv;
- SAPExportFulfillment_profiles.csv;
- SAPExportFulfillment_profilesprofiles.csv;
- SAPExportFulfillment_rolesprofiles.csv;
- SAPExportFulfillment_usersprofiles.csv;
- SAPExportFulfillment_rolesroles.csv;
- SAPExportFulfillment_groups.csv;
- SAPExportFulfillment_rolestransactions.csv.
See the Application Settings topic for additional information.
Fulfill
This connector can provision users, role memberships and group memberships to SAP ERP.
Configuration
Same as for export, fulfill is configured through connections. See the SAP ERP 6.0 and SAP S4/HANA topic for additional information.
For example:
Code attributes enclosed with <> need to be replaced with a custom value before entering the
script in the command line.
appsettings.agent.json
{
    ...
    "Connections": {
        ...
        "SAPExportFulfillment": {
            "Server": "<serverUrl>",
            "BapiLogin": "<login>",
            "BapiPassword": "<password>"
        }
    }
}
Setting attributes
| Name | Type | Description |
|---|---|---|
| IsHana default value: false | Boolean | True to connect to an S/4 HANA instance instead of an ERP 6.0. |
| Server required | String | URL of the SAP ERP server. |
| BapiLogin required | String | Login to connect to the specified server. |
| BapiPassword required | String | Password to connect to the specified server. |
Password reset
See the appsettings.agent topic for additional information on how to configure password reset settings.
When setting a password for an SAP ERP user, the password attribute is defined by the password specified in the corresponding RessourceTypeMapping. See the Sap Resource Type Mapping topic for additional information.
Credential protection
Data protection can be ensured through:
- RSA encryption, configured in the
appsettings.encrypted.agent.jsonfile - An Azure Key Vault safe
| Attribute | Naming Convention for the Key in Azure Key Vault |
|---|---|
| Server | Connections--<identifier>--Server |
| AseLogin | Connections--<identifier>--AseLogin |
| AsePassword | Connections--<identifier>--AsePassword |
| Instance | Connections--<identifier>--Instance |
| Port | Connections--<identifier>--Port |
| Client | Connections--<identifier>--Client |
| Language | Connections--<identifier>--Language |
| BapiLogin | Connections--<identifier>--BapiLogin |
| BapiPassword | Connections--<identifier>--BapiPassword |
| SystemNumber | Connections--<identifier>--SystemNumber |
- A CyberArk Vault able to store Active Directory's Login, Password, and Server.
See the RSA Encryption , Azure Key Vault, and CyberArk's AAM Credential Providers topics for additional information.
Protected attributes are stored inside a safe in CyberArk, into an account whose identifier can be
retrieved by Identity Manager from appsettings.cyberark.agent.json.
For example:
Code attributes enclosed with <> need to be replaced with a custom value before entering the
script in the command line.
appsettings.cyberark.agent.json
{
  ...
  "Connections": {
    ...
    "SAPExportFulfillment": {
        "Login": "SAPExportFulfillment_CyberArkKey",
        "Password": "SAPExportFulfillment_CyberArkKey",
        "Server": "SAPExportFulfillment_CyberArkKey"
    }
  }
}
SAP Netweaver
This connector exports and fulfills users and roles from/to an SAP Netweaver instance.
This page is about SAP S/4 HANA .

Overview
SAP ERP is an enterprise resource planning software developed by the German company SAP SE. The software incorporates the key business functions of an organization. ERP software includes programs in all core business areas, such as procurement, production, materials management, sales, marketing, finance, and human resources (HR).
Prerequisites
Implementing this connector requires:
- reading first the appsettings.agentdocumentation;
- a service account with reading and writing permissions on the SAP server.
Export
This connector exports users, roles, role memberships and groups from an SAP instance and writes the output to CSV files.
Configuration
This process is configured through a
Connection in the UI and/or
the XML configuration, and in the appsettings.agent.json > Connections section:
appsettings.agent.json
{
  ...
  "Connections": {
    ...
    "<ConnectionIdentifier>": {
      ...
    }
  }
}
The identifier of the connection and thus the name of the subsection must:
- be unique.
- not begin with a digit.
- not contain
<,>,:,",/,\,|,?,*and_.
For example:
appsettings.agent.json
{
...
"Connections": {
...
"SAPExportFulfillment": {
"Server": "serverUrl",
"Login": "login",
"Password": "password"
}
}
}
Setting attributes
| Name | Details |
|---|---|
| Server required | Type String Description URL of the SAP server. |
| Login required | Type String Description Login to authenticate to the specified server. |
| Password required | Type String Description Password to authenticate to the specified server. |
Output details
This connector is meant to generate to the Connection folder the following CSV files:
-
sap_users.csvwith the following columns:sap_users.csv
Command,logonname,isserviceuser,firstname,lastname,salutation,title,jobtitle,mobile,displayname,description,email,fax,locale,timezone,validfrom,validto,lastmodifydate,islocked,isaccountlocked,ispasswordlocked,ispassworddisabled,telephone,department,id,securitypolicy,datasource,company,streetaddress,city,zip,pobox,country,state,orgunit,accessibilitylevel,passwordchangerequired
Insert,value1,value2,...,valueN -
sap_groups.csvwith the following columns:sap_groups.csv
Command,uniquename,displayname,description,lastmodifydate,id,datasource,distinguishedname
Insert,value1,value2,...,valueN -
sap_roles.csvwith the following columns:sap_roles.csv
Command,uniquename,displayname,description,lastmodifydate,id,datasource,scopes,actions
Insert,value1,value2,...,valueN -
sap_roles_member.csvwith the following columns:sap_roles_member.csv
Command,id,member
Insert,value1,value2,...,valueN
Fulfill
This connector writes to SAP to create, update, and/or delete users, groups, roles and group memberships.
Configuration
Same as for export, fulfill is configured through connections.
Setting attributes
| Name | Details |
|---|---|
| Server required | Type String Description URL of the SAP server. |
| Login required | Type String Description Login to authenticate to the specified server. |
| Password required | Type String Description Password to authenticate to the specified server. |
For example:
appsettings.agent.json
{
"Connections": {
"SAPExportFulfillment": {
"Server": "serverUrl",
"Login": "login",
"Password": "password"
}
}
}
Authentication
Password reset
See the appsettings.agent topic to learn more on how to configure password reset settings.
When setting a password for an SAP user, the password attribute is defined by the password specified in the corresponding Resource Type Mappings.
Credential protection
Data protection can be ensured through:
- Connection , configured in
the
appsettings.encrypted.agent.jsonfile; - An Connection safe;
| Attribute | Naming Convention for the Key in Azure Key Vault |
|---|---|
| Server | Connections--<identifier>--Server |
| Login | Connections--<identifier>--Login |
| Password | Connections--<identifier>--Password |
- a Connection able to store
Active Directory's
Login,PasswordandServer.
Protected attributes are stored inside a safe in CyberArk, into an account whose identifier can be
retrieved by Identity Manager from appsettings.cyberark.agent.json.
For example:
appsettings.cyberark.agent.json
{
...
"Connections": {
...
"SAPExportFulfillment": {
"Login": "SAPExportFulfillment_CyberArkKey",
"Password": "SAPExportFulfillment_CyberArkKey",
"Server": "SAPExportFulfillment_CyberArkKey"
}
}
}
ServiceNow
This connector exports and fulfills any data, including users and roles, from/to a ServiceNow CMDB.
This page is about ServiceNow .

Overview
ServiceNow is a cloud-based company that provides software as a service (SaaS) for technical management support. The company specializes in IT service management (ITSM), IT operations management (ITOM) and IT business management (ITBM), allowing users to manage projects, teams and customer interactions via a variety of apps and plugins. This section focuses on ServiceNow Entity Management. To learn about how to use this connector to create tickets for other resources, see ServiceNow Ticket .
Prerequisites
Implementing this connector requires:
- reading first the appsettings documentation;
- a service account with the snc_platform_rest_api_access role, as well as reading and writing permissions on the target ServiceNow instance;
- the version ServiceNow London or later;
- the appropriate configuration in ServiceNow of authentication, Basic or OAuth.
Export
This connector exports to CSV files ServiceNow's tables (Users, Groups, Group Memberships).
An incremental search is possible to retrieve added and updated records but a full delta (including deleted items) can't be performed.
Configuration
This process is configured through a
Connection in the UI and/or
the XML configuration, and in the appsettings.agent.json > Connections section:
appsettings.agent.json
{
  ...
  "Connections": {
    ...
    "<ConnectionIdentifier>": {
      ...
    }
  }
}
The identifier of the connection and thus the name of the subsection must:
- be unique.
- not begin with a digit.
- not contain
<,>,:,",/,\,|,?,*and_.
The following example retrieves from users only those that are active, and no filter is applied to the other tables. A single request can retrieve up to 5,000 entries, no more. This means that if there are 6,000
sys_userto retrieve, then all of them will be retrieved but with two requests.appsettings.agent.json
{
...
"Connections": {
...
"ServiceNowExportFulfillment": {
"Server": "https://instance.service-now.com/api/now/table",
"Login": "login",
"Password": "password",
"ResponseSizeLimit":"5000",
"Filter":"sys_user#active=true"
}
}
}The following example is the same as above, but using OAuth Authentication:
appsettings.agent.json
{
...
"Connections": {
...
"ServiceNowExportFulfillment": {
"Server": "https://instance.service-now.com/api/now/table",
"Login": "login",
"Password": "password",
"ClientId": "ClientId",
"ClientSecret": "ClientSecret",
"OAuth2Url": "https://instance.service-now.com/oauth_token.do",
"ResponseSizeLimit":"5000",
"Filter":"sys_user#active=true"
}
}
}
Setting attributes
| Name | Details |
|---|---|
| Server required | Type String Description URL of the ServiceNow Server Table API endpoint. See ServiceNow Official API Reference. Info: the URL must start with https. |
| Login required | Type String Description Username of the service account used to connect to the server. |
| Password required | Type String Description Password of the service account used to connect to the server. |
| ClientId optional | Type String Description Client Id used (and required) with OAuth. |
| ClientSecret optional | Type String Description Client Secret used (and required) with OAuth. |
| OAuth2Url optional | Type String Description Application endpoint used (and required) with OAuth. |
| --- | --- |
| Server required | Type String Description URL of the ServiceNow Server Table API endpoint. See ServiceNow Official API Reference. Info: the URL must start with https. |
| Login required | Type String Description Username of the service account used to connect to the server. |
| Password required | Type String Description Password of the service account used to connect to the server. |
| ClientId optional | Type String Description Client Id used (and required) with OAuth. |
| ClientSecret optional | Type String Description Client Secret used (and required) with OAuth. |
| OAuth2Url optional | Type String Description Application endpoint used (and required) with OAuth. |
Output details
This connector is meant to generate to the
Connection folder one CSV
file for each table, named <connectionIdentifier>_<tableName>.csv.
Identity Manager lists the tables to retrieve based on Entity Type Mapping 's and Entity Association Mapping 's connection tables.
For the connector to work properly, the connection tables must follow the naming convention too:
<connectionIdentifier>_<tableName>.
For example, with the following configuration:
<EntityTypeMapping Identifier="User" Connector="ServiceNow" ConnectionTable="ServiceNowExportFulfillment_sys_user"> <Property Identifier="sys_id" ConnectionColumn="sys_id" IsPrimaryKey="true" /> <Property Identifier="name" ConnectionColumn="name" /> <Property Identifier="user_name" ConnectionColumn="user_name" /> <Property Identifier="email" ConnectionColumn="email" /></EntityTypeMapping><EntityTypeMapping Identifier="User" Connector="ServiceNow" ConnectionTable="ServiceNowExportFulfillment_sys_group"> <Property Identifier="sys_id" ConnectionColumn="sys_id" IsPrimaryKey="true" /> <Property Identifier="name" ConnectionColumn="name" /> <Property Identifier="description" ConnectionColumn="description" /></EntityTypeMapping><EntityAssociationMapping Identifier="Group_Members" Column1="user" EntityPropertyMapping1="User:sys_id" Column2="group" EntityPropertyMapping2="Group:sys_id" Connector="ServiceNow" ConnectionTable="ServiceNowExportFulfillment_sys_user_grmember" C0="sys_user_grmember"
/>
We would have:
ServiceNowExportFulfillment_sys_user.csv
sys_id,active,name,user_name,email
...
ServiceNowExportFulfillment_sys_group.csv sys_id,name,description ...
ServiceNowExportFulfillment_sys_user_grmember.csv
user,group
...
Fulfill
This connector writes to ServiceNow to create, update, and/or delete any data.
Configuration
Same as for export, fulfill is configured through connections.
For example:
appsettings.agent.json
{
...
"Connections": {
...
"ServiceNowExportFulfillment": {
"Server": "https://instance.service-now.com/api/now/table",
"Login": "login",
"Password": "password"
}
}
}
The following example is the same as above, but using OAuth Authentication:
appsettings.agent.json
{
...
"Connections": {
...
"ServiceNowExportFulfillment": {
"Server": "https://instance.service-now.com/api/now/table",
"Login": "login",
"Password": "password",
"ClientId": "ClientId",
"ClientSecret": "ClientSecret",
"OAuth2Url": "https://instance.service-now.com/oauth_token.do"
}
}
}
Setting attributes
| Name | Details |
|---|---|
| Server required | Type String Description URL of the ServiceNow Server Table API endpoint. See ServiceNow Official API Reference. Info: the URL must start with https. |
| Login required | Type String Description Username of the service account used to connect to the server. |
| Password required | Type String Description Password of the service account used to connect to the server. |
| ClientId optional | Type String Description Client Id used (and required) with OAuth. |
| ClientSecret optional | Type String Description Client Secret used (and required) with OAuth. |
| OAuth2Url optional | Type String Description Application endpoint used (and required) with OAuth. |
Authentication
Password reset
See the appsettings.agent topic to learn more on how to configure password reset settings.
When setting a password for an ServiceNow user, the password attribute is defined by the password specified in the corresponding Resource Type Mappings.
Credentials protection
Data protection can be ensured through:
- Connection , configured in
the
appsettings.encrypted.agent.jsonfile; - An Connection safe;
| Attribute | Naming Convention for the Key in Azure Key Vault |
|---|---|
| Server | Connections--<identifier>--Server |
| Login | Connections--<identifier>--Login |
| Password | Connections--<identifier>--Password |
| ClientId | Connections--<identifier>--ClientId |
| ClientSecret | Connections--<identifier>--ClientSecret |
| OAuth2Url | Connections--<identifier>--OAuth2Url |
| Filter | Connections--<identifier>--Filter |
| ResponseSizeLimit | Connections--<identifier>--ResponseSizeLimit |
- a Connection able to store
Active Directory's
Login,Password,Server,ClientIdandClientSecret.
Protected attributes are stored inside a safe in CyberArk, into an account whose identifier can be
retrieved by Identity Manager from appsettings.cyberark.agent.json.
For example:
appsettings.cyberark.agent.json
{
...
"Connections": {
...
"ServiceNowExportFulfillment": {
"Login": "ServiceNowExportFulfillment_CyberArkKey",
"Password": "ServiceNowExportFulfillment_CyberArkKey",
"Server": "ServiceNowExportFulfillment_CyberArkKey",
"ClientId": "ServiceNowExportFulfillment_CyberArkKey",
"ClientSecret": "ServiceNowExportFulfillment_CyberArkKey"
}
}
}
ServiceNowTicket
This connector opens tickets in ServiceNow for manual provisioning.
This page is about ServiceNow Ticket .

Overview
ServiceNow is a cloud-based company that provides software as a service (SaaS) for technical management support. The company specializes in IT service management (ITSM), IT operations management (ITOM) and IT business management (ITBM), allowing users to manage projects, teams and customer interactions via a variety of apps and plugins. This section focuses on ServiceNow ticket creation for the fulfillment of resources that can't or shouldn't be performed with an existing fulfill. To learn about how to manage entities, see ServiceNow Entity Management.
Prerequisites
Implementing this connector requires:
- reading first the appsettings.agentdocumentation;
- a service account with the snc_platform_rest_api_access role, as well as reading and writing permissions on the target ServiceNow instance;
- the version ServiceNow London or later;
- the appropriate configuration in ServiceNow of authentication, Basic or OAuth.
Export
This connector exports some of ServiceNow entities, see the export capabilities of the ServiceNow connector. Some entities cannot be exported.
Fulfill
This connector writes to ServiceNow to create incident and request tickets containing information to create, update or delete a resource. It does not create nor update a resource directly.
Once created, the ticket is managed in ServiceNow, not in Identity Manager.
When the ticket is closed or canceled, Identity Manager updates the Entitlement Assignment of the resource accordingly.
See the fulfill capabilities of the ServiceNow connector.
For example:
appsettings.agent.json
{
...
"Connections": {
...
"ServiceNowFulfillManual": {
"Server": "https://instance.service-now.com/api/now/table",
"Login": "login",
"Password": "password"
}
}
}
Authentication
Password reset
See the appsettings.agent topic to learn more on how to configure password reset settings.
When setting a password for a ServiceNow user, the password attribute is set to the chosen value and
the user's password_needs_reset attribute is set to true.
Credential protection
Data protection can be ensured through:
- Connection , configured in
the
appsettings.encrypted.agent.jsonfile; - An Connection safe;
| Attribute | Naming Convention for the Key in Azure Key Vault |
|---|---|
| Server | Connections--<identifier>--Server |
| Login | Connections--<identifier>--Login |
| Password | Connections--<identifier>--Password |
| ClientId | Connections--<identifier>--ClientId |
| ClientSecret | Connections--<identifier>--ClientSecret |
| OAuth2Url | Connections--<identifier>--OAuth2Url |
| TicketCookieDirectoryPath | Connections--<identifier>--TicketCookieDirectoryPath |
| ResponseSizeLimit | Connections--<identifier>--ResponseSizeLimit |
- a Connection able to store
Active Directory's
Login,Password,Server,ClientIdandClientSecret.
Protected attributes are stored inside a safe in CyberArk, into an account whose identifier can be
retrieved by Identity Manager from appsettings.cyberark.agent.json.
For example:
appsettings.cyberark.agent.json
{
...
"Connections": {
...
"ServiceNowFulfillManual": {
"Login": "ServiceNowFulfillManual_CyberArkKey",
"Password": "ServiceNowFulfillManual_CyberArkKey",
"Server": "ServiceNowFulfillManual_CyberArkKey",
"ClientId": "ServiceNowFulfillManual_CyberArkKey",
"ClientSecret": "ServiceNowFulfillManual_CyberArkKey"
}
}
}
SharedFolders
This connector exports users and permissions from Windows shared folders.
This page is about Shared Folders .

Overview
Also known as UFA (Identity Manager Folder Access), this connector can be used to scan the access rights assigned to folders and files in computers and networks which comply with the Windows File Security and Access Rights systems.
Prerequisites
Implementing this connector requires an account with the permissions:
-
to access all relevant folders and files and read their entitlements;
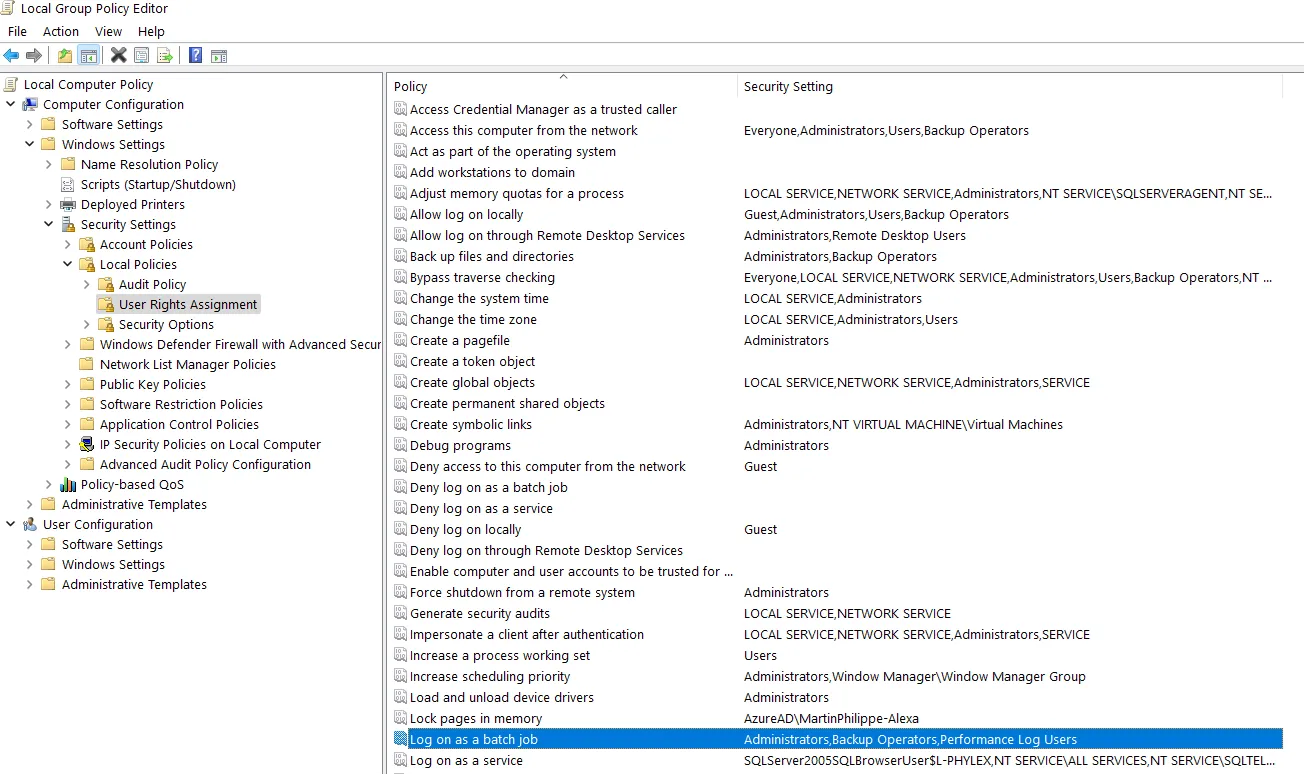
-
Log on as a batch job in the local group policy, when the connector's authentication mode is batch.
Export
This connector scans shared folders in order to export their content to CSV files.
Configuration
This process is configured through a
Connection in the UI and/or
the XML configuration, and in the appsettings.agent.json > Connections section:
appsettings.agent.json
{
  ...
  "Connections": {
    ...
    "<ConnectionIdentifier>": {
      ...
    }
  }
}
The identifier of the connection and thus the name of the subsection must:
- be unique.
- not begin with a digit.
- not contain
<,>,:,",/,\,|,?,*and_.
The following example reads
12levels of folders in the foldersR&D_ProjectsandManagementin the networkOfficeNetworkand inC:/. We only read entitlements about folders and we don't have access rights to the entitlements associated with the SIDsS-1-3-2-4andS-5-7-6-8. We use the service account account@example.com with its related password and domain, and interactive connection:appsettings.agent.json
{
...
"Connections": {
...
"SharedFolderExport": {
"InputDirectories": [ "OfficeNetwork/R&D_Projects", "OfficeNetwork/Management", "C:/" ],
"OnlyDirectoryScan": "true",
"LevelOfScan": "12",
"ListOfSIDToAvoid": [ "S-1-3-2-4", "S-5-7-6-8" ],
"Login": "account@example.com",
"Password": "accountexamplepassword",
"Domain": "Example",
"Interactive": true
}
}
}
Setting attributes
| Name | Details |
|---|---|
| InputDirectories required | Type String List Description Paths of the folders to be scanned. |
| Domain optional | Type String Description Domain of the account used to access files and read their access rights. |
| Interactive default value: False | Type Boolean Description True to set authentication as interactive, False to set it as batch. |
| LevelOfScan optional | Type Int32 Description Number of file and folder levels to be scanned. By default, it scans the whole folder tree for each input directory. |
| ListOfSIDToAvoid optional | Type String List Description SIDs (users or groups) to exclude from the scan. |
| OnlyDirectoryScan default value: False | Type Boolean Description True to scan only folders' entitlements and not files', False to scan all. |
| --- | --- |
| Login optional | Type String Description Login of the account used to access the files and folders. Note: when not specified and Password neither, then the account running Identity Manager will be used. Note: if Domain is null, then Login must be set in the User Principal Name (UPN) format. |
| Password optional | Type String Description Password of the account used to access the files and folders. Note: when not specified and Login neither, then the account running Identity Manager will be used. |
Output details
This connector is meant to generate to the Connection folder the following CSV files:
<connectionIdentifier>_ACE.csv, with the following columns:- key: concatenation of
Right,PathandOwnerSID; - Path: path of the folder or file;
- Right: entitlement among the following, listed from weakest to strongest: ListDirectory / ReadData / CreateFiles / WriteData / AppendData / CreateDirectories / ReadExtendedAttributes / WriteExtendedAttributes / ExecuteFile / Traverse / DeleteSubdirectoriesAndFiles / ReadAttributes / WriteAttributes / Write / Delete / ReadPermissions / Read / ReadAndExecute / Modify / ChangePermissions / TakeOwnership / Synchronize / FullControl
- AllowOrDeny:
0(orfalse) if the entitlement is allowed,1(ortrue) if it is denied; - OwnerSID: SID of the entitlement's owner.
- key: concatenation of
<connectionIdentifier>_PathInformations.csv, with the following columns:- Path;
- ParentPath: path of the file's or folder's parent folder;
- BlockInheritance:
trueif the file or folder blocks entitlement inheritance in the tree; - Hierarchy: hierarchy in the scanned tree.
<connectionIdentifier>_SID.csv, with only one column SID.
Fulfill
There are no fulfill capabilities for this connector.
Authentication
Password reset
This connector does not reset passwords.
Credential protection
Data protection can be ensured through:
- Connection , configured in
the
appsettings.encrypted.agent.jsonfile; - an Connection safe;
| Attribute | Naming Convention for the Key in Azure Key Vault |
|---|---|
| Domain | Connections--<identifier>--Domain |
| Interactive | Connections--<identifier>--Interactive |
| LevelOfScan | Connections--<identifier>--MembersFile |
| ListOfSIDToAvoid | Connections--<identifier>--ListOfSIDToAvoid |
| Login | Connections--<identifier>--Login |
| OnlyDirectoryScan | Connections--<identifier>--OnlyDirectoryScan |
| Password | Connections--<identifier>--Password |
| InputDirectories | Connections--<identifier>--InputDirectories |
- a Connection able to store
Active Directory's
LoginandPassword.
Protected attributes are stored inside a safe in CyberArk, into an account whose identifier can be
retrieved by Identity Manager from appsettings.cyberark.agent.json.
For example:
appsettings.cyberark.agent.json
{
...
"Connections": {
...
"SharedFolderExport": {
"Login": "SharedFolderSettings",
"Password": "SharedFolderSettings"
}
}
}
SharePoint
This connector exports sites, folders, groups and permissions from a SharePoint instance.
This page is about Storage/SharePoint.

Overview
SharePoint is a system used by organizations to store, organize, share and access information.
Prerequisites
Implementing this connector requires an account with the permissions to access all items and read their entitlements.
Configuration
This process is configured through a connection in the UI and/or the XML configuration, and in the
appsettings.agent.json > Connections section:
Code attributes enclosed with <> need to be replaced with a custom value before entering the
script in the command line.
                        appsettings.agent.json
{
  ...
  "Connections": {
    ...
    "<ConnectionIdentifier>": {
      ...
    }
  }
}
The identifier of the connection and thus the name of the subsection must:
- Be unique.
- Not begin with a digit.
- Not contain
<,>,:,",/,\,|,?,*and_.
The following example scans the example.sharepoint.com SharePoint at the more detailed level (ListItem) with the account account.example@acme.com:
Code attributes enclosed with <> need to be replaced with a custom value before entering the
script in the command line.
appsettings.agent.json
{
  ...
  "Connections": {
    ...
    "SharePointExport": {
        "Server": "https://example.sharepoint.com/",
        "Scanlevel": "ListItem",
        "Login": "account.example@usercube.com",
        "Password": "account'sexamplepassword",
        "CsvUrls": "C:/identitymanager/source/SP_others.csv¤URL¤,"
    }
  }
}
Setting attributes
| Name | Type | Description |
|---|---|---|
| Login required | String | Login of the account used to access files and read their entitlements. |
| Password required | String | Password of the account used to access files and read their entitlements. |
| Server required | String | URL of the SharePoint website to scan. |
| Domain optional | String | Domain, sometimes needed in addition to Login to make the connection to the SharePoint server. |
| TimeOut default value: 300000 | Int32 | Timeout (in milliseconds) for requests. |
| Scanlevel default value: ListItem | Scanlevel | Level of scan to be performed, from less to more detailed: Site; List; and ListItem. |
| CsvUrls optional | String | Path, column and separator (split by ¤) of the CSV file containing the other sites to be scanned. Useful when scanning a SharePoint with a root site (https://example.sharepoint.com) with other sites (https://example.sharepoint.com/sites/OtherSite) which are not sub-sites (https://example.sharepoint.com/SubSite). Sub-sites don't need to be provided through a CSV file because they are found from the root site. |
Limitations
Synchronization in incremental mode does not retrieve user account changes, because SharePoint is not able to provide this information through its API.
To avoid unnecessary scanning and to increase performance, the connector in incremental mode does not scan user accounts from the sites given through CsvUrls. However, it still retrieves the folders, groups, permissions and the links between users and these elements.
When needing to retrieve all of user account information, then go through complete synchronization instead of incremental.
Output details
This connector is meant to generate to the Export Output folder the following CSV files:
<connectionIdentifier>_Entity.csv, with the following columns:
- command— empty for complete synchronization, and
mergefor incremental; - Collection— SharePoint server's URL where the information was found;
- Id— Identifier of the entity;
- SharePointId— Identifier of the entity in the scanned site;
- Name— name of the entity;
- Description— description of the entity;
- PrincipalType— type of the entity, for example
User,SecurityGrouporSharePointGroup, etc.; - Email— email of the user;
- IsEmailAuthenticationGuestUser—
trueif the email is for the authentication of a guest user; - IsSiteAdmin—
trueif the user is a site administrator; - IsShareByEmailGuestUser—
trueif the user is a guest invited by email; - AadObjectId— Microsoft Entra ID (formerly Microsoft Azure AD)'s identifier of the entity;
<connectionIdentifier>_GroupMember.csv, with the following columns:
- command;
- Collection;
- Group_Id: Identifier of the group;
- Entity_Id: Identifier of the entity related to the group member;
<connectionIdentifier>_GroupMemberScanFail.csv, with the following columns:
- command;
- Collection;
- Id;
- Name;
- Description;
- PrincipalType;
<connectionIdentifier>_Role.csv, with the following columns:
- command;
- Collection;
- Id;
- Name;
- Description;
- Permissions: permissions concatenated together with line breaks;
<connectionIdentifier>_RoleAssignment.csv, with the following columns:
- command;
- Collection;
- Key— concatenation (with
-) of theRole_Id, theEntity_Idand theSecurableObject_Key; - Role_Id— Identifier of the role;
- Entity_Id— Identifier of the entity related to the role;
- Entity_Name— name of the group member;
- SecurableObject_Key— concatenation (with
|) of theCollectionand the relative URLs where the object was found;
<connectionIdentifier>_SecurableObject.csv, with the following columns:
- command;
- Key— concatenation (with
|) of theCollectionand the relative URLs where the object was found; - Collection;
- Level— level where the securable object was found, among:
Site;List;ListItem; - Label— title or display name of the securable object;
- ParentKey— key of the securable object's parent;
- ScanStatus— status of the scan (success or fail);
- HasUniqueRoleAssignments—
trueif entitlement inheritance is blocked for this securable object;
<connectionIdentifier>_SecurableObjectRightInheritance.csv, with the following columns:
- command;
- Collection;
- SecurableObject_Key;
- Inheritance_Key— key of the ancestor object that the securable object gets its inherited rights from;
<connectionIdentifier>_SecurableObjectScanFail.csv, with the following columns:
- command;
- Key: concatenation (with
|) of theCollectionand the relative URLs where the object was found; - Collection;
- Level;
- Label;
- ParentKey;
- HasUniqueRoleAssignments.
Fulfill
Identity Manager's fulfill functionality can add and remove members from existing SharePoint groups.
Configuration
Same as for export, fulfill is configured through connections.
For example:
Code attributes enclosed with <> need to be replaced with a custom value before entering the
script in the command line.
appsettings.agent.json
{
  ...
  "Connections": {
    ...
    "SharePointFulfillment": {
        "Server": "https://example.sharepoint.com/",
        "Scanlevel": "ListItem",
        "Login": "account.example@usercube.com",
        "Password": "account'sexamplepassword",
        "CsvUrls": "C:/identitymanager/source/SP_others.csv¤URL¤,"
    }
  }
}
Setting attributes
| Name | Type | Description |
|---|---|---|
| Login required | String | Login of the account used to access files and read their entitlements. |
| Password required | String | Password of the account used to access files and read their entitlements. |
| Server required | String | URL of the SharePoint website to scan. |
| Domain optional | String | Domain, sometimes needed in addition to Login to make the connection to the SharePoint server. |
| TimeOut default value: 300000 | Int32 | Timeout (in milliseconds) for requests. |
Password reset
This connector does not reset passwords.
Credential protection
Data protection can be ensured through:
- RSA encryption, configured in the
appsettings.encrypted.agent.jsonfile; - An Azure Key Vault safe;
| Attribute | Naming Convention for the Key in Azure Key Vault |
|---|---|
| Domain | Connections--<identifier>--Domain |
| Login | Connections--<identifier>--Login |
| Password | Connections--<identifier>--Password |
| Scanlevel | Connections--<identifier>--Scanlevel |
| TimeOut | Connections--<identifier>--TimeOut |
| Server | Connections--<identifier>--Server |
| CsvUrls | Connections--<identifier>--CsvUrls |
- A CyberArk Vault able to store SharePoint's
LoginandPassword.
See the RSA Encryption , Azure Key Vault, and CyberArk's AAM Credential Providers topics for additional information.
Protected attributes are stored inside a safe in CyberArk, into an account whose identifier can be
retrieved by Identity Manager from appsettings.cyberark.agent.json.
For example:
Code attributes enclosed with <> need to be replaced with a custom value before entering the
script in the command line.
                            appsettings.cyberark.agent.json
{
  ...
  "Connections": {
    ...
    "SharePointFulfill": {
        "Login": "SharePointSettings",
        "Password": "SharePointSettings"
    }
  }
}
Top Secret
This connector exports users and profiles from a Top Secret (TSS) instance.
This page is about TSS .

The documentation is not yet available for this page and will be completed in the near future.
RSA Encryption
Identity Manager provides a few options to protect sensitive data via RSA encryption.
Overview
Sensitive data can be RSA encrypted by using Identity Manager's tools:
-
Usercube-Protect-X509JsonValue to encrypt given values;
-
Usercube-Protect-X509JsonFile to encrypt a whole file.
The file encryption tool should be used only on files that contain only plain text values, not already encrypted ones.
Once encrypted, sensitive values can be added to the appsettings.encrypted.json and
appsettings.encrypted.agent.json files. Identity Manager will read first the values from the
encrypted appsettings files, before reading those from the usual non-encrypted appsettings files.
These methods require an X.509 public key certificate (the same for the encrypted appsettings files and the tools).
The value encryption tool can be used to encrypt specific values to be added to the encrypted appsettings files without having to encrypt the whole files again.
Focus on the Encrypted Appsettings Files
The appsettings.encrypted.json and appsettings.encrypted.agent.json files contain respectively
the appsettings.json and appsettings.agent.json files' sensitive setting values which are
protected by RSA encryption.
These files follow the exact same structure as the Agent Configuration .
Read the Encrypted Files
Identity Manager can use an RSA decoding algorithm fed by a public-key certificate in order to read the encrypted application settings.
This requires the usual appsettings file(s) to have UseEncryptedAppsettings set to true. See
below.
appsettings.json and/or appsettings.agent.json

{
    ...
    "EncryptionCertificate": {
        "File": "./Usercube.pfx",
        "Password": "secret",
        "UseEncryptedAppsettings": true
    }
}
This way, values from the encrypted file take priority over the values from the non-encrypted appsettings files.
For example, if
Passwordexists in both the encrypted file and the non-encrypted file, then the value from the encrypted file is used.
User Interface
See how-to customize Identity Manager's User Interface.
Architecture
Identity Manager is built to work via a specific architecture made of a server, an agent and a database.
Server, Agent and Database
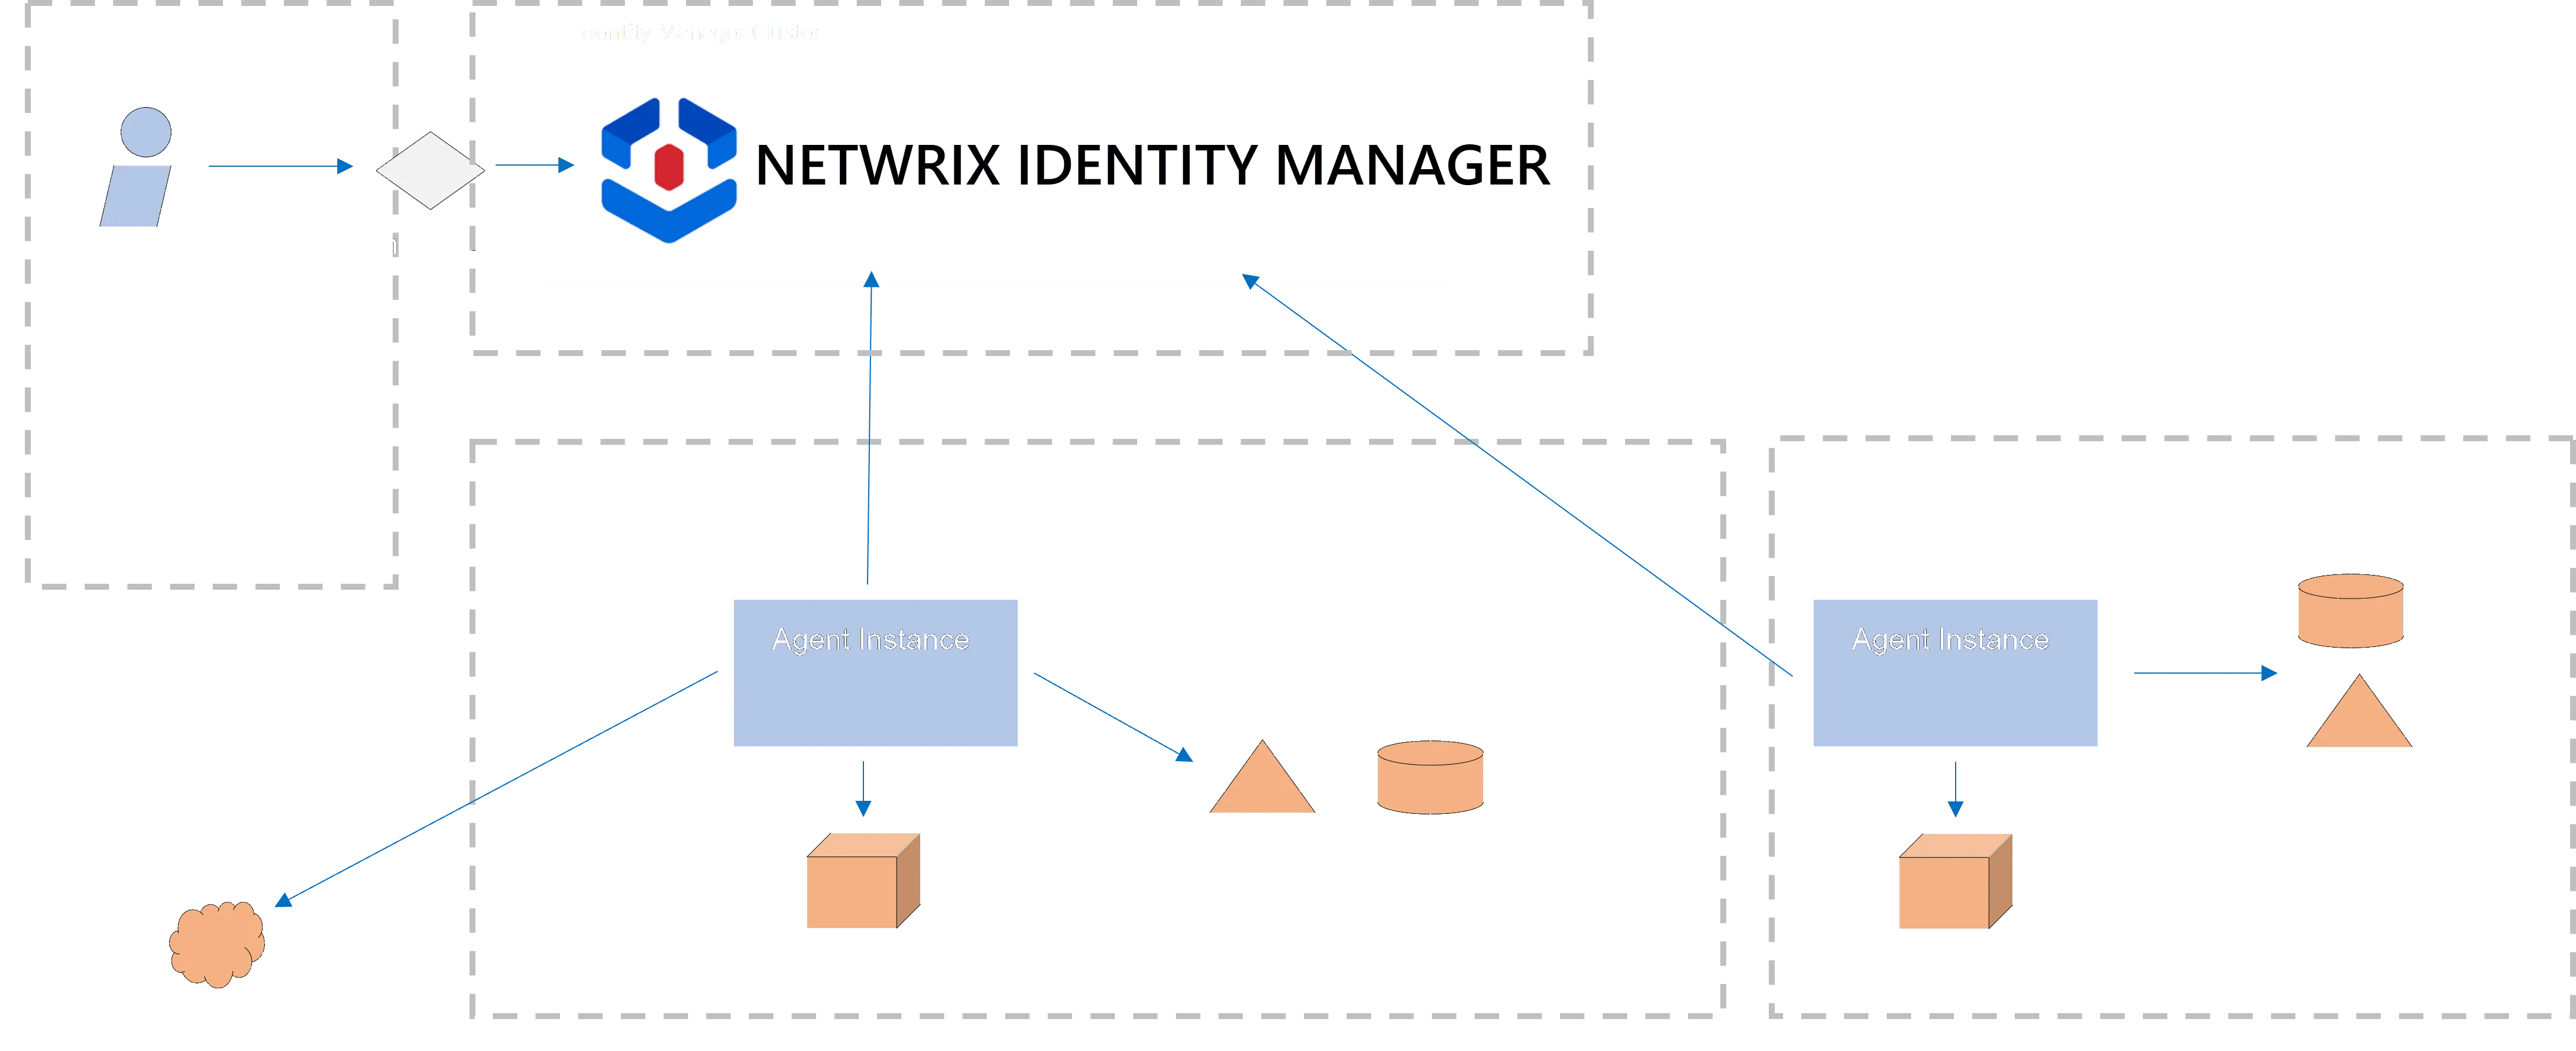
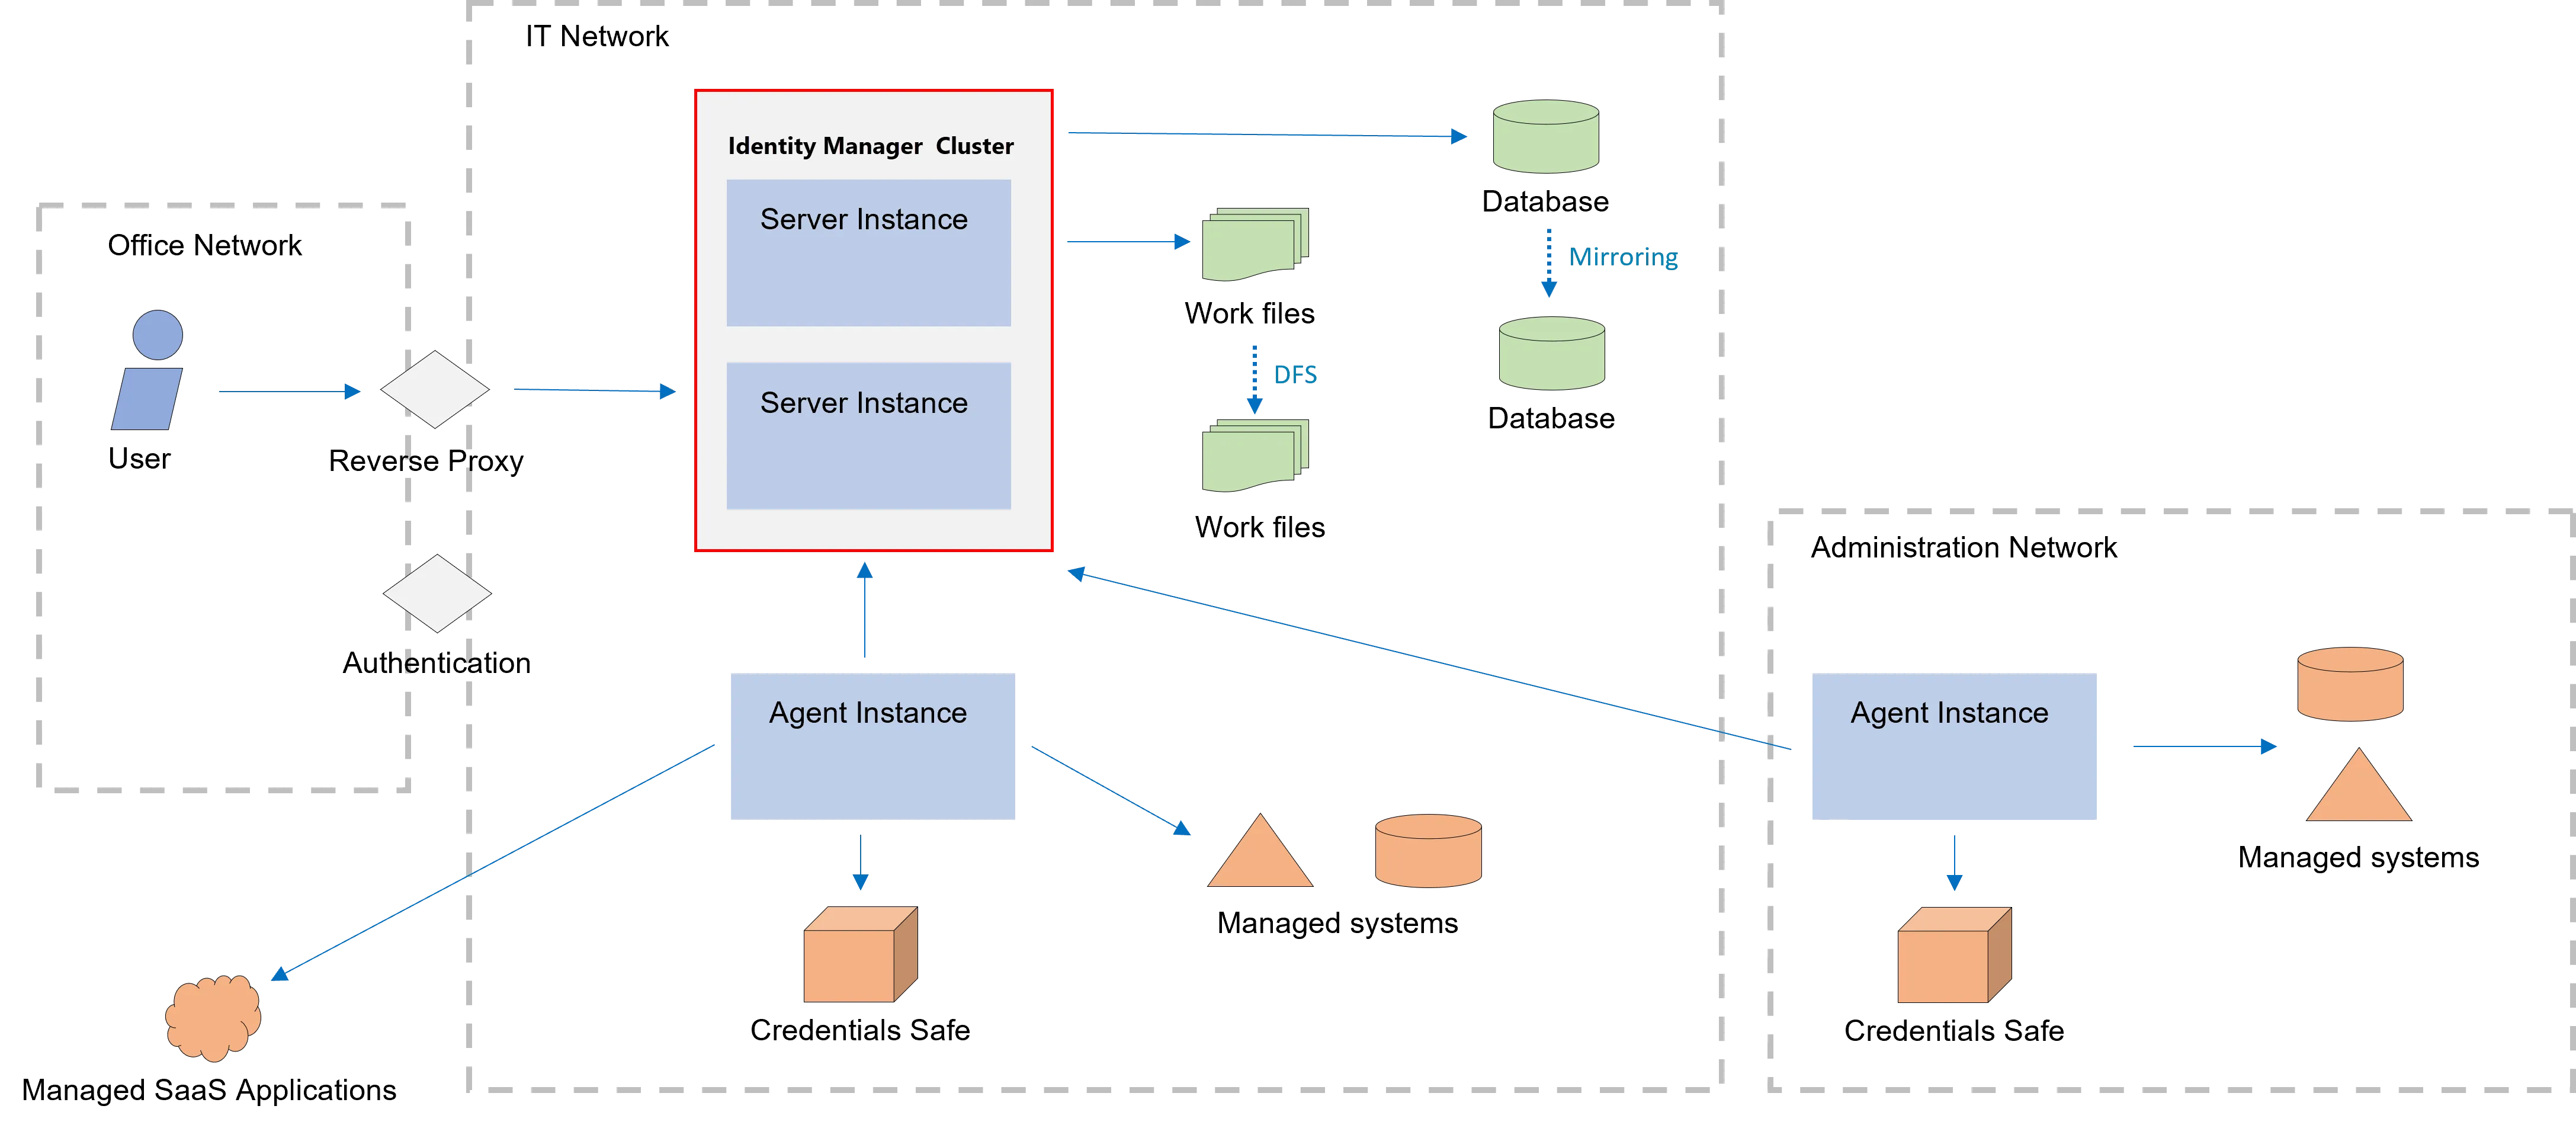
Identity Manager works via:
-
a server which operates computation, stores all applicative data in the database, and serves a web User Interface;
-
at least one agent which operates data flows to/from the managed systems.
The managed systems' credentials are used only by the agent and are never disclosed to the server.
The agent can call the server, but the server cannot call the agent. The data flows' initiatives are always from the agent.
Installation Types
Identity Manager can be installed:
-
SaaS so that the server dwells in the cloud and is provided as a service;
-
on-premises so that the server is installed on an isolated network within the company.
Next Steps
Let's learn about Identity Manager Configuration.
Learn More
Learn more on Identity Manager's Architecture.
See the Network Configuration topic for additional information.
Configuration
There are several options for configuring Identity Manager.
Application Configuration
User Interface
Netwrix Identity Manager (formerly Usercube) strongly recommends that Identity Manager be configured, as much as possible, via the UI.
XML files
For advanced users, if the UI is not enough, Identity Manager can also be configured via XML files.
These XML files should be placed in a Conf folder directly inside the working directory.
Database
Identity Manager's application configuration, whether it is made from the UI or the XML files, is stored in a database which should never be modified manually.
Network Configuration
Identity Manager's server and agent(s) are configured via JSON files, mainly appsettings.json and
appsettings.agent.json.
Next Steps
This is the end of the introduction guide, so you should now be able to dive into:
- The User Guide to configure Identity Manager from scratch via the UI, following the step-by-step procedures;
- The Integration Guide to complete Identity Manager's configuration in XML according to your needs;
- The Installation Guide to install Identity Manager in a production environment.
Learn More
Learn more on how to Create a Working Directory .
See the User Guide topic to learn how to configure Identity Manager from scratch via the UI.
See how to Export the Configuration to XML files.
See how to Identity Manager Deploy the Configuration .
Learn more about the XML Configuration Schema .
Learn more about the Network Configuration.
Introduction Guide
This guide is designed to give a complete overview of Identity Manager's principles, main objectives and capabilities.
Netwrix Identity Manager (formerly Usercube) strongly recommends starting here to fully benefit from the Integration Guide's or the User Guide's contents.
Target Audience
This guide is meant to be read by:
- integrators who configure Identity Manager to match their projects' needs;
- IGA project managers who want to get a better understanding of Identity Manager.
Prior Knowledge
A basic knowledge of Identity and Access Management (IAM) and overview (IGA) is required to understand this guide.
First Steps
Let's dive in with an IGA and Netwrix Identity Manager of IGA and Identity Manager.
Entitlement Management
Managing identities' entitlements requires managing entitlements and assigning them to identities. This page is about the role model.
Role Model Overview
A managed system's entitlements can have many forms. They authorize identities to access certain data on a given system, or a physical location.
For example, entitlements in the Active Directory are usually group memberships. For example, to have administrator rights in the Iris application, a user must be part of the members of the group
SG_APP_IT/Development/Iris/Administrator.
Identity Manager is designed to help establish an exhaustive and reliable catalog of the entitlements available in the managed systems, and assign the right entitlements to the right users.
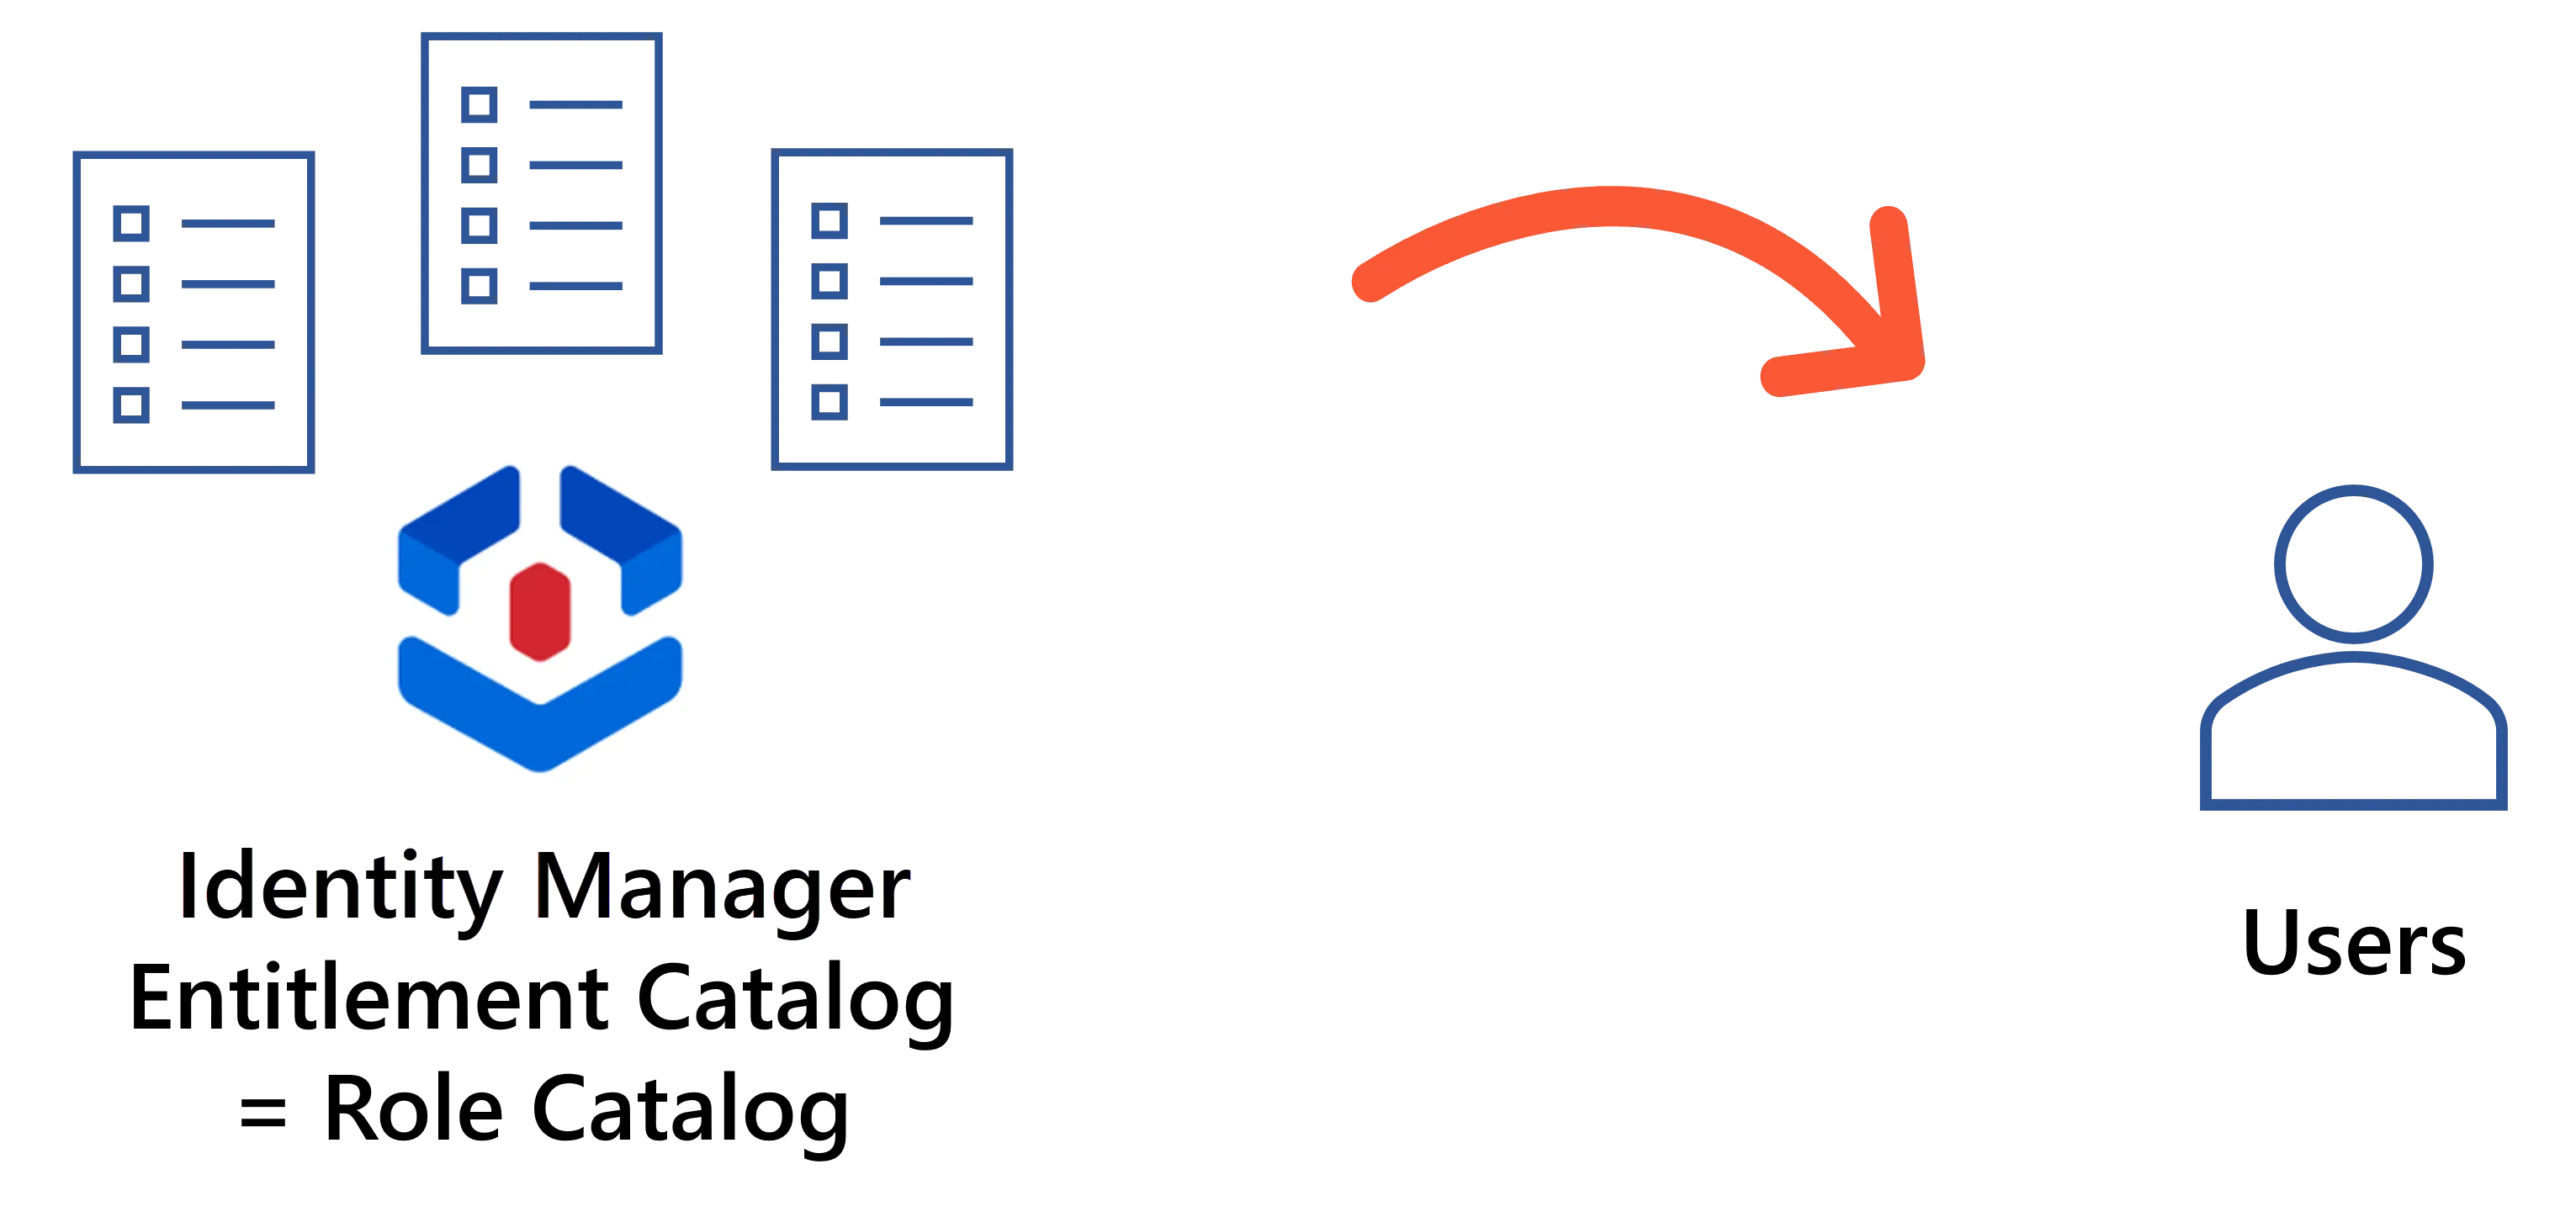
Thus, the role model contains:
- the entitlements, as roles, for all managed systems;
- the rules that trigger the assignment of entitlements to identities, and more broadly manage the systems' resources. Some of them act as link between Identity Manager's roles and the systems' accounts and permissions. Some of them are linked to, and thus apply only to, specific resource types.
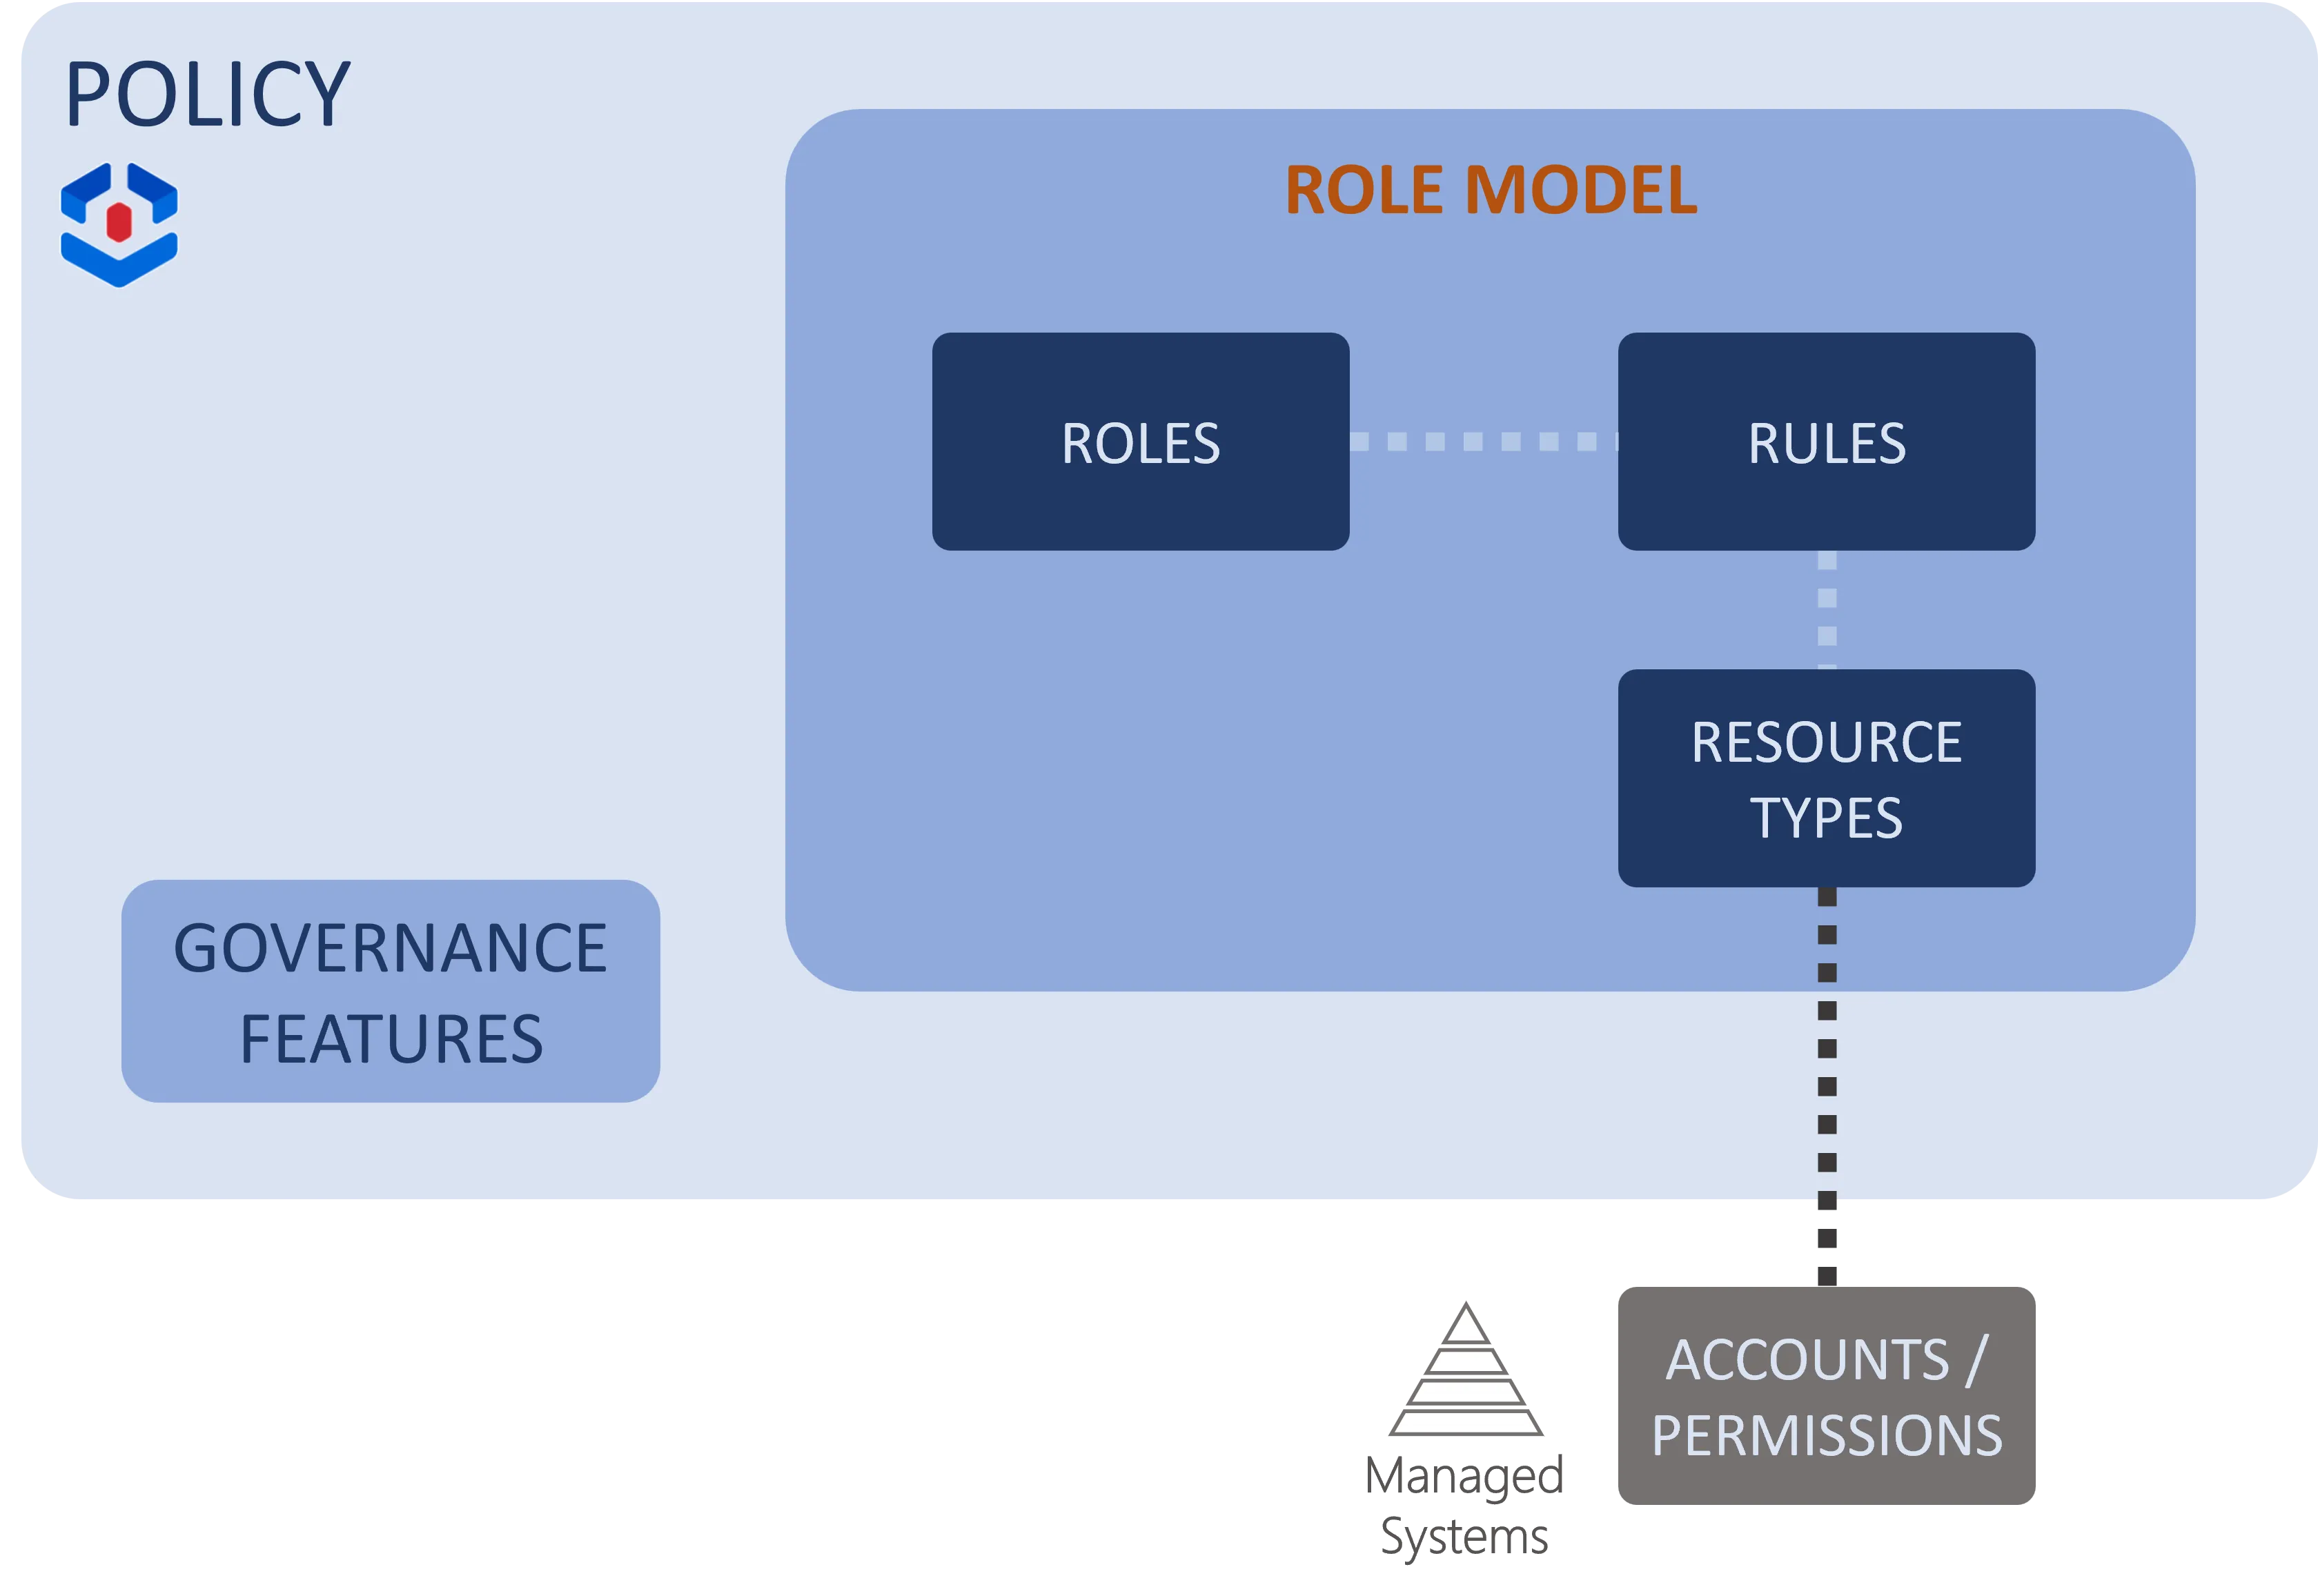
The role model is a subset of a policy that also includes Governance data such as risk definition. So, at a higher level, distinct policies can be used to implement distinct behaviors.
A Role Catalog
Identity Manager intends to represent IGA-related access right mechanisms by a role-based model. The goal of the role catalog is contain an exhaustive list of entitlements from all managed systems.
Entitlements from the managed systems are modeled by roles. For each entitlement, NETWRIX advises creating a single role, with an easily understandable name, more functional than technical, so that everyone knows what the role is for.

Each individual entitlement should usually be modeled by a single role, and single roles can be grouped together into composite roles to be closer to real job positions.

A Rule Set
Roles alone are not enough to give identities the systems' technical entitlements. We need rules to have Identity Manager write users' entitlements in the managed systems. Rules are further used to automatically assign roles to users, or to categorize users and accounts, etc.
Provisioning rules
Just like identities, accounts are represented in Identity Manager by an Identity Management entity-relationship model. So Identity Manager manages entitlements as resources' attribute values.
For example, giving specific Active Directory permissions to a new user means not only creating a new AD account, but also setting values for certain account properties like
cn,sAMaccountName,userAccountControlordn, etc.
Provisioning rules write the actual entitlements to the managed systems, most often based on users' roles.
For example, to give an AD entitlement to a user, we usually need to give them a group membership. Thus, we should have a rule that, when a user is assigned a specific role, adds the user to the member list of a specific AD group.
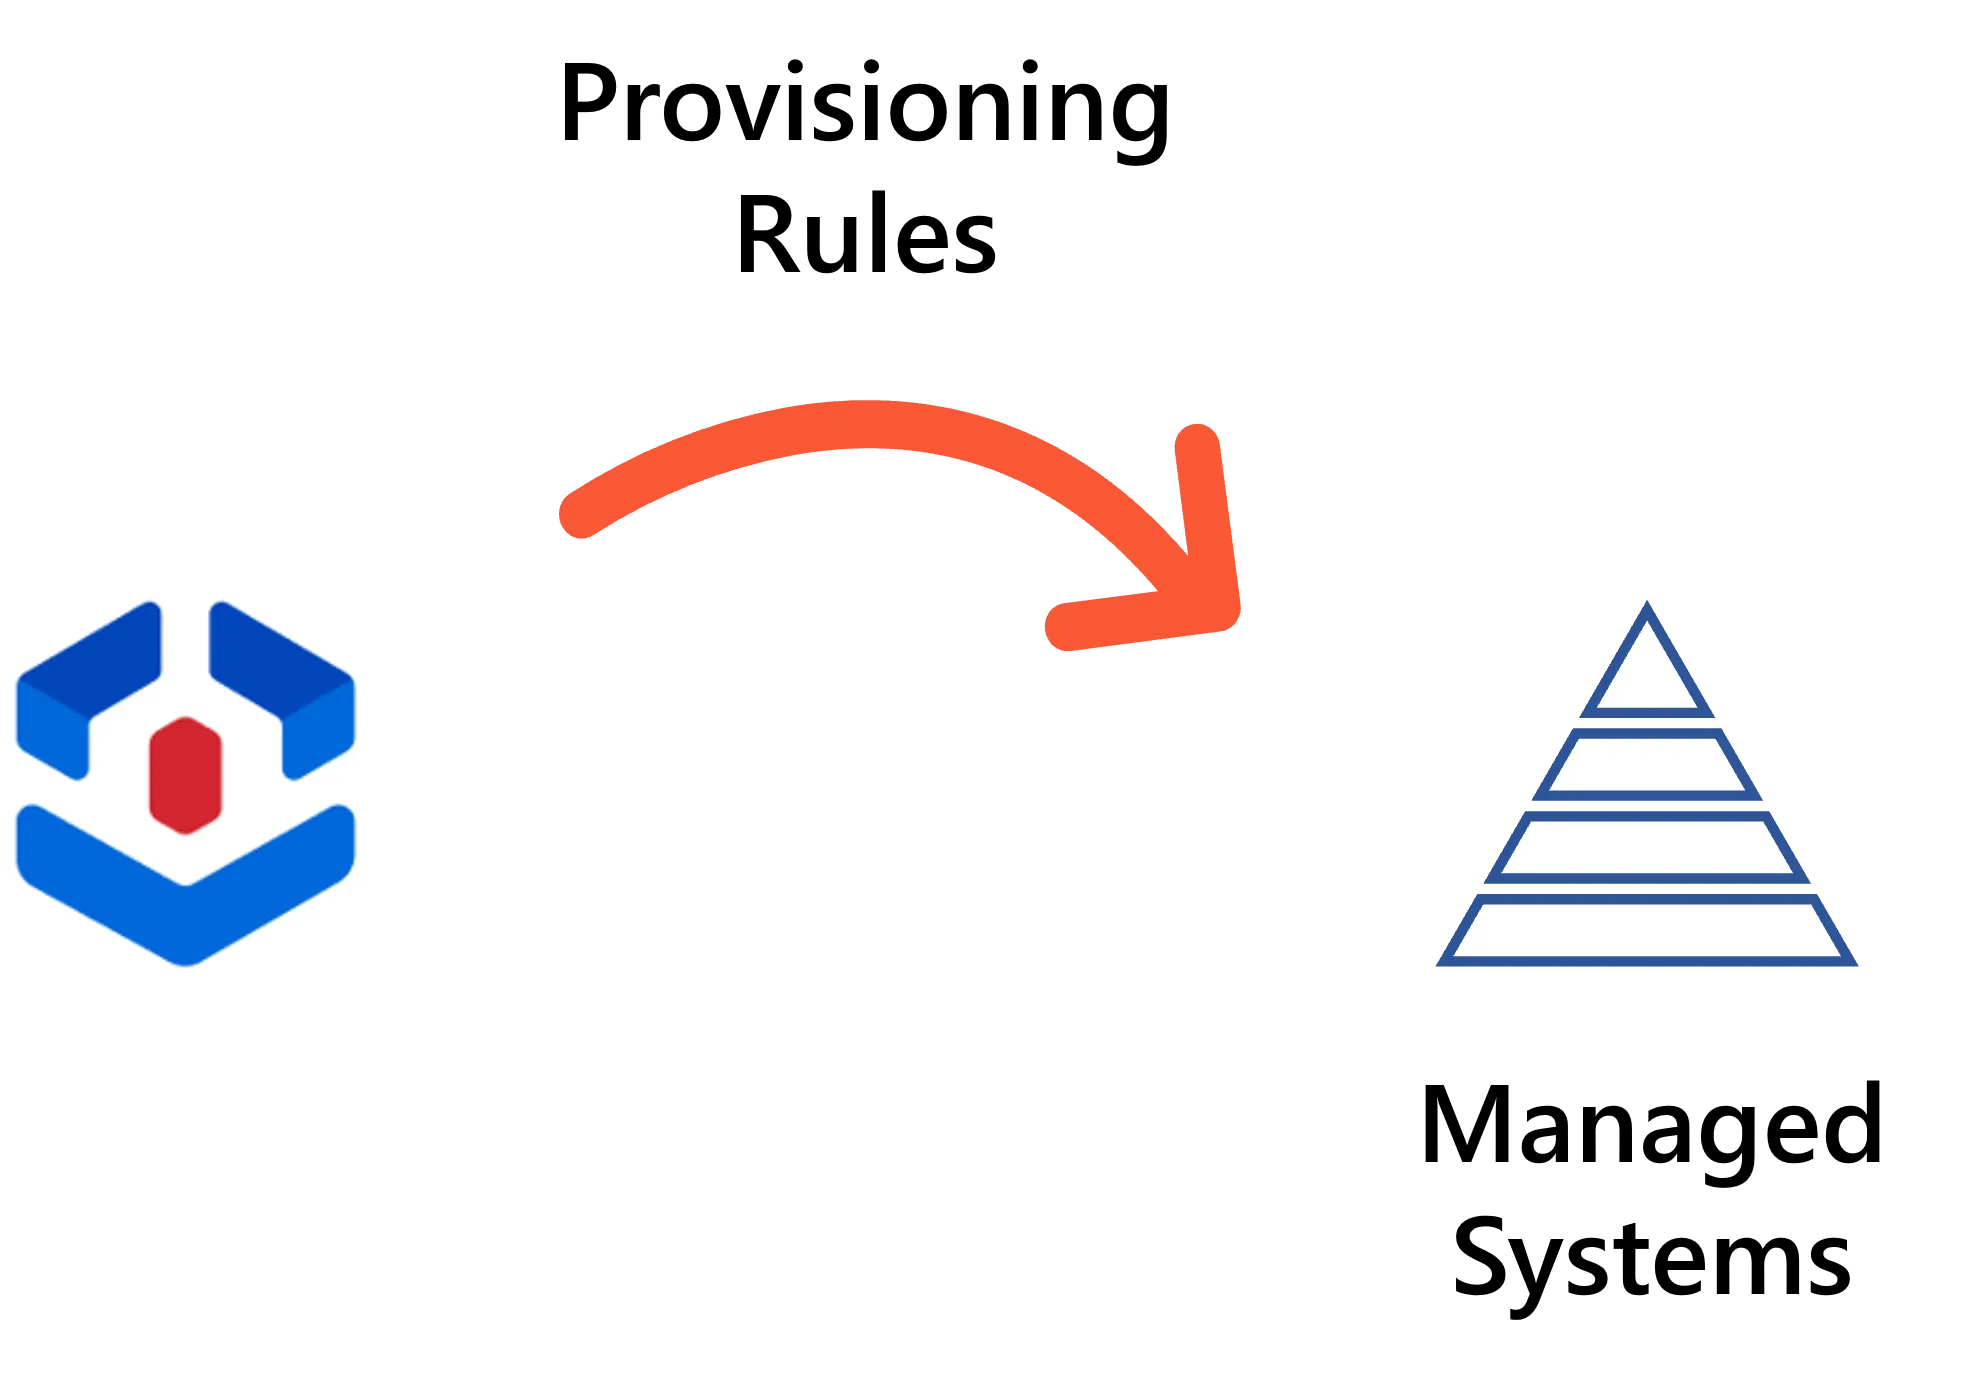
Even when a role is manually assigned, provisioning rules will determine which account (and permission groups) are given as entitlements.
Identity Manager's provisioning rules are:
- scalar rules to compute simple string properties;
- navigation rules and query rules to compute properties that act as foreign keys in a database;
- resource type rules to automatically create resources.
Assignment rules
While the role catalog and provisioning rules are together enough to manually give users their access rights, we often want Identity Manager to do this automatically. Assignment rules automatically assign roles to identities based on specific criteria.
For example, we can choose to assign the role
Benefits Manager - FRto any user whose job title is benefits manager and whose location is in France.
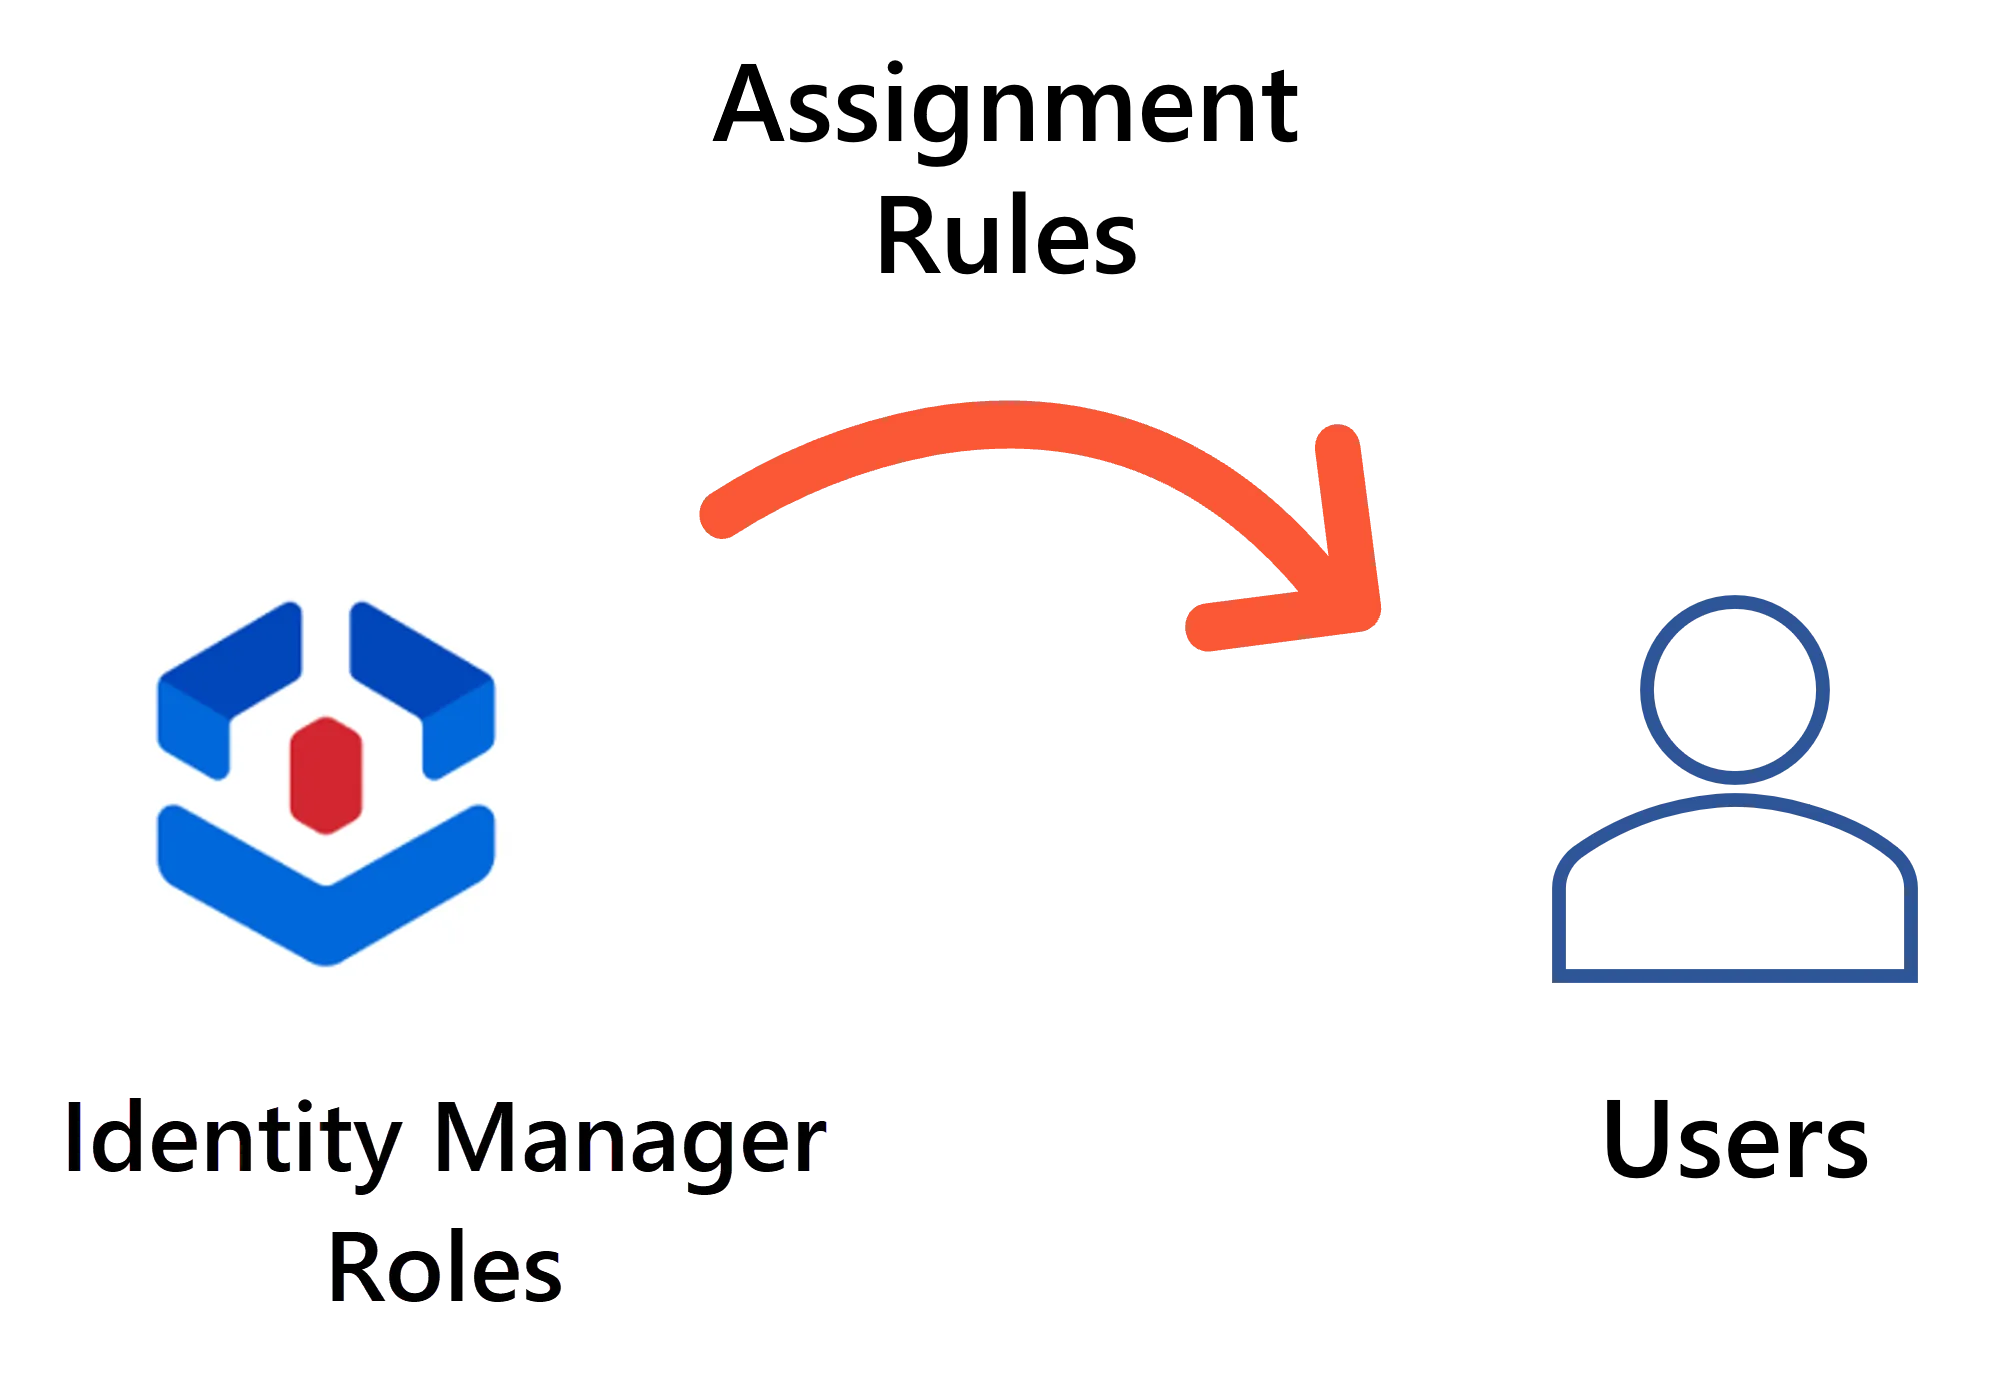
Once all assignment rules are created, Identity Manager is able to spot existing assignments that are not supported by any rule, marking them as non-conforming.
Identity Manager's assignment rules are:
- single role rules and composite role rules to assign single and composite roles;
- resource type rules to assign accounts.
Categorization rules
Different resources can be managed through different rules, by being part of different resource types. So a resource type is a group a resources that have the same IGA-related purposes. Categorization rules categorize resources into resource types and link identities to the accounts they own.
For example, we might need to differentiate AD's standard accounts from administration accounts. This way, we can configure different email addresses for privileged accounts, for example adm.john.smith@contoso.com. We can also add more approval steps in the workflows related to privileged accounts, for more security than for standard accounts.
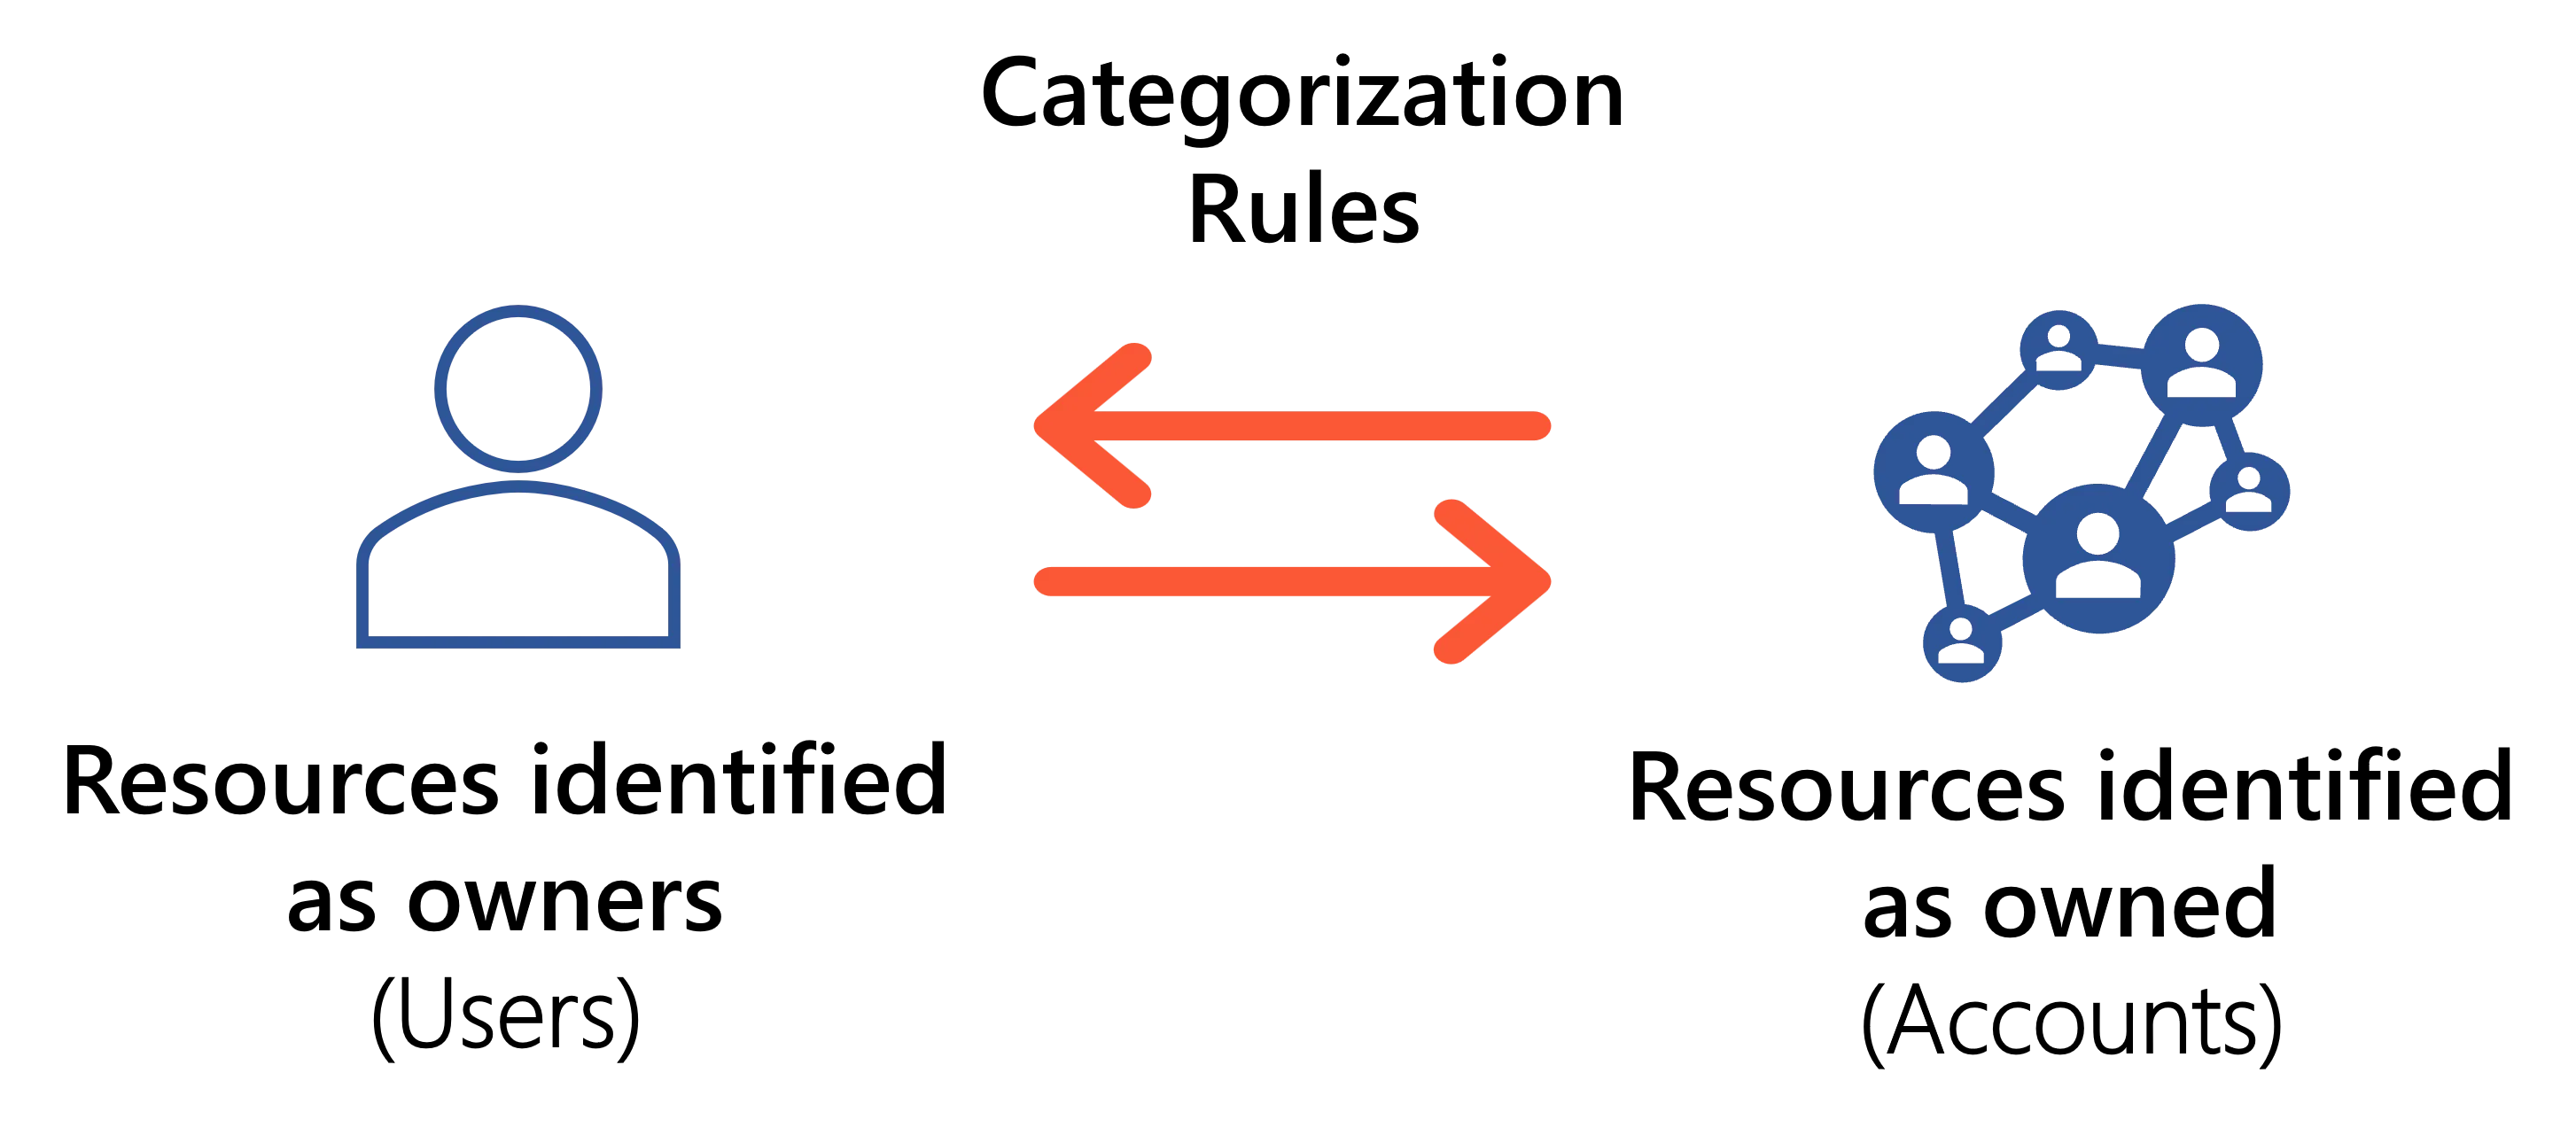
Identity Manager's categorization rules are:
- correlation rules to link identities to the accounts they own;
- classification rules to categorize resources into resource types.
More rules
Identity Manager provides more kinds of rules for optimization purposes, for example role naming conventions to help build the role catalog by generating roles and navigation rules based on the entitlements' names, or automation rules to help with governance by automating the review of the assignments that do not comply with the configured rules.
Dimensions
Rules can be triggered based on users' assigned roles, but also based on user data.
The Identity Management model can be refined by configuring dimensions: criteria from among resources' attributes that will trigger the application of the rules. Then Identity Manager applies the rule for any resource whose value for a given attribute matches the reference value specified in the rule.
For example, a user can be assigned the role
Benefits Manager - FRonly if their job title is benefits manager and their location is in France. In this case, users' attributes "job title" and "location" are the dimensions that trigger the assignment rule.
In a nutshell, dimensions determine who should be assigned the entitlements.
Identity Manager's name and logo are based on this dimension concept: entitlement assignment is governed by users' attributes defined as dimensions. Let's schematize users around these dimensions:
- The schema for this with one dimension would be a line with all available values for the dimension, and identities are distributed along the line.
- The schema with two dimensions would be a table, a square.
- The schema with three dimensions would be a 3D cube. And you can imagine 4D or 5D hypercubes, etc.

1D

2D

Next Steps
See the Governance topic for additional information.
Learn More
Learn more on the Role Model .
Learn how to Create Roles in the Role Catalog .
Learn more on hoe to Create a Composite Role.
Learn more on Role Assignment.
Learn more on Create a Provisioning Rule .
Learn more on Automate Role Assignments rules.
Learn more on the rules of Categorize Resources .
IGA and Netwrix Identity Manager
Identity Manager is a powerful tool for Identity Governance and Administration (IGA) automation.
Identity Governance and Administration (IGA)
Identity Governance and Administration (IGA) is a combination of Identity Access Management (IAM) and Identity Access Governance (IAG).
- IAM is about allowing the right identities to have the right permissions at the right time for the right reasons.
- IAG is about providing visibility regarding identities, user access, and for monitoring compliance.
See Gartner's documentation on IGA.
Why Identity Manager
We could explain Identity Manager's purpose like this:
Typically, Identity Manager manages entitlements automatically according to a user's needs, for example Active Directory group memberships.
Then, we need to manage entitlements, in other words access rights, or permissions.
Identity Manager helps you build a role catalog that lists all entitlements from all managed systems. The technical entitlements can then associated with new, functional names that more clearly represent a business-oriented view point.
In addition, Identity Manager helps you determine identities' expected entitlements by building a role model. This model contains different kinds of rules that will suggest entitlement assignments, or even assign them directly, based on the imported organizational data.
As each working environment has its own particularities, you will be able to refine the identity model by defining dimensions, i.e. criteria from among organizational data that will trigger the rules.
Define the Entity Type's Navigation Properties
Follow these steps:
-
Declare the Entity Type.
-
In the Properties section, open the Navigation Properties tab.
-
Click Map a navigation property to view available source columns and select the desired properties.
-
Fill out the configuration fields:

- The first line maps the source column.
- The second line defines the new property linked to that column.
Application Metadata
-
Identifier: Must be unique, whitespace-free, and C#-compatible. See Microsoft lexical structure -
Entity Type: Always refers to the current entity type. Source property can be from any. -
Storage Indicator: Can be:- Mono-valued (1:1 or many:1)
- Multi-valued (1:many or many:many)
Identity Manager supports up to 25 optimized mono-valued navigation properties per entity type. Prioritize:
- Properties used in forms and search
- Properties used in expressions and role models
- All others
-
Name: Shown in the UI. Use singular for mono-valued, plural for multi-valued. Avoid names like"Id"for both identifier and display name.
External System
-
Source: Connection to the external system. You can select the source by:- Mapping from the source (auto-selects connection table)
- Choosing from the dropdown (lists same-connector tables)
- Using the search icon (all connectors)
-
Source Column: The source field for data. -
Column Content: The field in the source used for identification.
Example: If the column is
managerand it stores userdns, setdnas the column content.
AD example navigation properties:
Entries,assistant,assistantOf,manager,directReports,memberOf,member,parentdn,children
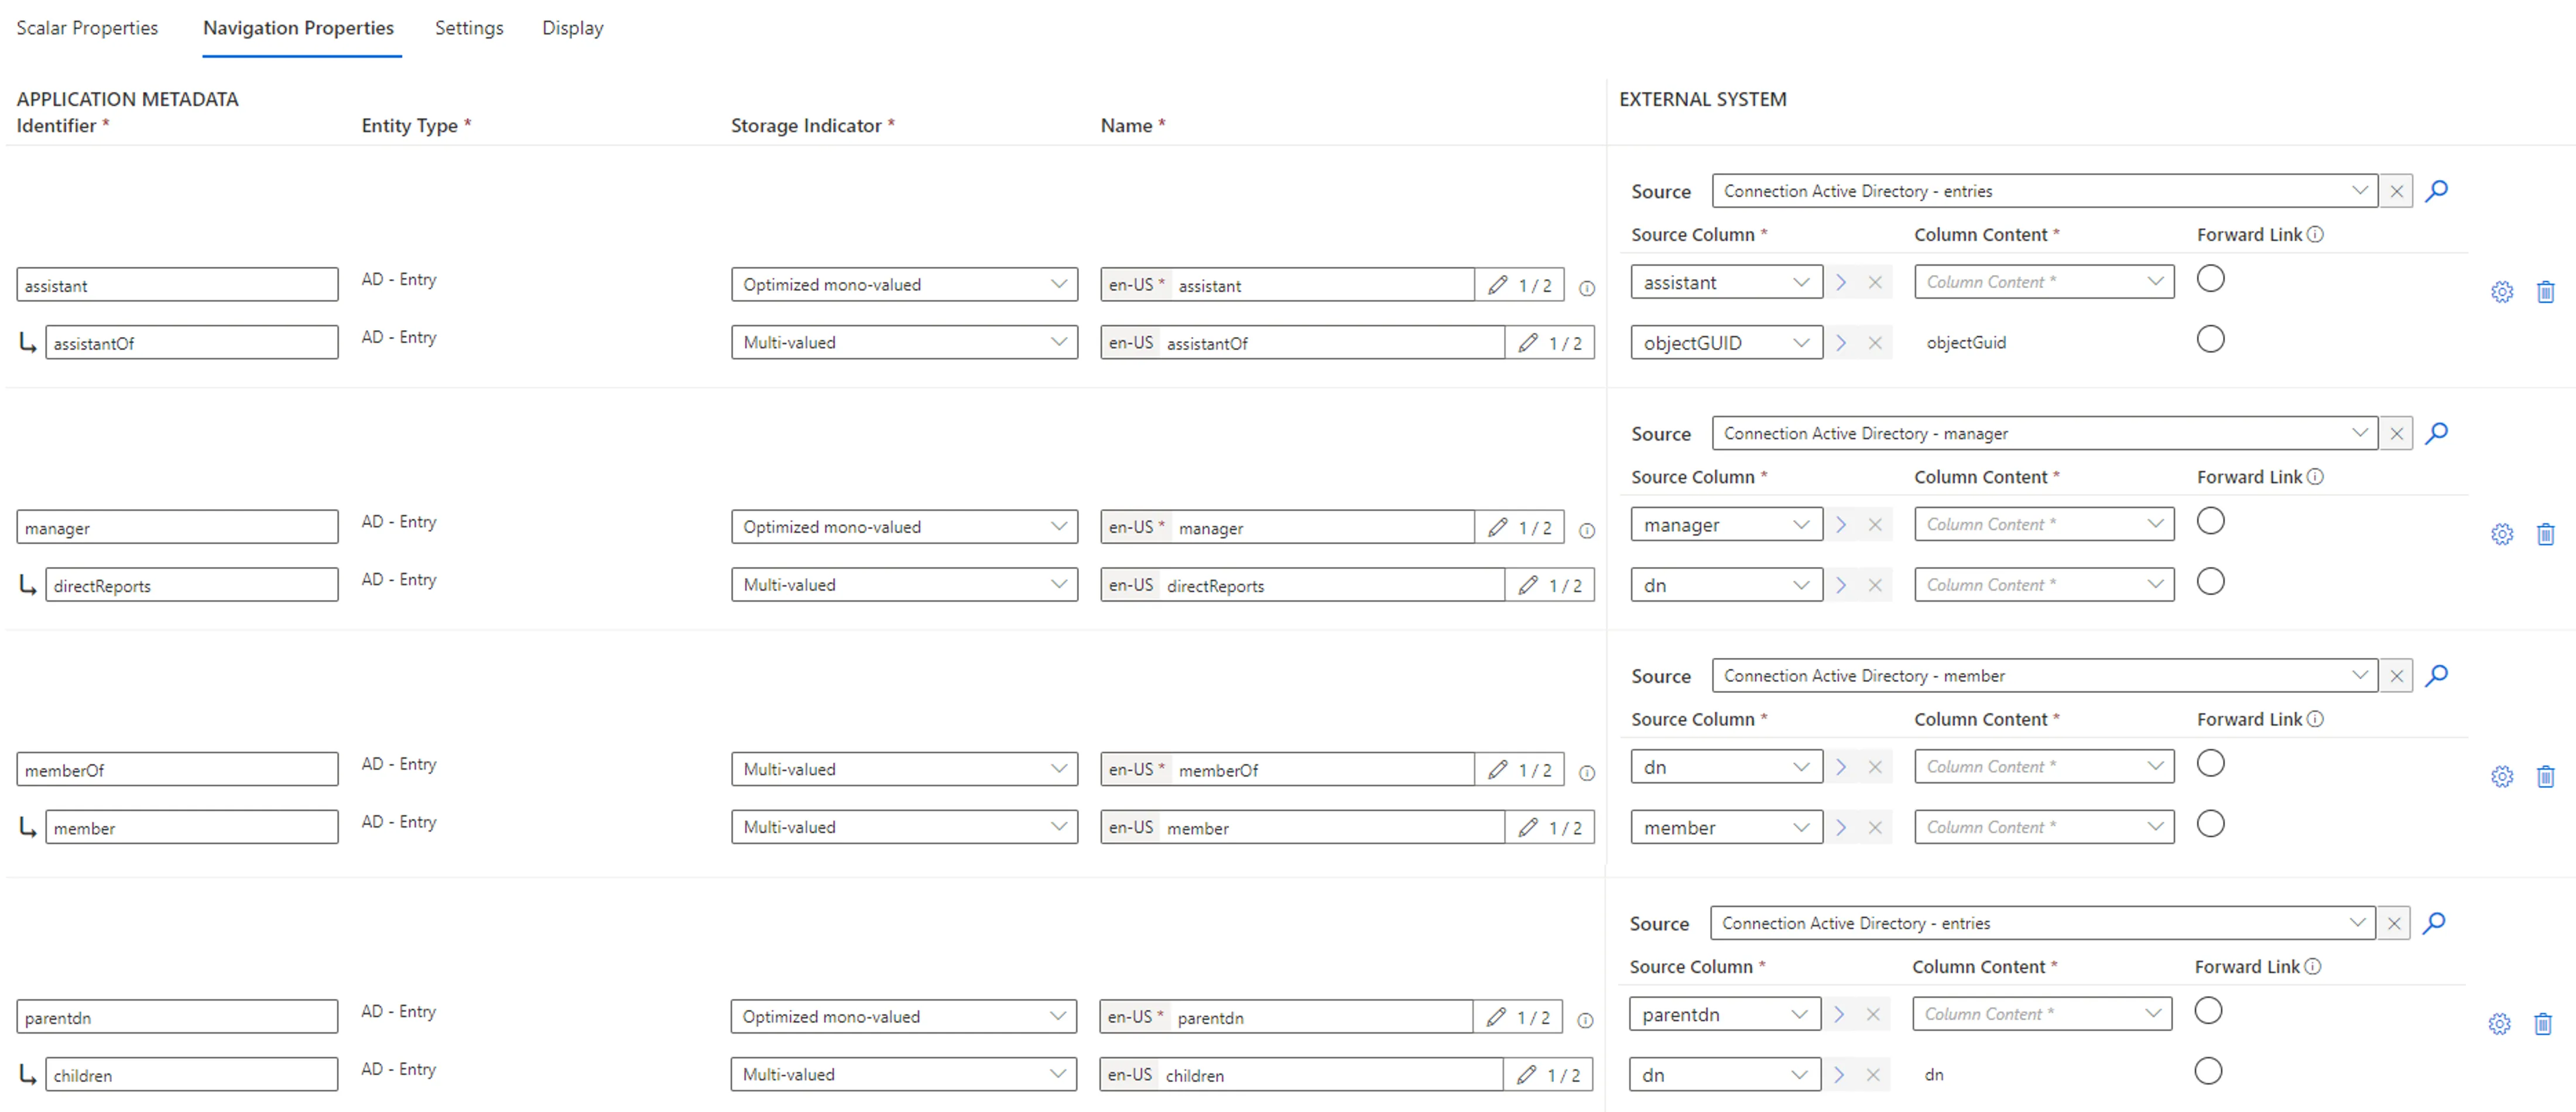
Reload
After saving changes, a green popup will prompt you to reload the schema. You can defer this, but must reload after final changes.

Reloading ensures the updated navigation properties appear in the UI’s left menu structure.
You can access the Reload button via:
- The green popup
- The connector’s dashboard