Set Up Incremental Synchronization
How to implement an incremental synchronization Job for a given Connector via XML, to upload the related system's resources to Identity Manager.
See an example on For Microsoft Entra ID (formerly Microsoft Azure AD).
Netwrix Identity Manager (formerly Usercube) strongly recommends configuring as much as possible via the UI instead of XML files. See how to Synchronize Data via the UI.
Prerequisites
First read how to Create a Connector.
Build the Incremental Synchronization Job
Identity Manager provides a fully-written standardized job to perform incremental synchronization through the UI. See here:
See how to launch incremental Synchronize Data via the UI.
Any IGA action is configured through Job .
Synchronization jobs contain tasks that are to be executed on agent side.
Components
Any synchronization job should include:
- export;
- synchronization preparation;
- synchronization.
The export is configured and performed by the Export Task , the synchronization preparation by the Prepare Synchronization Task and the synchronization by the Synchronize Task .
See the Upward Data Synchronization topic for additional information.
Identity Manager provides a scaffolding that generates the configuration for these steps, named Create Connector Synchro Incremental.
This guide is about incremental synchronization, but complete synchronization can be configured with the Create Connector Synchro Complete scaffolding.
Permissions for the agent
In order to launch a job via the Usercube-Invoke-Job tool, the agent must use a profile with the right permissions for each task.
Permissions within Identity Manager are configured through Access Control Rule.
For example:
Conf/Profile AgentJob.xml

<Profile Identifier="AgentSynchro" DisplayName_L1="Agent Synchro" />
Netwrix Identity Manager (formerly Usercube) recommends the creation of a profile for synchronization jobs, and another for provisioning jobs, in order to comply with the principle of least privilege.
In order to run a synchronization job, the agent requires the permissions to:
- view the tasks via
/Jobs/Task/Query; - access progress reports via
/Jobs/JobInstance/Query,/Jobs/JobInstance/Update,/Jobs/TaskInstance/Queryand/Jobs/TaskInstance/Update; - prepare the synchronization and synchronize via
/Connectors/Connector/Queryand/Connectors/SynchronizeSession.
Identity Manager provides scaffoldings that generate the configuration for granting these permissions: Synchronization Access Control Rules and Job View Access Control Rules .
The following example permits the
AgentSynchroprofile to run any synchronization job:
Conf/Profile AgentSynchro.xml

<SynchronizationAccessControlRules Profile="AgentSynchro"><JobViewAccessControlRules Profile="AgentSynchro">
Agent's authentication to the server
Every request from agent to server within the execution of a job needs to be authenticated with an OpenIdClient Connect ClientId/Secret pair.
So first, the configuration must contain a ClientId/Secret pair.
Usable ClientId/Secret pairs are configured through an
OpenIdClient .
The following example uses a secret hashed by Usercube-New-OpenIDSecret :
Conf/OpenIdClients.xml

<OpenIdClient Identifier="Job" HashedSecret="K7gNU3sdo+Op8wNhqoVWhr5v6s1xYv72ol/pe/Unols=" DisplayName_L1="ClientId for Jobs" Profile="Administrator" />
Then, the agent's profile must be linked to one of the ClientId/Secret pairs.
Agents' settings are configured in their appsettings.agent.json file.
The following example sets the
Job/secretpair to be used by tasks and jobs:
appsettings.agent.json

{ ... "OpenId":{ "OpenIdClients": { "Job": "secret" }, "DefaultOpenIdClient": "Job" } }
Permissions for users
In order to launch the job, a user must have the right permissions.
Permissions within Identity Manager are configured through Access Control Rule.
In order to launch a synchronization job, a user requires the appropriate permission:
/Jobs/RunJob/Launch.
Identity Manager provides a Job Execution Access Control Rules that generates the configuration for granting this permission.
For example:
Conf/Profile AgentSynchro.xml

<JobExecutionAccessControlRules Profile="AgentSynchro">
Schedule the Job
Scheduling the job execution can rely either on Identity Manager's scheduler or on an external scheduler.
Using scheduler
Identity Manager's scheduler is configured through the
Job 's CronTabExpression property.
See Crontab documentationfor more details .
Using an external scheduler
An external scheduler relies on using an external mechanism to schedule the Usercube-Invoke-Job .exe.
Validate the Job
Validate the job's execution by proceeding as follows:
- Deploy the XML configuration to the database, by using the Deploy Configuration Task .
- In the UI, access the Job Execution page from the dashboard's Administration section.
- Find the job named with the string specified in the XML configuration in the job's
DisplayNameproperty, and launch it. - Once the job is completed, the system's objects should be synchronized to the database's
UR_Resourcestable.
Usercube-Prepare-Synchronization
Usercube-Prepare-Synchronization is used as the second step of the
Synchronization process. It cleanses exported CSV files before
sending them to the server for database loading. It is performed on the Agent side.
Behavior Details
The task reads files from the source directory, usually the temp folder > ExportOutput folder. See the Application Settings topic for additional information.
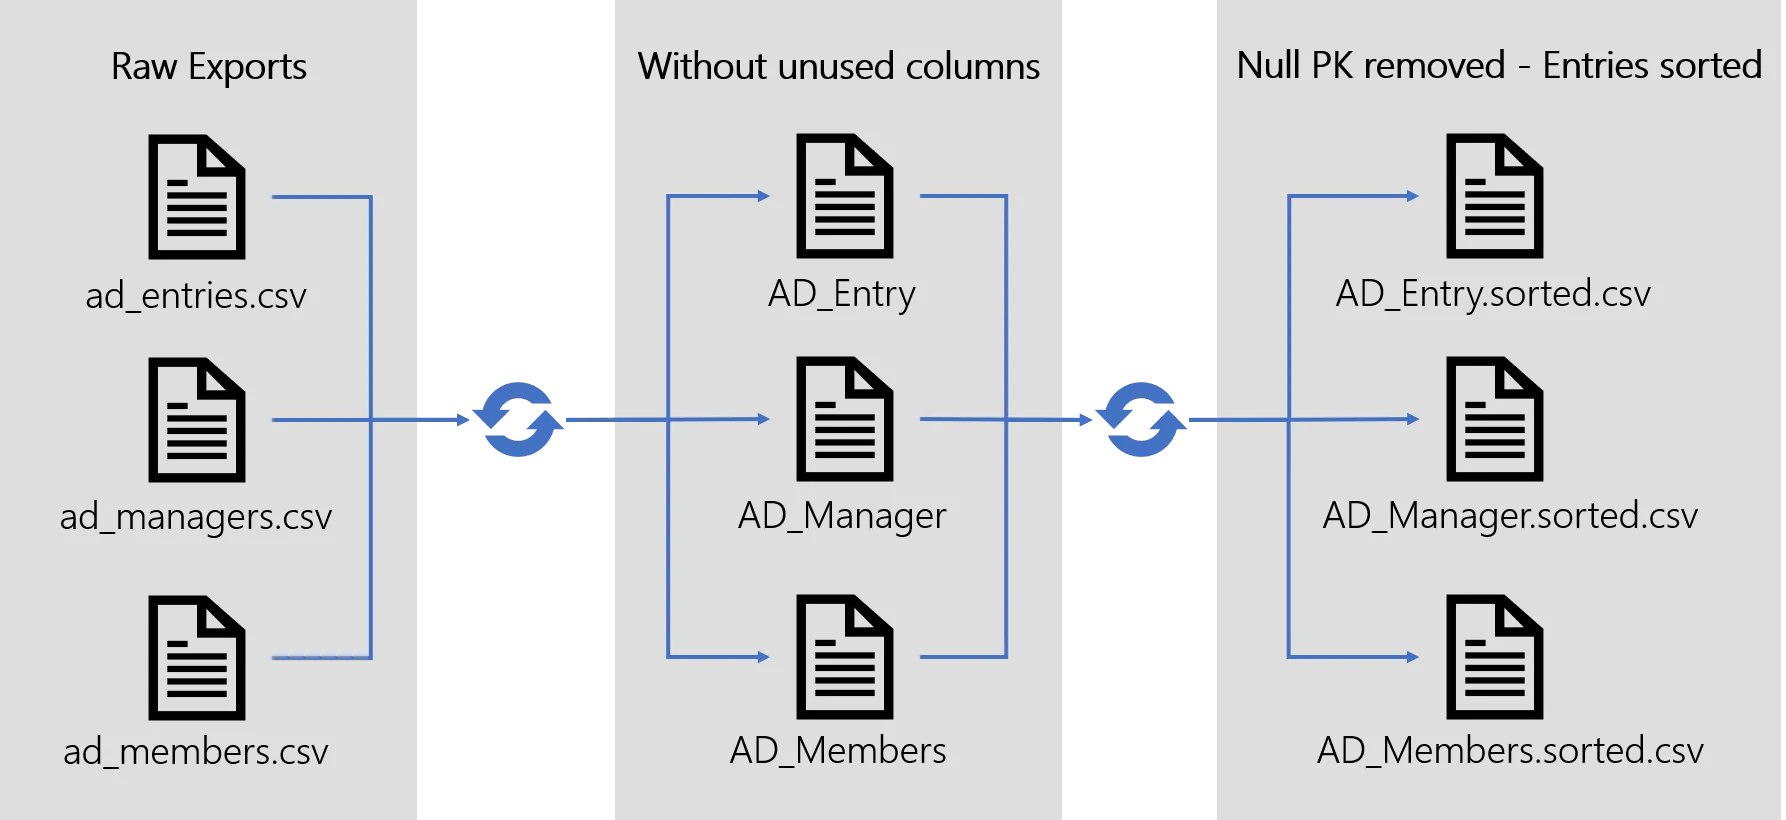
Cleanse data
The following actions are performed on the CSV source files:
- Remove columns that are not used in Entity Type Mapping or Entity Association Mapping .
- Remove entries that have a null primary key.
- Remove duplicates.
- Sort entries according to the primary key.
The result of the Prepare-Synchronization is stored in the Application Settings as three files:
- For every entity type of the relevant Connector involved in an
Entity Type Mapping
or an
Entity Association Mapping ,
a
.sorted.csvfile is generated, containing the final, cleansed and sorted result. - Duplicates are kept in a separate
.duplicates.csvfile. - Null primary key entries are kept in a separate
.nullpk.csvfile.
All files produced by the task are in the work folder > Collect directory. See the Application Settings topic for additional information.
Compute changes
In incremental mode, changes might need to be computed by the Agent:
- If the Export step has provided computed changes, no further process is required. The changes will be sent as-is to the server.
- If the Export step has provided a full extract of the managed systems, the
Prepare-Synchronization step computes changes. This computation is based on the result of the
last data cleansing, generated by the previous Prepare-Synchronization, and stored in the
previousfolder in the export directory. See the Application Settings topic for additional information.
For incremental mode, it is recommended, whenever possible, to use managed systems to compute changes. Dedicated workstations and knowledge of the inner data organization allow managed systems to compute changes with performance that Identity Manager can't match. Using managed systems for these operations avoids generating heavy files and alleviates Identity Manager's processing load.
The result is a set of clean lists of changes stored as a .sorted.delta file containing a
command column. The command column can take the following values:
- insert
- update
- delete
- merge
These values are instructions for the Synchronization step to apply the changes to the database.
The .sorted file (that is, the original clean export file, not the changes) is stored in
the previous folder inside the export directory. It will be used as a reference for the next
incremental Prepare-Synchronization to compute the changes, if needed. See the
Application Settings
topic for additional information.
Tampering with the previous folder content would result in false changes leading to false
computation. It would result in data corruption in the Identity Manager database. To restore the
Identity Manager database and reflect the managed system data updates, a complete__Sync Up would
be required.
Prepare the server
At the beginning of every Prepare-Synchronization process, the Server is notified via HTTP.
Upon receiving the notification, the server creates a directory on its host environment, identified
by a unique GUID, to contain .sorted or .sorted.delta files that will be sent by the agent.
This is designed to prevent network errors that would cause an incremental database update to happen more than once.
This means that several Export and Prepare-Synchronization tasks can be executed simultaneously. These tasks will be processed by the server one at a time, in the right order.
Any notification of a complete Prepare-Synchronization would cancel the previous non-processed incremental Prepare-Synchronizations. As a complete Prepare-Synchronization reloads the whole database, it renders incremental changes computation moot.
Send clean exports
.sorted or .sorted.delta files are sent over HTTP to the Server for the last step.
Example
The figure models the complete Prepare-Synchronization steps applied to an Active Directory export. The matching Connector defines an Entity Type AD Entry and two associations (members and manager).
Examples
Usercube-Prepare-Synchronization can be used as an executable file as follows:
./identitymanager-Prepare-Synchronization --api-url myserver.usercube.com --api-client-id myclientid --api-secret myclient secret --connector --agent myagent --synchronization-mode complete
Arguments
| Name | Details |
|---|---|
| --agent required | Type Agent Description Identifier of the agent where the task runs. |
| --connector required | Type Connector Description Identifier of the linked connector. The task is linked to a connector whose entity types are synchronized. |
| --synchronization-mode required | Type Upward Data Synchronization Mode Description Synchronization mode for this task can be one of the following: - Initial - Complete - Incremental This must be the same as the associated Export and Synchronize tasks. Use initial if this is the first time the target managed system is synchronized. Use complete to load the data from the managed system as a whole. Use incremental to consider only incremental changes from the last synchronization. In incremental mode, the Prepare-Synchronization task computes changes in the source managed system since the last Prepare-Synchronization. |
| --sources-directory default value: ExportOutput | Type String Description Directory path, relative to temp folder, from which export files to cleanse are read. See the Application Settings topic for additional information |
| --working-directory default value: Collect | Type String Description The directory path, relative to work folder, to which intermediary and cleansed files are stored. See the Application Settings topic for additional information |
| --- | --- |
| --api-client-id required | Type String Description Login used to authenticate to the server. Every request from agent to server needs to be authenticated with an OpenID Connect ClientId/Secret pair, linked to a profile with the relevant permissions. See the OpenIdClient topic for additional information. |
| --api-secret required | Type String Description Password used to authenticate to the server. Every request from agent to server needs to be authenticated with an OpenID Connect ClientId/Secret pair, linked to a profile with the relevant permissions. See the OpenIdClient topic for additional information. |
| --api-url required | Type String Description URL of Identity Manager server. |
| --- | --- |
| --log-level optional | Type LogLevel Description Level of log information among: Verbose; Debug; Information; Warning; Error; Fatal. |
Synchronization
The documentation is not yet available for this page and will be completed in the near future.
See more information about Upward Data Synchronization .
See how to Synchronize Data for a given managed system.
See how to anticipate changes due to synchronization thanks to Thresholds .
Synchronize Data
How to launch data synchronization, i.e. read managed systems' data and load it into Identity Manager.
Overview
Data synchronization is a data flow from the managed systems into Identity Manager.
Process
A connector's main purpose is to read and export the data previously mapped with Create an Entity Type in order to synchronize it with Identity Manager. Connectors provide tools to perform a basic extraction of the system's data in the form of CSV/XLSX files. These files are cleansed and loaded into Identity Manager. Synchronization is a three-step ETL process going through export, synchronization preparation and the synchronization itself.
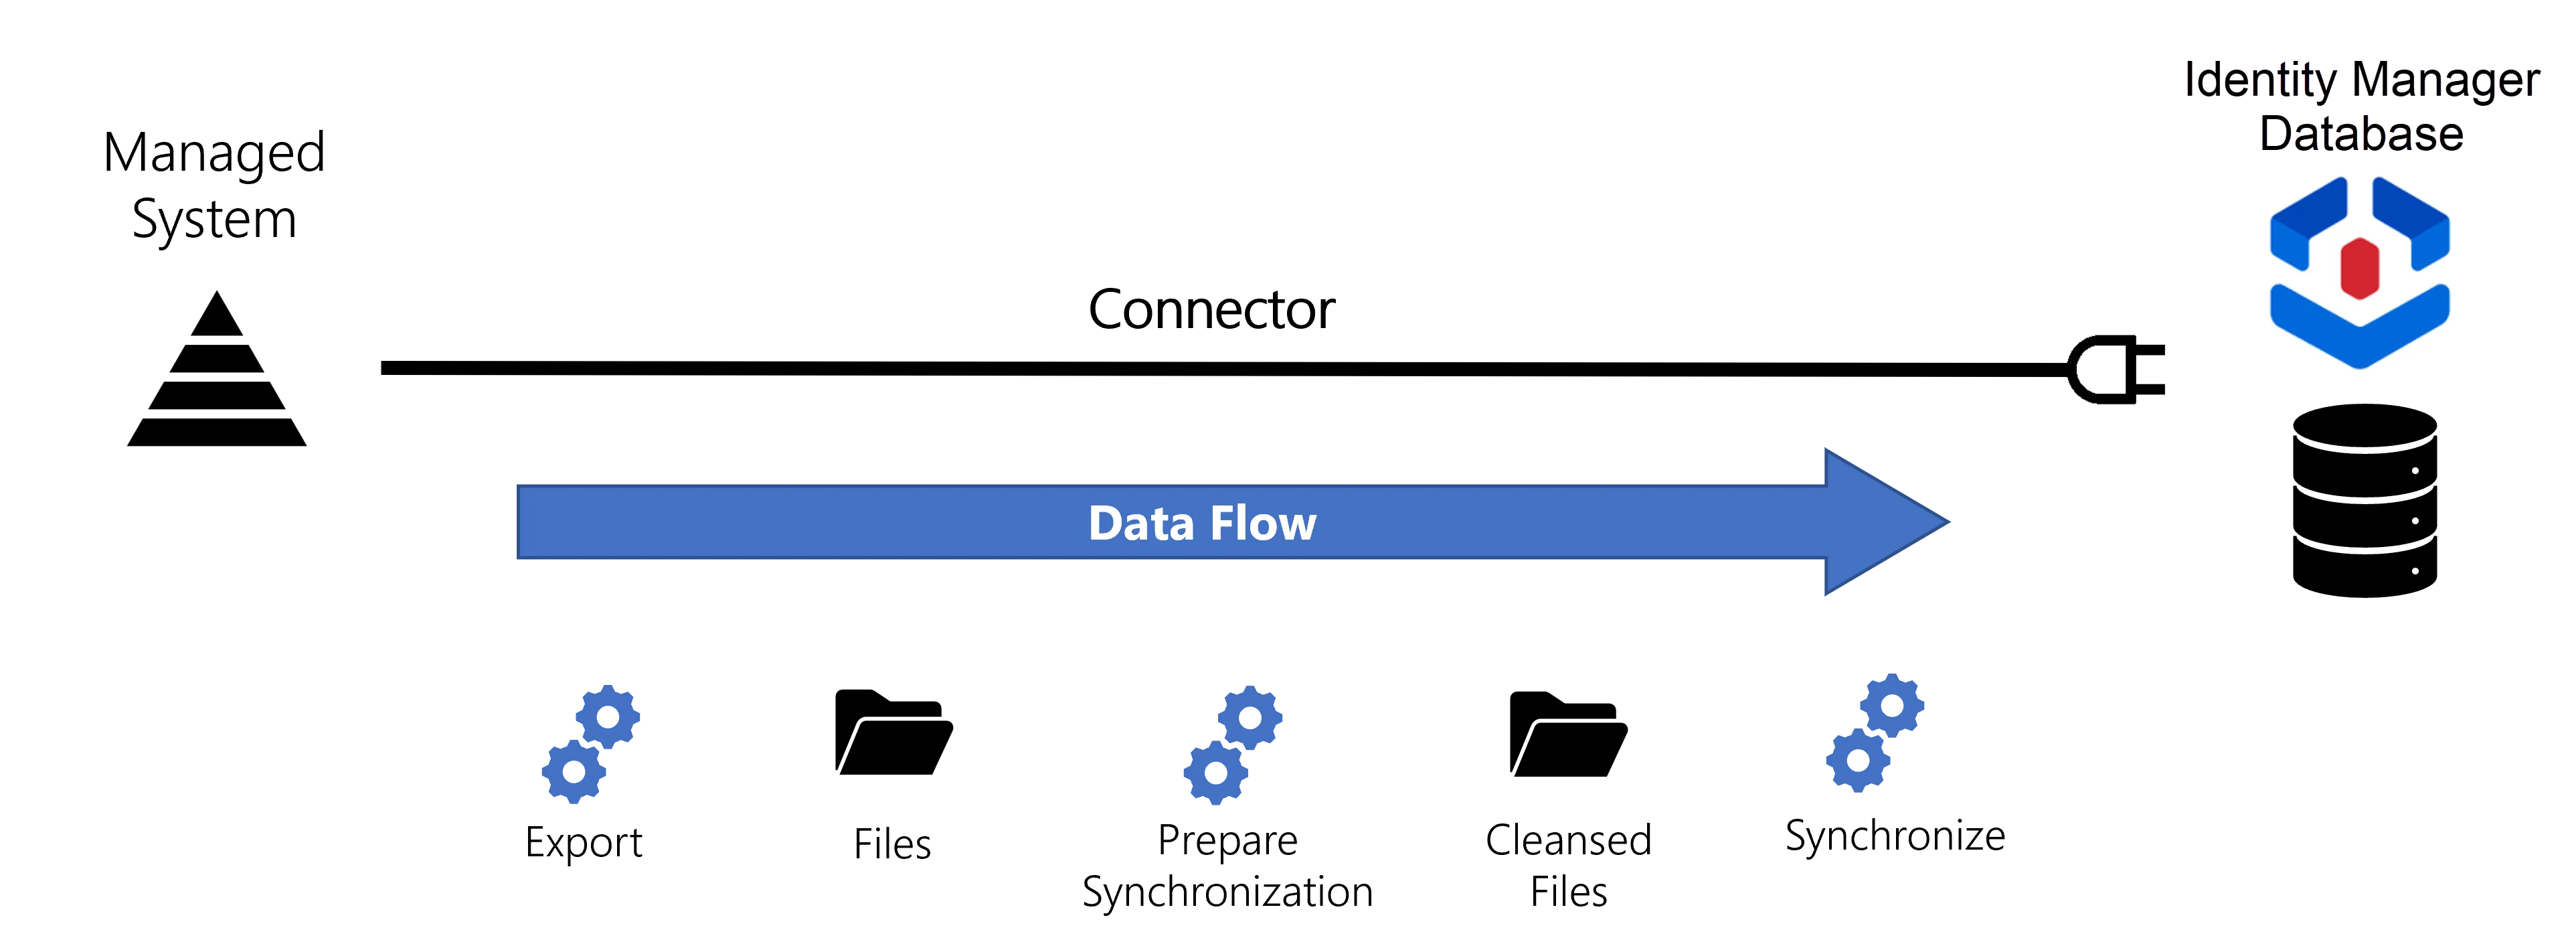
Export
The Export Task creates extractions, a snapshot of the managed system's data, used to insert and/or refresh the data that is inside Identity Manager. Extractions are accessible when there is at least one connection with an export-enabled References: Packages . Extracted data becomes meaningful when it is loaded into resources as specified by the entity type structure.
Exported data is stored inside CSV files in the folder /{InstallationFolder}/Temp/ExportOutput.
Prepare synchronization
The
Prepare Synchronization Task performs
a preparatory data cleansing to spot errors and list them in a generated file in the
/{InstallationFolder}/Work/Synchronization folder.
For example, this task spots an identity if it is linked to an organization code which doesn't exist.
Synchronize
The Synchronize task loads data into Identity Manager's database.
See the Upward Data Synchronization topic for additional information.
Prerequisites
Extracted data must have keys
Every extracted resource must have an attribute that serves as a primary key so that Identity Manager can uniquely identify the resource to be added/updated/deleted during synchronization. You must have defined keys during Entity Type creation. See the Create an Entity Type topic for additional information.
Extractions must not be modified before synchronization
Extractions must not be modified manually, for it may induce synchronization issues.
For example, saving an XLSX file implies an automatic modification of format.
Also, synchronization must not be disturbed by a change in the source format, such as the deletion of a column in the middle of the file.
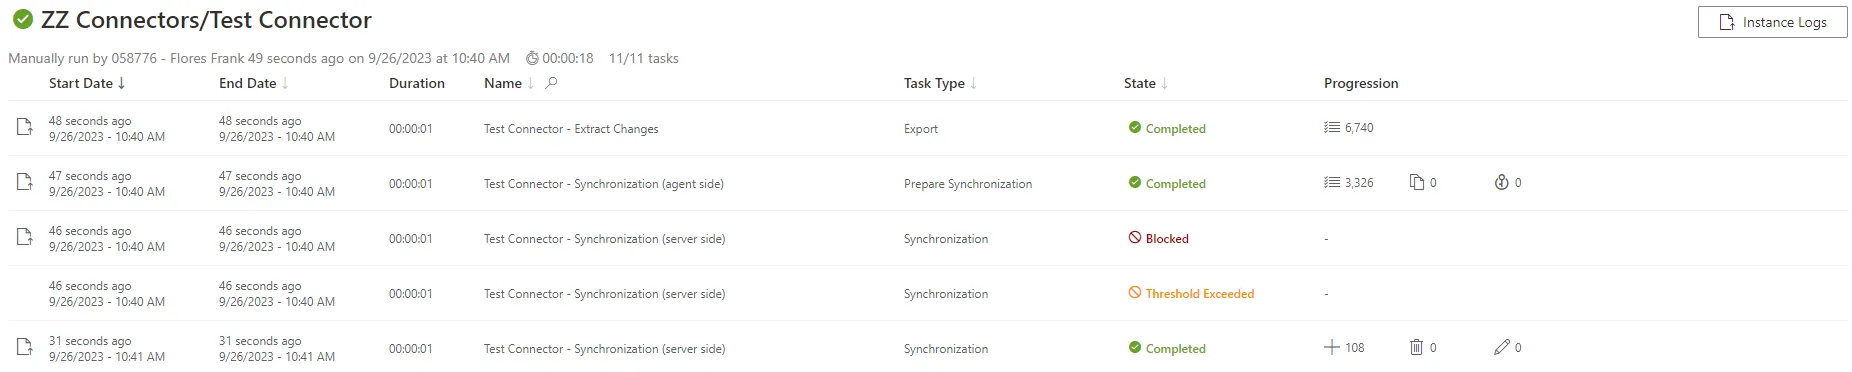
Thresholds must never be deactivated
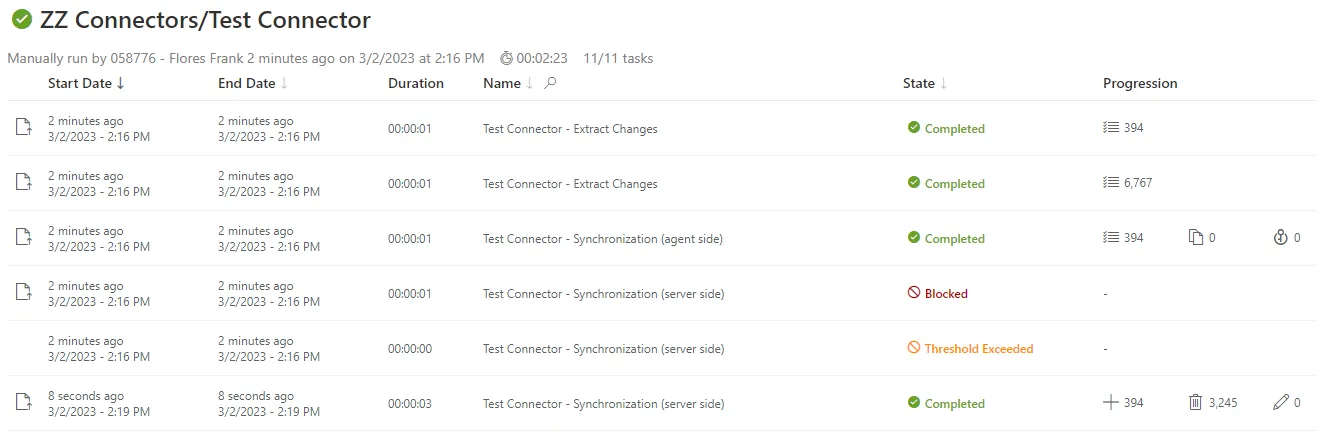
Thresholds are essential safety guards that control all changes, for example preventing the overwriting of important data by mistake. Thresholds are by default activated to warn users when synchronization or provisioning triggers too many modifications. If the number of modifications exceeds the specified threshold, Identity Manager stops the synchronization and displays a warning "Threshold Exceeded" on the log page described below.
Once the changes have been reviewed, the blocked job can be resumed (or not).
Thresholds are configured with default values using the following Connector attributes:
MaximumDeletedLines,MaximumInsertedLinesandMaximumUpdatedLinesfor scalar properties;MaxPercentageDeletedLines,MaxPercentageInsertedLinesandMaxPercentageUpdatedLinesfor scalar properties by percentage;MaximumLinkDeletedLines,MaximumLinkInsertedLinesandMaximumLinkUpdatedLinesfor navigation properties;MaxLinkPercentageDeletedLines,MaxLinkPercentageInsertedLinesandMaxLinkPercentageUpdatedLinesfor navigation properties by percentage.
Participants and Artifacts
At this point, integrators should have all the elements they need to perform synchronization.
| Input | Output |
|---|---|
| Connector with its entity types (required) | Synchronized data |
See the Connect to a Managed System topic for additional information.
Launch Synchronization
Launch synchronization for a given managed system by proceeding as follows:
-
Access the list of connectors by clicking on Connectors on the home page in the Configuration section.

-
On the relevant connector page, in the Entity Types frame, click on Jobs.
Here are all the tasks available for synchronization. They synchronize all connections and entity types for only this connector. It is possible to launch them individually in order to test them and debug a situation, or all together with All Tasks. According to the created connection(s) and package(s), all these tasks can be launched either in incremental or complete mode.

Update Expressions: computes the expressions used in the entity type mapping.All Tasks: launches all previous tasks in a row.
Notice that some connectors, depending on their connections and packages, can't be synchronized in incremental mode. As a consequence, when clicking on the Jobs button, you wouldn't have a choice between
CompleteandIncremental. See below this note.
Manage Synchronization Automation
Export and synchronization are executed manually from the connector screens. By default, they are also part of scheduled Jobs provided by Identity Manager:
- the complete job is scheduled to launch a synchronization once a day of all resources, modified or not;
- the incremental job is scheduled to launch a synchronization several times a day only of the resources modified since the last synchronization.
See the Set Up Incremental Synchronization and Set up Complete Synchronization topics for additional information.
Scheduling the jobs avoids manually triggering them everyday.
However, you can choose to withdraw a given connector from both the complete and incremental jobs by clicking on Deactivate on the connector's dashboard. This is particularly useful when modifying a connector. You can also re-insert it at any time with the same button which is now named Activate.

You can fine-tune the synchronization and/or provisioning of the connector by clicking on the Edit button.
![]()
Click on Job Results to access the progress of this connector's jobs.
All jobs are accessible on the Job Execution page in the Administration section.

Verify an Entity Type's Synchronization
In order to verify both the synchronization configuration and Create an Entity Type:
-
Launch synchronization.
-
Access the connector's logs (from Job Results on the connector's dashboard) to ensure that synchronization completed successfully.
-
Check that the entity types have been added to the left menu of the home page.

-
Access the relevant entity types (from the menu items on the left of the home page) to check synchronized resources, by navigating in the UI from the accounts through a sample of associations, via the eye icon:

You should first look for configuration validation, and only later validation of the actual data being synchronized.
For example, let's say we created a connector for SAB that contains two entity types called
SAB - UsersandSAB - Groups. Then, the home page shows them on the left.
Clicking on
SAB - Usersdisplays the list of all synchronized resources.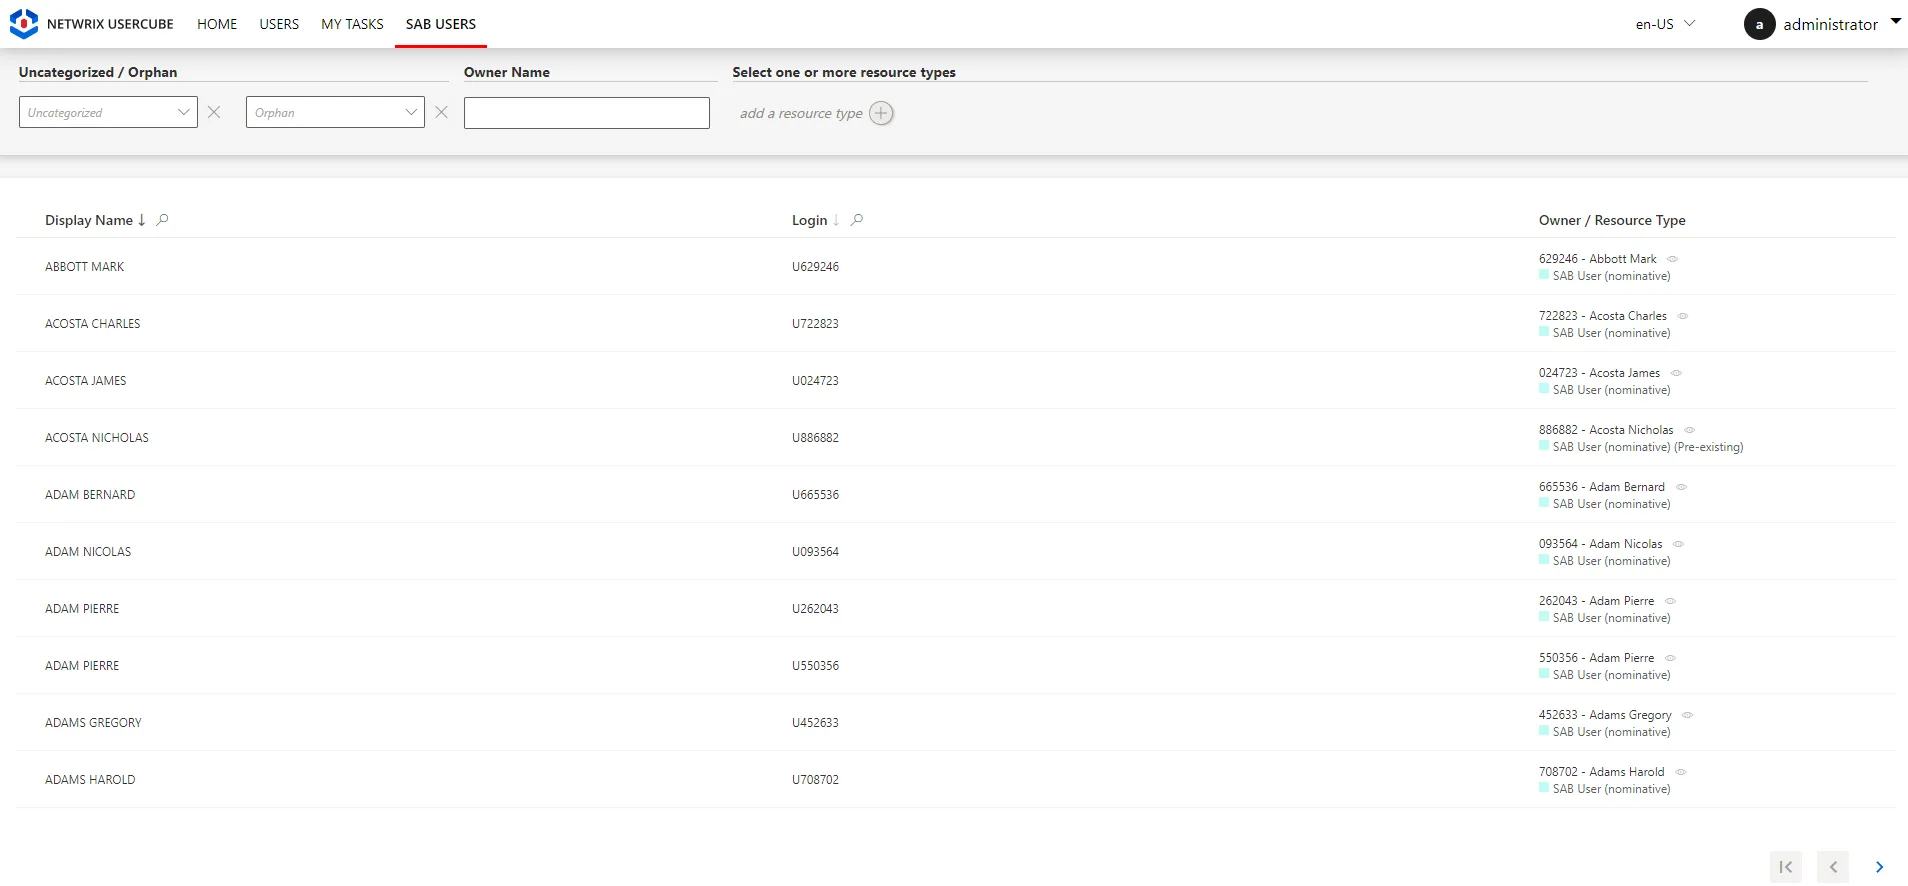
Clicking on any resource displays its detailed attributes, for example
Abbott Mark: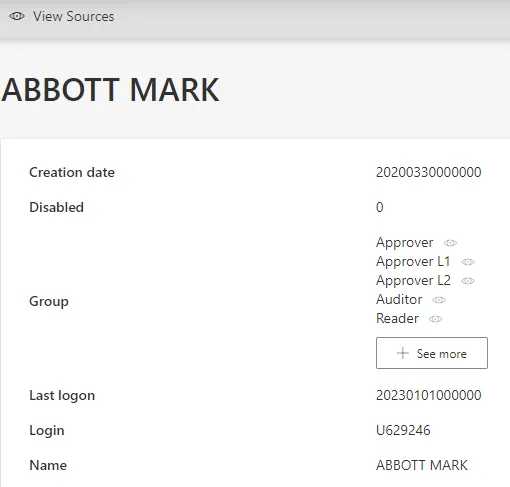
Clicking on any eye icon displays the corresponding resource. SAB was created here with a simple user-group schema that links n users to n groups. So here, we can check these links by navigating from a given user to one of their groups, to one of said group's users, to one of said user's groups, etc.
Troubleshooting
Make sure you followed the prerequisite guidelines for synchronization.
Keep in mind that a problem observed in synchronized data might also come from a mistake made previously in the connector's configuration. Therefore, logs can give more details. Logs are accessible from the Job Results button on the dashboard of a given connector.
Don't hesitate to launch synchronization-related tasks individually and observe the corresponding logs in order to debug a situation.
If the connector and/or entity type doesn't appear in the menu items, then:

Access the relevant connector's page and click on the Reload button to take into account the last changes in the entity type mappings.
If a newly added property doesn't appear in users' data, then:
Access the relevant connector's page to click on the Reload button to take into account the most recent changes in the entity type mappings.
If a synchronization is blocked by an exceeded threshold, then:

Find out the reasons to decide whether or not to bypass the threshold. Proceed as follows:
-
On the logs page (accessible from the Job Results button), click on the line of a task instance to see its logs.
-
Study synchronization counters and the list of all synchronization changes. These tools help you make a decision about whether to bypass synchronization thresholds.

In most cases, the first synchronization exceeds thresholds because no data exists in Identity Manager yet. Thus, a high quantity of modifications is expected and the synchronization is to be resumed.
Numerous modifications can also be triggered by:
- a change in date format;
- the input of blank files by mistake, because it would overwrite and erase all existing data;
- a swap of two headers in an input file.
-
If, after verifying, all changes are legitimate, click on the Resume button at the top of the job progress page. This will restart the job and allow the changes to be synchronized.
Be cautious, check twice for mistakes before resuming.
If an export doesn't complete, then:
-
Check the connection's settings.
-
If you manually typed the source column of a property in the entity types, then make sure that the source column exists in the corresponding managed system.

If a given property from users' data is displayed in an unexpected way, then:
Check the format of both the application metadata and the external system.

For example, if you find that a given date doesn't comply with what you set, then maybe the format in the External System section wasn't correctly selected, thus inducing a conversion error during the export computation.