Install the Agents
Most on-premises installations use an agent integrated with Usercube's server. If this is your case, and the server is already installed, no need to go further. If, on the other hand, you need separate agents, or if you are installing Usercube's agents within Usercube's SaaS offering, this is the way to go.
Please make sure that Usercube's agent requirements are met before going further.
Agent Working Directory
The agent runtime content should be extracted from the runtime archive following the instructions provided in Create a Working Directory.
In the separate agent setup, the agent is usually installed on a different workstation from the server.
The agent is configured thanks to the appsettings.agent.json file.
Create an IIS Website
It is recommended to run the Usercube agent as an IIS website.
To install Usercube's agent as a Windows service, please jump to Install the agent As a Windows Service.
Adding Usercube's agent as an IIS website can be achieved with the
Internet Information Services (IIS) Manager which can be launched with the
INETMGR.MSC command. You need to have an IIS 10.0 or greater.
The Microsoft Documentation provides the prerequisites and the procedure to create a new IIS site.
The information needed to go through the creation process are the following:
-
Usercube's agent uses an in-process hosting model.
-
Usercube's agent uses .Net.
-
Usercube agent's
web.configdwells in theruntimedirectory.It might require a few modifications to target the agent instead of the server:
1. Open
web.configwith a text editor.2. Change the
argumentsandstdoutLogFileattributes of the<aspNetCore>element as indicated below:
<aspNetCore processPath="dotnet" arguments="./identitymanager-Agent.dll" stdoutLogEnabled="false" stdoutLogFile="../Temp/stdout-agent.log" hostingModel="inprocess">
-
When creating the website, enter the following data:
1. Site name:
UsercubeAgent<Organization>is the recommended naming convention.2. Physical path:
/<agent working directory>/Runtime3. Type:
http4. IP address:
All unassigned5. Port & Hostname: To access Usercube's agent. Use the hostname and port that has been reserved for Usercube.
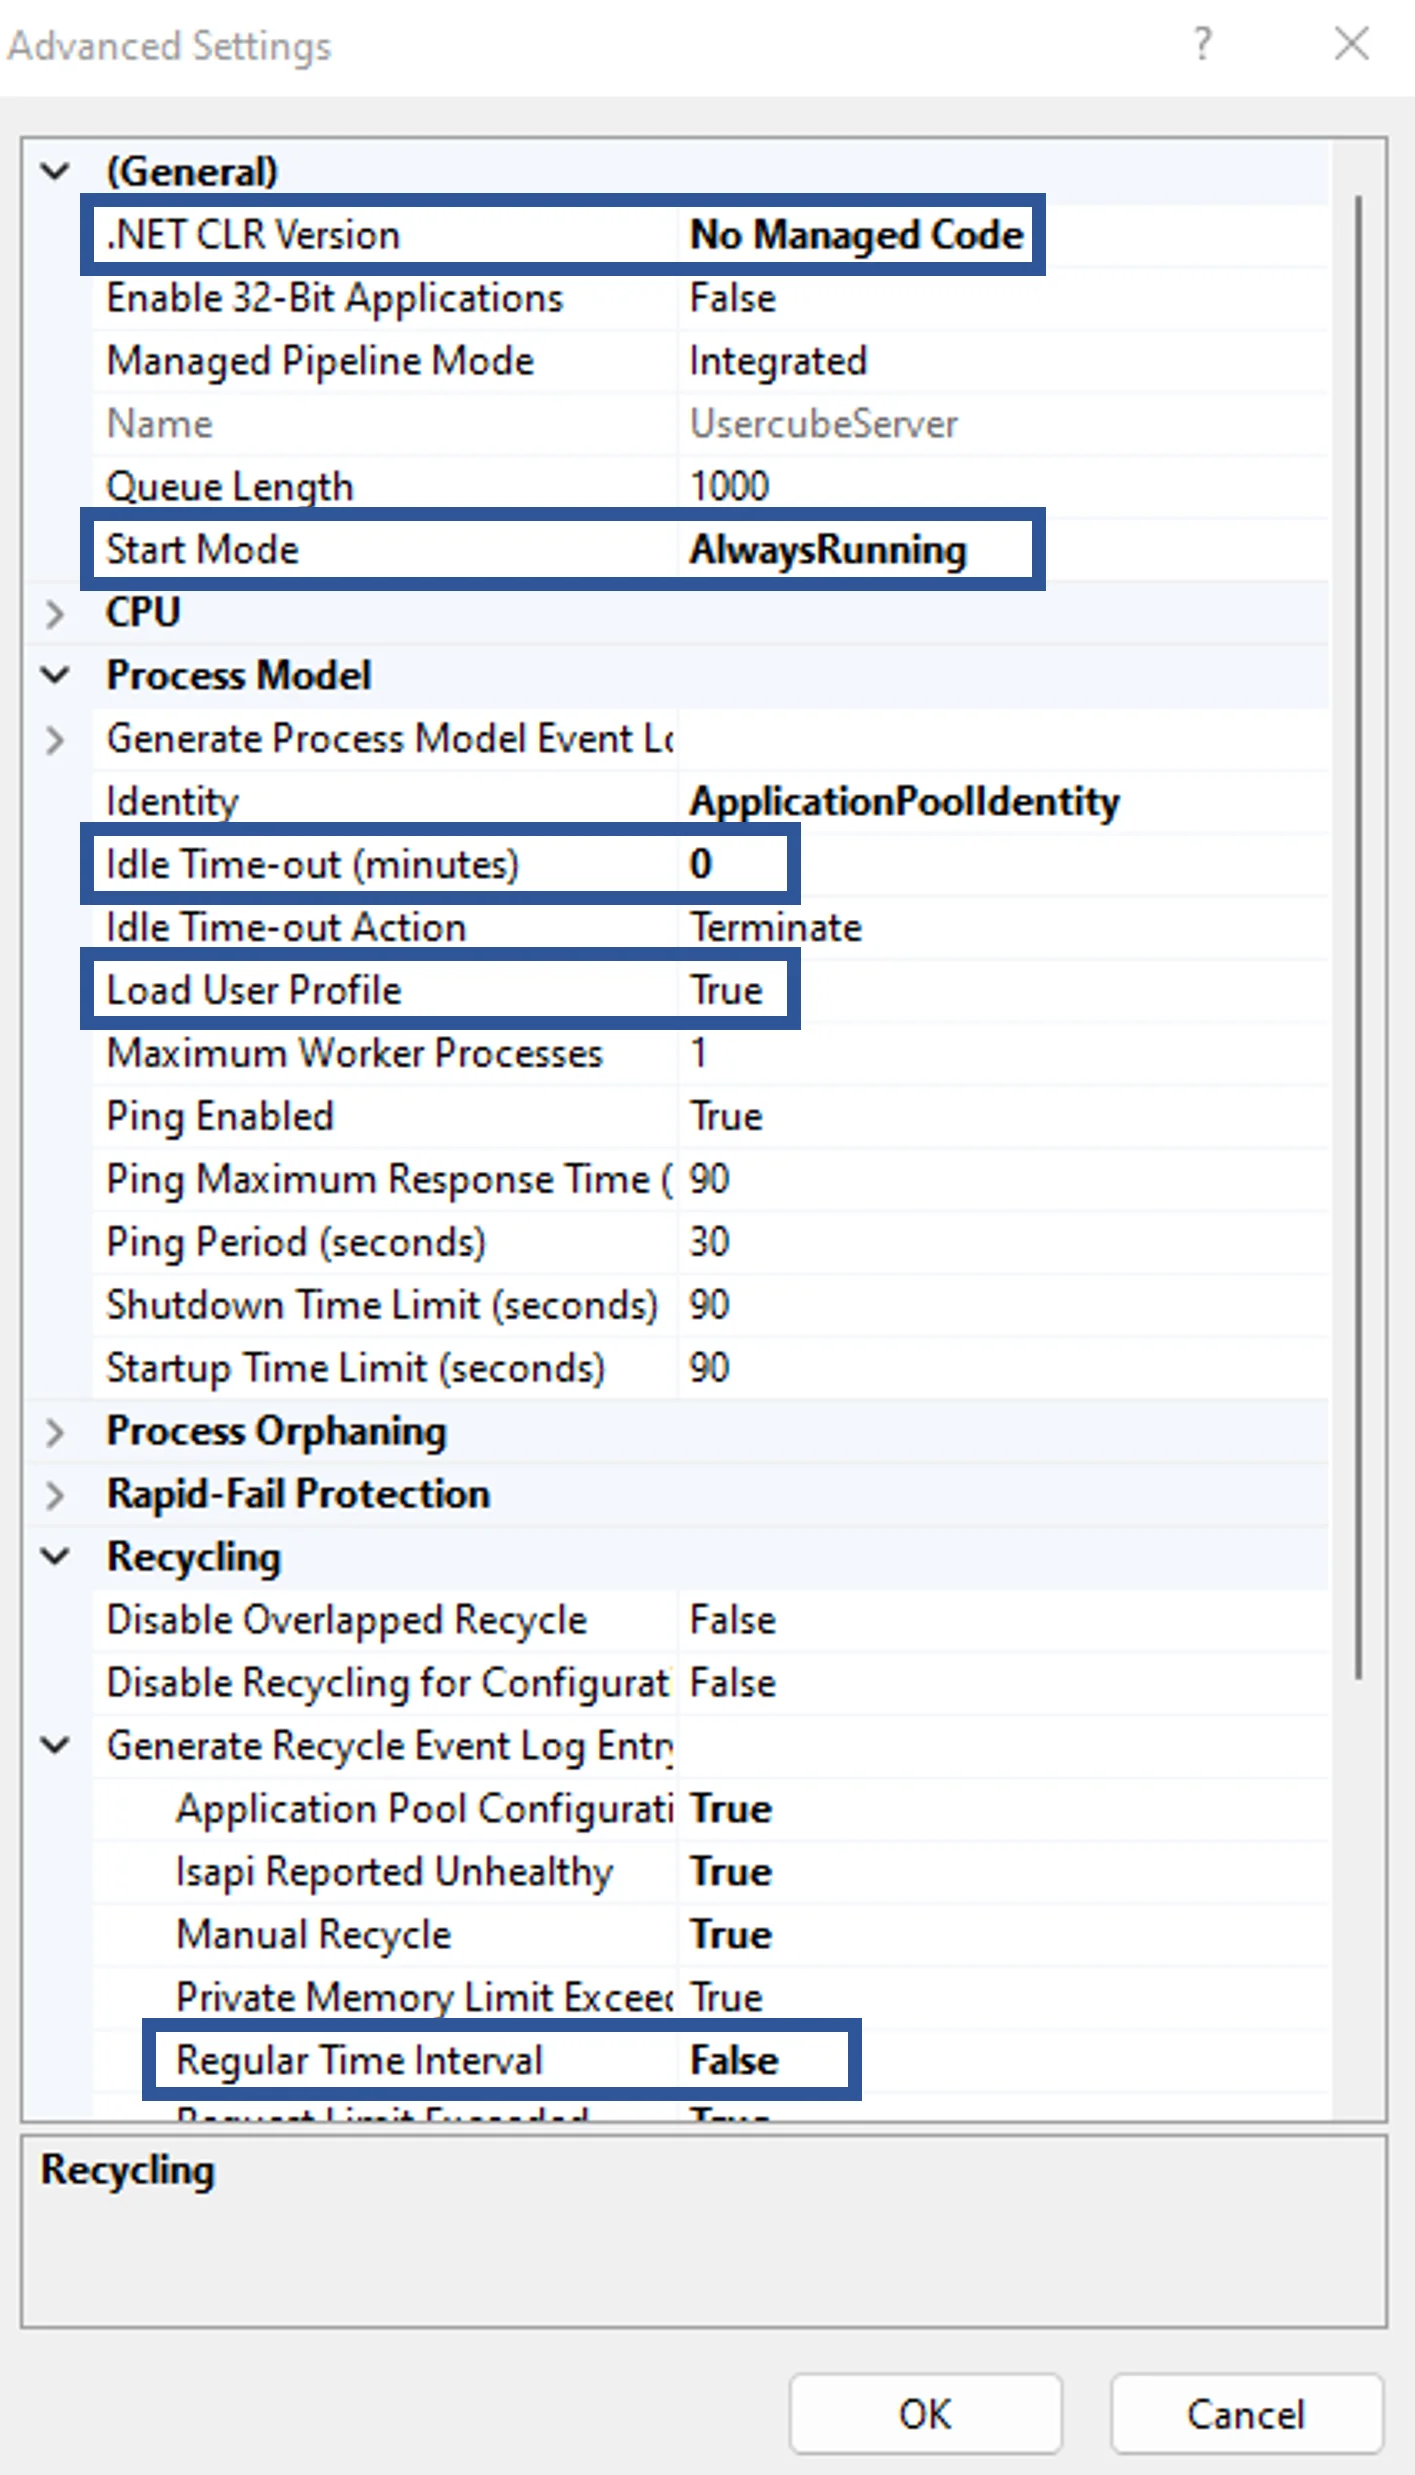
After creation, the following settings are recommended:
-
Application Pool >
Usercube<Organization>> Advanced Settings > General > Start Mode set toAlwaysRunning; -
Application Pool >
Usercube<Organization>> Advanced Settings > Process Model > Idle Time-out (minutes) set to0and Load User Profile set toTrue; -
Application Pool >
Usercube<Organization>> Recycling > Regular time intervals set to0.Recycling the application pool creates a discontinuation in the connection between server and agent, which can disrupt some of Usercube's features such as the job scheduler. IIS already recycles the application pool at each setting change, thus NETWRIX recommends not using periodic recycling.
The following is mandatory:
- Application Pool >
Usercube<Organization>> Advanced Settings > General > .NET CLR Version >No Managed Code
To sum up IIS settings:
Hosting Bundle
You need to install the dotnet hosting bundle (version 8.0 or higher) to be able to run dotnet application.
Select an Agent Identity
The Usercube Agent, through the IIS Website, should be assigned a service account with the relevant permissions.
You can either:
- Use the built-in application pool identity (see Check default behavior) and grant this identity the right permissions.
- Use a custom Windows service account with the right permissions and use it as an IIS identity for Usercube's agent IIS Website.
Check default behavior
Usually, creating an IIS application pool, such as the one within which Usercube's server website
runs, triggers the creation of a service account IIS APPPOOL/<apppool_name> (where
<apppool_name> is the application pool name) known as an application pool identity. It is
associated with the IIS website. This account is granted basic group membership that should enable
it to access what it needs.
For more information about IIS identities, visit the Microsoft Documentation.
Building on this default behavior, the default Application Pool Identity is usually granted the necessary permissions for Usercube's server to operate.
Before going further, you should check the following points:
- Find the group membership of
IIS APPPOOL\<apppool_name>. - Check the permissions on the working directory. Right-click the working directory and select
Security. The group section should contain one of the
IIS APPPOOL/<apppool_name>groups, namelyUsers.
From there:
- If the built-in application pool identity has been created but does not have the right permissions, you can use Set the Agent Permissions to fix it. Go back to Set an IIS Identity to make sure that the built-in application pool identity is effectively used by Usercube's server IIS Website.
- If you would rather use a custom service account instead of the built-in application pool identity, start with Set an IIS Identity.
- If you're not sure what to do, follow the procedure below, starting with Set an IIS Identity.
Set an IIS Identity
If you want to use the built-in application pool identity created with the application pool, you can use the Microsoft documentation.
If you'd rather use a custom service account created for Usercube's agent, follow the procedure below.
The following implies that a custom service account has already been created for Usercube's agent. This can be achieved by following the same steps as for the server:
- Open the IIS Manager (
INETMGR.MSC). - Open the Application Pools node underneath the machine node.
- Select the
UsercubeAgent/<Organization>application pool. - Right-click and select Advanced Settings.
- In the Process Model section, on the Identity list item, click on the three dots to open the Application Pool Identity dialog.
- Select the Custom Account radio button and click on Set.
- Enter the Service Account credentials.
- Click OK. You're all set.
Usercube's server IIS site will now use this identity to access the database and the working directory.
Set the Agent Permissions
Permissions
Usercube's agent needs specific permissions on its working directory to run, write synchronization output and read provisioning orders.
Up to four folders have to be considered:
- The working directory
- The
runtime
directory, usually
C:/identitymanager<Organization>/Runtime - The
data collection
directory, usually
C:/identitymanager<Organization>/Temp - The
provisioning orders
directory, usually
C:/identitymanager<Organization>/Temp(same as for the data collection directory).
Steps
The following steps can be performed for each of the relevant directories.
First, let's check what permissions the service account already has.
- Go to the working directory parent folder.
- Right-click the working directory.
- Select Properties.
- Select Security.
From there, you have two choices.
The agent service account that was chosen in the previous step:
-
Already has or belongs to a group that already has the needed permissions. There is nothing more to do.
-
Is missing one of the needed permissions:
-
Click on Edit.
-
Click on Add.
-
In the Enter the object names to select textbox, enter the service account name in the down-level logon format. For example, if you chose the built-in application pool identity, this would be
IIS APPPOOL/identitymanagerAgent<Organization>. -
Click on OK.
-
Select the newly added user name in the Group or user names panel at the top of the window.

-
Check the
Allowcolumn for the relevant permissions. Check theDenycolumn for the others. -
Apply OK.
-
The working directory permissions are all set.
The same steps have to be performed on the runtime, the data collection and the provisioning orders directories.
Name the Agent
Every agent is assigned a name. This name will be used in the UI to differentiate agents for the end-user, and in the XML configuration to assign connectors to specific agents.
In the appsettings.agent.json file, OpenId > AgentIdentifier can be set to any string
except for Local which is already taken by Usercube's inner workings. Then the agent set in the
XML configuration must have the same string as identifier.
For example:
appsettings.agent.json

"OpenId": {
  "AgentIdentifier": "MyAgent"
  }
With the following configuration:
<Agent Identifier="MyAgent" DisplayName_L1="My Agent" URI="https://contoso.com" />
Connect the Agent to the Managed Systems
The Runtime/appsettings.agent.json file is a
technical configuration
file that will enable you set up the connection between the agent and the target managed systems.
Every agent is associated with an appsettings.agent.json file.
The integration team should communicate the list of the managed systems to be connected to the agent, together with their configuration.
Here is an example of appsettings.agent.json connecting an agent to an Active Directory and an SAP
server.
appsettings.agent.json
{
  ...
  "Connections": {
    "ADExport": {
        "Servers": [
          {
           "Server": "paris.contoso.com",
           "BaseDN": "DC=paris,DC=com"
          }
        ],
        "AuthType": "Basic",
        "Login": "Login",
        "Password": "Password",
        "Filter": "(objectclass=*)",
        "EnableSSL": "true"
    }
    "SAPExportFulfillment": {
        "Server": "serverUrl",
        "Login": "login",
        "Password": "password"
    }
  }
}
Storing sensitive managed system data in configuration files, such as login/password pairs, is strongly discouraged. Sensitive data should be protected by one of the Credentials Protection methods.
Encryption Key Pair
Usercube's agent needs an RSA key pair to perform various encryption operations, such as source, configuration, or log file encryptions.
An RSA key pair, as in an X.509 public key certificate and a private key, can be stored one of two ways:
- As a PKCS #12 archive (also called
Personal Information Exchange file
or
.pfxfile) stored in the server's host file system. The file contains both the public key certificate and the private key. - As a certificate from a Windows' certificate store identified by SubjectDistinguishedName or by Thumbprint. The Windows certificate also contains both the public key certificate and the private key. This is the recommended method.
The key pair can be generated with tools such as OpenSSL or Microsoft's New-SelfSignedCertificateandpvk2pfx tool.
Here's an example showing how to generate a PKCS #12
archive (UsercubeContoso.pfx) bundling a public key certificate (usercubecontoso.cert) and a
private key (usercubecontoso.key) with OpenSSL, with a 50-year expiration date:
openssl req -x509 -newkey rsa:1024 -keyout usercubecontoso.key -out usercubecontoso.cert -days 18250
openssl pkcs12 -export -out UsercubeContoso.pfx -inkey usercubecontoso.key -in usercubecontoso.cert
Public key certificates can also be bought from trusted certificate providers and bundled with a private key into a PKCS #12 archive using step 2 in the frame above.
The certificate has to be linked to Usercube via EncryptionCertificate in the
appsettings.agent.json file.
For more information about configuration parameters, see EncryptionCertificate.
Certificate as a plain file
The following parameters are used to link the file to Usercube in EncryptionCertificate.
PKCS #12 archive can be
password protected,
hence the X509KeyFilePassword attribute.
Storing a .pfx file password in plain text in a production environment is strongly discouraged. It
should always be encrypted using the
Usercube-Protect-CertificatePassword tool.
appsettings.agent.json
{
  ...
  "EncryptionCertificate": {
      "File": "./identitymanagerContoso.pfx",
      "X509KeyFilePassword": "adefe$/izih"
  }
  ...
}
Certificate in the certificate store
The certificate can be stored in the certificate store instead of the file system. This is the recommended method.
appsettings.agent.json
{
  ...
  "EncryptionCertificate": {
      "DistinguishedName":"UsercubeContoso",
      "StoreLocation": "LocalMachine",
      "StoreName": "AuthRoot"
  }
  ...
}
Connect the Agent to Usercube's Server
The connection to Usercube's server is configured through:
1. The applicationUri attribute in the Runtime/appsettings.agent.json file has to be set to
Usercube's server URL.
2.OpenIdClients and DefaultOpenIdClient must be used to set the agent's credentials to connect to the server.
Their content should be provided by the integration team, in relation to the OpenIdClient tag in the applicative configuration.
The following example shows an appsettings.agent.json file that sets an agent to connect to
Usercube's server (https://identitymanagerserver.contoso.com) with the OpenId client identifier Job and
the password secret, stored in the OpenIdClients list which also contains the "admin/secret"
login/password pair.
{
    ....
    "ApplicationUri": "https://identitymanagerserver.contoso.com",
    "OpenIdClients": {
        "Job": "secret",
        "Admin": "secret"
     },
    "DefaultOpenIdClient": "Job"
}
Storing plain text passwords in configuration files is strongly discouraged. Sensitive passwords should be encrypted.
Install the Agent as a Windows Service
Installing Usercube's agent as a Windows service instead of an IIS website is mostly useful when using IIS is rendered moot by another system. For example, using a reverse proxy in front of Usercube's agent.
To install Usercube's agent as a service in Windows server, use the following command:
sc.exe create Usercube binpath= "Usercube-Agent.exe --service" displayname= "Usercube Agent" start= auto obj= "DOMAIN\USER" password= "PASSWORD"
Make sure to include a space between each parameter's equal sign = and the parameter value.
Configure the Starting Mode in IIS (optional)
This step is important if the scheduler is enabled. IIS starts Usercube's agent only if an incoming http request is made on the server and the scheduler is not launched until Usercube's agent is started. Because of that, you need to carefully set up the starting mode of IIS to force the starting of Usercube's agent.
Usercube's agent warm up is done using the <applicationInitialization> element in the web.config
file, the configuration is described here:
https://docs.microsoft.com/en-us/iis/get-started/whats-new-in-iis-8/iis-80-application-initialization
You need to:
- Enable the Application Initialization feature
- Modify the applicationHost.config file to set the startMode of the application pool as AlwaysRunning. You also need to set the preloadEnabled of your application set to true. It is advised to backup the applicationHost.config file when doing this step to prevent mistakes
- Double check that the following section is set in your web.config file, in the section system.webServer:
<applicationInitialization doAppInitAfterRestart="true"> <add initializationPage="/"></applicationInitialization>
Once done, you need to check that the configured jobs are launched via the Usercube's scheduler without having to manually issue a request on Usercube's agent.
If this is not correctly configured, any restart of your IIS or application pool could prevent jobs from being launched.
What's Next?
The last step in the installation process is setting up an Email server.
appsettings.agent
The appsettings.agent.json file is meant to contain configuration data to be used by the agent to
run Usercube.
It includes:
- connections to the managed systems;
- password reset settings;
- connections to potential additional databases;
- OpenId information;
- specific task configuration.
JSON files can contain any additional information that you might find useful. See the example below.
For example, in order to store the agent's address, we can add:
appsettings.json

"UsercubeAgent": {
  "Url": "http://localhost:1234"
}
As Usercube does not know any object named
UsercubeAgent, its content will be ignored, but it can still be used to store information for human use.
Supported Sections
| Name | Details |
|---|---|
| Connections optional | Type List of Connections Description Connection information of all the systems managed by this agent, for synchronization and fulfillment configuration. This section contains a subsection for each connection containing the connection's agent settings. { � "Connections": { � "<ConnectionIdentifier>": { "<AgentSetting>": "<Value>": � } } }Example{ � "Connections": { � "Directory": { "Path": "C:\UsercubeDemo\Sources\Directory.xlsx" }, "ServiceNowExportFulfillment": { "Server": "https://INSTANCE.service-now.com/api/now/table", "Login": "LOGIN", "Password": "PASSWORD" } } } See how to configure connections' agent settings via the UI. See more technical details on connections. |
| Databases optional | Type List of Databases Description Names and connection strings of all databases used by the agent through InvokeSqlCommandTask, other than Usercube's database and other than the databases provided in Usercube's available packages. This subsection contains a subsection for each additional database. { � "Databases": { "<DatabaseName>": "<DatabaseConnectionString>" } }Example{ � "Databases": { "UsercubeContoso": "data source=.;Database=Usercube;Integrated Security=SSPI;Min Pool Size=10;encrypt=false;" } } |
| OpenId optional | Type OpenId Description OpenId information, i.e. the ClientIds and related ClientSecrets that the agent may use to authenticate to the server in order to launch jobs and tasks. In order to launch jobs and tasks, the profiles related to these OpenId credentials must possess the required permissions. See examples below. |
| PasswordResetSettings optional | Type PasswordResetSettings Description Parameters which configure the reset password process for the managed systems that support it. See examples below. |
| SourcesRootPaths optional | Type String Array Description List of folder paths from which Usercube is allowed to read. This option is used to validate the sources files defined in file-based connections. These paths are case sensitive. Example{ � "SourcesRootPaths": [ "C:/identitymanagerContoso/SourceHR", "C:/identitymanagerContoso/SourcesPhone" ] } |
| TaskAgentConfiguration optional | Type TaskAgentConfiguration Description Various settings to customize the behavior of some agent tasks. See examples below. |
OpenId
| Name | Details |
|---|---|
| AgentIdentifier required | Type String Description Identifier of the agent, as it is named in the XML configuration. Example With the following configuration: <Agent Identifier="MyAgent" DisplayName_L1="My Agent" URI="https://contoso.com" /> We could have the following setting in the agent's appsettings.agent.json: { � "OpenId":{ � "AgentIdentifier": "MyAgent" } } |
| DefaultOpenIdClient required | Type String Description ClientId that defines the default OpenId pair, from the OpenIdClients section, used by the agent to authenticate to the server. Example{ � "OpenId":{ "OpenIdClients": { "Job": "secret1", "Admin": "secret2", "Agent": "secret3" }, "DefaultOpenIdClient": "Agent" } } |
| OpenIdClients required | Type List of OpenIdClients Description Pairs of ClientIds and non-hashed ClientSecrets, to override the corresponding secrets specified in the XML configuration. Example { � "OpenId":{ "OpenIdClients": { "Job": "secret", "Admin": "secret2" } } } |
PasswordResetSettings
| Name | Details |
|---|---|
| EncryptionCertificate required | Type [EncryptionCertificate] Description Location of the public key certificate and the private key used to handle input and output files' encryption. |
| MailSettings optional | Type MailSettings Description Settings for configuring the SMTP server, used to send password reset email notifications. |
| NotificationSettings optional | Type NotificationSettings Description Settings to configure password reset notifications. |
| TokenBuildingSettings optional | Type TokenBuildingSettings Description Settings to build the confirmation token used by the password reset's two-Way mode. The confirmation token is a base-64 encoded JSON Web Token (JWT) token that contains the information required to complete password reset when in two-way mode. It is appended to the confirmation Uri. |
| TwoFactorSettings optional | Type TwoFactorSettings Description Settings to configure the password reset's two-way mode, i.e. the process where Usercube sends emails containing links to users for them to click on it and reset their passwords. |
EncryptionCertificate
If you are using the certificate provided in the SDK, the agent will be unable to launch. You must create your own certificate.
Encryption certificate information can be set in one of two ways:
-
as a PKCS #12 archive (also called Personal Information Exchange file or
.pfxfile) stored in the agent's host file system. The archive contains both the public key certificate and the private key;Name Details File required Type String Description PKCS #12 archive path on the agent's host file system. Example { � "PasswordResetSettings": { "File": "C:/identitymanagerAgentContoso/contoso.pfx" } }Password optional Type String Description PKCS #12 archive password. Example { � "PasswordResetSettings": { "File": "C:/identitymanagerAgentContoso/contoso.pfx", "Password": "oarjr6r9f00" } } -
as a certificate from a Windows' certificate store, identified by its subject distinguished name or its thumbprint. The Windows certificate also contains both the public key certificate and the private key.
Name Details DistinguishedName requiredif Thumbprint is empty Type String Description Subject distinguished name of the certificate. Example { � "PasswordResetSettings": { "DistinguishedName": "UsercubeContoso" � } }StoreLocation required Type String Description Location of the relevant Windows certificate. Example { � "PasswordResetSettings": { � "StoreLocation": "LocalMachine" } }StoreName required Type String Description Name of the relevant Windows certificate. Example { � "PasswordResetSettings": { � "StoreName": "AuthRoot" } }Thumbprint requiredif DistinguishedName is empty Type String Description Thumbprint of the certificate. Example { � "PasswordResetSettings": { "Thumbprint": "6261A70E599642A21A57A605A73B6D2AE7C5C450" � } }
MailSettings
| Name | Details |
|---|---|
| FromAddress requiredif PickupDirectory is empty | Type String Description Email address used by Usercube to send notifications. Example{ � "PasswordResetSettings": { � "MailSettings": { "FromAddress": "no-reply@acme.com", � } } } |
| Host requiredif PickupDirectory is empty | Type String Description SMTP server domain name or an IP address. Note: to be used only when UseSpecifiedPickupDirectory is set to false. |
| Password required | Type String Description Password that Usercube will use to login to the SMTP server. Note: used only when the SMTP server is password-protected and UseSpecifiedPickupDirectory is set to false. |
| PickupDirectory requiredif FromAddress/Host are empty | Type String Description Path to the pickup directory. See more details on the pickup directory feature. Note: to be used only when UseSpecifiedPickupDirectory is set to true. Example{ � "PasswordResetSettings": { � "MailSettings": { "PickupDirectory": "../Mails", � } } } |
| Username required | Type String Description Username for Usercube to login to the SMTP server. Note: used only when the SMTP server is password-protected and UseSpecifiedPickupDirectory is set to false. |
| AllowedDomains optional | Type String Description List of domains to which the SMTP server is authorized to send emails. Domain names must be separated with ;. |
| CatchAllAddress optional | Type String Description Catch-all address that will receive all of Usercube's emails instead of usual users. Note: this is helpful for testing before going live. Example{ � "PasswordResetSettings": { � "MailSettings": { "CatchAllAddress": "administrator@acme.com", � } } } |
| CatchAllCCAddress optional | Type String Description Catch-all address that will receive all of Usercube's emails as cc (carbon copied). Example{ � "PasswordResetSettings": { � "MailSettings": { "CatchAllCCAddress": "administratorcc@acme.com", � } } } |
| Enabled default value: True | Type Boolean Description True to enable email sending. When set to false, no email is sent by Usercube. |
| EnableSsl default value: False | Type Boolean DEPRECATED: EnableSsl won't be supported in the future. Please specify a SecureSocketOption instead. To keep the same behavior as EnableSsl: True, use the setting SecureSocketOption: StartTls. Description True to encrypt communication with the SMTP server. Note: to be used only when UseSpecifiedPickupDirectory is set to false. |
| SecureSocketOption default value: Auto | Type String Description Specifies the encryption strategy to connect to the SMTP server. If set, this takes priority over EnableSsl. None: No SSL or TLS encryption should be used. Auto: Allow the mail service to decide which SSL or TLS options to use (default). If the server does not support SSL or TLS, then the connection will not be encrypted. SslOnConnect: The connection should use SSL or TLS encryption immediately. StartTls: Elevates the connection to use TLS encryption immediately after reading the greeting and capabilities of the server. If the server does not support the STARTTLS extension, then the connection will fail and a NotSupportedException will be thrown. StartTlsWhenAvailable: Elevates the connection to use TLS encryption immediately after reading the greeting and capabilities of the server, but only if the server supports the STARTTLS extension. Note: to be used only when UseSpecifiedPickupDirectory is set to false. |
| Port default value: 0 | Type String Description SMTP server port. Note: to be used only when UseSpecifiedPickupDirectory is set to false. |
| UseDefaultCredentials default value: False | Type Boolean Description True to use the default username/password pair to login to the SMTP server. When set to false, Windows authentication is used. Note: to be used only when UseSpecifiedPickupDirectory is set to false. |
| UseSpecifiedPickupDirectory default value: False | Type Boolean Description True to write emails as local files in the specified PickupDirectory instead of sending them as SMTP packets. See more details on the pickup directory feature. Example{ � "PasswordResetSettings": { � "MailSettings": { "UseSpecifiedPickupDirectory": true, � } } } |
NotificationSettings
| Name | Details |
|---|---|
| Cultures default value: ["en"] | Type String Array Description List of languages in which reset-password email notifications will be sent, among: fr; en. Example{ � "PasswordResetSettings": { � "NotificationSettings": { "Cultures": ["fr", "en"] } } } |
TokenBuildingSettings
| Name | Details |
|---|---|
| ValidFor default value: 03:00:00 | Type String Description Validity period of the issued token, and thus of the password reset link. The format must be HH:mm:ss. Example{ � "PasswordResetSettings": { � "TokenBuildingSettings": { "ValidFor": "03:00:00" } } } |
TwoFactorSettings
| Name | Details |
|---|---|
| ApplicationUri required | Type String Description URI of the Usercube application. Note: this helps create the links in the emails for two-way password reset. Example{ � "PasswordResetSettings": { � "TwoFactorSettings": { "ApplicationUri": "http://localhost:5000" � } } } |
| ResetConfirmationUri required | Type String Description Base URI for the password reset link that is sent to the user. The password reset confirmation token is appended to the ResetConfirmationUri. The resulting URI is sent to the user. Example{ � "PasswordResetSettings": { � "TwoFactorSettings": { � "ResetConfirmationUri": "http://localhost:5000/PasswordReset/Activate/?activationCode=" } } } |
TaskAgentConfiguration
| Name | Details |
|---|---|
| HttpClientTimeoutSupplement default value: 0 | Type Integer Description Additional minutes that extend the default timeout (30 minutes) of the HttpClient instance used to send requests to the server. Example Here the total timeout will be 50 minutes: { � "TaskAgentConfiguration": { � "HttpClientAdditionalTimeout": 20 } } |
Application Settings
This section describes the settings available in the agent's appsettings.json file, located in the agent's working directory or in environment variables.
NOTE: JSON files can contain any additional information that you might find useful. See the example below.
Code attributes enclosed with <> need to be replaced with a custom value before entering the
script in the command line.
For example, in order to store the agent's address, we can add:
Code attributes enclosed with <> need to be replaced with a custom value before entering the
script in the command line.
appsettings.json
"UsercubeAgent": {
  "Url": "<http://localhost:1234>"
}
As Usercube does not know any object named UsercubeAgent, its content will be ignored, but it can still be used to store information for human use.
The appsettings set allows the following attributes and sections:
| Name | Type | Description |
|---|---|---|
| ApplicationUri (required) | Uri | Server's listening URI. Used by the agent to send requests to the server. Example: Code attributes enclosed with <> need to be replaced with a custom value before entering the script in the command line. appsettings.json { "ApplicationUri": " <https://identitymanagerserver.contoso.com:5000>" } |
| Jobs (optional) | Job | Settings to configure all jobs with common values. |
| Scheduler (optional) | Scheduler | Settings to configure Usercube's scheduler. |
| TaskTimeoutSupplement default value: 0 | Int32 | Additional time (in minutes) for the Invoke-Job tool's Timeout property. Example: Code attributes enclosed with <> need to be replaced with a custom value before entering the script in the command line. appsettings.json { "TaskTimeoutSupplement": 10 } |
| InstallationDirectoryPath default value: Usercube-agent.exe directory | String | Path of the installation directory. It is used to read other configuration files. |
| EncryptionCertificate (required) | EncryptionCertificate | Settings to configure the encryption of specific files. |
| IdentityServer (required) | IdentityServer | Settings to configure the agent's encrypted network communication, for example with the server or a browser. |
| Authentication (required) | Authentication | Settings to configure end-user authentication, for example for users to launch a job from the UI. |
| Serilog (optional) | Logger setting | Settings to configure the logging service, complying to the Logger properties and structure. See the Monitoring topic for additional information. Example: Code attributes enclosed with <> need to be replaced with a custom value before entering the script in the command line. appsettings.json { "Serilog": { "WriteTo": [ "Console" ], "MinimumLevel": { "Default": "Error", "Override": { "Usercube": "Information" } } } } |
| Cors (optional) | Cors | Settings to configure the agent's CORS policy, which is useful when using non-integrated agents. |
| ApplicationInsights (optional) | ApplicationInsights | Settings to plug to and configure the AppInsights monitoring tool. |
| TempFolderPath (optional) | String | Path to the temporary folder which contains: - ExportOutput: directory storing data exported from connectors. - JobLogs: directory storing task instance logs. - Reports: directory storing generated reports. - Packages: directory storing the downloaded package logos. - PolicySimulations: directory storing the files generated by policy simulations. - ProvisioningCache.txt: file storing the clustered provisioning cache. When enabled, this file can be used to coordinate the API cache among clusters. - CorrelationCache.txt - RiskCache.txt - ExpressionCache.txt - scheduler.lock - connector.txt - container.reset.txt: file acting as a reset command for Usercube's server, i.e. any change to this file triggers the reset service, thus reloading all the services instantiated by the server. Note that this path can be overridden by ResetSettings > FilepathResetService. - Mails: directory storing the email messages. Note that this path can be overridden by ResetSettings > PickupDirectory. - Deployment these elements can be removed, but make sure to restart the server after doing so. Example: appsettings.json { "TempFolderPath": "../Temp" } |
| WorkFolderPath (optional) | String | Path of the work folder which contains: - Collect: directory storing the CSV source files exported by connectors. - ProvisioningOrders: directory storing the orders generated by the server. - FulfillPowerShell: PowerShell provisioner's working directory. - FulfillRobotFramework: Robot Framework's provisioner working directory. - ExportCookies: directory storing the cookies used for incremental export. - Synchronization: directory storing the agent's data collection results. - Upload: directory storing the uploaded media like uploaded pictures, before they are inserted into the database. - appsettings.connection.json These elements must not be removed, because doing so may disrupt Usercube's execution after restarting. Example: appsettings.json { "WorkFolderPath": "../Work" } |
| JobLaunchTimeout default value: 7500 | String | Time period (in milliseconds) after which, if a launched job has not started, it is considered in error. Example: appsettings.json { "JobLaunchTimeout": 9000 } |
| InvokeSqlCommands default value: null | String | List of parameter sets used to override InvokeSqlCommandTasks' SQLInputFile and OutputPath parameters from the XML configuration. See the InvokeSqlCommandTask topic for additional information. For each task to override, the key must be the task's identifier. Example: appsettings.json { "InvokeSqlCommands": { "InvokeSqlCommandTask_Identifier": { "SQLInputFile": "YourInputFilePath", "OutputPath": "YourOutputFilePath" }, } } |
Jobs
Below is an example of job that can be executed by the agent.
For example:
Code attributes enclosed with <> need to be replaced with a custom value before entering the
script in the command line.
appsettings.json
{
  ...
  "Jobs": {
    "MaxTaskBatchSize": "2"
  }
}
| Name | Type | Description |
|---|---|---|
| MaxTaskBatchSize default value: 5 | Int64 | Maximum number of tasks that can be launched simultaneously, thus avoiding timeout issues. When executing a job, Usercube launches simultaneously the tasks of a same Level. See the Job topic for additional information. If the number of same-level tasks exceeds MaxTaskBatchSize, then Usercube inserts new levels. These effective levels can be seen in the job's logs or with the Usercube-Get-JobSteps executable. See the Usercube-Get-JobSteps topic for additional information. |
Scheduler
Below is an example of scheduling and a list of attributes.
For example:
Code attributes enclosed with <> need to be replaced with a custom value before entering the
script in the command line.
appsettings.json
{
  ...
  "Scheduler": {
    "Enabled": "true",
    "MaxLockWatchTime": 3600
 }
}
| Name | Type | Description |
|---|---|---|
| Enabled (optional) | Boolean | True to activate Usercube's scheduler. |
| MaxLockWatchTime default value: 1800 | Int32 | Time period (in seconds) to spend watching for the scheduler's lock file before launching it. When set to 0 the duration is infinite, and when set to a negative value the scheduler launch fails if the lock file already exists. This parameter prevents a failure if Usercube's scheduler has already been launched from another source. |
Encryption Certificate
This information can be set one of two ways:
-
As a Public Key Cryptography Standards (PKCS) #12 archive (also called Personal Information Exchange file or .pfx file) stored in the Agent's host file system. The archive contains both the public key certificate and the private key.
-
As a certificate from a Windows' certificate store identified by SubjectDistinguishedName or by Thumbprint. The Windows certificate also contains both the public key certificate and the private key.
NOTE: Netwrix recommends using Windows' certificate store.
On the other hand, the PFX file takes priority over Windows' certificate, which means that when File is specified then the PFX certificate is used, even if the options for Windows' certificate are specified too.
In both ways, missing and/or incorrect settings trigger an error and no certificate is loaded.
As a PFX file
For example:
Code attributes enclosed with <> need to be replaced with a custom value before entering the
script in the command line.
{
    ...
    "EncryptionCertificate": {
        "File": "<C:/identitymanagerAgentContoso/contoso.pfx>",
        "Password": "<oarjr6r9f00>"
     }
 }
The archive is set using the following attributes:
| Name | Type | Description |
|---|---|---|
| File (required) | String | PKCS #12 archive path on the host file system. |
| Password (optional) | String | PKCS #12 archive password. |
NOTE: Storing a .pfx file password in plain text in a production environment is strongly discouraged. It should always be encrypted using the Usercube-Protect-CertificatePassword tool. See Usercube-Protect-CertificatePassword topic for additional information.
The archive is set using the following attributes:
| Name | Type | Description |
|---|---|---|
| File (required) | String | PKCS #12 archive path on the host file system. |
| Password (optional) | String | PKCS #12 archive password. storing a .pfx file's password in plain text in a production environment is strongly discouraged. It should always be encrypted using the Usercube-Protect-CertificatePassword.exe tool. See the Usercube-Protect-CertificatePassword topic for additional information. |
As a Certificate in the Windows Store
For example:
Code attributes enclosed with <> need to be replaced with a custom value before entering the
script in the command line.
 {
    ...
    "EncryptionCertificate": {
         "DistinguishedName":"<UsercubeContoso>",
         "StoreLocation": "<LocalMachine>",
         "StoreName": "<AuthRoot>"
     }
 }
The Windows certificate is set using these attributes:
| Name | Type | Details |
|---|---|---|
| DistinguishedName (optional) | String | SubjectDistinguishedName of the store certificate. It is required when Thumbprint is not specified. |
| Thumbprint (optional) | String | Thumbprint of the store certificate. It is required when DistinguishedName is not specified. |
| StoreLocation (required) | String | Location of the relevant Windows certificate store: LocalMachine or CurrentUser. |
| StoreName (required) | String | Name of the relevant Windows certificate store. |
Using Azure Key Vault
If the certificate is saved in Azure Key Vault, we must define the certificate identifier and the Vault connection. See the Azure Key Vault topic for additional information.
Code attributes enclosed with <> need to be replaced with a custom value before entering the
script in the command line.
"<EncryptionCertificate>": {
    "CertificateAzureKeyVault": "<CertificateIdentifier>"
}
Identity Server
Just like the Encryption Certificate, this information can be set one of two ways.
As a PFX file
For example:
Code attributes enclosed with <> need to be replaced with a custom value before entering the
script in the command line.
appsettings.json
"<IdentityServer>": {
  "X509KeyFilePath": "<./identitymanager.pfx>",
  "X509KeyFilePassword": "<oarjr6r9f00>"
}
The archive is set using the following attributes:
| Name | Type | Description |
|---|---|---|
| X509KeyFilePath (required) | String | PKCS #12 archive path on the agent's host file system. |
| X509KeyFilePassword (optional) | String | PKCS #12 archive password. |
NOTE: Storing a .pfx file password in plain text in a production environment is strongly discouraged. It should always be encrypted using the Usercube-Protect-CertificatePassword tool. See the Usercube-Protect-CertificatePassword topic for additional information.
As a Certificate in the Windows Store
For example:
Code attributes enclosed with <> need to be replaced with a custom value before entering the
script in the command line.
appsettings.json
"<IdentityServer>": {
  "X509SubjectDistinguishedName":"<UsercubeContoso>",
  "X509StoreLocation": "<LocalMachine>",
  "X509StoreName": "<AuthRoot>"
}
The certificate is set using these attributes:
| Name | Type | Description |
|---|---|---|
| X509StoreLocation (required) | String | Location of the relevant Windows certificate store: LocalMachine or CurrentUser. |
| X509StoreName (required) | String | Name of the relevant Windows certificate store. |
| X509SubjectDistinguishedName (optional) | String | SubjectDistinguishedName of the certificate. It is required when X509Thumbprint is not defined. |
| X509Thumbprint (optional) | String | Thumbprint of the certificate. It is required when X509SubjectDistinguishedName is not defined. |
NOTE: If you are using the certificate provided in the SDK, the agent will fail when launching. You must create your own certificate.
You can get the DistinguishedName of the certificate using OpenSSL:
openssl x509 -noout -in {certificate file name with full path} -subject
Authentication
An example of authentication and a list of attributes.
appsettings.json
{
  ...
  "Authentication": {
    "Enabled": true,
    "RequireHttpsMetadata": true
  }
}
| Name | Type | Description |
|---|---|---|
| Enabled default value: true | Boolean | True to enable authentication. |
| RequireHttpsMetadata default value: true | Boolean | True to set HTTPS required for the discovery endpoint. |
Cors
An example of cors and a list of attributes.
appsettings.json
{
  ...
  "Cors": {
    "AllowAnyHeader": true,
    "AllowAnyMethod": false,
    "AllowCredentials": true
  }
}
| Name | Type | Description |
|---|---|---|
| AllowAnyHeader default value: false | Boolean | True to enable the Access-Control-Allow-Headers: * header in the agent's response to a preflight request. |
| AllowAnyMethod default value: false | Boolean | True to enable the Access-Control-Allow-Methods: * header in the agent's response to a preflight request. |
| AllowCredentials default value: false | Boolean | True to enable the Access-Control-Allow-Credentials: true header in the agent's response to a preflight request. |
Application Insights
Usercube supports the Application Insights integration. It means that you can monitor the lifecycle of the application through a dedicated interface, which can be useful to measure performance, observe how the application is used or detect performance anomalies.
For example:
Code attributes enclosed with <> need to be replaced with a custom value before entering the
script in the command line.
appsettings.json
{
  ...
  "ApplicationInsights": {
    "InstrumentationKey": "<AppInsights instance's key>"
  }
}
The application insights details are:
| Name | Type | Details |
|---|---|---|
| InstrumentationKey default value: null | String | Key linked to the AppInsights instance to which the server's logs, requests, dependencies and performance are to be sent. See Microsoft's documentation to create an instrumentation key. |
NOTE: The logs sent to AppInsights are configured through the Logger properties. See the Monitoring topic for additional information.
Azure Key Vault
Prerequisites
First, NETWRIX recommends reading:
- Azure Key Vault's overview documentation and Basic concepts;
- how to sign in to Azure and create a vault;
- about Azure Key Vault's secrets because secrets are the data that Usercube needs to collect.
Compatible Settings
Every key from
appsettings.agent.json
that has a string value can be saved as a secret into Azure Key Vault.
See examples in connectors' credential protection sections.
Write Settings to the Vault
After creating the Azure Key Vault, open its page on Azure's portal and add a secret.
The important part of adding a secret in Azure Key Vault is defining its name and value:
- as secrets' names can only contain alphanumeric characters and double dashes (
--) as separator, the keys from theappsettings.agent.jsonfile must contain only alphanumeric characters too; - secrets' values are simply the value associated with the key in the JSON file.
For example, for the Active Directory:
appsettings.agent.json { ... "Connections": { ... "ADExport": { "Servers": [ > { > "Server": >
"paris.contoso.com", > "BaseDN": "DC=paris,DC=com" > }, > { > "Server": "marseille.contoso.com", >

> "BaseDN": "DC=defense,DC=marseille,DC=com" > } > ], "AuthType": "Basic", "Login": "login123",
> "Password": "password123", "Filter": "(objectclass=\*)", "EnableSSL": "false", } } }
To save the login to Azure Key Vault, create a secret whose name and value are respectively
Connections--ADExport--Loginandlogin123.To save the second server, create a secret whose name and value are respectively
Connections--ADExport--Servers--1--Serverandmarseille.contoso.com. Note that the index of the first element is0.
This way, values from the Azure Key Vault take priority over the values from the appsettings files.
For example, if
Loginexists in both Azure Key Vault andappsettings.agent.json, then the value from Azure Key Vault is used.
Configure Usercube
Connect Usercube to Azure Key Vault by adding to the agent's appsettings.json file a specific
section.
For example:
    appsettings.json

{ ... "AzureKeyVault": { "Vault" : "https://identitymanagerkeyvault.vault.azure.net/",
"ConnectionString":
"RunAs=App;AppId={dcb9b3a4-159c-45d8-93d5-8d6d677de4a7};TenantId={7a06f56c-47a8-469b-b0c0-089ec0666bd1};AppKey={Ju4m3BWA_U~s9XVlI_btgydJ8w5wY.iD.L}"
} }
| Name | Details |
|---|---|
| Vault required | Type String Description DNS Name found on the page of the vault in Azure's portal. Info: usually in the format https://yourVault.vault.azure.net/. |
| ConnectionString default value: null | Type String Description Identification token used to retrieve the various connection keys found in the Azure Key Vault. It concatenates a series of options defining the authentication to Azure Key Vault. null - the connection is established with the current user. Warning: this user must be connected to the Microsoft Entra ID (formerly Microsoft Azure AD) instance and to the correct tenant. Otherwise, Usercube gets the token from Microsoft Entra ID via: RunAs=App - a managed identity. Warning: connecting via a managed identity must be enabled on Azure's App Service. RunAs=App;AppId={ClientId of user-assigned identity} - a user-assigned identity. RunAs=App;AppId={TestAppId};KeyVaultCertificateSecretIdentifier={KeyVaultCertificateSecretIdentifier} - the application and a certificate's secret, for custom services authentication. RunAs=App;AppId={AppId};TenantId={TenantId};CertificateThumbprint={Thumbprint};CertificateStoreLocation={LocalMachine or CurrentUser} - a certificate with a thumbprint on TenantId. RunAs=App;AppId={AppId};TenantId={TenantId};CertificateSubjectName={Subject};CertificateStoreLocation={LocalMachine or CurrentUser} - a certificate with a DN on TenantId. RunAs=App;AppId={AppId};TenantId={TenantId};AppKey={ClientSecret} - a secret. |
CyberArk's AAM Credential Providers
This guide shows how to protect sensitive data by connecting Usercube to CyberArk's Application Access Manager (AAM) Credential Providers.
Data Protection
Usercube often needs to connect to external systems with credentials that need protection.
By default, the data used to connect to external systems is stored in plain text in the
Connections section of the appsettings.agent.json file. This is not a secure option.
CyberArk for Data Protection
CyberArk's Application Access Manager (AAM) Credential Providers, part of the Privileged Access Security solution, is used to stop storing hard-coded credentials in applications, scripts or configuration files, and instead store them in CyberArk's vault to be centrally logged and managed.
This way, the company can easily become compliant with potential internal and regulatory requirements of periodic password replacement, and able to securely monitor privileged access across all systems, databases and applications.
CyberArk is made of vaults. Inside a vault, safes can be created and owners allocated. Accounts and files can then be stored in safes accessible by users.
This section explains how Usercube retrieves these accounts from CyberArk.
Prerequisites
CyberArk AAM can be used either with:
-
agentless AAM: Central Credential Provider (works with Web Service using REST);
-
agent-based AAM: Credential Provider (works with C/C++ Application Password SDK).
Implementing the Credential Provider method requires placing the C/C++ Application Password SDK DLL, named
CPasswordSDK.dll(on 32-bit systems) orCPasswordSDK64.dll(on 64-bit systems), to theRuntimefolder of Usercube.
Usercube supports both AAMs. CyberArk's overview can help choose which AAM to go to.
See more details about Credential Provider's system requirements and installation guide.
Compatible Settings
The following table sums up which keys from appsettings.agent.json's Connections section can
be saved to CyberArk:
| Use Case | Possible Key |
|---|---|
| Login | Login / ApplicationId / ClientId |
| Password | Password / ApplicationKey / ClientSecret |
| Address | Server / MicrosoftGraphPathApi / ResponseUri |
Any connector using one of these attributes as key can retrieve the associated value from CyberArk.
For example, Active Directory can retrieve:
Login;Password;Server.
Set Authorization Details
While the application's identifier is required, setting an authentication method and allowed machines is optional but recommended for security concerns.
AppID
See CyberArk's documentation on how to add an application to the vault.
CyberArk uses for each client application an AppID, i.e. a unique name to identify the application's permissions to access given safes and stored secrets.
Authentication
Several authentication methods are available to protect the whole system and make sure that Usercube actually does the API calls.
NETWRIX recommends:
- using the certificate's serial number (see below how to configure certificates) when working with the agentless AAM - Central Credential Provider;
- generating a hash with the AIMGetAppInfo utility when working with the agent-based AAM - Credential Provider.
Allowed machines
Finally, allowed machines can be added to the safe. This way, the Credential Provider verifies that only applications running from an authorized machine can access secrets.
SSL certificate
If IIS is configured with AIMWebService set to Require SSL, then an SSL certificate must be
provided.
Usercube does not require a certificate, so it can be launched without certificate-related parameters, if CyberArk is configured to allow it.
Create a CyberArk Account
CyberArk's Password Vault Web Access (PVWA) is meant to enable users to access sensitive data through accounts in CyberArk, from any local or remote location.
The following procedure requires credentials in order to connect to PVWA.
Create a CyberArk account by adding it to the PVWA, defining at least the following properties:
| Property Name | Key in appsettings.agent.json |
| ------------- | ------------------------------- |
| Username | Login |
| Address | Server |
| Password | Password |

NETWRIX recommends customizing the account's name because it will be used in [```appsettings.cyberArk.agent.json```](#appsettingscyberarkagentjson) to retrieve this account from the vault.
Assign the Permissions
See CyberArk's documentation on how to add a safe member.
In order to assign the permissions to access the application, follow CyberArk's instructions to build the environment for the Credential Provider in the PVWA.
The aim here is to give the right permissions to:
- the AAM user, by default named
Prov_{Credential Provider machine name}, meant to enable the Credential Provider to authenticate to the vault and retrieve passwords; - the application, via its AppID.
Configure Usercube
Connect Usercube to CyberArk by adding to the agent's appsettings.json file a specific section.
For example:
appsettings.json

{
  ...
  "CyberArk": {
      "UseCyberArkSetting": true,
      "SafeName": "safeName",
      "ApplicationId" : "appId",
      "Server" : "serverUrl",
      "File": "certificateFilePath",
      "Password": "certificatePassword",
      "DistinguishedName": "certificateSubjectDistinguishedName",
      "Thumbprint": "certificateThumbprint",
      "StoreName": "certificateStoreName",
      "StoreLocation": "certificateStoreLocation"
  },
  ...
}
Vault settings
| Name | Details |
|---|---|
| UseCyberArkSetting default value: False | Type Boolean Description True to enable the CyberArk Provider for Usercube. |
| SafeName required | Type String Description Name of the safe containing the accounts used by Usercube. |
| ApplicationId required | Type String Description Application ID of the application that can access the safe. |
| Server required | Type String Description URL configured for the CyberArk Vault. It is recommended to use HTTPS for security purposes. Note: the Server attribute is only used with the CyberArk Central Credential Provider (Agentless AAM). |
Certificate settings
Certificate settings are only used with the Central Credential Provider (agentless AAM). They set the location of the public key certificate and the private key used by the agent to handle encrypted network communications with CyberArk.
This information can be set one of two ways:
-
As a Public Key Cryptography Standards (PKCS) #12 archive (also called Personal Information Exchange file or
.pfxfile) stored in the Agent's host file system. The archive contains both the public key certificate and the private key. -
As a certificate from a Windows' certificate store identified by SubjectDistinguishedName or by Thumbprint. The Windows certificate also contains both the public key certificate and the private key.
NETWRIX recommends using Windows' certificate store.
On the other hand, the PFX file takes priority over Windows' certificate, which means that when
Fileis specified then the PFX certificate is used, even if the options for Windows' certificate are specified too.In both ways, missing and/or incorrect settings trigger an error and no certificate is loaded.
As a PFX file
For example:
appsettings.json

{
  ...
  "CyberArk": {
    "UseCyberArkSetting": true,
    "SafeName": "safeName",
    "ApplicationId" : "appId",
    "Server" : "serverUrl",
    "File": "C:/identitymanagerAgentContoso/contoso.pfx",
    "Password": "oarjr6r9f00"
  },
  ...
}
The archive is set using the following attributes:
| Name | Details |
|---|---|
| File required | Type String Description PKCS #12 archive path on the host file system. |
| Password optional | Type String Description PKCS #12 archive password. Info: storing a .pfx file's password in plain text in a production environment is strongly discouraged. It should always be encrypted using the Usercube-Protect-CertificatePassword.exe tool. |
As a Certificate in the Windows Store
For example:
appsettings.json

{
  ...
  "CyberArk": {
    "UseCyberArkSetting": true,
    "SafeName": "safeName",
    "ApplicationId" : "appId",
    "Server" : "serverUrl",
    "DistinguishedName": "CN=contoso, OU=Biz, O=Contoso, L=Marseille, S=MA, C=FR",
    "StoreName": "My",
    "StoreLocation": "LocalMachine"
  },
  ...
}
The Windows certificate is set using these attributes:
| Name | Details |
|---|---|
| DistinguishedName optional | Type String Description SubjectDistinguishedName of the store certificate. Note: required when Thumbprint is not specified. |
| Thumbprint optional | Type String Description Thumbprint of the store certificate. Note: required when DistinguishedName is not specified. |
| StoreLocation required | Type String Description Location of the relevant Windows certificate store: LocalMachine or CurrentUser. |
| StoreName required | Type String Description Name of the relevant Windows certificate store. |
Usercube's CyberArk Vault
Once configured, Usercube retrieves the sensitive values from CyberArk via the
appsettings.cyberArk.agent.json file.
In this file:
- the keys must follow the same structure as in the Connections of the
appsettings.agent.jsonfile; - the values are the names of the accounts created before.
The following example saves in CyberArk the credentials for
AD_Export, with the accountsAdAccountandAdServer2:appsettings.cyberArk.agent.json
{
"Connections": {
"AD_Export": {
"Login": "AdAccount",
"Password": "AdAccount",
"Servers": [
{
"Server": "AdAccount"
},
{
"Server": "AdServer2"
}
]
}
}
}Thus, when launching a job via the
AD_Exportconnection, Usercube gets the values forLogin,PasswordandServerfrom CyberArk, and the others fromappsettings.agent.json.
After updating appsettings.cyberArk.agent.json, the agent must be restarted for the changes to
take effect.
To get a given property's value, Usercube reads first the section in
appsettings.cyberArk.agent.json for the appropriate connection. Only if the property is not listed
here will Usercube read the corresponding section in appsettings.agent.json to find it.
Thus, when a property is listed in both appsettings files, the value from the CyberArk vault takes priority over the one from the usual appsettings file.
Agent Configuration
Usercube Agent's configuration includes connection information to the managed systems and to the Server. Protection of sensitive credentials can be achieved through RSA encryption, storing information within a CyberArk Vault, or using an Azure Key Vault safe.
Configuration Files
The Agent configuration uses two sets of settings: the agent appsettings set and the appsettings.agent set.
- The appsettings set is written either to the Agent's working directory appsettings.json file or as environment variables.
- The appsettings.agent set is written as environment variables or to the appsettings.agent.json files from the Agent's working directory.
- There are two additional files involved in the Agent's configuration to protect sensitive data: appsettings.encrypted.agent.json and appsettings.cyberark.agent.json.
Protect Credentials
Managed system credentials are sensitive information. Usercube offers three strategies to protect sensitive data.
RSA encryption
Any Agent configuration setting value can be encrypted using Usercube-Protect-X509JsonValue and
Usercube-Protect-X509JsonFile tools. An encrypted value is then written to the
appsettings.encrypted.agent.json
file.
It means that any sensitive setting value that the user chooses to protect this way won't be written to the appsettings.agent.json file but to the appsettings.encrypted.agent.json file.
CyberArk Vault
Any Agent configuration setting value can be encrypted using Usercube's CyberArk integration.
To put it simply, any sensitive setting value that the user chooses to protect this way won't be written to the appsettings.agent.json file but stored within a CyberArk Vault.
Azure Key Vault safe
Any Agent configuration setting value can be encrypted using Usercube's Azure Key Vault integration.
To put it simply, any sensitive setting value that the user chooses to protect this way won't be written to the appsettings.agent.json file but stored within an Azure Key Vault safe.
Merge Priority
Because of the credential protection system, the Agent connection information to managed systems can be written to the following configuration sources:
- The appsettings.agent.json file which contains plain text, non-encrypted setting information.
- The appsettings.encrypted.agent.json file which contains encrypted setting information.
- An Azure Key Vault safe (see azure key vault).
- A CyberArk__Vault referenced by the appsettings.cyberark.agent.json file.
- The appsettings.connection.json file.
Each configuration source is loaded one after the other, in the following order:
- appsettings.agent.json
- appsettings.encrypted.agent.json
- Azure Key Vault safe
- CyberArk Vault
- appsettings.connection.json
If a json key is defined in multiple configuration source, only the last loaded json key is preserved to build the final configuration.
RSA Encryption
Usercube provides a few options to protect sensitive data via RSA encryption.
Overview
Sensitive data can be RSA encrypted by using Usercube's tools:
-
Usercube-Protect-X509JsonValue.exeto encrypt given values; -
Usercube-Protect-X509JsonFile.exeto encrypt a whole file.The file encryption tool should be used only on files that contain only plain text values, not already encrypted ones.
Once encrypted, sensitive values can be added to the appsettings.encrypted.json and
appsettings.encrypted.agent.json files. Usercube will read first the values from the encrypted
appsettings files, before reading those from the usual non-encrypted appsettings files.
These methods require an X.509 public key certificate (the same for the encrypted appsettings files and the tools).
The value encryption tool can be used to encrypt specific values to be added to the encrypted appsettings files without having to encrypt the whole files again.
Focus on the Encrypted Appsettings Files
The appsettings.encrypted.json and appsettings.encrypted.agent.json files contain respectively
the appsettings.json and appsettings.agent.json files' sensitive setting values which are
protected by RSA encryption.
These files follow the exact same structure as the agent's configuration files.
Read the Encrypted Files
Usercube can use an RSA decoding algorithm fed by a public-key certificate in order to read the encrypted application settings.
This requires the usual appsettings file(s) to have UseEncryptedAppsettings set to true. See
below.
appsettings.json and/or appsettings.agent.json

{
    ...
    "EncryptionCertificate": {
        "File": "./identitymanager.pfx",
        "Password": "secret",
        "UseEncryptedAppsettings": true
    }
}
This way, values from the encrypted file take priority over the values from the non-encrypted appsettings files.
For example, if
Passwordexists in both the encrypted file and the non-encrypted file, then the value from the encrypted file is used.