Entitlement Assignment
Assigning entitlements means giving users specific permissions, or access rights, etc.
Overview
As Usercube relies on a role-based assignment policy, entitlement assignment is simply role assignment. See more details.
So once a user is assigned a role, Usercube must make the right changes in the managed system(s) to actually enable the corresponding permission. The values to be changed in the managed systems are specified in provisioning orders.
Hence, an entitlement assignment is both the result of the execution of a provisioning order, and the enablement of an access right.
Automatic vs. Manual
Within Usercube, assignments can be created automatically, or can result from manual requests.
Automatic assignments are created by Usercube when evaluating the policy, i.e. when computing expected assignments based on existing users and the policy's roles and rules. Automatic assignments can either:
- result directly from the application of assignment rules on identities;
- be inferred, cascading, from another assignment.
Manual assignments and derogations are, on the other hand, requested individually through the UI.
Assignments' Approval Workflow
Some entitlements require the approval of one or several knowledgeable users before actually being assigned. This is standard procedure in many security-concerned organizations.
This is configurable through the role's or resource type's approval workflow type.
Each step of the approval workflow is associated with a workflow state, so that all assignments can be tracked and it is clear what step they are at.
All workflow states are detailed in the database schema of assigned roles or resource types, etc.
The same approval workflow is used for requests to add or remove roles.
For example, Ms. Jackson requests for Mr. Smith the single role
Server Room Accesswhich has a two-step approval workflow:
- At the end of the workflow, the assigned role has the workflow state
Requested.- Once the assignment is processed, the workflow state switches to
Pending Approval 1/2.- Once a reviewer approves the assignment, the state switches to
Pending Approval 2/2(and if the reviewer declined the assignment, the state would switch toDeclined).- Once a second reviewer approves the assignment, the stat switches to
Approvedand the assignment is finally effective.
Provisioning state
In addition to the workflow state that represents an assignment's progress in the approval workflow, any assignment also has a provisioning state to represent its progress in its lifetime from creation in the database to provisioning to the managed system and to its eventual deletion.
Contrary to the workflow state that concerns all assignments, the provisioning state is only about the assignments that need provisioning.
For example, roles exist only in Usercube and not in the managed systems, so assigned roles do not have a provisioning state, unlike assigned resource types, scalars and navigations, etc.
The following schema sums up the usual progress of an assignment's provisioning state:
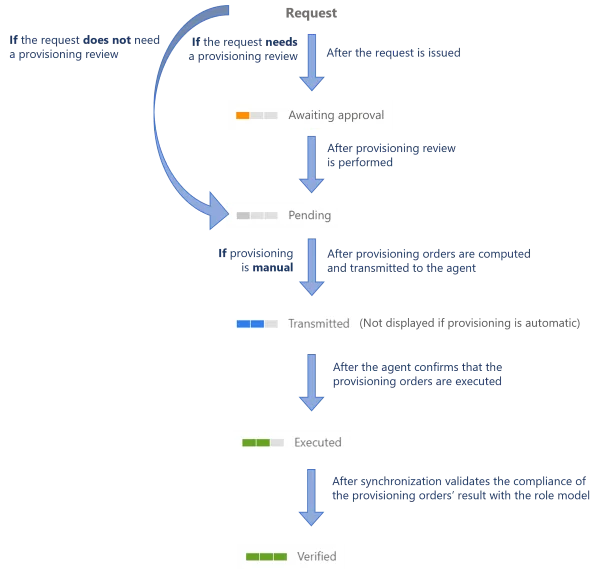
All provisioning states are detailed in the database schema of assigned resource types, etc.
For example, once Mr. Smith's role has completed the approval steps, we expect the provisioning of a navigation property:
- It is not yet ready for provisioning because we decided to add a provisioning review by a knowledgeable user because it is a sensitive permission, so the assigned resource navigation has the
Awaiting Approvalprovisioning state.- Once a reviewer approves the assignment, the provisioning state switches to
Pending.- Once provisioning orders are computed and transmitted to the agent, the state switches to
Transmitted.- Once the agent confirms that the related order is executed, the state switches to
Executed.- Once synchronization validates the consistency of the provisioned value with the policy, the state finally switches to
Verified.
Assignments whose provisioning orders are blocked because they are Awaiting Approval are to be
reviewed on the Provisioning Review screen.
Non-Conforming Assignments
Once a policy is configured with all its rules and roles, Usercube can combine it with user information in order to determine the expected assignments, i.e. the list of all assignments that comply with the policy.
On the other hand, via synchronization Usercube can read the existing assignments, i.e. the list of all assignments that actually exist in the managed systems.
Technically speaking, Usercube creates entitlements in the managed systems, and "translates" them into role model language. In other words, Usercube create assignments based on the entitlements found in the systems.
A simple comparison between these two lists defines the non-conforming assignments, i.e. the list of all assignments that do not comply with the policy.
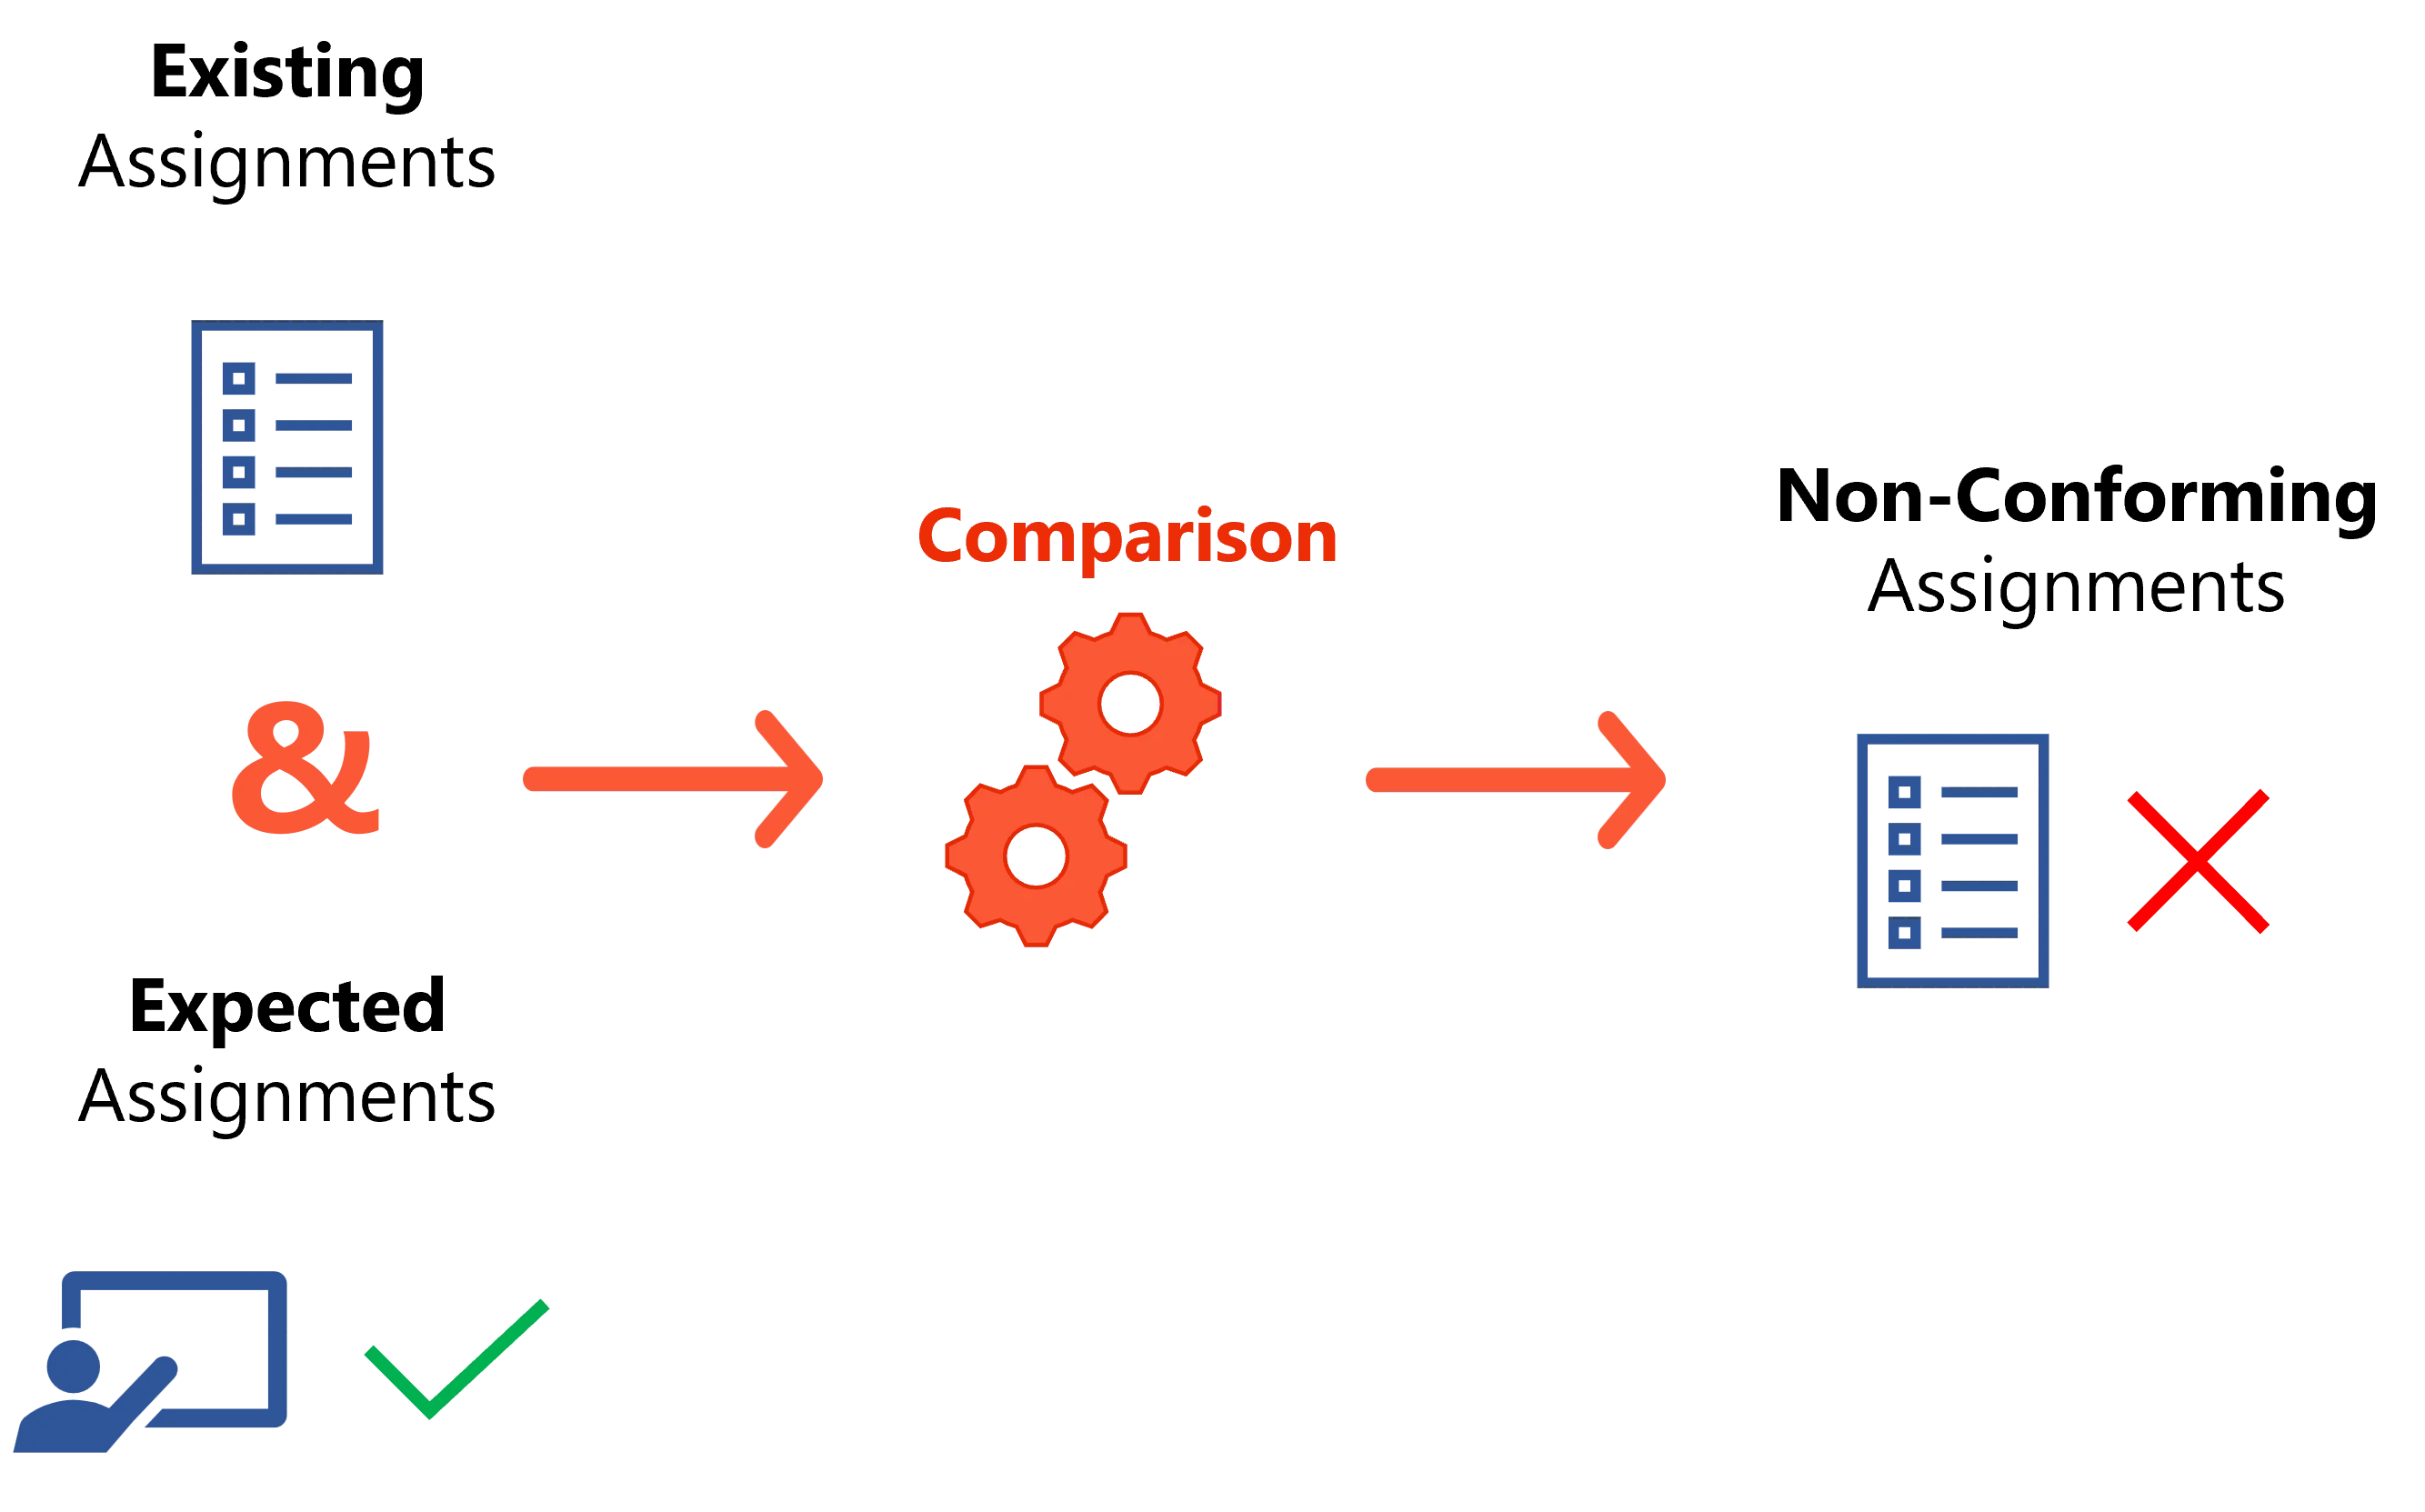
A non-conforming assignment must be reviewed in Usercube by a knowledgeable user, and is therefore:
- either removed if Usercube correctly spotted it and the owner should indeed not possess this permission;
- or kept as an exception if the configured rules do not apply to this particular case.
Non-conforming assignments are to be reviewed on the Role Reconciliation and/or Resource Reconciliation screens.
See more details on reconciliation.
Non-conforming assignments can still be split into two categories:
- pre-existing when they are found during the very first synchronization because they existed before Usercube's implementation;
- simply non-conforming when they are found later.
For example, consider a (navigation) rule stating that the
QuickBooks Level 1 Accessrole entitles its owner to theActive Directory QuickBooksgroup membership, that enables them to access the organization accounting balance information through QuickBooks.Now, let's say synchronization finds the
Active Directory QuickBooksgroup membership for Mr. Smith's Active Directory account. The trouble is, Mr. Smith digital identity has not bee assigned theQuickBooks Accessrole: this is an inconsistency.In order to fix the inconsistency, Usercube creates the assignment of this role to Mr. Smith to be reviewed by a knowledgeable user who can determine whether the assignment is legitimate or results from a mistake.
Review automation
Usercube provides automation rules to automate the review of non-conforming assignments by automatically approving/declining assignments that were pending approval for some time, if this behavior is desired.
For example, the single role
Server Room Accessis requested for Mr. Smith, with a two-step approval workflow. Ms. Jackson is supposed to review it, and then Mr. Jones. If Ms. Jackson takes too long, an automation can approve it, or most likely decline it, automatically. This way, the approval process ends and will need to be restarted at a later date if the need is genuine.
Resource Type Assignments
Resource types are not as intuitive as roles because they are more complex and subtle. Assigning a resource type materializes:
- the creation of a resource, usually an account, in the managed system;
- the creation of scalar and navigation properties for this new resource;
- the categorization of the created resource, which means both the correlation of the resource to an owner, and the classification of the resource into a specific type with specific rules between owner and owned resources.
Reconciliation
Just like any other assignment, a resource type assignment can be non-confirming when the resource's existence or its values do not comply with the policy.
For example, a SAP account is found for a user who should not have one according to the role model's rules.
An account can also be an orphan when it is found in the managed system, but no owner could be correlated.
Consolidated states
A resource type assignment also has consolidated workflow and provisioning states to represent the progress of the resource's scalar and navigation assignments.
Same as previously, the consolidated provisioning state represents the provisioning progress of the resource type assignment together with its nested scalar/navigation assignments.
The consolidated workflow state represents the provisioning progress of the resource type assignment together with its nested scalar/navigation assignments, and it is described by the following values:
-
ConsolidatedWorkflowReviewStaterepresents the progress in the approval workflow for a manual assignment;Except for very technical use cases, resource types should not be requested manually, they should only be inferred by a role and thus assigned automatically.
-
ConsolidatedWorkflowBlockedStateindicates whether one or more of the nested scalars/navigations are blocked; -
ConsolidatedWorkflowFoundStateindicates whether one or more of the nested scalars/navigations are stated as non-conforming or pre-existing.
All consolidated workflow and provisioning states are detailed in the database schema of assigned resource types.
Existing Assignments
The Compute Role Model task can deduce from synchronized data a list of assignments for every identity.
Overview
One of the main responsibilities of the Compute Role Model task is to translate data from the realm of the managed systems (such as accounts or groups) into the realm of roles.
The process results in a list of existing assignments, expressed as assigned roles, for every identity.
This is Usercube's first computation when deployed in an organization: assessing the current state of the managed system in order to suggest fixes.
The main process can be summed up as:
- Finding the owner
Oof a resourceRby applying correlation rules. - Deducing roles by applying provisioning rules (such as navigation or scalar) "in reverse". In
this step, Usercube tries to find the role that would have yielded a provisioning order for
resource
R, if assigned to identityO.
The following use cases can be encountered.
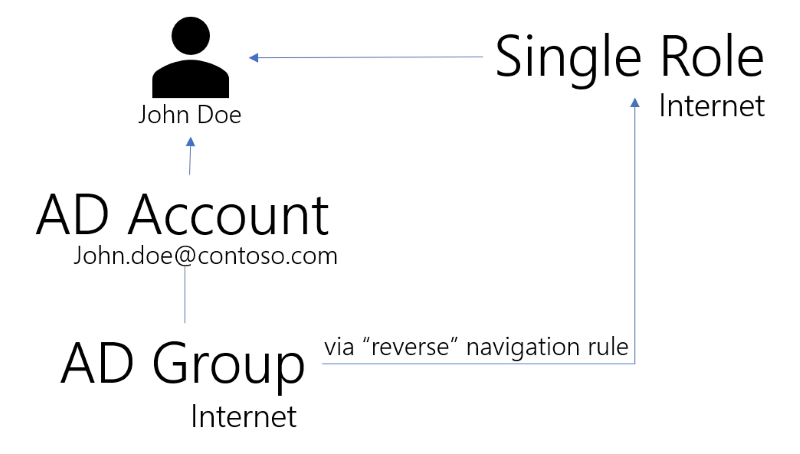
Use Case 1: One Group, One Role
This first use case involves a common role model situation: one single role represents one entitlement, for example an Active Directory group.
Let's study this use case with an example: a single role Internet is linked to an Active Directory
group Internet through a navigation rule N.

We are going to consider here an identity named John Doe, and his Active Directory account john.doe@contoso.com.
The most straightforward way to think about this role model is to consider the direct flow. This would happen if John Doe's account wasn't a member of the Internet group.
- Usercube performs the first synchronization, and correlates the nominative Active Directory account john.doe@contoso.com to John Doe.
- This account is not a member of the AD group Internet.
- A manager assigns the role to John Doe's identity using Usercube's UI.
- The Compute Role Model task applies the navigation rule
N. - A provisioning order for John Doe's Active Directory account becoming a member of the group Internet is issued.
This is a typical onboarding scenario for John Doe that happens to start a new job within the organization after Usercube was deployed.
Now, let's consider what happens for John Doe, if he started his job within the company before Usercube was ever deployed.
The initial situation is an identity, John Doe, and a "lonely" Active Directory account, john.doe@contoso.com.
This time, Usercube performs the "deduction" flow.
Usercube performs the first synchronization and tries to correlate accounts with identities. This results in finding out that John Doe is the owner of the Active Directory account john.doe@contoso.com. The synchronization also shows that the john.doe@contoso.com account is a member of the Internet Active Directory group.
The situation in Usercube database at this point is the following.

Integrators have defined the Internet single role and linked it to the Internet AD group through
the navigation rule N.
Now, the Compute Role Model task "studies" the role model: the only rule that assigns the Internet
Active Directory group is the navigation rule N. By following the rule in reverse, Usercube
deduces that the role Internet should de facto be assigned to John Doe, so that the rules be
consistent with the data found in the Active Directory.
The role is now listed under John Doe's assignment list (permissions) in Usercube.
Use Case 2: Several Groups, One Role
This second use case involves another common role model situation: one single role represents two or more entitlements. The single role is used here to package several Active Directory group assignments, for example, assignments which are always granted together to perform certain tasks.
For example, let Sales manager be a single role linked to the Active Directory groups operations
and sales through two navigation rules N1 and N2.
The "direct" flow here means that if John Doe is assigned the Sales manager role, Usercube fulfills the operations and sales group memberships for John Doe's Active Directory account.
Now, let's consider the reverse flow. If John Doe already had membership for the operations and
sales group before Usercube was deployed, the AD Synchronization will detect it. By applying N1
and N2 in reverse, Usercube deduces that John Doe must have the Sales manager single role.
His trusted advisor, Mary Webster, isn't a member of the operations group. She is only a member of
the sales group. Usercube applies N1 in reverse, but there is only one Single Role (Sales
manager) that grants the sales group membership. The only way for Mary to be granted the sales
group membership from the role model point-of-view is to have been granted the Sales manager role.
For Usercube, it is as if Mary had been assigned this role, but is missing the operations group.
That is exactly how it is materialized: the identity for Mary in Usercube will be assigned the
Sales manager role, and a missing group membership will come up in the provisioning review screen.
If the IGA administrator doesn't want Mary to be granted the Sales manager role and hence the operations group, another role must be created, that only grants the sales group but not the operations group.
Use Case 3: Several Groups, Several Roles
The third use case is a less common one, but can still be a little confusing.
Let's take two roles B and C.
Bgrants membership to two groups:AD1andAD2.CgrantsAD2andAD3.
This time, if only AD2 is found for a given user, no deduction can be made.
Generate Contexts
A context is a set of dimension-value pairs computed using the context rule or the combination of a context rule and the record sections if record sections are configured.
A context is used to compute the role assignments for an identity by verifying that the dimension-value pairs meet the role criteria.
Basic Context Generation
When using only a context rule without a record section, the context generation is straightforward: a set of dimension-value pairs is created by computing the value of the dimension bindings on the context rule.
For example, the following context rule defines guests' contexts based on their start date, end date, and company.
<ContextRule Identifier="ContextRuleForGuest" DisplayName_L1="ContextRuleForGuest" Policy="Default" ResourcesStartBinding="Directory_Guest:StartDate" ResourcesEndBinding="Directory_Guest:EndDate" SourceEntityType="Directory_Guest" BA="Directory_Guest:Company" />
Identity Context Generation
As described in identity management, identities are complex to model. Records were introduced to tackle this complexity by allowing multiple positions for the same identity.
Record sections go further by modeling the relationship between positions. Indeed with record sections, it is possible to define:
- what are the shared properties between all positions?
- what are the properties unique to each position?
- what happens when there is a time gap between two positions, should the previous be extended or should the future position be used to fill the gap?
- what happens when a position property value is not defined?
Before illustrating how the record sections can be configured to handle most cases of position management, here is the background situation for the examples that follow:
- A position is defined by a
JobTitle, aLocation, and aDepartment, all other properties belong to the identity and are shared between all positions. - Dimensions are
Category,JobTitle,Location, andDepartment. - Each position will have an
Id. Sxrepresents the start date of the position, and x is theIdof the position.Exrepresents the end date of the position, and x is theIdof the position.Csrepresents the contract start date.Cerepresents the contract end date.
The following configuration shows the context rule that will be used for the examples.
<ContextRule Identifier="ContextRuleUserToRecord" DisplayName_L1="ContextRuleUserToRecord" Policy="Default" ResourcesBinding="Records" ResourcesStartBinding="StartDate" ResourcesEndBinding="EndDate" B0="Directory_UserRecord:Department" B1="Directory_UserRecord:JobTitle" B2="Directory_UserRecord:Location" B3="Directory_UserRecord.Category" SourceEntityType="Directory_User" />
The context rule start/end dates bindings and expressions won't have any effect on the computation, they are overridden by the record sections dates properties.
Configuration of basic record sections
Default section:
<RecordSection Identifier="Directory_UserRecord_Default" DisplayName_L1="Contract Properties" SourceEntityType="Directory_User" ResourceEntityType="Directory_UserRecord" StartProperty="ContractStartDate" EndProperty="ContractEndDate">
</RecordSection>

Position record section:
<RecordSection Identifier="Directory_UserRecord_Position" DisplayName_L1="Position Properties" SourceEntityType="Directory_User" ResourceEntityType="Directory_UserRecord" StartProperty="StartDate" EndProperty="EndDate"> <Property Property="Department" ExtensionKind="None" /> <Property Property="Location" ExtensionKind="None" /> <Property Property="JobTitle" ExtensionKind="None" /></RecordSection>
The configuration above binds the position to the contract end date, meaning that a position without
an end date will take the end date of the contract. The properties of the position record section
cannot be propagated, meaning if a position does not have a Location it cannot take the Location
of the previous or future position.
The following image shows the positions of Mark Barn in a defined timeline.
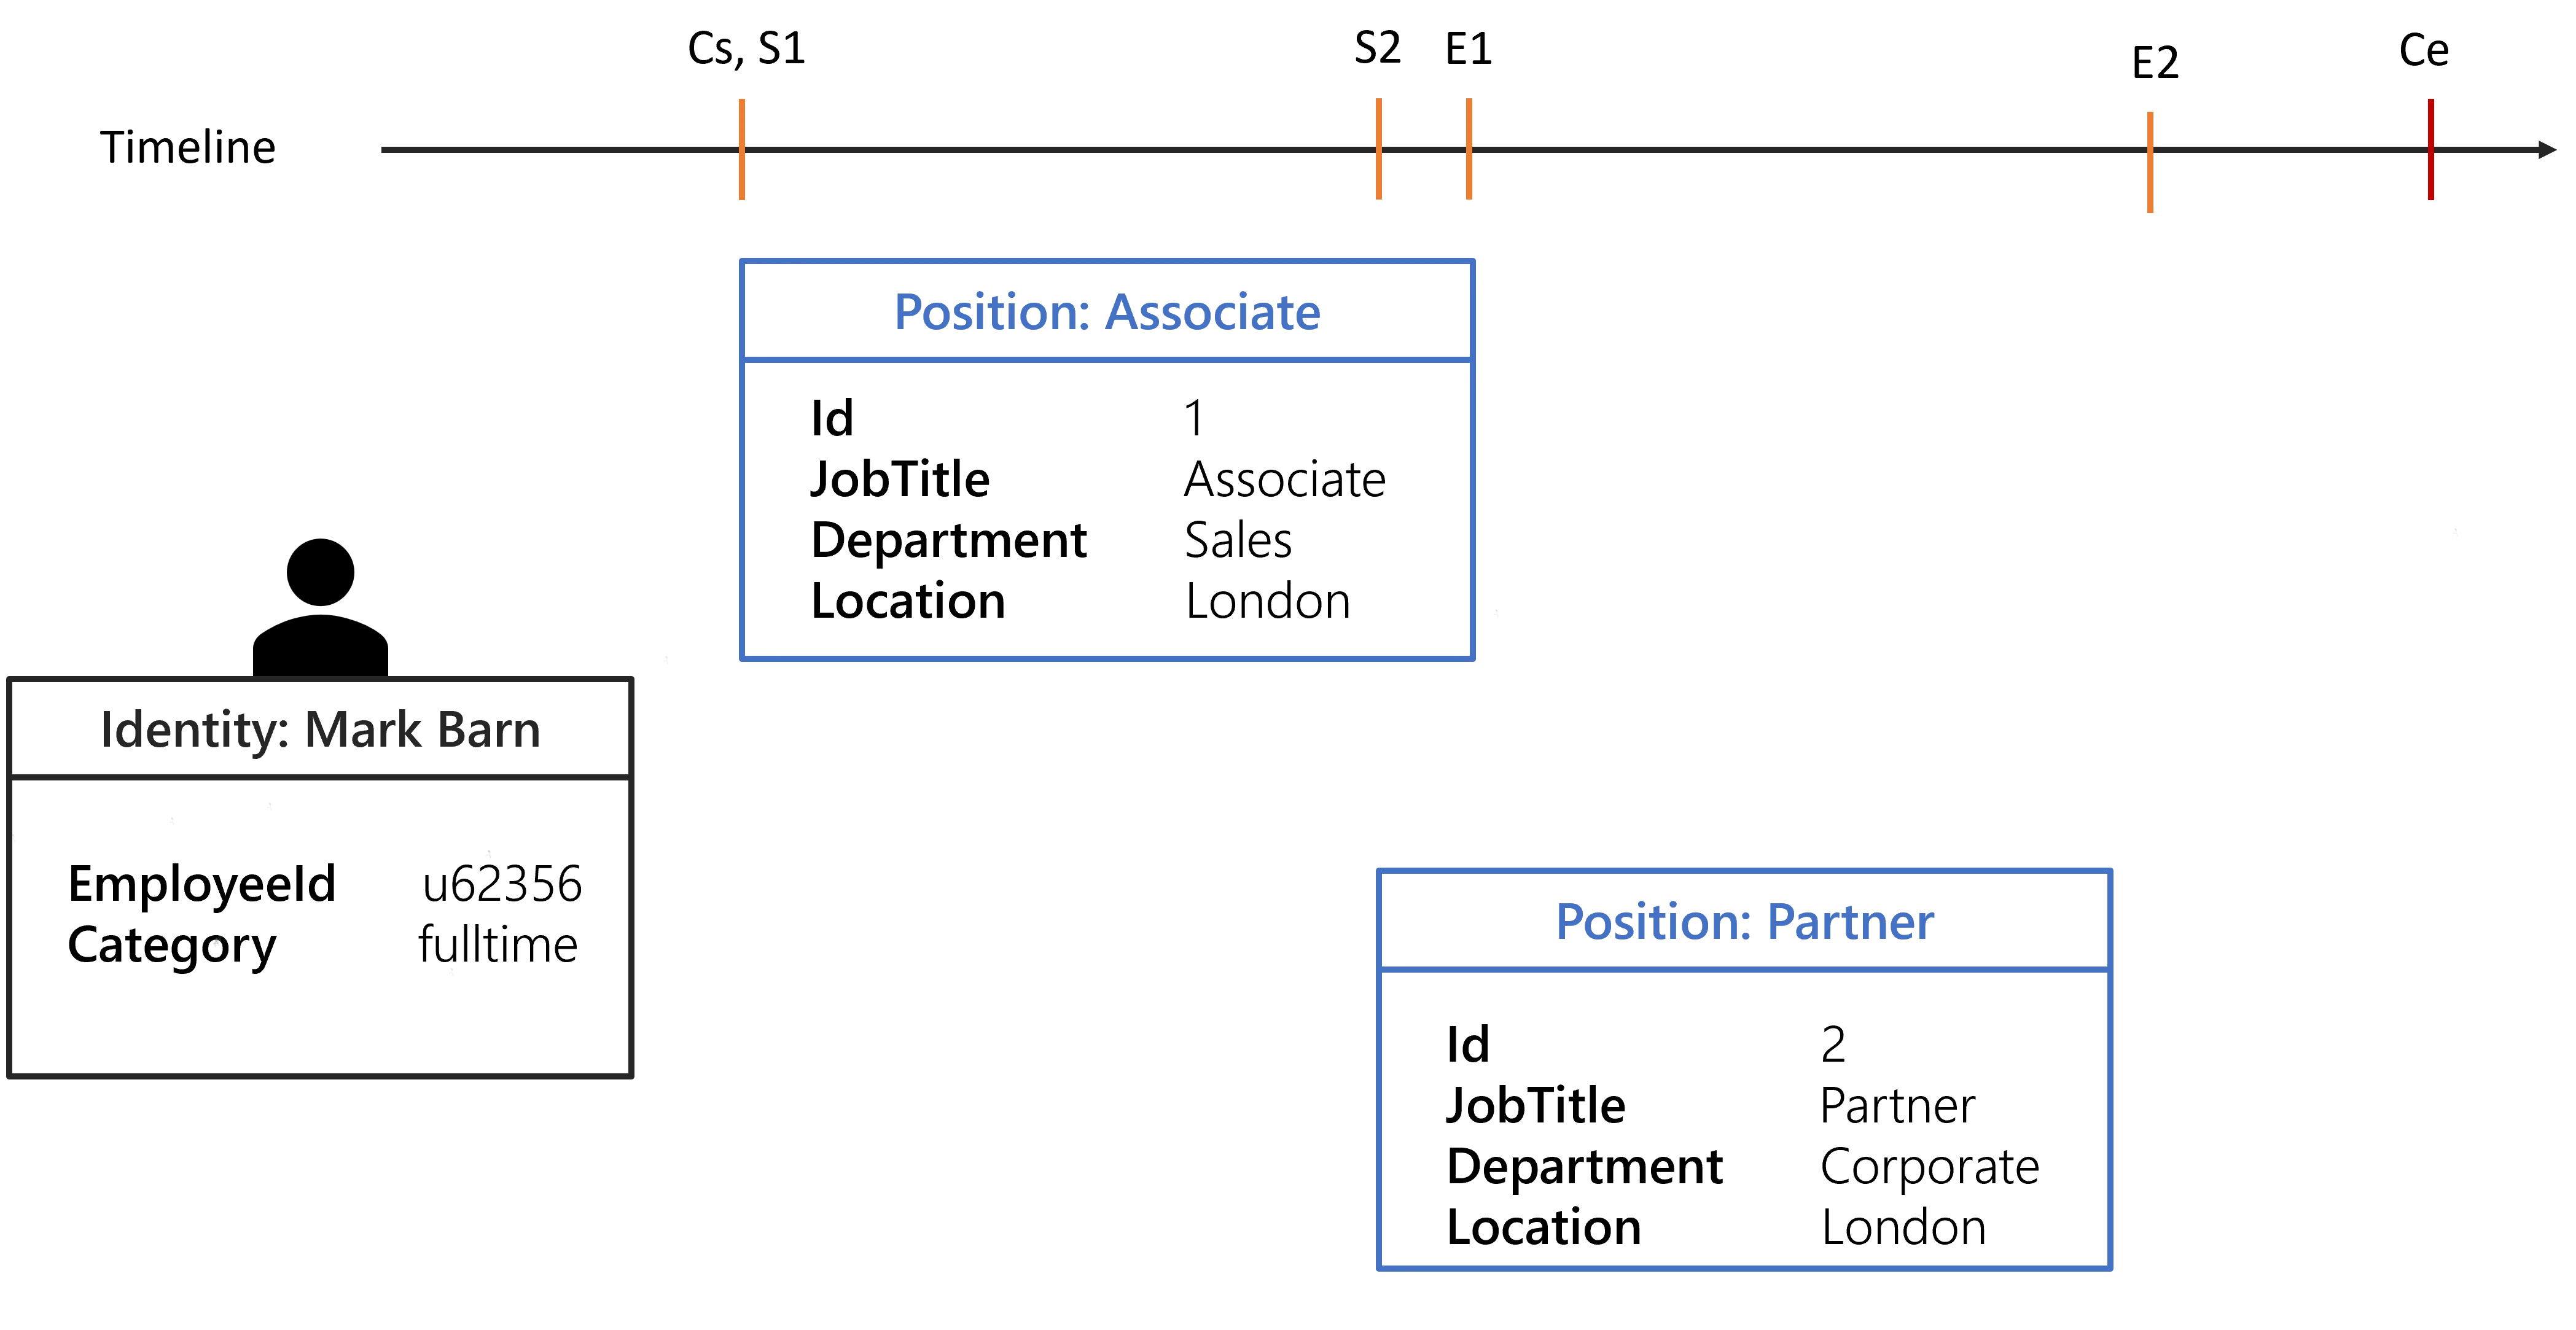
With the given configuration and the identity of Mark Barn, the following contexts are generated:
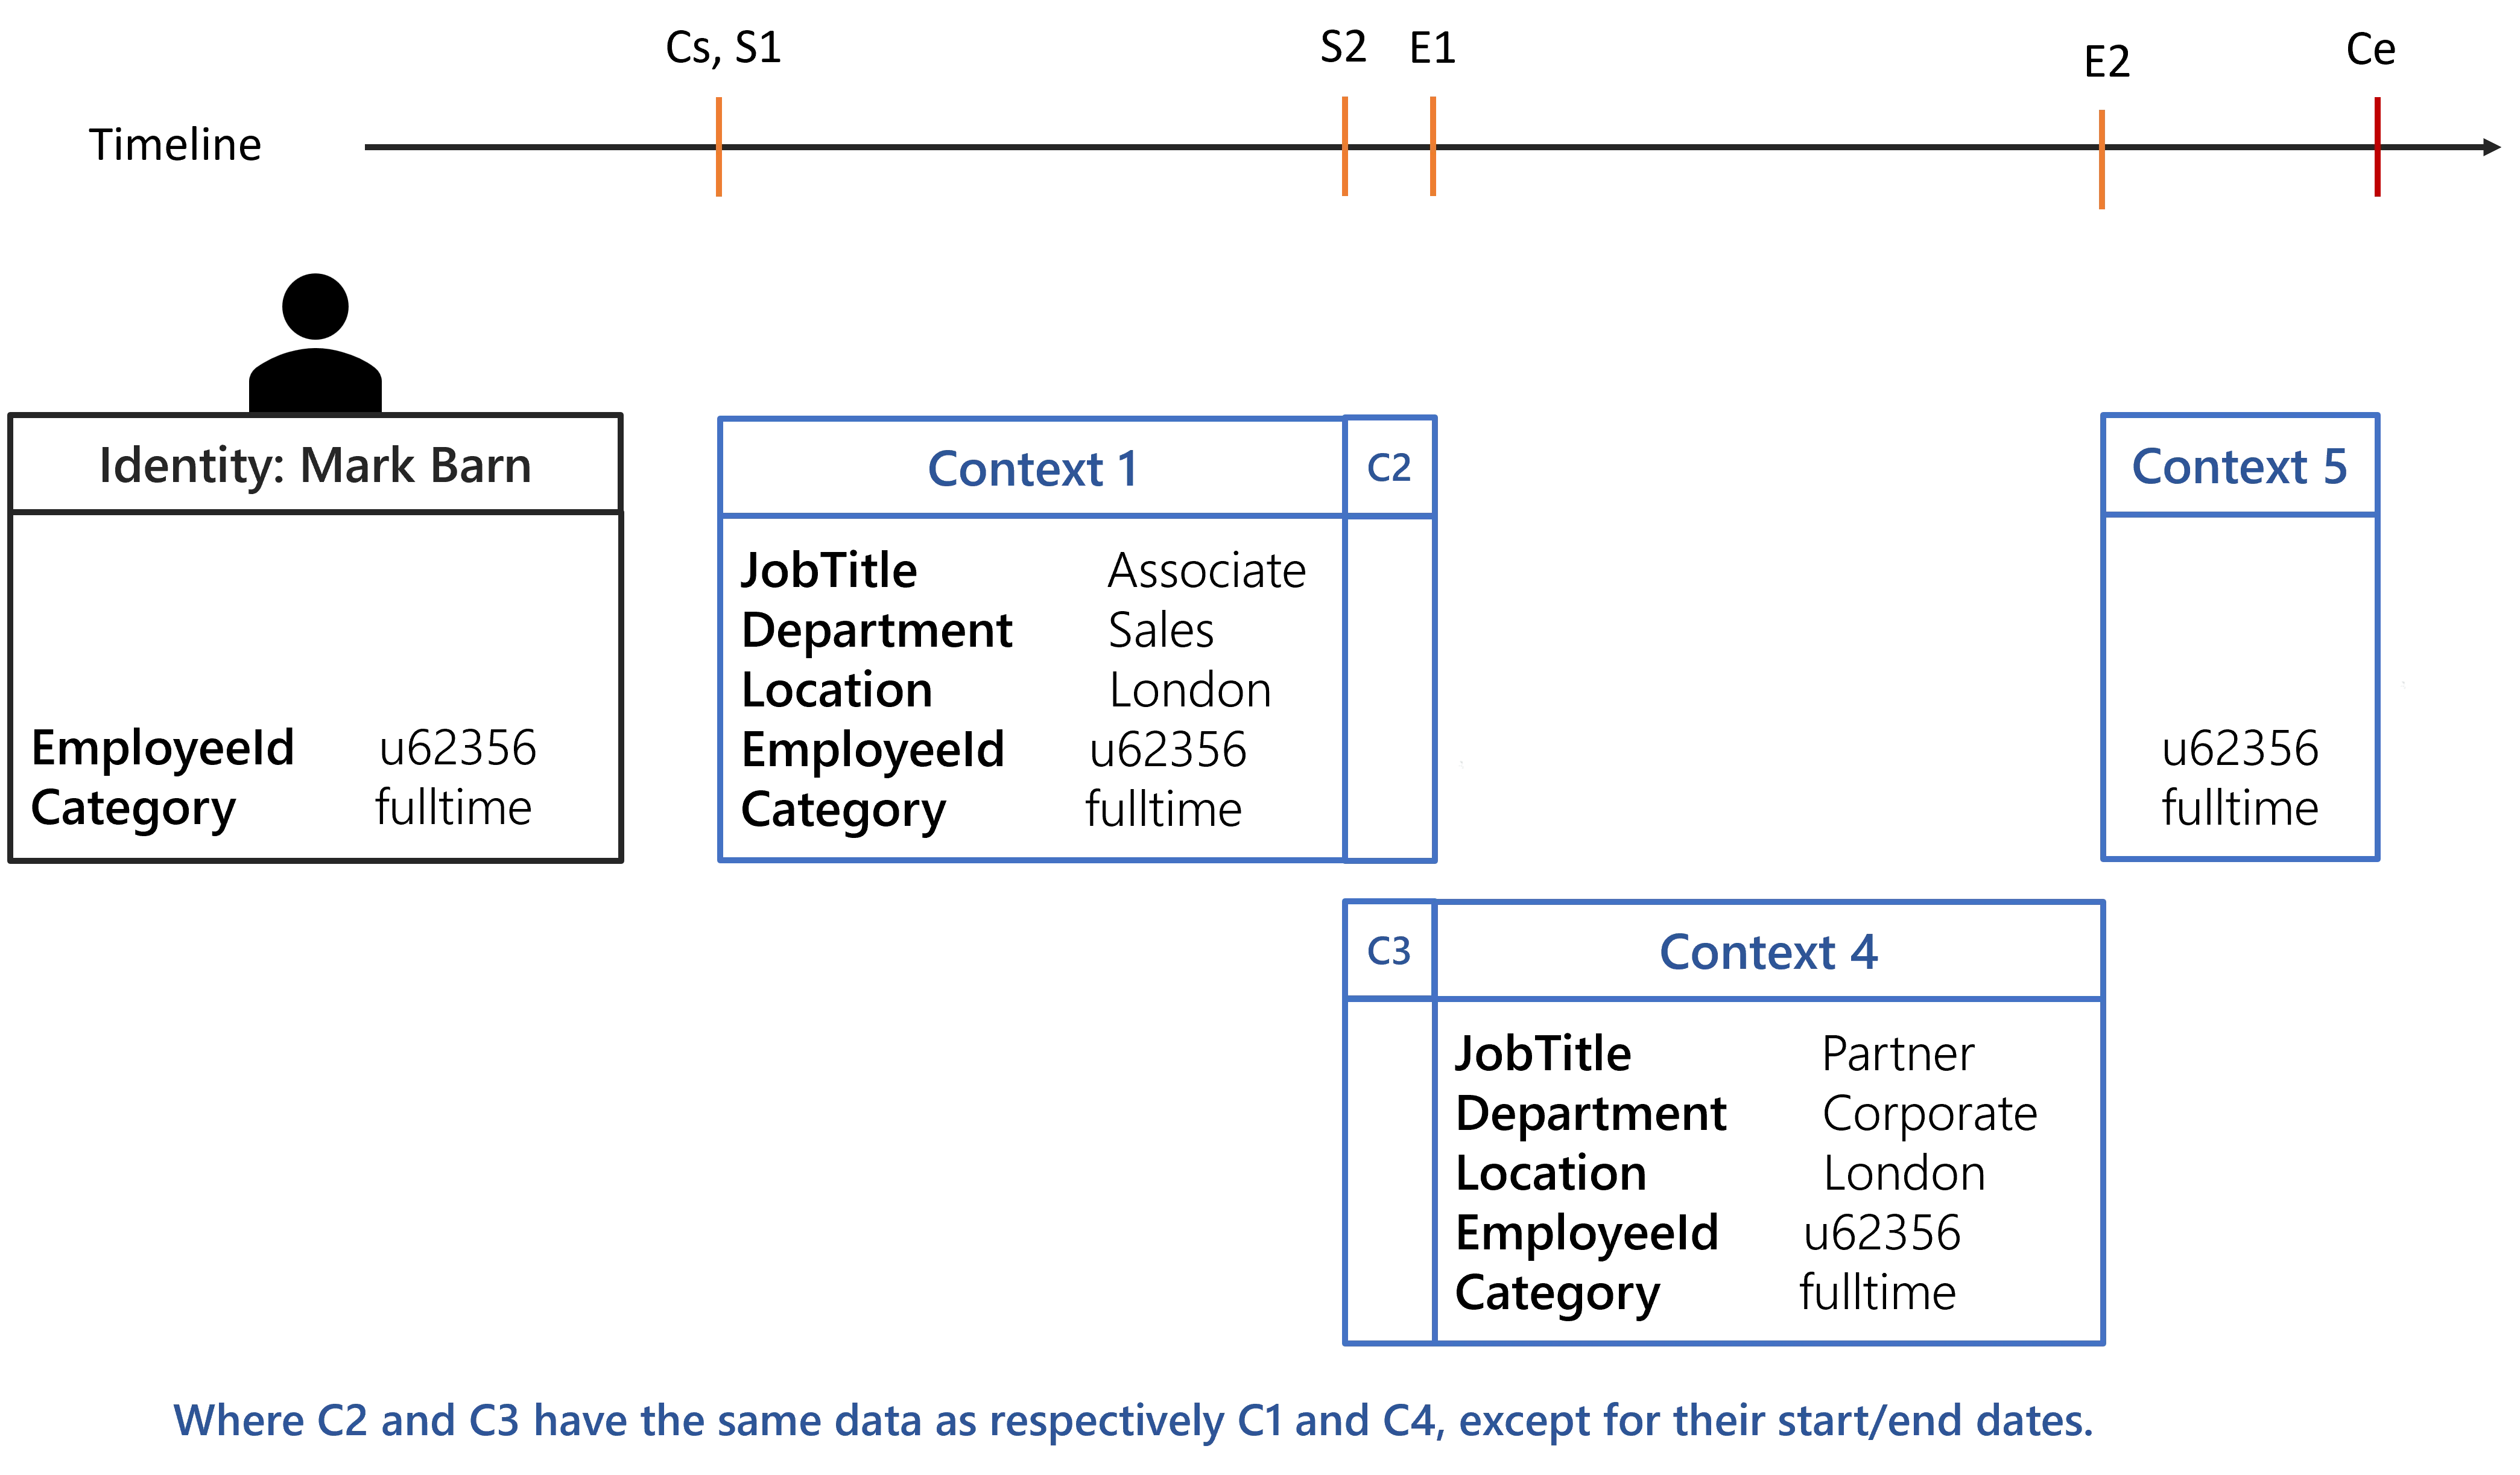
Each computed context will be used to create a set of dimension-value pairs, thus having 3 sets for the evaluate policy algorithm.
Any rules targeting identities with a fulltime Category will be assigned to Mark Barn from
Cs to Ce.
Any rules targeting identities working in London will be assigned to Mark Barn from S1 to
E2.
Any rules targeting all identities will be assigned to Mark Barn from Cs to E2 because from
E2 to Ce there isn't any position. This behavior can be overridden by specifying
ExtensionKind="None" on the Directory_UserRecord_Position section.
Configuration of a position extension
Extension of a property
The record sections can help extend some position property value when for some time the identity
does not have a position. For example, let's say that an identity can have multiple positions but
they must be in the same Location. So it is safe to configure the record sections to copy the
Location from a position if:
- the identity does not have a position for some time;
- for a position, the
Locationis not defined.
Here is the configuration needed to apply this policy.
Default section:
<RecordSection Identifier="Directory_UserRecord_Default" DisplayName_L1="Contract Properties" SourceEntityType="Directory_User" ResourceEntityType="Directory_UserRecord" StartProperty="ContractStartDate" EndProperty="ContractEndDate">
</RecordSection>

Position record section:
<RecordSection Identifier="Directory_UserRecord_Position" DisplayName_L1="Position Properties" SourceEntityType="Directory_User" ResourceEntityType="Directory_UserRecord" StartProperty="StartDate" EndProperty="EndDate"> <Property Property="Department" ExtensionKind="None" />
    <Property Property="Location" />
    <Property Property="JobTitle" ExtensionKind="None" /></RecordSection>
The ExtensionKind="None" was removed for the Location property.
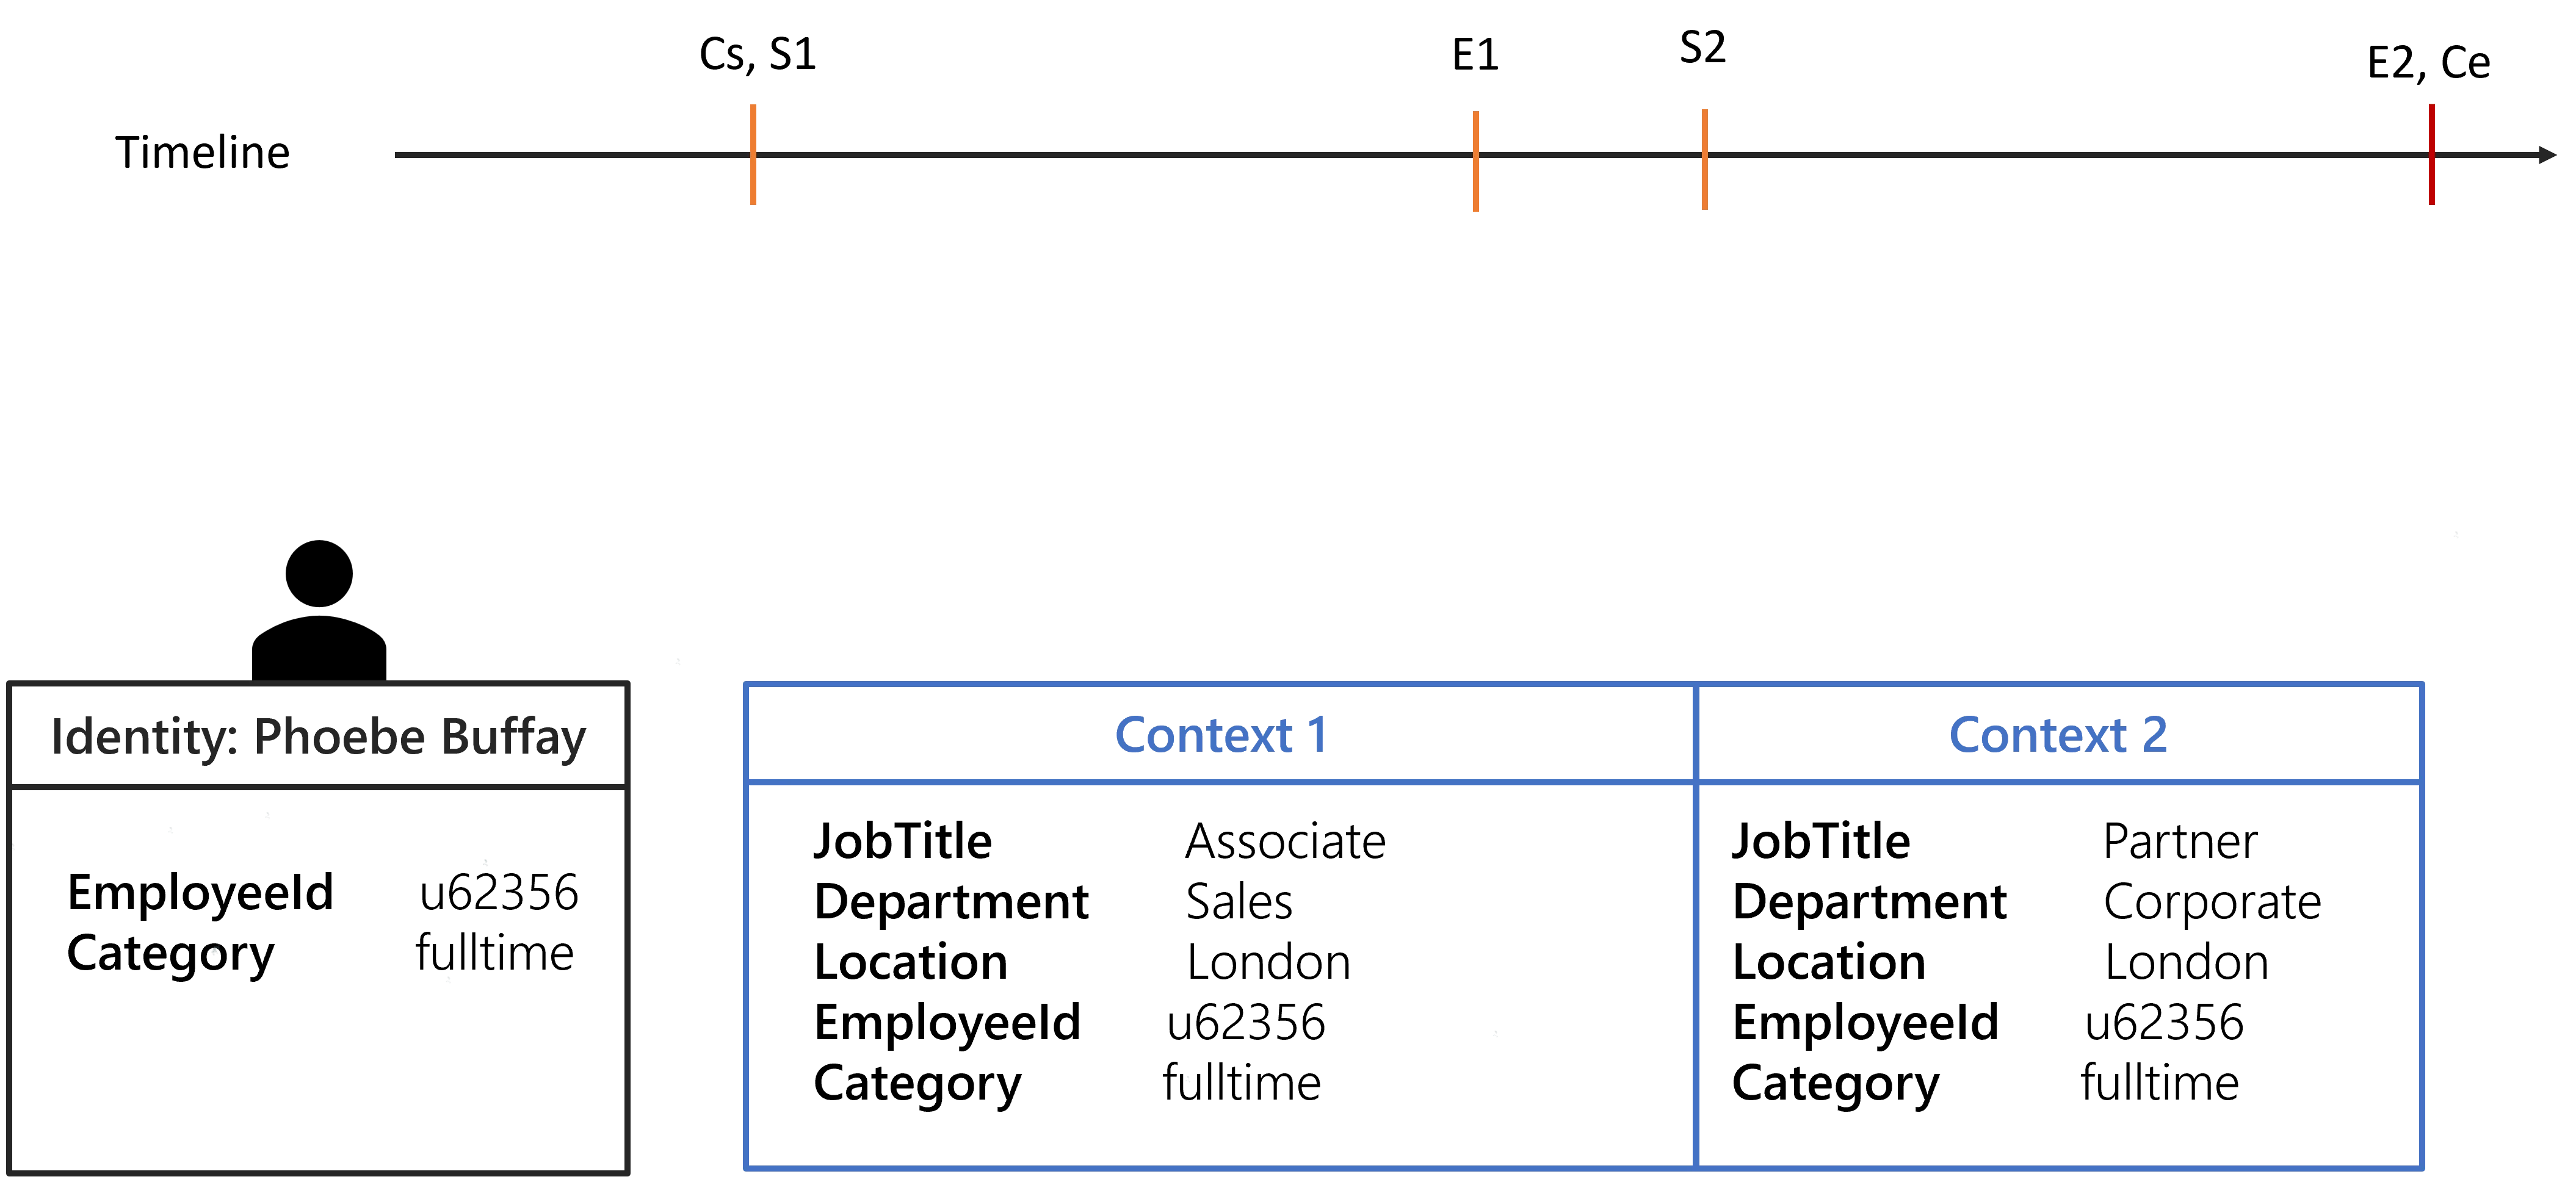
Using the identity of Mark Barn the computed contexts should be as followed:
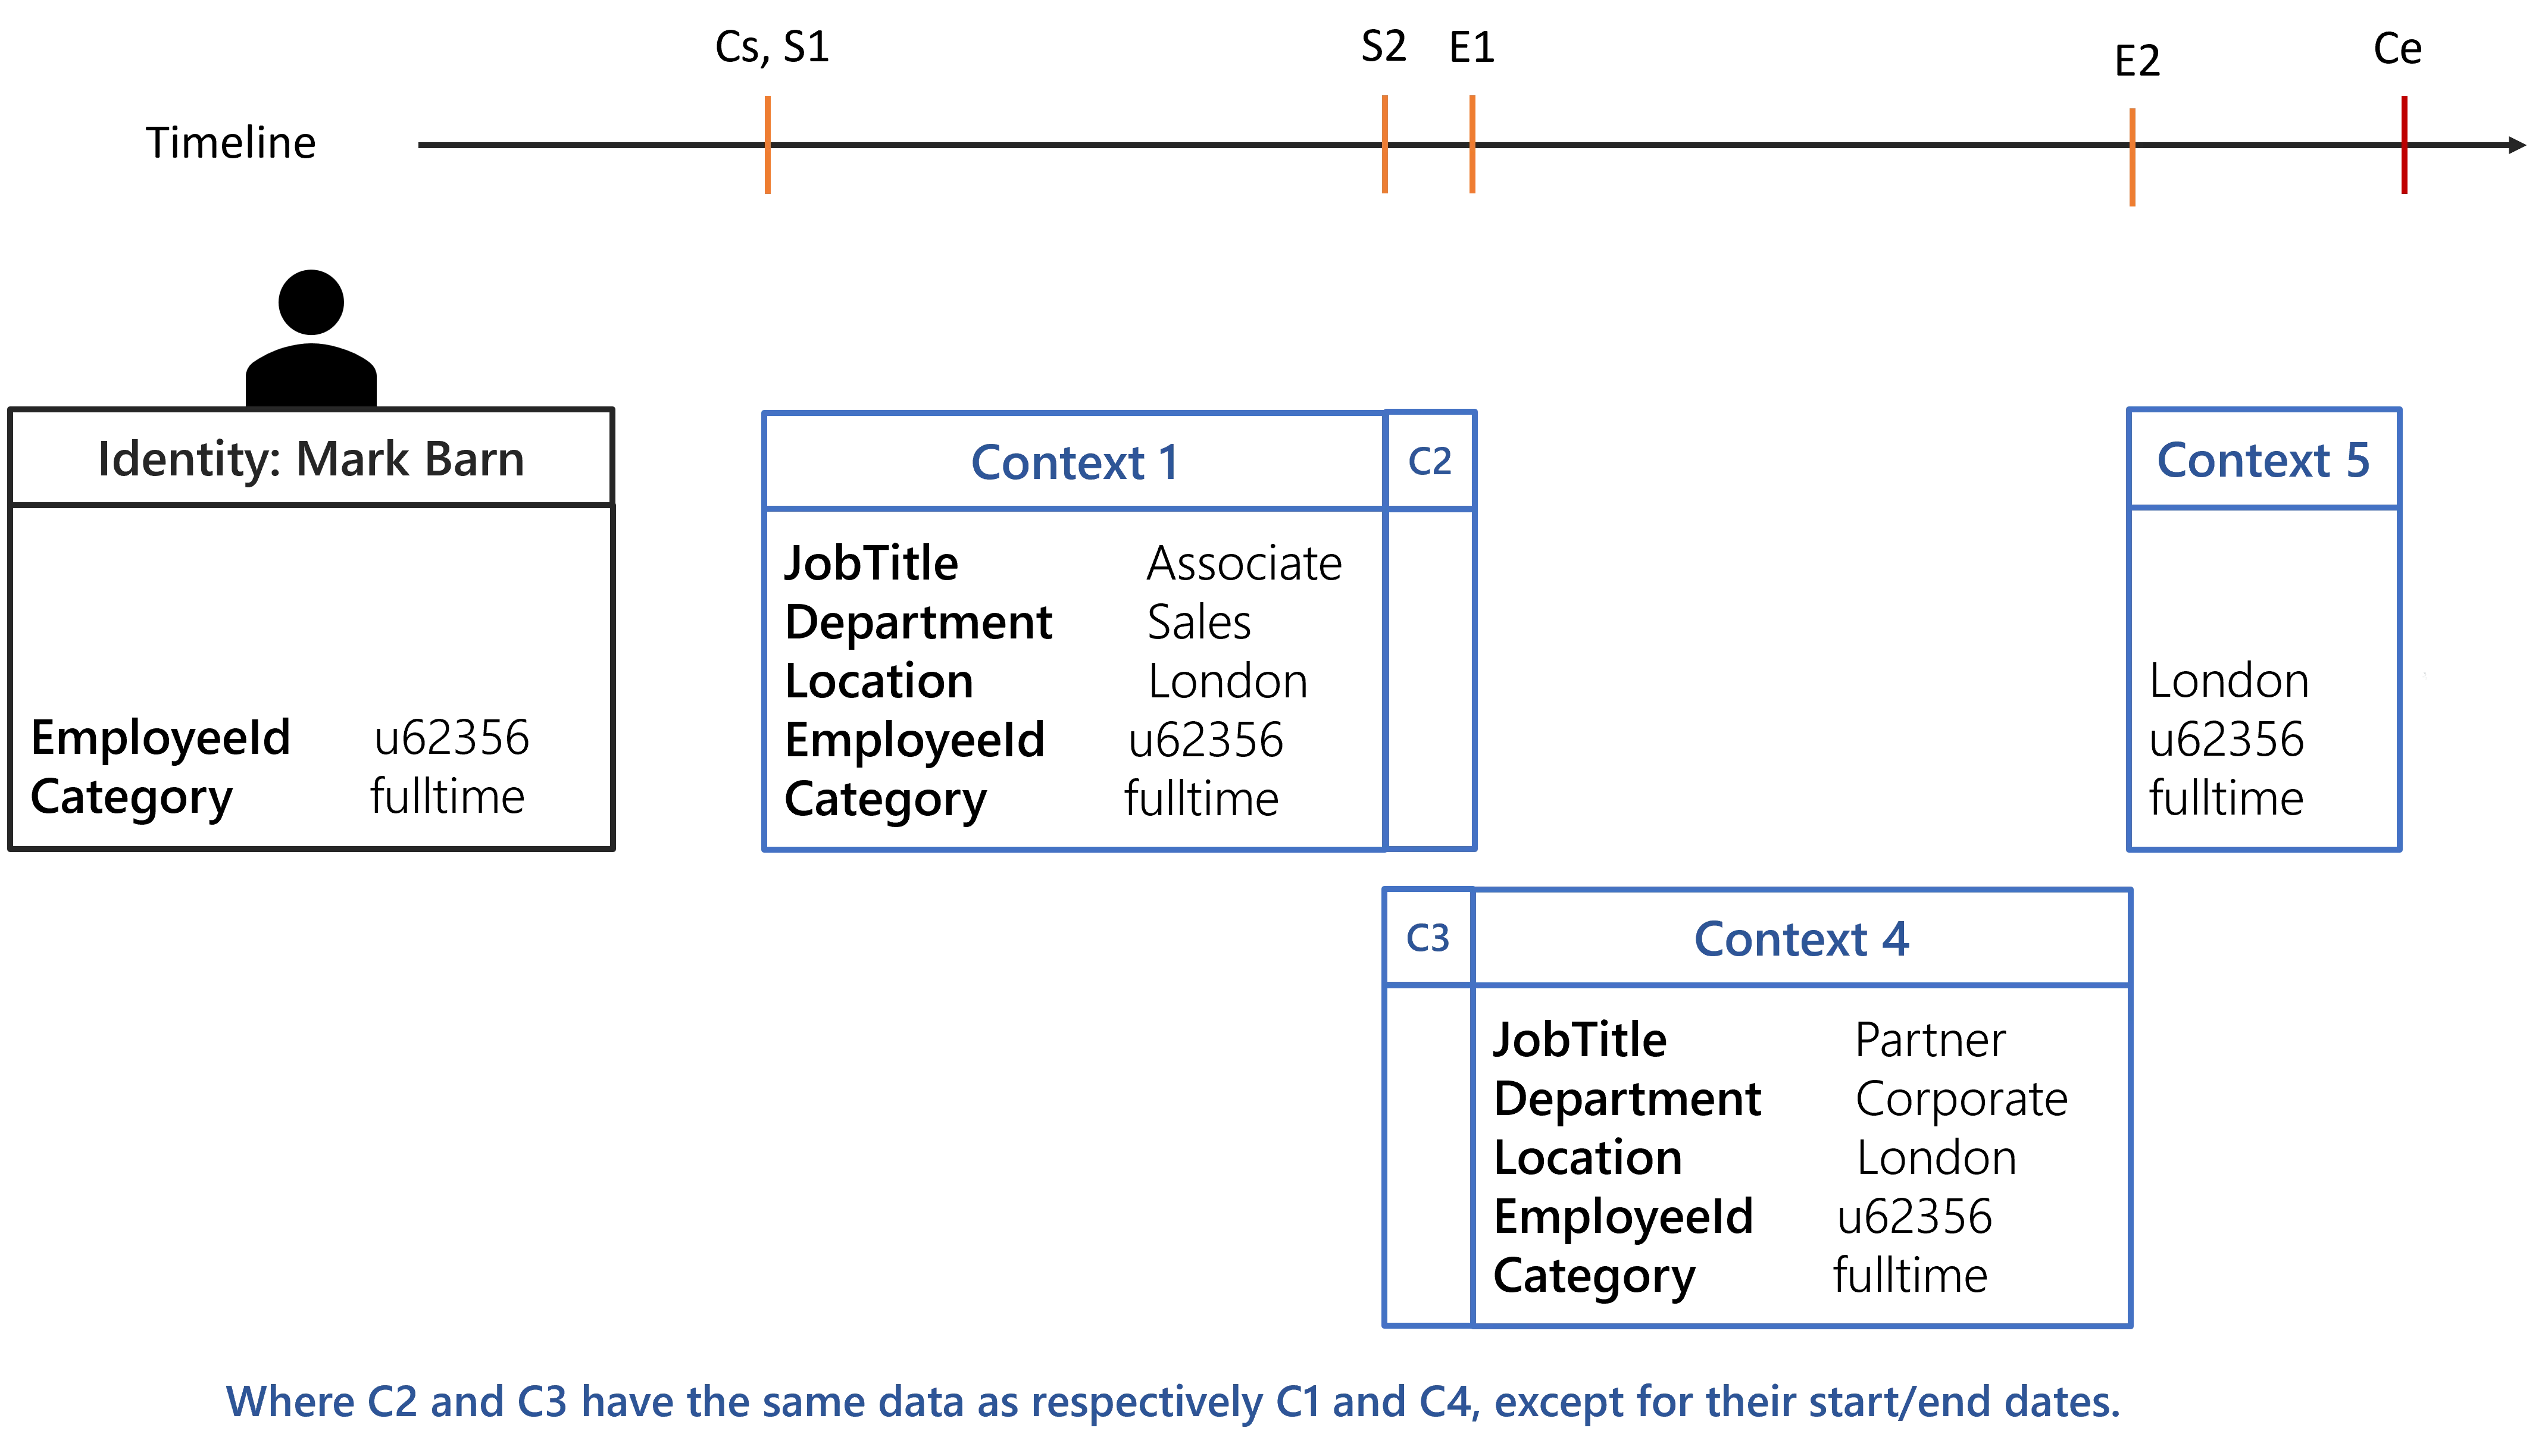
Any rules targeting identities working in London will be assigned to Mark Barn from Cs to
Ce.
Extension of a whole position
The property value copy can be leveraged to extend a chosen position when for some time the identity
does not have one. The following configuration and the identity of Phoebe Buffay will be used to
showcase a position extension. It is done by removing the ExtensionKind="None" of the position
properties.
Default section:
<RecordSection Identifier="Directory_UserRecord_Default" DisplayName_L1="Contract Properties" SourceEntityType="Directory_User" ResourceEntityType="Directory_UserRecord" StartProperty="ContractStartDate" EndProperty="ContractEndDate">
</RecordSection>

Position record section:
<RecordSection Identifier="Directory_UserRecord_Position" DisplayName_L1="Position Properties" SourceEntityType="Directory_User" ResourceEntityType="Directory_UserRecord" StartProperty="StartDate" EndProperty="EndDate">
    <Property Property="Department" /> <Property Property="Location" /> <Property Property="JobTitle" />
</RecordSection>
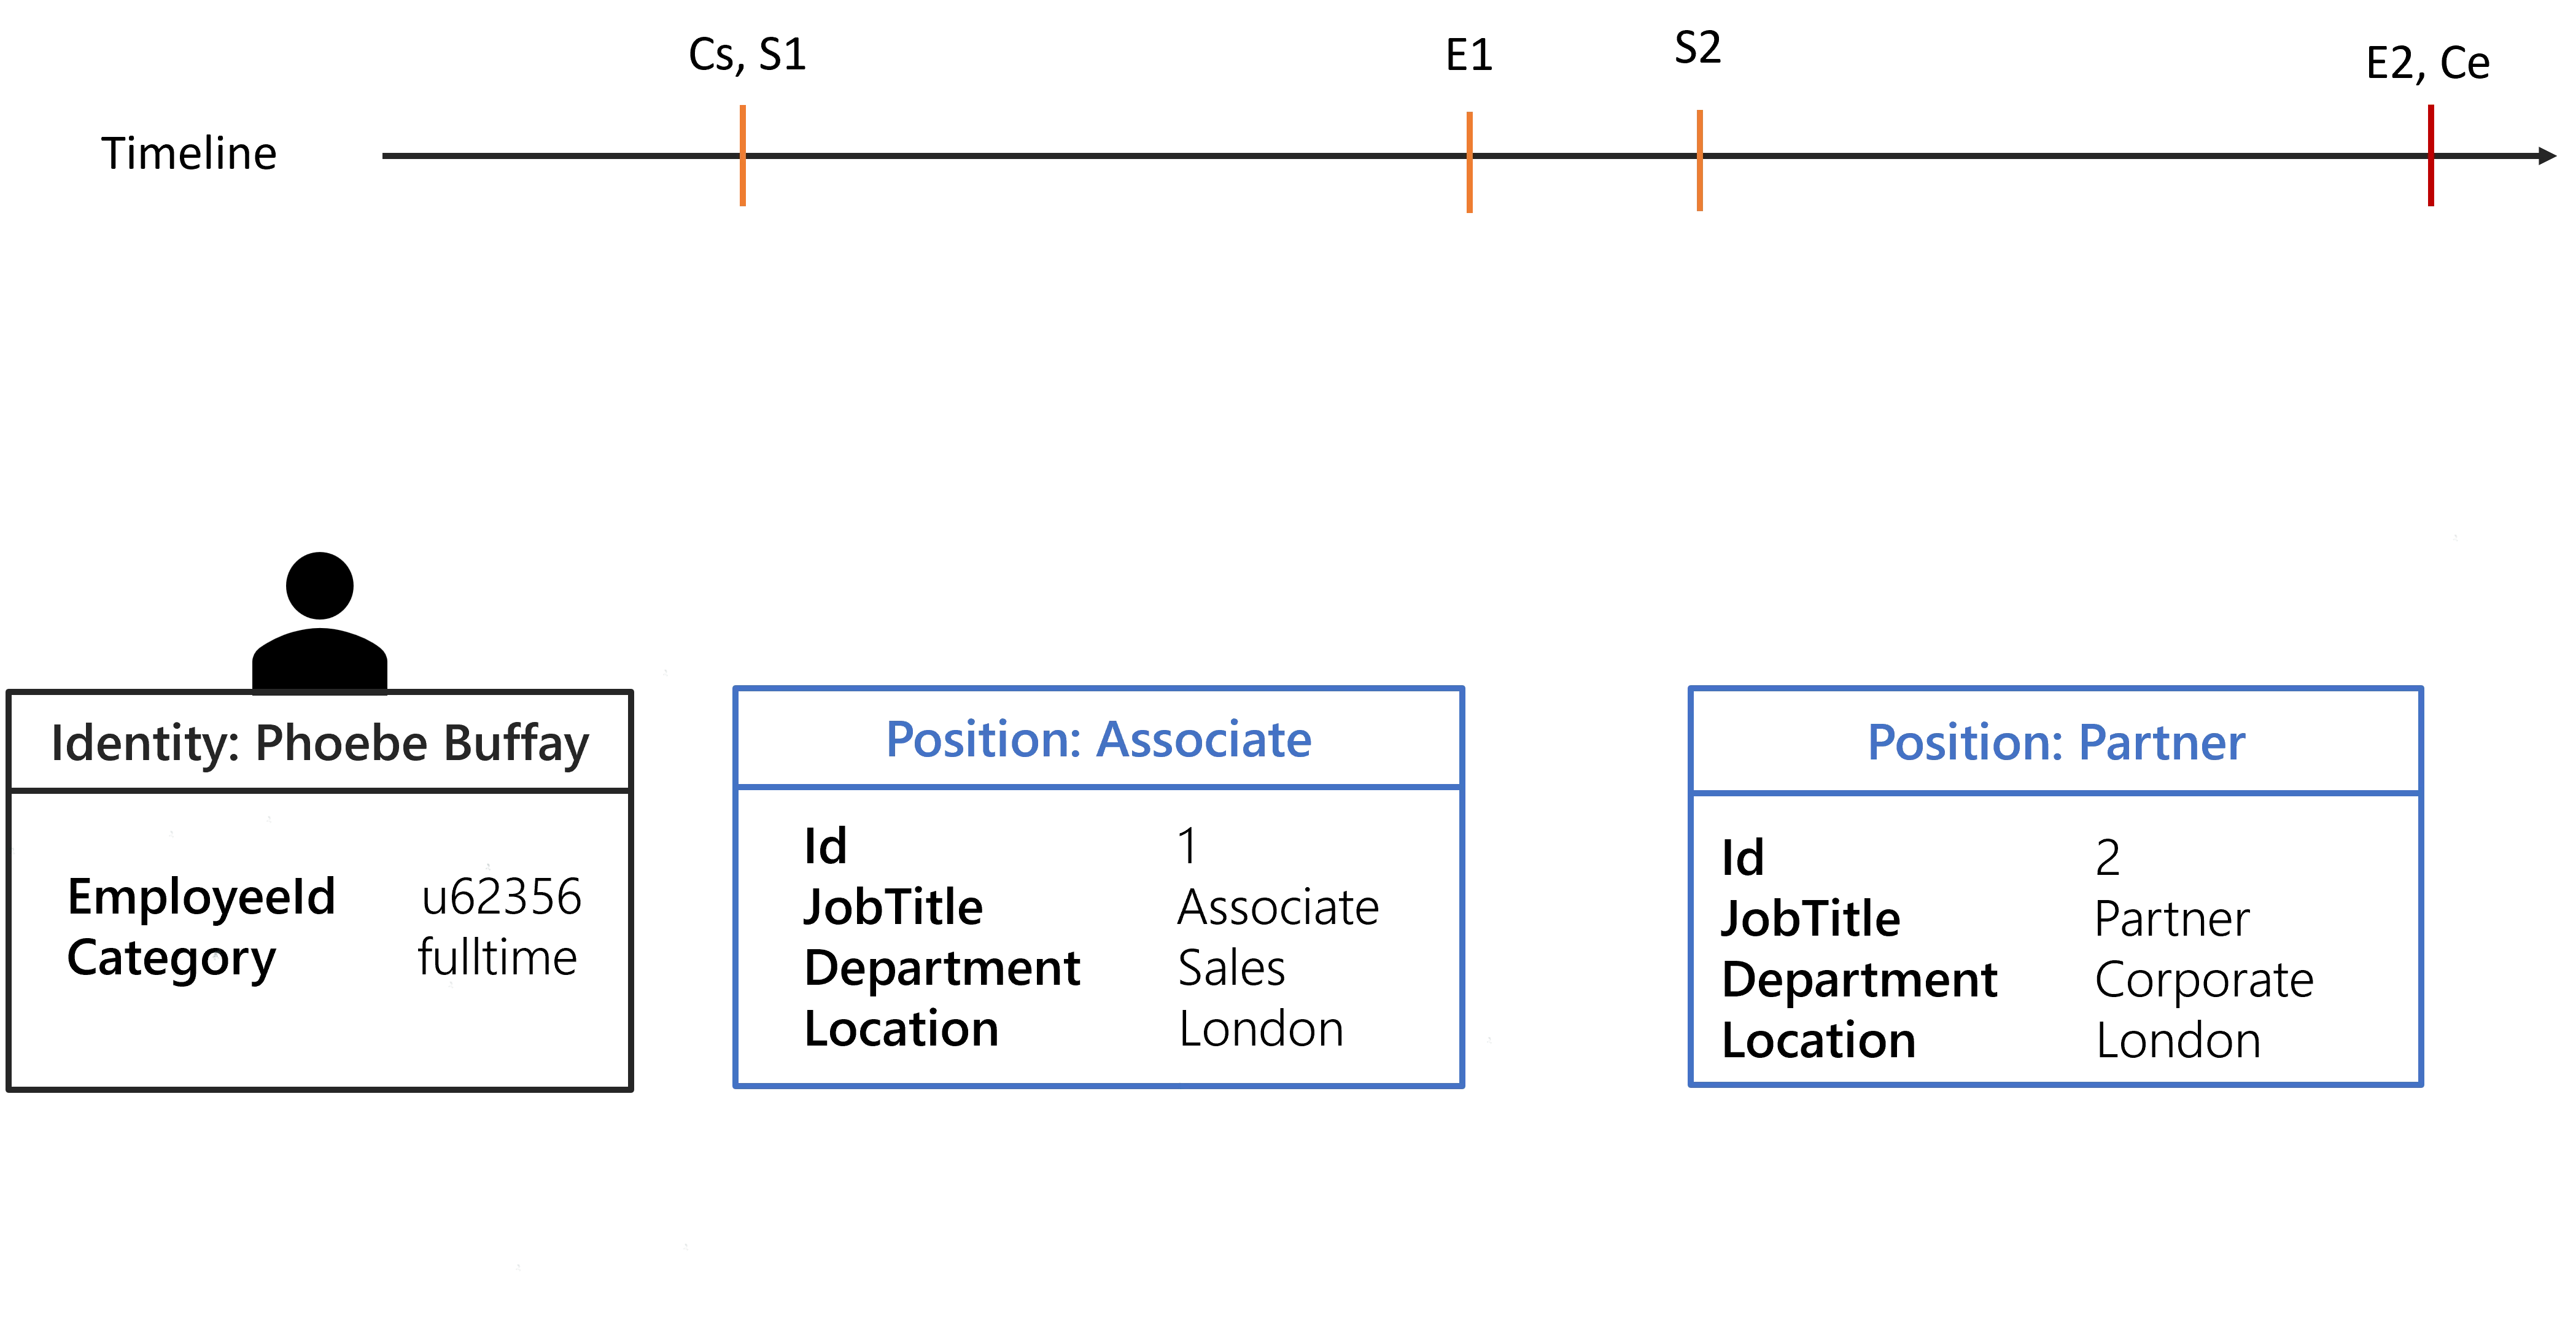
Two contexts will be generated.
By default, the previous position is extended when there is a gap. If there isn't any previous position then the next position will be anticipated.
The choice of the position to extend can be configured by leveraging the SortKeyExpression in the
position
record section.
Configure Indirect Permissions
The following how-to assumes that you have already read the topic on indirect permissions.
Configure Indirect Permissions in an Active Directory
Configure an indirect resource rule
Configuring an Indirect Resource Rule in the Usercube Configuration is the only step needed to set up Indirect Permissions and can be done by answering the following questions:
- What is the target Entity Type? There are multiple multiple Entity Types but for this example we
will choose
AD User (nominative). Another rule can be written if you want to handle Indirect Permissions forAD User (administration). - Which permissions can be obtained transitively in the Active Directory? Users get permissions by
being members of a group. The property is
memberOf. - Do we want to look for correspondences in another system? Here, we do not want to. This also means
that
Correspondence,CorrespondenceMembershipProperty, andEntitlementwill remain blank.
Finally, if we compile all this information and using the naming of the standard Usercube Demo, we get the following Indirect Resource Rule:
<IndirectResourceRule
    ResourceType="AD_Entry_NominativeUser" Property="memberOf" />
After adding this rule to the Configuration, do not forget to deploy the configuration.
Set up a test user
The aim of this section is to give you a step-by-step guide for setting up a test user. It will also cover what is displayed in Usercube. In this example, we will assign a Test Group A directly to the test user and the Test Group A will also be a member of the Test Group B. This way, the test user will also have an indirect assignment to the Test Group B. We will also create the corresponding roles.

A running Active Directory instance is required to reproduce these steps yourself.
Edit the Active Directory
Create two groups in your Active Directory, TestGroupA and TestGroupB. Then add TestGroupA as a member of TestGroupB. Finally add a test user as a member of TestGroupA. The test user can be any existing user in the AD that is known by Usercube.
Prepare Usercube
Since we have manually edited the Active Directory, we first need to run an AD synchronization job.
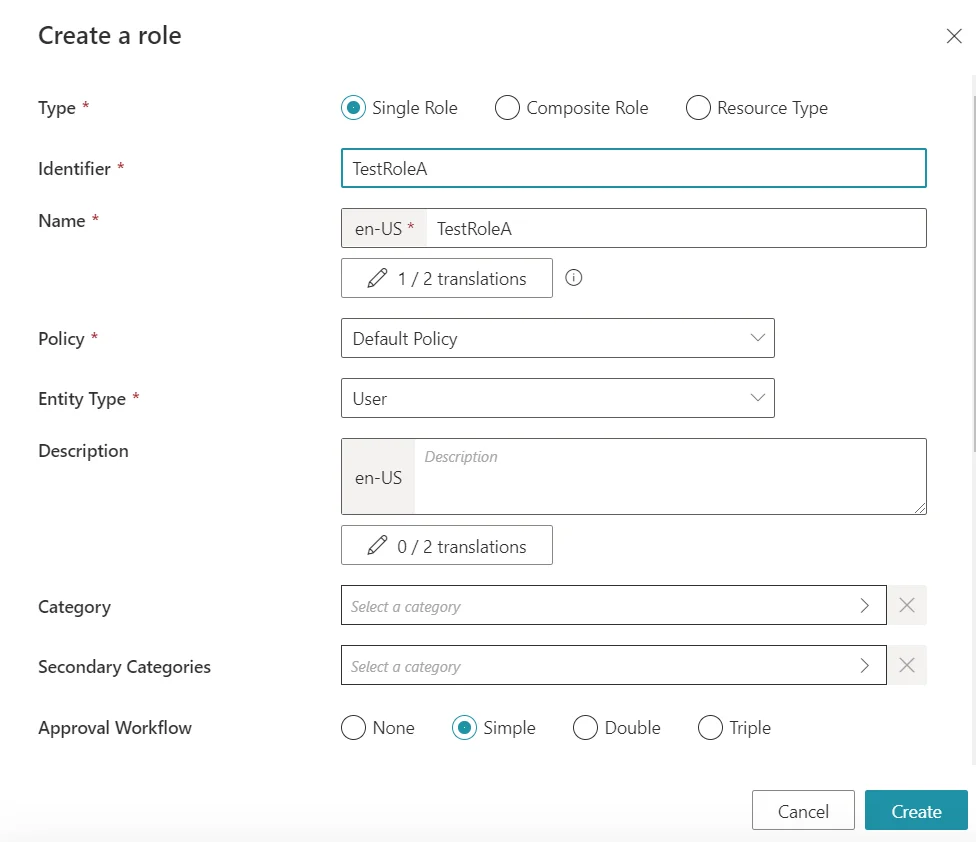
Then we create one Single Role for each group in the Active Directory. We will name them TestRoleA and TestRoleB for Directory > User, :
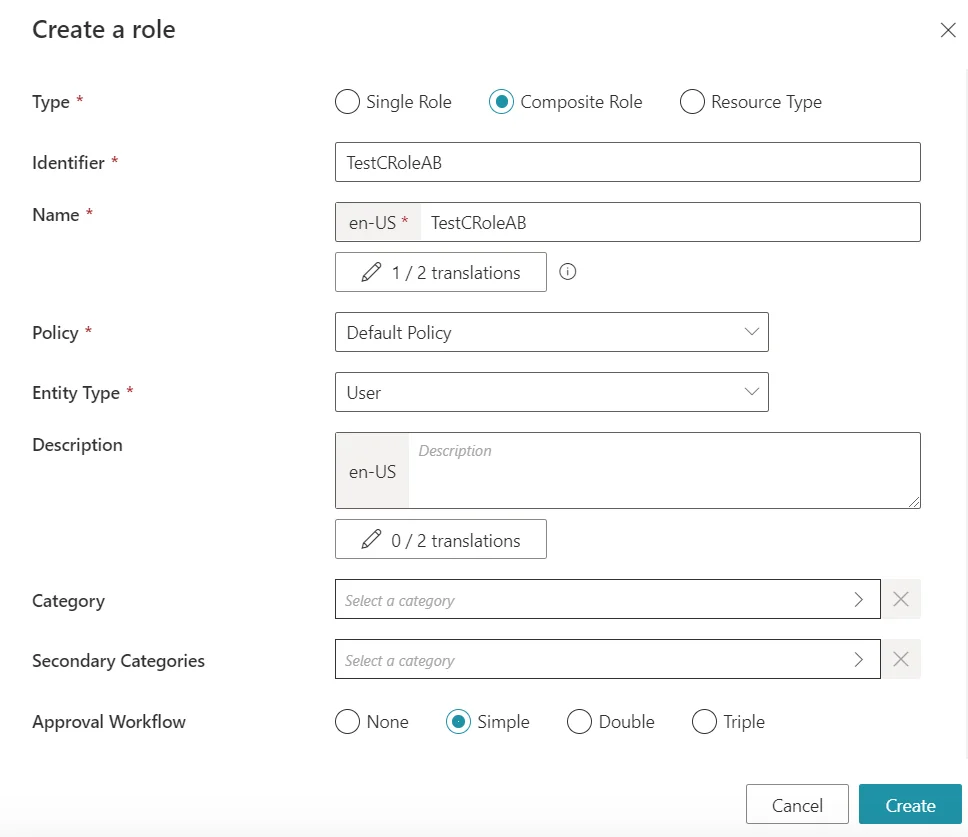
We will also create a test Composite Role to showcase indirect Composite Roles. We will name it TestCRoleAB:
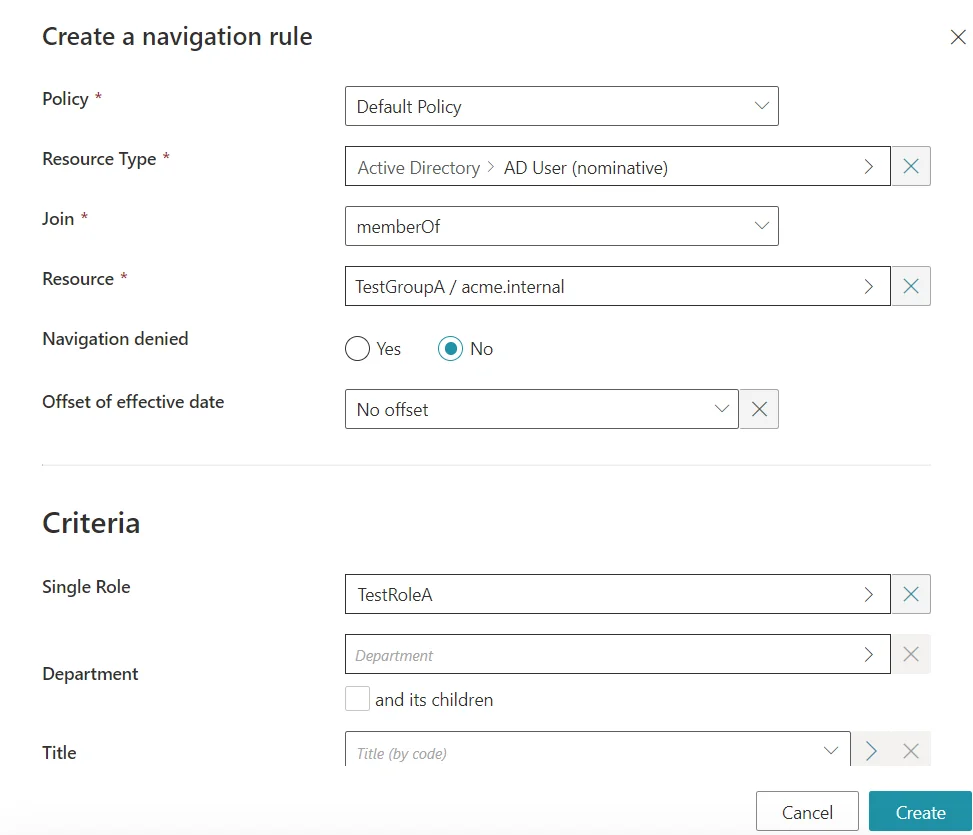
Then we will also need to add some rules. We first need to add one Navigation Rule for each group to link them with their respective Single Role:
And finally, we need to add Single Role Rules to link our two previously created Single Roles to the new Composite Role:
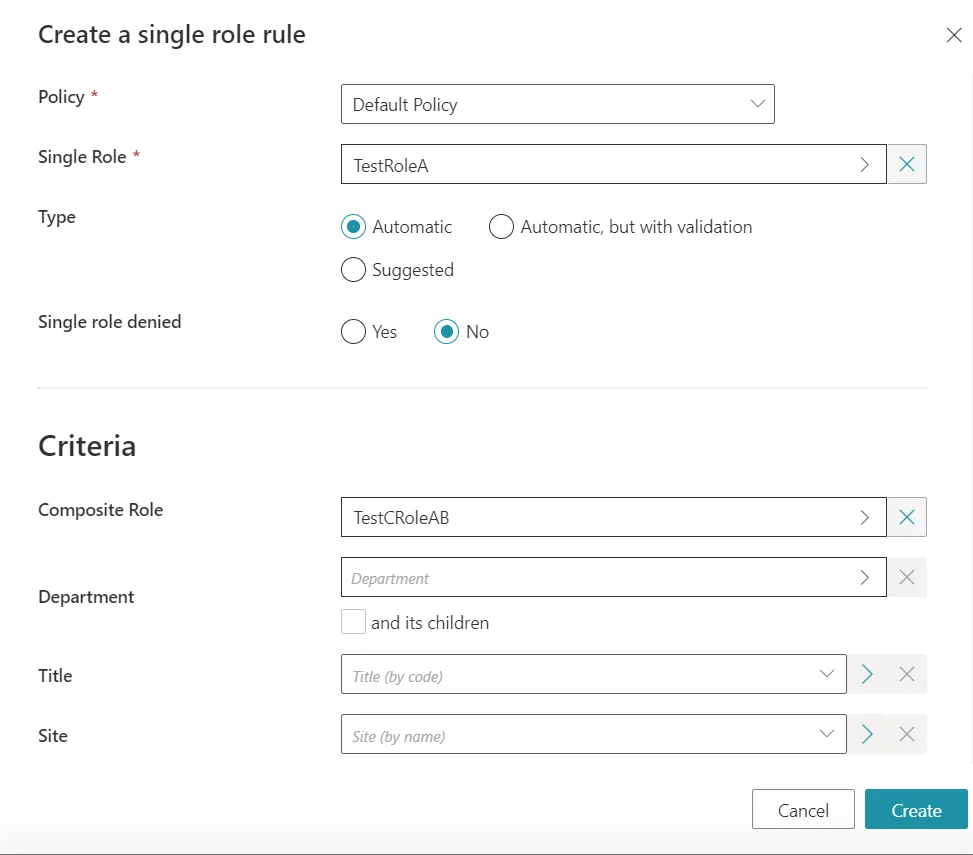
Even if two rules of a kind are needed, only one is pictured. Do not forget the other one.
Indirect permission display
After running a Compute Role Model task, Indirect Permissions should now appear for your test user.
The next screenshots were taken after adding the direct assignment directly inside the Active Directory. As such, the direct permission is also flagged as Non-conforming.
If you first go on the View permissions tab of your test user, the only new role that appears in the Simplified view is the indirect Composite Role TestCRoleAB:

To display Indirect Permissions, you need to switch over to the Advanced view. TestRoleA and TestRoleB should then appear:
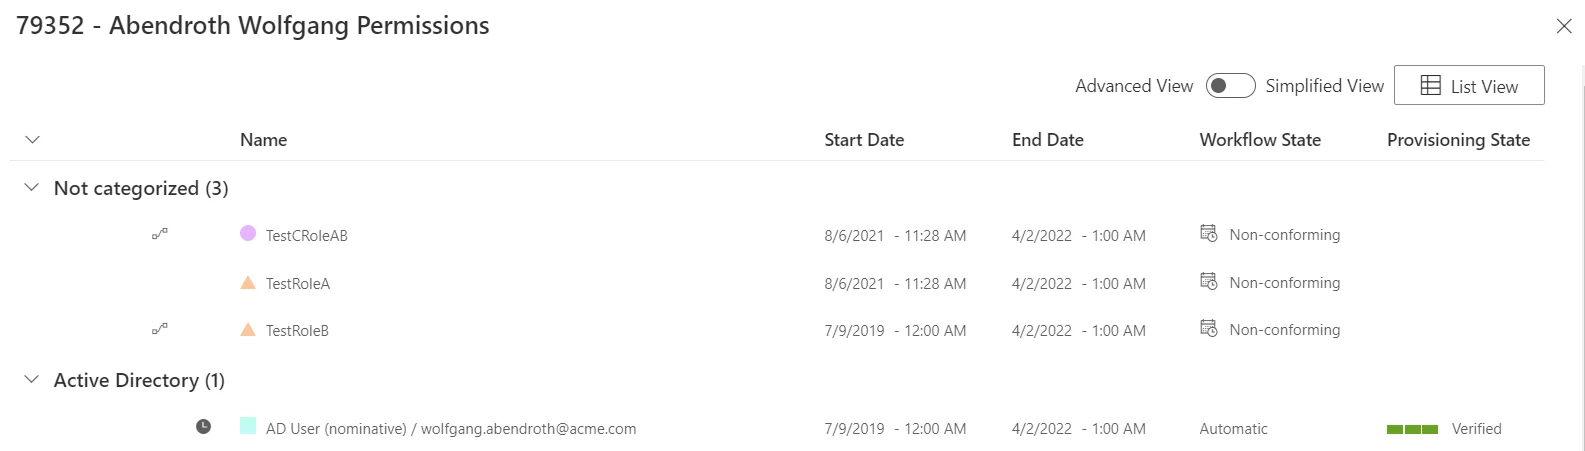
You can also directly display the Assigned Resource Navigations by clicking on AD User (nominative). The memberOf properties will appear in the list:

Configure Indirect Permissions in an Microsoft Entra ID
We can follow the same steps to configure this new rule:
- What is the target Entity Type?
Once again, we will configure a rule for nominative users. The Entity Type is
MicrosoftEntraID_DirectoryObject_NominativeUser. - Which permissions can be obtained transitively in the Microsoft Entra ID (formerly Microsoft Azure AD)?
Users get permissions by being members of a group. The property is
memberOf. - Do we want to look for correspondences in another system?
Here, we do not want to (it is possible, but it is not the aim of this How-To).
This also means that
Correspondence,CorrespondenceMembershipProperty, andEntitlementwill remain blank.
Finally, if we compile all this information and using the naming of the standard Usercube Demo, we get the following Indirect Resource Rule:
<IndirectResourceRule
    ResourceType="MicrosoftEntraID_DirectoryObject_NominativeUser" Property="memberOf" />
Configure Indirect Permissions in SharePoint using Correspondences from an Microsoft Entra ID
We can follow the same steps to configure this new rule, but this time we will showcase the correspondence feature:
- What is the target Entity Type? We first start in the Microsoft Entra ID. Once again, we will
configure a rule for nominative users. The Entity Type is
MicrosoftEntraID_DirectoryObject_NominativeUser. - Which permissions can be obtained transitively in the Microsoft Entra ID? Users get permissions by
being members of a group. The property is
memberOf. - Do we want to look for correspondences in another system? Yes, we want to find correspondences in
SharePoint. A correspondence can be found using the
SharePointObjectproperty. - Which permissions can be obtained transitively in SharePoint? Once again, users get permissions
based on which groups they are a member of. The property capturing this notion for SharePoint
entities is
Group - Is being member of a group in SharePoint the type of permissions that we want to capture? While
this can be computed, we are rather interested in compiling which SharePoint objects a user can
view/change/etc. We obtain this information using the
Entitlementproperty.
Finally, if we compile all this information and use the naming convention of the standard Usercube Demo, we get the following Indirect Resource Rule:
<IndirectResourceRule
    ResourceType="MicrosoftEntraID_DirectoryObject_NominativeUser" Property="memberOf" Correspondence="SharePointObject" CorrespondenceMembershipProperty="Group" Entitlement="Entitlement" />
This rule will also compute indirect permissions for the Microsoft Entra ID.
How-Tos
These guides will help you configure role assignment with practical step-by-step procedures.
-
Restrict the Assignment
Use filters on dimensions and/or roles to restrict the assignment of a role or resource type.- #### Infer Single Roles with a Composite Role Assign several single roles via the assignment of one composite role.- #### Configure Indirect Permissions Define indirect resource rules to use indirect permissions in Usercube.
Infer Single Roles with a Composite Role
This guide shows how to assign several single roles via the assignment of one composite role.
It is possible to infer SingleRoles with CompositeRole. The SingleRole can only be inferred by the CompositeRole if both the CompositeRole and SingleRole rules are verified.
Create a Dimension
The restriction of resource allocations is done from a filter. To do this, it is necessary to create dimensions to define which EntityTypes the filters will apply to.
For the different examples of restrictions, the filters will be based on the EntityType "Organization" and "Title".
<Dimension Identifier="Organization0" DisplayName_L1="Department" DisplayName_L2="D�partement" EntityType="Directory_Organization" ColumnMapping="0" IsHierarchical="true" ParentProperty="Parent" /> <Dimension Identifier="Title0" DisplayName_L1="Title" DisplayName_L2="Fonction" EntityType="Directory_Title" ColumnMapping="1" />
Create a Composite Role
A CompositeRole is created in the same way as a SingleRole.
<CompositeRole Identifier="FCT0711" DisplayName_L1="Developer" DisplayName_L2="D�veloppeur" ApprovalWorkflowType="Two" EntityType="Directory_User" Policy="Default" />
Assign the Composite Role Based on the Dimension
This step is optional for our simple purpose of inferring single roles with a composite role. The composite role can be linked to a dimension, but it does not have to.
The CompositeRoleRule can be limited with the use of dimensions.
<CompositeRoleRule Role="FCT0720" D1="FCT0720" Policy="Default" />
Assign Single Roles Based on the Composite Role
The link between a SingleRole and a CompositeRole is made in the SingleRoleRule.
<SingleRoleRule Role="DL-INTERNET-Restricted" CompositeRole="FCT0720" Policy="Default" /> <SingleRoleRule Role="RAS_0_USR-USERS_CONSOLE_DNS" CompositeRole="FCT0720" Policy="Default" /> <SingleRoleRule Role="RAS_0_USR-USERS_DES_SERVEURS_WINDOWS" CompositeRole="FCT0720" Policy="Default" /> <SingleRoleRule Role="RAY_0_GL_MUY10_MESI_ADM" CompositeRole="FCT0720" Policy="Default" /> <SingleRoleRule Role="RAY_0_GL_MUY10_MESI_ADM" CompositeRole="FCT0720" Policy="Default" /> <SingleRoleRule Role="RAY_0_LDAP_ADMINLDSFEDE" CompositeRole="FCT0720" Policy="Default" /> <SingleRoleRule Role="RAY_0_LDAP_READLDSFEDE" CompositeRole="FCT0720" Policy="Default" /> <SingleRoleRule Role="RAY_A_EASY_USER" CompositeRole="FCT0720" Policy="Default" /> <SingleRoleRule Role="RAY_A_LDAP_ADMINLDSCA" CompositeRole="FCT0720" Policy="Default" /> <SingleRoleRule Role="RAY_A_LYNC_W" CompositeRole="FCT0720" Policy="Default" /> <SingleRoleRule Role="RAY_A_XIOU_ OUTLOOK2010_PSTWRITE" CompositeRole="FCT0720" Policy="Default" /> <SingleRoleRule Role="RAY_F_ADMPDTEXT" CompositeRole="FCT0720" Policy="Default" /> <SingleRoleRule Role="RAY_F_ADMPDTFIXE" CompositeRole="FCT0720" Policy="Default" /> <SingleRoleRule Role="RAY_F_ADMPDTPORT" CompositeRole="FCT0720" Policy="Default" /> <SingleRoleRule Role="RAZ_0_APSB_RFICBUR" CompositeRole="FCT0720" Policy="Default" /> <SingleRoleRule Role="RAZ_0_GL_MUP10_BURI_DR" CompositeRole="FCT0720" Policy="Default" /> <SingleRoleRule Role="RAZ_0_GMPL_ADMIN" CompositeRole="FCT0720" Policy="Default" /> <SingleRoleRule Role="RAZ_0_GMPL_ADMINSRV" CompositeRole="FCT0720" Policy="Default" /> <SingleRoleRule Role="RAZ_0_GMPL_GESTPOSTE" CompositeRole="FCT0720" Policy="Default" /> <SingleRoleRule Role="RAZ_0_GMPL_GESTSERVEUR" CompositeRole="FCT0720" Policy="Default" /> <SingleRoleRule Role="RAZ_0_VCSPOWERUSER" CompositeRole="FCT0720" Policy="Default" /> <SingleRoleRule Role="RAZ_A_EXPLOITATION_U" CompositeRole="FCT0720" Policy="Default" /> <SingleRoleRule Role="RAZ_A_DR_V" CompositeRole="FCT0720" Policy="Default" /> <SingleRoleRule Role="RAZ_A_DW_V" CompositeRole="FCT0720" Policy="Default" /> <SingleRoleRule Role="RAZ_A_VCS_ADM" CompositeRole="FCT0720" Policy="Default" /> <SingleRoleRule Role="RAZ_A_VMW_ADM" CompositeRole="FCT0720" Policy="Default" /> <SingleRoleRule Role="RAZ_A_VMW_POW" CompositeRole="FCT0720" Policy="Default" /> <SingleRoleRule Role="SharePoint_IT_Reader" CompositeRole="FCT0720" Policy="Default" />
Restrict the Assignment
This guide shows how to use filters on dimensions and/or roles to restrict the assignment of a role or resource type.
Create a Dimension
The restriction of resource allocations is done from a filter. To do this, it is necessary to create dimensions to define which EntityTypes the filters will apply to.
For the different examples of restrictions, the filters will be based on the EntityType "Organization" and "Title".
<Dimension Identifier="Organization0" DisplayName_L1="Department" DisplayName_L2="D�partement" EntityType="Directory_Organization" ColumnMapping="0" IsHierarchical="true" ParentProperty="Parent" /> <Dimension Identifier="Title0" DisplayName_L1="Title" DisplayName_L2="Fonction" EntityType="Directory_Title" ColumnMapping="1" />
Create a Single Role
To be able to filter with the dimensions previously created, it is necessary to first create single roles which will serve as a restriction to the assignment of ResourceTypes for a given source.
The example below creates a SingleRole for the EntityType Directory_User (source of the ResourceTypes you want to restrict).
<SingleRole Identifier="DL-INTERNET-Restricted" DisplayName_L1="Filtered Internet access" DisplayName_L2="Acc�s Internet filtr�" Category="Internet" ApprovalWorkflowType="One" EntityType="Directory_User" Policy="Default" />
Assign the Role Based on the Dimension
We will define a single role rule on the "Title"; dimension with a given value to restrict the allocation of a resource in only one case.
<SingleRoleRule Role="DL-INTERNET-Restricted" D1="FCT0402" Policy="Default" />
D1 represents the dimension whose ColumnMapping="1".
<Dimension Identifier="Title0" DisplayName_L1="Title" DisplayName_L2="Fonction" EntityType="Directory_Title" ColumnMapping="1" />
The value in property D1 implies that the rule is checked only if the source resource has as association to the EntityType related to dimension 1 is "FCT0402".
Assign a Resource Type Based on the Role
The restriction on the creation of these accounts is integrated directly into the TypeRule of the ResourceTypes. This implies that the ResourceType will only apply if the SingleRole rule(s) are checked.
This part will link a SingleRole to a ResourceType. This implies that the allocation of a target resource to a source will only be done if the SingleRole rule(s) are verified.
<ResourceType Identifier="AD_Entry_NominativeUser" DisplayName_L1="AD User (nominative)" DisplayName_L2="Compte AD (nominatif)" Policy="Default" TargetEntityType="AD_Entry" Category="AD" SourceEntityType="Directory_User" ApprovalWorkflowType="One"> <TypeRule TimeOffsetReference="Arround" TimeOffsetBeforeReference="-10080" TimeOffsetAfterReference="43200" Policy="Default" SingleRole="DL-INTERNET-Restricted"/> ....
</ResourceType>
Use a navigation rule instead of a type rule
A navigationRule in addition to filling a multi-valued association, also serves as an allocation context for a ResourceType.
There are 3 ways to restrict the allocation of the ResourceType with a NavigationRule:
- Fill in one or more dimensions directly in the NavigationRule.
- Fill in a SingleRole.
- Fill in one or more dimensions and a SingleRole.
For the last 2 cases this will induce the ResourceType by the SingleRole.
    <ResourceType Identifier="AD_Entry_NominativeUser"> ...
        <NavigationRule Property="memberOf" Resource="CN=SG_APP_DL-INTERNET-Restricted,OU=Applications,DC=acme,DC=internal" SingleRole="DL-INTERNET-Restricted" /> </ResourceType>
In the example above the ResourceType does not need a TypeRule because the NavigationRule already serves as an allocation context. Unlike the previous example.
Role Assignment
Once the role model is established, role assignment can be performed, i.e. missing or non-conforming assignments can be detected in order to give users the appropriate access rights.
Be sure to read first the documentation about the role model.
Non-Conforming Assignments
The Compute Role Model task is able to detect from synchronized data a list of non-conforming or missing resources/entitlements for every identity. That is one of Usercube's most powerful governance features, provided you have a full role model configured.
Build the conforming assignment list
The first step is building the conforming assignment list, as explained in
Conforming Assignments.
This list (list A) includes the assignments that perfectly comply with the role model/assignment
policy.
Build the existing assignment list
The second step is building the existing assignment list (list B), as explained in
Existing Assignments:
every synced resource can be translated into a role assignment following the assignment rules "in
reverse".
Compare both lists
We can now compare both lists to find out if the managed systems really comply with the decided upon assignment policy.
For every assignment from list B representing resources from the synced data:
- There is a rule path from the identity attribute to the resource provisioning order in the role
model. The assignment was expected, it can be found in list
A. - There is no rule path from the identity attribute to the resource provisioning order in the role
model. The assignment was unexpected, it is not in list
Aor it is in listAbut not with exactly the same property values.
The "unexpected" (or non-conforming) assignments can be for example orphan accounts. Sometimes, the account itself should indeed exist according to the rules, but its attribute values are "unexpected", contradicting scalar rules.
Non-conforming accounts are presented in the reconciliation screens: from the role point-of-view in the role reconciliation screen and from the resource point-of-view in the resource reconciliation screen.
They need human confirmation to be either kept or destroyed.
For every assignment from list A representing expected assignments:
- There is an exact match in list
B. The managed system complies with the assignment policy for this resource. - There is no match in list
B: the managed system doesn't comply with the assignment policy. The resource is missing (the account is missing).
Missing accounts are presented in the provisioning review for validation before provisioning.
Usercube will never delete data without having a user's confirmation first. That is the reason why these variations from the ideal aren't fixed automatically but submitted for review.
Some users might wonder how they can perform governance if they don't have automated rules. Certification can help. By reviewing (even manually) the entitlement landscape, non-conforming account proliferation can be contained.
This feature is the final touch of the sync-fulfill-verify loop that makes Usercube so efficient. It is exactly like a closed-loop control system with a feedback loop: perturbations, in the form of modifications in a managed system that don't go through Usercube first, trigger a reaction. This reaction uses the role model to suggest a fix. This is the only way for the state of the entitlement landscape to tend towards the ideal standards described by the rules.