Appliance
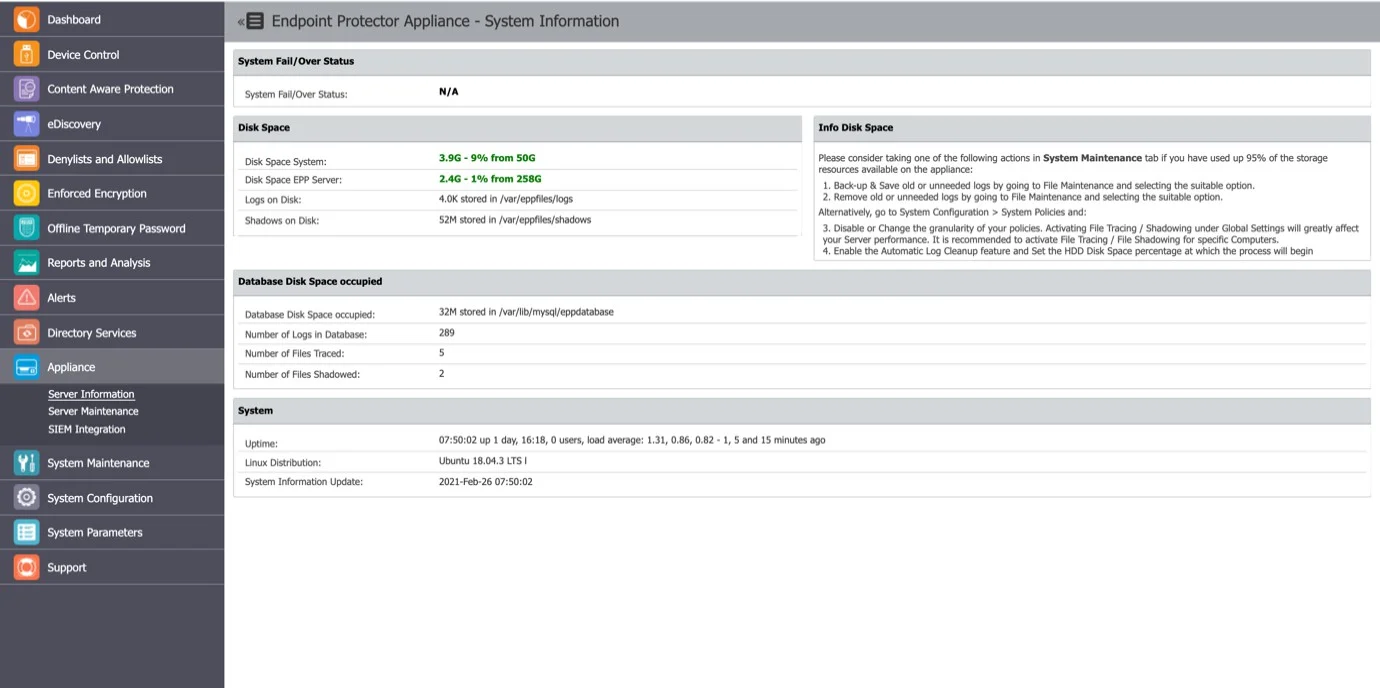
Server Information
From this section you can view general information about the Server, the System Fail/Over status, information on Disk Space usage and Database, and the Server Uptime.
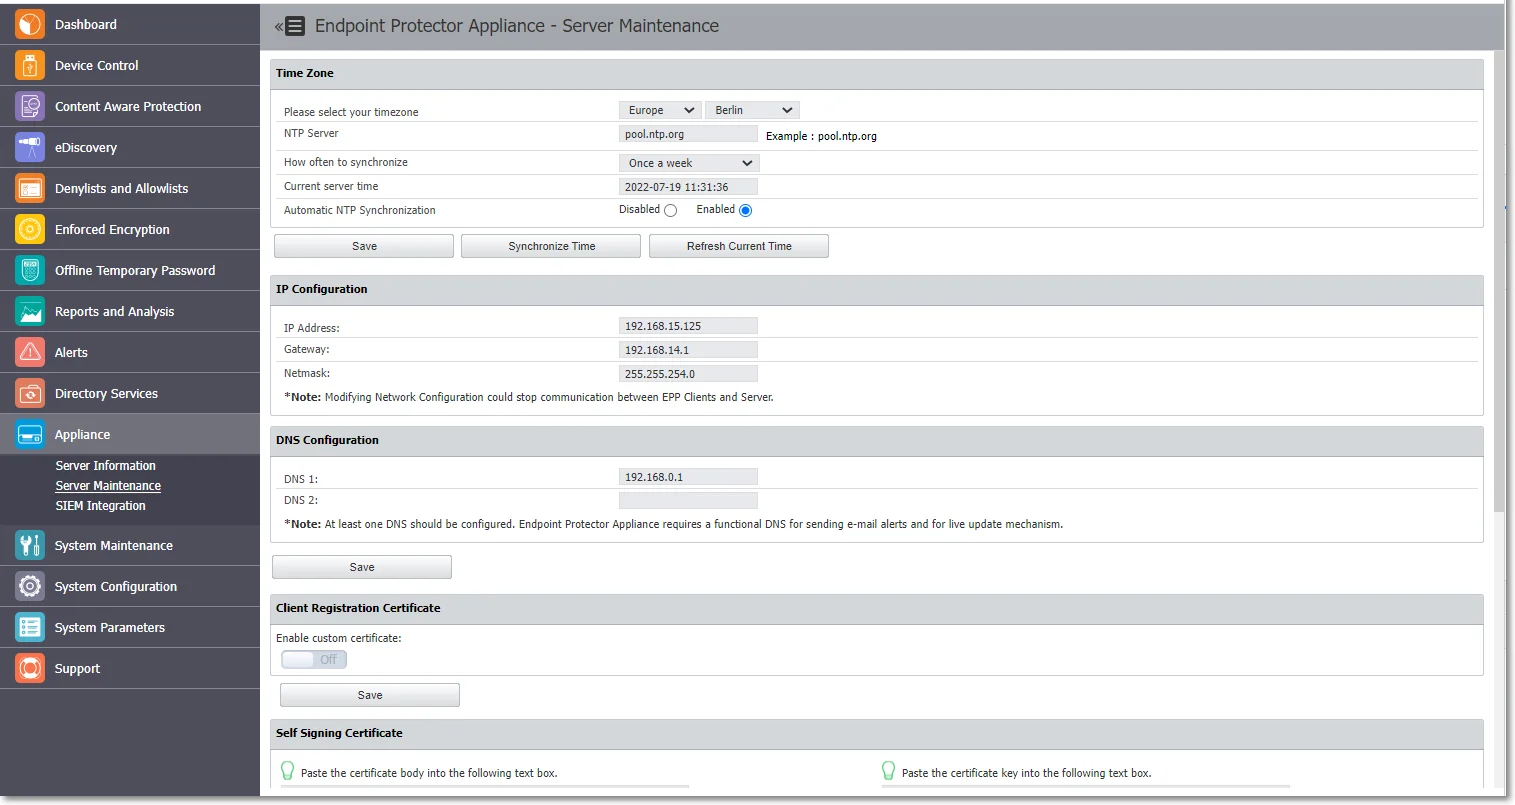
Server Maintenance
In this section, you can set up a preferential time zone and NTP synchronization server, configure the IP and DNS, register the client certificate, set up a self-signing certificate, perform routine operations and manage the SSH access.
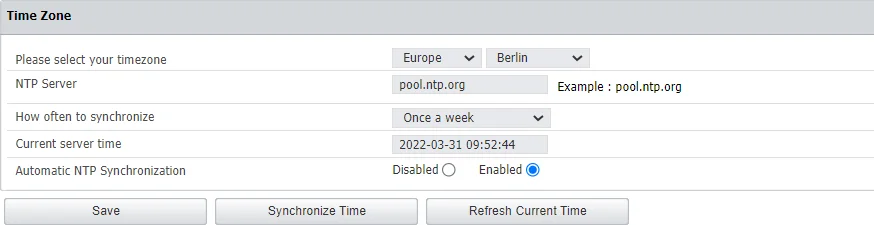
Time Zone
In this section you can set a preferential time zone and/or sync the appliance to an NTP source.
- Time zone – select from the drop-down lists the zone and location
- NTP Server – type the server or go with the default entry
- How often to synchronize – select from the drop-down a time interval when to synchronize of go with the default selection
NOTE: The appliances are prefigured to sync once a week with pool.ntp.org.
- Current server time – the field displays the current server time
- Automatic NTP Synchronization – opt in or out to trigger the NTP synchronization automatically
- Click Save to keep all modifications without triggering the synchronization process
- Click Synchronize Time to trigger the synchronization, which will occur in the next 5 minutes. The Alerts and Logs will be reported after the 5 minutes in a format of your choice
- Click Refresh Current Time to update the Current server time field
IP Configuration
In this section you can change the network settings for the appliance to communicate correctly in your network.
NOTE: Once you change the IP address, close and open again the Internet browser and then access the Endpoint Protector Administration and Reporting Tool with the new IP address.

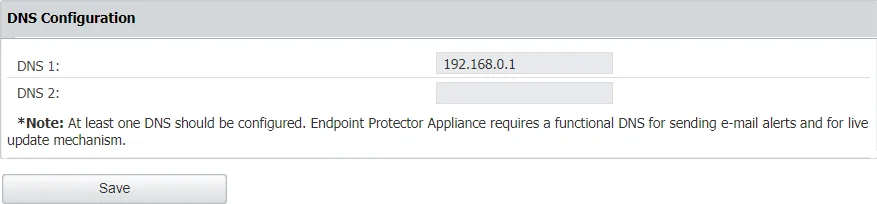
DNS Configuration
In this section you can modify or add a DNS server address and then Save your changes.
Client Registration Certificate
From this section, you can register and then verify the Endpoint Protector Client certificate signature. The client registration certificate is an additional security measure enabling certificate-based authentication.
CAUTION: The Client Registration Certificate feature is not available for Linux!
Step 1 – Enable the custom certificate setting and then upload the certificate chain, Root CA and Intermediate;
When the custom certificate is enabled then:
- Endpoint Protector Server will validate the client certificate at the registration phase
- Endpoint Protector Client will not validate the server certificate
When the custom certificate is disabled then:
- Endpoint Protector Server will not validate the client certificate at the registration phase
- Endpoint Protector Client will not validate the server certificate
Step 2 – Enable the test certificate setting and then upload a certificate signed by root CA just for testing the signature (for example the Endpoint Protector Client certificate)
Step 3 – Click Save and allow 2 minutes for the information to be validated. You will view a successful message confirming the custom certificate was added and the test certificate is valid.
NOTE: The client registration authentication certificate and the Endpoint Protector server certificate must be issued by the same CA.
For this feature to work, there must be cryptographic identities signed by the root CA deployed on the endpoints.
- On macOS these identities should be added to System Keychain in the "My Certificates" section
- On Windows they should be placed in the Certificate Manager's Local Computer\Certificates\Personal section

Server Certificate Validation
From this section, you can configure Server Certificate Validation, which ensures that certificates used for all communication requests on Endpoint Protector clients are validated. This feature is crucial for maintaining secure communication between various Endpoint Protector products.
NOTE: All certificate validation statuses will be reported to the Endpoint Protector Server and stored for debugging purposes in Endpoint Protector Client logs.
CAUTION: Please use this feature responsibly, as improper certificate usage with certification validation might disrupt Endpoint Protector Client to Endpoint Protector Server communication. For a successful connection, both server and client certificate validation must be enabled.
NOTE: Starting from the 5.9.0 or later, enabling this option activates Endpoint Protector Server Certificate Validation for all Endpoint Protector Client communication. This strengthens security by ensuring trusted and valid certificates are used.
Appliance Operations
In this section you can perform appliance operations such as Reboot or Shutdown.

SSH Server
In this section you can manage user access to the Appliance through the SSH protocol.
RECOMMENDED: Set this option to Enable before requesting Support access.

SIEM Integration
SIEM are a third-party security information and event management tools that allow logging and analyzing logs generated by network devices and software. The integration with SIEM technology enables Endpoint Protector to transfer activity events to a SIEM server for analysis and reporting.
In this section, you can add, edit or delete an existing SIEM Server integration. To edit or delete a SIEM Server you need to select an available SIEM server integration.
CAUTION: You can configure a maximum number of 4 SIEM Server integrations.
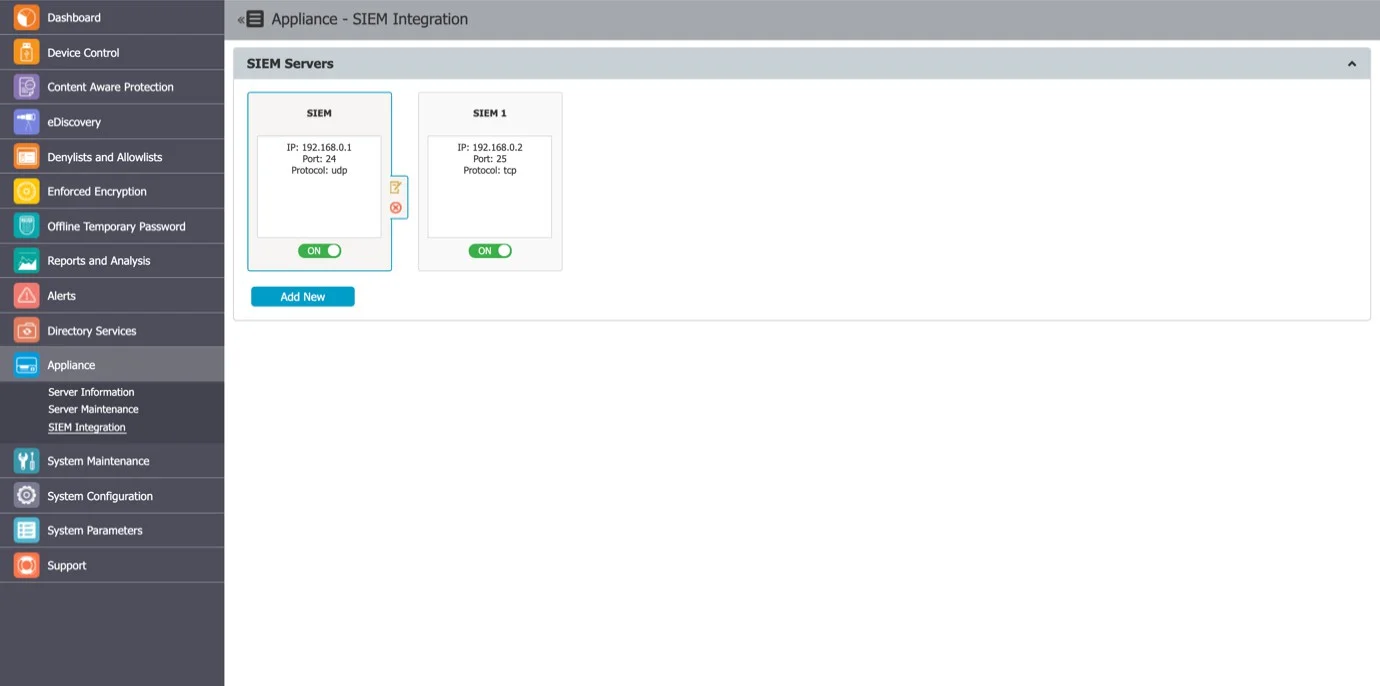
To create a SIEM Server, click Add New and provide the following information:
-
SIEM Status – toggle switch to enable/disable the SIEM server
-
Disable Logging – toggle switch to enable/disable logging
NOTE: If you disable logging, logs will be stored on the Endpoint Protector server or on the SIEM server when SIEM is installed.
-
Server Name – add a server name
-
Server Description – add a description
-
Server IP or DNS – add the IP or DNS
-
Server Protocol – select the UDP or TCP server protocol
NOTE: Based on the protocol you select you can enable SIEM Encryption.
-
Server Port – add a port
-
Exclude Headers - toggle switch to enable/disable log headers
NOTE: If you disable log headers, you will only export data to SIEM.
-
Log Types – select from the available options the logs to send to the SIEM Server
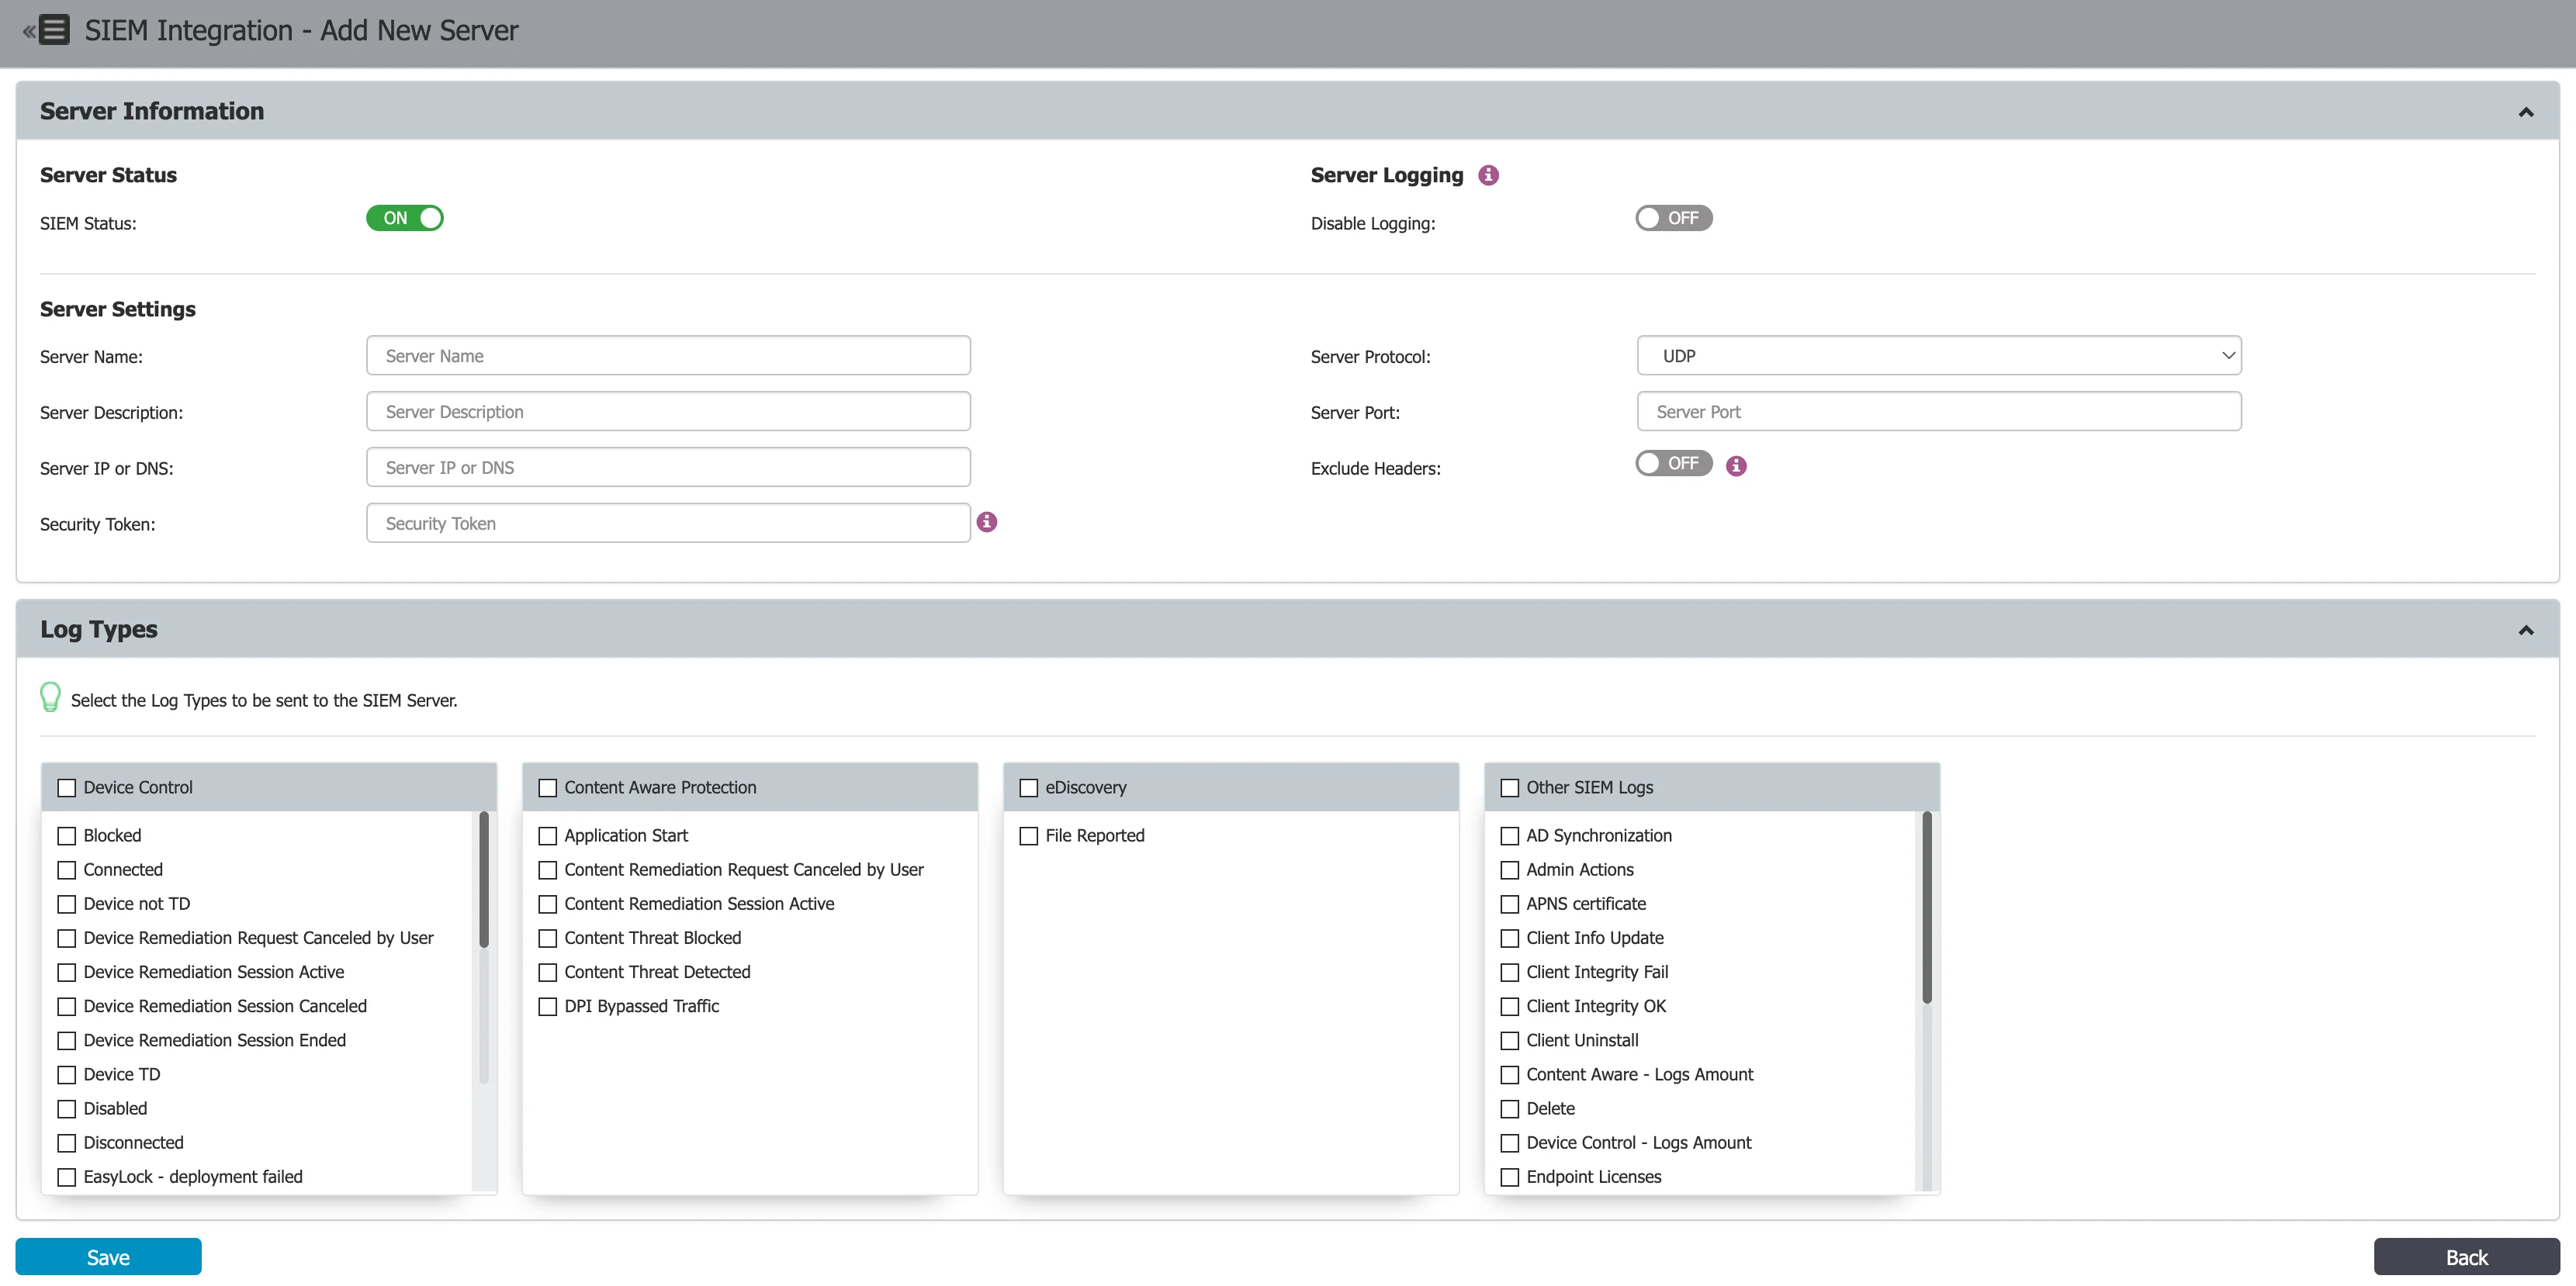
CAUTION: Please be aware that the SIEM integration feature in Endpoint Protector comes with certain limitations. To make use of the latest features of this SIEM integration, your environment must meet specific criteria. It should have been installed from image version 5.6.0.0 or a more recent version, and maintain an active HTTPS connection. Please note that SIEM integration is only accessible in environments that meet these stringent prerequisites.
SIEM Encryption
When using the TCP protocol, you have the option to encrypt communication to each SIEM server. In order to do so, enable the Encryption setting and then Upload the root CA that was used to sign the server certificate for the SIEM server in .pem format.
CAUTION: The certificate used on the SIEM server must be signed by the same CA as the one uploaded to the Endpoint Protector Server.
Endpoint Protector will check the following:
- The SIEM certificate is signed by the CA, and the CN or SAN matches the name for the SIEM machine
- The Root CA has the Basic Constraint CA set to true
When validating a certificate, the entire certificate chain must be valid, including the CA certificate; if any certificate of the chain is invalid, the connection will be rejected.
Make sure you update the certificate files when they expire.
NOTE: If you applied the latest patch using the option, and cannot view the SIEM encryption setting, please contact Customer Support.
SIEM Export log formats
Each log entry follows this
format: log_type: [field_name] field_value | [field_name] field_value | [field_name] field_value ..
Log structure
The log_type is a combination of "Device Control" and the event name.
Example terms for log types include:
-
Device Control – Blocked
-
Device Control – Connected
-
Device Control – Device not TD
To see the supported events on the Endpoint Protector Server, navigate to Appliances > SIEM Integration > SIEM Policy.
Column header
The column header is [field_name].
Example column headers include:
- [Event Name]
- [Client Computer]
- [IP Address]
You can find the complete list of [field_name] in the
SIEM Export Log Fields section.
Contents of the column
The field_value represents the actual contents within the column.
Example field values include:
- Offline Temporary Password used
- User’s computer
- 192.168.0
SIEM Export Log Fields
This section presents the field names for the Endpoint Protector Server's "Standard format," which has been available since the Endpoint Protector 5.9.4 release. Endpoint Protector Server exports logs to SIEM solutions with a maximum of 2,100 characters. Since the Endpoint Protector 5.9.1 release, we have increased the message limit to 10000 characters.
Device Control
The standard format for the Device Control fields is as follows:
- [Log ID]
- [Event Name]
- [Client Computer]
- [IP Address]
- [MAC Address]
- [Serial Number]
- [OS]
- [Client User]
- [Device Type]
- [Device]
- [Device VID]
- [Device PID]
- [Device Serial]
- [EPP Client Version]
- [File Name]
- [File Hash]
- [File Type]
- [File Size]
- [Justification]
- [Time Interval]
- [Date/Time(Server)]
- [Date/Time(Client)]
- [Date/Time(Server UTC)]
- [Date/Time(Client UTC)]
Content Aware Protection
When Reporting V1 is utilized, fields associated with Reporting V2 content, such as [Destination Details], [Email Sender], and [Email Subject], will remain blank.
The standard format for the Content Aware Protection fields is as follows:
- [Log ID]
- [Client Computer]
- [IP Address]
- [MAC Address]
- [Serial Number]
- [OS]
- [Client User]
- [Content Policy]
- [Content Policy Type]
- [Destination Type]
- [Destination]
- [Destination Details]
- [Email Sender]
- [Email Subject]
- [Justification]
- [Device VID]
- [Device PID]
- [Device Serial]
- [File Name]
- [File Hash]
- [File Size]
- [Matched Item]
- [Item Details]
- [Date/Time(Server)]
- [Date/Time(Client)]
- [Date/Time(Server UTC)]
- [Date/Time(Client UTC)]
E-Discovery
The standard format for the E-Discovery fields is as follows:
- [Log ID]
- [Computer]
- [IP Address]
- [MAC Address]
- [Serial Number]
- [OS]
- [Policy]
- [Matched type]
- [Matched Item]
- [Path]
- [Discovered at]
- [Discovered at (UTC)]
Other SIEM Logs
User Login/User Logout
The standard format for the Other SIEM Logs fields is as follows:
- [Log ID]
- [Client Computer]
- [IP Address]
- [MAC Address]
- [Serial Number]
- [OS]
- [EPP Client Version]
- [Client User]
- [File Name]
- [File Type]
- [Date/Time(Server)]
- [Date/Time(Client)]
- [Date/Time(Server UTC)]
- [Date/Time(Client UTC)]
Client Integrity OK/Client Integrity Fail
The standard format for the Client Integrity OK/Client Integrity Fail fields is as follows:
- [Log ID]
- [Client Computer]
- [IP Address]
- [MAC Address]
- [Serial Number]
- [OS]
- [EPP Client Version]
- [Client User]
- [File Name]
- [File Type]
- [Date/Time(Server)]
- [Date/Time(Client)]
- [Date/Time(Server UTC)]
- [Date/Time(Client UTC)]
Admin Action
The standard format for the Admin Action fields is as follows:
- [Log ID]
- [Administrator]
- [Section]
- [Action Type]
- [Before]
- [After]
- [Date/Time(UTC)]
User Information Updated
The standard format for the User Information Updated fields is as follows:
- [Log ID]
- [Client Computer]
- [IP Address]
- [MAC Address]
- [Serial Number]
- [OS]
- [EPP Client Version]
- [Client User]
- [Date/Time(Server)]
- [Date/Time(Client)]
- [Date/Time(Server UTC)]
- [Date/Time(Client UTC)]
Policies Received
The standard format for the Policies Received fields is as follows:
- [Log ID]
- [Event Name]
- [Client Computer]
- [IP Address]
- [Client User]
- [OS]
- [Date/Time(Server)]
- [Date/Time(Client)]
- [Date/Time(Server UTC)]
- [Date/Time(Client UTC)]
Uninstall Attempt / Forced Uninstall Attempt
The standard format for the Uninstall Attempt/Forced Uninstall Attempt fields is as follows:
- [Log ID]
- [Event Name]
- [Client Computer]
- [IP Address]
- [MAC Address]
- [Serial Number]
- [OS]
- [Client User]
- [Device Type]
- [Device]
- [Device VID]
- [Device PID]
- [Device Serial]
- [EPP Client Version]
- [File Name]
- [File Hash]
- [File Type]
- [File Size]
- [Justification]
- [Time Interval]
- [Date/Time(Server)]
- [Date/Time(Client)]
- [Date/Time(Server UTC)]
- [Date/Time(Client UTC)]
Client Uninstall
The standard format for the Client Uninstall fields is as follows:
- [Log ID]
- [Client Computer]
- [IP Address]
- [MAC Address]
- [Serial Number]
- [Department]
- [EPP Client Version]
- [Last Time Online]