Content Detection, Remediation and Compliance
Content detection identifies sensitive data across various file types and applications. Remediation allows users to resolve policy violations, while compliance ensures adherence to regulations like HIPAA and GDPR. By configuring detection rules, denylists, allowlists, and contextual filters, organizations can control the transfer of sensitive information and mitigate risks associated with data leakage.
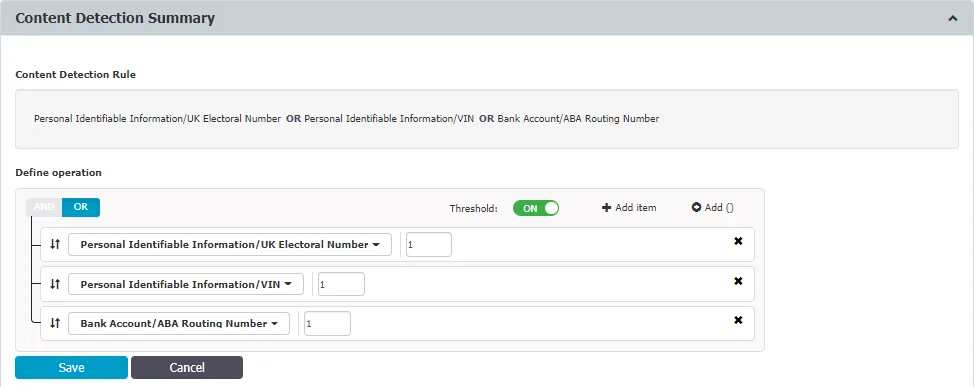
Content Detection Summary
The Custom Detection Summary displays all predefined content, custom content, regular expressions, and HIPAA which were checked in the Content Aware Policy.
You can use the Content Detection Rule to define the policy by combining multiple criteria using the operators AND, OR.
To edit a Content Detection Rule, click Edit and then, on the Define operation section, provide the following information:
- Select operator - OR (default), AND
- Enable Threshold and type the number adjacent to each entry from 1 to 1000; this will disable the Global Threshold setting from the Content Detection, Remediation and Compliance section.
- Add item and select from the drop-down Personal Identifiable Information; before saving the operation, you can change PIIs by selecting from the drop-down list. To delete an entry from the list, click x adjacent to each PII.
- Add group
Use the up and down arrows or drag and drop an entry from the list to change the order from the operation.
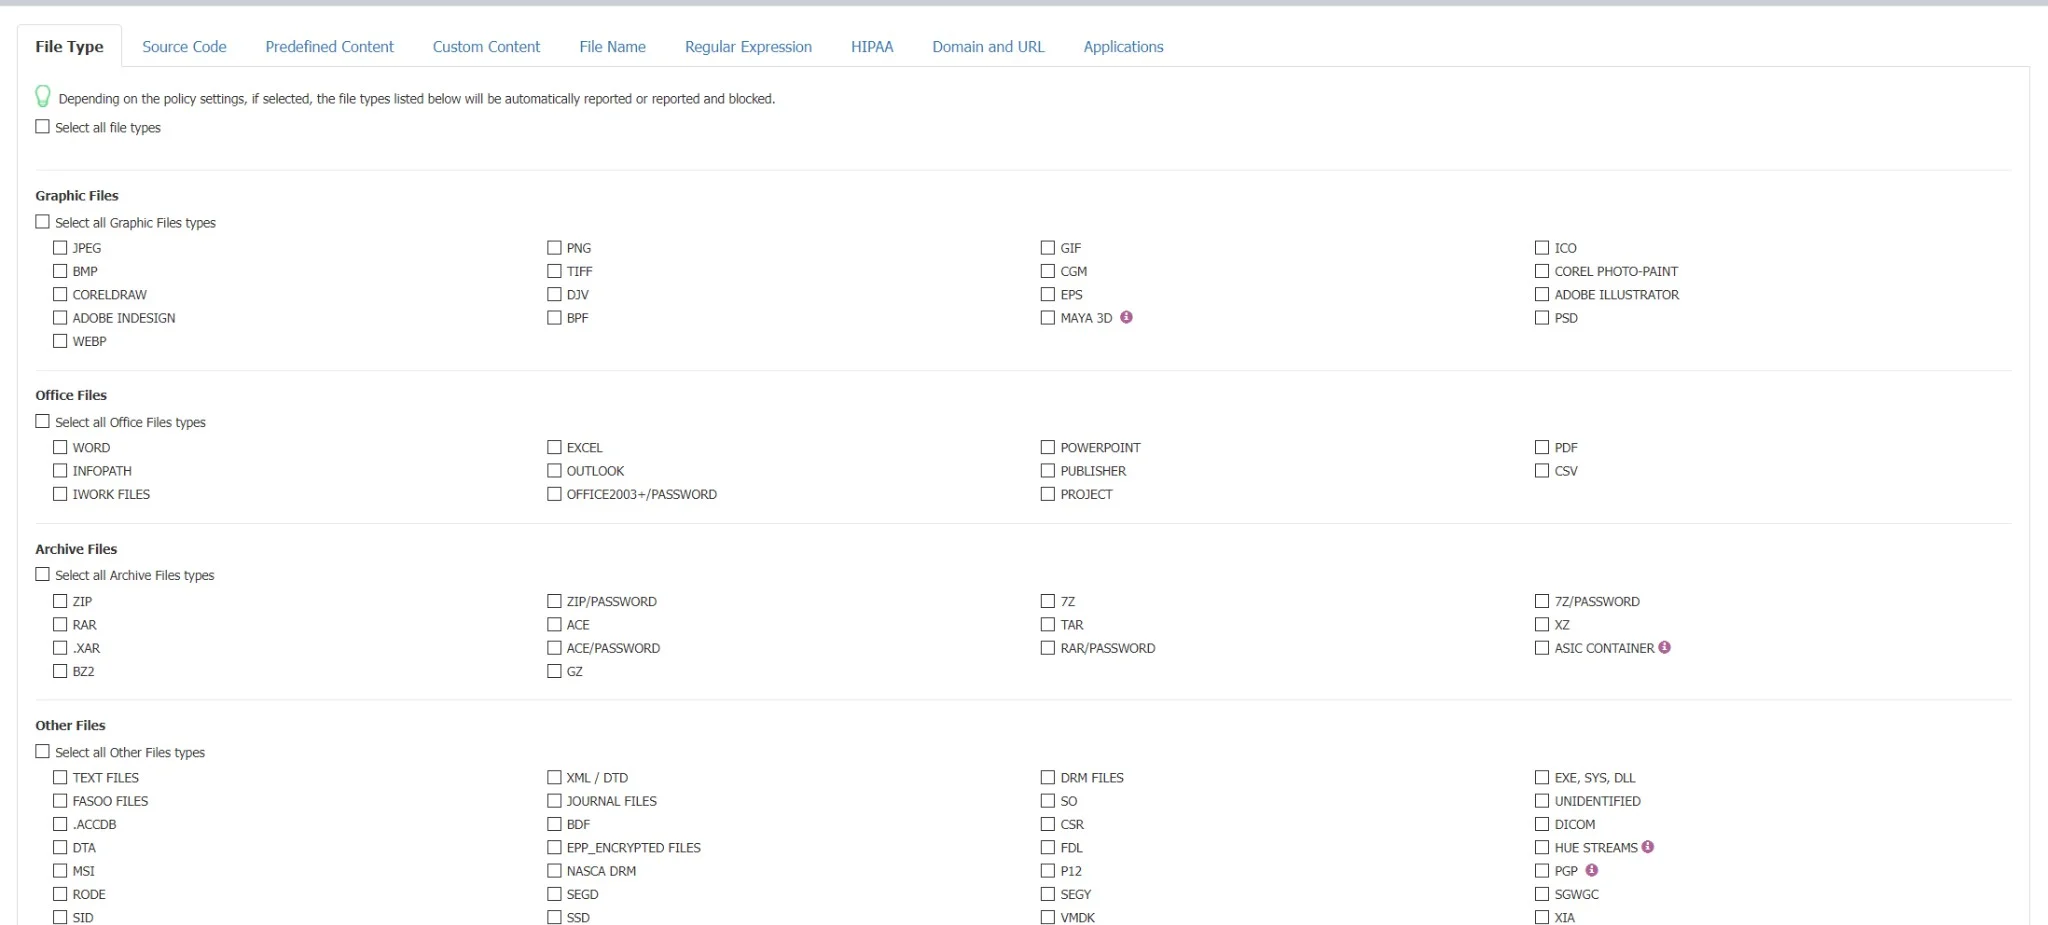
To Restrict Content Detection, select from the drop-down list the file types you want to apply the Content Detection Rule to.
If no file type is set, the content defined in the content Detection Rule will be searched in all the file types that are not blocked by this policy.
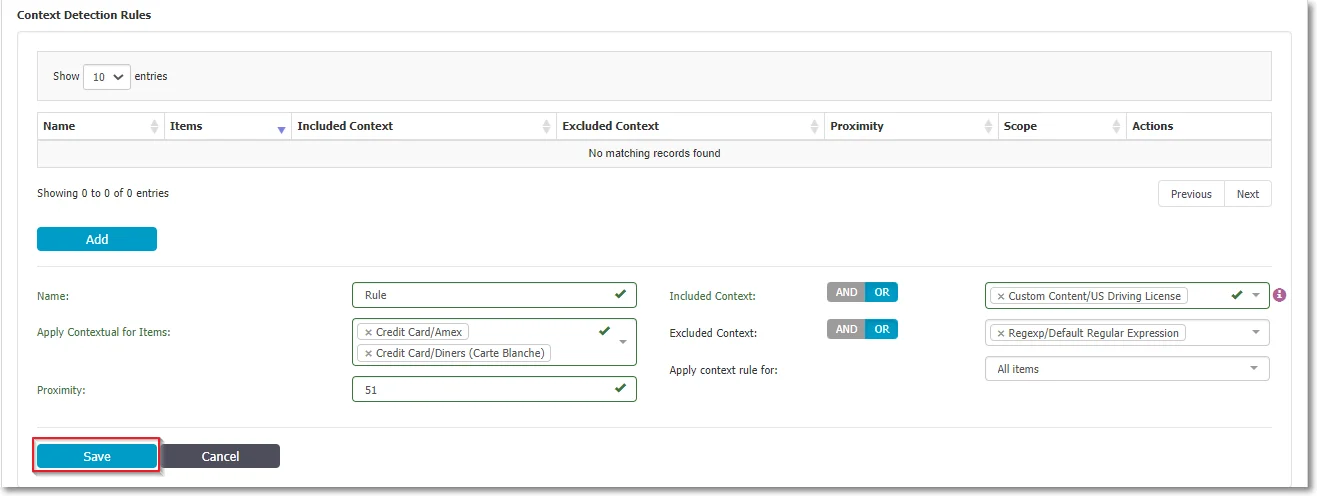
The Context Detection Rules allows you to specify the minimum or maximum number of contexts matches for one or more threat types previously defined in the Content Detection Rule and reducing false positive detections.
CAUTION: You can create Context Detection Rules only if you define a Content Detection Rule using an OR operator.
To create a new Context Detection Rules click Add, fill in the following and then Save:
-
Name – add a name for the context detection rule
-
Apply Contextual for Items – select from the drop-down list the predefined content selected in the Content Detection Rule
-
Proximity – add a number between 50 and 3000
-
Included Context – select the AND/OR operator and then select from the drop-down list the custom content, RegEx or HIPPA you want to be included in the rule
-
Excluded Context – select the AND/OR operator and then select from the drop-down list the custom content, RegEx or HIPPA you want to be excluded from the rule
NOTE: Custom content used in Content Detection rules will not be displayed in the included and excluded context drop-down lists.
-
Apply context rule for - select if you want to apply the rule to All items or At least 1 item.
NOTE: You can create a maximum number of 15 Context Detection Rules.
CAUTION: To address conflicts between per-policy and Global Contextual Rules, Endpoint Protector clients no longer receive Global Contextual Rules if at least one policy has its individual Contextual Rule set. This marks the deprecation of Global Contextual Rules, emphasizing the prioritization of individual policy configurations.
Policy Denylists and Allowlists
The policy denylist and allowlist specify the content to be detected – it includes file type filtering, predefined content filtering, custom content filtering, file allowlists, regular expressions and domain allowlists, deep packet inspection, etc.
NOTE: Upgrade to Endpoint Protector 5.9.4+ to take advantage of increased denylist/allowlist capabilities: 1000 lists (previously 10/100) and 50,000 entries per list.
Policy Denylists
You can use the following Denylists:
-
File Type - since many files (e.g.: Programming Files) are actually .TXT files, we recommend more precaution when selecting this file type to avoid any unexpected effects.
NOTE: File type detection will not always work accurately for some very large password-protected Microsoft Office files.
-
Source Code - An N-gram based detection method is used to increase the accuracy of these file types. However, as various source code is closely linked together (e.g.: C, C++, etc.), these also are checked. To make things easier, Endpoint Protector automatically marks these correlations.
When the Deep Packet Inspection is enabled an extended way to monitor Git is available. If Git is selected from the Restricted Apps, Git-related actions (fetch, clone, push, pull) will be blocked, regardless of the git application used. This will result in completely blocking Git. However, Deep Packet Inspection Allowlists can be used to allow a specific Git, linked to a specific domain (e.g.: internalgit.mydomain.com).
NOTE: All Git traffic is encrypted therefore, allowing a specific domain will result in any file transfers to be allowed, regardless of content or other policy restrictions defined.
If Git is selected from Restricted Apps, no Endpoint Protector client notifications and logs will be generated for the Git-related actions (fetch, clone, push, pull).
Italian SSN and ID Usage
Starting with Endpoint Protector server version 5.7.0.0, Italian SSN was added to the PII list. Similar to Italian ID, if selected from the list of PIIs, the SSN will detect the same entity.
RECOMMENDED: When using Italian SSN and ID, we recommend you upgrade to the latest Endpoint Protector agent version.
To maintain compatibility with older agent versions after the server upgrade, Italian ID will remain under section ID and server upgrade will retain previous settings, including Italian ID.
- Use Italian SSN when deploying to agent versions xxx and later
- Use Italian ID when deploying to agent versions xxx and earlier
- Use both Italian SSN and ID for a mixed environment of new and older agent versions
Because the Italian SSN and ID detect the same entity, do not select Italian ID to avoid multiple reporting results.
The new Endpoint Protector agent versions will report on both Italian ID and SSN.
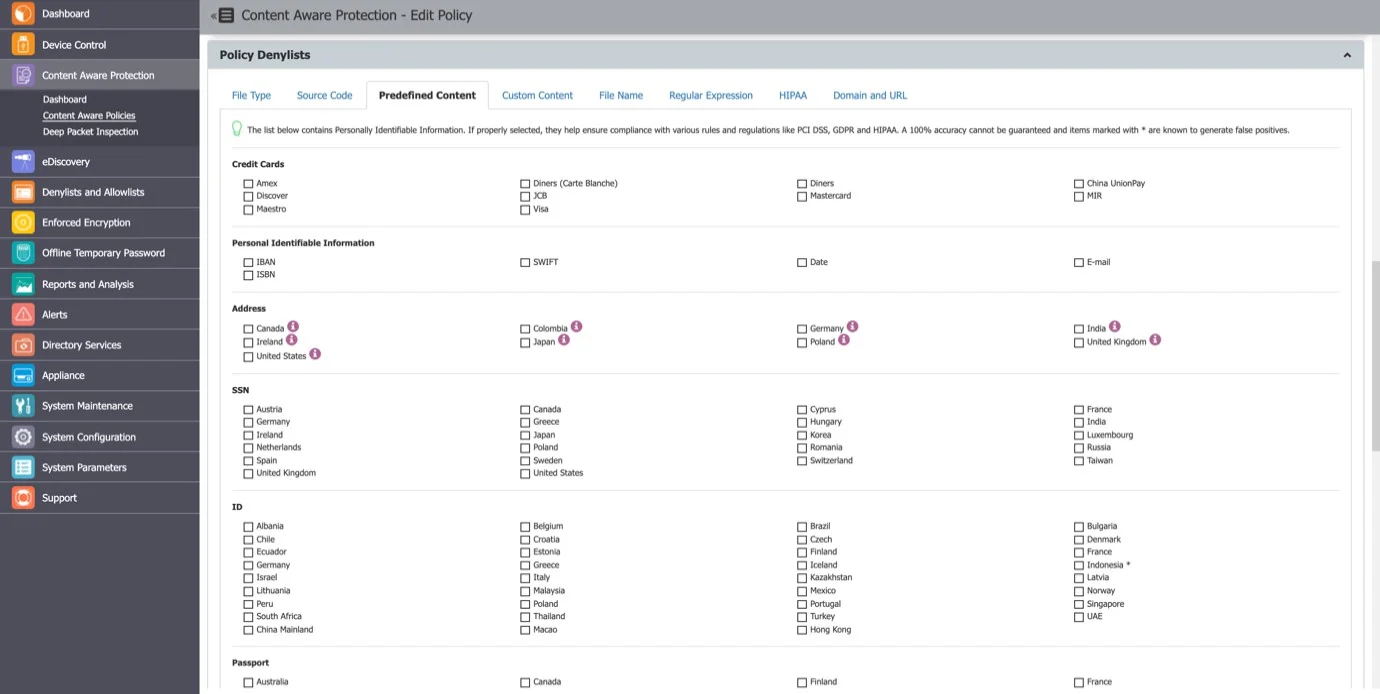
- Predefined Content - the majority of the Predefined Content items are country-specific (e.g. Australia, Canada, Germany, Korea, United Kingdom, United States, .etc.). To avoid a large number of logs or potential false positives, only enable the Passports that apply to your region or sensitive data.
- Custom Content
- File Name
- File Location
- Regular Expressions
- HIPAA
- Domain and URL
HIPAA Compliance
Any Content Aware Protection policy automatically becomes a HIPAA policy if any options from the HIPAA tab are selected. The available options refer to FDA-approved lists and ICD terms. These will automatically report or block transfer files containing PII like Health Insurance Numbers, Social Security Numbers, Addresses, and much more.

NOTE: For a HIPAA policy to be effective and more accurate, it is recommended to utilize Contextual Detection Rules in conjunction with Predefined Content and Custom Content filters. To enhance precision, users should also enable ‘Whole Word Only’ under Custom Content. The ICD-11 dictionary focuses solely on specific terms, not insurance codes.
NOTE: It is advisable to set appropriate thresholds and combinations of arguments to minimize false positives for shorter disease descriptions
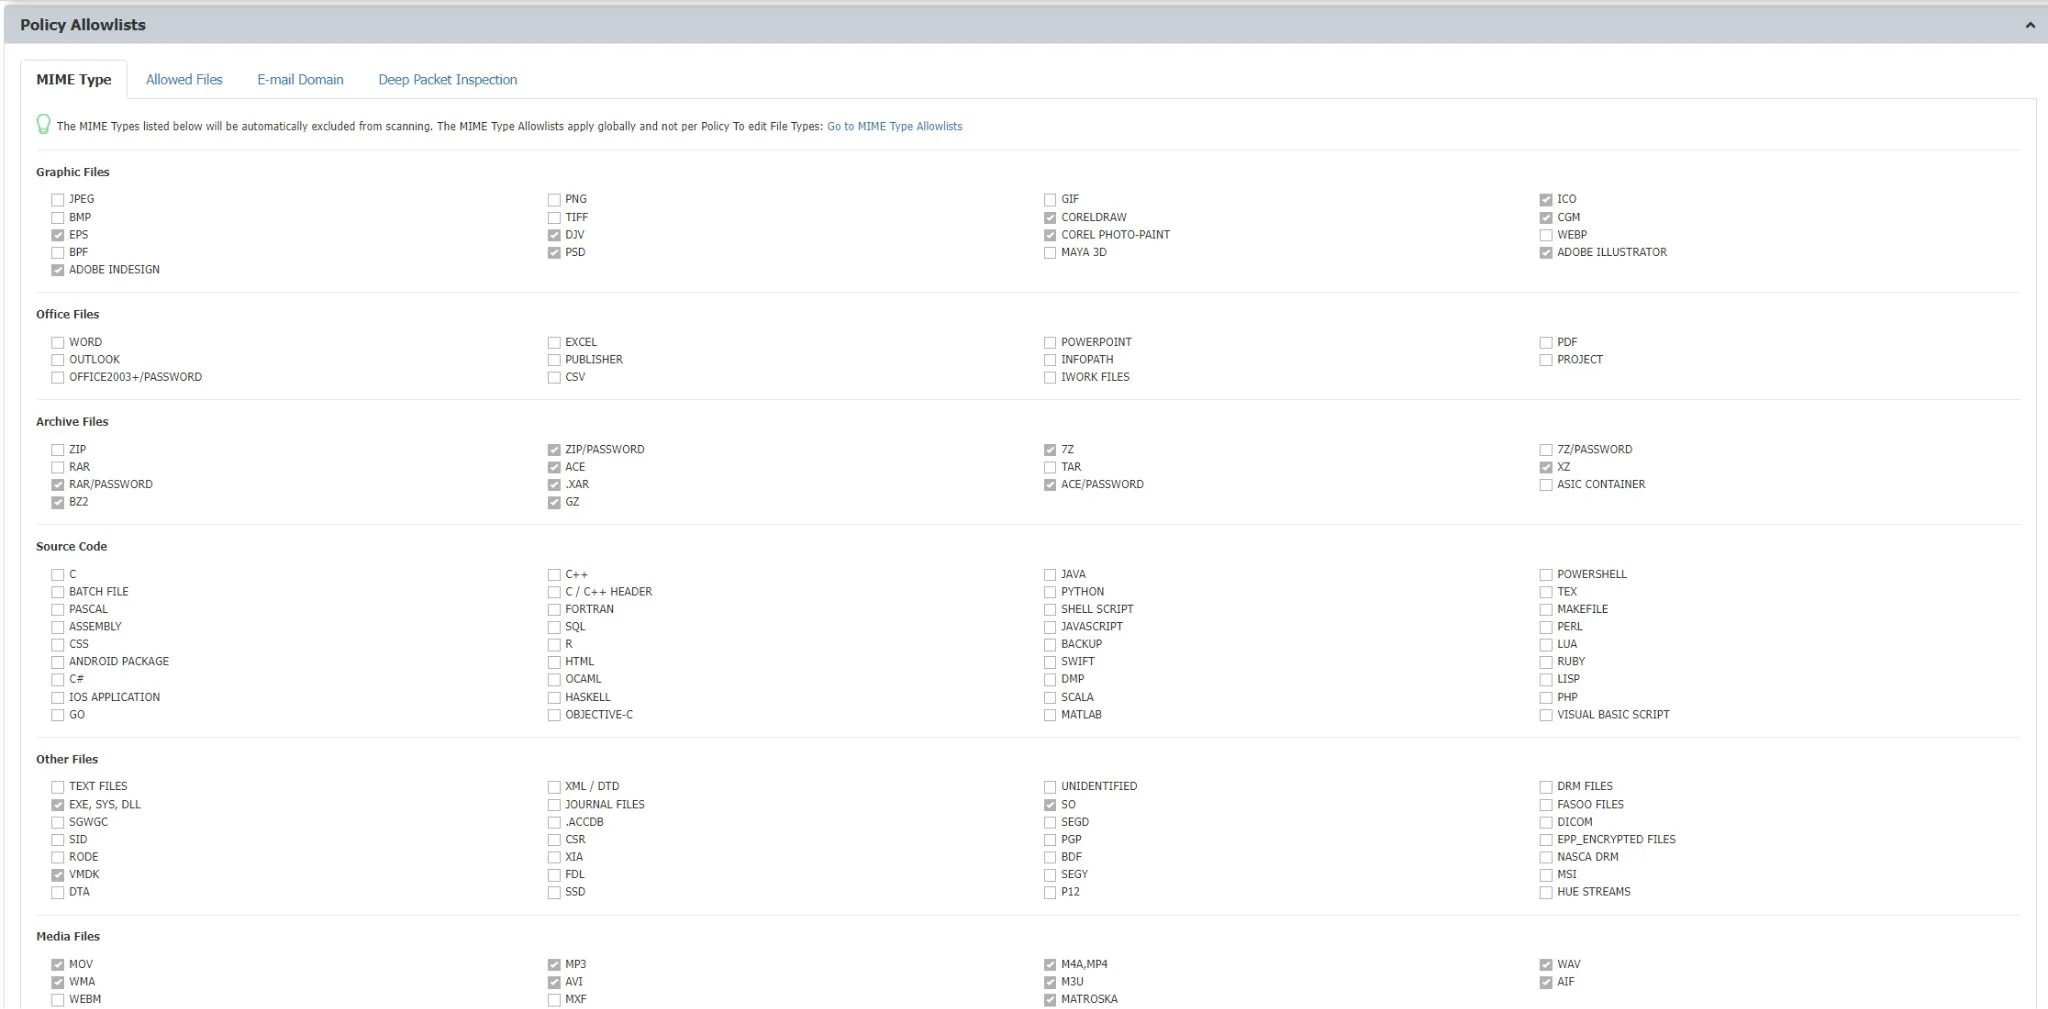
Policy Allowlists
You can use the following Allowlists:
- MIME Type
- Allowed Files
- File Location
- Network Share
- Email Domain
- URL Name
- Deep Packet Inspection
NOTE: For detailed information on Denylists and Allowlist, refer to the Denylists and Allowlists topic.
CAUTION: The Content Aware Protection Policies continue to report and/or block sensitive data transfers from protected computers even after they are disconnected from the company network. Logs will be saved within the Endpoint Protector Client and will be sent to the Server once the connection has been reestablished.
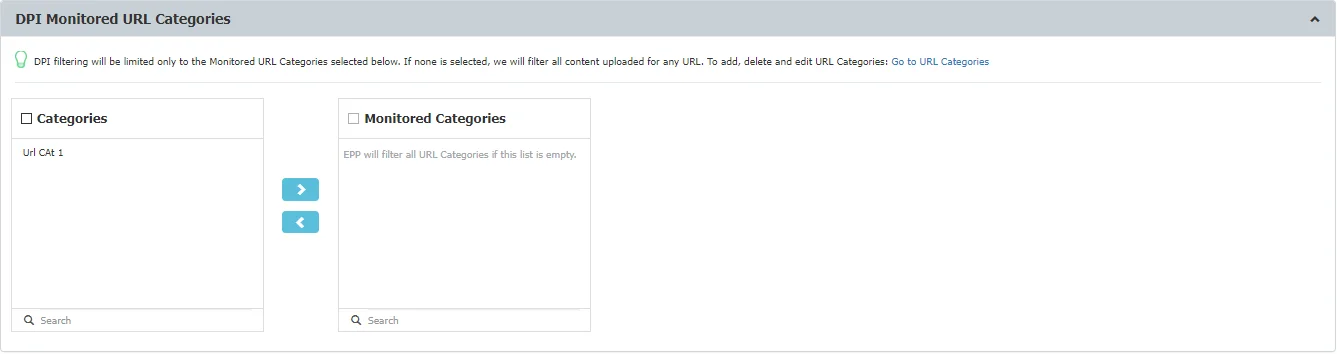
DPI Monitored URL Categories
You can define the monitored URL categories the Deep Packet Inspection will filter. If none is selected, Deep Packet Inspection will filter all content uploaded for any URL.
You can add, delete and edit Denylists and Allowlists from the Denylists and Allowlists section.
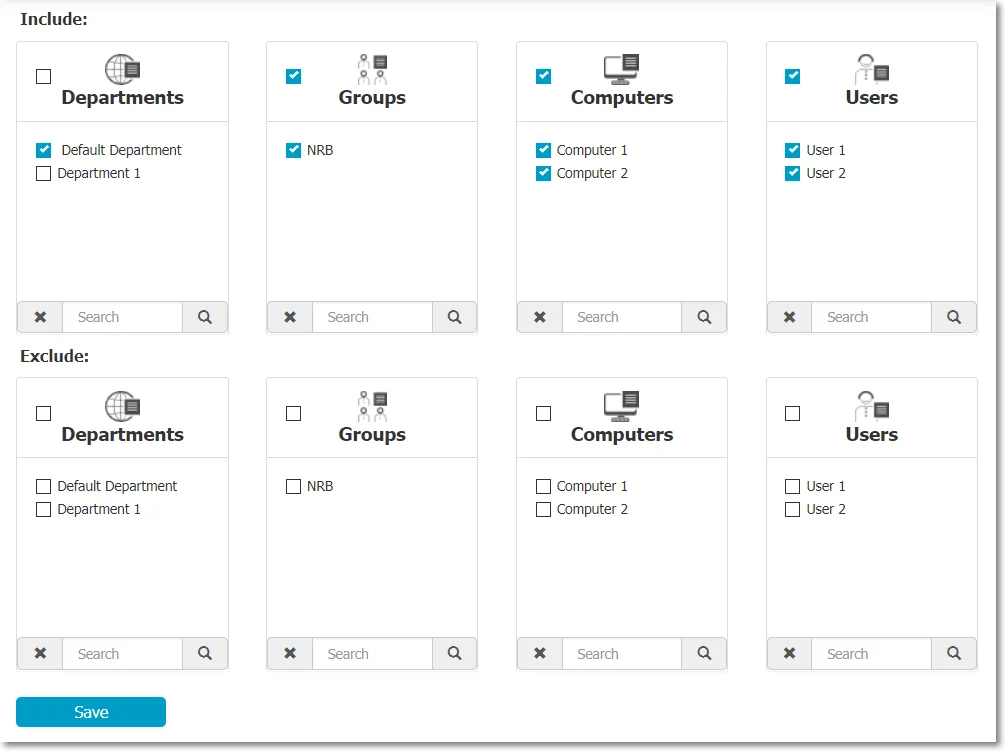
Policy Entities
The final step in creating a policy is selecting the entities that it will apply to from the available ones:
- Departments
- Groups
- Computers
- Users
NOTE: If a Content Aware Policy was already enforced on a computer, user, group, or department, when clicking on it, the corresponding network entities on which it was applied will be highlighted.
You can also define a list of entities that will be excluded from the policy by selecting from the Excluded section.
Block and Remediate Policies
Block and Remediate policies are a category of Content Aware Policies. This category of policies gives the end-user the possibility to resolve the Content Aware threats by using justifications.
You can create Block and Remediate Content Aware Policies from the Content Aware Protection section, Create Content Aware Policies, Policy Action, Block and Remediate.
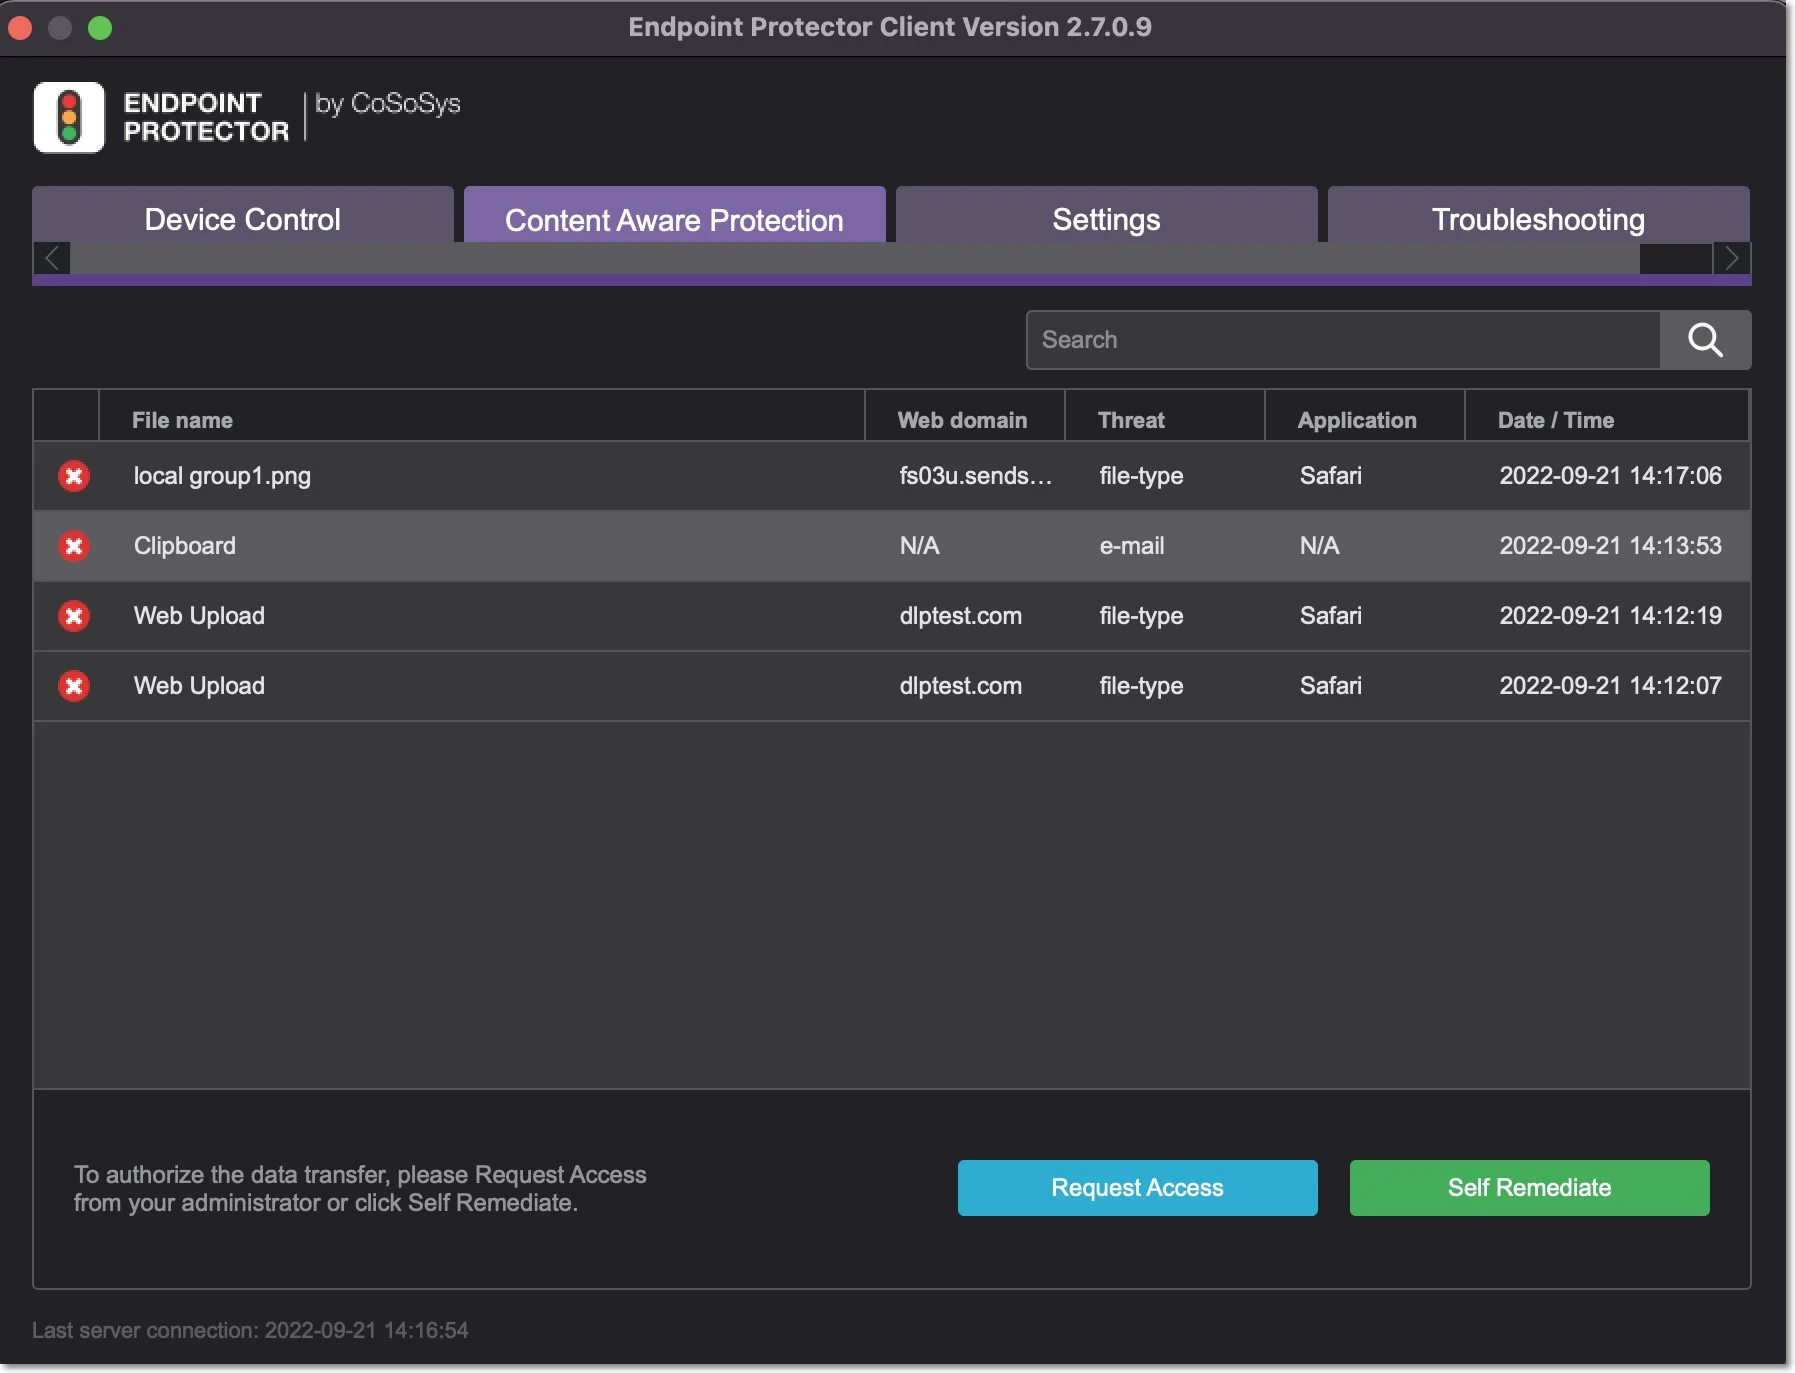
When detected, Content Aware threats are displayed:
- in the Endpoint Protector notifier, the Content Aware tab
- as pop-up notifications if this option is enabled from the Settings section
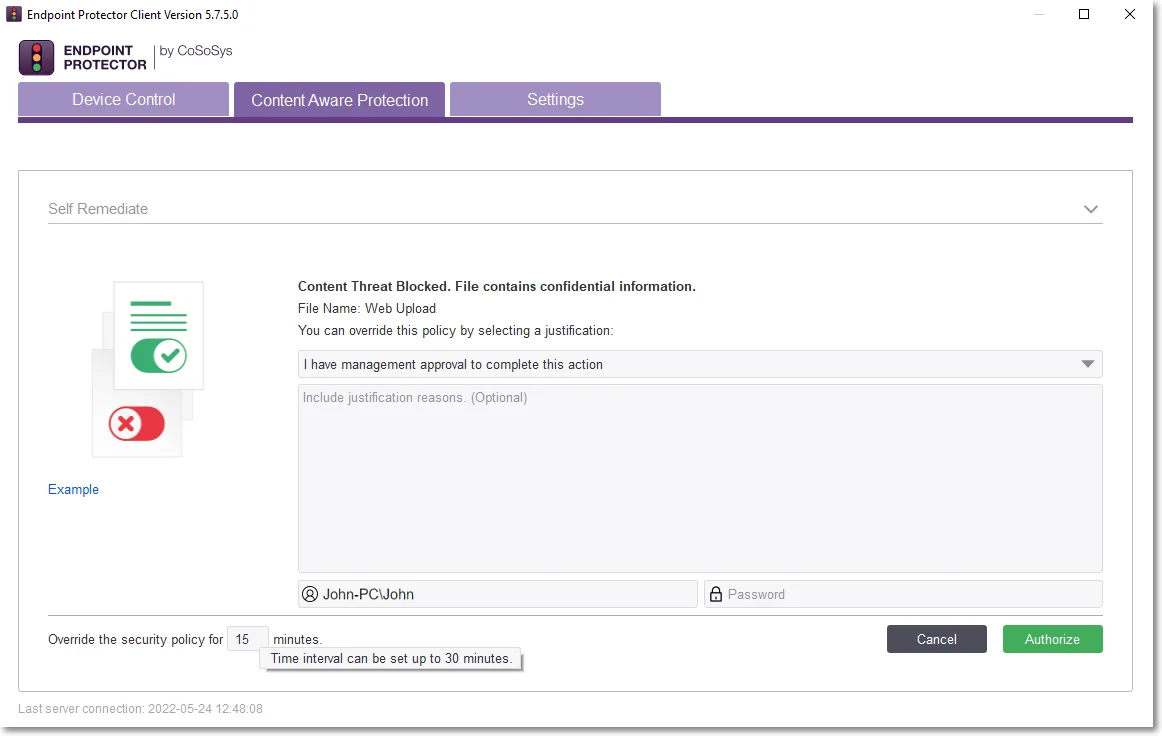
To remediate the threat, the user has to follow these steps:
Step 1 – Open the Endpoint Protector notifier and go to the Content Aware Protection tab.
Step 2 – Select the file for remediation and click Self Remediate.
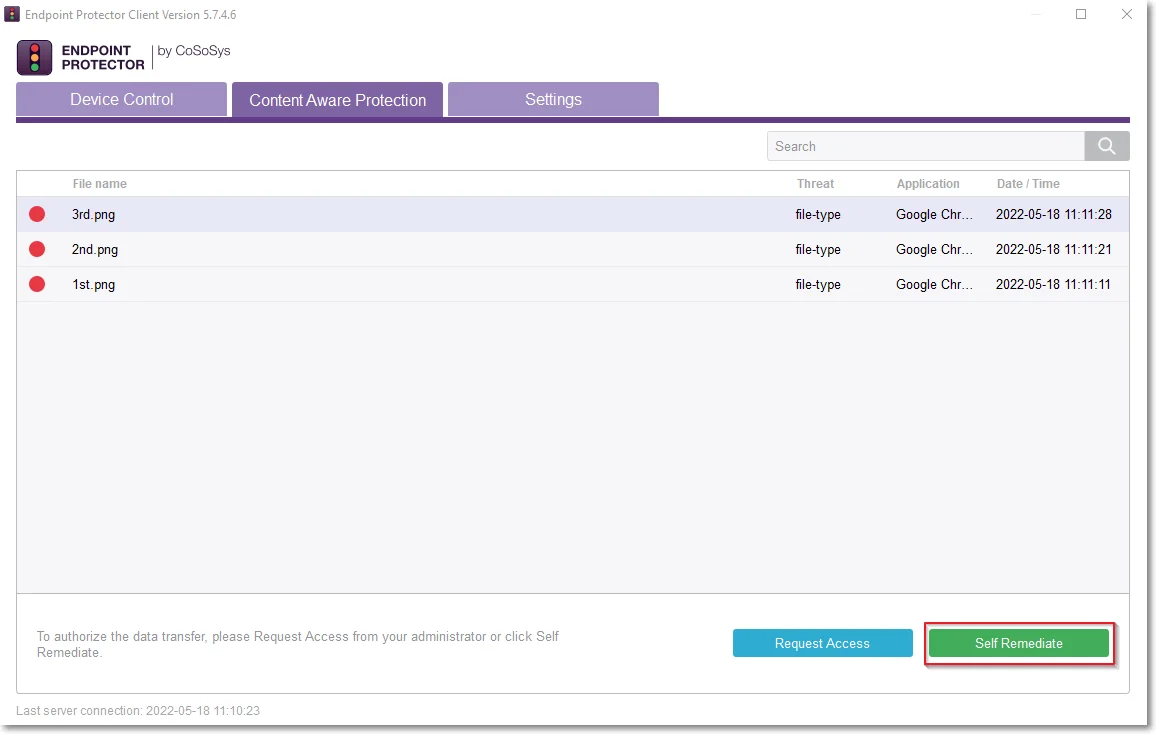
Step 3 – On the Self Remediate section:
- select a justification from the drop-down list
- add a reason for the justification (if required)
- navigate to the custom URL situated under the logo
- add your credentials if the Require Credentials setting was enabled (click the username icon to refresh your current username)
- add the number of minutes needed to remediate the device (you can hover over the default number to view the maximum time interval)
- click Authorize
NOTE: You can manage more settings for the Self Remediate feature from System Preferences and User Remediation sections.
User Remediation for Content Aware Protection can remediate file transfers via web domains.
To apply User Remediation on specific web domains, enable Deep Packet Inspection from Global/Computers/Users/Group. This feature will then be enabled by default for Browsers and Desktop Email applications.
To enable Deep Packet Inspection for other applications, navigate to the Content Aware Protection module, specifically the Deep Packet Inspection section, and manually activate it in the Actions column.
-
When Deep Packet Inspection is enabled – you can apply User Remediation for files transferred on a specific web domain.
For example; If you upload a file on uploadsite.com and apply User Remediation, you can only upload on uploadsite.com, not on otheruploadsite.com.
-
When Deep Packet Inspection is disabled – you can only apply User Remediation for files transferred on a specific application.
For example; If you upload a file on Chrome and apply User Remediation, you can upload the file on any URL from Chrome.
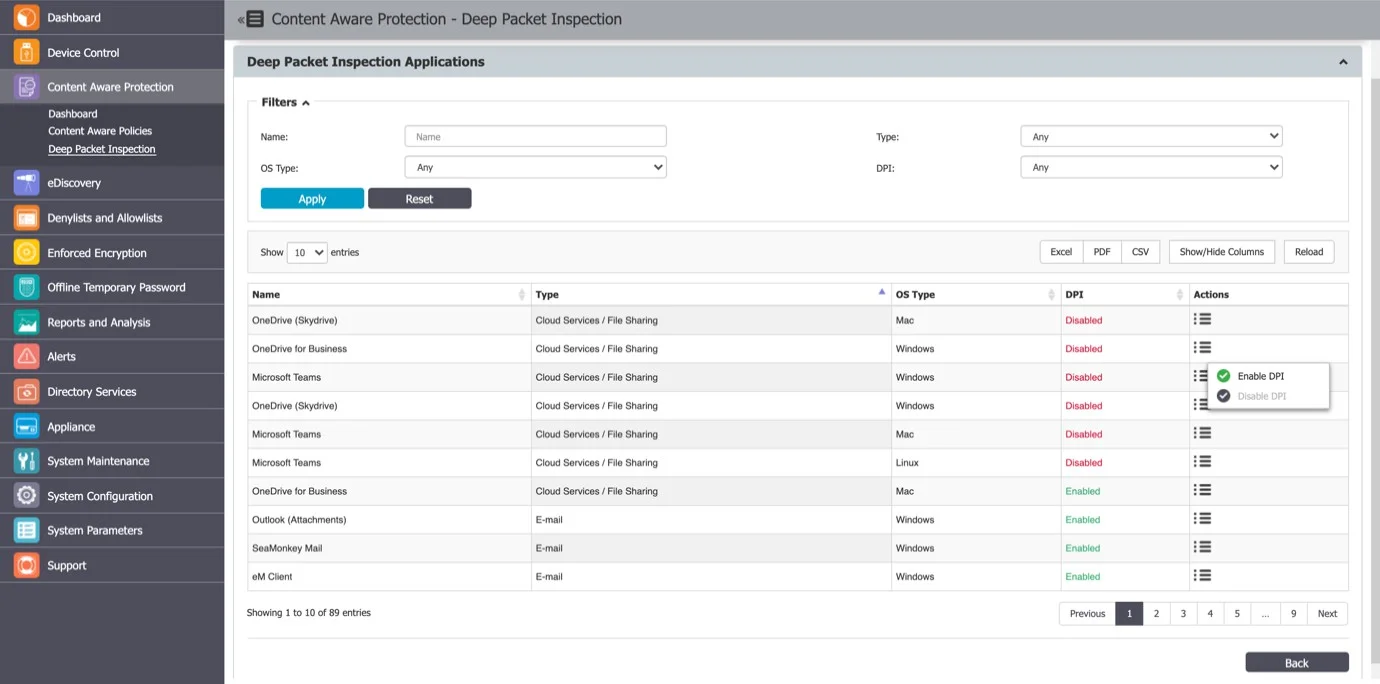
You can view the web domains used for the User Remediation in the Endpoint Protector Client, the Content Aware Protection tab on the Web Domains column.
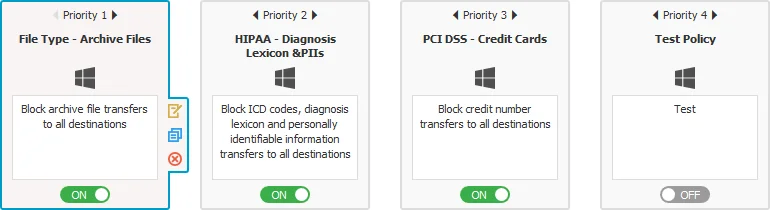
Applying multiple Content Aware Policies
Content Aware Protection is a very versatile tool, where you can perform the granular implementation of actions regarding the report and/or block and report of files.
A Content Aware Policy is a set of rules for reporting or blocking & reporting the selected information. All the other options left unchecked will be considered as Ignored by Endpoint Protector.
When applying two policies to the same PC, it is possible to block one type of file, for example, PNG files, when they are uploaded through Mozilla Firefox, while a second policy is to report only PNG files when they are uploaded through Internet Explorer. In the same way, it is possible to report only files that contain confidential words from a selected dictionary that are sent through Skype, while the second policy is to block the same files if they are sent through Yahoo Messenger. Similarly, it is possible to create combinations that block a file type or a file that contains predefined content/custom content/regular expression for one application, while letting it through reporting it only for another.
The following rules are used in the application of one or more Content Aware Policies on a computer/user/group/department for each separately selected item (e.g., a specific file type, predefined information, or a custom content dictionary):
| Policy A with Priority 1 | Policy B with Priority 2 | Policy C with Priority 3 | Endpoint Protector Action |
|---|---|---|---|
| IGNORED | IGNORED | IGNORED | Information will not be blocked or reported. |
| IGNORED | IGNORED | REPORTED | Information will be reported. |
| IGNORED | REPORTED | REPORTED | Information will be reported. |
| REPORTED | REPORTED | REPORTED | Information will be reported. |
| IGNORED | IGNORED | BLOCKED | Information will be blocked. |
| IGNORED | BLOCKED | BLOCKED | Information will be blocked. |
| BLOCKED | BLOCKED | BLOCKED | Information will be blocked. |
| IGNORED | REPORTED | BLOCKED | Information will be reported. |
| IGNORED | BLOCKED | REPORTED | Information will be blocked. |
| REPORTED | IGNORED | BLOCKED | Information will be reported. |
| BLOCKED | IGNORED | REPORTED | Information will blocked. |
| REPORTED | BLOCKED | IGNORED | Information will be reported. |
| BLOCKED | REPORTED | IGNORED | Information will be blocked. |
CAUTION: The information left unchecked when creating a policy will be considered as Ignored by Endpoint Protector and not as Allowed.
The deep packet inspection feature has been expanded to email scanning based on domain allowing.
RECOMMENDED: HIPAA should be considered a Content Aware Policy that, besides the options in the HIPAA tab, also has the below configuration:
- All the File Types recognized should be included.
- All Personal Identifiable Information should be Country Specific to the United States (Address, Phone/Fax, and Social Security Numbers)
- Both Internet Protocol Addresses Access should be selected
- The URL and Domain Allowlists options should also be checked
HIPAA policies can be created and used on their own or in combination with regular policies, for better control of the data inside the network. These policies are available for Windows, Mac OS X, or Linux computers.