How do I automate BitLocker deployment for my enterprise with Group Policy and Endpoint Policy Manager?
Many organizations want to protect the data on the end-user's computers from prying eyes. Especially laptops that may be virtually anywhere. BitLocker is an encryption feature built into computers running Window 10 Professional, Enterprise and Education that creates a secure environment for your data.
Deploying BitLocker to an enterprise can be a daunting task. Group Policy in combination with Netwrix Endpoint Policy Manager (formerly PolicyPak) can automate the entire process with one GPO.
This document assumes the following
- Compatible version of Windows 10
- TPM present and enabled on the computer (TPM uses hardware level encryption to store BitLocker keys allowing zero-touch deployment and computer start-up)
Implement BitLocker
The instructions below will configure BitLocker to encrypt the used space on the SystemDrive with 256-bit encryption and save the Recovery Password and key to Active Directory. There are many more options that can be configured either through additional policies or customized script if so required.
Step 1 – Create a Group Policy on the desired Domain / OU and Edit
Step 2 – Expand Computer Configuration -> Endpoint Policy Manager and click on Administrative Templates Manager
Step 3 – Add a new collection
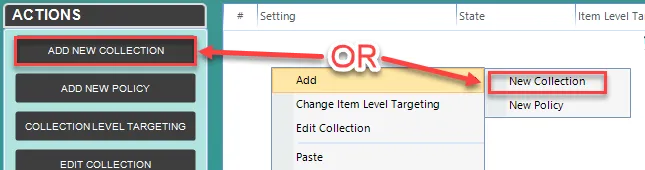
Step 4 – Give the Collection a descriptive name and, if required, set Item Level Targeting (ILT can filter the policy based on many different criteria including computer type (e.g. laptops), Operating System (e.g. Windows 10) or Security Group (e.g. Sales))
Step 5 – Double-click to open the collection
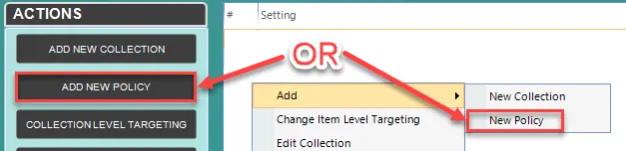
Step 6 – Add a new Policy
Step 7 – Browse to Windows Components and click on BitLocker Drive Encryption
Step 8 – Open "Store BitLocker recovery information in Active Directory Domain Services (Windows Server 2008 and Windows Vista)" and set the following configuration
-
Select "Enable"
-
Check "Require BitLocker Backup to AD DS"
-
Set Select BitLocker recovery information to store: "Recovery passwords and key packages"
-
Click OK

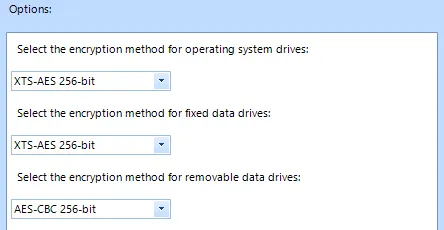
Step 9 – In the same location, open "Choose drive encryption method and cipher strength (Windows 10 [version 1511] and later) and set the following configuration
-
Select "Enable"
-
Set the encryption method for drive type (CBC-AES is recommended for drives that may connect to non-Windows 10 computers)
-
Click OK
Step 10 – Click CLOSE

NOTE: If deploying different BitLocker configurations for different groups of users or computers, repeat steps 4 through 10 for each different configuration, setting the ILT on the collection to target your desired groupings.
Step 11 – Still under Endpoint Policy Manager, click on Scripts Manager
Step 12 – Add a new policy to start the Scripts Manager wizard
-
Click NEXT
-
Select "Apply this policy to computer (default) and click NEXT

-
Configure "On apply action"
-
On the dropdown that says "(None)", select "Batch Script" and type in the following text
Manage-bde -on %systemdrive% -Used
-
Click NEXT
-
-
Configure "On revert action"
-
On the dropdown that says "(None)", select "Batch Script" and type in the following text
Manage-bde -off %systemdrive%
-
Click NEXT
-
-
Select either "Once" or "Once or when forced" and click NEXT

-
Give the policy a descriptive name and set Item Level Targeting if required
-
Click FINISH
Step 13 – Close Group Policy Management Editor
When the policy has been deployed to the user, they will receive a notification that a reboot will be required. It is not necessary that it be one immediately. Upon reboot BitLocker will automatically start to encrypt the drive with no input required from the user.