How do I use Endpoint Policy Manager Remote Work Delivery Manager to update the Client Side Extension?
If you do not have an existing software distribution solution, delivery of software and updates can be a bit of a hassle. Remote Work Delivery Manager (RWDM) can assist you in getting your software out to your endpoints. This includes keeping Netwrix Endpoint Policy Manager (formerly PolicyPak) up to date on all your endpoints.
Prerequisites
- As the CSE is required to perform an installation or update, it must already be installed on the endpoints and at version 2536 or higher.
- RWDM must properly be licensed or computer in trial mode.
- The Installation MSI file is stored on a file share accessible to all endpoints that require the update.
Creating the Policy
As with most applications, the Endpoint Policy Manager CSE come in two varieties – 64 and 32 bit. This article will cover creating a policy to cover both.
Step 1 – Create a new Group Policy Object and edit it.
Step 2 – Expand Computer Configuration -> PolicyPak -> Apps and Patch Management and click on
Remote Work Delivery Manager.
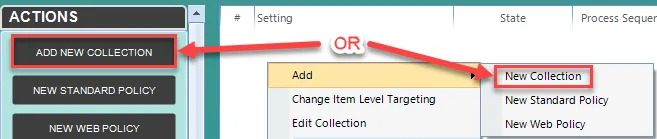
Step 3 – Add a New Collection, rename it, enable and click OK.
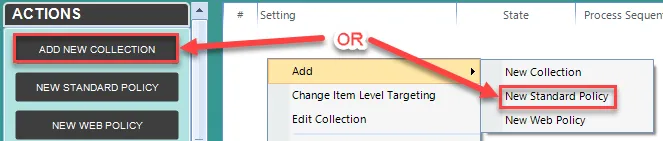
Step 4 – Add a New Standard Policy.
Step 5 – Select Copy a single File and click Next.
Step 6 – Select Apply this policy to all users who log on to the computer (switched mode) and click Next.
Step 7 – Enter the UNC path to the MSI file (32 or 64 bit) and click Next.
![]()
Step 8 – Set the directory that you want to place the downloaded file and ensure the file name is correct. Click Next.

NOTE: You can use Environment Variables.
Step 9 – Select Access both source and destination as User and click Next.
Step 10 – Select Always. This will allow the application to stay up to date as the source file is updated and replaced. Click Next.

Step 11 – Under Post-copy actions, select Run process and Type/copy in the installation
command (msiexec.exe /qb /i %destination%). Click Next.

NOTE: %Destination% = destination path + filename (%Systemdrive\temp\CSE\PPx54.MSI)
Step 12 – Under Revert actions, select Do Nothing (the application cannot uninstall itself). Click Next.

Step 13 – Rename the Policy if desired (e.g. Update PolicyPak CSE – 64bit)
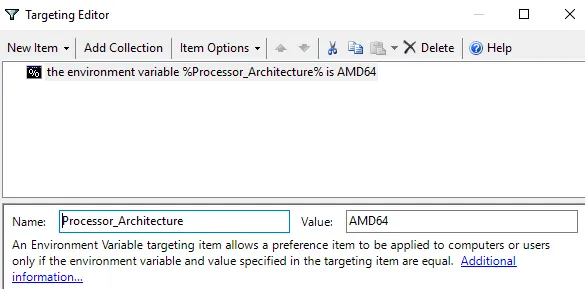
Step 14 – Enable Item Level Targeting and click Edit.

- Click on New Item and select Environment Variable
- Name = Processor_Architecture
- Value = AMD64 (for 64-bit) OR x86 (for 32-bit)
- Click OK to close
Step 15 – Click Finish.
Step 16 – If required, repeat steps 4 – 16 for 32-bit, making the necessary changes along the way.