How to install the Endpoint Policy Manager Cloud Client for use in an Azure Virtual Desktop image
The goal of this article is to define the steps needed to install the Netwrix Endpoint Policy Manager (formerly PolicyPak) Cloud (PPC) client on the Azure Virtual Desktop (AVD) Master Desktop Image so that machines created using this image automatically register to the correct PPC computer (company) group or groups at startup, and then unregister from the PPC portal at shutdown.
Option 1: SYSPREP (Recommended Method)
Stage PPC Client on the Master Desktop Image then register PPC Client at Startup and unregister PPC Client at Shutdown.
NOTE: For Persistent VMs skip the Unregister PPC Client at shutdown section (steps 4-7) as that is not needed for Persistent VMs.
Once logged into the Master Desktop Image, perform the following steps:
Step 1 – Create a folder called "PPC Client" under the root of the C: drive on the Master Desktop Image.
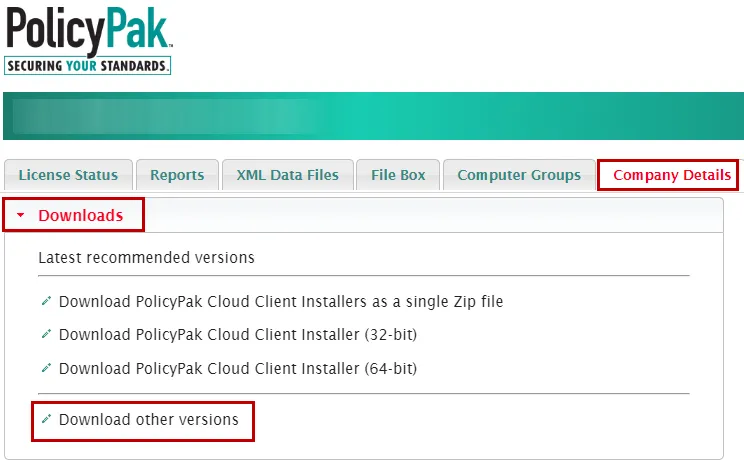
Step 2 – Download the required Endpoint Policy Manager Cloud Client MSI package (version
20.5.2449.838 or higher) to the Master Desktop Image, and save it under the "C:\PPC Client" folder
on the Master Desktop Image.
The required PPC client version (20.5.2449.838 or higher) can be found within your PPC Portal at the following page https://cloud.endpointpolicymanager.com/ManageCustomer/UserList under the Downloads section, by clicking on the Download other versions link at the bottom of the page.
Step 3 – On the Master Desktop Image, while logged in as a local administrator, install the
Endpoint Policy Manager Cloud Client MSI that you saved under C:\PPC Client, by using MSIEXEC and
including the relevant JOINTOKEN string for your environment.
For Example:
msiexec /i "C:\PPC Client\PolicyPak Cloud Client for [Customer name] x64.msi" JOINTOKEN=" AZAEllLPLTY9XKUA3CYO+ths=" /qn
For more information on creating and using a JOINTOKEN to automatically assign computers to computer groups in PPC please see this video KB: Endpoint Policy Manager Cloud: Automatically Join Groups with JOINTOKEN
NOTE: For Persistent VMs skip steps 4-7 below.
Unregister PPC Client at shutdown (required for Non-Persistent VMs):
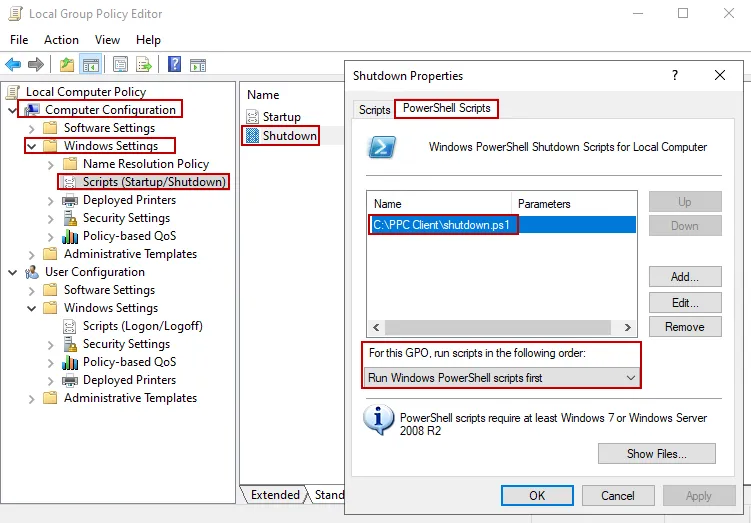
Step 4 – In the C:\PPC Client directory create a text file called shutdown.ps1
Step 5 – Run PowerShell ISE as Administrator and then edit the C:\PPC Client\Shutdown.ps1
fileby adding the following commands to the script. When done, save the file.
Set-ExecutionPolicy Unrestricted -force
PPCloud.exe /sysprep /nextstartwhenuserlogsin /JOINTOKEN:AZAEllLPLTY9XKUA3CYO+ths=
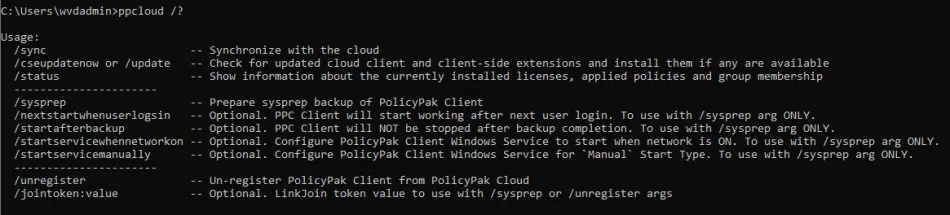
NOTE: To see details on PPCloud.exe switches run "PPCloud /?" from CMD.
Step 6 – Run GPEDIT.MSC and add an entry under Computer Configuration > Windows
Settings > Scripts (Startup/Shutdown). Select the shutdown.ps1 file for the PowerShell
Shutdown script, then click OK to save the settings.
Step 7 – If you like you can reboot the Master Desktop image machine at this point and log in as a regular user account to verify that everything works, that is,the computer is unregistered at shutdown from the PPC portal and then re-registered at login, and also shows up under the correct computer groups.
Step 8 – If everything is working as expected, go ahead and log off from the Master Desktop Image machine and then set it as the image to be used for new AVD VMs. If any of the steps above were unsuccessful, or if you need assistance with any of these steps, please contact Support.
Option 2: Install PPC Client at Startup and Uninstall PPC Client at shutdown
Once logged into the Master Desktop Image, perform the following steps:
Step 1 – Create a folder called PPC Client under the root of the C: drive on the Master Desktop Image.
Step 2 – Download the required Endpoint Policy Manager Cloud Client MSI package (version
20.5.2449.838 or higher) to the Master Desktop Image, and save it under the C:\PPC Client folder
on the Master Desktop Image.
The required PPC client version (20.5.2449.838 or higher) can be found within your PPC Portal on the following page https://cloud.endpointpolicymanager.com/ManageCustomer/UserList under the Downloads section, by clicking on the Download other versions link at the bottom of the page.
Step 3 – On the Master Desktop Image, while logged in as a local administrator, install the
Endpoint Policy Manager Cloud Client MSI that you saved under C:\PPC Client, by using MSIEXEC and
including the relevant JOINTOKEN string for your environment.
For Example:
msiexec /i "C:\PPC Client\PolicyPak Cloud Client for [Customer name] x64.msi" JOINTOKEN="AZAEllLPLTY9XKUA3CYO+ths=" /qn
For more information on creating and using a JOINTOKEN to automatically assign computers to computer groups in PPC please see this video: Endpoint Policy Manager Cloud: Automatically Join Groups with JOINTOKEN
OPTIONAL: Run PPCloud /sync from a command prompt to verify that you see the correct groups
assigned. In my example I am using a JOINTOKEN for a computer group called Testing so I see the
following when I run PPCloud /sync.

NOTE: All Computers in PPC will be members of the All group in addition to any other groups they are added to.
Step 4 – In the c:\PPC Client directory create 2 empty text files, one called Startup.bat
and the other called shutdown.bat.
Step 5 – Edit startup.bat using notepad and add the command line below. You need to substitute
the MSI name and JOINTOKEN in the example below with the corresponding values needed for your
environment before saving and closing the file.
msiexec /i "C:\PPC Client\PolicyPak Cloud Client for [Customer name] x64.msi" JOINTOKEN="AZAEllLPLTY9XKUA3CYO+ths=" /qn

Step 6 – Edit the shutdown.bat file adding the command line below, remembering to substitute
the MSI name in the example below with the corresponding value needed for your environment before
saving and closing the file.
msiexec /x "C:\PPC Client\PolicyPak Cloud Client for [Customer name] x64.msi"

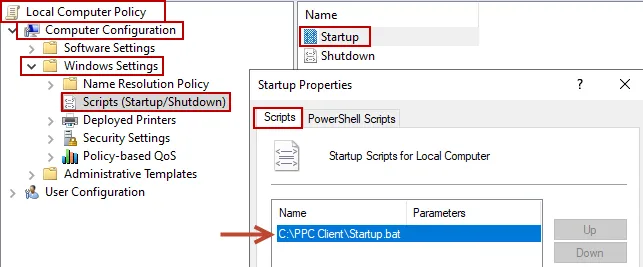
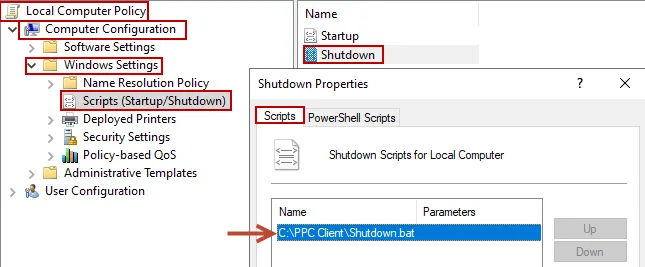
Step 7 – Run GPEDIT.MSC and add an entry under Computer Configuration > Windows
Settings > Scripts (Startup/Shutdown). Select the startup.bat file for Startup script and
select the shutdown.bat for the Shutdown script, then click OK to save the settings.
Step 8 – At this point the Master Desktop image should already be registered in the PPC Portal. As a best practice, launch the PPC portal to verify that the machine is listed under the correct computer groups.
Step 9 – Once this is verified, run the shutdown.bat file manually (right-click bat file and
choose Run as Administrator) then verify that the PPC Client is uninstalled successfully from
the Master Desktop Image machine, check under Programs and Features to make sure Endpoint Policy
Manager Cloud Client is not present, etc. Then also check in the PPC portal, look under the All
group to ensure the machine was unregistered successfully.
Step 10 – Run the startup.bat file manually (as Administrator) to reinstall the PPC client,
then verify that the PPC Client is installed successfully on the Master Desktop Image machine. Check
under Programs and Features to make sure Endpoint Policy Manager Cloud Client is present, etc.
Also check in the PPC portal. Look under the All group and any other groups that the machine
should be listed under to ensure the machine was registered successfully.
Step 11 – If both the install on the Master Desktop Image machine and the re-register to PPC portal were successful, then perform one last test by shutting down and restarting the machine while monitoring the PPC portal to watch the machine get unregistered at shutdown and re-registered at startup. Once the machine is restarted, log in and run PPCloud /sync to verify correct groups are shown and also that sync is successful.
Step 12 – At this point, if everything is working, go ahead and shutdown the Master Desktop Image machine and set it as the image to be used for new AVD VMs. If any of the steps above were unsuccessful, or if you need assistance with any of these steps, please contact Support.
Troubleshooting:
If you receive the following error message below, please revisit Option 1 or Option 2 above and ensure that you have followed all steps exactly.
Could not sync with the cloud.
A network error occurred during sending RegisterComputer to https://cloudsvc.endpointpolicymanager.com/Services/Registration: Keyset does not exist

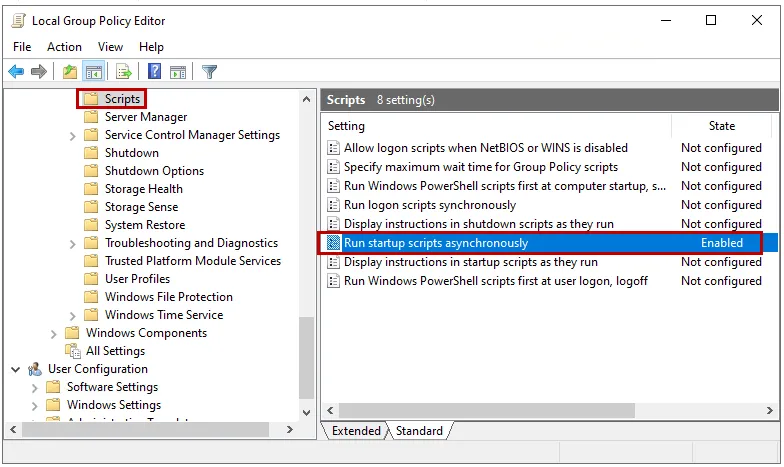
If you receive a blank screen at login on the Master image machine or VDI, you can try logging out and back in, or you can try the following to see if it resolves the issue.
Using GPEDIT.MSC, verify that the following setting Run startup scripts asynchronously is
enabled under Local Computer Policy > Administrative Templates > System.