Prerequisites for Deployments in Docker
To deploy the Directory Manager applications in Docker, make sure you have a running instance of Docker deamon in your environment.
Directory Manager Applications for Docker
With every Directory Manager release, images for the following applications are pushed to Directory Manager’s repository on Docker Hub:
- Directory Manager portal
- Data service
- Security service
- Admin Center
Images are akin to templates. You can pull an application image to Docker deamon and use it to create a container for that application in Docker. Your application runs within this container.
For example, you can pull a Data service image from Docker Hub to Docker deamon and create a container to deploy and run the service.
Image as template
Think of an image as a template. Run an image as many times as needed. On every run, a new container is created in Docker, representing a new deployment of the same application.
Docker Settings in the Configuration Tool
In Directory Manager, Docker-related configurations are managed using the Configuration Tool. These include:
- Connectivity with Docker Hub
- Creating the default Data service
- Creating the default Security service
Specify Repository Info
To connect with Docker Hub, provide the name of the Directory Manager repository on Docker Hub. Images for the Directory Manager applications are publicly available here:
On pulling an image, you are prompted to provide your Directory Manager license. Enter a valid license to deploy the application in Docker.
Service Deployment (Optional)
Using the Configuration Tool, you can choose to deploy the default Data service and Security service in Docker or native IIS.
To proceed with a Docker deployment, provide a container name, a port number, and the Docker Engine URL for Data service and then for Security service. The Configuration Tool creates a container for each service in Docker deamon and runs the service from within that container.
Images and Containers in Docker Desktop
In Docker Desktop, you can view the images available in the remote repository (Docker Hub), the images that you have pulled, and the containers created (the applications running in Docker).
Images
Launch Docker Desktop and click Images in the left pane.

The Images page (Local tab) shows all images that you have pulled from different repositories. Notice the first image is from Directory Manager. Here:
- Imanami is the repository name.
- gid-selfservice is the Directory Manager application name.
- Tag is the Directory Manager version.
Click Remote Repositories to go to the remote server, where you will find all Directory Manager-specific images under Imanami.

Directory Manager application images for different Directory Manager versions are listed here. For example, three Data service images are available for three distinct Directory Manager versions.
Hence, multiple images for an application are available in Docker Hub, each linked to a different Directory Manager version. Based on the Directory Manager version you install, the corresponding images will be pulled from Docker Hub and deployed in Docker.
Containers
On the Images page – Local tab, you can manually run an image to create a container for deploying the application.
Click Containers/Apps in the left pane to view the containers.

Select a container and click Inspect to view its details.

See Also
Prerequisites for Deployments in Remote IIS
To deploy Directory Manager portals and services (Data service and Security service) in remote IIS, you must set up the following prerequisites:
- Install the required software
- Create a site in remote IIS for deploying the Directory Manager portal and services, and assign permissions
- Generate an access key for the Microsoft IIS Administration API
Prerequisite Software
Before you can deploy Directory Manager portals and services in remote IIS, make sure the following prerequisite software is installed on the remote IIS machine. Install them in the following order:
- ASP.NET Core Runtime 6.0.30 (Hosting Bundle)
Click here to download. - .NET Desktop Runtime 6.0.30
Click here to download. - ASP.NET Core Runtime 2.1.25 (Hosting Bundle)
Click here to download. - Microsoft IIS Administration 2.3.0
Click here to download.
Create a Site in Remote IIS
As a prerequisite to deploying a Directory Manager application in remote IIS, you need to create a site there and assign appropriate permissions to it. Directory Manager portals and services should be created within this site.
To create a site in remote IIS:
-
Launch Internet Information Services (IIS) Manager (see [Opening IIS Manager](https://docs.microsoft.com/en-us/previous-versions/iis/6.0-sdk/ms525920(v=vs.90).
-
In the left pane, right-click Sites and select Add Website.

-
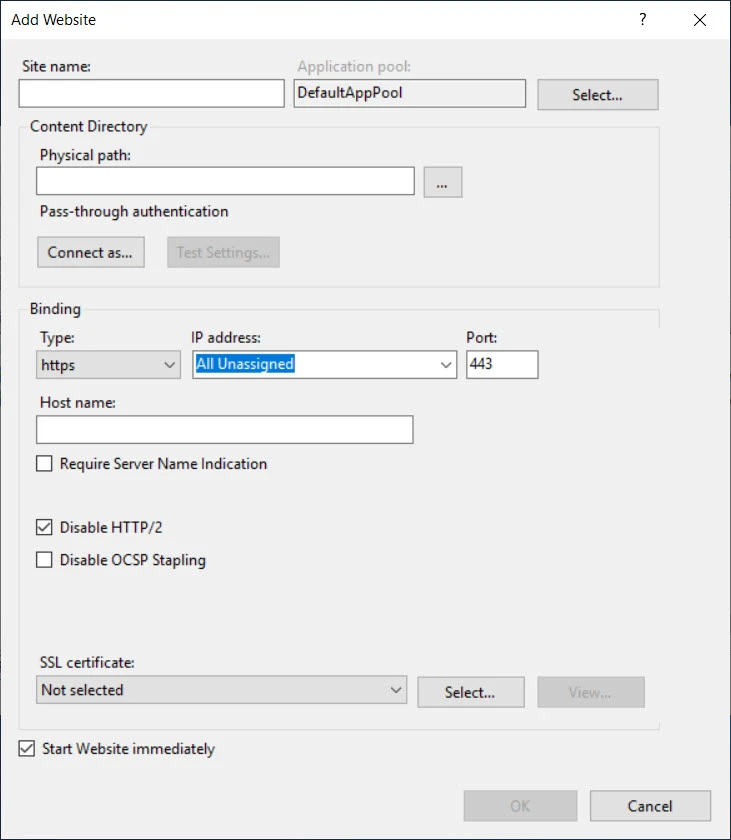
Enter the information as shown below and click OK:
-
Enter a name for the site in the Site name box.
-
Create a new folder on the remote machine and bind this site to that folder. Provide the physical path of the newly created folder in the Physical path box. When you create a Directory Manager application in the site, a sub-folder will be created within this folder and application files will be copied to it.
-
Provide binding information in the Binding section.
- Type: HTTPS
- Port: any available port
-
Select an SSL certificate from the SSL certificate dropdown list.
-
Assign Permissions
The next step is to assign permissions on the physical folder that binds to your site in remote IIS.
-
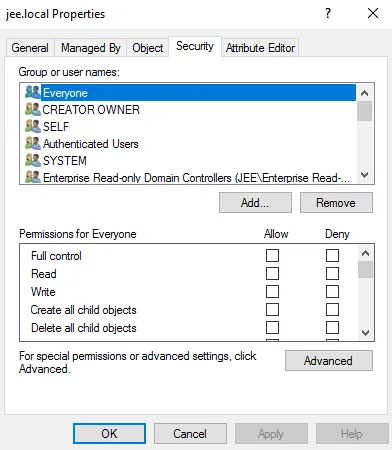
Go to the physical path of your IIS site folder and provide the full control to a local group IIS_IUSRS on this folder.
To assign these permissions:-
Right click the group you created and select Properties.
-
Select the Security tab.
-
Click Edit.
-
Click Add.
-
Click Locations.
-
Select your machine name from the list in the Locations box. Click OK.
-
In the Enter the object names box type IIS_IUSRS and click the Check Names button. The group name should appear as follows:
`<your machine name>`\IIS_IUSRS -
Click OK.
-
Allow Full Control to IIS_IUSRS group.
-
Click Apply and then click OK.
-
Click OK to close the Permissions for
<folder name>dialog box. -
Click OK to close the
<folder name>Properties dialog box. -
The required permissions have been assigned to the folder.
-
-
After assigning the permissions, go to the following path
C:\Program Files\IIS Administration\2.3.0\Microsoft.IIS.Administration\config\ -
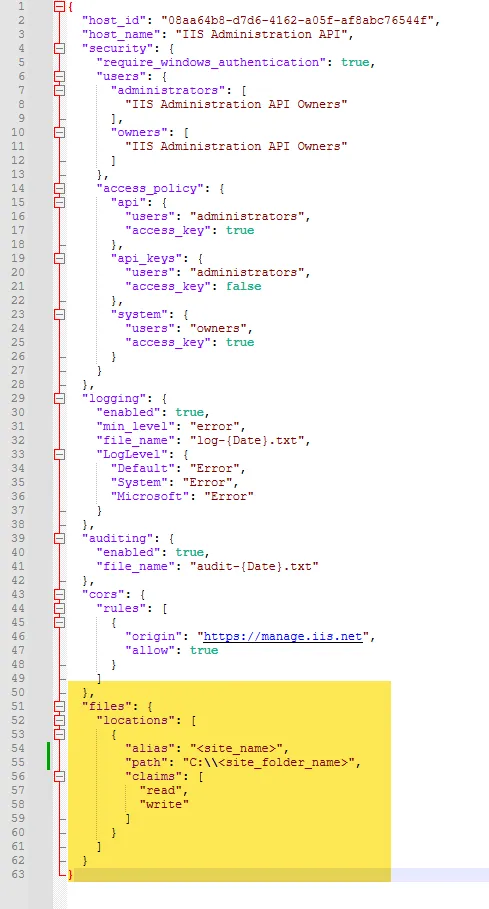
Open the appsettings.json file and add the highlighted script at the end of the file:
-
The script to be added is given below:
   },
   "files": {
       "locations": [
         {
           "alias": "<site_name>",
           "path": "<site_folder_name>",
           "claims": [
             "read",
             "write"
           ]
         }
       ]
     }
Remember, to provide values for alias "site name" and path "physical folder location of the site", created in the section Create a Site in Remote IIS.
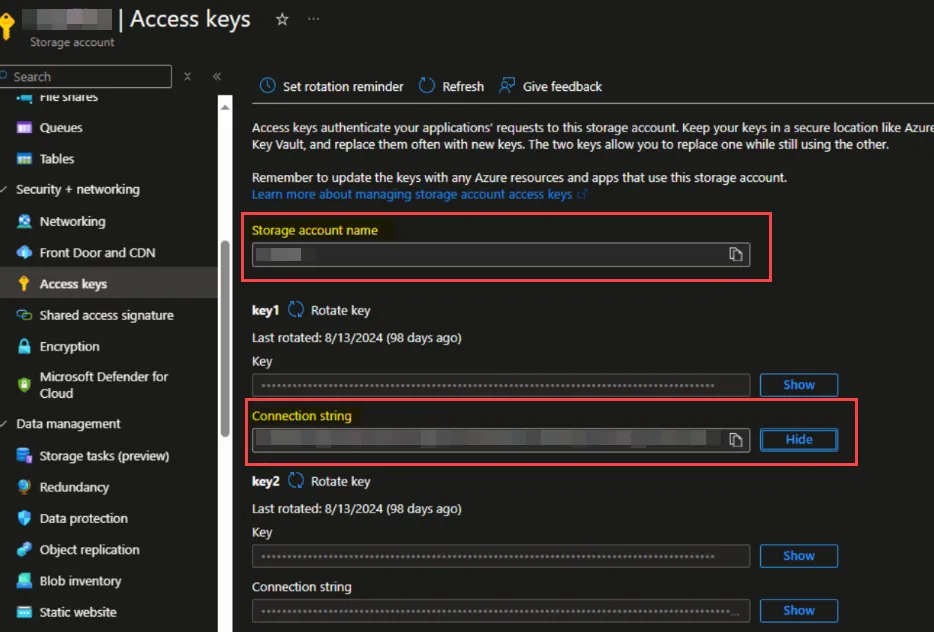
Generate an Access Key
Admin Center uses the Microsoft IIS Administration API to communicate with remote IIS. Make sure this API is instphysical folder location of the site", created in the section Create a Site in Remote IISalled as a Windows service on the remote IIS machine.
To connect to the API, an access key is required. Follow the steps below to generate it.
-
Go to https://localhost:55539/ to launch the Microsoft Administration API interface.
Note that this is the default URL. It may change for reasons such as when a different port is used. -
Click ACCESS KEYS.
-
Click Create Access Key to generate an access key and provide the following information:

-
On clicking Create, the access key is generated.

Database Requirements
Directory Manager requires an SQL Server database to store and retrieve data. The SQL database may reside on any SQL Server in your environment.
Directory Manager supports the following versions of SQL Servers:
| Database Servers | Editions |
|---|---|
| Microsoft SQL Server 2016 | Express, Standard, Enterprise Express edition available at: SQL Server 2016 Express edition |
| Microsoft SQL Server 2017 | Express, Standard, Enterprise Express edition available at: SQL Server 2017 Express edition |
| Microsoft SQL Server 2019 | Express, Standard, Enterprise Express edition available at: SQL Server 2019 Express edition |
| Microsoft SQL Server 2022 | Express, Standard, Enterprise Express edition available at: SQL Server 2022 Express edition |
The SQL Server Browser service is required and during the installation of SQL Server, you can set its start mode either as Automatic, Disabled or Manual. If it is disabled, SQL Servers are not listed in the SQL Server box on the Database settings page of the Configuration Tool. In that case, you have to type the server name in the SQL Server box to select the required server manually.
To enable the SQL Server Browser service, see How to: Start and Stop the SQL Server Browser Service.
NOTE: Directory Manager now uses .NetCore 8 and it requires a SQL certificate to access database using Windows Authentication. Therefore, if you want to access the Directory Manager database using Windows Authentication, then a SQL certificate must be added to the Trusted Root Certification Authorities certificate store on connecting clients or servers such as Directory Manager. See the SQL Certificate for Windows Authentication topic for additional information.
Supported Microsoft Exchange Servers
Directory Manager supports the following Microsoft Exchange Servers:
- Microsoft Exchange Server 2013
- Microsoft Exchange Server 2016
- Microsoft Exchange Server 2019
Hardware Requirements
Minimum hardware requirements for Directory Manager are:
-
1.4 GHz or faster with four or more cores on a 64-bit processor
-
8 GB of RAM in case of Directory Manager-managed Elasticsearch
6 GB of RAM in case of self-managed Elasticsearch
RECOMMENDED: We recommend a dedicated server for Directory Manager. If you install any other application on the Directory Manager server, then adjust RAM requirements accordingly. For example, if you install SQL Server, you may need to add 2-4 GB RAM depending on the edition of the SQL Server.
Different editions of SQL Server have varying resource requirements. For example:
- SQL Server Express – Minimal resource usage; 2 GB additional RAM may suffice.
- SQL Server Standard or Enterprise – These require more resources; allocate 4 GB or more additional RAM for optimal performance.
-
6 GB or more disk space (for installation only)
Space requirements are relative to the provider's data size growth for Elasticsearch data.
Requirements
This page lists the hardware, operating system, MS Exchange, and database required to run Directory Manager 11.1. The prerequisites may vary depending on your environment.
- Hardware Requirements
- Microsoft Windows Servers Requirements
- Supported Microsoft Exchange Servers
- Database Requirements
Prior to installation, the Preparation Tool installs the required software and Windows features. See the What does the Preparation Tool Install topic for the list of components the tool installs.
Service Account for Active Directory and Exchange
You must have a service account to connect an identity store to an Active Directory domain. Directory Manager uses the account to access objects in Active Directory. If Microsoft Exchange is configured as the messaging provider for the identity store, you can also delegate permissions to this account to access Exchange objects.
You can use an existing account, provided it has the required permissions, or you can create a new one. Instructions for both options are discussed in the following sections, although it is recommended that you create a new service account rather than using an existing account.
NOTE: You must add the service account to the membership of the Local Administrator group of the member server on which Directory Manager is installed.
What do you want to do?
- Use an Existing Account as a Service Account
- Create a New Service Account
- SQL Server Account and Database Permissions
Use an Existing Account as a Service Account
Verify that the account that you want to use as a service account has the following Active Directory and Exchange permissions:
Exchange permissions are required if Microsoft Exchange is configured as the messaging provider for the identity store.
| Active Directory | Recommended: Domain Admins Minimum permissions: - Grant permissions to create and delete users, contacts, and groups. - Grant permissions to modify users, contacts, and groups. See the Create a New Service Account topic for instructions on modifying the service account to grant the required permissions. |
| Exchange 2013/2016/2019 | Recipient Management |
Create a New Service Account
If you do not have a service account, you need to create one. Follow the three sets of instructions in this section to:
-
Create a Service Account:
-
Delegate Active Directory Permissions to the New Account:
-
Delegate Exchange Permissions to the New Account:
f Exchange is configured as the messaging provider for the identity store)
Create a Service Account:
-
Select either:
-
Server Manager from the Windows Start screen.
Or
-
Server Manager from the Quick Launch toolbar available by default on the Windows taskbar.
Or
-
Administrative Tools from the Windows Start screen.
-
-
In case of Server Manager selection, select Tools > Active Directory Users and Computers.
In case of Administrative Tools selection, select the Active Directory Users and Computers option in the Name column. -
In the directory tree, select the required container, point to New, and then click User. The New User dialog box is displayed.
-
Enter the required information for the user.
After creating the user, you can click the container to view the newly created user.
Delegate Active Directory Permissions to the New Account:
In the Active Directory Users and Computers console:
-
Select Advanced Features from the View menu.
-
In the left pane, right-click the domain name or organizational unit and select the Properties option. On the Properties window, select the Security tab.
-
Click the Advanced button; the Advanced Security Settings window is displayed.
-
Click the Add button. The Permission Entry window is displayed.
-
Click the Select a principal link next to Principal. The Select User, Computer, Service Account, or Group dialog box is displayed.

Type the name of the service account in the Enter the object name to select box. Click OK. The Permissions Entry window is displayed with all fields enabled (see step 4).
-
In the Applies to box, select This object and all descendant objects.
-
Grant permissions to create and delete users, contacts, and groups.
-
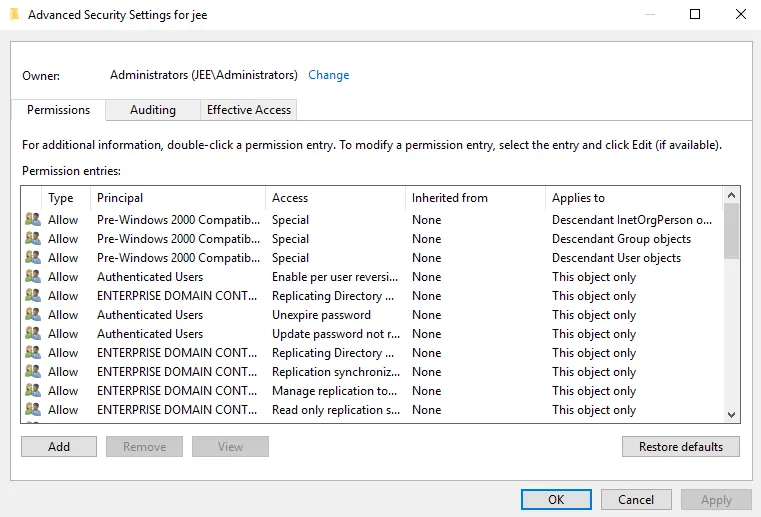
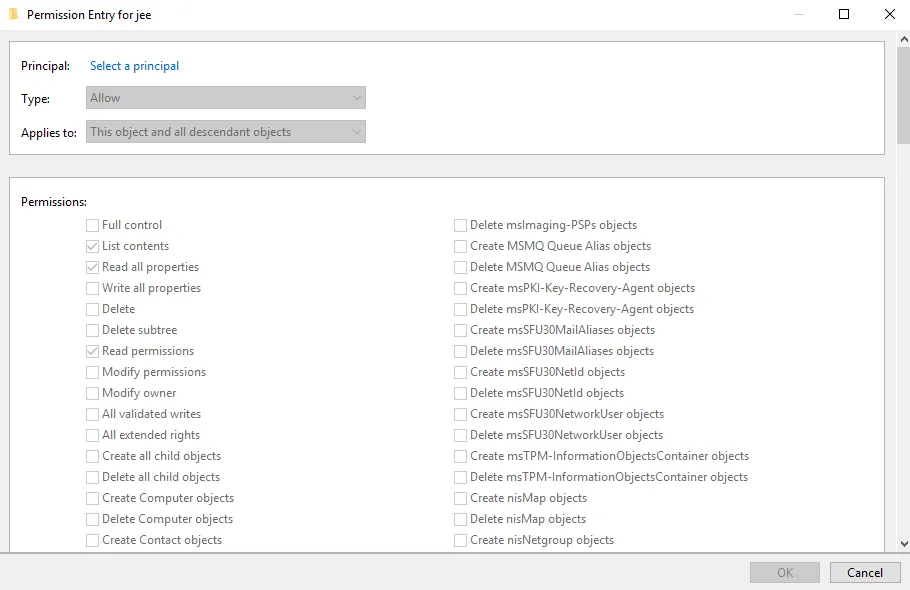
Scroll down the list of permissions in the Permissions box and select the check boxes for the options shown below:

-
Click OK. The granted permissions appear in the Advanced Security Settings window as shown below:
-
-
Grant permissions to modify users, contacts, and groups.
-
Click the Add button on the Advanced Security Settings window. The Permission Entry window is displayed (see step 4).
-
Click the Select a principal link next to Principal. The Select User, Computer, Service Account, or Group dialog box is displayed. Type the name of the service account in the Enter the object name to select box and click OK. The Permissions Entry window is displayed.
-
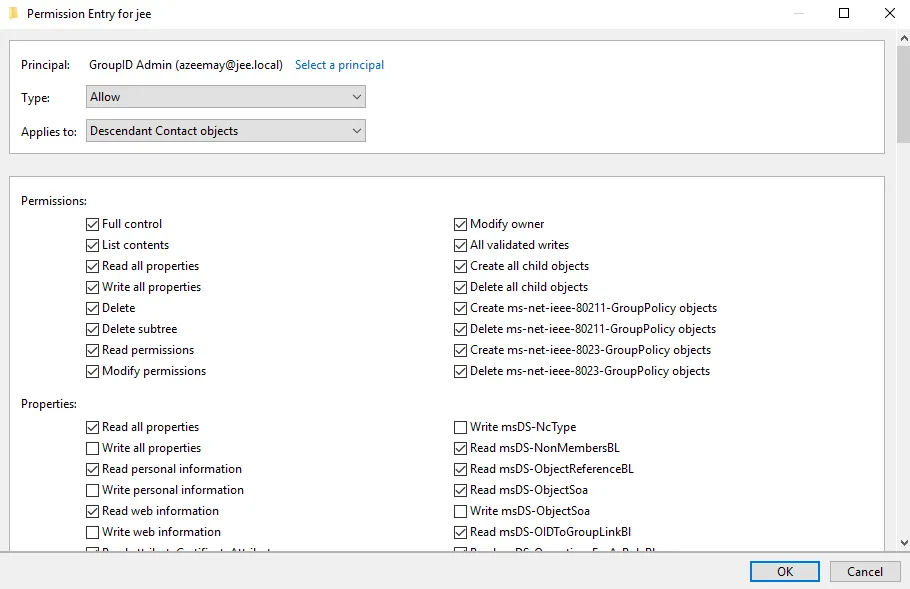
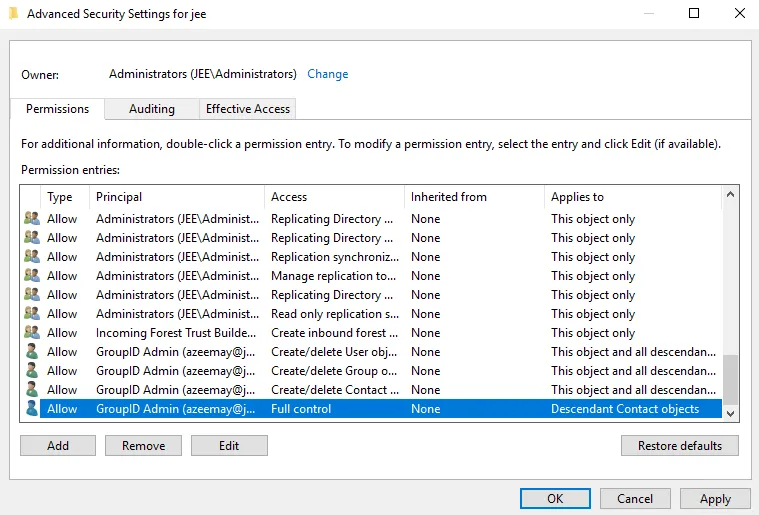
In the Applies to box, select the Descendant Contact objects option and select the Full control check box in the Permissions area. It is as follows:
-
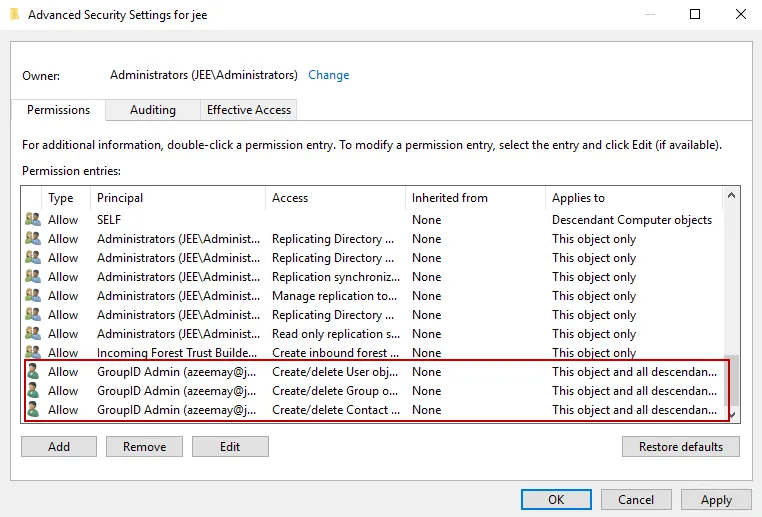
Click OK. The granted permissions appear in the Advanced Security Settings window as shown below:
-
Repeat steps a – d for Descendant Group objects and Descendant User objects on the Permission Entry window.
The service account now has permissions to modify users, contacts, and groups. These permissions appear in the Advanced Security Settings window. It is as shown below: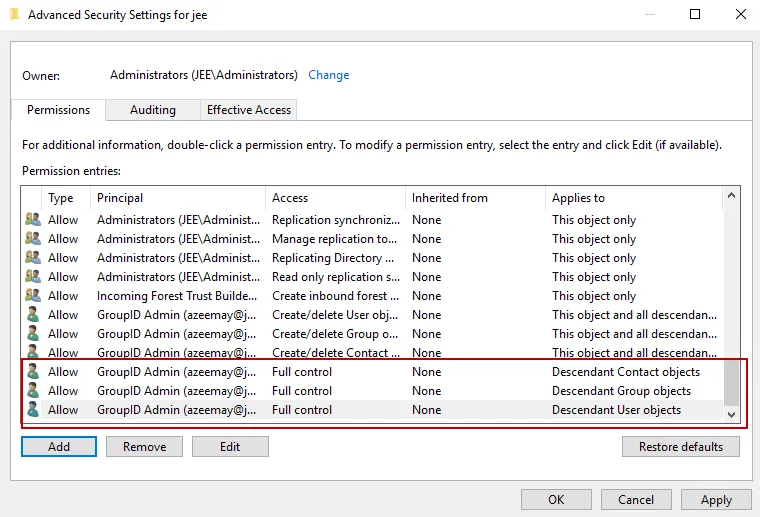
-
-
Click OK.
Delegate Exchange Permissions to the New Account:
In addition to Active Directory permissions, the service account also needs access permissions for Exchange, when Exchange is configured as the messaging provider for the identity store.
Instructions for delegating permissions for each supported Exchange Server version are as follows.
For Exchange Server 2013/2016/2019:
Launch Exchange Management Shell and type the following command:
Add-RoleGroupMember "Recipient Management" -Member domain name\user
SQL Server Account and Database Permissions
See the Authentication Modes topic for information about the roles and permissions the SQL server and database accounts must have for SQL Server Authentication mode and for Windows Authentication mode.
See Also
gMSA for Active Directory
Directory Manager enables you to use a Group Managed Service Account (gMSA) to connect an Active Directory identity store to the identity provider. To ensure that the gMSA can be configured and used effectively, verify the following:
- General Checks
- Required Permissions
- Allowed Principals
General Checks
-
Run the following cmdlet in Windows PowerShell on the Directory Manager server to verify the gMSA status as either true or false.
Test-ADServiceAccount -Identity <gMSA> -
In case a gMSA is configured for GroupIDAppPool11 or as a service account for identity store make sure the account name follows the format:
FQDN<gMSA>$)
Required Permissions
- The gMSA must have full permissions on the Directory Manager installation folder.
- It must be a member of the local administrator group (Administrators) on the Directory Manager server.
- It must be a member of the local IIS group (IIS_IUSRS) on the Directory Manager server.
Allowed Principals
-
The following principals must be allowed to retrieve the managed password for the gMSA that you use to connect an identity store to an identity provider:
- Directory Manager server (type: Computer)
- The account configured for the Directory Manager app pool (type: Service Account)
-
If any of these principals are not allowed to retrieve the managed password for the gMSA, do the following depending on the scenario:
- If a group is mentioned in the 'PrincipalsAllowedToRetrieveManagedPassword' parameter of
the New-ADServiceAccount cmdlet, add the missing principal (Directory Manager server and/or
app pool account) to the group.
Both these principals must be enlisted directly or indirectly in the 'PrincipalsAllowedToRetrieveManagedPassword' parameter. - If an individual principals are mentioned in the 'PrincipalsAllowedToRetrieveManagedPassword' parameter of the New-ADServiceAccount cmdlet, use the 'PrincipalsAllowedToRetrieveManagedPassword' parameter of the Set-ADServiceAccount cmdlet to add the missing principals (Directory Manager server and/or app pool account).
- If a group is mentioned in the 'PrincipalsAllowedToRetrieveManagedPassword' parameter of
the New-ADServiceAccount cmdlet, add the missing principal (Directory Manager server and/or
app pool account) to the group.
NOTE: Restart the Directory Manager server if you apply any of the above.
See Also
Service Account Permissions
To connect an Active Directory identity store to a domain, you must use a service account with elevated privileges. You can also use a Group Managed Service Account (gMSA) for this purpose.
See the following topics for details on these accounts:
Authentication Modes
While setting up Directory Manager, you must select an authentication mode for connecting to SQL Server (that hosts the Directory Manager database). There are two possible modes:
- SQL Server Authentication
- Windows Authentication
SQL Server Authentication
It is recommended that you create a new SQL Server account for Directory Manager. You must add the account to the db_creator server role so that it can create and maintain the Directory Manager database.
The account must also be part of the db_owner database role, so that it can execute DDL (Data Definition Language) and DML (Data Manipulation Language) commands. However, unlike Windows Authentication mode setup, you do not need to add the account to the db_owner role because SQL Server db_creator is mapped to the db_owner database role by default.
NOTE: Note: For SQL Server 2016, 2017, 2019 and 2022 families, every SQL Server account is assigned the public role. Therefore, the Directory Manager SQL account belongs to two server roles: db_creator and public.
To add the Directory Manager SQL account to the db_creator role:
Step 1 – Launch SQL Server Management Console.
Step 2 – Create a new account for Directory Manager 11, if needed.
Step 3 – Connect to the server using your new Directory Manager SQL account.
Step 4 – Right-click the database server node and click Properties.
Step 5 – On the Properties dialog box, select the Permissions page.
Step 6 – Scroll down on the Explicit tab to the Connect SQL permission and select the Grant check box for it.
Step 7 – Click the Effective tab. You should have the following permissions listed here:
- Connect SQL
- Create any database
- View any database
Step 8 – Click OK.
Windows Authentication
Directory Manager works with SQL Server (which hosts the Directory Manager database) using the Windows Authentication mode in context of the account configured in GroupIDAppPool11 (when SQL Server is available locally or remotely). Directory Manager detects this account and authenticates with it on SQL Server via Windows authentication.
You can configure a domain account in GroupIDAppPool11 and use it to connect Directory Manager to SQL Server, provided that it has the following permissions on SQL Server.
- The user account type on SQL Server must be a Windows account with db_owner permissions on the Directory Manager database.
- For creating a new database, the user account must have the db_creator role and db_owner permissions on the master database.
Use a domain account when SQL Server is available remotely or locally. A local Windows account will work only when Directory Manager and SQL Server are running on the same machine).
The domain account used to connect Directory Manager with SQL Server must:
- Be a member of the IIS_IUSR and Backup Operators groups.
- Have read/write permissions on the Directory Manager 11 installation folder: [Directory Manager installation drive]:\Program Files\Imanami\GroupID 11.0.
SQL Certificate for Windows Authentication
Directory Manager now uses .NetCore 8 and it requires a SQL certificate to access SQL database using Windows Authentication. Therefore, if you want to access the Directory Manager database using Windows Authentication, then a SQL certificate must be added to the Trusted Root Certification Authorities certificate store on connecting clients or servers such as Directory Manager.
Generate a certificate for SQL server
Create the certificate on the SQL Server using the following command.
New-SelfSignedCertificate-DnsName “SQL Server name” -CertStoreLocation “Cert:LocalMachine\My” -KeySpec KeyExchange
The certificate is saved at the specified location.
Follow the steps to bind the generated SQL certificate with SQL server machine.
Step 1 – In SQL Server Configuration Manager, expand SQL Server Network Configuration in the left pane.
Step 2 – Right-click Protocols for <instance Name>, and then select Properties.
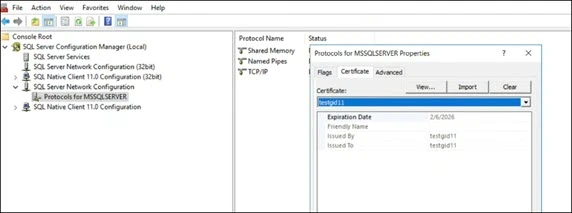
Step 3 – On the Certificate tab, select the certificate you created from theCertificate drop-down.
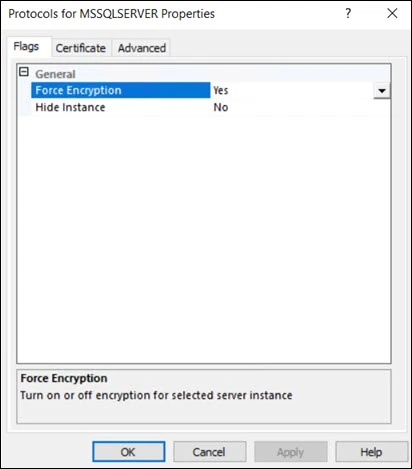
Step 4 – On the Flags tab, check the Force Encryption option to Yes.
Step 5 – Click OK.
Install the Certificate on a Directory Manager Client or Server
Copy the certificate on Directory Manager server and install it by adding it to the Trusted Root Certification Authorities and Local machine and current user certificate stores.
Microsoft Windows Servers Requirements
Directory Manager supports the following Microsoft Windows Servers:
Microsoft Windows Server 2016 Family
- Windows Server 2016 Standard
- Windows Server 2016 Datacenter
Microsoft Windows Server 2019 Family
- Windows Server 2019 Standard
- Windows Server 2019 Datacenter
Microsoft Windows Server 2022 Family
- Windows Server 2022 Standard
- Windows Server 2022 Datacenter