Manage Advanced Workflow Settings
You can specify advanced settings for workflow, such as set a default approver for workflow requests and define approver acceleration settings.
NOTE: Functions discussed in this topic are licensed under different add-ons. See the License GroupID topic.
What do you want to do?
- Specify a Default Approver
- Apply Approver Acceleration
- Delete Workflow Requests
- Integrate with Microsoft Power Automate
Specify a Default Approver
You can designate a recipient as the default approver for workflow requests. Requests are routed to this recipient based on the following rules:
-
When approver acceleration is not enabled, the applicable rules are discussed in the Workflow Approval Scenarios topic.
-
When approver acceleration is enabled:
- A request is sent to the default approver when the last approver in the acceleration chain does not approve or deny it within the specific number of days.
- A request is routed to the default approver when the hierarchy breaks at any point in the acceleration chain. For example, if the maximum acceleration level is set to 3 but there is no recipient to accelerate the request after second level acceleration, the request goes to the default approver.
The default approver also receives group expiry and deletion notifications for groups without owners.
To specify a default approver:
-
In Admin Center, click Identity Stores in the left pane.
-
On the Identity Stores page, click the ellipsis button for an identity store and select Edit.
-
Click Workflows under Settings in the left pane.
-
On the Workflows page, click the Advanced Workflow Settings tab.
-
On th Advanced Workflow Settings tab, use the Default Approver box to specify a recipient as the default approver. To search for a recipient:
-
Enter a search string in the box. Group and user names starting with the string are displayed as you type. Select a user or group to set as the default approver.
Or
-
Click Advanced to search an object by different parameters, such as name, department, company, and email.
In the advanced search box, enter a search string and click Search. User and group objects matching the string are displayed. Select the required object.
To remove the default approver, click Delete for it.
-
-
Click Save.
Apply Approver Acceleration
The workflow approver acceleration feature ensures that no workflow request remains undecided. To apply setting related to approver acceleration, see the Workflow Approver Acceleration topic.
Delete Workflow Requests
You can delete the workflow requests generated for an identity store based on certain settings. For example, you can delete the ‘denied’ requests that are old by 30 days or more.
To delete workflow requests:
-
In Admin Center, click Identity Stores in the left pane.
-
On the Identity Stores page, click the ellipsis button for an identity store and select Edit.
-
Click Workflows under Settings in the left pane.
-
On the Workflows page, click the Advanced Workflow Settings tab. Go to the Workflow Requests section.
-
In the Delete requests that are x or more days old box, specify a number, say 30. Workflow requests that are 30 days old and older will be auto deleted.
-
Select the type of requests you want to delete.
- Pending: to delete requests that are pending, including your own.
- Approved: to delete requests that have been approved.
- Denied: to delete requests that have been denied.
-
Click Delete. GroupID deletes requests of the selected type that are old or older than the specified number of days.
-
Click Save.
Integrate with Microsoft Power Automate
You can also link your Power Automate flows to GroupID workflows. For details, see the Integrate with Power Automate topic.
See Also
Workflow Approver Acceleration
The workflow approver acceleration feature ensures that no workflow request remains undecided. It automatically accelerates a request to another approver if the current approver does not act on it for a certain number of days.
Let’s assume User A, who is the approver of a workflow, does not approve/deny a request for x number of days. This request will accelerate to User B (first acceleration level), and if User B does not take action for x days, it will accelerate to User C (second acceleration level). The request will continue to be accelerated to the maximum level, and if not approved/denied, it will go to the default approver. When no default approver is defined, the request becomes static. A static request is one that is active in GroupID and can be approved or denied by the approver any time. It continues to appear in the list of pending requests for the approver(s).
Workflow approver acceleration settings apply to all workflows in the identity store. However, you can exempt individual workflows from it.
What do you want to do?
Apply Approver Acceleration
To configure approver acceleration for an identity store, you have to:
- Enable approver acceleration.
- Set the number of days a request stays with an approver before it is accelerated to the next approver.
- Specify the maximum number of acceleration levels.
A scheduled job, Workflow Acceleration, is responsible for accelerating requests to the next level, auto approve requests, and send notifications. See the Workflow Acceleration Schedule topic.
To apply approver acceleration:
-
In Admin Center, click Identity Stores in the left pane.
-
On the Identity Stores page, click the ellipsis button for an identity store and select Edit.
-
Click Workflows under Settings in the left pane.
-
On the Workflows page, click the Advanced Workflow Settings tab.
NOTE: When an SMTP server is not defined for the identity store, approver acceleration settings are disabled and a message is displayed with a Configure Now link to redirect you to the Notifications page.
-
Use the Approver Acceleration toggle button to apply the approver acceleration settings and rules to all workflows defined for the identity store.
To exempt a particular workflow, open it and clear the Approver Acceleration check box. See the Modify a Workflow topic. -
In the Maximum Levels box, specify a number, say 2. Workflow requests would be accelerated to a maximum of 2 levels for approval. Requests that are nor approved or denied at the maximum level become static.
-
In the Repeat Every X Days box, specify x number of days, say 5. When an approver does not act on a request for the specified number of days, the request is accelerated to the next approver in the acceleration chain.
-
Click Save.
Workflow Approver Acceleration Rules
When the approver of a workflow does not approve/deny a request within a certain number of days, GroupID applies certain rules to forward it to another approver.
On acceleration, the new approver receives an email notification to approve/deny the request.
NOTE: Even after acceleration, all previous approvers are authorized to approve/deny the requests. Administrators can also approve or deny these requests at any given time from the All Requests node in the GroupID portal.
Workflow acceleration rules are discussed below, with these assumed acceleration settings:
Acceleration level: 3
Approval days: 5
When the Approver is a User
Acceleration rules for a user approver are:
- When the approver is a user who does not approve/deny a request for 5 days, the request is
accelerated to the user’s primary manager.
Example: A workflow request is with User A, who does not approve/deny it. After 5 days, the request will be accelerated to User A’s manager (first level acceleration). - If the new approver (User B) does not approve/deny the request in the next 5 days, the request is accelerated to User B's primary manager (User C) - second level acceleration.
- If the new approver (User C) does not approve/deny the request in the next 5 days, the request is accelerated to User C’s primary manager (User D) – third level acceleration).
- After the third (and the last) level acceleration, if User D does not approve or deny the request for 5 days, the request goes to the default approver. If the default approver is not specified, the request becomes static.
NOTE: Consider the following:
- If, in the acceleration chain, any approver is disabled, the workflow request is directly sent to the primary manager of the disabled approver in the same acceleration hop. Referring to the example in step 3, if User C is disabled, the workflow request will go to User D (instead of User C) in second-level acceleration.
- If the hierarchy breaks at any point in the acceleration chain, the request is routed to the default approver. Referring to the example in step 3, if User C does not have a manager, the chain breaks. As a result, the request is sent to the default approver. See the Cases for the Default Approver topic.
When the Approver is a Group
If a group is set as the approver of a workflow route or comes up as an approver in the acceleration chain, the request is available to all group members for approval. Members added to the group hereafter do not have the authority to approve or deny the request. The request is considered approved or denied when any one group member takes action on it.
Acceleration rules for a group approver are:
-
When a group is set as the approver in a workflow, the request is available to all existing group members for approval. If no group member approves/denies the request for 5 days, the request is accelerated to the group’s primary owner.
Let’s assume a workflow request is with Group A, and none of the members approve/deny it. After 5 days, the request is accelerated to Group A’s primary owner, (first level acceleration). -
If Group A’s primary owner (Object O) does not approve/deny the request in the next 5 days, the following happens:
- When Object O is a user, the request will accelerate to its manager (second level acceleration). It will move up the acceleration chain of Object O till the maximum acceleration level.
- When Object O is a group, the request will accelerate to all group members (second level acceleration). And when none of the group members approve or deny the request in the next 5 days, the request will accelerate to the group;s primary owner (third level acceleration).
-
After the third (and the last) level acceleration, if the approver(s) do not approve or deny the request for 5 days, the request goes to the default approver. If the default approver is not specified, the request becomes static.
-
If the group set as approver has a nested group as its member, then requests are also sent to members of the nested group, but only up till level 1.
Suppose a group has three members; User A, User B, and Group C (nested group). A request sent to this group goes to User A, User B, and all members of Group C. If Group C has another group as its member, the request will not go to the member group. -
Scenarios where an approver is disabled or the hierarchy breaks are discussed as a note at the end of the When the Approver is a User topic.
Cases for the Default Approver
Rules for the default approver are:
- When the default approver is a user who does not approve/deny a request for 5 days, the request becomes static.
- When a default approver is not set in advanced workflow settings, requests cannot be accelerated to it; hence they become static.
- When a group is set as the default approver, workflow requests are accelerated to all group members.
- If members of the default approver group do not approve/deny a request for 5 days, it is accelerated to the group's primary owner.
- If the default approver group has no members or when all members are disabled, the request is accelerated to the group's primary owner.
- However, if the owner of the default approver group is also a group, the workflow request is not accelerated and becomes static.
Other Cases
- In a circular manager situation, requests are auto-approved.
Example: User A is the approver of a workflow, who does not approve/deny a request for 5 days. The request is accelerated to User A’s manager – User B (first level acceleration). If User B does not approve/deny the request in the next 5 days, the request goes to User B’s manager – User C (second level acceleration). If User C does not approve/deny the request in the next 5 days, the request is accelerated to User C’s manager (third level acceleration). However, if User A is the manager of User C, a circular manager situation occurs and the workflow request will be auto approved (and not go to User A). - When the requester comes up as an approver in the approval acceleration chain, the request is
auto approved.
Example: User A does not approve/deny a request for 5 days. The request is accelerated to User A’s manager (first level acceleration). If User A’s manager (User B) is the initiator of the workflow request, the request is auto approved (and not accelerate to User B). - For the Transfer a User workflow, a request goes to the new primary manager of the requester
for first level acceleration.
If User A transfers User B to another manager (User C), a request goes to User C for approval. If User C does not approve/deny it for 5 days, the request will move up User C’’s acceleration chain. - When the approver, with whom a request currently resides, is removed as manager or group owner,
the request is sent to the recipient that is set as the new manager/owner and removed from the
previous manager’s/owner’s approval queue. The request will also ascend the new manager's/owner's
managerial line.
Example: A workflow request accelerates to User A but before User A approves/denies it and the next acceleration is due, User A is replaced by User B as manager. In this case, the request will move to User B and ascend User B’s managerial line accordingly. - If an administrator re-routes a workflow request to another user (User B) from the GroupID portal, the request acceleration chain will follow User B’s managerial line.
See Also
Implement Workflows
To create a workflow, you have to specify the following:
- Object - the object(s) - user, contact, group - to apply the workflow to.
- Event - a create, edit, or delete event that, when performed for the object(s), would trigger the workflow.
- Field - one or more fields (attributes) that the workflow would apply to. When the values of these attributes change for the object, an approval request is triggered.
- Filter - a condition that prevents the workflow from triggering, even when the object, event, and field criterion is met.
- Approver - the object to send the workflow request for approval.
As additional workflow features, you can also:
- Enable workflow approver acceleration
- Link a workflow with a Microsoft Power Automate flow
Workflow example:
Consider a workflow where:
- Object: Group
- Event: Edit
- Field: criteria
- Approver: Group owner
It implies that when a user edits the values stored in the criteria attribute of a group, a workflow request is sent to the group owner, who is the workflow approver. Changes are applied after the request is approved.
But if you add a filter as:
| Field | Condition | Value |
| employee Type | Not Equals | manager |
It implies that when a manager edits the value of the criteria attribute, the change is effective immediately and this workflow does not apply. When a non-manager user changes the value of the attribute, it triggers the workflow.
What do you want to do?
- View the Workflows
- Create a New Workflow
- Link a Workflow to a Power Automate Flow
- Modify a Workflow
- Enable or Disable a Workflow
- Delete a User-defined Workflow
View the Workflows
-
In Admin Center, click Identity Stores in the left pane.
-
On the Identity Stores page, click the ellipsis button for an identity store and select Edit.
-
Click Workflows under Settings in the left pane. On the Configure Workflows tab of the Workflows page, the following information is displayed for a workflow:
Label Description Enable Shows whether a workflow is enabled or disabled. Use the toggle button next to a workflow to enable or disable it. Type A workflow has one of these types: - System: workflows that are defined by default for an identity store. - User Defined: workflows that are defined by users for an identity store. Name A descriptive name for a workflow that identifies the action the workflow audits. Object(s) The directory object(s) the workflow applies to. Approver(s) The approver(s) specified for a workflow. Approver(s) are responsible for approving or denying the requests generated for the workflow. Event The event that triggers a workflow. -
You can perform the following actions:
- Click Add Workflow to create a new workflow for the identity store.
- Click the ellipsis button for a workflow and select Edit to update workflow details, such as approvers, filters, and fields.
Create a New Workflow
-
In Admin Center, click Identity Stores in the left pane.
-
On the Identity Stores page, click the ellipsis button for an identity store and select Edit.
-
Click Workflows under Settings in the left pane.
-
On the Configure Workflows tab of the Workflows page, click Add Workflow in the top right corner.
-
On the Create Workflow page, enter a name for the workflow In the Name box.
-
Select one or more objects (User, Contact, Group) to apply the workflow to.
-
In the Events drop-down list, select the event (Create, Edit, Delete) that will trigger the workflow.
NOTE: (1) For the Create event, you can define only one workflow for an object.
(2) A workflow for the Group object with the Delete event will be triggered when the group is manually deleted. -
Select the Mail Approval check box to enable the approver to approve or deny a workflow request from within the workflow email notification. These notifications contain the Accept and Deny buttons. On clicking any of these, the approver is redirected and auto-authenticated on the GroupID portal, where he or she can approve or deny the request.
When this check box is not selected, the Accept and Deny buttons are not available in the email notifications. Approvers have to sign into the GroupID portal or the GroupID mobile app to manage workflow requests. -
The Approver Acceleration check box applies if approver acceleration is enabled for the identity store. See the Apply Approver Acceleration topic.
- To apply approver acceleration to this workflow, select the Approver Acceleration check box.
- To exempt this workflow from approver acceleration, clear this check box.
-
Enter a brief description for the workflow in the Description box.
-
In the Portal URL drop-down list, select a GroupID portal URL to include in the workflow email notifications. The URL will redirect the recipients to the portal for taking action on a request, such as approve or deny it.
The list contains URLs of GroupID portals linked with the identity store. -
Click Add Approver(s) in the Approver(s) section to select the users and groups to approve the requests generated for this workflow: The Add Approver(s) dialog box is displayed.
-
Fields on the Add Approver(s) dialog box vary, depending on the object and event selected. Then select one or more of the available options:
Option Available For Description Owner of the Group Edit and delete events of the Group object Select it to specify the group’s primary owner as the request approver. Owner and Additional Owner of the Group Edit and delete events of the Group object Select it to specify the group’s primary and additional owners as the request approvers. Manager of User Edit and Delete events of the User and Contact objects Select it to specify the user’s or contact’s primary manager as the request approver. Manager and Additional Manager of User Edit and Delete events of the User and Contact objects Select it to specify the user’s/contact’s primary and additional managers as the request approvers. Search Container Include Sub-Containers Search box For all objects and events You can specify one or more users and groups as approvers. In case of a group, all its members are set as approvers. Specify a container to search for the desired object(s); then perform a search to locate and select the object. - Click the down arrow in the Search Container box and select a container to limit the search scope to it. - Select the Include Sub-Containers check box to include the sub-containers within the selected container to search for the object. - Enter a search string in the search box; objects starting with the string are displayed as you type. Click Add for an object to select it. You can also perform an advanced search to locate the object. Click Advanced in the search box and use the search fields to enter a search string. On clicking Search, objects matching the string are displayed. Select the user or group you want to add as approver. -
Click Add to close the Add Approver(s) dialog box.
-
-
Use the Filters section to specify a criterion; anything beyond that criterion will not trigger the workflow. For example, when you define the following filter:
Object: Group
Event: Delete
Filter: groupType = Security
This workflow will trigger when a security group is deleted. However, when a group object with type other than ‘Security’ is deleted, this workflow will not trigger.-
In the Filter(s) section, click Add Filter(s). The Add Filter dialog box is displayed.
-
Select a schema attribute from the field list.
-
Select an operator to evaluate the attribute from the operator list.
- Present - returns objects that have a value specified for the attribute.
- Not Present - returns objects that do not have a value specified for the attribute.
- Equals - returns objects when the attribute value exactly matches the text you specify in the value box.
- Not Equals - returns objects when the attribute value does not match the text you specify in the value box.
-
Enter a value in the value box (not case-sensitive). This box is not available for the Present and Not Present operators, which are not comparison operators.
-
Click Add to close the Add Filter dialog box.
-
-
Use the Field(s) section to specify the fields (attributes) that you want to apply the workflow to. For example, when you define a workflow as:
Object: User
Event: Edit
Filter: Department = IT
Field: Email
This workflow will trigger when the Email field for a user object with department set to IT is edited. It will not be triggered when the Email field is edited for a user that does not belong to the IT department, or when a field other than Email is edited for a user in the IT department.- To add a field, click Add Field(s) in the Field(s) section.
- On the Add Fields dialog box, select the check box for a field to add it to the workflow and click Add.
NOTE: The Field(s) section is not available when Create is selected in the Events drop-down list.
-
By default, the workflow is enabled, as indicated by the Enabled toggle button at the top of the page. If required, use the toggle button to disable it.
-
Click the Create Workflow button on the Create Workflow page to create the workflow.
-
Click Save on the Workflows page.
Link a Workflow to a Power Automate Flow
You can define Power-Automate settings for a workflow to link that workflow to a Power Automate flow.
These settings enable you to connect to Power Automate from within a workflow (say Workflow1) and create a basic flow template there. On providing the URL of the flow template in Workflow1, the two are linked. As a result, the flow auto triggers when the GroupID workflow is triggered.
For details on linking a workflow to a flow, see the Trigger a Flow from GroupID topic.
Modify a Workflow
Workflows for an identity store are differentiated by their type. Predefined workflows (also called system workflows), by default, are displayed at the top; user-defined workflows follow.
You can update all details for a user-defined workflow. A system workflow, however, can be modified to a limited extent. You can only update the approvers, enable/disable mail approval, enable/disable approver acceleration, and link it to a Power Automate flow.
To modify a workflow:
- In Admin Center, click Identity Stores in the left pane.
- On the Identity Stores page, click the ellipsis button for an identity store and select Edit.
- Click Workflows under Settings in the left pane.
- On the Configure Workflows tab of the Workflows page, click the ellipsis button for a workflow and select Edit.
- The Edit Workflow page is displayed. Follow steps 5-15 in the Create a New Workflow topic to update the required information.
- To link this workflow to a Power Automate flow, click Power Automate Settings in the top right corner; the Power Automate Settings dialog box is displayed. Follow step 6 and onwards in the Link an Identity Store Workflow to a Flow topic to complete the task.
- After making the required changes, click Update Workflow on the Edit Workflow page to save the settings.
- Click Save on the Workflows page.
Enable or Disable a Workflow
Workflows in an identity store can be disabled to prevent them from triggering.
You can enable or disable a workflow in any of the following ways.
Method 1:
- In Admin Center, click Identity Stores in the left pane.
- On the Identity Stores page click the ellipsis button for an identity store and select Edit.
- Click Workflows under Settings in the left pane.
- On the Configure Workflows tab of the Workflows page, use the Enable toggle button for a workflow to enable or disable it.
- Click Save.
Method 2:
- In Admin Center, click Identity Stores in the left pane.
- On the Identity Stores page click the ellipsis button for an identity store and select Edit.
- Click Workflows under Settings in the left pane.
- On the Configure Workflows tab of the Workflows page, click the ellipsis button for a workflow and select Edit.
- On the Edit Workflow dialog box, use the toggle button in the top left to enable or disable the workflow. Then click Update Workflow.
- On the Workflows page, click Save.
Delete a User-defined Workflow
Workflows in an identity store can have their type as System or User Defined. You can delete user-defined workflows; system workflows cannot be deleted.
To delete a workflow:
- In Admin Center, click Identity Stores in the left pane.
- On the Identity Stores page, click the ellipsis button for an identity store and select Edit.
- Click Workflows under Settings in the left pane.
- On the Configure Workflows tab of the Workflows page, click the ellipsis button for a user-defined workflow and select Delete Workflow.
- Click Delete on the confirmation dialog box.
- Click Save.
See Also
- Workflows
- Manage Advanced Workflow Settings
- Workflow Approver Acceleration
- Integrate with Power Automate
Integrate with Power Automate
You can link an identity store in GroupID to Power Automate to achieve the following:
- Trigger a flow from GroupID - To achieve this, you have to link a workflow in an identity store to a Power Automate flow. When the GroupID workflow is triggered, the linked flow is auto triggered.
Trigger a Flow from GroupID
You can link a workflow in an identity store to a flow. Both system and user-defined workflows can be linked to flows.
- As a one-time process, connect your identity store to Microsoft Power Automate .See the Connect an Identity Store to Power Automate topic.
- Link a workflow to a flow by providing the URL of that flow in the workflow .See the Link an Identity Store Workflow to a Flow topic.
Consequently, when the identity store workflow is triggered, the linked flow is auto triggered.
NOTE: When the flow is approved in Power Automate, the identity store workflow request is auto approved. However, if the identity store workflow request is approved first, the flow would not be auto approved.
Connect an Identity Store to Power Automate
To connect an identity tore to Power Automate, you must configure a Power Automate client for that identity store. This will establish a communication channel between the GroupID Data service and the Power Automate platform.
NOTE: Make sure the GroupID server is deployed on a machine that is exposed over the Internet, as Power Automate needs to communicate with the GroupID server for processing requests. Power Automate cannot communicate with a server deployed on a machine behind NAT.
To configure a Power Automate client for an identity store:
-
In Admin Center, click Identity Stores in the left pane.
-
On the Identity Stores page, click the ellipsis button for an identity store and select Edit.
-
Click Workflows under Settings in the left pane.
-
On the Workflows page, click the Advanced Workflow Settings tab.
-
In the Power Automate Settings section, click Register Client.
-
Enter the following information:
- Organization Code - the unique name for the environment that stores your flows in Power Automate.
- Region - the location of your environment.
- GroupID Data Service URL - the URL of the Data service. Requests from Power Automate will
communicate with the Data service endpoint. The URL is as:
https://<GroupID server name>/<Data service name>
For example:
https://powerautomate-netwrix1.msappproxy.net/directorymanagerdataservice - Tenant ID - the tenant ID assigned to the GroupID application when you registered it in Microsoft Entra Admin Center.
- Client ID - the application ID assigned to the GroupID application when you registered it in Microsoft Entra Admin Center.
NOTE: The GroupID application in Microsoft Entra Admin Center must have the following permissions for Power Automate:
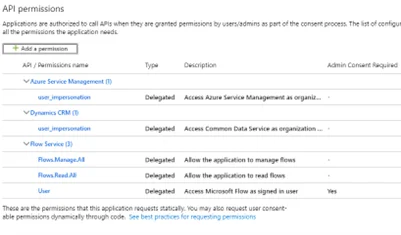
-
Click Save on the Advanced Workflow Settings page.
Link an Identity Store Workflow to a Flow
To link an identity store workflow to a Power Automate flow, generate a flow template from an identity store workflow and provide the URL of the flow in workflow settings. When the workflow is triggered, the linked flow is auto triggered.
To link a workflow to a flow:
-
In Admin Center, click Identity Stores in the left pane.
-
On the Identity Stores page, click the ellipsis button for an identity store and select Edit.
-
Click Workflows under Settings in the left pane.
-
On the Configure Workflows tab of the Workflows page, click the ellipsis button for a workflow and select Edit.
-
On the Edit Workflow page, click Power Automate Settings in the top right corner.
-
On the Power Automate Settings dialog box, provide the username and password of a Microsoft Entra ID account for managing flows in the Microsoft Power Automate portal. This account must have the following permissions on the Entra tenant:
-
Click Create Template. GroupID creates a basic flow in Power Automate with the same name as the workflow, and displays the following message:

-
The next step is to copy the flow URL from Power Automate and provide it here. To copy the URL, do the following:
-
Launch Power Automate and navigate to Environments > GroupID application > My Flows. This page displays the flow you created in Power Automate from the GroupID workflow.
-
Hover the mouse over the flow to display the ellipsis button. Click it and select Edit.
-
Expand the Connections area.

-
Click Approvals in the Connections area. The approver of the GroupID workflow is auto added here. Click Save.
-
Expand the When a HTTP request is received area and copy the URL displayed for HTTP POST URL.
-
-
In GroupID, return to the workflow being linked to the flow, and click Configure a Request URL on the Power Automate Settings dialog box.
-
Enter the copied HTTP POST URL in the Request URL box.
-
Click Authenticate and then Save.
-
Click Update Workflow on the Edit Workflow page to save the settings.
-
Click Save on the Workflows page.
-
Next, enable the linked flow in Power Automate. To do so:
- In Power Automate, navigate to Environments > GroupID application > My Flows. This page displays the flow you created in Power Automate from the GroupID workflow.
- Hover the mouse over the flow to display the ellipsis button. Click it and select Turn on.
See Also
Workflows
A workflow is a set of rules that GroupID uses as a built-in auditing system to ensure that changes made to an object are approved by an authorized user before they are committed to the directory.
Workflows are defined for an identity store and apply to the different operations, such as group creation and expiry.
A workflow triggers when a certain operation, performed by a user, meets the criteria defined for that workflow. Designated users can approve or deny workflow requests using the GroupID portal or the GroupID mobile app.
NOTE: Workflows require an SMTP server to be configured for the identity store. See the Configure an SMTP Server topic.
System Workflows
GroupID provides the following predefined workflows (also called system workflows) that trigger when their associated events occur:
| Workflow Name | Description | Default Approver | |
|---|---|---|---|
| 1. | Workflow to Reset Password | When a user resets his or her password. It does not apply when helpdesk users reset the passwords of other users. | Primary and additional managers of the user |
| 2. | Workflow to Change Group Expiration Policy | When a user changes the expiry policy of a group. By default, this workflow is disabled and no approver is specified. You can edit the workflow to add an approver. | None |
| 3. | Workflow to Nest a Group | When a user adds a group (Group A) to the membership of another group (Group B). | Primary and additional owners of Group B |
| 4. | Workflow to Join a Group | When a user joins a semi-private group. | Primary and additional owners of the group |
| 5. | Workflow to Leave a Group | When a user leaves a semi-private group. | Primary and additional owners of the group |
| 6. | Workflow to Transfer a User | When a user transfers his or her direct report. | The new manager |
| 7. | Workflow to Terminate a User | When a manager terminates a direct report. By default, this workflow is disabled and no approver is specified. You can edit the workflow to add an approver. | None |
| 8. | Workflow to Change Manager | When a user changes his or her primary or additional manager. | Existing primary and additional managers of the user |
You can also define new workflows for an identity store.
NOTE: You cannot delete a system workflow, but you can disable it. You can also modify it to a limited extent.
Synchronize Jobs and Workflows
Workflows apply to Synchronize jobs as follows:
-
When you manually run a Synchronize job, GroupID evaluates whether the task it will perform falls under the scope of a workflow. If yes, then a workflow request is triggered. The job will run when the request is approved.
Workflows do not apply to Synchronize jobs that auto run through a Synchronize schedule.
Example: You have a Synchronize job that changes the job title of users in bulk. You also have a ‘Change Title’ workflow that triggers when the job title of a user is changed. In this case, the Synchronize job falls under the scope of the ‘Change Title’ workflow. When the job is run manually, the workflow triggers and an approval request goes to the recipient set as the workflow approver. If the approver approves the request, the job will run. If not, then it will not run. -
When you manually run a job collection in which some jobs fall under the scope of workflows while others do not, workflow requests will be triggered for the respective jobs while the other jobs will run as usual.
-
When a workflow request against a Synchronize job is pending for approval, another request will be triggered when the same user or any other user runs the same job again.
-
When a Synchronize job runs to set the manager for a user who does not already have a manager, the following happens:
- The Workflow to Change Manager will trigger if a default approver is set in advanced workflow settings.
- If the default approver is not set, the workflow will not trigger and the user's manager will be set without requiring any approval.
-
When a Synchronize job updates multiple attributes for an object type and different workflows have been defined for the various attributes that it updates, then a separate request is triggered for each of the applicable workflows and sent to the respective approvers. Even when one of these requests is approved, the job runs, irrespective of whether another approver denies it.
Example: A Synchronize job falls under the scope of three workflows. Hence, three requests are generated and sent to three different recipients for approval. If an approver approves it, another denies it, and the third does not take any action, the job will run and update all target attributes. -
Filters in workflows do not apply to Synchronize jobs.
How are Workflow Requests Handled
When a workflow is triggered, an approval request is generated and sent to the designated approver(s), informing them of the actions that a user wants to perform in an identity store. The approver can view these requests in the GroupID portal and the GroupID mobile app.
- If the approver is satisfied with the requested actions, he or she can approve the request and the changes are committed to the directory.
- If the approver deems the actions inappropriate, he or she can deny the request and provide a reason for denial.
In any case, the requester and other approvers (in case of multiple approvers) are notified of the outcome.
Workflow Approval Scenarios
The following scenarios are valid when workflow approver acceleration settings are not applied.
- When the object specified as an approver for a workflow is not available (such as if it is disabled or not specified), workflow requests are sent to the default approver. If the default approver is disabled or not specified either, the requests are auto approved. See the Specify a Default Approver topic.
- If the requester is also the approver for that workflow, the request is auto approved.
Integration with Microsoft Power Automate
To automate your everyday tasks, you can also link your GroupID workflows to Power Automate flows.
See Also
- Implement Workflows
- Manage Advanced Workflow Settings
- Workflow Approver Acceleration
- Integrate with Power Automate
All Requests
Use All Requests node to view workflow requests generated by enterprise users. The view displays pending requests only.
You can click a column header to sort the requests by that attribute. For each request, you can view the description, approver(s), requester name, the target to change, status, date the request was made on, and the reason why that request was denied. Expand a request to view more details, such as the field changed along with its old and new value.
What do you want to do?
Approve a request
-
On the left navigation bar, click Requests. Then click the All Requests tab to view the workflow requests that are pending for approval.
You can expand a request to view its details.
-
Select a request and click Approve Requests to approve it.
GroupID will process the request and execute the changes.
Deny a request
-
On the left navigation bar, click Requests. Then click the All Requests tab to view the workflow requests that are pending for approval.
You can expand a request to view its details.
-
Select the request you want to deny, type the reason for denial and click Deny Request.
GroupID will not perform any action and no changes will be made.
ReRoute a request
To reroute a request to a different approver, follow these steps:
-
On the left navigation bar, click Requests. Then click the All Requests tab to view the workflow requests that are pending for approval.
You can expand a request to view its details.
-
Select the request you want to reroute, click ReRoute.
-
On the Reroute Workflow Request wizard, select one of the following:
-
Manager of User
-
Manager and Additional Manager of User
-
Other
Search the any user and select them from the search list.
-
-
Click Reroute to close the wizard.
Filter requests
-
On the Requests page, use the following areas to specify a criterion for filtering the requests' list.
- Requesters
- Approvers
- Date
- Actual Approver / Denier
- Target Object
- Request Status
-
From Requesters list, select an option:
- All: view requests requested by all the users.
- Custom: view requests requested by specific users mentioned in Custom Requesters box.
-
From Approvers list, select an option:
- All: view requests approved by all the users.
- Custom: view requests approved by specific users mentioned in Custom Approvers box.
-
Use the Date list to specify the duration you want to view the requests for.
-
All
-
Today
-
Yesterday
-
Last 7 Days
-
Last 30 Days
-
Last 90 Days
Requests that are initiated in the given period will be displayed.
-
-
From Actual Approver/Denier list, select an option:
- All: view requests approved/denied by all the users.
- Custom: view requests approved/denied by specific users mentioned in Custom Actual Approvers/Deniers box.
-
From Target Object list, select an option:
- All: view requests related to all types of objects.
- Custom: view requests related to specific objects mentioned in Custom Target Object box.
-
From the Request status list, select an option:
- Pending: view requests that are pending for you to approve or deny.
- Approved: view requests that you have approved.
- Denied: view requests that you have denied.
- All: view all pending, approved, and denied requests.
-
To add more filters, click Add Filter.
-
From the Select a filter list, select any of the following to search relevant requests:
- Description
- Workflow Event
- Workflow Type
-
Two more boxes get displayed next to Select a filter box upon selecting a filter.
- Select an Operator: select the operator from that is relevant to your filter.
- Select a Value: Specify the value for the selected operator in the first box.
-
Click Apply.
Workflow requests matching the specified criteria are displayed.
-
Click Reset Filter to remove the filters that you have added.
All the workflow request will be displayed below.
See Also
My Requests
To view the workflow requests that you initiated, expand the Requests node on the left navigation bar and select My Requests. You can view the requests pending for approval as well as requests that have been processed (approved or denied).
By default, the page displays pending requests that you initiated today. You can also filter the request by adding filters.
For each request, you can view the description, approver(s), requester name, the target to change, status, date the request was made on, and the reason why that request was denied. Expand a request to view more details, such as the field changed along with its old and new value.
See Also
Requests
A workflow request is a set of rules that GroupID uses as a built-in auditing system to ensure that users enter correct data before committing changes to a directory. A workflow triggers when some GroupID operation, performed by a user, meets the criteria defined in the workflow route.
Workflow requests are defined for an identity store and applied to the different operations performed using GroupID.
GroupID provides the following predefined workflows (also called system workflows) that trigger when their associated events occur:
| Workflow Name | Description | Default Approver | |
|---|---|---|---|
| 1. | Workflow to Reset Password | When a user resets his or her password. It does not apply when helpdesk users reset the passwords of other users. | Primary and additional managers of the user |
| 2. | Workflow to Change Group Expiration Policy | When a user changes the expiry policy of a group. By default, this workflow is disabled and no approver is specified. You can edit the workflow to add an approver. | None |
| 3. | Workflow to Nest a Group | When a user adds a group (Group A) to the membership of another group (Group B). | Primary and additional owners of Group A |
| 4. | Workflow to Join a Group | When a user joins a semi-private group. | Primary and additional owners of the group |
| 5. | Workflow to Leave a Group | When a user leaves a semi-private group. | Primary and additional owners of the group |
| 6. | Workflow to Transfer a User | When a user transfers his or her direct report. | The new manager |
| 7. | Workflow to Terminate a User | When a manager terminates a direct report. By default, this workflow is disabled and no approver is specified. You can edit the workflow to add an approver. | None |
| 8. | Workflow to Change Manager | When a user changes his or her primary or additional manager. If the user does not have a primary manager, and no default approver is set, the request is auto approved. | Existing primary and additional managers of the user |
The administrator can also define more workflows for the identity store.
In case of a Synchronize job, GroupID evaluates whether the task it will perform falls under the scope of a workflow. If yes, then a workflow request is triggered the first time the job is executed. The job will run when the request is approved.
On GroupID Portal, use the Requests node to view and manage workflow requests for the connected identity store. Expanding this node displays the following tabs:
- My Requests lists workflow requests that you have generated. It displays both pending and processed requests.
- Request Inbox lists the workflow requests for which you are the approver. You can view, approve, deny, or reroute these requests.
- All Requests lists all pending workflow requests generated by enterprise users.
NOTE: If the user is high priority such as Administrator, only then they will see the All Requests tab.
Workflow Implementation
GroupID workflows are carried out in a standard action sequence:
- When a user performs an action in GroupID, it is evaluated according to the workflow settings.
- If no approval is required, the change takes place in the directory and change notifications are sent.
- If a workflow applies, GroupID routes an approval request to the approving authorities and a 'request sent' notification is send to the requester. When the request is approved, the requested changes are made in the directory and change notifications go to the requester and approvers (except the one who has approved the request) by email.
- If the request is denied, information is not updated in the directory and an email notification is sent to the requester and the approvers (except the one who has approved the request) with an explanation of why it was denied.
The administrator may enable the email approval option for a workflow route. Email notifications generated for such workflow requests contain the Accept and Deny buttons. On clicking any of these, the approver is redirected to the GroupID portal, where he or she can approve or deny the request. Navigation within the portal will require authentication.
NOTE: Email notifications are sent when an SMTP server has been configured for the identity store.
Approving authority for a Workflow Request (without Workflow Acceleration)
For each workflow, an approving authority is also specified. The following scenarios are valid when workflow approver acceleration settings are not applied:
-
If the object specified as an approver in a workflow route is not available (such as if it is disabled or not specified), the workflow request would be routed to the default approver. If the default approver is not specified or disabled, the request is auto approved.
See the Specify a Default Approver topic.
-
If the requester is also the approver for that workflow, the request is auto-approved.
-
When a Synchronize job runs to set the manager for a user who does not already have a manager, the following happens:
- The Workflow to Change Manager will trigger if a default approver is set in advanced workflow settings.
- If the default approver is not set, the workflow will not trigger and the user's manager will be set without requiring any approval.
Workflow Acceleration
The workflow approver acceleration feature in GroupID ensures that no workflow request remains unnoticed and undecided. Based on certain rules, it automatically accelerates a request to another approver if the current approver does not act on it for a certain number of days.
The administrator can enable and configure workflow approver acceleration for an identity store in GroupID Admin Center.
See Workflow Approver Acceleration
See Also
Request Inbox
Using the GroupID portal, designated approvers can view the workflow requests and approve or deny them accordingly. On the left navigation bar, click Requests. Then click the Request Inbox to view the workflow requests that are waiting for approval. You can also view the request count next to the Request Inbox label.
By default, the page displays pending requests that were initiated today. You can also view processed (approved or denied) requests. Use add filters to filter the requests list as required.
For each request, you can view the description, approver(s), requester name, the target to change, status of the request, creation date, and the reason why that request was denied. Expand a request to view more details, such as the field changed along with its old and new value.
You can perform the following functions on Requests Inbox page:
See Also