Manage Groups
All Groups
This tab lists all groups defined in the identity store including all active groups:
- Private Groups
- Semi Private Groups
- Public Groups
- Expired Groups
- Expiring Groups
- Smart Groups
- Dynasties
- Password Expiry Groups
- Teams (for Microsoft Entra ID based identity store)
Viewing all groups from the directory source may slow down the loading of groups in the view, especially when there are more than 100 groups.
You can:
-
Manually update the membership of a Smart Group using the Update command. You can also view update details on Processing Object (s) wizard. Click OK once done.
If you click Background, the update runs in the background and will show in the Background Tasks tab.
-
View and modify the Group Properties of a group.
-
Expire a group manually . After expiring the group, it will be listed in Expired Group list.
-
Select a smart group and click Renew on the toolbar; this re-applies the expiry policy of the group starting from today, thus renewing the group.
-
Join a group as a Join a group temporarily or Join a group permanently
Select Other to add other users to the group.
-
Leave a group’s membership Leave a group temporarily or Leave a group permanently.
Select Other to remove other users from the group.
-
To Join/Leave the group, you can also click on Want to write reason to group owner? and state the reason for joining or leaving the group for the group owner.
-
Update the security type of a group group using Set Security Type option. You can select one of the following security types:
- Public
- Semi Private
- Private
-
Update the expiration policy of a group using Set Expiration Policy option.
- Never Expire
- Expire Every 30 Days
- Expire Every 60 Days
- Expire Every 90 Days
- Expire Every 120 Days
- Expire Every 6 Months
- Expire Every Year
- Other
-
Set owner for a group using Set Owner option. The drop down list displays two options:
- Me: You can set yourself as the Owner.
- Other: You can select some other user as the Owner.
-
Physically delete a group. Select a group and click Delete on the toolbar.
-
Click Attest Group to update and verify group's attributes and memberships.
-
Get a list of all groups managed by a particular group (i.e., all groups for which the selected group is a primary or additional owner).
Select a group and click Managed By on the toolbar to get a list of groups managed by the selected group.
-
Select a group and click Move Group from the toolbar. You can specify a new container from Select Container box where you want to move the group.
-
Add a group’s email to your email contact list using the vCard.
Select a group and click Add to Contacts on the toolbar. The portal creates the group's vCard and prompts you to save it on your machine. You can then use it to add the group's email address to your email contact list.
-
Click Add to Group to add the group into the membership of another group (Add a group to the membership of another group (nesting)).
-
Select a group and click Send Email on the toolbar. This launches the default Windows email application for sending an email to group members.
-
Click Export Results on the toolbar to export the group list to a Microsoft Excel file.
-
In the Results box, select the number of search results to display on a page.
Use the page numbers under the group listing to page through all groups.
You can also control the number of records to be displayed per page by modifying the Search results per page setting on the Portal Settings panel.
Modify Search Directory
You can modify the search results in Modify Search Directory. You can select entire directory or a domain to search active groups from.
Transfer Ownership
You can find Transfer Ownership option on the top right corner. Transfer Ownership enables you to:
- Assign owners to orphan groups.
- Transfer group ownership (including Exchange 2013/2016/2019 additional ownership) from one recipient to another.
Filter All Groups
You can add filters in All Group Grid Filters while searching for specific groups.
-
Click Add Filter to specify a criterion for filtering groups.
-
From the Select a Filter list, select the attribute to filter groups.
-
Two more boxes get displayed next to Select a Filter box upon selecting a filter.
- Select an Operator from the first list.
- Specify a value for the selected operator in the second box.
-
Click Apply Filter.
All active groups that match the specified criterion are displayed.
-
You can add additional filters by clicking Add Filter.
-
To undo the filters, click Reset Filter. It will remove all the criteria set before.
See Also
Attest an Expiring Group
If the GroupID administrator enables group attestation for the identity store, then group owners must review and validate the attributes and membership of an expiring group before renewing it.
While attesting a group, the owner can:
- Update a few attributes, such as the group’s display name, expiration policy, security type, etc.
- Verify the group’s membership and inactivate unrequired members. Inactive members are removed from group membership instantly or after x number of days, depending on the configurations made by the administrator.
A group expires when it is not attested and renewed during its expiring days.
History Logging
GroupID tracks and maintains history for group attestation. On the Object properties - History tab in group properties, the following is logged:
- The date the group was attested on.
- Any attribute value updated during group attestation.
- The status of a group member set to ‘active’ or ‘inactive’.
What do you want to do?
Attest a group
-
In GroupID portal, on the left navigation bar, click Groups. On the Groups page select the All Groups tab.
-
Select an expiring group and click Attest Group on the toolbar.
The button would be disabled if you select multiple groups.
-
On the Attest Group wizard, review the values provided for the group attributes and update any information, if required. Then click Next Step.
-
On the Step 2: Member Attestation page, verify the group members. The page has 3 tabs:
- Disabled Members: Lists group members that are disabled in the directory.
- Not logged in 30 days: Lists group members that have not logged into their workstations in the last 30 days.
- All Members: Lists active group members only. Disabled members and those who have not logged in during the last 30 days are not included.
-
On each of these tabs, review the members list and set their status to active or inactive.
-
Use the Active All and Inactive All buttons to mark the status of all members as active or inactive respectively. To individually mark an active member as inactive and vice versa, click the relevant button for it.
The Active All and Inactive All buttons are available if the administrator has allowed group owners to specify the status of all member in a single click.
-
If the Active All and Inactive All buttons are not available, the group owner must verify each member one by one (by individually specifying its status as active or inactive.
NOTE: Setting ‘active’ as status for a disabled user does not activate or enable the user's account.
Setting ‘active’ as status for users who have not logged in during the last 30 days does not move them to the All Members listing. -
-
The Membership column displays the membership type for active members.
You can change the membership type of users in all three listings – All Members,Disabled Members and Not logged in 30 days.
Membership types are:
-
Perpetual - To make the object a permanent member of the group.
-
Temporary Member - To make the object a temporary member of the group for the period you specify in the Beginning and Ending boxes. At the end of the period, the object is removed from the group membership.
-
Addition Pending - Indicates that the object will be a temporary member of the group for a period in the future. Use the Beginning and Ending boxes to set a period. Before the beginning date, the object’s membership type is displayed as ‘Addition Pending’. On the beginning date, the membership type changes to ‘Temporary Member’.
Here is an example:
You add Smith as a temporary member to Group A on May 15, 2019 for future dates, May 20-30, 2019.
Smith will be displayed in Group A’s membership with ‘Addition Pending’ as its membership type from May 15 to 19, 2019. However, Smith would not be added to group membership in the provider.
On May 20, Smith will become a temporary member of Group A and its membership type will change to ‘Temporary Member’ from May 20 to 30, 2019. Smith will also be added to group membership in the provider.
After May 30, Smith will be removed from Group A as a member in GroupID and in the provider.
-
Removal Pending - Indicates that the object will be temporarily removed from group membership for a period in the future. Use the Beginning and Ending boxes to set a period. Before the beginning date, the object’s membership type is displayed as ‘Removal Pending’. On the beginning date, the membership type will change to ‘Temporary Removed’.
Here is an example:
You remove Smith from Group A on May 15, 2019 for future dates, May 20-30, 2019.
Smith will be displayed in Group A’s membership with ‘Removal Pending’ as membership type from May 15 to 19, 2019.
On May 20, Smith’s membership type in GroupID will change to ‘Temporary Removed’; lasting till May 30, 2019. However, Smith will be removed from Group A’s membership in the provider.
After May 30, Smith will be added back to Group A as a permanent member in GroupID and in the provider.
-
Temporary Removed - Indicates that the object is temporarily removed from group membership for the period specified in the Beginning and Ending boxes. At the end of the period, the object is added back to the group membership as a permanent member.
-
-
For inactive members, the Membership column displays the status as Inactive. The duration for an inactive member to remain in group membership depends on configurations made by the administrator.
-
The administrator can specify X number of days, say 5.
When the status of a member is set to inactive, he/she is immediately removed from group membership in the directory provider. In GroupID, however, he/she remains a group member till the specified number of days, starting from the inactivation date. On the Attest & Renew Group wizard, the Beginning column displays the date when the user’s status was set to inactive, and the Ending column displays the date when the user would be removed from group membership in GroupID, based on the specified days.
During this period, the member can be activated (added back to group membership). When the member is not activated, the Membership Life Cycle job removes it from group membership in GroupID too.
-
If the administrator has not specified any days, the inactivated member is removed from group membership in the directory provider and in GroupID when the Attest & Renew Group wizard completes. In this case, the Beginning and Ending columns remain blank.
-
-
Click Next Step.
-
The Summary page displays the attributes that have been updated and the members’ updated status.
Click Attest Group to attest and renew the group.
On attestation, the group’s expiration policy is re-applied to it, starting from today.
See Also
Dynasties Functions
In GroupID portal, you can manage Dynasty structure and its membership using the following functions.
What do you want to do?
- Manage attributes for an Organizational/Geographical/Custom Dynasty
- Manage Managerial Dynasty structure
- Set attribute inheritance
- Modify alias and display name templates
Manage attributes for an Organizational/Geographical/Custom Dynasty
Dynasties are built on attributes. For example, if the Country, State, and City attributes are specified for a Geographical Dynasty, GroupID creates a Smart Group for every distinct country, then for each state within a country, and finally for each city within a state.
-
On the left navigation bar, click Groups and then select the My Groups tab.
You can also Directory Search the Organizational, Organizational, or custom Dynasty you want to change the attributes for.
-
Select the required Dynasty and click Properties on the toolbar.
The Dynasty's Group Properties page is displayed with the General tab in view.
-
On the Dynasty Options tab, update the attributes in the Attributes area.
Refer to the Dynasty Options page for details.
-
Click Save.
Manage Managerial Dynasty structure
-
On the left navigation bar, click Groups and then select the My Groups tab.
You can also Directory Search the Managerial Dynasty you want to restructure.
-
Select the required Dynasty and click Properties on the toolbar.
The Dynasty's Group Properties page is displayed with the General tab in view.
-
On the Dynasty Options tab, modify the options related to the Dynasty structure.
Refer to the Dynasty Options page (Managerial Dynasty) for details.
-
Click Save.
Set attribute inheritance
-
On the left navigation bar, click Groups and then select the My Groups tab.
You can also Directory Search the Dynasty you want to change the inheritance option for.
-
Select the required Dynasty and click Properties on the toolbar.
The Dynasty's Group Properties page is displayed with the General tab in view.
-
On the Dynasty Options tab, select the required option from the Inheritance drop-down list.
See the Inheritance section in Dynasty Options.
-
Click Save.
Modify alias and display name templates
For an Organizational/Geographical/Custom Dynasty
-
On the left navigation bar, click Groups and then select the My Groups tab.
You can also Directory Search the Dynasty you want to change the alias or display name template for.
-
Select the required Organizational/Geographical/Custom Dynasty and click Properties on the toolbar.
The Dynasty's Group Properties page is displayed with the General tab in view.
-
On the Dynasty Options tab, use the Alias Template and Display Name Template boxes to modify the respective templates.
For details, see the Alias Template and Display Name Template sections in Dynasty Options for an Organizational/Geographical/Custom Dynasty.
-
Click Save.
For a Managerial Dynasty
-
On the left navigation bar, click Groups and then select the My Groups tab.
You can also Directory Search the Dynasty you want to change the alias or display name template for.
-
Select the required Managerial Dynasty and click Properties on the toolbar.
The Dynasty's Group Properties page is displayed with the General tab in view.
-
On the Dynasty Options tab, use the Alias Template and Display Name Template boxes to modify the respective templates.
For details, see the Alias Template and Display Name Template sections in Dynasty Options for a Managerial Dynasty.
-
Click Save.
See Also
General Group functions
You can perform the following general functions on your directory groups.
What do you want to do
- Search for groups
- View object properties
- View groups managed by an object
- Manage group access
- Set email delivery restrictions
Search for groups
See Directory Search.
View object properties
You can view and modify the properties of a mailbox, group, user and contact.
-
Directory Search the required object.
-
Select this object on the Search Results page and click Properties on the toolbar.
The object's Group Properties page is displayed.
View groups managed by an object
You can get a list of all groups managed by a particular object (i.e., all groups for which the selected object is a primary or additional owner).
- Directory Search the required object.
- Select this object on the Search Results page and click Owner on the toolbar.
Manage group access
A group’s security type determines how non-members can access the group and become its members.
A security type is assigned to the group when it is created. However, you can change it later, if required.
-
In GroupID portal, click Groups in the left navigation pane, select Groups.
The Groups page is displayed with the My Groups tab in view.
-
Select a group and click Properties on the toolbar.
The group's Group Properties page is displayed with the General tab in view.
-
Select a different security type for the group from the Security list.
-
Click Save.
Set email delivery restrictions
You can allow or restrict a group from receiving emails from specified recipients.
NOTE: This feature is not available for groups in a Microsoft Entra ID based identity store.
-
In GroupID portal, click Groups in the left navigation pane, select My Groups.
The Groups page is displayed with the My Groups tab in view.
-
Select the required group and click Properties on the toolbar.
The group's Group Properties page is displayed.
-
Click the Delivery Restrictions tab.
-
Specify the senders that the group can receive emails from:
- Click the Add button in the Accept from area.
- Enter a search string to locate the required object, or click Advanced to use the Find Dialog Box for performing a search.
-
Select the senders that the group cannot accept emails from:
- Click the Add button in the Reject from area.
- Enter a search string to locate the required object, or click Advanced to use the Find Dialog Box for performing a search.
-
Save the changes.
See Also
Manage Group Access
A group's security type determines how non-members can access the group and become its members. GroupID provides three security types:
- Private
- Semi-Private
- Public
A security type is assigned to the group when it is created. However, you can change it later, if required.
What do you want to do?
Changing the security type for a group
-
In GroupID Portal, select Groups> [required group node].
-
In the groups list, click the required group and select Set Security Type from the above pane. Select any of the following:
- Private
- Semi-Private
- Public
-
Click Save.
Changing the security type for multiple groups
-
In GroupID Portal, select Groups > [required group node].
-
In the groups list, select the required groups and select Set Security Type from the above pane. Select any of the following:
- Private
- Semi-Private
- Public
-
Click Save.
See Also
Group Deletion
In GroupID, groups can be deleted in any of the following ways:
- Physical deletion
- Logical deletion
Physical Deletion
When you manually delete a group using the Delete button on the toolbar, the group is said to be physically deleted. However,
-
A group with a valid expiry policy will not be deleted.
-
A group without an expiry policy will be physically deleted.
Directory groups that are created outside of GroupID do not have an expiry policy.
In GroupID, you cannot distinguish groups with an expiry policy from groups without an expiry policy because groups without an expiry policy are displayed with "Never Expire' set as policy.
Moreover, when you use the Expire button on the toolbar to expire a group with a ‘Never Expire’ policy, the portal physically deletes it.
Physically deleted groups are not available in the portal anymore.
To renew a physically deleted group, contact the GroupID administrator.
Logical Deletion
Groups that are deleted by the Group Life Cycle job are considered to be logically deleted. This job deletes expired groups automatically based on the Group Life Cycle policy for the identity store.
Logically deleted groups are moved to the My Deleted Groups page with the 'Deleted_' prefix added to their names. Such groups have all their attributes intact. As a result, a logically deleted group, when renewed, returns to the state it had at the time of deletion.
See the What Happens When a Group is Deleted topic for additional information on group deletion.
Group Deletion Notifications
The Group Life Cycle job also notifies the owner or, if there is no owner, the default approver specified in the Group Life Cycle policy for the identity store. The job does not delete a group that neither has an owner nor a default approver.
Deleted groups are locked for further operations until renewed.
See Also
Group Expiry
GroupID provides two ways to expire a group:
-
Use the Expire button on the Group Properties toolbar to expire a group manually.
-
The Group Lifecycle job expires groups automatically based on the expiry policy specified for each group.
The expiry policy for a group specifies the period for which the group remains active. At the end of the period, the group expires.
The following events take place when a group expires:
- The group becomes inactive and is locked for all activities.
- "EXPIRED_" is added as a prefix to the group name.
- A mail-enabled group is mail-disabled, which means that any emails sent to the group and are bounced back with an expiration message.
- For a security group, its member list is cleared and any permissions set for that group no longer apply. However GroupID keeps a backup of its membership in the database.
GroupID moves an expired group to the Expired Groups tab; however all group attributes remain intact. You can renew an expired group.
When you expire an Office 365 group using GroupID, its member list is backed up in the database and cleared from Office 365.
In case of an Active Directory identity store with Office 365 as messaging provider:
In case of an Active Directory identity store with Office 365 as the messaging provider, the following happens when a distribution group is expired manually or via the Group Lifecycle job:
- The group’s email address is removed in Active Directory.
- "EXPIRED_" is added as a prefix to the group name.
- The group is removed from Office 365 when the AAD Sync schedule runs.
On renewing an expired distribution group, the following happens:
- The group’s email address is added in Active Directory.
- The "EXPIRED_" prefix is removed from the group’s name.
- The group is created with members in Office 365 when the AAD Sync schedule runs.
In case of a Microsoft Entra ID identity store with Office 365 as messaging provider:
In case of a Microsoft Entra ID identity store with Office 365 as the messaging provider, the following happens when a distribution group is expired manually or via the Group Lifeycle job:
- GroupID takes a backup of the group’s membership.
- It empties out the group’s membership in Office 365.
On renewing an expired distribution group, the following happens:
- The group’s membership is repopulated in Microsoft Entra IDand Office 365.
Group Expiry policy
All settings related to group expiry are specified in the default Group Lifecycle policy. This policy is defined for an identity store and applies to all groups.
The Group Life Cycle policy mainly defines:
- When to expire a group. Groups with a 'Never Expire' policy cannot be expired manually or by the Group Lifecycle job.
- Whether to notify the group owner or the default approver (in case the group has no owner) about group expiry x number of days before the group expires.
- The x number of days after which an expired group would be deleted, starting from the expiry date. This also applies to manually expired groups.
Of these, only the expiry period can be changed for individual groups. The remaining settings apply to all groups in the identity store and cannot be changed for individual groups.
When the Group Lifeycle job executes the Group Lifecycle policy, it monitors group expiry dates as determined by each group’s expiration period. See the Set a Default Expiry Policy for Groups topic.
Group Expiry Notifications
The Group Lifecycle job monitors the expiry policy of all groups. When a group approaches its expiry, the job does the following:
-
When notifications are not enabled in the Group Lifecycle policy, the Group Lifecycle job expires the group without notifying anyone.
-
When notifications are enabled, the job notifies the primary and additional owners or the default approver (in case no owner is set for the group) about the approaching expiry.
In case the notification could not be sent or no recipient is available, the schedule extends the expiry date of the group by 7 days on the group’s expiry day. It continues to do so until the notification is sent.
-
When the 1 day before group expiration option is selected for sending notifications and the Group Life Cycle schedule evaluates the group for the first time a day before its expiration date, GroupID will extend the group’s expiration date by 7 days.
Notifications are sent if an SMTP server is configured for the identity store. See the Set Group Expiry Notifications topic for additional information.
See Also
Group Expiry Functions
You can expire, renew or delete a group using GroupID portal. You can change expiry policy of a group and attest an expiring group, if required.
What do you want to do?
- Expire a group manually
- Change the expiry policy for a group
- Attest an expiring group
- Renew an expired group
Expire a group manually
-
On the left navigation bar, click Groups and then select the My Groups, My Memberships, or My Expiring Groups tab.
You can also Directory Search the group you want to expire.
-
On the page displayed, select the required group and click Expire on the toolbar.
NOTE: Note the following:
-
When you try to manually expire a group with the expiry policy set to ‘Never Expire’, an error message is displayed, informing you that the group cannot be expired.
-
When you manually expire a group with an expiry policy other than ‘Never Expire’, the group expires and is moved it to the My Expired Groups page.
-
A group without an expiry policy will not expire.
Directory groups that are created outside of GroupID do not have an expiry policy.
In GroupID, you cannot distinguish groups with an expiry policy from group without an expiry policy because groups without an expiry policy are displayed with "Never Expire' set as policy.
If expired groups are not renewed within a specific period (set by the GroupID administrator in the Group Lifecycle policy for the identity store), they are logically deleted when the period ends. See Group life cycle job.
Logically deleted groups are moved to the My Deleted Groups page with the “Deleted_” prefix added to their names.
Change the expiry policy for a group
When a group is created, it has its expiry policy set to 'Never Expire'. You can change this policy as required.
The Group Life Cycle job expires groups according to their respective expiry policies and moves them to the My Expired Groups page.
-
Directory Search the group you want to change the expiry policy for.
-
Select this group on the Search Results page and click Properties on the toolbar.
The group's Group Properties page is displayed with the General tab in view.
-
From the Expiration Policy list, select the duration that the group would remain active for, starting today. The group expires when the period ends.
If you select the Other option from the list, two boxes are displayed under the Expiration Policy box. First, select an option (Days, Months, or Years) from the second list. Then enter a value for the selected option in the first box. The group will remain active for the duration you specify here.
The Expiration Date box displays the group's expiry date after you save the changes.
-
Click Save.
NOTE: If the GroupID administrator has specified this action for review, your changes will not take effect until verified by an approver. See Requests.
Attest an expiring group
Renew an expired group
To use an expired group again, you can renew it. On renewal, the group becomes active again and its expiry policy is re-applied to it, starting from the date of renewal.
In the Group Life Cycle policy, the administrator can specify a period for retaining expired groups in the directory. If a group is not renewed within this period, the Group Life Cycle job automatically deletes it from the directory.
- On the left navigation bar, click Groups and then select the My Groups tab.
- Go to My Expired Groups tab and select the required group and click Renew on the toolbar.
- Click OK to confirm the renewal.
See Also
Join/Leave a Group
GroupID provides you the facility to join/leave a group temporarily or permanently for a specified period of time.
What do you want to do?
- Join a group permanently
- Join a group temporarily
- Leave a group permanently
- Leave a group temporarily
- Join or leave a group on behalf of a direct report or peer
Join a group permanently
You can join a semi-private or public group as a permanent member.
-
Directory Search the group(s) you want to join.
-
On the page displayed, select the group(s) to join.
-
Point to the Join button on the toolbar, make sure that the Join Perpetually option is selected, and click Join.
You can also join a group on the group's Group Properties page by using the Join button on the toolbar.
When a user joins a Smart Group or Dynasty, he or she is added to the Include list on the Query Designer - Include/Exclude tab of the Query Designer. As a result, the user remains a group member even when it does not fall in the scope of the query.
NOTE: For a semi-private group, the group owner must approve your join request before you are added to group membership. See Requests.
Join a group temporarily
The logged-in user can join a semi-private or public group as a temporary member.
-
Directory Search the group(s) you want to join.
-
On the page displayed, select the group(s) to join.
-
Point to the Join button on the toolbar and select the Join Temporarily option.
-
In the Duration list, select one of the following options:
- 7 Days - to join the selected group(s) for 7 days starting today
- 30 Days - to join the selected group(s) for 30 days starting today.
- 60 Days - to join the selected group(s) for 60 days starting today.
- 90 Days - to join the selected group(s) for 90 days starting today.
- Custom - to join the selected group(s) for the time period you specify in the From Date and To Date boxes. You will become a member of the selected group(s) on the date given in the From Date box.
-
Click Join.
You can also join a group on the group's Group Properties page by using the Join button on the toolbar.
When a user joins a Smart Group or Dynasty, he or she is added to the Include list on the Query Designer - Include/Exclude tab of the Query Designer. As a result, the user remains a group member even when it does not fall in the scope of the query.
NOTE: For a semi-private group, the group owner must approve your join request before you are added to group membership. See Requests.
Leave a group permanently
The logged-in user can permanently leave the membership of a semi-private or public group.
-
In GroupID portal, click Groups in the left navigation pane, select Groups.
Select the My Groups/My Memberships tab.
Or
Directory Search the group(s) you want to leave.
-
On the page displayed, select the required group(s).
-
Point to the Leave button on the toolbar, make sure that the Leave Perpetually option is selected, and click Leave.
You can also leave a group on the group's Group Properties page by using the Leave button on the toolbar.
When a user leaves a Smart Group or Dynasty, he or she is added to the Exclude list on the Query Designer - Include/Exclude tab of the Query Designer. As a result, the user is not added to group membership even when it falls in the scope of the query.
NOTE: For a semi-private group, the group owner must approve your leave request before you are removed from group membership. See Requests.
Leave a group temporarily
The logged-in user can leave the membership of a semi-private or public group on a temporary basis.
-
In GroupID portal, click Groups in the left navigation pane, select Groups.
Select the My Groups/My Memberships tab.
Or
Directory Search the group(s) you want to leave.
-
On the page displayed, select the required group(s).
-
Point to the Leave button on the toolbar and select the Leave Temporarily option.
-
In the Duration list, select one of the following options:
- 7 Days - to leave the selected group(s) for 7 days starting today.
- 30 Days - to leave the selected group(s) for 30 days starting today.
- 60 Days - to leave the selected group(s) for 60 days starting today.
- 90 Days - to leave the selected group(s) for 90 days starting today.
- Custom - to leave the selected group(s) for the time period you specify in the From Date and To Date boxes. You will be removed from group membership on the date selected in the From Date box.
-
Click Leave.
You can also leave a group on the group's Group Properties page by using the Leave button on the toolbar.
When a user leaves a Smart Group or Dynasty, he or she is added to the Exclude list on the Query Designer - Include/Exclude tab of the Query Designer. As a result, the user is not added to group membership even when it falls in the scope of the query.
NOTE: For a semi-private group, the group owner must approve your leave request before you are removed from group membership. See Requests.
Join or leave a group on behalf of a direct report or peer
Using the GroupID portal, a user can join or leave a group on behalf of another user.
-
If a user has the ‘Manage my Direct Reports’ permission in the identity store, he or she can join or leave a group on behalf of any of his or her direct reports.
For example, User A has two direct reports, User B and User C. User A can have User B and User C join/leave a group.
-
Similarly, if a user has the ‘Join/Leave on behalf of Peer’ permission in the identity store, he or she can join or leave a group on behalf of any of his or her peers.
For example, User A, User B and User C are peers (users having the same manager are considered as peers). If User A has the ‘Join/Leave on behalf of Peer’ permission, he or she can have User B and User C join/leave a group.
To join on behalf:
The logged-in user can join a group on behalf of a direct report or peer.
-
On the left navigation bar, click Groups and then select the My Groups, My Memberships, or My Expiring Groups tab.
You can also Directory Search the group you want to join on behalf of a direct report or peer.
-
On the page displayed, select the group to join.
-
Click Join on the toolbar and then click Other on the dialog box.
The Other option is visible to users who have the ‘Manage my Direct Reports’ or ‘Join/Leave on behalf of Peer’ permission or both.
-
Search the required direct report or peer.
- A user with the ‘Manage My Direct Reports’ permission can only search and select direct reports.
- A user with the ‘Join/Leave on behalf of Peer’ permission can only search and select peers.
- A user with both permissions can search and select both direct reports and peers.
-
Specify whether this direct report/peer should join the group for a permanent or temporary period, and click Join.
When a user is joined on behalf to a Smart Group or Dynasty, he or she is added to the Include list on the Query Designer - Include/Exclude tab of the Query Designer. As a result, the user remains a group member even when it does not fall in the scope of the query.
To leave on behalf:
The logged-in user can leave a group on behalf of a direct report or peer.
-
On the left navigation bar, click Groups and then select the My Groups, My Memberships, or My Expiring Groups tab.
You can also Directory Search the group you want to leave on behalf of a direct report or peer.
-
On the page displayed, select the group to leave.
-
Click Leave on the toolbar and then click Other on the dialog box.
The Other option is visible to users who have the ‘Manage my Direct Reports’ or ‘Join/Leave on behalf of Peer’ permission or both.
-
Search the required direct report or peer.
- A user with the ‘Manage My Direct Reports’ permission can only search and select direct reports.
- A user with the ‘Join/Leave on behalf of Peer’ permission can only search and select peers.
- A user with both permissions can search and select both direct reports and peers.
-
Specify whether this direct report/peer should leave the group for a permanent or temporary period, and click Leave.
When a user is removed on behalf from a Smart Group or Dynasty, he or she is added to the Exclude list on the Query Designer - Include/Exclude tab of the Query Designer. As a result, the user is not added to group membership even when it falls in the scope of the query.
NOTE: For a semi-private group, workflow is triggered and a notification is sent to the group’s primary owner for approval. If the requester is the default approver, the request is auto approved. Else, the request must be approved by an authorized user for changes to take effect.
See Also
Group Membership functions
Groups let you apply a common set of policies to multiple users. Groups also guarantee consistency of permissions and privileges across the membership.
You can add members to groups manually, using a scheduled job, or import them from an external data source.
Group Membership Settings
To avoid large, unusual changes to Smart Group and Dynasty memberships, the administrator can configure the ‘Out of Bounds’ setting for an identity store.
The administrator can:
- Specify the maximum number of members for a Smart Group and Dynasty.
- Determine actions to take if the limit is exceeded, such as not updating group membership or breaking the membership into smaller nested groups.
Example:
Let’s assume the administrator sets the maximum membership limit to 500 and opts for nested groups when membership exceeds this limit.
Scenario 1: On update, 485 objects are fetched to be added to Group A’s membership. Since the count is less than 500, the objects are directly added as group members.
Scenario 2: On the next update, 620 objects are fetched to be added to Group A’s membership. Since the count exceeds 500, it breaks the membership into 2 child groups (Group 1 with 500 members and Group 2 with 120 members) and nests them into Group A. Hence, GroupID checks the member count and takes necessary action before adding members to the group.
NOTE: An Office 365 group cannot have other groups as members. Therefore, the option to break the
membership into child groups would have the following impact:
An Office 365 group (Group A) will be updated according to the Smart Group update process. When the
maximum membership limit is hit, the update process will create child group(s). These child groups
will exist but without any link to Group A. Hence, Group A’s membership will be empty.
What do you want to do?
- Add members to a group
- Change the membership type of a group member
- Remove members permanently from a group
- Add a group to the membership of another group (nesting)
- Import members to a group
- Export group members
- Invite a guest user
Add members to a group
You can add one or more objects to the membership of one or more groups. These objects would be added as permanent members. You will find them listed as members on the Members tab in Group Properties.
NOTE: In a Microsoft Entra ID based identity store, only user objects can be added as members of an Office 365 group.
Use any of the following methods to add members to groups.
Method 1:
- Directory Search the required objects.
- Select these objects on the Search Results page and click Add to Group on the toolbar.
- The Find Dialog Box is displayed, where you can search and select the group(s) to add the objects to.
Method 2:
-
Directory Search the group you want to add members to.
-
Select this group on the Search Results page and click Properties on the toolbar.
The group's Group Properties page is displayed.
-
On the Members tab, click Add.
-
Enter a search string to locate the objects to add as members, or click Advanced to use the Find Dialog Box for performing a search.
-
Save the changes.
NOTE: These methods for adding members are recommended for static (unmanaged) groups only. For Smart Groups, GroupID will discard any manual membership changes when it updates the group through the Smart Group Update job.
To add a member temporarily to a group, see Change the membership type of a group member .
Change the membership type of a group member
By default, all new members are added as permanent member to a group. However, you can change the membership type of an object from permanent to temporary and vice versa.
You can also add or remove an object from a group's membership for a temporary period.
-
Directory Search a group to change the membership type of its member(s).
-
Select this group on the Search Results page and click Properties on the toolbar.
The group's Group Properties page is displayed, where the Members tab lists the group members.
-
To change the membership type of a member, click anywhere in the respective row to make it editable, and select one of the following options from the Membership list:
-
Perpetual - To make the object a permanent member of the group.
-
Temporary Member - To make the object a temporary member of the group for the period you specify in the Beginning and Ending boxes. At the end of the period, the object is removed from the group membership.
-
Addition Pending - Indicates that the object will be a temporary member of the group for a period in the future. Use the Beginning and Ending boxes to set a period. Before the beginning date, the object’s membership type is displayed as ‘Addition Pending’. On the beginning date, the membership type changes to ‘Temporary Member’.
Here is an example:
You add Smith as a temporary member to Group A on May 15, 2019 for future dates, May 20-30, 2019.
Smith will be displayed in Group A’s membership with ‘Addition Pending’ as its membership type from May 15 to 19, 2019. However, Smith would not be added to group membership in the provider.
On May 20, Smith will become a temporary member of Group A and its membership type will change to ‘Temporary Member’ from May 20 to 30, 2019. Smith will also be added to group membership in the provider.
After May 30, Smith will be removed from Group A as a member in GroupID and in the provider.
-
Removal Pending - Indicates that the object will be temporarily removed from group membership for a period in the future. Use the Beginning and Ending boxes to set a period. Before the beginning date, the object’s membership type is displayed as ‘Removal Pending’. On the beginning date, the membership type will change to ‘Temporary Removed’.
Here is an example:
You remove Smith from Group A on May 15, 2019 for future dates, May 20-30, 2019.
Smith will be displayed in Group A’s membership with ‘Removal Pending’ as membership type from May 15 to 19, 2019.
On May 20, Smith’s membership type in GroupID will change to ‘Temporary Removed’; lasting till May 30, 2019. However, Smith will be removed from Group A’s membership in the provider.
After May 30, Smith will be added back to Group A as a permanent member in GroupID and in the provider.
-
Temporary Removed - Indicates that the object is temporarily removed from group membership for the period specified in the Beginning and Ending boxes. At the end of the period, the object is added back to the group membership as a permanent member.
-
-
Save the changes.
The Membership Life Cycle job updates the temporary membership of groups. It adds and removes temporary members from group membership on the specified dates.
Consider a scenario where the Membership Life Cycle job is scheduled to run once a week, say Mondays. If an object is to be added to group membership for three days - Wednesday till Friday, it will not be added. This happens because the Membership Life Cycle job did not run on the particular days for temporary membership update.
Remove members permanently from a group
-
Directory Search the group you want to remove member(s) from.
-
Select this group on the Search Results page and click Properties on the toolbar.
The group's Group Properties page is displayed.
-
On the Members tab, select the group members you want to remove and click Remove.
-
Save the changes.
NOTE: This method of removing members is recommended for static (unmanaged) groups only. For Smart Groups, GroupID will discard any manual membership changes when it updates the group through the Smart Group Update job.
To remove a member temporarily from a group, see Change the membership type of a group member .
Add a group to the membership of another group (nesting)
- In GroupID portal, click Groups in the left navigation pane, select Groups.
- Select the My Groups, My Memberships, or My Expiring Groups tab.
- Select the group(s) to add to the membership of another group and click Add to Group on the toolbar.
- On the Find Dialog Box, search and select the group to add members to it, and click OK.
Import members to a group
You can import members to a group using an external file.
NOTE: In a Microsoft Entra ID based identity store, only user objects can be added as members of an Office 365 group.
-
In GroupID portal, click Groups in the left navigation pane, select Groups.
The Groups page is displayed with the My Groups tab in view.
-
Select the group you want to import members to, and click Properties on the toolbar.
The group's Group Properties page is displayed.
-
On the Group properties - Members tab, click Import to launch the Import Members wizard.
-
See Import Group Members for further information and instructions.
-
Save the changes.
Export group members
You can export members of a group to an external file.
-
Directory Search a group to export its members to an external file.
-
Select this group on the Search Results page and click Properties on the toolbar.
The group's Group Properties page is displayed.
-
On the Members tab, click Export to launch the Export Members wizard.
-
On the Attributes page:
-
In the Attributes list, select the required directory attributes and move them to the Selected Attributes list.
Members' data for the selected attributes is exported to the output file.
-
Click Next.
-
-
On the File Type page, select the file type to export the data to. Supported file types are:
- Microsoft Excel (.xls and .xlsx)
- Comma Separated Value (.csv)
- Extensible Markup Language (.xml)
- Text (.txt)
-
Click Finish.
-
When the file is successfully generated, you can save it to your machine.
Invite a guest user
For a Microsoft Entra ID based identity store, the portal enables you to invite a user from another Microsoft Entra ID tenant to the membership of a group in your domain.
-
In GroupID portal, click Groups in the left navigation pane, select Groups.
The Groups page is displayed with the My Groups tab in view.
Or
Directory Search the group you want to invite a guest user to.
-
Select the required group from the list and click Properties on the toolbar. The group's Group Properties page is displayed.
-
On the Members tab, click the Invite User button.
-
On the Invite User dialog box, provide the following information:
-
In the Email box, enter the email address of the user you want to invite to your domain.
-
In the Redirect URL box, provide the URL of a portal page, such as the My Profile page. On accepting the invite, the guest user will be redirected to this page.
-
Add any message for the guest user in the Personal Message box.
-
Click Invite User.
NOTE: If the group you want to invite a guest user to is a distribution group and the invited user is not in the guest user list of Microsoft 365 Admin portal than the invited user is not added into the group on the first invite but on the second invite.
-
-
The guest user is sent an email with the redirect link. On clicking this link, the guest user is successfully invited.
The Invite User button on the Invite User dialog box changes to Add To Group.
-
Click the Add To Group button to add the guest user as a group member.
-
Save the information.
An object for the guest user is created in Microsoft Entra ID, with type as ‘guest user’. This user has the same rights and permissions as any other group member.
See Also
Group Ownership Functions
The GroupID portal enables you to perform ownership related functions such as change primary owner of a group, specify additional owner(s) of a group, import/export additional owner and so on.
When a new group is created; by default, the group creator is set as its primary owner. However, you can change the primary owner or even remove it, leaving the group orphan.
You cannot remove a group’s primary owner if the Group Owners policy for your role does not allow it.
Additional owners
You can also specify temporary and permanent additional owners for a group. These can be users, contacts and even security groups. In case of a group, all its members will be considered as additional owners.
You can change the ownership type of an additional owner from temporary to permanent and vice versa.
Additional owners have the same privileges as the primary owner to manage the group. Group expiry, deletion, and renewal notifications are sent to the additional owners along with the primary owner. However, you can exclude some or all additional owners from receiving email notifications.
By default, there is no restriction on the number of additional owners a group can have. However, if the administrator has specified a maximum and minimum value for additional owners in the Group Owners policy for your role in the identity store, you cannot create a group or save modifications to it unless it has the specified number of additional owners.
Exchange 2013/2016/2019 additional owners
Microsoft Exchange 2013/2016/2019 offers the co-managed by feature that enables you to specify Exchange additional owners for a group, provided that Exchange 2013/2016/2019 is configured as the messaging provider for the identity store. Exchange additional owners are stored in the msExchangecoManagedby attribute.
GroupID sends group expiry, deletion, and renewal notifications to all Exchange additional owners along with the group’s primary owner and additional owners.
NOTE: For email notifications to be sent, an SMTP server must be configured for the connected identity store.
NOTE: Only users, contacts and security groups can be set as the primary and additional owners of a group. Moreover, only mail-enabled users can be set as Exchange additional owners.
NOTE: Note the following for a Microsoft Entra ID based identity store:
- Only users can be set as primary owners.
- Microsoft Entra ID supports multiple primary owners for a group.
- At least one primary owner is mandatory.
- Exchange additional owners are not supported.
What do you want to do?
- Change a group's primary owner
- Set additional owners for a group
- Import additional owners for a group
- Export additional owners
- Change an additional owner’s ownership type
- Set Exchange additional owners
Change a group's primary owner
-
In GroupID portal, click Groups in the left navigation pane, select My Groups.
The Groups page is displayed with the My Groups tab in view.
-
Select the required group and click Properties on the toolbar.
-
The group's properties page is displayed.
-
On the Group properties - Owner tab, the Owner box displays the group's primary owner.
To change the primary owner, click Browse to launch the Find Dialog Box, where you can search and select another owner.
-
Save the changes.
Set additional owners for a group
You can add and remove additional owners for a group.
Additional owners have the same privileges as the primary owner to manage the group.
NOTE: Only users, contacts and security groups can be set as the additional owners of a group.
If you specify a group, all its members are considered additional owners.
NOTE: The contact object type is not supported in a Microsoft Entra ID based identity store.
If the administrator has specified the Group Owner policy for the identity store, it may have an impact on the number of additional owners the group can have.
-
In GroupID portal, click Groups in the left navigation pane, select My Groups.
The Groups page is displayed with the My Groups tab in view.
-
Select the required group and click Properties on the toolbar.
-
The group's Group Properties page is displayed.
-
On the Group properties - Owner tab, click Add in the Additional Owners area.
-
Enter a search string to locate the object to add as an additional owner, or click Advanced to use the Find Dialog Box for performing a search.
-
By default, all group-related notifications (such as group expiry, deletion, and renewal notifications) are sent to the primary owner and all additional owners. To exclude an additional owner from receiving notifications, select the Do not notify check box.
NOTE: When a Smart Group Update job runs on a group, the notification behavior is as follows:
Even with the Do not Notify check box selected, the additional owner will receive the notifications if the administrator has included its email address for job-specific notifications.
-
Save the changes.
Import additional owners for a group
-
In GroupID portal, click Groups in the left navigation pane, select My Groups.
The Groups page is displayed with the My Groups tab in view.
Or
Directory Search a group to import its additional owners from an external file.
-
Select the required from the list. and click Properties on the toolbar.
The group's Group Properties page is displayed.
-
On the Group properties - Owner tab, click Import to launch the Import Additional Owners wizard.
-
See Import Additional Owners for further information and instructions.
-
Save the changes.
Export additional owners
You can export additional owners of a group to an external file.
-
In GroupID portal, click Groups in the left navigation pane, select My Groups.
The Groups page is displayed with the My Groups tab in view.
Or
Directory Search a group to export its additional owners to an external file.
-
Select the group and click Properties on the toolbar.
The group's Group Properties page is displayed.
-
On the Owner tab, click Export to launch the Export Additional Owners wizard.
-
On the Attributes page:
-
In the Attributes list, select the required directory attributes and move them to the Selected Attributes list.
Additional owners' data for the selected attributes is exported in the output file.
-
Click Next.
-
-
On the File Type page, select the file type to export the data to. Supported file types are:
- Microsoft Excel (.xls and .xlsx)
- Comma Separated Value (.csv)
- Extensible Markup Language (.xml)
- Text (.txt)
-
Click Finish.
-
When the file is successfully generated, you can save it to your machine.
Change an additional owner’s ownership type
Ownership type indicates whether an object is a temporary or permanent additional owner of a group. You can change the ownership type of an additional owner from temporary to permanent and vice versa.
-
Directory Search a group to change the ownership type of its additional owner(s).
-
Select this group on the Search Results page and click Properties on the toolbar.
-
On the group's Group Properties page, click the Owner tab.
-
To change the ownership type of an additional owner, click anywhere in the respective row to make it editable, and select an option from the Ownership list:
-
Perpetual - To make the object a permanent additional owner of the group.
-
Temporary Owner - To make the object a temporary additional owner of the group for the period you specify in the Beginning and Ending boxes. At the end of the period, the object is removed from the group ownership.
-
Addition Pending - Indicates that the object will be a temporary additional owner of the group for a period in the future. Use the Beginning and Ending boxes to set a period. Before the beginning date, the object’s ownership type is displayed as ‘Addition Pending’. On the beginning date, the ownership type changes to ‘Temporary Owner’.
Here is an example:
You add Smith as a temporary additional owner of Group A on May 15, 2019 for future dates, May 20-30, 2019.
Smith will be listed with Group A’s additional owners with ‘Addition Pending’ as its ownership type from May 15 to 19, 2019.
On May 20, Smith will become a temporary additional owner of Group A and its ownership type will change to ‘Temporary Owner’ from May 20 to 30, 2019.
After May 30, Smith will be removed from Group A as an additional owner.
-
Removal Pending - Indicates that the object will be temporarily removed from group ownership for a period in the future. Use the Beginning and Ending boxes to set a period. Before the beginning date, the object’s ownership type is displayed as ‘Removal Pending’. On the beginning date, the ownership type will change to ‘Temporary Removed’.
Here is an example:
You remove Smith as an additional owner of Group A on May 15, 2019 for future dates, May 20-30, 2019.
Smith will be displayed as Group A’s additional owner with ‘Removal Pending’ as ownership type from May 15 to 19, 2019.
On May 20, Smith’s ownership type in GroupID will change to ‘Temporary Removed’; lasting till May 30, 2019.
After May 30, Smith will be added back to Group A as a permanent additional owner.
-
Temporary Removed - Indicates that the object is temporarily removed from group ownership for the period specified in the Beginning and Ending boxes. At the end of the period, the object is added back to the group as a permanent additional owner.
-
-
Save the changes.
The Managed By Life Cycle job updates the temporary ownership of groups by adding and removing temporary additional owners on the specified dates.
Consider a scenario where the Managed By Life Cycle job is scheduled to run once a week, say Mondays. If an object is to be added as a group’s temporary additional owner for three days - Wednesday till Friday, it will not be added. This happens because the Managed By Life Cycle job did not run on the particular days for temporary ownership update.
Set Exchange additional owners
If your portal is connected to an identity store having Exchange Server
2013/2016/2019 deployed; then you can specify Exchange additional owners for a group. Exchange additional owners have the same privileges as the primary owner. GroupID sends group expiry, deletion, and renewal notifications to all Exchange additional owners along with the group’s primary owner and additional owners.
Microsoft Exchange 2013/2016/2019 offers the co-managed by feature that enables you to specify Exchange additional group owners.
-
In GroupID portal, click Groups in the left navigation pane, select My Groups.
The Groups page is displayed with the My Groups tab in view.
-
Select the required group and click Properties on the toolbar.
-
The group's Group Properties page is displayed.
-
On the Email tab, click Add in the Managed By area.
-
Enter a search string to locate the object to add as an Exchange additional owner, or click Advance to use the Find Dialog Box for performing a search.
NOTE: Only mail-enabled users can be set as Exchange additional owners.
-
Save the changes on the Email tab.
See Also
Scheduled Updates Functions
When a Smart Group or Dynasty is updated using a scheduled job, it involves the following:
-
Each Smart Group and Dynasty has a query defined for it. On update, the query retrieves records from the directory and group membership is updated with these records.
If the administrator has defined a Query Designer policy for your role, group membership is updated as per the defined policy. See the Query Designer Policytopic for additional information.
NOTE: Whatever the records returned by the query, the membership of an Office 365 group is updated with user objects only.
-
The values of certain attribute(s) is updated.
-
For a Smart Group, for example, the value of the managedBy attribute is updated for nested groups. These nested groups are created when the Out of Bounds settings are applied at the identity store level.
-
For Dynasties, the administrator can specify certain attributes in Dynasty Settings for an identity store. Values for the selected attributes are passed on from parent to child Dynasties.
These attributes’ values are updated for child Dynasties on update, depending on the inheritance option set for each Dynasty.
-
Update Methods
GroupID Portal provides different methods to update Smart Groups and Dynasties, namely:
- Manual update
- Scheduled update
In both methods, the query defined for the group is executed to update membership; the difference being that in manual update, you can execute the query manually any time while scheduled updates run automatically at a specified frequency.
In GroupID portal, you can perform the following functions for Smart Groups and Dynasties.
What do you want to do?
- Modify the query for a Smart Group/Dynasty
- Schedule periodic membership updates for Smart Groups/Dynasties
- Update the membership of a Smart Group/Dynasty using the Update command
- View Smart Group Update job status
- Modify the query for a Smart Group/Dynasty created by other role members
Modify the query for a Smart Group/Dynasty
-
In GroupID portal, click Groups in the left navigation pane, select My Groups.
The Groups page is displayed with the My Groups tab in view.
Or
Directory Search the group you want to modify the query for.
-
Select the required Smart Group or Dynasty and click Properties on the toolbar.
-
Use the Group properties - Smart Group/Query Designer tab to view the query defined for the group.
Click the Query Designer button to launch the Query Designer dialog box, where you can modify the query.
-
Save the changes.
NOTE: For an Office 365 group in a Microsoft Entra ID based identity store, group membership is updated with user objects only.
Schedule periodic membership updates for Smart Groups/Dynasties
You can associate a scheduled Smart Group Update job with a Smart Group/Dynasty. This job runs on a set frequency and updates the group's membership with records fetched by the respective group's query.
Membership update settings defined for the identity store also impact Smart Group and Dynasty membership update.
-
In GroupID portal, click Groups in the left navigation pane, select My Groups.
The Groups page is displayed with the My Groups tab in view.
Or
Directory Search the group you want to associate a Smart Group Update job with.
-
Select the required Smart Group or Dynasty and click Properties on the toolbar.
The group's Group Properties page is displayed.
-
On the Smart Group/Query Designer tab, select a Smart Group Update job from the Scheduled Job list.
When this job runs, it updates the group's membership.
NOTE: The schedule job will update the group taking into account Query Designer policy of group owner role, if defined.
-
Save the changes.
Update the membership of a Smart Group/Dynasty using the Update command
You can manually update a Smart Group or Dynasty any time by selecting the group and clicking Update on the toolbar. This executes the query defined for the group and updates its membership.
Membership update settings defined for the identity store also impact Smart Group and Dynasty membership update.
-
In GroupID portal, click Groups in the left navigation pane, select My Groups
-
On the Groups page, click My Groups/My Memberships/My Expiring Groups tab.
-
On the page displayed, select the groups for manual membership update and click Update on the toolbar.
A dialog box is displayed, that shows the progress of the Smart Group Update job.
-
You can click the Run in Background button on this dialog box to run the update job in the background.
View Smart Group Update job status
Use the Background Tasks icon in the top right corner to view the status of the Smart Group Update jobs.
- Jobs that are currently running in the background are displayed under In Progress.
- All jobs that have completed successfully, failed or canceled are listed under Other.
Modify the query for a Smart Group/Dynasty created by other role members
If you have the permission to manage any group, you can view and modify the query of an existing or a new Smart Group/Dynasty created by other role member according to the policy defined for your role. You can only modify the group if there is no conflict between yours and other role's policies.
Let’s say the administrator has defined the following Query Designer policy for the Administrator role:
- Start In Containers: Entire Directory containers
- Objects: Users, Groups, Contacts
- Default Filter Criteria: None
The administrator has defined the following Query Designer Policy for the User role of which you are a member of:
- Start In Containers: Users
- Objects: Users
- Default Filter Criteria: Company is Exactly ABC
A member of administrator role has created a Smart Group named QDGroup1.
-
In GroupID portal, you search this group query of which you want to view or modify.
-
On the Properties page, select the Smart Group tab.
-
Click the Query Designer button to open the Query Designer dialog box.
All the options that the administrator has restricted for your role appear as disabled. You can modify the query using the options allowed for your role.
Please note in case of a conflict in the role policies, you cannot modify the group. For example:
- the administrator role member who created the group has defined some settings on the Database tab but in your role policy the Database tab is hidden, in this case, you will not be able to modify the query of the group.
- Similarly, if the group has been created using the user object and in your role policy the user object is not available, upon group update an error will be displayed.
See Also
The Send As and Send on Behalf features
The administrator can configure the Send As and Send on Behalf features for a GroupID portal.
For the Send As feature, a portal user (User A) can set another object or objects in its Send As list. An added object (User B) will be able to choose User A’s email address in the ‘From’ field when composing a message in Outlook. In this instance, the message, while sent by User B, will appear as sent by User A.
Similarly, for the Send on Behalf feature, a portal user (User A) can set another object or
objects in its Send on Behalf list. An added object (User B) will be able to choose User A’s email
address in the From field when composing a message in Outlook. However, message recipients will see
both User A’s address and User B’s address (as the actual author of the message). This means that
when User B sends a message using User A’s address, the ‘From’ address will show ‘From: Mailbox
<User B's address> on behalf of Mailbox <User A's address>'.
The administrator can provide the Send As and Send on Behalf features on any tab in Group Properties. They are displayed as:
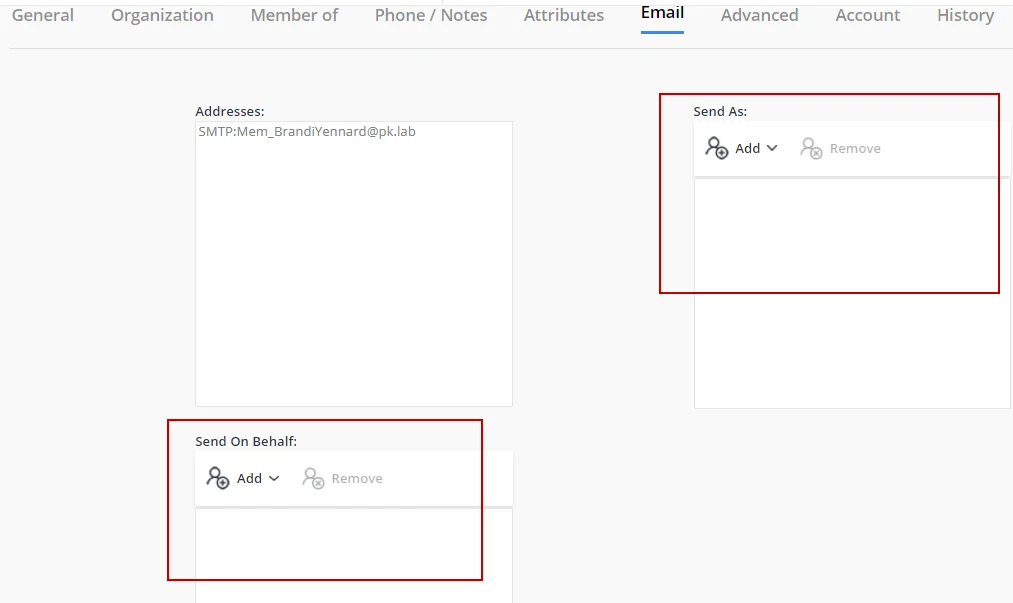
Use the Add and Remove buttons to add and remove objects in the Send As and Send on Behalf lists.
NOTE: Only mailboxes and mail-enabled groups can add objects to their Send As and Send on Behalf lists.
See Also
Working with Groups
A GroupID portal enables you to manage your directory groups in the identity store, so you can do the following and more:
- Add and remove members from your groups
- Join and leave other groups
- Associate a scheduled job for membership update with Smart Groups
- Expire groups instantly or set an expiry policy to auto expire them later
General
- Search for groups
- View object properties
- View groups managed by an object
- Manage group access
- Set email delivery restrictions
- The Send As and Send on Behalf features
Group Membership
- Add members to a group
- Change the membership type of a group member
- Remove members permanently from a group
- Add a group to the membership of another group (nesting)
- Import members to a group
- Export group members
- Invite a guest user
Scheduled Updates
- Modify the query for a Smart Group/Dynasty
- Schedule periodic membership updates for Smart Groups/Dynasties
- Update the membership of a Smart Group/Dynasty using the Update command
- View Smart Group Update job status
Group Ownership
- Change a group's primary owner
- Set additional owners for a group
- Import additional owners for a group
- Export additional owners
- Change an additional owner’s ownership type
- Set Exchange additional owners
Join/Leave a Group
- Join a group permanently
- Join a group temporarily
- Leave a group permanently
- Leave a group temporarily
- Join or leave a group on behalf of a direct report or peer
Dynasties
- Manage attributes for an Organizational/Geographical/Custom Dynasty
- Manage Managerial Dynasty structure
- Set attribute inheritance
- Modify alias and display name templates
Group Expiry and Deletion
- Group Expiry
- Expire a group manually
- Change the expiry policy for a group
- Attest an expiring group
- Renew an expired group
- Group Deletion
Query Designer Policy for Groups
- Modify the query for a Smart Group/Dynasty created by other role members
- Schedule periodic membership updates for Smart Groups/Dynasties (as per group owner role's Query Designer policy)
See Also
My Groups
To view and manage the groups that you own in the identity store, click Groups on the left navigation pane and select My Groups. This page lists all your active groups:
- My Memberships
- My Expired Groups
- My Expiring Groups
- My Deleted Groups
- My Smart Groups
- My Dynasties
- My Teams (for Microsoft Entra ID based identity store)
By default, the My Groups tab displays the groups that you are the primary owner for. To include the groups for which you are an additional owner, select the Display additional group ownership in My Groups check box on the Portal Settings panel. This tab lists active groups only; expired and deleted groups are not displayed.
You can Modify Search Directory to search your groups and add Filter All Groupsby clicking My Groups Grid Filters. All your groups matching the filters will be displayed.
You can:
-
Manually update the membership of a Smart Group using the Update command. You can also view update details on Processing Object (s) wizard. Click OK once done. If you click Background, the update runs in the background and will show in the Background Tasks tab.
-
View and modify the Group Properties of a group.
-
Manually expire your groups. After expiring the group, it will be listed in My Expired Groups list.
-
Select a smart group and click Renew on the toolbar; this re-applies the expiry policy of the group starting from today, thus renewing the group.
-
Join a group as a Join a group temporarily or Join a group permanently
-
Leave a group’s membership Leave a group temporarily or Leave a group permanently.
-
Join / leave a group Join or leave a group on behalf of a direct report or peera direct report or peer.
-
To Join/Leave the group, you can also click on Want to write reason to group owner? and state the the reason for joining or leaving the group for the group owner.
-
Update the security type of your group using Set Security Type option. You can select one of the following security types:
- Public
- Semi Private
- Private
-
Select a group and click Move Group from the toolbar. You can specify a new container from Select Container box where you want to move the group.
-
Select a group and click Add to Contacts on the toolbar to add a group’s email to your email contact list using the vCard. The portal creates the group's vCard and prompts you to save it on your machine. You can then use it to add the group's email address to your email contact list.
-
Click Add to Group to add the group into the membership of another group (Add a group to the membership of another group (nesting)).
-
Select a group and click Send Email on the toolbar to send an email to the group. This launches the default Windows email application for sending an email to group members.
-
Click Export Results on the toolbar to export the group list to a Microsoft Excel file.
-
Update the expiration policy of your group using Set Expiration Policy option.
-
Update owner for your group using Set Owner option. The drop down list displays two options:
- Me: You can set yourself as the Owner
- Other: You can select some other user as the owner.
-
Manually Group Deletion any of your group.
-
Get a list of all groups managed by s particular group (i.e., all groups for which the selected group is a primary or additional owner)
Select a group and click Managed By on the toolbar to get a list of groups managed by the selected group.
-
Click Attest Group to update smart groups and dynasties, and verify your group's attributes and memberships.
-
In the Results box, select the number of search results to display on a page.
Use the page numbers under the group listing to page through all groups.
You can control the number of records to be displayed per page by modifying the Search results per page setting on the Portal Settings panel.
Modify Search Directory
You can modify the search results in Modify Search Directory. You can select entire directory or a domain to search active groups from.
Transfer Ownership
You can find Transfer Ownership option on the top right corner. Transfer Ownership enables you to:
- Assign owners to orphan groups.
- Transfer group ownership (including Exchange 2013/2016/2019 additional ownership) from one recipient to another.
Filter My Groups
You can add filters in My Group Grid Filters while searching for specific groups.
-
Click Add Filter to specify a criterion for filtering groups.
-
From the Select a Filter list, select the attribute to filter groups.
-
Two more boxes get displayed next to Select a Filter box upon selecting a filter.
- Select an Operator from the first list.
- Specify a value for the selected operator in the second box.
-
Click Apply Filter.
All your groups that match the specified criterion are displayed.
-
You can add additional filters by clicking Add Filter.
-
To undo the filters, click Reset Filter.
It will remove all the criteria set before.
See Also
My Memberships
To view the groups that you are a member of, click Groups on the left navigation pane and select My Groups. On the My Groups page, click the My Memberships tab.
The My Memberships tab lists only active groups that you are a member of; expired and deleted groups are not displayed.
You can Modify Search Directory to search your memberships and add Filter All Groupsby clicking My Memberships Grid Filters. All your memberships matching the filters will be displayed.
See Also
- My Groups
- Groups
- Group Properties
- Group Membership functions
- Join/Leave a Group
- Working with Groups
- Directory Search
My Teams
This page lists all the Microsoft Teams groups that you own.
You can Modify Search Directory to search teams and add Filter All Groupsby clicking My Teams Grid Filters. All the teams matching the filters will be displayed.
See Also
- My Groups
- Groups
- Group Properties
- Group Expiry
- Join/Leave a Group
- Working with Groups
- Directory Search
Private Groups
This view lists only the private groups created using GroupID in the connected identity store. It does not list expired or deleted private groups. To view the expired or deleted groups, select the Expired Groups or Deleted Groups respectively.
You can Modify Search Directory to search private groups and add Filter All Groups by clicking Private Group Grid Filters. All the private groups matching the filters will be displayed.
See Also
- All Groups
- Groups
- Dynasty
- Group Properties
- Group Expiry
- Join/Leave a Group
- Directory Search
- Working with Groups
Public Groups
This view lists only the public groups created using GroupID in the connected identity store. It does not list expired or deleted public groups. To view the expired or deleted groups, select the Expired Groups or Deleted Groups respectively.
You can Modify Search Directory to search private groups and add Filter All Groups by clicking Public Group Grid Filters. All the public groups matching the filters will be displayed.
See Also
- All Groups
- Groups
- Dynasty
- Group Properties
- Group Expiry
- Join/Leave a Group
- Directory Search
- Working with Groups
Semi Private Groups
This view lists only the semi-private groups created using GroupID in the connected identity store. It does not list expired or deleted semi private groups. To view the expired or deleted groups, select the Expired Groups or Deleted Groups respectively.
You can Modify Search Directory to search semi private groups and add Filter All Groups by clicking Private Group Grid Filters. All the semi private groups matching the filters will be displayed.
See Also
- All Groups
- Groups
- Group Properties
- Group Expiry
- Join/Leave a Group
- Directory Search
- Working with Groups
Transfer Ownership
The Transfer Ownership wizard provides a convenient way to:
- Assign ownership to orphan groups.
- Transfer group ownership (including Exchange 2016/2019 additional ownerships) from one recipient to another.
Depending on the number of groups and the amount of available bandwidth between GroupID and the messaging system server (such as Exchange server) or directory server, this process may take several minutes.
Transfer the ownership of a group
-
In GroupID Portal, from the left pane, select All Groups or My Groups under Groups and select Transfer Ownership option on the top right corner.
-
On the Containers page, click Browse to select an organizational unit, domain, or the entire directory.
Your selection determines where the wizard searches for the groups to transfer their ownership. The smaller the selection, the less time it takes to carry out the transfer.
Specify whether to search for groups in sub-containers by selecting or clearing the Include sub-containers check box.
The scope of this setting varies, depending on the container that you selected in the previous step. The following table explains the actual structures searched when you select the Include sub-containers option:
Selected Container Selecting Include sub-containers Organizational Unit Includes the Sub-organizational units in the search for required groups. Domain Includes all organizational units and their sub-trees in the search for required groups. Entire Directory Searches the entire forest. NOTE: For Active Directory, if the search container is set to Global Catalog and Extension Data is not replicated to the Global Catalog, additional ownership of the groups will not be transferred.
-
Click Next.
-
On the Existing Owner page, select one of the following:
- No Owner: To change the ownership of groups without owner.
- Selected Owner: To change the ownership of groups managed by a owner. This option includes all groups for which the selected owner is the primary owner, additional owner, or Exchange 2013/2016/2019 additional owner. After selecting this option, click Browse and use the Find dialog box to select the required owner.
Click the Preview button to view the list of groups that match the given criteria for ownership transfer.
-
Click Next.
-
On the New Owner page, click Browse to select a new owner using the Find dialog box.
-
Click Next.
-
The Summary page displays following details regarding Ownership
- Existing Owner: It will display name of the owner who owns that group. In case of the group has no owner, it will display None.
- Container: It will display the container name you selected in step 2.
- Include Subcontainers: It will say Yes if you have selected the Include Subcontainers checkbox and No otherwise.
- New Owner: It will display the name of new owner that you selected in step 6.
-
Click Finish to complete ownership transfer.
-
The Transferring ownership page displays the transfer progress. Click Show Details to view object name and status.
The page displays the distinguished names of all groups that have been successfully processed and transferred to the new owner. It also displays any errors that were encountered during the process.
See Also