Create a GroupID Portal
Admin Center lets you quickly build and deploy web-based portals for end-users to carry out user, group, and entitlement management tasks. Users can also view detailed reports on the current state and health of the directory.
You can create multiple GroupID portals as well as create multiple instances for a portal.
Host a Portal
A portal is hosted on a web server, with native IIS, remote IIS, and Docker as the supported servers.
-
IIS deployment - Your GroupID portal is hosted within a site in IIS. To launch IIS, see Opening IIS Manager.
-
Docker deployment - For a Docker deployment, make sure you have a running instance of Docker daemon in your environment. A portal runs within a container in Docker.
Deploy Multiple Instances of a Portal
For load balancing and high availability, GroupID facilitates you to create multiple GroupID portals, and even create multiple instances of the same portal. You may host different instances on different web servers. For example, you can create two instances of a portal while hosting one in native IIS and another in remote IIS.
Multiple instances of a portal share the same design settings and the same server settings, except that each instance has its own deployment settings. A change to the shared settings propagates to all deployment instances.
As multiple Data services and Security services can be created in GroupID, you can bind a different Data service and Security service with each deployment instance of a portal. In this way, different instances use different services for improved response times and load balancing.
What do you want to do?
- Create a Portal in Native IIS
- Create a Portal in Remote IIS
- Create a Portal in Docker
- Deploy Another Instance of a Portal
- Create a Portal by Copying an Existing Portal
- View the Details of a Portal
- Launch a Portal
Create a Portal in Native IIS
When you create a portal in native IIS, GroupID does the following:
- It creates a directory with the portal’s name at the following physical path on the GroupID
server, and copies the portal files from its template directory to the new portal directory:
X:\Program Files\Imanami\GroupID 11.0\GroupIDPortal\Inetpub\
(X represents the GroupID installation drive) - It also creates a virtual directory for the portal in your desired IIS site.
The portal runs within a virtual directory in native IIS while the portal files are physically located on disk.
To create a portal:
-
In Admin Center, click Applications in the left pane.
-
Click Add Application.
-
On the next page, select GroupID Portal and click Next step.
-
On the Create GroupID Application page, make sure the IIS tile is selected.
-
In the Application Name box, enter a unique name for the portal or use the default name. The portal is displayed with this name in GroupID.
-
In the Deployment Name box, enter a deployment name for the portal. This name is used to indicate the deployment instance for the portal in GroupID.
A portal can have multiple deployments, for example, one in IIS and another in Docker.
The application name and deployment name are displayed on the portal card on the GroupID Portal tab.
-
In the IIS Application Name box, enter an IIS deployment name for the portal. This name should be unique for each portal deployed in IIS.
- The IIS application name is used to name the portal’s directory in IIS and its physical
directory under X:\Program Files\Imanami\GroupID 11.0\GroupIDPortal\Inetpub on the GroupID
server.
(X represents the GroupID installation drive) - This IIS application name is also appended to the web server address to construct the URL that
users click to access this deployment instance of the portal. For example:
https://<web-server-name>:<port>/<IIS-application-name>
Hence, a different URL is constructed for each deployment of a portal in IIS.
- The IIS application name is used to name the portal’s directory in IIS and its physical
directory under X:\Program Files\Imanami\GroupID 11.0\GroupIDPortal\Inetpub on the GroupID
server.
-
In the IIS Site drop-down list, select a website to host the portal files. The list displays the websites defined on the native IIS server. GroupIDSite11 is the default selection.
-
In the Service Endpoints area, bind a Data service and a Security service with the portal.
- In the Data Service drop-down list, select a Data service for the portal to use. The list contains all Data services defined in GroupID.
- In the Security Service drop-down list, select a Security service for the portal to use. Thelist contains all Security services defined in GroupID.
-
In the Support Information area, enter internal contact information and resource links for the portal's users to obtain help while using the portal.
A portal includes a Contact link and a Help icon on its web interface. The Contact link launches an email application to send an email to a user or helpdesk for inquiries or support. The Help icon launches the online help for the portal in a new browser window. Both links are customizable, and their target email address or web address is specified in the Support Information area.- In the Support group or administrator’s email address box, enter the email address of a group or user to redirect user queries to. This email address is mapped to the Contact link in the portal.
- In the Help URL box, specify the address of your company's internal support website or
the portal’s help page, where portal users can find support material or report a problem. By
default, this box displays the URL of the portal’s help published by Netwrix.
This URL is mapped to the Help icon in the portal.
-
In the Select Identity Stores area, select the check boxes for the identity stores you want to associate with the portal. Users in the associated identity stores can sign into the portal to manage directory objects, their directory profiles, and more.
While associating identity store(s), you may get the following message:
This relates to the scenario when identity stores in GroupID have been linked, as discussed in the Linked Identity Stores and the GroupID Portal topic. Hence, when two identity stores, IdentityStoreA and IdentityStoreB, are linked and you associate IdentityStoreA with the portal, this message is displayed. It alerts you to associate the second identity store in the linked pair (dentityStoreB) with the portal too, in order to benefit from the linking.
-
Each identity store associated with a portal has its own set of design settings, as listed in the Design a Portal with Display Types topic.
If you are upgrading to GroupID 11 from GroupID 9 or GroupID 10, you can import the design settings for an identity store from a Self-Service portal in a previous version - as an alternate to defining these settings from scratch. Following are the details of the file containing identity store design settings for a Self-Service portal in GroupID 9 and 10:
Design file name:
<Identity store name>..xml.For example: ADStore.xml
A separate design file exists for each identity store linked with a Self-Service portal.File location in GroupID 9/10:
[GroupID installation drive]:\Program Files\Imanami\GroupID <version>\SelfService\Inetpub\<portal name>\Design\For example: C:\Program Files\Imanami\GroupID 10.0\SelfService\Inetpub\TestPortal\Design\
Similarly, a separate file exists for each linked combo created in the Self-Service portal.
Linked combo file name: The file has the same name as that of the linked combo in the portal.for example, Country-State.xml
File location in GroupID 9/10: All linked combo files, regardless of the identity store they are used for, are available at the following path:
[GroupID installation drive]:\Program Files\Imanami\GroupID <version>\SelfService\Inetpub\<portal name>\Web\LinkedCombo\
For example: C:\Program Files\Imanami\GroupID 10.0\SelfService\Inetpub\TestPortal\Web\LinkedCombo\To import the design file and linked combo file(s), do the following:
- As a prerequisite to GroupID 11 upgrade, the folder structure for the source version was copied to the GroupID 11 server. In this case, the design and linked combo files for all portals in the previous version are already available on the machine. Else copy the above mentioned files for the respective identity stores associated with the Self-Service portal, and place them on your local machine or a shared network location.
- In he Select Identity Stores area, click Import Design next to an identity store name to import the design file for it.
- Browse for the file to select and import it. The import process takes a while.
Each identity store associated with a Self-Service portal has its own design file, so make sure you import the correct file. For example, if Identity Store A is associated with two Self-Service portals, then these will be two different design files for the same identity store, though at different locations. - After the file is uploaded, a message is displayed, showing the number of linked combos
defined in the imported design settings and prompting you to import the respective linked
combo files.
Browse to the location of the linked combo files and import those that represent the linked combos defined in the design settings.
-
A portal has certain advanced settings defined for it, as discussed in the Manage Advanced Settings topic.
If you are upgrading to GroupID 11 from GroupID 9 or GroupID 10, you can import the advanced settings of a Self-Service portal from a previous version as an alternate to defining settings from scratch. Following are the details of the file containing advanced settings for a Self-Service portal in GroupID 9 and 10:File name: server.xml. A separate file exists for each Self-Service portal.
File location in GroupID 9/10:[GroupID installation drive]:\Program Files\Imanami\GroupID <version>\SelfService\Inetpub\<portal name>\
For example: C:\Program Files\Imanami\GroupID 10.0\SelfService\Inetpub\TestPortal\To import the file, do the following:
- As a prerequisite to GroupID 11 upgrade, the folder structure for the source version was copied to the GroupID 11 server. In this case, the server.xml file for all portals in the previous version is already available on the machine. Else copy the server.xml file for the Self-Service portal whose advanced settings you want to import, and place it on your local machine or a shared network location.
- On the Create GroupID Application page, click Import Settings in the Advanced Settings area.
- Browse for the file to select and import it. The import process takes a while.
-
Click Create Application.
The new portal is displayed on the GroupID Portal tab.
Create a Portal in Remote IIS
You can host a portal within a site in remote IIS. For this, you need to connect with the Microsoft IIS Administration API running on the remote IIS machine.
When you create a portal in remote IIS, GroupID does the following:
- It creates a virtual directory for the portal in a preconfigured site in remote IIS.
- It creates a physical directory for the portal in the folder that is mapped to this preconfigured site.
The portal runs within a virtual directory in remote IIS while the portal files are physically located on disk.
To learn about the remote IIS settings and configurations before hosting a portal, see thePrerequisites for Deployments in Remote IIS topic.
To create a portal:
-
In Admin Center, click Applications in the left pane.
-
Click Add Application.
-
On the next page, select GroupID Portal and click Next step.
-
On the Create GroupID Application page, select the Remote IIS tile.
-
In the Application Name box, enter a unique name for the portal or use the default name. The portal is displayed in GroupID with this name.
-
In the Deployment Name box, enter a deployment name for the portal. This name is used to indicate the deployment instance for the portal in GroupID. A portal can have multiple deployments, for example, one in IIS and another in Docker.
The application name and deployment name are displayed on the portal card on the GroupID Portal tab. -
In the API URL box, enter the URL of the API to use for communicating with the remote IIS server.
Make sure the Microsoft IIS Administration API is installed as a Windows service on the remote IIS machine. Fetch the URL of this API from remote IIS and provide it here to enable communication. -
In the Access Token box, enter the access token to allow Admin Center to access the Microsoft IIS Administration API. This access token is generated from the Microsoft IIS Administration API’s interface.
-
In the Username and Password boxes, enter the credentials of a Windows account to communicate with the API. This account must have access to the remote IIS machine, with sufficient permissions to enable you to create and manipulate objects in IIS.
-
In the IIS Application Name box, enter an IIS deployment name for the portal. This name should be unique for each portal deployed within the same site in remote IIS.
- The IIS application name is used to name the portal’s directory in the IIS site and its physical directory on the remote IIS machine. The physical directory is created within the folder that is mapped to the preconfigured site, and portal files are copied to it.
- This IIS application name is also appended to the web server address to construct the URL that
users click to access this deployment instance of the portal. For example:
https://<web-server-name>:<port>/<IIS-application-name>
Hence, a different URL is constructed for each deployment of a portal in remote IIS.
-
On providing the above information, the Website drop-down list displays the sites defined on the remote IIS server. Select the site that you have configured with the appropriate permissions for GroupID.
-
For entering information in the Service Endpoints, Support Information, Select Identity Stores, and Advanced Settings areas, follow steps 9-13 in the Create a Portal in Native IIS topic.
-
Click Create Application.
The new portal is displayed on the GroupID Portal tab.
Create a Portal in Docker
GroupID enables you to host a portal in Docker. For this, you need to connect with the API running on a Docker deamon in your environment, so that GroupID can create a container for the portal there and run the portal from within that container.
For an overview on application deployment in Docker, see the Prerequisites for Deployments in Docker topic.
NOTE: To host the portal, Docker daemon should be configured to run Windows containers.
To create a portal:
- In Admin Center, click Applications in the left pane.
- Click Add Application.
- On the next page, select GroupID Portal and click Next step.
- On the Create GroupID Application page, select the Docker tile.
- In the Application Name box, enter a unique name for the portal or use the default name. The portal is displayed in GroupID with this name.
- In the Deployment Name box, enter a deployment name for the portal. This name is used to
indicate the deployment instance for the portal in GroupID. A portal can have multiple
deployments, for example, one in IIS and another in Docker.
The application name and deployment name are displayed on the portal card on the GroupID Portal tab. - In the Port box, enter the port for the host machine to map the container to host ports. By
default, the container port is 443.
This enables network access to the portal in Docker over this port. - In the Service URL box, enter the API URL to use for accessing and communicating with Docker
Engine.
On installing Docker Engine, you must expose an API over TCP on the same machine to enable communication with GroupID.
The URL you provide in the Service URL box identifies the Docker deamon where you want to host the portal. - In the Container Name box, enter a name for the container that is created in Docker for deploying the portal.
- For entering information in the Service Endpoints, Support Information, Select Identity Stores, and Advanced Settings areas, follow steps 9-13 in the Create a Portal in Native IIS topic.
- Click Create Application.
The new portal is displayed on the GroupID Portal tab.
Deploy Another Instance of a Portal
You can deploy more than one instance of a portal. Instances can be deployed in different web servers, for example, one in IIS, another in remote IIS, and yet another in Docker. For more on how instances work, see the Deploy Multiple Instances of a Portal topic.
To deploy a new instance, you have to provide deployment details only. All instances share the same server and design configurations, while only deployment details differ. For example, all instances serve the same identity stores and have the same display and search-related configurations. Changing a shared setting propagates to all deployment instances of the portal.
To deploy an instance:
-
In Admin Center, select Applications in the left pane.
-
On the GroupID Portal tab, click the ellipsis button for a portal and select Deploy Another Instance.
-
On the Deploy Another Instance page, select the IIS, Remote IIS, or Docker tile to indicate the web server where you want to deploy the instance.
The Application Name field displays the name of the portal as read-only. -
Fields on the page vary, depending on the web server selected. In any case, the Support Information, Select Identity Stores, and Advanced Settings areas are not available, as they remain the same for all instances.
- To deploy an instance in native IIS, follow steps 6-9 in the Create a Portal in Native IIS topic.
- To deploy an instance in remote IIS, follow steps 6-12 in the Create a Portal in Remote IIS topic.
- To deploy an instance in Docker, follow steps 6-10 in the Create a Portal in Docker topic.
-
After entering the required information, click Deploy Instance.
The new instance is displayed on the portal’s card.
Create a Portal by Copying an Existing Portal
You can create a new portal by copying an existing portal. All server and design configurations of the template portal are duplicated to the new portal. Deployment details are not duplicated, hence you can choose to deploy the new portal in any of the supported web servers.
To create a portal:
-
In Admin Center, select Applications in the left pane.
-
On the GroupID Portal tab, click the ellipsis button for a portal and select Copy.
The Copy GroupID Application page is displayed; populated with the following settings of the copied portal:- The Data service and Security service linked to the portal
- The support information for the portal, i.e., the admin/helpdesk contact email address and the portal’s help URL
- The identity store(s) associated with the portal
-
You can deploy the new portal in native IIS, remote IIS, or Docker.
- To specify settings for a native IIS deployment, follow the instructions in the Create a Portal in Native IIS topic, beginning at step 4.
- To specify settings for a remote IIS deployment, follow the instructions in the Create a Portal in Remote IIS topic, beginning at step 4.
- To specify settings for a Docker deployment, follow the instructions in the Create a Portal in Docker topic, beginning at step 4.
View the Details of a Portal
-
In Admin Center, click Applications in the left pane.
The GroupID Portal tab displays the portals that you have created. -
The card for a portal displays the following information:
Info Description Name The name given to the portal. Identity Stores The names of the identity stores the portal serves. Deployment Instances Displays the deployment instance(s) of the portal as tiles. A tile shows the deployment name of the instance and the web server where it is deployed. Status A portal has one of the following statuses: - Running: Indicates that the portal is up and running. - Stopped: Indicates that GroupID is unable to communicate with the portal. To troubleshoot, go to the web server where the portal is deployed and make sure the portal is running. - Error: Any issue other than stopped is categorized as error. In this case, contact your system administrator. Launch Application Click this link to launch the portal. When multiple deployments of a portal are available, select the tile for a deployment instance and click this link to launch that instance. Ellipsis Click it to launch a shortcut menu with the following options: - Settings: Launches the portal settings page, where you can manage server and design settings. - Server Settings: Includes the deployment details of each portal instance, the help URL for the portal, the identity stores linked with the portal, and more. - Design settings: These settings relate to the portal’s user interface. - Deploy Another Instance: Enables you to deploy another instance of the portal. - Copy: Enables you to create a new portal by copying the settings of this portal. - Delete: Deletes the portal.
You may notice a portal with an orange card and an orange icon on the card. On hovering the mouse over the icon, the tooltip says that linked mode will not be allowed. This relates to the scenario when identity stores in GroupID have been linked, as discussed in the Linked Identity Stores and the GroupID Portal topic. Hence, when two identity stores, IdentityStoreA and IdentityStoreB, are linked and you associate IdentityStoreA with the portal, the portal card appears in orange. It informs you to associate the second identity store in the linked pair (dentityStoreB) with the portal too, in order to benefit from the linking.
Launch a Portal
-
In Admin Center, select Applications in the left pane.
-
On the GroupID Portal tab, click Launch Application on a portal’s card to launch it.
When multiple deployments of a portal are available, select a deployment instance on the card and click Launch Application to launch that instance.
Provide the URL of an instance to your users so they can access the portal. You can either copy the URL from the address bar or from a portal's deployment settings. See the View the Launch URL for an Instance topic.
See Also
Delete a Portal
You can delete a portal or a deployment instance of a portal. On deleting a portal, all its instances are deleted with it.
What do you want to do?
- Delete a Deployment Instance for a Portal
- Delete a Portal
Delete a Deployment Instance for a Portal
A portal can have multiple deployment instances. When you delete an instance, the following is removed:
-
For an instance in native IIS:
- The portal directory under the following location on the GroupID server:
X:\Program Files\Imanami\GroupID 11.0\GroupIDPortal\Inetpub\
(X represents the GroupID installation drive) - The portal's directory in the IIS site
- The portal directory under the following location on the GroupID server:
-
For an instance in remote IIS:
- The portal's directory in the remote IIS site
- The portal's physical directory under the folder mapped to the remote IIS site
-
For an instance in Docker:
The container created in Docker Engine for the portal
To delete an instance:
-
In Admin Center, select Applications in the left pane.
-
On the GroupID Portal tab, click the ellipsis button for a portal and select Settings.
-
Select Deployments under Server Settings in the left pane.
The Deployment Settings page has varying tabs, depending on the deployment instances of the portal.- The IIS tab is available when one or more portal instances are deployed in native IIS.
- The Remote IIS tab is available when one or more portal instances are deployed in remote IIS.
- The Docker tab is available when one or more portal instances are deployed in Docker.
Select a tab to delete a portal instance deployed in the respective web server.
-
The Select Application Deployment drop-down list displays the portal instances deployed on the selected web server. Select an instance and click Delete.
Delete a Portal
Deleting a portal removes all its deployments and configurations from GroupID.
To delete a portal:
- In Admin Center, select Applications in the left pane.
- On the GroupID Portal tab, click the ellipsis button for a portal and select Delete.
See Also
Prerequisites for Deployments in Docker
To deploy the GroupID applications in Docker, make sure you have a running instance of Docker deamon in your environment.
GroupID Applications for Docker
With every GroupID release, images for the following applications are pushed to GroupID’s repository on Docker Hub:
- GroupID portal
- Mobile service
- Data service
- Security service
- Admin Center
Images are akin to templates. You can pull an application image to Docker deamon and use it to create a container for that application in Docker. Your application runs within this container.
For example, you can pull a Data service image from Docker Hub to Docker deamon and create a container to deploy and run the service.
Image as template
Think of an image as a template. Run an image as many times as needed. On every run, a new container is created in Docker, representing a new deployment of the same application.
Docker Settings in the GroupID Configuration Tool
In GroupID, Docker-related configurations are managed using the Configuration Tool. These include:
- Connectivity with Docker Hub
- Creating the default Data service
- Creating the default Security service
Specify Repository Info
To connect with Docker Hub, provide the name of the GroupID repository on Docker Hub. Images for the GroupID applications are publicly available here:
On pulling an image, you are prompted to provide your GroupID license. Enter a valid license to deploy the application in Docker.
Service Deployment (Optional)
Using the Configuration Tool, you can choose to deploy the default Data service and Security service in Docker or native IIS.
To proceed with a Docker deployment, provide a container name, a port number, and the Docker Engine URL for Data service and then for Security service. The Configuration Tool creates a container for each service in Docker deamon and runs the service from within that container.
Images and Containers in Docker Desktop
In Docker Desktop, you can view the images available in the remote repository (Docker Hub), the images that you have pulled, and the containers created (the applications running in Docker).
Images
Launch Docker Desktop and click Images in the left pane.

The Images page (Local tab) shows all images that you have pulled from different repositories. Notice the first image is from GroupID. Here:
- Imanami is the repository name.
- gid-selfservice is the GroupID application name.
- Tag is the GroupID version.
Click Remote Repositories to go to the remote server, where you will find all GroupID-specific images under Imanami.

GroupID application images for different GroupID versions are listed here. For example, three Data service images are available for three distinct GroupID versions.
Hence, multiple images for an application are available in Docker Hub, each linked to a different GroupID version. Based on the GroupID version you install, the corresponding images will be pulled from Docker Hub and deployed in Docker.
Containers
On the Images page – Local tab, you can manually run an image to create a container for deploying the application.
Click Containers/Apps in the left pane to view the containers.

Select a container and click Inspect to view its details.

See Also
GroupID Portal
A GroupID portal represents a virtual link with the directory. Using it, users can do the following in an identity store:
- Search the directory.
- Perform group management tasks, such as create and update their groups; join and leave groups; attest, expire and renew groups, and more.
- Carry out user management tasks, such as create, update, and delete users in the directory. Users can maintain and update their profiles, change their passwords, manage their accounts, manage their direct reports, and more.
- Synchronize data between a source and a destination, such as directories, files, and databases.
- Manage user and group entitlements to shared resources on file servers and SharePoint sites.
- Approve and deny workflow requests.
- Generate hundreds of insightful reports on Active Directory, Microsoft Entra ID, Exchange, and Office 365 objects (groups, users, mailboxes, contacts, computers, and servers).
- View history data for directory objects that are created, updated, or deleted in the directory using GroupID.
Delegating group and user management tasks to end-users reduces the workload on IT administrators and helpdesk, as users are empowered to manage their groups and direct reports without assistance from an administrator. Moreover, when users maintain and update their profile information, data is more accurate and reliable.
Administrators can maintain complete control over data integrity, as they can implement fine-grained controls and policies that determine what users can view and change using the GroupID portal. They can also define workflows for an identity store, that serve as a built-in auditing system to ensure that users enter correct data before changes are committed to the directory.
A GroupID portal can be linked with multiple identity stores, thus eliminating the need to create a separate portal for each identity store. Users can select an identity store while signing in.
Linked Identity Stores and the GroupID Portal
The administrator can link two or more identity stores in GroupID. As a prerequisite for linking, the identity stores must be built on Active Directory or Microsoft Entra ID domains. The purpose is to link identical objects in different domains.
To learn about linked identity stores and how they work in a GroupID portal, see the Linked Identity Stores and the GroupID Portal topic.
Notifications in the Portal
A GroupID portal can send email notifications to designated recipients when a user makes a change to objects in an identity store. To specify notification recipients, see the Specify Notification Recipients topic.
By default, notifications are sent to users in the English language. However, a user can opt to receive notifications in a supported language by personalizing the language settings from the Settings panel in the portal.
See Also
Prerequisites for Deployments in Remote IIS
To deploy GroupID portals and services (Data service, Security service, and Mobile service) in remote IIS, you must set up the following prerequisites:
- Install the required software
- Create a site in remote IIS for deploying the GroupID portal and services, and assign permissions
- Generate an access key for the Microsoft IIS Administration API
Prerequisite Software
Before you can deploy GroupID portals and services in remote IIS, make sure the following prerequisite software is installed on the remote IIS machine. Install them in the following order:
- ASP.NET Core Runtime 6.0.30 (Hosting Bundle)
Click here to download. - .NET Desktop Runtime 6.0.30
Click here to download. - ASP.NET Core Runtime 2.1.25 (Hosting Bundle)
Click here to download. - Microsoft IIS Administration 2.3.0
Click here to download.
Create a Site in Remote IIS
As a prerequisite to deploying a GroupID application in remote IIS, you need to create a site there and assign appropriate permissions to it. GroupID portals and services should be created within this site.
To create a site in remote IIS:
-
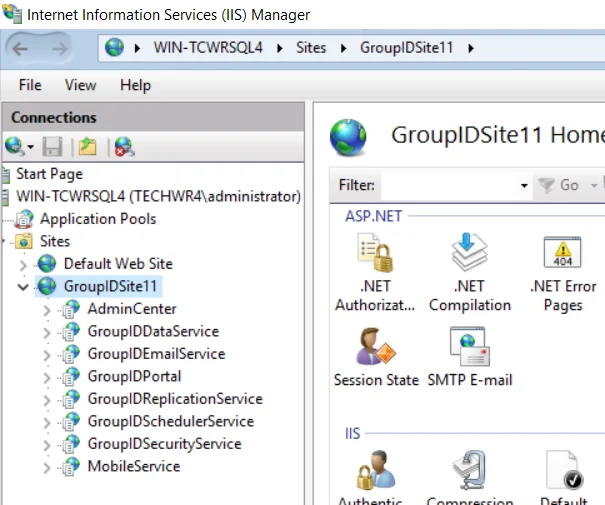
Launch Internet Information Services (IIS) Manager (see [Opening IIS Manager](https://docs.microsoft.com/en-us/previous-versions/iis/6.0-sdk/ms525920(v=vs.90).
-
In the left pane, right-click Sites and select Add Website.

-
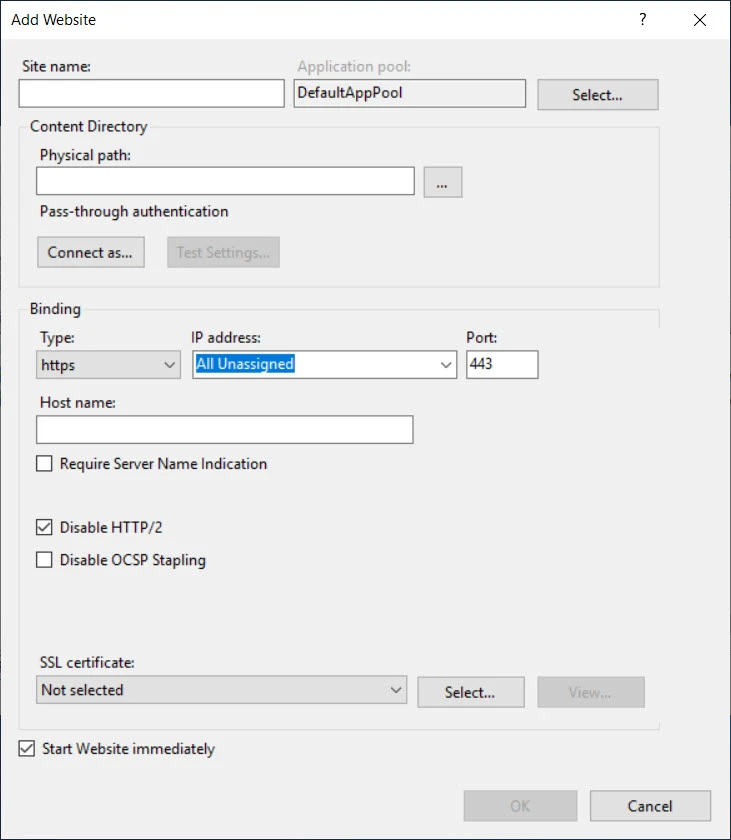
Enter the information as shown below and click OK:
-
Enter a name for the site in the Site name box.
-
Create a new folder on the remote machine and bind this site to that folder. Provide the physical path of the newly created folder in the Physical path box. When you create a GroupID application in the site, a sub-folder will be created within this folder and application files will be copied to it.
-
Provide binding information in the Binding section.
- Type: HTTPS
- Port: any available port
-
Select an SSL certificate from the SSL certificate dropdown list.
-
Assign Permissions
The next step is to assign permissions on the physical folder that binds to your site in remote IIS.
-
Go to the physical path of your IIS site folder and provide the full control to a local group IIS_IUSRS on this folder.
To assign these permissions:-
Right click the group you created and select Properties.
-
Select the Security tab.
-
Click Edit.
-
Click Add.
-
Click Locations.
-
Select your machine name from the list in the Locations box. Click OK.
-
In the Enter the object names box type IIS_IUSRS and click the Check Names button. The group name should appear as follows:
<your machine name>\IIS_IUSRS -
Click OK.
-
Allow Full Control to IIS_IUSRS group.
-
Click Apply and then click OK.
-
Click OK to close the Permissions for
<folder name>dialog box. -
Click OK to close the
<folder name>Properties dialog box. -
The required permissions have been assigned to the folder.
-
-
After assigning the permissions, go to the following path
C:\Program Files\IIS Administration\2.3.0\Microsoft.IIS.Administration\config\ -
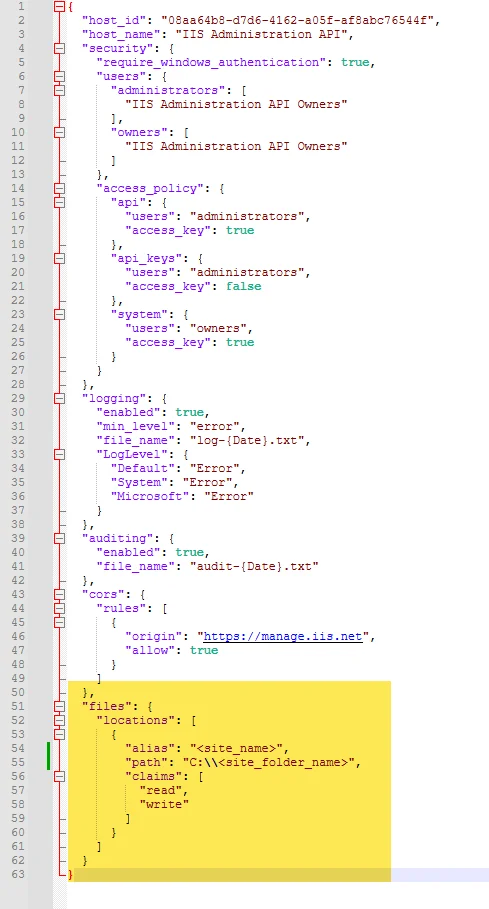
Open the appsettings.json file and add the highlighted script at the end of the file:
-
The script to be added is given below:
   },
   "files": {
       "locations": [
         {
           "alias": "<site_name>",
           "path": "<site_folder_name>",
           "claims": [
             "read",
             "write"
           ]
         }
       ]
     }
Remember, to provide values for alias "site name" and path "physical folder location of the site", created in the section Create a Site in Remote IIS.
Generate an Access Key
Admin Center uses the Microsoft IIS Administration API to communicate with remote IIS. Make sure this API is instphysical folder location of the site", created in the section Create a Site in Remote IISalled as a Windows service on the remote IIS machine.
To connect to the API, an access key is required. Follow the steps below to generate it.
-
Go to https://localhost:55539/ to launch the Microsoft Administration API interface.
Note that this is the default URL. It may change for reasons such as when a different port is used. -
Click ACCESS KEYS.

-
Click Create Access Key to generate an access key and provide the following information:

-
On clicking Create, the access key is generated.

See Also
Manage Advanced Settings
Advanced settings allow you to customize the functionality and appearance of a portal. For example, you can set the default landing page, change the portal logo, show or hide the help link, display enrollment reminders, and more.
Default values for all advanced settings are specified for a portal. You can update any setting as required. You can also import these advanced settings for a portal from a previous GroupID version. See step 13 in the Create a Portal in Native IIS topic.
You can manage the following advanced settings for a portal:
- Portal & Search
- Listings Display
- Miscellaneous
Portal & Search
| Setting | Description |
|---|---|
| Portal Logo | Use the default GroupID portal logo or a logo of your choice for display in the portal. - Click Change to select and upload a logo of your choice. - Click Reset to revert to the default logo. |
| Default Startup Page | Specify a landing page for the portal. By default, the Welcome page is set as the start page. You can change it to one that your users frequently visit. You can change the start page to any of these pages: - Welcome - My Groups - My Memberships - My Expired Groups - My Expiring Groups - My Deleted Groups - My Smart Groups - My Dynasties - Search - My Profile - My Direct Reports - Change My Password - Reset Password - Request Inbox - My Requests - Link Account - Entitlement - History - Reports - Synchronize NOTE: Individual users can personalize this setting from the Settings panel in the portal. |
| Search Default | Set the default selection in the portal's Search Directory box, which is available on the Groups, Users, and Advanced Search pages as well as on the Find dialog box. Options are: - Global Catalog: Selecting this option shows "Entire Directory" selected in the Search Directory box. Also, expanding the list displays the Entire Directory check box selected instead of the logged-on domain. Select this option when most of the searches that portal users perform are based on the global catalog. - Domain: The Search Directory box shows the domain of the identity store the portal is connected to. Users can expand the list to select any other option. NOTE: Individual users can personalize this setting from the Settings panel in the portal. |
| Sort Search | Set the field name (column header) for sorting listings and search results in the portal, such as listings on the All Groups, My Groups, and Users pages, and searches performed using Advanced Search and the Find dialog box. In the Sort Search field, specify an attribute to use for sorting listings and search results. By default, the displayName attribute is specified, indicating that listings and search results are sorted by this attribute in ascending order. If you specify an attribute that is not used as a column header in a listing or search results, GroupID sorts it on the basis of the default attribute, i.e., displayName. |
| Find Dialog / Look For | Select any or all the Users, Groups, and Contacts check boxes to specify the type of objects that can be searched using the portal's Find dialog box. You can launch the Find dialog box from multiple portal pages to search for objects to designate as owners, managers, additional owners, members, and more. By default, the Find dialog box searches for all types of objects, including users, contacts, and groups. Use this setting to limit the Find feature to specific object types. For example, select the Users check box to limit users to search for the User objects only. |
| Request Inbox Page Size | Specify a value in the 5 to 1000 range to set the number of workflow request items to display on the portal's All Requests, My Requests and Request Inbox pages. Setting zero or a negative number displays all workflow requests. By default, these pages display 20 request items at a time. When setting the page size, consider the volume of request traffic generated by your users. Showing all or many workflow requests increases page load time and response time. |
| Toolbar Default Most Recent Used Object Count | Specify a value in the 1 to 9 range to set the number of most recently used objects to display in the portal's quick search box. The quick search box is displayed at the top of each page in the portal. Clicking in it displays objects that the logged-on user recently viewed. Clicking an object opens its properties. NOTE: Individual users can personalize this setting from the Settings panel in the portal. |
| Default Search Page Size | Specify a value in the 5 to 1000 range to set the maximum number of list objects to display on a portal page. Many portal pages display lists of objects. Examples are the My Groups and Users pages. By default, all list views display 25 objects per page. When setting the page size, consider available network bandwidth and server resources, as the greater the number, the higher the potential for increased page load time and slow response time. NOTE: Individual users can personalize this setting from the Settings panel in the portal. |
| Autocomplete Quick Search | Specify whether to turn on search predictions for the portal's quick search. The quick search box is displayed at the top of every page in the portal. Search predictions are possible search terms related to the term the user is typing as search string. - Enable the toggle button to turn on search predictions for quick search in the portal. The portal will show matched items as users type a search string. - Disable the toggle button to turn off search predictions. |
Listings Display
| Setting | Description |
|---|---|
| Display Nested Ownership | Controls whether to display nested ownership on the portal's My Groups page. It applies to all listings on the page except My Memberships. - When the toggle button is disabled, the My Groups page displays groups for which the logged-in user is the primary owner, additional owner, or Exchange additional owner. - When enabled, the My Groups page also displays groups with nested ownership. Example: the logged-in user is a member of Group A, and Group A is an owner of Group B. When this setting is enabled, the My Groups page also shows Group B as the logged-in user is its nested owner. |
| Display Groups in My Groups | Controls whether to display the groups for which the logged-on user is an additional owner, on the portal's My Groups tab. By default, the tab displays the groups that the logged-on user is the primary owner. Enable this setting to include groups for which the logged-on user is an additional owner. |
| Display Groups in My Deleted Groups | Controls whether to display the deleted groups for which the logged-on user is an additional owner, on the portal's My Deleted Groups tab. By default, the tab displays the groups that the logged-on user is the primary owner. Enable this setting to include deleted groups for which the logged-on user is an additional owner. |
| Display Groups in My Expired Groups | Controls whether to display the expired groups for which the logged-on user is an additional owner, on the portal's My Expired Groups tab. By default, the tab displays the groups that the logged-on user is the primary owner. Enable this setting to include expired groups for which the logged-on user is an additional owner. |
| Display Groups in My Expiring Groups | Controls whether to display the expiring groups for which the logged-on user is an additional owner, on the portal's My Expiring Groups tab. By default, the tab displays the groups that the logged-on user is the primary owner. Enable this setting to include expiring groups for which the logged-on user is an additional owner. |
| Display Groups in My Smart Groups | Controls whether to display the Smart Groups for which the logged-on user is an additional owner, on the portal's My Smart Groups tab. By default, the tab displays the groups that the logged-on user is the primary owner. Enable this setting to include Smart Groups for which the logged-on user is an additional owner. |
| Display Groups in My Dynasties | Controls whether to display the Dynasties for which the logged-on user is an additional owner, on the portal's My Dynasties tab. By default, the tab displays the Dynasties that the logged-on user is the primary owner. Enable this setting to include Dynasties for which the logged-on user is an additional owner. Note that this setting applies individually to parent, middle, and leaf Dynasties. |
| Display Additional Manager Direct Reports | Controls whether to display the direct reports for whom the logged-on user is an additional manager, on the portal's My Direct Reports tab. By default, the tab displays the direct reports that the logged-on user is the primary manager. Enable this setting to include direct reports for whom the logged-on user is an additional manager. |
NOTE: Individual users can personalize all except the Display Nested Ownership setting from the Settings panel in the portal.
Miscellaneous
| Setting | Description |
|---|---|
| Use Contains Filter | Controls the filter that the search function on the portal's Advanced Search page and the Find dialog box should use while searching objects. - By default, the setting is disabled, implying that when a user enters a search string, the portal searches the directory on the "starts with" basis. For example, if a user enters "Sam" in the First Name box on the Advanced Search page, the portal searches the directory for all objects having first names starting with "Sam". - When you enable the setting, it changes the filter to "Contains", which returns objects with the string "Sam" anywhere in the first name. |
| Hide Help Link | Controls whether to display the Help icon in the portal. This icon opens the portal help in a new browser window, where portal users can find support content or report their problems. - Enable the setting to display the Help icon in the portal. - Disable the setting to hide the Help icon. In this case, users will not be able to access the portal's help pages. |
| Enrollment Reminder | Controls whether to display a reminder with redirect to the Enroll My Account page to unenrolled users when they sign into the portal. Enabling the setting initiates these events: 1. On signing in, the landing page displays an information bar requesting the user to enroll his or her account. (The user can ignore the request.) 2. Clicking the bar redirects the user to the Enroll My Account page. Disabling the setting does not display the information bar for account enrollment. |
| Suggest Owner/Manager | Set the portal to suggest owners for orphan groups and managers for users without managers. Enable the setting to allow GroupID to suggest a primary owner for an orphan group (on the Owner tab in group properties) and a primary manager for a user without one (on the Organization tab in user properties). - The manager is suggested with respect to the user's department (say, User A); if the department is not specified, manager suggestion does not work. GroupID checks the primary managers of all users who have the same department as User A, and the user who shows up most as a manager is suggested as User A's primary manager. - The owner is suggested with respect to the group's membership; GroupID checks the managers of group members and the user who shows up most as a manager is suggested as the group owner. This user may or may not be a member of the group. For example, when 40 members of Group A have User A as their manager and 38 members have User B as manager, User A is suggested as Group A's primary owner. Disable the setting to turn off the owner/manager suggestion function. |
What do you want to do?
- Update a Setting
Update a Setting
-
In Admin Center, select Applications in the left pane.
On the GroupID Portaltab, a portal card displays its info. -
Click the ellipsis button for a portal and select Settings.
-
Click Advanced Settings under Server Settings.
-
On the Advanced Settings page, navigate to the required setting and update it.
- To change general portal settings, see the Portal & Search table.
- To change display settings for groups, see the Listings Display table.
- To manage other settings, see the Miscellaneous table.
-
Click Save.
See Also
Manage Settings for a Docker Deployment
You can manage various settings for a portal instance deployed in Docker.
What do you want to do?
- Start or Stop an Instance
- View the Deployment Settings for an Instance
- Set File Logging and Windows Logging for an Instance
- Delete an Instance
Start or Stop an Instance
To start or stop a deployment instance, see the Start or Stop an Instance topic.
View the Deployment Settings for an Instance
While deploying a portal instance in Docker, you have to specify:
- the port for the host machine to map the container to host ports
This is the port the application runs on. - the service URL for communicating with Docker Engine
After instance creation, this info cannot be changed.
To view the info:
- In Admin Center, select Applications in the left pane.
On the GroupID Portal tab, a portal card displays its info, including all its instances. - Click the ellipsis button for a portal and select Settings.
- Click Deployments under Server Settings.
- On the Deployment Settings page, click the Docker tab.
- On the Docker tab, the Select Application Deployment drop-down list displays all
instances of the portal deployed in Docker.
On selecting an instance, it’s port, service URL, and the URL to launch the instance is displayed on the Deployment Configurations tab.
Set File Logging and Windows Logging for an Instance
To set file logging and Windows logging levels for a deployment instance, see the Manage Log Settings topic.
Delete an Instance
To delete a portal’s deployment instance, see the Delete a Deployment Instance for a Portal topic.
See Also
Manage General Server Settings
You can manage general server settings for a portal, such as change it's display name, associate identity stores with it, and view it's various deployments.
What do you want to do?
- Change a Portal's Display Name
- Associate Identity Stores with a Portal
- View the Deployment(s) for a Portal
Change a Portal's Display Name
A portal is assigned an application name during creation, which is used as it's display name in GroupID. On changing it, the portal is displayed with the new name.
To change a portal's display name:
- In Admin Center, select Applications in the left pane.
On the GroupID Portal tab, a portal card displays its info, including its name. - Click the ellipsis button for a portal and select Settings.
- On the General Settings page, enter a new name for the portal in the Application Name box.
- Click Save.
Associate Identity Stores with a Portal
You must associate one or more identity stores with a portal. When signing into the portal, a user must select an identity store to connect to, for performing group and identity management operations for that identity store.
Users can connect a portal to an associated identity store only.
To associate an identity store:
-
In Admin Center, select Applications in the left pane.
On the GroupID Portal tab, a portal card displays its info, including the identity stores associated with it. -
Click the ellipsis button for a portal and select Settings.
-
The Identity Stores area on the General Settings page lists the identity stores in GroupID. It displays the provider type the identity store is created for, and whether the identity store is enabled.
- Select the check box for an identity store to associate it with the portal.
- Clear the check box for an identity store to dissociate it.
All instances of this portal serve the identity store(s) you select here.
-
Click Save.
NOTE: You may observe the following message on the Server Settings – General page:
It relates to the scenario when identity stores in GroupID have been linked, as discussed in the Linked Identity Stores and the GroupID Portal topic. Hence, when two identity stores, IdentityStoreA and IdentityStoreB, are linked and you associate IdentityStoreA with the portal, this message is displayed. It alerts you to associate the second identity store in the linked pair (dentityStoreB) with the portal too, in order to benefit from the linking.
View the Deployment(s) for a Portal
A portal can have multiple deployments in the same or different web servers. You can update certain settings for each deployment instance of a portal.
To view a portal’s deployment instances:
-
In Admin Center, select Applications in the left pane.
On the GroupID Portal tab, a portal card displays its info, including all its deployment instances. -
Click the ellipsis button for a portal and select Settings.
-
Click Deployments under Server Settings.
-
The Deployment Settings page has varying tabs, depending on the deployment instances of the portal.
- The IIS tab is available when one or more portal instances are deployed in native IIS. Select an instance to view the name of the instance directory in IIS, the IIS site that hosts the instance, the URL for the instance, the Data service and Security service associated with the instance, and logging levels. See the Manage Settings for a Native IIS Deployment topic for details.
- The Remote IIS tab is available when one or more portal instances are deployed in remote IIS. Select an instance to view the Microsoft IIS Administration API URL and access token that GroupID uses to communicate with the remote IIS server, the credentials used to communicate with the API, the site that hosts the instance, the Data service and Security service associated with the instance, and logging levels. See the Manage Settings for a Remote IIS Deployment topic for details.
- The Docker tab is available when one or more portal instances are deployed in Docker. Select an instance to view the port and Service URL used for deployment. See the Manage Settings for a Docker Deployment topic for details.
See Also
Manage Log Settings
GroupID uses Windows logging and file logging to monitor events from a portal. You can set the logging level for a deployment instance of a portal to track a specific set of information for it.
File Logging
File logging records events for a portal’s deployment instance in a text file. When the file size reaches 100 MB, GroupID archives it in the same directory by replacing the file extension with the suffix .Log.X and then creating a new text file with the original name. X in .Log.X is a number from 1 to 10 representing the archiving order; where ‘1’ denotes the most recent file.
View Log Files
For a native IIS and remote IIS deployment:
- Launch IIS and navigate to:
…\Sites<site that hosts the service/portal instance><service/portal instance name>
Example:
…\Sites\GroupIDSite11\GroupIDPortal - Right-click this directory and select Explore.
- Locate the Logs folder to read the logs.
Windows Logging
Windows logging records events from a deployment instance of a portal in a centralized event log named Imanami GroupID. Windows log entries are generated on the machine where IIS is running.
- For portal instances deployed in native IIS, you can view Windows logs in the Windows Event Viewer on the GroupID server.
- For portal instances deployed in remote IIS, you can view Windows logs in the Windows Event Viewer on the remote IIS machine.
The Windows Event Viewer shows a log of application and system messages, including errors, information messages, and warnings. It is a useful tool for troubleshooting all kinds of Windows problems.
NOTE: Windows logging is not available for a portal instance deployed in Docker.
View Windows Logs
- On the GroupID server/remote IIS machine, type eventvwr in the Run dialog box and click OK to launch Windows Event Viewer.
- Click Applications and Service Logs > Imanami GroupID in the left pane to view the event logs for GroupID.
What do you want to do?
- Change the File Logging Level for a Portal Instance
- Turn Off File Logging for a Portal Instance
- Windows Logging
- Turn Off Windows Logging for a Portal Instance
Change the File Logging Level for a Portal Instance
-
In Admin Center, select Applications in the left pane.
On the GroupID Portal tab, a portal card displays its info. -
Click the ellipsis button for a portal and select Settings.
-
Click Deployments under Server Settings; the Deployment Settings page is displayed.
-
To set the file logging level for a deployment instance, first select the web server (IIS/Remote IIS/Docker) where the instance is deployed. Then select the instance in the Select Application Deployment drop-down list.
-
Click the Logging tab.
-
In the File Logging area, select a logging level for the instance in the Log Events drop-down list. File logging groups events into the following levels, based on the type of information captured:
Level Information Captured 1 - All Every event involving the portal instance; this is the highest logging level. 2 - Debug Fine-grained event information that is most useful for debugging the application. 3 - Info Successful operations of a functionality. 4 - Warn Events that are not necessarily significant, but that could potentially cause a future problem. 5 - Error Errors that might still allow the portal instance to continue running. Default level. 6 - Off No events captured; turns off file logging. -
Click Save.
Turn Off File Logging for a Portal Instance
- In Admin Center, select Applications in the left pane.
On the GroupID Portal tab, a portal card displays its info. - Click the ellipsis button for a portal and select Settings.
- Click Deployments under Server Settings; the Deployment Settings page is displayed.
- To turn off file logging for a deployment instance, first select the web server (IIS/Remote IIS/Docker) where the instance is deployed. Then select the instance in the Select Application Deployment drop-down list.
- Click the Logging tab.
- In the File Logging area, select Off in the Log Events drop-down list.
- Click Save.
Change the Windows Logging Level for a Portal Instance
- In Admin Center, select Applications in the left pane.
On the GroupID Portal tab, a portal card displays its info. - Click the ellipsis button for a portal and select Settings.
- Click Deployments under Server Settings; the Deployment Settings page is displayed.
- To set the Windows logging level for a deployment instance, first select the web server (IIS or Remote IIS) where the instance is deployed. Then select the instance in the Select Application Deployment drop-down list.
- Click the Logging tab.
- In the Windows Logging area, select a logging level for the instance in the Log Events
drop-down list.
Windows logging groups events into different levels, based on the type of information captured. These levels are discussed in the table in the Change the File Logging Level for a Portal Instance topic. - Click Save.
Turn Off Windows Logging for a Portal Instance
- In Admin Center, select Applications in the left pane.
On the GroupID Portal tab, a portal card displays its info. - Click the ellipsis button for a portal and select Settings.
- Click Deployments under Server Settings; the Deployment Settings page is displayed.
- To turn off Windows logging for a deployment instance, first select the web server (IIS/Remote IIS/Docker) where the instance is deployed. Then select the instance in the Select Application Deployment drop-down list.
- Click the Logging tab.
- In the Windows Logging area, select Off in the Log Events drop-down list.
- Click Save.
See Also
Manage Settings for a Native IIS Deployment
You can manage various settings for a portal instance deployed in native IIS.
What do you want to do?
- Start or Stop an Instance
- Change the IIS Application Name for an Instance
- Move an Instance under a Different IIS Site
- View the Launch URL for an Instance
- View the Data Service and Security Service Bound to an Instance
- Set File Logging and Windows Logging for an Instance
- Delete an Instance
Start or Stop an Instance
You can start and stop a portal instance deployed in native IIS, remote IIS, and Docker. When you stop an instance, the following happens:
- For a native IIS deployment, GroupID stops the instance’s application pool.
- For a remote IIS deployment, GroupID stops the site that hosts the instance.
- For a Docker deployment, GroupID stops the container where the instance is deployed.
To start or stop an instance:
-
In Admin Center, select Applications in the left pane.
On the GroupID Portal tab, a portal card displays its info, including all its instances. -
Click the ellipsis button for a portal and select Settings.
-
Click Deployments under Server Settings; the Deployment Settings page is displayed.
-
On the IIS, Remote IIS, or Docker tab, the Select Application Deployment drop-down list displays the portal instances deployed in the respective web server.
Select an instance to start or stop it.- When an instance is running, Stop is displayed next to it. Click it to stop the instance.
- When an instance has stopped, Start is displayed next to it. Click it to start the instance.
Change the IIS Application Name for an Instance
Each deployment instance of a portal in IIS is assigned an IIS application name to represent that specific deployment. The name uniquely identifies the deployment in the IIS site and is used to name:
- The instance’s virtual directory in IIS.
- It’s physical directory under X:\Program Files\Imanami \GroupID 11.0\GroupIDPortal\Inetpub\ on the
GroupIDserver
(X represents the GroupID installation drive)
This name is also appended to the web server address to construct the URL that users click to access
the portal instance. For example:
https://<web-server-name>:<port>/<IIS-application-name>
When you change the name, it propagates to the instance’s IIS directory, physical directory, and launch URL. You must provide the updated URL to users to enable them to access the portal. See the Launch a Portal topic.
To change the IIS application name:
- In Admin Center, select Applications in the left pane.
On the GroupID Portal tab, a portal card displays the portal’s info, including all its instances. - Click the ellipsis button for a portal and select Settings.
- Click Deployments under Server Settings; the Deployment Settings page is displayed.
- On the IIS tab, the Select Application Deployment drop-down list displays all portal instances deployed in native IIS. Select an instance to change its IIS application name.
- In the IIS Application Name box on the Deployment Configurations tab, update the IIS deployment name for the instance.
- Click Save.
Move an Instance under a Different IIS Site
You can change the IIS site that hosts a deployment instance of a portal. In doing so, the URL of the deployment instance also changes. You must provide the updated URL to your users to enable them to access the instance. See the Launch a Portal topic.
To change the site:
- In Admin Center, select Applications in the left pane.
On the GroupID Portal tab, a portal card displays its info, including all its instances. - Click the ellipsis button for a portal and select Settings.
- Click Deployments under Server Settings; the Deployment Settings page is displayed.
- On the IIS tab, the Select Application Deployment drop-down list displays all portal instances deployed in native IIS. Select an instance to move its directory under a different IIS site.
- In the IIS Site drop-down list on the Deployment Configurations tab, select a site to move the instance’s directory under it. The list displays the websites defined in native IIS.
- Click Save.
View the Launch URL for an Instance
Use the URL for a portal's deployment instance to launch the respective instance.
To view the URL:
- In Admin Center, select Applications in the left pane.
On the GroupID Portal tab, a portal card displays its info, including all its instances. - Click the ellipsis button for a portal and select Settings.
- Click Deployments under Server Settings; the Deployment Settings page is displayed.
- On the IIS, Remote IIS, or Docker tab, the Select Application Deployment drop-down list displays the portal instances deployed in the respective web server. Select an instance to view the launch URL for it.
- The Launch URL box on the Deployment Configurations tab displays the URL. Copy and paste it in the browser to launch the deployment instance of the portal or share it with users to enable them to launch the instance.
View the Data Service and Security Service Bound to an Instance
- In Admin Center, select Applications in the left pane.
On the GroupID Portal tab, a portal card displays its info, including all its instances. - Click the ellipsis button for a portal and select Settings.
- Click Deployments under Server Settings; the Deployment Settings page is displayed.
- On the IIS, Remote IIS, or Docker tab, the Select Application Deployment drop-down list displays the portal instances deployed in the respective web server. Select an instance to view the launch URL for it.
- The Data Service and Security Service boxes on the Deployment Configurations tab display the Data service and Security service this portal instance uses.
Set File Logging and Windows Logging for an Instance
To set file logging and Windows logging levels for a deployment instance, see the Manage Log Settings topic.
Delete an Instance
To delete a portal’s deployment instance, see the Delete a Deployment Instance for a Portal topic.
See Also
Server Settings
A GroupID portal is deployed as a web application on a web server (native IIS, remote IIS, or Docker). You can manage the following server-related settings for a portal:
- Change a portal’s name (i.e., the application name given to the portal).
- Update support information for the portal, i.e., the contact email address and the portal’s help URL.
- Specify search-related, group-related, and other advanced settings for a portal.
- Associate identity stores with a portal.
You can also view the deployment details for all instances of a portal and do the following:
- Start or stop an instance.
- Configure Windows logging and file logging for an instance.
- Delete an instance.
- Move a portal instance under a different site in IIS.
NOTE: On changing some of these settings, the portal’s session ends and all connected users are logged out. When accessed again, the portal runs under the new configurations.
See Also
- Create a GroupID Portal
- Manage General Server Settings
- Manage Settings for a Native IIS Deployment
- Manage Settings for a Remote IIS Deployment
- Manage Settings for a Docker Deployment
- Manage Log Settings
- Add Support for a Portal
- Manage Advanced Settings
Manage Settings for a Remote IIS Deployment
You can manage various settings for a portal instance deployed in remote IIS.
What do you want to do?
- Start or Stop an Instance
- View the Deployment Settings for an Instance
- Set File Logging and Windows Logging for an Instance
- Delete an Instance
Start or Stop an Instance
To start or stop a deployment instance, see the Start or Stop an Instance topic.
View the Deployment Settings for an Instance
When creating a portal’s deployment instance in remote IIS, you have to provide info related to the Microsoft IIS Administration API, such as:
- The API URL that GroupID uses for communicating with the remote IIS server
- The access token that GroupID uses to access the API
- The credentials used to connect to the API
You also have to provide an IIS application name, select a site to host the portal instance, and specify the Data service and Security service the instance should use.
Once the instance is created, you can view these settings but you cannot modify them.
To view deployment settings:
- n Admin Center, select Applications in the left pane.
On the GroupID Portal tab, a portal card displays its info, including all its instances. - Click the ellipsis button for a portal and select Settings.
- Click Deployments under Server Settings; the Deployment Settings page is displayed. Click the Remote IIS tab.
- On the Remote IIS tab, the Select Application Deployment drop-down list displays all portal instances deployed in remote IIS. Select an instance to view its settings.
- On the Deployment Configurations tab, you can view the API URL, access token, and credentials. You can also view the name of the portal application in remote IIS, the site where it is hosted, the URL to launch the instance, and the Data service and Security service the instance uses. Refer to steps 7-12 in the Create a Portal in Remote IIS topic for a description of these fields.
Set File Logging and Windows Logging for an Instance
To set file logging and Windows logging levels for a deployment instance, see the Manage Log Settings topic.
Delete an Instance
To delete a portal’s deployment instance, see the Delete a Deployment Instance for a Portal topic.
See Also
Add Support for a Portal
Portals include a Contact link and a Help icon on their web interface. The Contact link launches an email application to send an email to a user (such as administrator) or group (such as helpdesk) for inquiries or feedback. The Help icon launches the online help for the portal in a new browser window. Both links are customizable, and their target email address or web address can be changed.
What do you want to do?
- Update the Support Email Address
- Change the Help URL for a Portal
- View the Client ID Assigned to a Portal
Update the Support Email Address
- In Admin Center, select Applications in the left pane.
On the GroupID Portal tab, a portal card displays its info. - Click the ellipsis button for a portal and select Settings.
- Click GroupID Support under Server Settings; the GroupID Support page is displayed.
- In the Support/GroupID Administrator's Email box, update the email address of the group or
user responsible for responding to requests and inquiries from portal users.
This email address is mapped to the Contact link in the portal. - Click Save.
Change the Help URL for a Portal
- In Admin Center, select Applications in the left pane.
On the GroupID Portal tab, a portal card displays its info. - Click the ellipsis button for a portal and select Settings.
- Click GroupID Support under Server Settings; the GroupID Support page is displayed.
- In the Help URL box, update the URL of the portal help pages, where portal users can find support content or report their problems. This URL is mapped to the Help icon in the portal.
- Enable the Netwrix Help toggle button if the help URL points to the portal help published by
Netwrix. For GroupID 11, this URL is as:
https://helpcenter.netwrix.com/bundle/directorymanager_11.0/page
Disable the Netwrix Help toggle button if the help URL points to help pages other than Netwrix help, such as when it points to your company’s internal help pages. - Click Save.
View the Client ID Assigned to a Portal
Every GroupID client (such as Management Shell and a GroupID portal) is registered with a unique ID in the database, known as client ID. This client ID is required while integrating a third-party single sign-on solution that support the SAML standard, into GroupID via any of its clients.
To view the client ID for a portal:
- In Admin Center, select Applications in the left pane.
On the GroupID Portal tab, a portal card displays its info. - Click the ellipsis button for a portal and select Settings.
- Click GroupID Support under Server Settings; the GroupID Support page is displayed.
The Client ID box displays the client ID assigned to the portal. It is read-only and can be copied for use.
See Also