Create a Mobile Service
You can create a Mobile service in native IIS, remote IIS, and Docker.
What do you want to do?
- Create a Mobile Service in Native IIS
- Create a Mobile Service in Remote IIS
- Create a Mobile Service in Docker
- Deploy Another Instance of a Mobile Service
- Create a Mobile Service by Copying an Existing Service
- View Mobile Service Details
- Launch a Mobile Service or a Service Instance
Create a Mobile Service in Native IIS
When you deploy a Mobile service in native IIS, GroupID does the following:
- It creates a directory with the Mobile service’s name at the following physical path on the
GroupID server, and copies the service files from its template directory to the new service
directory:
X:\Program Files\Imanami\GroupID 11.0\GroupIDMobileService\Inetpub\
(X represents the GroupID installation drive). - It also creates a virtual directory for the service in your desired IIS site.
The Mobile service runs within a virtual directory in IIS while the service files are physically located on disk.
To create a Mobile Service:
-
In Admin Center, click Applications in the left pane.
-
Click Add Application.
-
On the next page, select Mobile Service and click Next step.
-
On the Create GroupID Application page, make sure the IIS tile is selected.
-
In the Application Name box, enter a unique name for the Mobile service or use the default name. The Mobile service is displayed with this name in GroupID.
-
In the Deployment Name box, enter a deployment name for the service. This name is used to indicate the deployment instance of the service in GroupID. A service can have multiple deployments, for example, one in IIS and another in Docker. The application name and deployment name are displayed on the service card, as shown below:

-
In the IIS Application Name box, enter an IIS deployment name for the service. The name should be unique for each Mobile service deployed in IIS.
- The IIS application name is used to name the service’s directory in IIS and its physical
directory under X:\Program Files\Imanami\GroupID 11.0\GroupIDMobileService\Inetpub.
(X represents the GroupID installation drive.) - This IIS application name is also appended to the web server address to construct the URL that
users click to access this deployment instance of the service. Users can then configure the
GroupID app with this instance. For example:
https://<web-server-name>:<port>/<IIS-application-name>
Hence, a different URL is constructed for each deployment of a service in IIS.
- The IIS application name is used to name the service’s directory in IIS and its physical
directory under X:\Program Files\Imanami\GroupID 11.0\GroupIDMobileService\Inetpub.
-
In the IIS Site drop-down list, select a website to host the service files.
The list displays the websites defined on the local IIS server. GroupIDSite11 is the default selection. -
In the Service Endpoints area, bind a Data service and a Security service with the Mobile service.
- In the Data Service drop-down list, select a Data service. When the GroupID app is configured using this deployment of the Mobile service, it will use the Data service you select here.
- In the Security Service drop-down list, select a Security service. When the GroupID app is configured using this deployment of the Mobile service, it will use the Security service you select here.
-
In the Select Identity Stores area, select the check boxes for the identity stores you want to associate with the Mobile service. When the GroupID app is configured using this Mobile service, app users will be presented with these identity stores for signing in.
-
Click Create Application.
The Mobile service is created and displayed on the Mobile Service tab.
Create a Mobile Service in Remote IIS
You can deploy a Mobile service within a site in remote IIS. For this, you need to connect with the Microsoft IIS Administration API running on the remote IIS machine.
When you create a service in remote IIS, GroupID does the following:
- It creates a virtual directory for the service in a preconfigured site in remote IIS.
- It creates a physical directory for the service in the folder that is mapped to this preconfigured site.
The service runs within a virtual directory in remote IIS while the service files are physically located on disk.
To learn about the remote IIS settings and configurations before deploying a service there, see the Prerequisites for Deployments in Remote IIS topic.
To create a service:
- In Admin Center, click Applications in the left pane.
- Click Add Application.
- On the next page, select Mobile Service and click Next step.
- On the Create GroupID Applicationpage, select the Remote IIS tile.
- In the Application Name box, enter a unique name for the Mobile service or use the default name. The service is displayed in GroupID with this name.
- In the Deployment Name box, enter a deployment name for the service. This name is used to
indicate the deployment instance of the service in GroupID. A Mobile service can have multiple
deployments, for example, one in IIS and another in Docker.
The application name and deployment name are displayed on the service card. - To enter information for API URL, Access Token, Username, Password, IIS Application Name, and Website, refer to steps 7-11 in the Create a Portal in Remote IIS topic. Replace any reference to the portal with the Mobile service.
- To enter information in the Service Endpoints and Select Identity Stores areas, refer to steps 9-10 in the Create a Mobile Service in Native IIS topic.
- Click Create Application.
The Mobile service is displayed on the Mobile Service tab.
Create a Mobile Service in Docker
GroupID enables you to deploy a Mobile service in Docker. For this, you need to connect with the API running on a Docker deamon in your environment, so that GroupID can create a container for the service there and run the service from within that container.
For an overview on application deployment in Docker, see the Prerequisites for Deployments in Docker topic.
NOTE: To host the Mobile service, Docker daemon should be configured to run Windows containers.
To create a service:
- In Admin Center, click Applications in the left pane.
- Click Add Application.
- On the next page, select Mobile Service and click Next step.
- On the Create GroupID Application page, select the Docker tile.
- In the Application Name box, enter a unique name for the Mobile service or use the default name. The service is displayed in GroupID with this name.
- In the Deployment Name box, enter a deployment name for the service. This name is used to
indicate the deployment instance of the service in GroupID. A service can have multiple
deployments, for example, one in IIS and another in Docker.
The application name and deployment name are displayed on the service card. - To enter information for Port, Service URL, and Container Name, refer to steps 7-9 in the Create a Portal in Docker topic. Replace any reference to the portal with the Mobile service.
- To enter information in the Service Endpoints and Select Identity Stores areas, refer to steps 9-10 in the Create a Mobile Service in Native IIS topic.
- Click Create Application.
The service is created and displayed on the Mobile Service tab.
Deploy Another Instance of a Mobile Service
GroupID enables you to deploy more than one instance of a Mobile Service. Instances can be deployed in different web servers, for example, one in IIS, another in Remote IIS, and yet another in Docker. For more on how instances work, see the Deploy Multiple Instances of a Portal topic.
To deploy a new instance, you have to provide deployment details only. All instances share the same server and design configurations, while only deployment details differ. For example, all instances serve the same identity stores and have the same display and search-related configurations. Changing a shared setting propagates to all deployment instances of the service.
To deploy an instance:
-
In Admin Center, select Applications in the left pane.
-
On the Mobile Service tab, click the ellipsis button for a service and select Deploy Another Instance.
-
Select the IIS, Remote IIS, or Docker tile to indicate the web server where you want to deploy the service instance.
The Application Name field displays the name of the service as read-only. -
Fields on the page vary, depending on the web server selected. In any case, the Select Identity Stores area is not available, as it remains the same for all instances.
- To deploy an instance in native IIS, follow steps 6-9 in the Create a Mobile Service in Native IIS topic.
- To deploy an instance in remote IIS, follow steps 6-8 in the Create a Mobile Service in Remote IIS topic.
- To deploy an instance in Docker, follow steps 6-8 in the Create a Mobile Service in Docker topic.
-
After entering the required information, click Deploy Instance.
The new instance is created and displayed on the service’s card.
Create a Mobile Service by Copying an Existing Service
You can create a new Mobile service by copying an existing service. All server and design configurations of the template service are duplicated to the new service. Deployment details are not duplicated, so you can choose to deploy the new service in any of the supported web servers.
To create a service:
-
In Admin Center, select Applications in the left pane.
-
On the Mobile Service tab, click the ellipsis button for a service and select Copy.
The Copy GroupID Application page is displayed; populated with the following settings of the copied service:- The Data service and Security service linked to the service
- The identity store(s) linked with the service
-
You can deploy the new service in native IIS, remote IIS, or Docker.
- To specify settings for a native IIS deployment, follow the instructions in the Create a Mobile Service in Native IIS topic, beginning at step 4.
- To specify settings for a remote IIS deployment, follow the instructions in the Create a Mobile Service in Remote IIS, beginning at step 4.
- To specify settings for a Docker deployment, follow the instructions in the Create a Mobile Service in Docker topic, beginning at step 4.
View Mobile Service Details
- In GroupID Admin Center, select Applications in the left pane.
- On the Applications page, click the Mobile Service tab.
The tab displays the default Mobile service in GroupID and any other Mobile service that you have created. For details displayed on a service card, see the table in the View Data Service Details topic.
Launch a Mobile Service or a Service Instance
To launch a Mobile service or an instance of a service means that you launch the GroupIDMobileService page in a web browser, which displays a server URL and a QR code. Users can use any of these to configure the GroupID app on their phones. See the Configure the App topic.
To launch a service or a service instance:
-
In Admin Center, select Applications in the left pane.
-
On the Mobile Service tab, click Launch Application on a service’s card to launch it.
When multiple deployments of a service are available, select a deployment instance on the card and click Launch Application to launch that instance.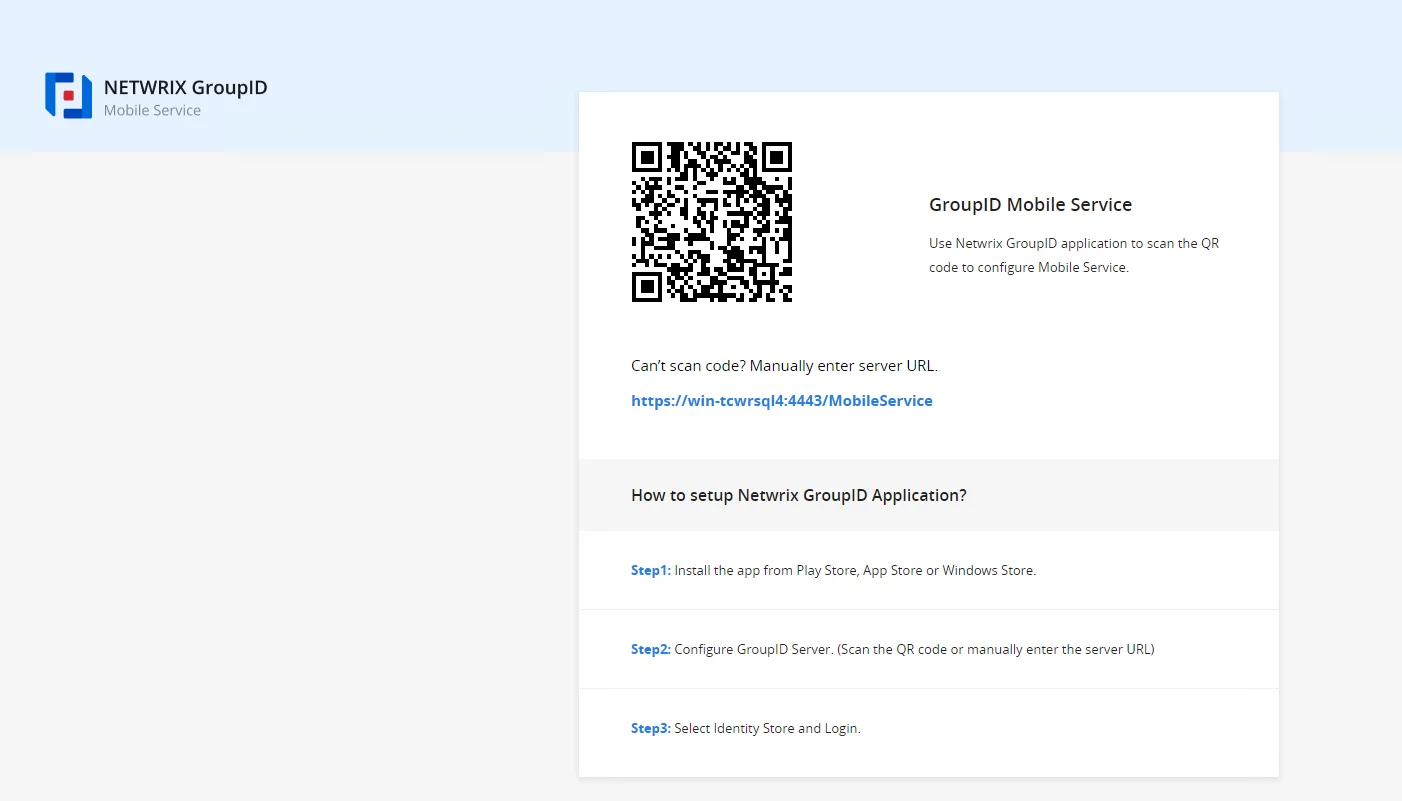
Provide the URL of the GroupIDMobileService page to your users so they can use the QR code or the server URL to set up the GroupID app on their mobile phone while binding it to the respective deployment instance of the Mobile service.
You can either copy the URL of the GroupIDMobileService page from the address bar or from a service's deployment settings. See the View the Launch URL for an Instance topic.
See Also
Delete a Service
You can delete a Mobile service or an instance of a service. On deleting a service, all its instances are deleted with it.
What do you want to do?
- Delete a Deployment Instance for a Service
- Delete a Service
Delete a Deployment Instance for a Service
A service can have multiple deployment instances. When you delete an instance, the following is removed:
-
For an instance in native IIS:
- The service directory under the following location on the GroupID server:
X:\Program Files\Imanami\GroupID 11.0\GroupIDMobileService\Inetpub\
(X represents the GroupID installation drive) - The service directory in the IIS site
- The service directory under the following location on the GroupID server:
-
For an instance in remote IIS:
- The service's directory in the remote IIS site
- The service's physical directory under the folder mapped to the remote IIS site
-
For an instance in Docker:
The container created in Docker Engine for the service
To delete a deployment instance:
-
In Admin Center, select Applications in the left pane.
-
On the Mobile Service tab, click the ellipsis button for a service and select Settings.
-
Select Deployments under Server Settings in the left pane.
The Deployment Settings page has varying tabs, depending on the deployment instances of the service.- The IIS tab is available when one or more service instances are deployed in native IIS.
- The Remote IIS tab is available when one or more service instances are deployed in remote IIS.
- The Docker tab is available when one or more service instances are deployed in Docker.
Select a tab to delete a service instance deployed in the respective web server.
-
The Select Application Deployment drop-down list displays the service instances deployed on the selected web server. Select an instance and click Delete.
Delete a Service
Deleting a Mobile service removes all its deployments and configurations from GroupID.
To delete a service:
- In Admin Center, select Applications in the left pane.
- On the Mobile Service tab, click the ellipsis button for a service and select Delete.
Customize Object Properties Pages
Users can view basic information (properties) of the following directory objects in the GroupID app:
- Users/Contacts
- Groups
You can customize the property page for an object by specifying the fields (attributes) to display for that object in the app.
What do you want to do?
- Add a Field to the Properties Page
- Edit a Field on the Properties Page
- Remove a Field from the Properties Page
Add a Field to the Properties Page
-
In Admin Center, select Applications in the left pane.
-
On the Mobile Service tab, click the ellipsis button for a service and select Settings.
-
Select an identity store under Design Settings to customize the app design for it.
All identity stores associated with the Mobile service are listed under Design Settings. You can design a different app for each of these. -
Click Properties in the left pane. The Properties page is displayed.
-
In the Select Directory Object drop-down list, select a directory object.
The Name list displays the tabs currently available on the object’s properties page. -
Click Edit for a form to modify it.
-
On the Edit Design Category pane, the Fields area displays the fields on the properties page. Click Add Field.
-
On the Add Field pane, provide the following information and click OK:
- Field – Select a schema attribute to link to the field. The field will display the value of this attribute.
- Display Name – Enter a display name for the field. This name serves as the field’s label in the app.
- Display Type – Select a display type to render this field in the app.
-
Click OK on the Edit Design Category pane.
-
Click Save.
Edit a Field on the Properties Page
You can change the following for a field on a properties page:
- The name of the field, as displayed in the app
- The schema attribute linked to the field
- The display type used to render the field in the app
To update a field:
- In Admin Center, select Applications in the left pane.
- On the Mobile Service tab, click the ellipsis button for a service and select Settings.
- Select an identity store under Design Settings to customize the app design for it.
All identity stores associated with the Mobile service are listed under Design Settings. You can design a different app for each of these. - Click Properties in the left pane.
- On the Properties page, select a directory object in the Select Directory Object
drop-down list.
The Name list displays the tabs currently available on the object’s properties page. - Click Edit for a form to modify it.
- On the Edit Design Category pane click Edit for a field to update it.
The Edit Field pane is displayed. Follow steps 8-10 in the Add a Field to the Properties Page topic to update the field.
Remove a Field from the Properties Page
- n Admin Center, select Applications in the left pane.
- On the Mobile Service tab, click the ellipsis button for a service and select Settings.
- Select an identity store under Design Settings to customize the app design for it.
All identity stores associated with the Mobile service are listed under Design Settings. You can design a different app for each of these. - Click Properties in the left pane.
- On the Properties page, select a directory object in the Select Directory Object
drop-down list.
The Name list displays the tabs currently available on the object’s properties page. - Click Edit for a form to modify it.
- On the Edit Design Category pane, the Fields area displays the fields on the properties page. Click Remove for a field to remove it from the properties page.
- Click OK.
- Click Save.
See Also
Design Settings
With identity stores associated with a Mobile service, GroupID enables you to define design settings for each of the identity stores. When users configure the GroupID app with a Mobile service or an instance of the service, the design settings apply to the app. In this way, the app offers a different design and functionality for each linked identity store.
You can customize the following design settings for an identity store associated with a Mobile service:
- Directory Search: specify the schema attributes whose values will be matched when users perform a search in the app. See the Manage Search Attributes topic.
- Search Results: control the fields to be displayed on the search results pages in the app. See the Customize the Search Results Pages topic.
- Object Properties: control what properties of directory objects (user, group) you want to display in the app. See the Customize Object Properties Pages topic.
- Permissions: grant permissions on different functions of the app to security roles in an identity store. See the Grant Permissions to Security Roles topic.
- Property Validation: manage the fields (schema attributes) that users must review and update while validating their profiles using the app. See the Manage Property Validation topic.
See Also
Grant Permissions to Security Roles
In GroupID, three security roles are defined by default in an identity store: Administrator, Helpdesk, and User. More security roles can be added as required.
NOTE: In a Microsoft Entra ID identity store, the Helpdesk role is not available by default.
You can grant permissions on the GroupID app to security roles that exist in an identity store associated with a Mobile service, so that role members can access the allowed features only.
What do you want to do?
- Grant Permissions to Security Roles
Grant Permissions to Security Roles
-
In Admin Center, select Applications in the left pane.
-
On the Mobile Service tab, click the ellipsis button for a service and select Settings.
-
Select an identity store under Design Settings to customize the app design for it.
All identity stores associated with the Mobile service are listed under Design Settings. You can design a different app for each of these. -
Click Features in the left pane.
All security roles in the identity store are listed in the Role column. You can grant permissions to a role on the following app features:- Directory Search: Enables role members to search the directory.
- Workflow: Enables role members to view the workflow requests.
-
To grant permission to a role on a function, select the check box for it.
To deny permission, clear the respective check box. -
Click Save.
See Also
Manage Property Validation
In GroupID, property validation applies to:
- Users
- Groups
Profile Validation for Users
See the Profile Validation for Users topic.
Property Validation for Groups
See the Property Validation for Groups topic.
What do you want to do?
Add a Property Validation Field
-
In Admin Center, select Applications in the left pane.
-
On the Mobile Service tab, click the ellipsis button for a service and select Settings.
-
Select an identity store under Design Settings to customize the app design for it.
All identity stores associated with the Mobile service are listed under Design Settings. You can design a different app for each of these. -
Click Property Validation in the left pane.
-
In the Select Directory Object drop-down list on the Property Validation page, select:
- Group: to add, edit, or remove attributes for group attestation.
- User: to add, edit, or remove attributes for user profile validation.
On selecting an option, the fields available for group attestation or profile validation in the app are listed under Name.
-
Click Add to add a new field. The Add Profile Validation Attribute pane is displayed.
-
Select an attribute from the Field drop-down list.
-
In the Display Name box, specify a name to use as the field’s label on the Attest Group/Validate Profile page of the app.
-
In the Display Type drop-down list, select a display type for rendering the attribute (field) in the app.
-
In the Visibility Level drop-down list, select a security role. The field would be visible to users of this role and roles with a priority value higher than this role. See Priority.
Select Never to hide the field from all users. -
Click Advanced options to enter further details for the field.
-
As mentioned for visibility level, the field is visible to members of the selected role and roles with a priority value higher than the selected role.
In the Exclude Roles area, select the check boxes for the higher priority roles you want to hide the field from. -
In the ToolTip Text box, enter the help text to appear when a user hovers the mouse over the field.
-
In the Max Length box, enter a number that represents the maximum number of characters that users can enter as value for the field. Entering 0 indicates it can accept an unlimited number of characters as value.
-
Select the Is Required check box to force users to provide a value for the field.
-
Select the Is Read Only check box to make the field read-only.
-
Click OK.
-
Click Save.
Edit a Field
You can change the following for a field available in the app for group attestation or user profile validation:
- The attribute associated with the field
- The display name (the field is displayed with this label in the app)
- The display type used to render the field in the app
- Visibility level
- Tooltip
- The maximum characters that a user can enter as value for the field
- Make the field editable or read–only
- Make it optional or mandatory for users to provide a value for the field
To update a field:
-
In Admin Center, select Applications in the left pane.
-
On the Mobile Service tab, click the ellipsis button for a service and select Settings.
-
Select an identity store under Design Settings to customize the app design for it.
All identity stores associated with the Mobile service are listed under Design Settings. You can design a different app for each of these. -
Click Property Validation in the left pane.
-
In the Select Directory Object drop-down list on the Property Validation page, select:
- Group: to update a group attestation field.
- User: to update a user profile validation field.
-
In the Name area, click Edit for a field.
-
Modify the required info on the Edit Profile Validation Attribute pane. Follow the steps in the Add a Property Validation Field topic, beginning at step 7.
Remove a Field
-
In Admin Center, select Applications in the left pane.
-
On the Mobile Service tab, click the ellipsis button for a service and select Settings.
-
Select an identity store under Design Settings to customize the app design for it.
All identity stores associated with the Mobile service are listed under Design Settings. You can design a different app for each of these. -
Click Property Validation in the left pane.
-
In the Select Directory Object drop-down list on the Property Validation page, select:
- Group: to remove a field from the Attest Group page in the app.
- User: to remove a field from the Validate Profile page in the app.
-
In the Name area, click Remove for a field to remove it.
-
Click Save.
See Also
Manage Search Attributes
In the GroupID mobile app, users can search for directory objects (groups, users, contacts) in an identity store. You can specify the schema attributes that search is performed on. When a user enters a search string, the values of the specified attributes are matched to return the results.
You can also specify a search operator that determines what part of the attribute value should match the search string.
What do you want to do?
Specify Search Attributes
- In Admin Center, select Applications in the left pane.
- On the Mobile Service tab, click the ellipsis button for a service and select Settings.
- Select an identity store under Design Settings to customize the app design for it.
All identity stores associated with the Mobile service are listed under Design Settings. You can design a different app for each of these. - Click Search Forms in the left pane.
- On the Search Forms page, click the Quick Search Attributes tab.
- On the Quick Search Attributes tab, the Name column lists the schema attributes whose values will be matched when a user enters a search string in the app's directory search box. Click Add to add an attribute to this list.
- On the Add Search Attribute dialog box, select a schema attribute in the Attribute
drop-down list and click OK.
The attribute is displayed in the Name column on the Quick Search Attributes tab.
To remove an attribute, click Remove for it. - Click Save.
To specify an operator:
-
In the Quick Search Operator drop-down list on the Quick Search Attributes tab, select an option.
- Equal - looks up the values of the attributes listed in the Name column and returns records with values exactly matching the search string.
- Contains - looks up the values of the attributes listed in the Name column and returns records that contain the string anywhere in their values.
- Starts with - looks up the values of the attributes listed in the Name column and returns records with values starting with the search string.
- Ends with - looks up the values of the attributes listed in the Name column and returns records with values ending with the search string.
-
Click Save.
See Also
Customize the Search Results Pages
When a user searches for objects in the GroupID app, matched items are displayed on the following search results pages:
- Groups: displays search results for group objects.
- Default: displays search results for user and contact objects.
You can customize these pages by adding, updating, and removing fields.
What do you want to do?
- Add a Field to a Search Results Page
- Edit a Field on a Search Results Page
- Remove a Field from a Search Results Page
Add a Field to a Search Results Page
-
In Admin Center, select Applications in the left pane.
-
On the Mobile Service tab, click the ellipsis button for a service and select Settings.
-
Select an identity store under Design Settings to customize the app design for it.
All identity stores associated with the Mobile service are listed under Design Settings. You can design a different app for each of these. -
Click Search Forms in the left pane.
The Search Results tab of the Search Forms page lists the search result forms in the GroupID mobile app. -
Click Edit for a form to modify it.
-
On the Edit Search Results pane, the Fields area lists the fields available on the search results page. Click Add Field to add a new field.
-
On the Add Field pane, provide the following information and click OK:
- Field – Select a schema attribute to link to this field. The field will display the value of this attribute on the search results page.
- Display Name – Enter a display name for the field. This name is the field’s label on the search results page.
- ToolTip – Enter the text to appear when a user hovers the mouse over the field.
- Display Type – Select a display type to render this field in the app.
-
Click OK on the Edit Search Results pane.
-
Click Save.
Edit a Field on a Search Results Page
You can change the following for a field on a search results page:
- The name of the field, as displayed in the app
- The schema attribute linked to the field
- The display type used to render the field in the app
- The tooltip for the field
To update a field:
- In Admin Center, select Applications in the left pane.
- On the Mobile Service tab, click the ellipsis button for a service and select Settings.
- Select an identity store under Design Settings to customize the app design for it.
All identity stores associated with the Mobile service are listed under Design Settings. You can design a different app for each of these. - Click Search Forms in the left pane.
The Search Results tab of the Search Forms page lists the search result forms in the GroupID mobile app. - Click Edit for a form to modify it.
- On the Edit Search Results pane, click Edit for a field to update it.
The Edit Field pane is displayed. Follow step 7 and onwards in the Add a Field to a Search Results Page topic to update the field.
Remove a Field from a Search Results Page
- In Admin Center, select Applications in the left pane.
- On the Mobile Service tab, click the ellipsis button for a service and select Settings.
- Select an identity store under Design Settings to customize the app design for it.
All identity stores associated with the Mobile service are listed under Design Settings. You can design a different app for each of these. - Click Search Forms in the left pane.
The Search Results tab of the Search Forms page lists the search result forms in the GroupID mobile app. - Click Edit for a form to modify it.
- On the Edit Search Results pane, click Remove for a field to remove it from the search results page.
- Click OK.
- Click Save.
See Also
Mobile Service
The Mobile service enables the GroupID mobile app to communicate with the GroupID server, enabling it to work on smartphones.
NOTE: The GroupID app can connect with the Mobile service over HTTP and HTTPS. For HTTPS, a security certificate from a trusted certification authority is required.
The app enables users to manage the following in an identity store from their smartphones:
- Search the directory
- Validate their directory profile
- Enroll their identity store accounts
- Join and leave semi-private and public groups
- View the groups they own and the groups they are members of
- Approve and deny workflow requests
- Make phone calls and send emails to users and contacts
- Change their identity store account password
- Reset their identity store account password
- Unlock their identity store account
Actions performed in the app are logged in Admin Center history. See the History in GroupID topic.
To secure access to the app, the administrator can enable the following for an identity store:
- Second factor authentication: applies when users sign into the app.
- Multifactor authentication: applies when users change their identity store passwords, reset their passwords, or unlock their accounts using the app.
Installation and Configuration
By default, one Mobile service is created in Admin Center. You can create and deploy one or more Mobile services in native IIS, remote IIS, and Docker. You can also create multiple instances of the same service. For more info, refer to the Host a Portal topic.
After creating a Mobile service, you can configure the following for it:
In Admin Center
- Server Settings, that control deployment settings and file logging.
- Design Settings, that control what users can view and do in an identity store using the app.
On a smartphone
The Android, Windows, and iOS versions of the GroupID app are available on Google Play, Windows Store, and App Store respectively. To install and configure the app, see the Install and Configure the GroupID App topic.
See Also
Install and Configure the GroupID App
To use the GroupID app on a smartphone, users must do the following:
- Install the GroupID app on their smartphone
- Connect it to the GroupID server
Install the App
The Android, Windows, and iOS versions of the GroupID mobile app have been published on Google Play, Windows Store, and App Store respectively.
- Go to the relevant store on your smartphone and search for Imanami GroupID.
- Install the app and launch it on your phone.
Configure the App
The GroupID app uses the Mobile service to communicate with the GroupID server. Mobile service can be hosted on any of these three web servers: native IIS, remote IIS, and Docker.
To connect the app to the GroupID server, you must register the URL of the web server that hosts the Mobile service in the app. Choose any of the following methods to do so:
- Enter the web server URL manually in the app, or
- Scan a QR code with your phone.
NOTE: Since you can have multiple Mobile services as well as multiple instances of the same service, the administrator should provide the URL or QR code of the specific service or instance that they want users to configure the app with.
Manually Provide the Web Server URL
The web server URL for a Mobile service or an instance of a service is displayed on the GroupIDMobileService page (see the Launch a Mobile Service or a Service Instance topic). Provide it to your users to enable them to configure the app.
To get the URL of the page that displays the web server URL:
- Launch the required Mobile service or its instance. (See the Launch a Mobile Service or a Service Instance topic.)
- Copy the URL of the GroupIDMobileService page and provide it to your users, so they can open this page in a web browser.
To enter the web server URL in the app:
- When you launch the GroupID app on your smartphone for the first time, the Configure page is displayed. Tap Configure Application Manually.
- Copy the web server URL displayed on the GroupIDMobileService page and enter it in the GroupID Server URL box in the app.
- Tap Save and Proceed.
The app validates the URL and on success, the Login page is displayed. Sign into the app and start using it.
Scan the QR Code
The QR code is an easy way to configure the GroupID app. Provide the QR code of a Mobile aervice or an instance of a service to users, so they can scan it to connect the app with the respective service.
To get the URL of the page that displays the QR code:
- Launch the required Mobile service or its instance. (See the Launch a Mobile Service or a Service Instance topic.)
- Copy the URL of the GroupIDMobileService page and provide it to your users, so they can open this page in a web browser.
To configure the app with QR code:
- Launch the GroupIDMobileService page with the given URL.
- Launch the GroupID app on your smartphone and tap Configure Application using QR Code on the Configure page.
- Scan the QR code with your smartphone.
On successful configuration, the Login page is displayed. Sign into the app and start using it.
See Also
Manage Deployment Settings
You can manage various deployment settings for a Mobile service in any of the web servers: native IIS, remote IIS, and Docker.
What do you want to do?
- View the Deployment(s) for a Mobile Service
- Start or Stop a Deployment Instance
- View the Launch URL for an Instance
- View the Data Service and Security Service Bound to an Instance
- Manage Event Logging for an Instance
- Change the IIS Application Name for an Instance (Native IIS)
- Move an Instance under a Different Site (Native IIS)
- View the Deployment Settings for an Instance (Remote IIS and Docker)
View the Deployment(s) for a Mobile Service
A Mobile service can have multiple deployments in the same or different web servers. You can update certain settings for each deployment instance of a service.
To view a service’s deployment instances:
-
In Admin Center, select Applications in the left pane.
-
On the Mobile Service tab, click the ellipsis button for a service and select Settings.
-
Click Deployments under Server Settings; the Deployment Settings page is displayed:
-
The Deployment Settings page has varying tabs, depending on the deployment instances of the service.
- The IIS tab is available when one or more service instances are deployed in native IIS. Select an instance to view the name of the instance directory in IIS, the IIS site that hosts the instance, the URL for the instance, the Data service and Security service associated with the instance, and logging levels.
- The Remote IIS tab is available when one or more service instances are deployed in remote IIS. Select an instance to view the Microsoft IIS Administration API URL and access token that GroupID uses to communicate with the remote IIS server, the credentials used to communicate with the API, the site that hosts the instance, the Data service and Security service associated with the instance, and logging levels.
- The Docker tab is available when one or more service instances are deployed in Docker. Select an instance to view the port and Service URL used for deployment.
Start or Stop a Deployment Instance
See the Start or Stop a Service topic for details. Remember to use the Select Application Deployment drop-down list to select the Mobile service instance you want to start or stop.
View the Launch URL for an Instance
See the View the Launch URL for a Service topic for details. Remember to use the Select Application Deployment drop-down list to select the Mobile service instance you want to view the launch URL for.
Use the launch URL for a Mobile service instance to launch the GroupIDMobileService page, which is shown in the Launch a Mobile Service or a Service Instance topic.
View the Data Service and Security Service Bound to an Instance
See the View the Data Service and Security Service Bound to an Instance topic. Replace references to the portal with the Mobile service.
Manage Event Logging for an Instance
To manage Windows logging and file logging for an instance of a Mobile service, see the Specify Log Settings for a Service topic. Remember to use the Select Application Deployment drop-down list to select the Mobile service instance you want to manage event logging for.
Change the IIS Application Name for an Instance (Native IIS)
An instance of a mobile service is assigned an IIS application name to represent its deployment in IIS. The name uniquely identifies the deployment in the IIS site and is used to name:
- The instance’s directory in IIS.
- It’s physical directory at the following path on the GroupID server:
X:\Program Files\Imanami\GroupID 11.0\GroupIDMobileService\Inetpub\
(X represents the GroupID installation drive).
This name is also appended to the web server address to construct the URL that users click to launch
the GroupIDMobileService page. For example:
https://<web-server-name>:<port>/<IIS-application-name>
When you change the IIS application name, it propagates to the instance’s IIS directory, physical directory, and launch URL.
To change the IIS application name:
- In Admin Center, select Applications in the left pane.
- On the Applications page, click the tab for the desired service. For example, click the Mobile Service tab.
- Click the ellipsis button for a service on its respective card and select Settings.
- Click Deployments under Server Settings.The Deployment Settings page is displayed.
- On the IIS tab, the Select Application Deployment drop-down list displays all service instances deployed in native IIS. Select an instance to change its IIS application name.
- In the IIS Application Name box on the Deployment Configurations tab, update the IIS deployment name for the instance.
- Click Save.
Move an Instance under a Different Site (Native IIS)
You can change the IIS site that hosts a deployment instance of a service. In doing so, the URL of the deployment instance also changes. The updated URL is displayed in the Launch URL box on the Deployment Settings page. You must provide the updated URL to your users to enable them to configure the GroupID app with this deployment instance of the Mobile service.
To change the site:
- In Admin Center, select Applications in the left pane.
- On the Applications page, click the tab for the desired service. For example, click the Mobile Service tab.
- Click the ellipsis button for a service on its respective card and select Settings.
- Click Deployments under Server Settings; the Deployment Settings page is displayed.
- On the IIS tab, the Select Application Deployment drop-down list displays all service instances deployed in native IIS. Select an instance to move its directory under a different IIS site.
- In the IIS Site drop-down list on the Deployment Configurations tab, select a site to move the instance’s directory under it. The list displays the websites defined in native IIS.
- Click Save.
View the Deployment Settings for an Instance (Remote IIS and Docker)
-
n Admin Center, select Applications in the left pane.
-
On the Mobile Service tab, click the ellipsis button for a service and select Settings.
-
Click Deployments under Server Settings; the Deployment Settings page is displayed. Click the Remote IIS or Docker tab.
-
The Select Application Deployment drop-down list displays all service instances deployed in the respective web server. Select an instance to view its settings.
-
On the Deployment Configurations tab:
- For a remote IIS deployment, you can view the Microsoft IIS Administration API URL, access token, and credentials. You can also view the name of the service application in remote IIS, the site where it is hosted, the URL to launch the instance, and the Data service and Security service the instance uses.
- For a Docker deployment, you can view the port and service URL used to communicate with Docker engine. You can also view the URL to launch the instance, and the Data service and Security service the instance uses.
See Also
Manage General Server Settings
You can change the display name of a Mobile service and associate identity stores with it.
What do you want to do?
Change a Service’s Display Name
See the Change a Service’s Display Name topic.
Associate Identity Stores with a Service
You must associate one or more identity stores with a Mobile service. When users configure the app with a particular service, the identity stores associated with that service will be available in the app for logging in.
To associate an identity store:
-
In Admin Center, select Applications in the left pane.
-
On the Mobile Service tab, click the ellipsis button for a service and select Settings.
-
The Identity Stores area on the General Settings page lists the identity stores defined in Admin Center. It displays the provider type an identity store is created for, and whether the identity store is enabled.
- Select the check box for an identity store to associate it with the service.
- Clear the check box for an identity store to dissociate it.
All instances of this Mobile service serve the identity stores you select here.
-
Click Save.
See Also
Server Settings
Server settings for a Mobile service include:
- General settings
- Change the name of a service (i.e., the application name given to the service)
- Associate identity stores with a service
- Deployment settings
- Start or stop a service instance
- Change the IIS application name for an instance (for native IIS)
- Move a service instance under a different site (for native IIS)
- View the IIS application name, API-specific details, and the site hosting an instance (for remote IIS)
- View the port and Service URL for a service instance (for Docker)
- Configure Windows logging and file logging for an instance
- Delete an instance
See Also