Configure an Identity Store
Various configurations can be defined for an identity store.
To manage configurations:
-
In Admin Center, click Identity Stores in the left pane.
-
On the Identity Stores page, click the ellipsis button for an identity store and select Edit.
-
You can configure the following for an identity store:
Identity Store-specific Configurations
The following configurations have to be defined for an identity store:
- An SMTP server for sending email notifications. See the Configure an SMTP Server topic.
- Authentication types and policies. See the Authentication Policy topic.
- A group life cycle policy that controls the expiry and deletion of groups in the identity store. See the Manage Group Lifecycle Settings topic.
- Membership life cycle policies for static groups. See the Manage Membership Life Cycle Policies topic.
- Inheritance settings for Dynasties. See the Manage Dynasty Settings topic.
- Group update and membership settings. See the Manage Group Membership Settings topic.
- Group name prefixes, which are used to append group names. See the Set Group Name Prefixes topic.
- Settings for history tracking. See the Configure History Tracking topic.
- A messaging provider so that mail-enabled objects can be created in the identity store. See the Configure a Messaging Provider topic.
- Profile validation settings to ensure the accuracy of users’ information in the directory. See the Configure User Profile Validation topic.
- Circular reference settings for object update. See the Manage Circular Reference topic.
- Password restrictions and rules for setting identity store passwords. See the Configure Password Options topic.
Security Roles
An identity store has security roles defined for it, and only role members can access GroupID. See the Security Roles topic.
You can specify the following configurations for a role:
- Assign permissions on different GroupID functions. See the Security Role – Permissions topic.
- Specify policies for roles. See the Security Role Policies topic.
Replication Settings
The Replication service is responsible for replicating objects that are created or modified directly on the directory server, to the Elasticsearch repository. You can specify the attributes for the Replication Service to replicate from the provider to the Elasticsearch repository.
See the Manage Local Replication Settings topic for details.
Identity Store History
You can view the changes made to an identity store’s configurations, workflows, and security roles in an identity store. See the Identity Store History topic.
Workflows
Workflows are a built-in auditing system to ensure that changes made to directory objects are approved by an authorized user before they are committed to the directory.
You can define different workflows for an identity store. For example, you can define a workflow that triggers when a user creates a group in the directory using GroupID. See the Workflows topic for details.
Entitlements
Specify file servers in Active Directory and SharePoint sites to view and update the permissions assigned to objects on shared resources. See the Entitlement topic.
Schedules
Define schedules to auto execute different GroupID functions, such as group expiry and deletion, Smart Group membership update, temporary additional manager assignment to users, and more. See the Schedules topic.
See Also
Authentication Policy
The GroupID authentication policy is based on:
- Second Factor Authentication
- Multifactor Authentication
- Second Way Authentication
Authentication Policies - A Comparison
The following table shows a comparison between second factor authentication, multifactor authentication, and second way authentication.
| Second Factor Authentication | Multifactor Authentication | Second Way Authentication | |
|---|---|---|---|
| Configuration | It is enabled and configured for an identity store, and then for a security role in the identity store. | It is enabled and configured for an identity store. Settings at the security role level are optional. | It is configured for an identity store. |
| Applies when | Users sign into Admin Center Users sign into the GroupID portal Users sign into the GroupID Mobile app | Users reset password or unlock account in the GroupID portal. Users reset password or unlock account in the GroupID mobile app. Helpdesk users need to verify the identity of users before resetting their password and unlocking their account in Admin Center. | Unenrolled users attempt to reset their identity store account password or unlock account using the GroupID portal or the mobile app. |
| Supported authentication types | - Security Questions - SMS - Email - Authenticator - YubiKey - Windows Hello | - Security Questions - SMS - Email - Authenticator - Linked Account - YubiKey - Windows Hello | - Security Questions - SMS - Email |
| Number of authentication types required to authenticate | Only one | Can be more than one, as set by the administrator | Can be one or more, as set by the administrator |
NOTE: Account unlock is not supported in a Microsoft Entra ID identity store.
See Also
- Enable Authentication Types
- Set Up Authentication Types
- Authentication Policy for Security Roles
- Configure Second Factor Authentication
- Configure Multifactor Authentication
- Second Way Authentication - SWA
- Enroll with Authentication Types
- Authenticate with Authentication Types
Enable Authentication Types
You must enable authentication types for an identity store to allow users to use them for second factor authentication and multifactor authentication.
Moreover, you must also enable enrollment for an identity store, so users can enroll their accounts.
What do you want to do?
- Enable Authentication Types
- Enable Enrollment
- Enable QR Code
Enable Authentication Types
-
In Admin Center, click Identity Stores in the left pane.
-
On the Identity Stores page, click the ellipsis button for an identity store and select Edit.
-
Click Configurations under Settings in the left pane. Then click Authentication Types.
-
On the Authentication Types page, use the toggle button for an authentication type to enable or disable it.
Enabled authentications types are available to identity store users for enrollment and authentication. You must configure them before they can be used. Supported authentication types are:- Security Questions
- SMS
- Authenticator
- Linked Account
- YubiKey
- Windows Hello
-
Click Save.
Enable Enrollment
- In Admin Center, click Identity Stores in the left pane.
- On the Identity Stores page, click the ellipsis button for an identity store and select Edit.
- Click Configurations under Settings in the left pane. Then click Authentication Types.
- On the Authentication Types page, select the Enrollment Enabled check box to force
unenrolled users to enroll their identity store accounts in GroupID.
Do not select this check box if you do not want to use multifactor authentication or second factor authentication in GroupID. - Click Save.
NOTE: For second factor authentication and multifactor authentication to work in GroupID, the Enrollment Enabled check box must be selected. Else, users will not be able to enroll, which will prevent them from using GroupID.
Enable QR Code
The administrator can enable the QR code option for an identity store to provide users with a passwordless method for signing into GroupID.
Users can simply scan the QR code with the GroupID mobile app on their smartphones to connect Admin Center or the GroupID portal to an identity store and sign in, without the need to provide a username and password.
To enable QR code for an identity store:
- In Admin Center, click Identity Stores in the left pane.
- On the Identity Stores page, click the ellipsis button for an identity store and select Edit.
- Click Configurations under Settings in the left pane. Then click Authentication Types.
- On the Authentication Types page, set the QR Code Authentication toggle button to
Enabled to enable QR code for the identity store.
Users can use QR code for passwordless authentication while connecting Admin Center or the GroupID portal to this identity store. - Click Save.
Prerequisite for Using QR Code
To sign in via QR code, users must first install the GroupID mobile app on their mobile device.
To install the GroupID app:
-
Do the following with respect to your device:
- On an iPhone, launch App Store and search for Imanami GroupID.
- On an Android phone, launch Google Play and search for Imanami GroupID.
-
Tap Install to install the app.
Sign in with QR Code
To sign in using the QR code, see the Access Admin Center topic.
See Also
- Authentication Policy
- Configure Second Factor Authentication
- Configure Multifactor Authentication
- Set Up Authentication Types
Manage Circular Reference
By default, GroupID checks for circular reference and does not allow it when users update objects manually or when objects are auto updated via a GroupID schedule. If a circular reference occurs, GroupID displays an error and prevents the user from saving the change.
Examples of circular reference are:
- When UserA is a direct report of UserB and UserB is a direct report of UserC, a circular reference would occur when you try to set UserA as UserC's manager.
- When you try to add a group as its member, say, add GroupA as a member of GroupA, a circular reference would occur.
- When GroupA is a member of GroupB, GroupB is a member of GroupC, a circular reference would occur when you try to add GroupC as a member of GroupA.
You can change the default setting to allow GroupID to save updates to objects even when a circular reference occurs.
What do you want to do?
Allow Circular Reference
- In Admin Center, click Identity Stores in the left pane.
- On the Identity Stores page, click the ellipsis button for an identity store and select Edit.
- Click Configurations under Settings in the left pane. Then click Miscellaneous.
- On the Miscellaneous page, uncheck the Check for Circular Reference check box to allow
GroupID to save changes to objects that involve circular reference.
The check box is selected by default, indicating that GroupID prevents circular reference in objects. - Click Save.
Skip the replication of members of a dynamic group in Entra ID
- In Admin Center, click Identity Stores in the left pane.
- On the Identity Stores page, click the ellipsis button for an identity store and select Edit.
- Click Configurations under Settings in the left pane. Then click Miscellaneous.
- On the Miscellaneous page, select the Skip Replicating members related attributes of Groups with dynamic membership check box to skip the replication of members of a dynamic group in Microsoft Entra ID based identity store.
- Click Save.
Manage Dynasty Settings
A Dynasty is a Smart Group that creates and manages other Smart Groups using information in the directory. The Smart Groups that a Dynasty creates are called child groups that become members of their respective parent Dynasties.
A Dynasty retrieves data from the directory on the same pattern as a Smart Group does, but it has its own mechanism of dividing the query results into child groups. To learn more about Dynasties, see the Dynasties topic.
You can control how GroupID processes Dynasties through the following settings:
- Auto update Dynasty children when parent changes
- Auto delete empty and orphan child Dynasties
- Specify attributes for inheritance
How does GroupID update Dynasties?
Each Smart Group and Dynasty has a query defined for it. On update, this query is executed to update membership.
The GroupID portal provides two methods to update Smart Groups and Dynasties:
- Manual update: you can manually execute the query for a Dynasty and Smart Group any time.
- Scheduled update: Scheduled updates, powered by a Smart Group Update schedule, auto run at a specified frequency to update the target groups and Dynasties. See the Smart Group Update Schedule topic.
What happens on Dynasty update?
When a Dynasty is updated, the following happens:
- Each Dynasty has a query defined for it. On update, the query retrieves records from the directory and updates Dynasty membership.
- You can specify certain attributes whose values are passed on from parent to child Dynasties. The values of these attributes are updated when the Dynasty is updated. See the Specify Attributes for Inheritance topic.
What do you want to do?
- Auto Update Dynasty Children When Parent Changes
- Auto Delete Empty and Orphan Dynasty Children
- Specify Attributes for Inheritance
Auto Update Dynasty Children When Parent Changes
By default, when you update a parent Dynasty, its child groups are also updated. However, you can disable the Dynasty children update option, in which case, each child group will have to be updated like a single Smart Group.
To apply auto update settings:
- In Admin Center, click Identity Stores in the left pane.
- On the Identity Stores page, click the ellipsis button for an identity store and select Edit.
- Click Configurations under Settings in the left pane. Then click Dynasties.
- On the Dynasties page, select the Update Dynasty Children check box. This will update the
child groups every time the parent Dynasty is updated.
Clear this check box to prevent Dynasty children from getting updated with the parent Dynasty. - Click Save.
Auto Delete Empty and Orphan Dynasty Children
An empty child Dynasty is one with no member and an orphan child Dynasty is one whose parent Dynasty has been removed.
By default, empty and orphan Dynasty children are auto deleted from the identity store. However, you can disable this setting to retain empty and orphan Dynasty children in the identity store.
To auto delete empty and orphan Dynasty children:
- In Admin Center, click Identity Stores in the left pane.
- On the Identity Stores page, click the ellipsis button for an identity store and select Edit.
- Click Configurations under Settings in the left pane. Then click Dynasties.
- On the Dynasties page, select the Delete Empty and Orphan Dynasty Children check box.
This ensures that empty and orphan Dynasty children are automatically deleted from the identity
store.
When this check box is not selected, empty and orphan Dynasty children are retained in the identity store. - Click Save.
Specify Attributes for Inheritance
You can control the attributes that a child Dynasty inherits from its parent.
By default, the values of the following attributes are passed on from the parent to child Dynasties (for an Active Directory identity store):
| Attribute | Description |
|---|---|
| unauthOrig | Contains the list of DNs of users who do not have permissions to send email to the group. |
| authOrig | Contains the list of DNs of users who have permissions to send email to the group. |
| dLMemRejectPerms | Contains the DNs of groups that do not have permissions to send email to the group. |
| dLMemSubmitPerms | Contains the DNs of groups that have permissions to send email to the group. |
| delivContLength | Contains the maximum limit for incoming messages to the group. |
| managedBy | Contains information about the group’s primary owner. |
| groupType | Contains information about the group’s type, i.e., security or distribution group. |
You can add and remove attributes to this list.
To add/remove attributes for inheritance:
-
In Admin Center, click Identity Stores in the left pane.
-
On the Identity Stores page, click the ellipsis button for an identity store and select Edit.
-
Click Configurations under Settings in the left pane. Then click Dynasties.
-
On the Dynasties page, the Attributes area lists the attributes that child Dynasties inherit from their respective parent Dynasties.
- To add an attribute, click Add Attributes. On the Add Fields dialog box, select the required attributes and click Add.
- To remove an attribute, click Remove for it.
-
Click Save.
NOTE: (1) At the Dynasty level, you can control whether child Dynasties should inherit these
attributes only when child Dynasties are created, or every time the parent Dynasty is updated. You
can also opt to disable attribute inheritance for child Dynasties.
(2) If, for a managerial Dynasty, the ‘Set manager as owner’ option is applied and the managedBy
attribute is set for inheritance, then the latter settings will not have any impact and the manager
of a child Dynasty will be set as its owner.
NOTE: In a Microsoft Entra ID identity store, where a group can have multiple primary owners, the owner of the parent Dynasty and the manager of a child Dynasty are collectively set as owners of that child Dynasty.
See Also
Group Expiry and Deletion
Using GroupID, you can expire and delete groups in two ways:
- Manually expire and delete groups
- Automatically expire and delete groups using the Group Life Cycle schedule
What Happens When a Group Expires
GroupID provides two ways to expire a group:
- You can manually expire a group from the GroupID portal.
- The Group Life Cycle schedule expires groups automatically based on the expiry policy specified for the respective group.
The following events take place when a group expires:
In case of an Active Directory identity store with Microsoft Exchange as messaging provider:
- The group becomes inactive and is locked for all activities.
- "EXPIRED_" is added as a prefix to the group name.
- A mail-enabled distribution group is mail-disabled.
- For a security group, its member list is cleared. However, GroupID keeps a backup of its membership in the database.
In case of an Active Directory identity store with Office 365 as messaging provider:
The following happens when a distribution group is expired manually or via the Group Lifecycle job:
- The group’s email address is removed in Active Directory.
- "EXPIRED_" is added as a prefix to the group name.
- The group is removed from Office 365 when the AAD Sync schedule runs.
On renewing an expired distribution group, the following happens:
- The group’s email address is added in Active Directory.
- The "EXPIRED_" prefix is removed from the group’s name.
- The group is created with members in Office 365 when the AAD Sync schedule runs.
In case of a Microsoft Entra ID identity store with Office 365 as messaging provider:
The following happens when a distribution group is expired manually or via the Group Life Cycle schedule:
-
GroupID takes a backup of the group’s membership.
-
It empties out the group’s membership in Office 365.
NOTE: When an Office 365 group is expired, its member list is backed up in the database and cleared from Office 365.
On renewing an expired distribution group, the following happens:
- The group’s membership is repopulated in Microsoft Entra ID and Office 365.
Renewal of Expired Groups
If you want an expired group back, you can renew it. On renewal, the group becomes active again and its expiry policy is re-applied to it, starting from the date of renewal.
What Happens When a Group is Deleted
Using GroupID, groups can be deleted physically or logically. Deleted groups can be viewed in the GroupID portal. You can distinguish physically deleted groups from logically deleted groups as:
- Physically deleted groups are listed under Tombstone Groups.
- Logically deleted groups are listed under Logically Deleted Groups. They also have Deleted_ prefixed to their display names. However, groups in the Recycle Bin are displayed by their names, not their display names.
Both types are locked for further operations until restored.
NOTE: While all searches in GroupID are catered through Elasticsearch, the Recycle Bin is an exception; it fetches data from the directory.
NOTE: The Recycle Bin does not display data for a Microsoft Entra ID identity store.
Physical Deletion
Physical group deletion refers to manually deleting groups from the GroupID portal. GroupID moves a physically deleted group to the Recycle Bin while stripping it of most of its properties. You cannot delete a group from the Recycle Bin; however, you can restore it. The restoration process not only restores the group to its original container, but it also reinstates the home container for the group, if deleted.
A physically deleted group is restored with limited attributes; its membership is not restored. Smart Groups and Dynasties are restored as static groups with no members and no query.
Logical Deletion
Groups that are deleted by the Group Life Cycle schedule are considered as logically deleted. The schedule deletes expired groups x number of days after group expiry, as specified in the Auto Delete Expired Groups topic.
On deletion, logically deleted groups are moved to the Recycle Bin with all their attributes intact. As a result, a logically deleted group, when restored, returns to its state it had at the time of deletion. The restoration process not only restores the group to the container from where it was deleted but it also reinstates the home container for the group, if deleted.
You can also manually delete a logically deleted group in the Recycle Bin, making it physically deleted.
Deletion Notifications
When the Group Life Cycle schedule deletes a group, it notifies the group owners or, if there is no owner, the default approver. The job does not delete a group that neither has an owner nor a default approver. See the Specify a Default Approver topic.
See Also
Manage Group Lifecycle Settings
GroupID can effectively manage group life cycle through all stages, from creation to deletion. It enables you to define the following setting to control the group life cycle in an identity store:
- A default expiry policy for groups
- Exclude groups from expiration and deletion
- Prevent the expiry of security groups
- Wait period for deleting expired groups
- Group usage life cycle
- Group attestation
- Notifications for expiring groups
Of these, only the first setting, i.e., the group expiry policy, can be changed for individual groups. All other settings apply to all groups in the identity store and cannot be changed for individual groups.
The Group Life Cycle schedule defined for the identity store is responsible for applying the group life cycle settings to groups. This schedule runs on containers you specify as its targets, to process the groups that reside therein. Groups that reside outside of the target containers will not be processed by the schedule; hence, the group life cycle policy is not applied to them. See the Group Life Cycle Schedule topic.
NOTE: Before you specify a group life cycle policy for a Microsoft Entra ID identity store, see the Group Expiration Policy section in the Microsoft Entra ID vs. Active Directory Identity Stores topic.
What do you want to do?
- Set a Default Expiry Policy for Groups
- Apply Policy on Specific Containers
- Exempt Security Groups from Expiry
- Auto Delete Expired Groups
- Enable Group Usage Lifecycle
- Enable Group Attestation
- Set Group Expiry Notifications
Set a Default Expiry Policy for Groups
The expiry policy specifies the period for which a group remains active. When the period ends, the group expires.
When a group is created, it inherits the default expiry policy, but you can change it for individual groups. The Group Life Cycle schedule executes the Group Lifecycle policy as defined for the identity store, but monitors group expiry dates as determined by each group’s expiry policy. This job expires groups according to their respective expiry policy.
To set a default expiry policy:
-
In Admin Center, click Identity Stores in the left pane.
-
On the Identity Stores page, click the ellipsis button for an identity store and select Edit.
-
Click Configurations under Settings in the left pane. Then click Group Lifecycle.
-
In the Default Expiration Policy drop-down list on the Group Lifecycle page, select an expiration criterion that you want to set as default. Options are:
- Never Expire
- Expire Every 30 Days
- Expire Every 60 Days
- Expire Every 90 Days
- Expire Every 120 Days
- Expire Every 6 Months
- Expire Every Year
- Other: On selecting this, two boxes are displayed. Select a unit of time (years, months, days) from the second list and specify a number in the first box to set a custom period for group expiration.
-
Click Save.
Apply Policy on Specific Containers
By default, the Group Life Cycle schedule evaluates all groups that reside in the container(s) specified as its targets, and processes them according to the group lifecycle policy. However, you can exempt containers from the Group Life Cycle schedule, so that it does not process the groups in those containers.
To limit the policy to specific containers:
-
In Admin Center, click Identity Stores in the left pane.
-
On the Identity Stores page, click the ellipsis button for an identity store and select Edit.
-
Click Configurations under Settings in the left pane. Then click Group Lifecycle.
-
On the Group Lifecycle page, select one of the following options:
-
Do not apply policy on following containers
- Select this option and click Add/Modify Container(s).
- On the Add Container(s) dialog box, select the containers you want to exempt from the Group Lifecycle policy settings and click Add. The selected containers are displayed in the Container(s) area. The Group Life Cycle schedule will not process the groups in these containers even when they are set as its targets.
-
Apply policy only on following containers
- Select this option and click Add/Modify Container(s).
- In the Add Container(s) dialog box, select the container(s) you want to apply the Group Lifecycle policy to, and click Add. The selected containers are displayed in the Container(s) area. The Group Life Cycle schedule will only process groups in these containers in the identity store.
-
-
Click Save.
NOTE: If a container is set as target in a Group Life Cycle schedule while it is also listed as an exempted container in the Group Lifecycle policy, the schedule does not process it. As a result, different aspects of the Group Lifecycle policy, such as group expiry and group attestation does not apply to groups in the container.
Exempt Security Groups from Expiry
By default, security group expiration is disabled, indicating that security groups in the identity store cannot be expired either manually or by the Group Life Cycle schedule. You must enable it to expire security groups.
When a security group expires, its membership is cleared. However, GroupID keeps a backup of its membership in the database.
NOTE: In a Microsoft Entra ID identity store, the security group expiry option also applies to Office 365 groups.
The security group expiration paradox
A security group may grant or restrict access to network resources to its members. Enabling security group expiry may pose a problem; the members of an expired security group will get undesired access to network resources, or will be denied access to resources that were assigned to it.
To manage this, make sure your critical security groups reside in the OU that the expiry policy does not apply to. Use the Do not apply policy on following containers option to set the OU aside (see the Apply Policy on Specific Containers topic). In this way, those groups will not expire even if you enable the expiry of security groups.
To enable security group expiry:
- In Admin Center, click Identity Stores in the left pane.
- On the Identity Stores page, click the ellipsis button for an identity store and select Edit.
- Click Configurations under Settings in the left pane. Then click Group Lifecycle.
- On the Group Lifecycle page, select the Expire Security Groups check box to allow the
expiry of security groups in the identity store. (Security groups can be expired manually and by
the Group Life Cycle schedule.)
Clear the check box to prevent the expiry of security group. - Click Save.
Auto Delete Expired Groups
You can set GroupID to auto delete expired groups x number of days after expiry. These wait days apply to both auto expired and manually expired groups. The Group Life Cycle schedule is responsible for deleting expired groups. These auto deleted groups are called logically deleted groups.
To set wait days:
- In Admin Center, click Identity Stores in the left pane.
- On the Identity Stores page, click the ellipsis button for an identity store and select Edit.
- Click Configurations under Settings in the left pane. Then click Group Lifecycle.
- On the Group Lifecycle page, select the Delete Expired Groups check box and type the number of days after which you want an expired group to be deleted, starting from the expiry date.
- Click Save.
Enable Group Usage Lifecycle
You can set the expiry of mail-enabled distribution groups based on their usage. It is as:
- If an expiring group is used in the last x number of days, it will be renewed by reapplying the expiry policy to it.
- If a group is not used in the last x number of days, its life will be reduced to 7 days.
The Group Usage Service schedule time stamps each mail-enabled distribution group with respect to its last usage. The Group Life Cycle schedule extends or reduces the life of a group based on this information.
To enable group usage lifecycle:
-
In Admin Center, click Identity Stores in the left pane.
-
On the Identity Stores page, click the ellipsis button for an identity store and select Edit.
-
Click Configurations under Settings in the left pane. Then click Group Lifecycle.
-
On the Group Lifecycle page, use the toggle button for Extend or reduce the life of mail-enabled groups to enable group usage lifecycle.
-
Select one of the following options:
-
Extend group life if used in last x Days: select this option button and specify x number of days in the box to prevent your active mail-enabled distribution groups from expiry. If an expiring group is used in the last x number of days, the Group Life Cycle schedule will renew it by reapplying its expiry policy.
-
Reduce group life if not used in last x Days: select this option button and specify x number of days in the box to reduce the life of mail-enabled distribution groups that have not received any email in the last x number of days.
By default, this setting works for groups that are idle for 60 days since their creation, last renewal, or last usage. You can change the number of days anywhere from 1 to 360. The Group Life Cycle schedule will reduce the life of such groups to 7 days and send an email notification to the group owner or the default approver (for groups without owners), informing them of the approaching expiry. See the Specify a Default Approver topic.
-
-
Click Save.
Enable Group Attestation
You can enforce group owners to review and validate the attributes and membership of expiring groups before renewing them. While enabling group attestation, consider the following:
- Group attestation does not apply to groups that have ‘Never Expire’ as their expiry policy.
- The Membership Life Cycle schedule must be defined for the identity store.
- Group attestation does not apply to excluded containers. See the Apply Policy on Specific Containers topic.
- With group attestation enabled, the Group Usage Lifecycle settings cannot be applied. If those settings are already defined, they get disabled when you enable group attestation. See the the Enable Group Usage Lifecycle topic.
- For attestation, group owners must use the GroupID portal.
- In the default portal template, a few fields (attributes) for group attestation are specified. You can add and remove fields to include those that you want group owners to validate and update.
- In case of a Dynasty, parent and child Dynasties have to be attested individually. Child Dynasties include both middle and leaf Dynasties. However, child Dynasties cannot be renewed after attestation, as they are renewed with their respective parent Dynasty.
- When attesting the membership of a parent Dynasty, child Dynasty, or a Smart Group, the members list does not include group objects for attestation. Only users and contacts are displayed. When attesting static groups, however, the members list also includes groups for attestation.
To enable group attestation:
-
In Admin Center, click Identity Stores in the left pane.
-
On the Identity Stores page, click the ellipsis button for an identity store and select Edit.
-
Click Configurations under Settings in the left pane. Then click Group Lifecycle.
-
On the Group Lifecycle page, use the toggle button for Enforce group owners to attest expiring groups to enable group attestation for the identity store.
-
Select the Enforce user to verify each member check box to enforce group owners to verify each group member one by one (by individually specifying the status of each member as active or inactive). When this check box is not selected, group owners can select all members in a single click and specify their status as active or inactive.
-
You can specify the duration for which inactive members remain in group membership.
-
Select the Specify member inactive period check box and specify a duration in days (for example, 5). When the status of a member is set to inactive, he or she is instantly removed from group membership in the directory. In GroupID, however, he or she remains a group member till the specified number of days, starting from the inactivation date. During this period, the member can be activated (added back to group membership). If the member is not activated, the Membership Life Cycle schedule removes it from group membership in GroupID when the specified number of days lapse.
-
If you want inactive members to be instantly removed from group membership in the directory and in GroupID, do one of the following:
- Select the Specify member inactive period check box and specify ‘0’ in the box.
- Do not select the Specify member inactive period check box.
-
-
Click Save.
Set Group Expiry Notifications
You can choose to send email notifications 1 day, 7 days, or 30 days before a group expires, to inform the group owners (or the default approver when the group has no primary or additional owners) about the approaching expiry.
To set group expiry notifications:
-
In Admin Center, click Identity Stores in the left pane.
-
On the Identity Stores page, click the ellipsis button for an identity store and select Edit.
-
Click Configurations under Settings in the left pane. Then click Group Lifecycle.
-
In the Notification Options section on the Group Lifecycle page, select any of the following options to specify when group expiry notifications should be sent:
- 1 day before group expiration
- 7 days before group expiration
- 30 days before group expiration
-
Click Save.
Group expiry notifications and the Group Lifecycle schedule
The Group Life Cycle schedule handles group expiry notifications as follows:
- When no option is selected for expiry notifications, the schedule expires the groups in the identity store without notifying anyone.
- When notifications are enabled, the schedule notifies the primary and additional owners of the group, or the default approver (in case the group has no owner) about the approaching expiry. In case the notification could not be sent or no recipient is available, the schedule extends the expiry date of the group by 7 days on the group’s expiry day. It continues to do so until the notification is sent.
- When the 1 day before group expiration option is selected for sending notifications and the Group Life Cycle schedule evaluates the group for the first time a day before its expiration date, GroupID will extend the group’s expiration date by 7 days.
See Also
Configure History Tracking
In GroupID, history for an identity store is tracked at two levels:
-
When objects are created, modified, and deleted - When you enable history tracking for an identity store, GroupID tracks all actions that are committed to the directory using:
- GroupID portal (whether manually, through Synchronize jobs. or changes to object entitlements)
- GroupID Management Shell cmdlets
- GroupID mobile app
- GroupID Admin Center (actions performed by schedules only)
- GroupID APIs
You can choose to track specific actions, such as ownership change and object deletion. The table in the Track Specific Actions for an Identity Store topic lists some individual actions available for tracking.
Use the History node in the GroupID portal to view the history data that the history tracking function collects for objects. History for individual objects is also displayed in the respective object’s properties.
-
When changes are made to an identity store’s configurations - GroupID enables you to track the changes made to an identity store’s configurations, which include the following:
- identity store properties
- workflows
- security roles
See the Identity Store History topic to view the tracked history data.
By default, history tracking is disabled. You can:
- Enable the history tracking function for an identity store.
- Track all or specific actions.
- Specify a period for retaining history data in the GroupID database. When the period is over, data is exported to CSV files and deleted from the database.
RECOMMENDED: History tracking can slow down system performance. For optimal performance, it is recommended that you track only specific, more important actions and limit GroupID history data storage to the most recent records.
What do you want to do?
- Enable History Tracking for All Actions
- Track Specific Actions for an Identity Store
- Retain Complete History Data
- Retain History for a Specific Period
- Disable History Tracking
Enable History Tracking for All Actions
You can choose to enable or disable history tracking for an identity store. When enabled, all actions that users perform on directory objects using GroupID are tracked by default. For example, when a user creates a group, adds members to it, changes its expiry date, and assigns owners, history logs are generated in GroupID. Moreover, changes made to identity store configurations, workflows, and security roles are also tracked.
To enable history tracking:
-
In Admin Center, click Identity Stores in the left pane.
-
On the Identity Stores page, click the ellipsis button for an identity store and select Edit.
-
Click Configurations under Settings in the left pane. Then click History.
-
Use the toggle button in the top right corner to enable or disable history tracking for the identity store.
- On enabling, All Actions is auto selected in the Track drop-down list. This indicates
that (a) all actions that users perform on directory objects and (b) changes made to identity
store configurations, workflows, and security roles are tracked for the identity store.
To track specific actions, see the Track Specific Actions for an Identity Store topic. - Disabling history tracking does not delete already recorded history data.
- On enabling, All Actions is auto selected in the Track drop-down list. This indicates
that (a) all actions that users perform on directory objects and (b) changes made to identity
store configurations, workflows, and security roles are tracked for the identity store.
-
Click Save.
Track Specific Actions for an Identity Store
Rather than tracking all actions for an identity store, you can choose to track the most important actions, such as changes to a group’s primary owner and object creation.
To track specific actions:
-
In Admin Center, click Identity Stores in the left pane.
-
On the Identity Stores page, click the ellipsis button for an identity store and select Edit.
-
Click Configurations under Settings in the left pane. Then click History.
-
On the History page, make sure history tracking is enabled. Them select Selected Actions in the Track drop-down list. This enables the Actions area, where the following actions are listed:
Action Description Ownership Change Changes to a group's primary ownership. Additional Owner Change Addition and removal of a group's additional owner(s) Expiration Policy Change Any change to a group's expiry policy. Group Expire/Renew Expiration of a group and renewal of an expired group. Query Change Changes to the query of a Smart Group or Dynasty. Object Created Creation of a new object. Object Deleted Deletion of an object. Workflows history Addition, deletion, or modification made to a workflow. It does not track the deletion of workflow requests, that is tracked under the Identity Store history option. Security Roles history Addition, deletion, or modification made to a security role. Security Type Change Changes to a group's security type. Identity Store history Changes to an identity store’s settings. This includes the configurations available for an identity store. This option does not track changes made to workflows and security roles. It does, however, track the deletion of workflow requests. -
Click an action to track it for the identity store. The tile for the action changes to blue, indicating that it is tracked.
-
Click Save.
Retain Complete History Data
You can set GroupID to retain history data for the identity store in the GroupID database forever.
To retain history data forever:
-
In Admin Center, click Identity Stores in the left pane.
-
On the Identity Stores page, click the ellipsis button for an identity store and select Edit.
-
Click Configurations under Settings in the left pane. Then click History.
-
On the History page, select All in the History Options drop-down list to retain all tracked history data in the database.
NOTE: This setting may result in a massive increase in the database size and may affect GroupID performance.
-
Click Save.
Retain History for a Specific Period
You can set GroupID to retain an identity store's history data for a specified length of time in the database. When the retention period is over, the History Retention schedule archives this data by moving it from the database to CSV files. See the History Retention Schedule topic.
To retain history data for a specific period:
-
In Admin Center, click Identity Stores in the left pane.
-
On the Identity Stores page, click the ellipsis button for an identity store and select Edit.
-
Click Configurations under Settings in the left pane. Then click History.
-
On the History page, select one of the following options in the History Options drop-down list:
- Last 30 Days
- Last 60 Days
- Last 90 Days
- Last 120 Days
- Last 6 Months
- Last 1 Year
- Last 2 Years
- Last 5 Years
-
Click Save.
Disable History Tracking
On disabling history tracking for an identity store, GroupID does not log the history for actions performed in the identity store. Disabling history tracking does not delete any already recorded history data.
To disable history tracking:
- In Admin Center, click Identity Stores in the left pane.
- On the Identity Stores page, click the ellipsis button for an identity store and select Edit.
- Click Configurations under Settings in the left pane. Then click History.
- On the History page, use the toggle button in the top right corner to disable history tracking for the identity store.
- Click Save.
See Also
Manage Membership Life Cycle Policies
A membership lifecycle policy enables you to specify a period, so that all members added or removed from specific group(s) during that period are treated as temporary addition or removal respectively.
You can define a membership policy for groups and OUs. In case of an OU, the policy applies to all groups in that OU. The Membership Life Cycle schedule is responsible for applying membership lifecycle policies to groups.
NOTE: Membership lifecycle policies apply to static groups only. You cannot specify system critical objects, Smart Groups, and Dynasties as target groups in a policy.
NOTE: When Smart Groups and Dynasties reside in a target OU, GroupID does not process them.
Types of Membership Lifecycle Policies
You can define two types of membership life cycle policies:
- Add temporary - Users added to group membership during a specified period will be temporary members, to be removed from membership at the end of the period. If this policy is extended to existing group members, then all members (including permanent members) will be removed from group membership when the period ends.
- Remove temporary - Users added to group membership during a specified period will be temporarily removed on addition, to be permanently added to group membership at the end of the period. If this policy is extended to existing group members, then all members (including permanent members) will be temporarily removed from group membership for the specified period. At the end of the period, they will be added back as permanent members.
Key Features
Some main features of the membership lifecycle policies are:
- Groups with nested membership - If a policy is applied to a group with nested membership, it does not affect nested membership. For an OU with nested OUs, the policy applies to all nested OUs.
- Groups with different settings for individual members - When a policy is applied to a group having members with temporary addition or removal applied to them individually, then individual member settings take precedence over the group policy. Temporary addition or removal applied to individual members remains intact when you remove a policy from a group or OU.
- Single policy rule - A single policy can be applied to a group or an OU at a time. Hence, a group or OU cannot be set as the target in more than one policy. If you apply a policy to an OU that contains a group with a different policy already applied to it, then the group policy would be effective.
- Notifications - GroupID generates notifications when users are temporarily added or removed from a group’s membership. See the Manage Membership Life Cycle Notifications topic.
What do you want to do?
- Specify an ‘Add Temporary’ Membership Policy
- Specify a ‘Remove Temporary’ Membership Policy
- Edit a Policy
- Reapply a Policy
- Delete a Policy
Specify an ‘Add Temporary’ Membership Policy
An add temporary membership policy states that all members added to the target groups during a certain period will be temporary. When the period ends, they will be removed from group membership.
To define a policy:
-
In Admin Center, click Identity Stores in the left pane.
-
On the Identity Stores page, click the ellipsis button for an identity store and select Edit.
-
Click Configurations under Settings in the left pane. Then click Membership Life Cycle.
The Group/OU Based Membership Lifecycle page displays any group/OU based membership policy already defined. -
Click Add; the Add Group/OU Based Membership Lifecycle Policy dialog box is displayed.
-
In the Membership Type drop-down list, select Add Temporary.
-
To specify a duration for the policy, select one of these options:
- Click Days and in the box below, specify the number of days the policy will apply to target group(s), starting from today.
- Click Custom and specify a date range in the Starting Date and Ending Date boxes. The starting date must be the current or future date.
-
Specify groups and OUs to apply the policy to.
-
In the Add Group and OU to Membership Policy area, enter a search string in the box. Group and OU names starting with the string are displayed as you type. Click Add for an object to add it to the policy.
Or
-
Click Advanced to search an object by different parameters, such as name, display name, and email.
The selected objects are displayed with their type (can be group or OU), display name, and distinguished name.
- For a container, the policy applies to all groups residing in it and its sub-containers.
- For a group, the policy does not apply to any groups that are nested into your selected group(s).
To remove an object, click Remove for it.
-
-
Click Add.
-
On the Apply Policy to Existing Members message box, do one of the following:
- Click Yes to extend the policy to include the target groups’ existing membership. All members of the target group(s) convert to temporary at the start of the period, and get removed from the respective group(s) when the period ends. Simply put, a group’s membership will be emptied when the period ends. Membership change is also logged in the group’s history.
- Click No to apply the policy to new members only and exempt existing members.
-
The policy is displayed on the Group/OU Based Membership Life Cycle page. Click Save.
To view the impact of the policy, go to the properties of a target group in the GroupID portal.
Specify a ‘Remove Temporary’ Membership Policy
A remove temporary policy states that all members added to the target group(s) during a certain period will be temporarily removed from membership. When the period ends, those members would be added back as permanent members.
To define a policy:
-
In Admin Center, click Identity Stores in the left pane.
-
On the Identity Stores page, click the ellipsis button for an identity store and select Edit.
-
Click Configurations under Settings in the left pane. Then click Membership Life Cycle.
The Group/OU Based Membership Life Cycle page displays any group/ OU based membership policy already defined. -
Click Add; the Add Group/OU Based Membership Lifecycle Policy dialog box is displayed.
-
In the Membership Type drop-down list, select Remove Temporary.
-
To specify a duration for the policy, select one of these options:
- Click Days and in the box below, specify the number of days the policy will apply to target group(s), starting from today.
- Click Custom and specify a date range in the Starting Date and Ending Date boxes. The starting date must be the current or future date.
-
Specify groups and OUs to apply the policy to.
-
In the Add Group and OU to Membership Policy area, enter a search string in the box. Group and OU names starting with the string are displayed as you type. Click Add for an object to add it to the policy.
Or
-
Click Advanced to search an object by different parameters, such as name, display name, and email.
The selected objects are displayed with their type (can be group or OU), display name, and distinguished name.
- For a container, the policy applies to all groups residing in it and its sub-containers.
- For a group, the policy does not apply to any groups that are nested into your selected group(s).
To remove an object, click Remove for it.
-
-
Click Add.
-
On the Apply Policy to Existing Members message box, do one of the following:
- Click Yes to extend the policy to include the target groups’ existing membership. All membership of the target group(s) is temporarily removed at the start of the period, and is added back as permanent members when the period ends. Membership change is also logged in the group’s history.
- Click No to apply the policy to new members only and exempt existing members.
-
The policy is displayed on the Group/OU Based Membership Life Cycle page. Click Save.
To view the impact of the policy, go to the properties of a target group in the GroupID portal.
Edit a Policy
You can edit a policy to change its details.
Let’s assume you have an ‘add temporary’ policy with May 1 and May 31 set as starting and ending dates. By May 14, User A and User B are added as temporary members, to be removed from membership on May 31.
On May 15, you change the policy’s ending date to May 20. The new ending date will apply to members that are added to the group hence onwards; it does not apply to User A and User B, who will still be removed on May 31. However, if the policy is applied to existing members, User A and User B will also be removed from membership on May 20.
To edit a policy:
-
In Admin Center, click Identity Stores in the left pane.
-
On the Identity Stores page, click the ellipsis button for an identity store and select Edit.
-
Click Configurations under Settings in the left pane. Then click Membership Life Cycle.
-
On the Group/OU Based Membership Life Cycle page, click the ellipsis button for a policy and select Edit.
-
Make the required changes to the policy on the Edit Group/OU Based Membership Lifecycle Policy dialog box.
- For an add temporary policy, follow step 5 and onwards in the Specify an ‘Add Temporary’ Membership Policy topic.
- For a remove temporary policy, follow step 5 and onwards in the Specify a ‘Remove Temporary’ Membership Policy topic.
-
On the Group/OU Based Membership Life Cycle page, click Save.
Reapply a Policy
You need to reapply a policy when:
- A new group is created in the policy’s target OU through the identity provider, such as Active Directory. To extend the policy to the new group, you have to reapply it.
- A group is moved to a target OU using GroupID or the identity provider.
You do not need to reapply a policy when a new group is created in the policy’s target OU through GroupID. In this case, the policy is automatically applied.
Consider the following:
- If a policy has been defined for future dates and you add a group to a target OU before the start date, you must reapply the policy. Reapplying a policy when no group has been added to a target OU has no impact.
- If you add a group to a target OU of a policy that is currently active, you must reapply it to extend the policy to that group.
- When you reapply a policy after its effective dates, it has no impact.
Example: Let’s assume a policy is active from Jan. 20-31. Reapplying it on Feb 1 will have no impact.\
NOTE: When you move a group from a target OU in a policy (OUA) to an OU that is not the target of any policy (OUB), the policy applied to the group in OUA will continue to apply to till its end date.
To reapply a policy:
- In Admin Center, click Identity Stores in the left pane.
- On the Identity Stores page, click the ellipsis button for an identity store and select Edit.
- Click Configurations under Settings in the left pane. Then click Membership Life Cycle.
- On the Group/OU Based Membership Life Cycle page, click the ellipsis button for a policy and select Reapply.
- On the Reapply Membership Lifecycle Policy dialog box, click Yes to reapply the policy to the target groups’ new and existing members or No to close the dialog box without reapplying the policy.
- Click Save.
Delete a Policy
Deleting a membership lifecycle policy has the following impact:
- When a policy is deleted before or after its effective dates, it has no impact.
- When a policy is deleted during its effective dates, all members of the target groups and those of groups in the target OUs become permanent members of the respective groups.
To delete a policy:
-
In Admin Center, click Identity Stores in the left pane.
-
On the Identity Stores page, click the ellipsis button for an identity store and select Edit.
-
Click Configurations under Settings in the left pane. Then click Membership Life Cycle.
-
On the Group/OU Based Membership Life Cycle page, click the ellipsis button for a policy and select Delete.
-
The Delete Membership Lifecycle Policy message box is displayed.
- On clicking Yes, all members of the target groups and those of groups in the target OUs become permanent members of the respective groups and the policy is deleted.
- On clicking No, the policy is not deleted and continues to apply to the target groups and OUs.
-
Click Save.
See Also
Configure a Messaging Provider
GroupID can create email addresses for mail-enabled objects (groups, users, and contacts) with any mailing system. It can be an Exchange Server (2013/2016/2019) deployed in your environment or an external email provider such as Exchange Online and Office 365.
GroupID supports the following messaging providers:
- Microsoft Exchange 2013/2016/2019
- Office 365
- Google Workspace
- Other external providers, such as Exchange Online, Office 365, Yahoo, Gmail, and Google Groups
When a messaging provider is not available in your environment or you want to restrict the creation of mail-enabled objects in the identity store, select the None option.
Exchange Server Priority
In environments that run multiple versions of Microsoft Exchange, GroupID enables you to set Exchange Server priority. All messaging provider-related actions will reiterate on Exchange servers according to priority.
Let’s assume you have an environment with:
- Active Directory 2012
- Exchange 2013 with two servers: ExchA and ExchB, where you set Exchange server priority as ExchB and ExchA
When you create a mail-enabled group using GroupID, it will be created in Active Directory first. Messaging provider-related configurations will go to ExchB. In case of failure, the system will reiterate the same action on ExchA.
What do you want to do?
- Set Microsoft Exchange as Messaging Provider
- Set Office 365 as Messaging Provider
- Set Google Workspace as Messaging Provider
- Set an External Provider to Create Email Addresses
- Do Not Set a Messaging Provider
Set Microsoft Exchange as Messaging Provider
Follow the steps to set Microsoft Exchange as a messaging provider.
Step 1 – In the Admin Center, click Identity Stores in the left pane.
Step 2 – On the Identity Stores page, click the ellipsis button for an identity store and select Edit.
Step 3 – Click Configurations under Settingsin the left pane. Then click Messaging System. The Messaging System page is displayed.
Step 4 – In the Messaging Provider drop-down list, select the Exchange version that you want to use.
Step 5 – Enter the domain name where the mail server resides in the Domain name box.
Step 6 – Enter the username and password of an authorized user account on the mail server in the Username and Password boxes.
Step 7 – The Server Name column in the Server Status & Priority area lists the mail servers in the environment. GroupID randomly assigns the highest priority to a server. You can change its priority level and set the priority for other servers..
Step 8 – If your required server is not listed, click Sync Again.
- In the Server Status & Priority section, select the check box for the server you want to specify or change the priority for. GroupID checks the availability of the server and displays its status as Online (available) or Offline (unavailable) in the Status column.
- In the Priority box, select a priority level for the server, with ‘1’ representing the highest priority.
Step 9 – Click Save.
Set Office 365 as Messaging Provider
Follow the steps to set Office 365 as a messaging provider.
Step 1 – In Admin Center, click Identity Stores in the left pane.
Step 2 – On theIdentity page, click the ellipsis button for an identity store and select Edit.
Step 3 – Click Configurations under Settings in the left pane. Then click Messaging System.
Step 4 – On theMessaging System page, select Office 365 in the Messaging Provider drop-down list.
Step 5 – From the Cloud drop-down list, select the cloud where your Microsoft Entra ID tenant exists.
Step 6 – Enter the domain name configured for Office 365 in the Domain name box.
Step 7 – In the ApplicationID box, enter the application ID assigned to the GroupID application when you registered it in Microsoft Entra Admin Center.
Step 8 – In the Client box, provide the client secret value generated against the certificate uploaded to Microsoft Entra Admin Center while registering the GroupID application.
Step 9 – Specify the path to the PFX certificate in the PFX Certificate box. For that, click
Choose File and browse for the file. Select it and click Open.
As a prerequisite, the PFX certificate must be generated on the GroupID server and exported to this
machine for upload.
Step 10 – In the PFX Certificate Password box, enter the password that was created while exporting the PFX certificate.
Step 11 – In the Server Status & Priority area, the Server Name box displays the name of the
mail server; the priority option does not apply to it. GroupID checks the availability of the server
and displays its status as Online (available) or Offline (unavailable) in theStatus column.
If the server is not listed, click Sync Again.
Step 12 – Click Save.
NOTE: When Office 365 is configured as the messaging provider for an Active Directory identity store, GroupID creates distribution groups but does not populate their membership in Office 365. Use AD Connect or any directory synchronize tool to replicate information (such as membership info) between on-premises AD and Office 365.
Set Google Workspace as Messaging Provider
Follow the steps to set a Google Workspace as a messaging provider.
Step 1 – In Admin Center, click Identity Stores in the left pane.
Step 2 – On the Identify Storespage, click the ellipsis button for an identity store and select Edit.
Step 3 – Click Configurations under Settings in the left pane. Then click Messaging System.
Step 4 – On the Messaging System page, select Google Workspace in the Messaging Provider drop-down list.
Step 5 – In theService Account box, enter the service account name assigned to you when you created your Google Workspace account.
Step 6 – Enter the username of an authorized user on the messaging provider in the Admin Username box.
Step 7 – Specify the path to the p12 key file in the P12 Certificate box.
Click Choose File and browse for the file. Select the file and click Open.
As a prerequisite, you must generate the p12 key file for your account in Google Cloud Console and
download it.
Step 8 – In the Server Status & Priority area, the Server Name box displays the name of the mail
server; the priority option does not apply to it. GroupID checks the availability of the server and
displays its status as Online (available) or Offline (unavailable) in the Status column.
If the server is not listed, click Sync Again.
Step 9 – Click Save.
Set an External Provider to Create Email Addresses
Follow the steps to set an external provider to create email addresses.
Step 1 – In Admin Center, click Identity Stores in the left pane.
Step 2 – On the Identity Stores page, click the ellipsis button for an identity store and select Edit.
Step 3 – Click Configurations under Settings in the left pane. Then click Messaging System.
Step 4 – On the Messaging System page, select Other in the Messaging Provider drop-down list.
Step 5 – In the Domain Name box, enter the domain name of the external email provider, for example, googlegroups.com.
Step 6 – In the Maximum Length Allowed for Email Alias box, specify the maximum number of characters that an email alias can contain.
Step 7 – Enter a regular expression in the Email Alias Regular Expression box; the email alias
created in the external provider must satisfy this regular expression.
Follow these links for information about regular expressions and their syntax:
Step 8 – In the Enter Example to Validate Regular Expression box, enter an email alias as an example, and then click Validate to verify that the example satisfies the regular expression.
Step 9 – Click Save.
Do Not Set a Messaging Provider
Follow the steps to not set a messaging provider.
Step 1 – In Admin Center, click Identity Stores in the left pane.
Step 2 – On the Identity Stores page, click the ellipsis button for an identity store and select Edit.
Step 3 – Click Configurations underSettings in the left pane. Then click Messaging System.
Step 4 – When no messaging provider is available in your environment or you want to prevent users from creating mail-enabled objects in the identity store, select None in the Messaging Provider drop-down list.
Step 5 – Click Save.
See Also
Manage Group Membership Settings
GroupID enables you to update group membership in the following ways:
- Add members manually (only recommended for static groups)
- Auto update Smart Groups and Dynasties using a Smart Group Update schedule.
- Import members using an external data source
To avoid large, unforeseen changes to Smart Group and Dynasty memberships, you can configure the following group membership setting for an identity store:
- Specify the maximum number of members for Smart Groups and Dynasties. Then determine the action to take when the member limit is exceeded, such as not to update or break the membership into smaller, nested groups.
- Define a criterion for out-of-bounds exceptions to raise alerts for group owners.
What do you want to do?
Set the Maximum Number of Group Members
You can set the maximum membership limit for groups and set GroupID to do one of the following when an update to a group breaches this limit.
-
Not to update the group membership, thereby retaining the old membership.
Or
-
Create nested groups to accommodate membership. Nested groups are created as sub-groups of the group being updated. This simplifies permissions by allowing sub-groups to inherit permissions from the parent group.
Example:
Let’s assume you set the maximum membership limit to 500 and opt for nested groups when membership exceeds this limit.
Scenario 1: On update, 485 objects are fetched to be added to Group A’s membership. Since the count is less than 500, the objects are directly added as group members.
Scenario 2: On the next update, 620 objects are fetched to be added to Group A’s membership. Since the count exceeds 500, it breaks the membership into 2 child groups (Group 1 with 500 members and Group 2 with 120 members) and nests them into Group A. Hence, GroupID checks the member count and takes necessary action before adding members to the group.
NOTE: In case of an Office 365 group, the option to break the membership into child groups has the following impact - An Office 365 group (Group A) will be updated according to the Smart Group update process. However, when the maximum membership limit is hit, the update process will create child group(s) and try to add them as members of Group A. Since an Office 365 group cannot have groups as members, Group A’s membership will be empty. The child groups will continue to exist but without any link to Group A.
To set group membership limits:
-
In Admin Center, click Identity Stores in the left pane.
-
On the Identity Stores page, click the ellipsis button for an identity store and select Edit.
-
Click Configurations under Settings in the left pane. Then click Out of Bounds.
-
In the Maximum membership per group box on the Out of Bounds page, enter the number of maximum members that a Smart Group or Dynasty can contain.
-
Select one of the following options for When threshold reached:
- Do not update: to prevent any action when the maximum membership limit is hit on update. As a result, the group will not be updated and will retain its old membership.
- Nest into child groups: to create nested child groups when the maximum membership limit is reached. Each nested group, in turn, cannot have more than the maximum number of members specified. Nested groups are displayed in GroupID as members of the parent group.
-
Click Save.
Manage Orphan Nested Groups
An orphan nested group is one that has its relationship cut-off from the parent group, since this orphan group has no members to bind it to the parent group.
This may happen, for example, when the membership of a group decreases, or the maximum membership limit is increased. As a result, when group membership is updated, members from one or more nested child groups are emptied, leaving the nested groups orphan.
You can choose to delete or retain the orphan nested groups in the identity store.
To delete orphan nested groups:
- In Admin Center, click Identity Stores in the left pane.
- On the Identity Stores page, click the ellipsis button for an identity store and select Edit.
- Click Configurations under Settings in the left pane. Then click Out of Bounds.
- On the Out of Bounds page, select the Delete orphan nested groups check box to delete
nested groups that become orphan on membership update.
To retain orphan nested groups, do not select the check box. - Click Save.
Set a Group Update Threshold
Out-of-bounds exceptions prevent large, unforeseen membership changes to groups. When an out-of-bounds exception occurs, GroupID does not update group membership and notifies the intended recipient(s) by email. If they deem the change as valid, they can update the group manually in the GroupID portal.
NOTE: 1. Settings in the Threshold section apply in case of membership update through a Smart
Group Update schedule. On manual update, these settings have no impact.
2. If the group is not updated manually after an out-of-bounds exception, the changes remain
pending and the group will not be updated in future when the Smart Group Update job runs.
3. Out-of-bounds exception notifications are sent as per notification settings configured for the
Smart Group Update schedule responsible for updating the respective group.
To set a group update threshold:
-
In Admin Center, click Identity Stores in the left pane.
-
On the Identity Stores page, click the ellipsis button for an identity store and select Edit.
-
Click Configurations under Settings in the left pane. Then click Out of Bounds.
-
On the Out of Bounds page, use the toggle button for Do not update and alert to monitor out-of-bounds exceptions in group memberships and enable alerts in case an out-of-bounds exception occurs.
-
Provide values for the following:
-
In the Percent change in membership exceeds box, enter a percentage of membership change that, when exceeded, raises an out-of-bounds exception.
Membership change is the difference between new membership and the existing membership. Percentage change in membership is calculated by the following formula:
(newMemberCount - oldMemberCount) x 100 / oldMemberCountLet’s assume you specify 20 in this field. When group membership changes by 20% or more, GroupID considers it as an exception.
So, if Group A has 500 members and 200 new members are to be added, the formula will be as
(newMemberCount - oldMemberCount) x 100 / oldMemberCount
(700-500) x 100 / 500 = 40Since 40 is greater than 20, GroupID treats it as an out-of-bounds exception.
-
In the And either current or new membership exceeds box, type the number of current or new memberships. If the current or new membership of a group is equal or less than the specified number, GroupID does not raise an out-of-bounds exception for the group, even when the change percentage is exceeded. This allows you to ignore changes to small groups.
For example, you set the change percentage to 20 and specify 25 in the And either current or new membership exceeds box. It works as follows:
- For current (existing) membership - When the existing membership of a group is equal or less than 25, GroupID does not trigger out-of-bounds for this group when the change percentage is exceeded (is greater than 20). For example, adding 3 new members to a group of 10 members would not trigger an exception. GroupID will ignore the change percentage and update the group.
- For new membership - When, say 12 new members are added to a group with 10 existing members, the new membership reaches 22, which is less than 25. Even though the change percentage is exceeded, GroupID will not raise an exception and update group membership.
-
-
Click Save.
See Also
Set Group Name Prefixes
You can standardize group names in the directory by defining prefixes. When users create groups using the GroupID portal, they must select a prefix, which is added to the group’s name and display name.
NOTE: The Group Name Prefixes policy does not apply when a user creates a group using GroupID Management Shell.
You can define group name prefixes (a) for an identity store, (b) for security roles in an identity store, or (c) both at the identity store and role levels.
- Prefixes defined for an identity store are available to all security roles in an identity store. When creating a group, users must select a prefix to append the group’s name.
- Prefixes defined for a security role are available to role members only. You can enforce members to select a role-specific prefix to append a group’s name while creating a group. Role-specific prefixes help distinguish between groups created by different roles.
- When prefixes are defined at both the identity store and role levels, both sets of prefixes are available to role members in a single drop-down list. Role members can select any prefix to append a group’s name. However, when prefixes are enforced at the role level, role members can only select a role-specific prefix to append a group’s name.
NOTE: (1) For a user with multiple roles, prefixes for all roles are displayed when creating or
updating groups.
(2) If prefixes are enforced for the highest priority role of a user, he or she must select a prefix
from the list of prefixes defined for this highest priority role.
(3) If prefixes are enforced for a role other than the highest priority role of a user, enforcement
does not apply to him or her.
Consider the following:
- For existing groups, the prefix option is available for unmanaged groups (and not for Smart Groups and Dynasties). A user can choose to add a prefix to the group name in group properties. Once added, it cannot be removed.
- For managed groups (Smart Groups and Dynasties), prefixes can only be added while creating a group and cannot be changed or removed later.
A group naming policy defined in Microsoft Entra Admin Center has no impact in GroupID. For details, see the Group Naming Policy topic.
What do you want to do?
Add a Prefix for an Identity Store
- In Admin Center, click Identity Stores in the left pane.
- On the Identity Stores page, click the ellipsis button for an identity store and select Edit.
- Click Configurations under Settings in the left pane. Then click Group Name Prefixes.
- On the Group Name Prefixes page, type a prefix in the box displayed at the top and click Add. The prefix is displayed in the Group Name Prefix area.
- Click Save.
Edit a Prefix
- On the Group Name Prefixes page, click Edit for a prefix and update it. Then click the check mark icon to save or the cross icon to discard your changes.
- Click Save.
The change does not propagate to group names that have already been created with the prefix.
Delete a Prefix
- On the Group Name Prefixes page, click Remove for a prefix to delete it.
- Click Save.
Deleting a prefix has no impact on group names that have already been created with it.
Add a Prefix for a Security Role in an Identity Store
- In Admin Center, click Identity Stores in the left pane.
- On the Identity Stores page, click the ellipsis button for an identity store and select Edit.
- Click Security Roles under Settings in the left pane.
- On the Security Roles page, click Edit for a security role.
- On the Edit Security Role page, click Specify policies for the members in the Policies area.
- On the Add Policies pane, click the Group Name Prefixes tab.
- Refer to step 4 and onwards in the Add a Prefix for an Identity Store topic to add, edit, or delete a group name prefix for a security role.
- Select the Enforce Prefix check box to make it mandatory for role members to select a role-specific prefix to append group names while creating groups.
- Click OK.
- On the Edit Security Role page, click Update Security Role.
- On the Security Roles page, click Save.
See Also
Configure User Profile Validation
The profile validation process in GroupID is designed to ensure the accuracy of users’ information in the directory.
When you apply profile validation to a group, all group members must verify and update their profile information in the directory using the GroupID portal or the GroupID mobile app. You must also specify a profile validation life cycle period (for example, 90 days), so that each member must validate his or her profile once during each 90-day cycle.
Additionally, you can choose to specify a different profile validation period for new users. Once a new user validates his or her profile within this period, the regular profile validation cycle applies.
By default, a few attributes (fields) are available in the GroupID portal and the mobile app for profile validation. You can add and remove fields as required. See the Manage Property Validation Attributes topic.
What can Users do While Validating their Profiles?
When performing profile validation, a user can:
-
Update his or her directory profile
-
Change his or her primary manager - When a user changes his or her primary manager (Manager A), then Manager A and the user’s additional managers are notified through email to accept or reject the request. If any of them accepts it, the user’s manager is changed. If any approver rejects it, the user remains with Manager A.
NOTE: This is the default flow of the change manage workflow for the identity store. If the administrator disables the workflow or changes the approver, the flow changes accordingly.
-
Transfer his or her direct reports to another manager - When a user transfers his or her direct report, the new manager is notified by email to accept or reject the transfer. If the manager accepts it, the direct report is transferred to him or her. If the manager rejects the transfer, the direct report remains with the old manager.
NOTE: This is the default flow of the transfer a user workflow for the identity store. If the administrator disables the workflow or changes the approver, the flow changes accordingly.
-
Terminate his or her direct reports - When a user terminates his or her direct report, it takes effect immediately when the terminate a user workflow is disabled. If enabled, a request is sent to the approver. If the approver accepts it, the direct report is terminated and if the approver rejects it, the direct report remains with the manager.
For workflows in an identity store, see the System Workflows topic.
What Happens When Users do not Validate their Profiles?
Periodically, users receive reminder emails to validate their profile. GroupID expires the users who ignore these reminders and do not validate their profiles within the required time. Consequently, their accounts get disabled.
Expired users can request the administrator or helpdesk to unlock their accounts temporarily and grant an extension period. If they do not validate their profile within that extension period either, GroupID expires them again and notifies their managers by email. To reactivate these accounts, users’ managers must send a request to the helpdesk.
To identify user accounts that are disabled for not validating their profiles, see the Identify User Accounts Expired due to Non-Profile Validation topic.
The User Life Cycle Schedule
The User Life Cycle schedule monitors the profile validation function in GroupID. It:
- Monitors the profile validation dates for users.
- Generates reminder emails, if reminder notifications settings are applied.
- Expires (disables) users who do not validate their profiles within the given period.
- Marks user accounts that are disabled due to profile non-validation, provided that the ‘Profile Validation Attribute’ setting is applied.
- Deletes the profile validation date if it is x number of days old, provided that the ‘Clear the validation data for disabled users, x number of days after they are disabled’ setting is applied.
What do you want to do?
- Specify a Group for Profile Validation
- Set a Profile Validation Life Cycle Period
- Specify a Profile Validation Period for New Users
- Specify a Duration for the Extension Period
- Specify Reminder Notification Settings
- Identify User Accounts Expired due to Non-Profile Validation
- Apply Settings to Clear the Validation Date
Specify a Group for Profile Validation
By default, profile validation is not enabled for an identity store, and therefore does not apply to any user.
You can apply profile validation to a directory group. As a result, all group members will be required to validate their profiles. Only one group can be specified at a time.
To specify a group:
-
In Admin Center, click Identity Stores in the left pane.
-
On the Identity Stores page, click the ellipsis button for an identity store and select Edit.
-
Click Configurations under Settings in the left pane. Then click Profile Validation.
-
On the Profile Validation page, use the Search for the Criteria box to search and specify a group.
-
Type a search string in the box. GroupID displays all groups with names that start with the string. Click Select for a group to select it for profile validation.
Or
-
Click Advanced to search a group by different parameters, such as name, display name, and description. Enter a search string and click Search. Groups matching the string are displayed. Select the required group.
The selected group is displayed in the Search for the Criteria box. Members of this group have to validate their profiles according to the settings you configure on the Profile Validation page.
To preview group members:
- To view the members of the selected group, click Preview.
To remove the group:
- To remove the selected group, click Remove for it.
-
-
Click Save.
Set a Profile Validation Life Cycle Period
By default, the profile validation life cycle period is set to 90 days, which means that users must validate their profiles once during each cycle of 90 days. When a user validates his or her profile, the current cycle ends and the next cycle starts for him or her.
The User Life Cycle schedule monitors the profile validation dates for users; it expires users who do not validate their profiles within the given period.
To specify a life cycle period:
- In Admin Center, click Identity Stores in the left pane.
- On the Identity Stores page, click the ellipsis button for an identity store and select Edit.
- Click Configurations under Settings in the left pane. Then click Profile Validation.
- In the User Profile Validation Lifecycle box on the Profile Validation page, type the
number of days to set as the profile validation life cycle period.
If this number of days is less than the days set for any of the reminders configured in the Reminder Notification Settings area, GroupID removes that reminder from the list. - Click Save.
Specify a Profile Validation Period for New Users
Apart from the regular profile validation life cycle, GroupID enables you to set a separate profile validation period for newly found user objects (by way of newly created objects or by way of disabled object enabled again) in the directory.
For new users, you can specify a certain number of days, say 30, to serve as the first profile validation life cycle period. New users receive a welcome email and a profile validation request, directing them to validate their profiles for the first time within the given number of days. Once they validate their profiles, the regular profile validation life cycle settings would apply to them.
To specify a profile validation period for new users:
- In Admin Center, click Identity Stores in the left pane.
- On the Identity Stores page, click the ellipsis button for an identity store and select Edit.
- Click Configurations under Settings in the left pane. Then click Profile Validation.
- On the Profile Validation page, use the toggle button next to the New Object Profile Validation Lifecycle box to enable a separate profile validation life cycle for new users.
- In the New Object Profile Validation Lifecycle box, specify a certain number of days to set as the profile validation period. New users must validate their profiles within this period. If they fail to do so, their accounts will be disabled.
- Click Save.
Specify a Duration for the Extension Period
Using the GroupID portal, the administrator or helpdesk can grant an extension period to users who have been expired due to non-profile validation. If users do not validate their profile within the extended period, GroupID disables them again, and an email notification is sent to their managers.
On the Profile Validation page, you can specify the duration of the extension period in days.
To set the extension period:
- In Admin Center, click Identity Stores in the left pane.
- On the Identity Stores page, click the ellipsis button for an identity store and select Edit.
- Click Configurations under Settings in the left pane. Then click Profile Validation.
- In the Extension Period box on the Profile Validation page, specify the number of days
that will be granted as extension period to expired users.
By default, the extension period is set to four days. You can extend it to seven days. - Click Save.
Specify Reminder Notification Settings
By default, three email notifications are sent to a user, precisely 30, 21 and 14 days before the profile validation period ends. These notifications serve as reminders, directing users to validate their profiles. The final reminder is sent to the user and the user’s manager.
You can change the number of reminders to be sent along with their Before # of Days value. The User Life Cycle schedule sends reminder notifications to users according to the specified settings.
For email notifications, an SMTP Server must be configured for the identity store. See the an Configure an SMTP Server topic.
To set a new reminder:
-
In Admin Center, click Identity Stores in the left pane.
-
On the Identity Stores page, click the ellipsis button for an identity store and select Edit.
-
Click Configurations under Settings in the left pane. Then click Profile Validation.
-
In the Reminder Notification Settings area, click Add Reminder.
-
On the Add Reminder dialog box, provide a name for the reminder in the Reminder Name box.
-
Enter a value in the Before Number of Days box. The reminder is sent to the user when x number of days are left for the profile validation period to end. For example, if you enter 5, the reminder will be sent five days before the profile validation period ends.
-
Click Add.
Edit a reminder:
- In the Reminder Notification Settings area, click Edit for a reminder.
- On the Edit Reminder dialog box, update the name and before no. of days setting for the reminder.
- Click OK.
Remove a reminder:
- In the Reminder Notification Settings area, click Remove for a reminder to remove it.
-
On the Profile Validation page, click Save.
Identify User Accounts Expired due to Non-Profile Validation
User accounts in an identity store may get disabled for various reasons, such as when the administrator disables a user in the directory or when the User Life Cycle schedule expires a user account because the user did not validate his or her directory profile during a given period.
To identify users that are disabled by the User Life Cycle schedule, the administrator can apply the Profile Validation Attribute setting. This setting requires the administrator to select a schema attribute and specify a string as its value.
- When the User Life Cycle schedule expires a user, it sets the given string as the attribute’s value for the user.
- For active users or those disabled for a different reason, this attribute does not have the specified string as value.
When the administrator or a helpdesk user extends the profile validation period for a disabled user, the string value is cleared and the attribute is empty again.
The administrator can access the directory server to check whether the string value is set for the attribute. For example, he or she can use a standard Microsoft-based Active Directory tool to view the attribute’s value either natively in the given propertysheet options or via the ADSI property sheet shell extension.
To designate an attribute with a value:
- In Admin Center, click Identity Stores in the left pane.
- On the Identity Stores page, click the ellipsis button for an identity store and select Edit.
- Click Configurations under Settings in the left pane. Then click Profile Validation.
- On the Profile Validation page, use the toggle button for Set an attribute that will be updated with the desired value for users that are expired due to non-profile validation to enable the attribute value setting.
- Select a schema attribute in the Attribute drop-down list and specify a string as value for
it in the Desired Value box.
When the User Life Cycle schedule expires a user who does not validate his or her profile within the given period, it also sets the attribute’s value to the specified string for that user. - Click Save.
Apply Settings to Clear the Validation Date
The administrator can specify an x number of days for the ‘Clear the validation data for disabled users, x number of days after they are disabled’ setting. The User Life Cycle schedule scans all disabled users and if x number of days have passed since the last validation date, it clears the validation date.
This setting is required for a potential rehire scenario, in which case the user will be treated as a newly created object and the validation process for new users will apply to it.
To apply the setting:
- In Admin Center, click Identity Stores in the left pane.
- On the Identity Stores page, click the ellipsis button for an identity store and select Edit.
- Click Configurations under Settings in the left pane. Then click Profile Validation.
- On the Profile Validation page, use the toggle button for Clear the validation data for disabled users, x number of days after they are disabled to enable the clear validation date setting.
- In the After number of Days box, specify a certain number of days, say 60. The User Life
Cycle schedule scans all disabled users and if 60 days have passed since the last validation
date, it clears the validation date.
If you specify zero (0), the schedule clears the validation date as soon as it expires the user. - Click Save.
See Also
- User Life Cycle Schedule
- Manage Property Validation Attributes (for the GroupID portal)
- Manage Property Validation (for the GroupID mobile app)
Configure Password Options
You can define the following password restrictions and rules for an identity store:
- Specify restricted passwords
- Define regular expressions for allowed passwords
- Specify disallowed passwords using an external file
When identity store users reset or change their passwords using GroupID, their new passwords must adhere to the defined rules.
NOTE: (1) These password configurations do not apply when helpdesk users reset passwords of
end-users.
(2) In case a user has linked his or her accounts in different identity stores, the password
configurations for the master account apply.
In addition to these password restrictions, you can define a password policy for a security role in an identity store. See the Set a Password Policy topic.
What do you want to do?
- Define Restricted Passwords
- Specify Regular Expressions for Allowed Passwords
- Specify Disallowed Passwords Using an External File
Define Restricted Passwords
You can specify certain strings of text that users cannot use as passwords or part of passwords. You can also specify regular expressions to prevent users from creating passwords that match the expression.
To restrict passwords:
-
In Admin Center, click Identity Stores in the left pane.
-
On the Identity Stores page, click the ellipsis button for an identity store and select Edit.
-
Click Configurations under Settings in the left pane. Then click Password Options.
-
In the Password Exception area on the Password Options page, click Add Password Exception.
-
On the Add New Password Exception dialog box, select an operator in the Type drop down list.
- Equals: passwords that match the value you specify in the Exception Value box are not allowed.
- Starts with: passwords that start with the value you specify in the Exception Value box are not allowed.
- Ends With: passwords that end with the value you specify in the Exception Value box are not allowed.
- Contains: passwords that contain the value you specify in the Exception Value box are not allowed.
- Regular Expression: passwords that satisfy the regular expression you specify in the Exception Value box are not allowed. See the What are Regular Expressions? topic to learn about regular expressions and their syntax.
-
Type a value for the selected operator in the Exception Value box.
-
Click OK.
-
Follow steps 4 to 7 to define as many exceptions as required. All exceptions are treated as password restrictions.
To remove a password restriction:
- In the Password Exception area, click Remove for a restriction or rule to remove it.
- To remove all restrictions, click Remove All.
-
Click Save on the Password Options page.
Specify Regular Expressions for Allowed Passwords
By specifying regular expression(s) for allowed passwords, you ensure that passwords created by users follow certain rules and patterns.
To specify a regular expression:
-
In Admin Center, click Identity Stores in the left pane.
-
On the Identity Stores page, click the ellipsis button for an identity store and select Edit.
-
Click Configurations under Settings in the left pane. Then click Password Options.
-
In the Password Rules area on the Password Options page, click Add Password Rule.
-
On the Add Rules dialog box, type a regular expression in the Regular Expression box.
See the What are Regular Expressions? topic to learn about regular expressions and their syntax. -
Click OK. The regular expression is displayed in the In the Password Rules area.
-
Follow steps 4 to 6 to define as many regular expressions as required. Passwords that satisfy any of the regular expressions are allowed.
To remove a regular expression:
- In the Password Rules area, click Remove for a regular expression to remove it.
- To remove all regular expressions, click Remove All.
-
Click Save on the Password Options page.
Specify Disallowed Passwords Using an External File
A simple way of preventing users from using certain words or strings as passwords is to add those restricted passwords to a .csv or .txt file and upload it to GroupID.
To upload the file:
- In Admin Center, click Identity Stores in the left pane.
- On the Identity Stores page, click the ellipsis button for an identity store and select Edit.
- Click Configurations under Settings in the left pane. Then click Password Options.
- On the Password Options page, select the Check for disallowed passwords from imported file check box in the Import Disallowed Password List area to enable file upload.
- Click Import to browse and select the file (.csv, .txt) containing the disallowed passwords.
- Click Save on the Password Options page.
NOTE: Only a single file containing disallowed passwords can be imported for an identity store; importing another file will replace the existing one.
See Also
Second Way Authentication - SWA
You can configure second way Authentication (SWA) to allow unenrolled users to access the following functions in the GroupID portal and the GroupID mobile app:
- Account unlock
- Password reset
SWA allows only one-time access to these functions. Users must enroll their identity store accounts in GroupID to use the stated functions again.
SWA can authenticate unenrolled users through:
- Security questions
- Mobile
Configuring these types for second way authentication is different from configuring the same authentication types for multifactor and second factor authentication. For second way authentication, you have to link an authentication type to a schema attribute. When resetting account passwords or unlocking accounts using the GroupID portal or the mobile app, the value provided by the user for an authentication type is matched to the value of the linked attribute in the directory. If it matches, authentication is successful, and the user can perform the required action in the portal or the app.
For example, link the Email type with the mail attribute. When an unenrolled user tries to reset the account password, he or she must provide the verification code sent to his or her email address. On providing the right code, he or she can proceed with the operation.
Second way authentication is disabled by default for an identity store. To facilitate users to avail it, you must enable one or more authentication types.
What do you want to do?
- Enable Second Way Authentication Via Security Questions
- Enable Second Way Authentication via Mobile
- Enable Second Way Authentication via Email
- Enforce Users to Authenticate Using x Number of SWA Types
Enable Second Way Authentication Via Security Questions
-
In Admin Center, click Identity Stores in the left pane.
-
On the Identity Stores page, click the ellipsis button for an identity store and select Edit.
-
Click Configurations under Settings in the left pane. Then click Second Way Authentication.
-
On the Second Way Authentication page, use the toggle button for Enable Second Way Authentication via Security Questions to enable it.
-
Click Add Security Question.
-
On the Add New Security Question dialog box, type your question in the Question box.
-
In the Attribute drop-down list, select a schema attribute to map to this question.
-
Click OK.
For successful authentication, the answer a user provides for the security question must match the value of the linked attribute.To edit or remove a security question:
- In the Enable Second Way Authentication via Security Questions area, click Remove for a question to remove it.
- To remove all questions, click Remove All.
- To change the question text or link it to a different schema attribute, click Edit for it.
-
Click Save on the Second Way Authentication page.
Enable Second Way Authentication via Mobile
-
In Admin Center, click Identity Stores in the left pane.
-
On the Identity Stores page, click the ellipsis button for an identity store and select Edit.
-
Click Configurations under Settings in the left pane. Then click Second Way Authentication.
-
On the Second Way Authentication page, use the toggle button for Enable Second Way Authentication via Mobile to enable it.
NOTE: If an SMS gateway account is not linked with the identity store, Configure Now is displayed in place of the toggle button. Click it to go to the SMS Authentication page, where you can link an SMS gateway account with the identity store. See the Link an SMS Gateway Account to an Identity Store topic.
-
In the Mobile Attribute drop-down list, select an attribute that stores mobile numbers in the directory.
For authentication via mobile, a verification code is sent to the user’s mobile number. The user has to enter the code in GroupID for authentication. -
Click Save.
Enable Second Way Authentication via Email
-
In Admin Center, click Identity Stores in the left pane.
-
On the Identity Stores page, click the ellipsis button for an identity store and select Edit.
-
Click Configurations under Settings in the left pane. Then click Second Way Authentication.
-
On the Second Way Authentication page, use the toggle button for Enable Second Way Authentication via Email to enable it.
NOTE: If an SMTP server is not defined for the identity store, Configure Now is displayed in place of the toggle button. Click it to go to the Notifications page for configuring an SMTP server. See the Configure an SMTP Server topic.
-
In the Email Attribute drop-down list, select an attribute that stores email addresses in the directory.
For authentication via email, a verification code is sent to the user’s email address. The user has to enter the code in GroupID for authentication. -
Click Save.
Enforce Users to Authenticate Using x Number of SWA Types
You can enforce users to authenticate with one, two, or all three SWA types.
When the enforced number of authentication types is less than the enabled types, (such as when you have enabled all three SWA types and enforce users to authenticate with two), users can choose the type(s) they want to use for authentication.
To enforce SWA types:
- In Admin Center, click Identity Stores in the left pane.
- On the Identity Stores page, click the ellipsis button for an identity store and select Edit.
- Click Configurations under Settings in the left pane. Then click Second Way Authentication.
- On the Second Way Authentication page, enter a number in the Authentication Factor (chosen by the end user) box. This number must be equal or less than the enabled SWA authentication types. Users must use these x number of types for second way authentication.
- Click Save.
See Also
Manage the Local Question Pool
When you create a new identity store, four questions from the global question pool are added to the identity store’s local pool by default. A local pool is maintained individually by each identity store. You can modify a local pool by (a) adding questions from the global question pool, (b) adding questions of your choice (questions that are not in the global pool), and (c) by removing questions from it.
To enroll using security questions, identity store users must select a certain number of questions from the local pool and provide answers.
What do you want to do?
- Add a Question to the Local Pool from the Global Pool
- Add a Question of your Choice to the Local Pool
- Remove a Question from the Local Pool
Add a Question to the Local Pool from the Global Pool
- In Admin Center, click Identity Stores in the left pane.
- On the Identity Stores page, click the ellipsis button for an identity store and select Edit.
- Click Configurations under Settings in the left pane. Then click Security Questions.
- On the Security Questions page, click in the box at the top and select a security question from the list of global security questions. You can also type a search string to filter the questions containing the string. After selecting a question, click Add. The question is added to the Questions list.
- Click Save.
Add a Question of your Choice to the Local Pool
- In Admin Center, click Identity Stores in the left pane.
- On the Identity Stores page, click the ellipsis button for an identity store and select Edit.
- Click Configurations under Settings in the left pane. Then click Security Questions.
- On the Security Questions page, click in the box at the top and type a security question. Then click Add. The question is added to the Questions list.
- Click Save.
Remove a Question from the Local Pool
- In Admin Center, click Identity Stores in the left pane.
- On the Identity Stores page, click the ellipsis button for an identity store and select Edit.
- Click Configurations under Settings in the left pane. Then click Security Questions.
- On the Security Questions page, click Remove for a security question to remove it from the local pool. To remove all questions, click Remove All.
- Click Save.
Deleting a question does not impact the users currently enrolled with the question.
See Also
SMS Authentication
To enable users to enroll and authenticate their identity store accounts using SMS, you must make sure that an SMS gateway account is linked with the identity store. Using this gateway account, GroupID sends confirmation codes to the users' mobile phone numbers for verification.
See the Manage SMS Gateway Accounts topic for creating and managing SMS gateway accounts.
What do you want to do?
- Enable SMS Authentication for an Identity Store
- Link an SMS Gateway Account to an Identity Store
- Enforce SMS Authentication for a Security Role
Enable SMS Authentication for an Identity Store
The SMS authentication type must be enabled for an identity store before users can use it for second factor authentication and multi-factor authentication.
To enable it, see the Enable Authentication Types topic.
Link an SMS Gateway Account to an Identity Store
- In Admin Center, click Identity Stores in the left pane.
- On the Identity Stores page, click the ellipsis button for an identity store and select Edit.
- Click Configurations under Settings in the left pane. Then click SMS Authentication.
- In the SMS gateway account drop-down list on the SMS Authentication page, select an SMS gateway account to link it with the identity store. If a default SMS gateway account is defined before the identity store was created, it is auto selected in this list.
- In the Text message box, modify the displayed message, except the [Code] placeholder.
This box displays the text that is sent to the users’ mobile phone numbers along with the confirmation code. GroupID randomly generates a confirmation code and inserts it into the [Code] placeholder. Users have to enter this code in GroupID for enrollment and authentication. - Click Save.
Enforce SMS Authentication for a Security Role
To enforce an authentication type, see the Authentication Policy for Security Roles topic.
Role members must use an enforced authentication type for multifactor authentication. When an authentication type is enabled but not enforced, role members can choose to use it for enrollment and authentication.
See Also
Configure an SMTP Server
An identity store requires an SMTP server for sending email notifications. It can be an Exchange server deployed in your environment or an external SMTP server; for example, Gmail or Office 365.
When configuring a provider that supports modern authentication, such as Exchange Online and Office 365, you have the option to use OAuth for modern authentication.
NOTE: With Microsoft Entra ID's mandatory multifactor authentication policy, basic authentication cannot be used for an Office 365 SMTP server. You can only use OAuth for modern authentication.
You can also specify notification recipients, that can be:
- individual recipients
- the user who makes a change to a directory object
- the directory object being modified
- group owners and user managers—a practice that does not require update when role assignments change
- owners of a public group on membership changes
- an object that is added to the membership of a group
- an object that is removed from the membership of a group
What do you want to do?
- Configure an SMTP Server
- Specify Notification Recipients
- Specify a Portal URL for Password Expiry Group Notifications
- Manage Membership Life Cycle Notifications
- Manage Managed by Life Cycle Notifications
Configure an SMTP Server
Follow the steps to configure an SMTP Server.
Step 1 – In Admin Center, click Identity Stores in the left pane.
Step 2 – On the Identity Stores page, click the ellipsis button for an identity store and select Edit.
Step 3 – Click Configurations under Settings in the left pane. Then click Notifications. The Notifications page is displayed.
Step 4 – In the SMTP Server section, enter the fully qualified domain name or IP address of the SMTP server in the SMTP Server box. Email notifications will be routed through this server.
Step 5 – Enter the email address to use for sending notifications in the From email address box.
Step 6 – Enter a port for communicating with the SMTP server in the Port box.
Step 7 – Select the SSL enabled check box if the SMTP server is SSL-enabled.
Set up user authentication
By default, the credentials of the user logged into Admin Center are used to connect to the SMTP
server. Hence, each user connects to the server in the context of the identity store and credentials
he or she has currently used to sign into Admin Center.
However, you may choose to specify a single account for connecting, in case your user accounts do
not have rights on the SMTP server or you want to use a dedicated account. Select the Use SMTP
user authentication check box. This enables the credentials options, where you can choose basic
authentication or OAuth; then provide the credentials of an authorized user account on the SMTP
server.
-
For basic authentication
- Select the Basic tile.
- Enter the username and password of an authorized user account on the SMTP server in the SMTP username and SMTP password boxes.
-
For modern authentication
OAuth settings are available when you specify a provider that supports modern authentication, such as Exchange Online and Office 365.
NOTE: For OAuth to work, you must enable the Graph API's 'SMTP.Send' permission for the GroupID app in Microsoft Entra Admin Center:
-
Click the OAuth 2.0 tile.
-
In the Token Endpoint box, provide the following URL:
https://login.microsoftonline.com/organizations/oauth2/v2.0/tokenNOTE: In case of Office 365 provider, you need to provide Graph Endpoint of your CloudType in the Token Endpoint box, for example, https://graph.microsoft.com/v1.0
-
In the Client ID box, provide the client ID assigned to the GroupID application when you registered it in Microsoft Entra Admin Center.
-
In the Client Secret box, provide the client secret value generated against the certificate uploaded to Microsoft Entra Admin Center while registering the GroupID application.
-
In the Scope box, provide the following URL:
https://outlook.office365.com/SMTP.SendNOTE: In case of Office 365 provider, provide name of the tenant the Scope box, for example, abcd.onmicrosoft.com
-
In the Username and Password boxes, provide the credentials to connect to the SMTP server.
NOTE: The user account used for SMTP Authentication for OAuth should have no MFA applied to it or have a conditional bypass for GraphAPI requests.
-
Test the connection
Step 8 – Click Test Server to check the server settings. In the Test Notification dialog box, enter an email address to receive the test notification, and click OK. A test email is sent to the provided email address using the configured SMTP settings.
Step 9 – Click Save on the Notifications page.
Specify Notification Recipients
Follow the steps to specify notfication recipients.
Step 1 – In Admin Center, click Identity Stores in the left pane.
Step 2 – On the Identity Stores page, click the ellipsis button for an identity store and select Edit.
Step 3 – Click Configurations under Settings in the left pane. Then click Notifications. The Notifications page is displayed.
Step 4 – In the To: and CC: boxes in the Recipients section, enter the email addresses of one or more notification recipients, separating multiple addresses with a semicolon (;). All email notifications generated for the identity store are sent to these recipients.
Step 5 – You can also select other recipients to send email notifications for different events. In the Also Notify area, select the required check boxes.
- Logged in users for their actions – To send email notifications to the logged-on user for changes they make to directory objects using Admin Center, GroupID portal, GroupID Management Shell, and the GroupID mobile app. This setting applies to mail-enabled users only.
- Object being modified – To send email notifications to the object (group, user, contact) being modified. In case of a group, all members are notified.
- Group ownser(s) for their groups To send email notifications to the primary and additional owners of groups about changes made to their respective groups.
- Manager(s) for their direct reports – To send email notifications to managers about changes made to their respective direct reports.
- Newly added group members on addition – To send email notifications to objects when they are added to the membership of a group.
- Removed group member on removal – To send email notifications to objects when they are removed from the membership of a group.
- Public group owner for membership – To send email notifications to the primary and additional owners of a public group on membership change. See the Group Security Types topic.
Step 6 – Click Save on the Notifications page.
Specify a Portal URL for Password Expiry Group Notifications
A password expiry Smart Group can be created using the GroupID portal. Its membership is limited to users whose identity store account passwords are approaching their expiry dates.
The administrator can apply a setting to send a password expiry warning email to group members every time group membership is updated. This email includes the URL of a GroupID portal to redirect users there for changing their passwords.
Users who change their passwords are removed from group membership.
Follow the steps to specify the portal URL.
Step 1 – In Admin Center, click Identity Stores in the left pane.
Step 2 – On the Identity Store page, click the ellipsis button for an identity store and select Edit.
Step 3 – Click Configurations under Settings in the left pane. Then click Notifications. The Notifications page is displayed.
Step 4 – In the Password Expiry Group Notifications section, select the URL of a GroupID portal in
the GroupID Portal URL drop-down list. This URL will be included in password expiry warning
emails to redirect users to the portal, where they can change their identity store account
passwords.
The list contains URLs of all GroupID portals linked with the identity store.
Step 5 – Click Save on the Notifications page.
NOTE: Password expiry Smart Groups cannot be created in a Microsoft Entra ID identity store.
Manage Membership Life Cycle Notifications
Membership lifecycle notifications are triggered on the following events:
- When the Membership Life Cycle schedule temporarily adds or removes a user from the membership of a semi-private or public group, the respective user is notified.
- Peers and managers can temporarily join or leave a group on behalf of another user (User A). Membership lifecycle notifications are sent to User A when the Membership Life Cycle schedule adds or removes him or her from group membership.
- Users are also notified when they are temporarily added or removed from group membership according to membership lifecycle policies. See the Manage Membership Life Cycle Policies topic.
You can choose to send notification when users are temporarily added to groups, removed from groups, or on both events.
Follow the steps to set Membership Life Cycle notifications.
Step 1 – In Admin Center, click Identity Stores in the left pane.
Step 2 – On the Identity Stores page, click the ellipsis button for an identity store and select Edit.
Step 3 – Click Configurations under Settings in the left pane. Then click Notifications. The page is displayed.
Step 4 – In the Membership Lifecycle Notifications section, select your desired options.
- On joining group – Sends email notifications to users when the Membership Life Cycle schedule temporarily adds them to group membership.
- On leaving group – ends email notifications to users when the Membership Life Cycle schedule temporarily removes them from group membership.
- X days before user is going to leave the group – Select this check box and specify a certain number of days, say 2. The user receives a notification 2 days before he or she is removed from group membership by the Membership Life Cycle schedule. This setting also applies to users who have been marked for removal from group membership in the group attestation process. (See the Specify member inactive period setting in the Enable Group Attestation topic.
- Click Save on the Notifications page.
Manage Managed by Life Cycle Notifications
You can set up email notifications for objects when the Managed By Life Cycle schedule adds or removes them as temporary additional owners for groups and temporary additional managers for users.
When a group is set or removed as a temporary additional owner, all its members are notified.
Follow the steps to set up Managed By Life Cycle notifications.
Step 1 – In Admin Center, click Identity Stores in the left pane.
Step 2 – On the Identity Stores page, click the ellipsis button for an identity store and select Edit.
Step 3 – Click Configurations under Settings in the left pane. Then click Notifications. The Notifications page is displayed.
Step 4 – In the Managed By Notifications section, select your desired options.
- Same as membership life cycle – Applies the membership lifecycle notification settings to the managed by life cycle and disables the Managed By Notifications section. For example, if On joining group is selected for Membership life cycle, it has the same behavior as discussed for Object is added as additional owner/manager.
- Object is added as additional owner/manager – Object is added as additional owner/manager - Sends an email notification to an object when the Managed By Life Cycle schedule adds it as the temporary additional owner of a group or the temporary additional manager of a user. The primary owner or primary manager is also notified accordingly.
- Object is removed as additional owner/manager – Sends an email notification to an object when the Managed By Life Cycle schedule removes it as the temporary additional owner of a group or the temporary additional manager of a user. The primary owner or primary manager is also notified accordingly.
- X Days before object is removed as additional owner/manager – Select this check box and specify a certain number of days, say 2. The temporary additional manager/owner receives a notification 2 days before the Managed By Life Cycle schedule removes him or her as additional manager/owner.
Step 5 – Click Save on the Notifications page.
See Also
History Item Details
Details of a history item are displayed on the History Details dialog box. If the target attribute is single-valued, the old and new values of the attribute are shown. For multi-valued attributes, the lists of added items and removed items are displayed.
Information includes:
- Attribute Modified - The name of the target attribute.
- Object Name - The name of the GroupID function this history item pertains to. For example, if it pertains to a workflow, the name of the workflow is displayed here.
- Who - The name of the user who performed the action.
- Where - The name of the computer the action was performed on.
- When - The date and time of the action.
The following lists are available when the target attribute is multi-valued:
- Added Item - A list of values that were added to the multi-value attribute.
- Removed Items - A list of values that were removed from the multi-value attribute.
The following lists are available when the target attribute is single-valued:
- Old Value - The value before the action was performed.
- New Value - The value after the action was performed.
Annotate History Items
GroupID enables a user to add notes to history actions that he or she performed. A note may explain the reason for an action, such as why he or she changed the security type for a group. Only the user who added a note can update it. Other users can view it, but they cannot edit it or add comments.
On the History Details dialog box, one of the following is available to you:
- The Add Note button - When you are the user who performed the action that logged this history item, and you haven’t added any note yet.
- The Save Note button - When you are the user who performed the action that logged this history item and you have already added a note.
- The note text - When the user who performed the action has added a note.
- None of the above - When you are not the user who performed the action and the user performing the action has not added any note.
Add a Note
Notes can be added to history items logged for an identity store. Only the user (i.e., the doer of the action) can add and update notes.
To add a note:
- Click Add Note to add a note to the history item. The Note text box is displayed.
- Type a note for the history item. Your note can have a maximum of 500 characters.
- Click Save Note. On the History page, the annotated item is displayed with a View Note button next to it. This helps distinguish annotated items from non-annotated items.
Edit a Note
- On the History Details dialog box, the Note box displays your note for the history item. Make the required changes to the text.
- Click Save Note.
Remove a Note
On the History Details dialog box, the Note box displays your note. Remove it and click Save Note.
See Also
Event Logging
GroupID employs Windows logging and file logging to maintain event logs for all GroupID clients and services, namely:
- Admin Center
- GroupID portals
- GroupID mobile app
- Data Service (file logging only)
- Security Service (file logging only)
- Replication Service
- Email Service
- Scheduler service
- GroupID Management Shell
In case of multiple deployments of a client or service, separate logs are maintained for each deployment instance.
Use the Applications node in Admin Center to manage Windows logging and file logging for each of the above (except for Management Shell).
File Logging
File logging records events for GroupID clients, scheduled jobs, and services in log files. Log file location depends on where the respective instance of the client or service is deployed.
For a native IIS and remote IIS deployment:
- Launch IIS and navigate to:
…\Sites<site that hosts the client or service instance><client or service instance name>
Example:
…\Sites\GroupIDSite11\GroupIDDataService - Right-click this directory and select Explore.
- Locate the Logs folder to read the logs.
Events are logged in a text file. When the file size reaches 100 MB, GroupID archives it in the same directory by replacing the file extension with the suffix .Log.X and then creating a new text file with the original name. X in .Log.X is a number from 1 to 10 representing the archiving order; where ‘1’ denotes the most recent file.
Windows Logging
Under Windows logging, events for GroupID clients and services are logged to the Windows application log.
See Also
Identity Store History
In Admin Center, you can view the history data that the GroupID history-tracking function collects for changes made to the configurations, workflows, and security roles in an identity store.
This data represents the events that history-tracking is configured to track. For example, history is logged when a user enables enrollment for the identity store, removes an approver from a workflow, modifies a policy for a security role, and more. History is not logged when a user refreshes a page or previews any information.
Furthermore, if history tracking is not enabled or has been lately disabled, the Identity Store History page is blank or it displays data that was logged before history-tracking was turned off.
What do you want to do?
- View Identity Store History
- Filter History Data
- Navigate Through History Items
- Annotate History Items
- Export History Data
View Identity Store History
Changes made to identity store configurations, security roles, and workflows can be tracked and viewed in Admin Center.
To view identity store history:
-
In Admin Center, click Identity Stores in the left pane.
-
On the Identity Stores page, click the ellipsis button for an identity store and select Edit.
-
Click History under Settings in the left pane.
The Identity Store History page displays history data in a descriptive and concise manner. Items are sorted according to the date and time they were last updated, with the most recent at the top.
Click a history item to view its details. See the History Item Details topic.
Filter History Data
GroupID provides filters to limit the history results displayed on the Identity Store History page. You can define a criterion to filter history data by action, machine name, new value, old value, and more.
To define a filter:
-
In Admin Center, click Identity Stores in the left pane.
-
On the Identity Stores page, click the ellipsis button for an identity store and select Edit.
-
Click History under Settings in the left pane.
On the Identity Store History page, use the History Filters area to specify a filter. -
In the Select a Filter drop-down list, select an attribute to use for filtering history records. Options are:
- Action
- Machine Name
- Modified On
- New Value
- Old Value
- User Name
-
In the Select an Operator drop-down list, select an operator to apply to the selected attribute. This drop-down displays the operators on the basis of the selected attribute. Available operators are:
(missing or bad snippet)
-
In the Select a Value box, specify a value for the attribute. The selected attribute and operator determine the kind of value that can be entered in this box.
For some operators, such as Present and Not Present, this field is not available. These operators check if a value for the attribute is present or not.Add more filters - On adding a filter, the next row is displayed, so you can add another filter.
Remove a filter row - To remove a filter row, click Remove for it.
Remove the filter - To remove all the filter rows, click Clear. -
To apply the filter, click Apply. With multiple filters, history items that satisfy all the filters are displayed.
Navigate Through History Items
By default, the page size for the Identity Store History page is set to 10, indicating that ten history items are displayed per page. You can set the page size to a maximum of 100 items.
To move through pages and navigate the records, use the page numbers and arrows given at the bottom of the listing.
Set the page size:
- In Admin Center, click Identity Stores in the left pane.
- On the Identity Stores page, click the ellipsis button for an identity store and select Edit.
- Click History under Settings in the left pane.
- On the Identity Store History page, use the Items per page drop-down list to specify the number of items to be displayed per page.
Navigate through records:
Navigation options are displayed at the bottom of the history records. You can view the history items count along with the range of items you are currently viewing.
- Click First to jump to the first page, containing the latest history records.
- Click Last to jump to the last page, containing the oldest history records.
- Use the arrows to move to the previous or next page.
- Click a page number to jump to that page.
Annotate History Items
GroupID enables a user to add notes to history actions that he or she performed. A note may explain the reason for an action, such as why he or she changed the security type for a group. Only the user who added a note can update it. Other users can view it, but they cannot edit it or add comments.
To annotate history items:
- In Admin Center, click Identity Stores in the left pane.
- On the Identity Stores page, click the ellipsis button for an identity store and select Edit.
- Click History under Settings in the left pane.
- On the Identity Store History page, click a history item.
- On the History Details dialog box, manage notes for the history item. See the Annotate History Items topic.
Export History Data
You can export identity store history to Microsoft Excel, CSV, and XML formats.
To export history:
- In Admin Center, click Identity Stores in the left pane.
- On the Identity Stores page, click the ellipsis button for an identity store and select Edit.
- Click History under Settings in the left pane.
- On the Identity Store History page, click Export History.
- On the Export History dialog box, enter a name for the history file in the Name box or leave it to default.
- Select a format for the history file in the Format drop-down list. Available formats are Excel, CSV, and XML
- Click Export History. The file is saved at the download location specified in browser settings.
- A message is displayed that history data is successfully exported. Click OK.
See Also
Manage Identity Store Links
You can link identity stores built on the supported identity providers in GroupID. In this way, identical user and group objects existing in multiple identity stores (domains) can be linked together and auto synced. GroupID further enables you to manage these linked identity stores.
What do you want to do?
- Link Two Identity Stores
- View the Identity Store Links
- Edit a Link
- Disable or Enable a Link
- Delete a Link
Link Two Identity Stores
-
In Admin Center, click Identity Stores in the left pane.
-
On the Identity Stores page, click Link Identity Stores Now in the Identity Store Links area. In case a link already exists, the Create Identity Store Link button is available.
-
On the Link Identity Stores page, click Add. The Add Identity Stores dialog box lists all the Active Directory and Microsoft Entra ID identity stores created in GroupID.
-
Select two identity stores and click Add 2 Stores. The selected identity stores are displayed on the Link Identity Stores page.
-
Next, you have to specify the attributes for linking user and group objects in the identity stores. Separate filter expressions for user and group objects have to be created for this purpose.
- To create a filter expression for linking user objects, click Users.
- To create a filter expression for linking group objects, click Groups.
The Add Filter for Users or Add Filter for Groups pane is displayed.
-
For mapping, follow these steps:
-
Click Add Filter to create a filter expression to map objects.
- The first list displays schema attributes from the first identity store.
- Next you have one condition, i.e., Is Exactly.
- The third list displays schema attributes from the second identity store.
Select a schema attribute from the first and third lists to map them. Users with identical values for both attributes in the respective identity stores will be linked.
-
(Optional) You can add more clauses to enhance the filter. These clauses must be joined by a logical ‘and’ or ‘or’.
- Click Add More Filters.
- Select a schema attribute from the first and third lists to map them, with Is Exactly as the condition.
- Select two clauses and then group them by inserting a logical ‘and’ or ‘or’.
To select a clause, click the down arrow next to it and choose Select row. On selecting the second clause, AND and OR are displayed. Select an option to group the clauses.
You can add as many clauses as required. Moreover, you can group and regroup clauses. Users that satisfy the filter expression will be linked.
-
On clicking the operator, a menu is displayed with the following options:
- Select Group / Deselect Group: This option is not relevant when there is only one group containing multiple clauses. It is relevant when you have two or more groups. Click it to select the respective group. Then select another group to bind them with a logical AND/OR.
- Ungroup: Removes the logical AND/OR to ungroup the clauses in the filter expression. In case the operator binds two groups, this option removes the operator to ungroup them.
- Change to AND/OR: Changes the logical AND to OR and vice versa.
- Add Clause: Adds a new clause to the filter.
- Delete: Deletes the operator along with all the clauses that the operator joins.
-
Notice the two buttons: Clear and Preview, at the top of the filter expression.
-
Clear: Clears the entire filter expression, thereby deleting all attribute mappings.
-
Preview: Launches the Preview Results dialog box, where you can view identical user objects in the identity stores, based on the filter expression.
On the Preview Results dialog box, enter the name of an object (user or group) in the first box, select an identity store, and click Preview.- For an Active Directory identity store, GroupID looks up the values of the name, sAMAccountName, objectGUID, and distinguishedName attributes to match the string using the Is exactly operator.
- For a Microsoft Entra ID identity store, GroupIDlooks up the values of the
userPrinicipalName, ObjectGUID, distinguishedName, and name (which is equivalent to
display name) attributes to match the string using the Is exactly operator.
Note that Microsoft Entra ID does not contain the distinguishedName attribute; however it is available as a pseudo attribute in GroupID and its value is the same as that of the distinguishedName attribute in Active Directory.
The Preview Results dialog box displays the user object found in the selected identity store on the basis of the search string. Next to it, one of the following is displayed:
- The user object identical to it in the other identity store. This is fetched on the basis of the mapped attributes. The display name and distinguished name of the user are displayed in both identity stores.
- If no identical object is found, nothing is displayed next to the user.
- If multiple identities of a user are found in the other identity store, then a Multiple Objects link is displayed. Click it to open a popup that lists all identical objects for the user found in the other identity store.
If, on the Preview Results dialog box, you do not enter a user name but simply select an identity store and click Preview, all user objects from the selected identity store are displayed along with their linked identities in the other identity store. If the process takes too long, you can click the orange button at the bottom to terminate the process.
-
-
Click Add Filter for Users in the bottom right corner of the Add Filter for Users or Add Filter for Groups pane.
NOTE: If you have added multiple clauses but do not group them using the AND/OR operator, GroupID auto groups them using AND. Similarly, if you add two groups of clauses but do not group them using the AND/OR operator, GroupID auto groups them using AND.
The filter is added and displayed on the Link Identity Stores page.
You can specify one filter expression for the user object and one filter expression for the group object. -
Click Add Filter Scope to specify a container for linked identities GroupID to link and sync later on when they are updated. New objects are also created in this container.
-
-
Click Create Link to save the link.
NOTE: An identity store link is effective when the two identity stores linked together are also associated with a GroupID portal, say Portal A. If a portal does not exist with both identity store associated with it, a message is displayed to alert you to it.
The link is displayed on the Identity Stores page.
View the Identity Store Links
All identity store links created in GroupID are displayed under Identity Store Links on the Identity Storespage.
To view the links:
-
In Admin Center, click Identity Stores in the left pane.
On the Identity Stores page, each card under Identity Store Links represents a distinct link between two identity stores. The following information is displayed for a link:-
The names of the two linked identity stores and the identity providers they have been created on.
-
The object types that are linked, i.e., user and group.
-
The link status, displayed in the top right corner of the card. A link can have one of the following statuses:
- Healthy - Indicates that both the identity stores are fully functional with replication occurring regularly.
- Errors - Indicates that one or both the identity stores have run into errors due to replication or connectivity issues. Check the concerned identity store to resolve the issue. You will notice that the card for the respective identity store also shows ‘Error’ as status.
-
-
Click the ellipsis button to launch a shortcut menu with the following options:
- Edit: launches the Link Identity Stores page, where you can update the link.
- Disable: disables the link between the two identity stores.
- Delete: deletes the link.
Edit a Link
A link between two identity stores involves (a) two identity stores (b) a filter that identifies identical user objects in the identity stores to link them, and (c) a filter that identifies identical group objects in the identity stores to link them.
You can edit a link to:
- Replace an identity store in the link
- Update the filter expression for a user or group object
- Remove the filter expression for a user or group object
To edit a link:
-
In Admin Center, click Identity Stores in the left pane.
On the Identity Stores page, each card under Identity Store Links represents a distinct link between two identity stores. -
Click the ellipsis button on a card and select Edit.
The Link Identity Stores page opens, displaying the linked identity stores and the filters.-
Replace an identity store - To change the identity store(s) in the link, either click Edit next to the identity stores’ names. On the Add Identity Stores dialog box, select the identity stores to replace the existing ones. Then click Add 2 Stores.
When one or both identity stores are replaced, the filter expression is automatically removed. You must create a new filter expression to establish a link between the identity stores. -
Modify the filter expression for user or group object - Click Edit on the filter card for the user or group object. The Add Filter pane is displayed, where you can update the filter expression. Follow step 6a-e in the Link Two Identity Stores topic to update the filter expression.
Modifying the filter expression for the user or group object breaks the link for the respective objects in the linked identity stores. Objects will be relinked on the basis of the new filter expression and will be synced accordingly in the GroupID portal. -
Delete a filter expression - Click Remove on the filter card for a user or group object to delete it. Deleting the filter expression for the user or group object breaks the link for the respective objects in the linked identity stores.
NOTE: At least one filter expression for the user object and one filter expression for the group object must exist for the identity store link. Else changes will not be saved.
-
-
After making the required changes, click Update Link.
Disable or Enable a Link
When you disable a link between two identity stores, it becomes inactive and the objects in the identity stores are not linked anymore in the GroupID portal.
A disabled link can be enabled again to relink objects in the identity stores.
To disable a link:
- In Admin Center, click Identity Stores in the left pane.
On the Identity Stores page, each card under Identity Store Links represents a distinct link between two identity stores. - Click the ellipsis button on a card and select Disable to disable the link.
Click the ellipsis button for a disabled link and select Enable to reactivate it.
Delete a Link
When you delete a link between two identity stores, the objects in the identity stores are not linked anymore in the GroupID portal.
To delete a link:
- In Admin Center, click Identity Stores in the left pane.
On the Identity Stores page, each card under Identity Store Links represents a distinct link between two identity stores. - Click the ellipsis button on a card and select Delete to delete the link.
See Also
Link Identity Stores
You can link identity stores in GroupID. In this way, identical user and group objects existing in multiple identity stores (domains) can be linked together and auto synced.
For example, you can create a link between the following types of identity stores:
- Two Active Directory identity stores
- An Active Directory identity store and a Microsoft Entra ID identity store
- Two Microsoft Entra ID identity stores
- An Active Directory identity store and a Google Workspace identity store
NOTE: (1) Two identity stores built on the same domain cannot be linked.
(2) An identity store must be replicated in GroupID before it can be linked.
Linked Identity Stores and the GroupID Portal
Linking, in itself, is not effective until the identity stores joined via linking are associated with a GroupID portal, say Portal_A. Consider the following:
- The administrator links IdentityStoreA and identityStoreB.
- The administrator creates a portal, Portal_A, and associates both the linked identity stores with it.
- This enables portal users to view data from IdentityStoreA and identityStoreB at the same time,
rather than having to switch identity stores. Users can also filter data for identical objects in
both the identity stores.
Users can choose to view data for a single identity store or switch to the ‘linked’’ mode to view data simultaneously from both the linked identity stores.
When only IdentityStoreA or IdentityStoreB is associated with Portal_A, the linking between the two identity stores serves no purpose.
Benefits of Running the Portal Under the ‘Linked’ Mode
A portal running under the ‘linked’ mode is effectively connected to all the linked identity stores that are associated with it. You can access objects in different identity stores in a single instance of the portal, rather than having to log out and connect the portal to another identity store.
The following portal functions are impacted under the ‘linked’ mode:
-
When a user performs a search, results are fetched from all the linked identity stores.
-
When an action is performed on a user or group object, it is replicated to all the identical objects in the linked identity store(s). In this way, identical user and group objects in the linked identity stores are auto synced. Consider the following:
- When you create a static group, its identical static group is created in a linked identity store.
- When you create a Smart Group, its identical group is created as a static group in a linked identity store.
- When you create a mail-enabled group, an identical simple group is created in a linked identity store.
- When you create a mailbox or a mail-enabled user, an identical simple user is created in a linked identity store.
- When you delete a user or group object in an identity store, its linked object(s) are also deleted.
- When you update the properties of a user or group object, those same properties are also updated for its linked object(s) in the linked identity store(s).
- When you execute the query for a Smart Group to update it, its linked Smart Group(s) will not be auto updated.
- When you upgrade a static group (say, GroupA) to a Smart Group, the linked static group(s) (say, GroupB and GroupC) in the linked identity store(s) will not be upgraded to Smart Groups.
-
Group listings in the portal (namely All Groups, My Groups, and Deleted Groups) display the groups from all the linked identity stores. Users can select groups from any identity store to perform an action in bulk, such as expire them.
-
User listings in the portal, such as My Direct Reports, display user objects from all the linked identity stores. Users can select user objects from any identity store to perform an action in bulk, such as terminate them.
-
For entitlements, the portal shows Active Directory file server and SharePoint permissions from all the linked identity stores.
When the logged-in user exists in multiple linked identity stores, he or she can perform actions in an identity store according to his or her role and permissions in the respective identity store. For example, if the user is an administrator in IdentityStoreA and a standard user in IdentityStoreB, he or she can perform administrative actions on groups in IdentityStoreA only, even though the group listing displays all groups from both the linked identity stores.
How to Link Two Identity Stores
Linking two identity stores follows a simple and straight-forward process:
- Select the required identity stores.
- Create a filter expression to map attributes. Select a schema attribute from IdentityStoreA and
another from IdentityStoreB. This mapping establishes a link between the two identity stores.
You can also create an advanced filter expression by adding multiple clauses to the filter (where each clause is a one-to-one mapping of attributes) and joining them with the ‘and’ or ‘or’ operator.
You have to create a separate filter expression for user and group objects. - When two objects have the same value for the mapped attributes in the two identity stores, GroupID identifies them as identical objects, and hence links them.
For example, to link IdentityStoreA to IdentityStoreB, select the displayName and cn attributes from IdentityStoreA and IdentityStoreB respectively to map them. Now when an object has Mary Jones as value for the distinguishedname attribute in dentityStoreA and an object has Mary Jones as value for the cn attribute in dentityStoreB, GroupID identifies them as identical objects existing in two distinct directories, and links them.
RECOMMENDED: For mapping, always use attributes that store unique values.
How to Link Multiple Identity Stores
You can link more than two identity stores; in fact, GroupID empowers you to link identity stores created for GroupID supported providers.
You cannot just create one link to link multiple identity stores. Rather, if you want to link three identity stores, you will have to create two links; to link four identity stores, create three links, and so on. Each link involves two identity stores, thereby creating a chain of linked identity stores.
Here is how it works:
- Link two identity stores, IdentityStoreA and IdentityStoreB, by following the discussion in the
How to Link Two Identity Stores topic.
GroupID now considers this link as one entity. Let’s call it Entity1. - Next, link IdentityStoreA or IdentityStoreB to IdentityStoreC using the same method.
This establishes a link between Entity1 and IdentityStoreC.
In this way, you can create a chain of links between identity stores.
See Also
Manage an Identity Store
Once you create and configure an identity store, you can perform group and identity management operations in the identity provider using GroupID.
What do you want to do?
- View Identity Store Details
- Enable or Disable an Identity Store
- Update General Info for an Identity Store
- Exclude an Active Directory Domain from Replication
- Set DC Priority for an Active Directory Identity Store
- Delete an Identity Store
View Identity Store Details
In Admin Center, click Identity Stores in the left pane. The Identity Stores page displays the identity stores created in GroupID.
The card for an identity store displays the following information:
| Info | Description |
|---|---|
| Basic info | The display name of the identity store and the identity provider it is built on, such as Active Directory. |
| Identity store status | The status is displayed on the top right corner of the card. An identity store has one of the following statuses: - Healthy: Indicates that the identity store is fully functional. Hover the mouse over the status to view the factors used to determine health. - Errors: Indicates that the identity store has run into one or both of the following errors: - It cannot connect to the identity provider using the service account provided on the Identity Store Details page. - Data from the provider is not replicated to Elasticsearch within the required time interval. The last replication time and date is displayed at the bottom of the card. Hover the mouse over the status to view the reason for the Errors status. |
| History | Indicates whether history tracking for the identity store is enabled or disabled. See the Configure History Tracking topic to enable or disable history tracking. |
| MFA | Indicates whether second factor authentication is enabled for security roles in the identity store. See the Configure Second Factor Authentication topic. One of the following is displayed for MFA: - Available for x/x roles: Indicates the number of security roles that second factor authentication is enabled for, out of the total security roles in the identity store. For example, 1/3 indicates that there are 3 security roles defined for the identity store and second factor authentication is enabled for one of those roles. - Not Available: Indicates that second factor authentication is not enabled for any security role in the identity store. |
| Last replication date and time | The last run date and time of the Replication service. If the service does not run at the specified interval, the identity store status changes to Errors. |
| Ellipsis | Click it to launch a shortcut menu with the following options: - Edit: launches the identity store properties page, where you can manage identity store settings, workflows, security roles, replication attributes, and more. See the Configure an Identity Store topic. - Disable: disables the identity store. - Replicate Objects: runs the Replication service to replicate object data in the identity store. See the Force Run the Replication Service (for Object Replication) topic. - Replicate Deleted Objects: runs the Replication service to remove those objects from Elasticsearch that have been deleted from the identity provider. See the Force Run the Replication Service (for Deleting Objects) topic. - Delete: deletes the identity store from GroupID. |
Enable or Disable an Identity Store
When you disable an identity store, all users logged into GroupID with that store are logged out, and the identity store is unavailable for operations.
You can disable an identity store in any of the following ways. However, a disabled identity store can be enabled using Method 1 only.
Method 1: Enable or disable an identity store
- In Admin Center, click Identity Stores in the left pane.
- On the Identity Stores page, click the ellipsis button for an identity store and select Enable or Disable.
Method 2: Disable an identity store
- In Admin Center, click Identity Stores in the left pane.
- On the Identity Stores page, click the ellipsis button for an identity store and select Edit.
- On the Identity Store Details page, use the toggle button in the top right to disable the identity store.
- Click Save.
Update General Info for an Identity Store
You can change the display name for an identity store, add a description for it, change the service account credentials to connect to the identity provider, and update any other information you provided while creating it.
To update the info:
- In Admin Center, click Identity Stores in the left pane.
- On the Identity Stores page, click the ellipsis button for an identity store and select Edit.
- On the Identity Store Details page, update the required information on the General tab.
This page differs by provider. Refer to the steps for creating the respective provider in the Create an Identity Store topic for more information. - Click Save.
Exclude an Active Directory Domain from Replication
By default, GroupID replicates the domain specified for the identity store and its child domains. You can exclude a domain or a child domain from replication, in which case the Replication service will not replicate it. See the Elasticsearch and Replication topic.
You can still create and manage objects in an excluded domain using GroupID.
To exclude a domain:
- In Admin Center, click Identity Stores in the left pane.
- On the Identity Stores page, click the ellipsis button for an identity store and select Edit.
- On the Identity Store Details page, click the Connection tab.
- In the Excluded Domains areas, select the check boxes for the domains you want to exclude
from replication.
To select all domains, select the check box in the header area. - Click Save.
Set DC Priority for an Active Directory Identity Store
You can select a domain controller in an Active Directory domain to work with GroupID. Data service and Replication service will connect to this domain controller to perform their respective operations in the domain. In this way, you can ensure that the selected domain controller is always available with minimum downtime.
To understand how the DC priority function works, let’s assume the following:
- gene.local is your parent domain with two child domains.
- You have four domain controllers in the parent domain: DC_N, DC_S, DC_E, and DC_W.
- You also have two domain controllers in each of the two child domains.
You can set a separate DC priority list for the parent domain and each of the child domains.
To create a DC priority list for a domain, list the domain controllers in the order of priority. Let’s say you set priority for the parent domain as:
Priority 1: DC_E
Priority 2: DC_S
DC_N and DC_W are not included in your priority list.
When the Data service restarts for reasons such as IIS restart, it does the following:
- The Data service attempts to connect to the first domain controller in the priority list, i.e., DC_E.
- If DC_E is not available, the Data service attempts to connect to the second domain controller in the priority list, i.e., DC_S.
- If DC_S is not available either, the Data service will resort to the normal lookup process.
Normal lookup process for Data service
Data service makes a connection with a domain controller through the System.DirectoryServices API. It sends a request to the API, which, in turn, connects to any domain controller in the domain. In this way, Data Service communicates with the domain controller to perform the required function.
System.DirectoryServices does not evaluate the domain controller in the DC priority list for creating a connection. Hence, in the above example, the API will connect to DC_N or DC_W.
“Server Not Operational” error
When Data service connects to a domain controller (say DC_E), it caches the domain logon information and uses it to create all subsequent sessions with the domain controller. Hence it does not iterate on the DC priority list every time it has to create a session.
In case DC_E is down, the ‘Server Not Operational” error will be displayed in GroupID. It indicates that Data service has lost connection with the domain and needs to re-establish a connection.
To resolve the error, restart IIS. In this way, Data service will make a connection again using the process discussed above. It will connect to a different domain controller and cache the domain logon information (and continue to make a session with this domain controller unless Data service is restarted).
DC priority and Replication
Every time the Replication service is triggered, it consults the DC priority list to connect to a domain controller for replication. If it is unable to connect to any domain controller in the priority list, it reverts to the normal lookup process to connect to a domain controller in the domain.
In a nutshell
- If DC priority is defined for a domain, Data service and Replication service will connect to a domain controller in the domain using the defined DC priority list. If no domain controller in the list is available, the services will rely on the normal lookup process to connect to a domain controller in the domain.
- If DC priority is not defined for a domain, Data service and Replication service will connect to it using the normal lookup process.
To set DC priority for a domain:
-
In Admin Center, click Identity Stores in the left pane.
-
On the Identity Stores page, click the ellipsis button for an identity store and select Edit.
-
On the Identity Store Details page, click the Connection tab. The DC Priority area displays two options:
- Set default priority: This tile is selected by default and indicates that no DC priority is set for the identity store domain. As a result, Data service and Replication service will connect to it using the normal lookup process.
- Choose my own priority: Select this tile to set a DC priority list for the identity store domain and its child domains, if any.
-
On selecting the Choose my own priority tile, the following fields are displayed:
-
Select Domain: This drop-down list displays the identity store domain and its child domains, if any. Excluded domains are not listed. Select a domain to define a DC priority list for it.
Note that each domain in the list has either Priority set or Default Priority displayed next to it.- Priority set: indicates that DC priority has been defined for the domain, even if it is set for one DC and not for all DCs in the domain.
- Default Priority: indicates that priority has not been set for any DC in the domain.
-
The table displays the domain controllers in the selected domain. The DC Name column displays the name of the DC while the Priority column displays the priority assigned to it, with ‘1’ being the highest priority. When no priority is assigned to a DC, Not set is displayed for it.
You can choose to assign priority to selected DCs in the domain. For example, if a domain has 4 DCs, you can set priority for two and leave the rest.- To assign priority to a domain controller, click Set priority for it. The Priority column displays the priority assigned to it. To revoke priority, click Reset priority.
- To change the priority for a DC, click in the row, hold down the left mouse button, and drag to change its position in the list. By default, "1" is assigned as priority to the first DC in the list, followed by '2' to the second DC in the list, and so on.
- To revoke priority for all DCs in the domain, click Reset all to default. With this, Default Priority is displayed next to the domain in name in the Select Domain drop-down list.
-
-
Click Save.
NOTE: When you change the DC priority for a domain or a child domain, it takes effect instantly. Data service reestablishes a connection with a DC based on new priority.
Delete an Identity Store
You can delete an identity store with all its configurations. As a result, GroupID cannot be connected to that identity store, nor can it be used in a Synchronize job.
NOTE: You cannot delete an identity store that has been linked to another identity store. You must first delete the link(s) before deleting the identity store.
To delete an identity store:
- In Admin Center, click Identity Stores in the left pane.
- On the Identity Stores page, click the ellipsis button for an identity store and select Delete.
See Also
Service Account for Active Directory and Exchange
You must have a service account to connect an identity store to an Active Directory domain. GroupID uses the account to access objects in Active Directory. If Microsoft Exchange is configured as the messaging provider for the identity store, you can also delegate permissions to this account to access Exchange objects.
You can use an existing account, provided it has the required permissions, or you can create a new one. Instructions for both options are discussed in the following sections, although it is recommended that you create a new service account rather than using an existing account.
NOTE: You must add the service account to the membership of the Local Administrator group of the member server on which GroupID is installed.
What do you want to do?
- Use an Existing Account as a Service Account
- Create a New Service Account
- SQL Server Account and Database Permissions
Use an Existing Account as a Service Account
Verify that the account that you want to use as a service account has the following Active Directory and Exchange permissions:
Exchange permissions are required if Microsoft Exchange is configured as the messaging provider for the identity store.
| Active Directory | Recommended: Domain Admins Minimum permissions: - Grant Permissions to Create and Delete Users, Contacts, and Groups - Grant Permissions to Modify Users, Contacts, and Groups See the Create a New Service Account topic for instructions on modifying the service account to grant the required permissions. |
| Exchange 2013/2016/2019 | Recipient Management |
Create a New Service Account
If you do not have a service account, you need to create one. Follow the three sets of instructions in this section to:
-
Create a Service Account:
-
Delegate Active Directory Permissions to the New Account:
-
Delegate Exchange Permissions to the New Account:
f Exchange is configured as the messaging provider for the identity store)
Create a Service Account:
-
Select either:
-
Server Manager from the Windows Start screen.
Or
-
Server Manager from the Quick Launch toolbar available by default on the Windows taskbar.
Or
-
Administrative Tools from the Windows Start screen.
-
-
In case of Server Manager selection, select Tools > Active Directory Users and Computers.
In case of Administrative Tools selection, select the Active Directory Users and Computers option in the Name column. -
In the directory tree, select the required container, point to New, and then click User. The New User dialog box is displayed.
-
Enter the required information for the user.
After creating the user, you can click the container to view the newly created user.
Delegate Active Directory Permissions to the New Account:
In the Active Directory Users and Computers console:
-
Select Advanced Features from the View menu.
-
In the left pane, right-click the domain name or organizational unit and select the Properties option. On the Properties window, select the Security tab.
-
Click the Advanced button; the Advanced Security Settings window is displayed.
-
Click the Add button. The Permission Entry window is displayed.
-
Click the Select a principal link next to Principal. The Select User, Computer, Service Account, or Group dialog box is displayed.
Type the name of the service account in the Enter the object name to select box. Click OK. The Permissions Entry window is displayed with all fields enabled (see step 4).
-
In the Applies to box, select This object and all descendant objects.
-
Grant Permissions to Create and Delete Users, Contacts, and Groups.
-
Scroll down the list of permissions in the Permissions box and select the check boxes for the options shown below:
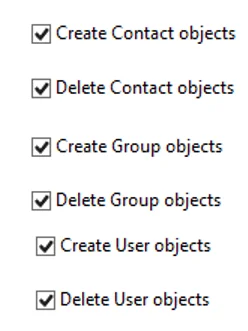
-
Click OK. The granted permissions appear in the Advanced Security Settings window as shown below:
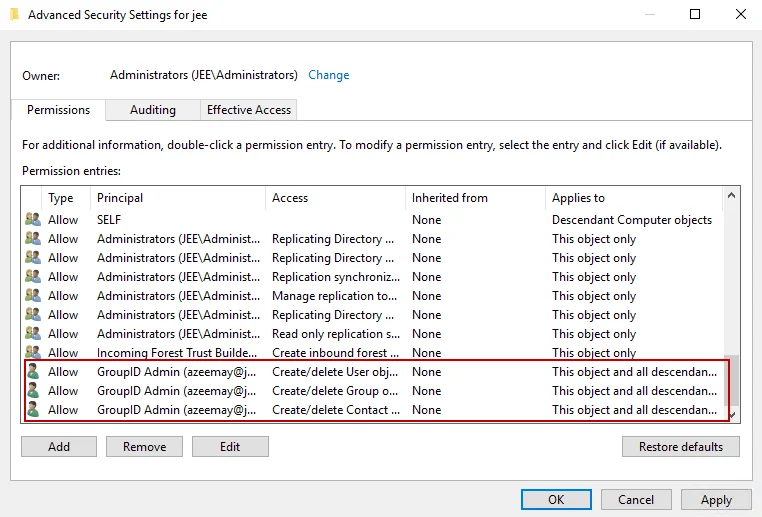
-
-
Grant Permissions to Modify Users, Contacts, and Groups.
-
Click the Add button on the Advanced Security Settings window. The Permission Entry window is displayed (see step 4).
-
Click the Select a principal link next to Principal. The Select User, Computer, Service Account, or Group dialog box is displayed. Type the name of the service account in the Enter the object name to select box and click OK. The Permissions Entry window is displayed.
-
In the Applies to box, select the Descendant Contact objects option and select the Full control check box in the Permissions area. It is as follows:
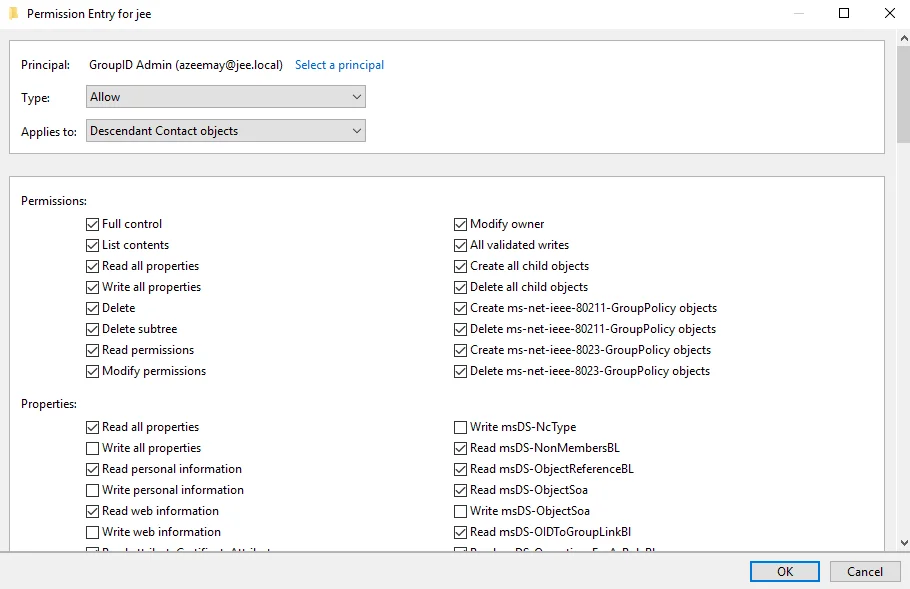
-
Click OK. The granted permissions appear in the Advanced Security Settings window as shown below:
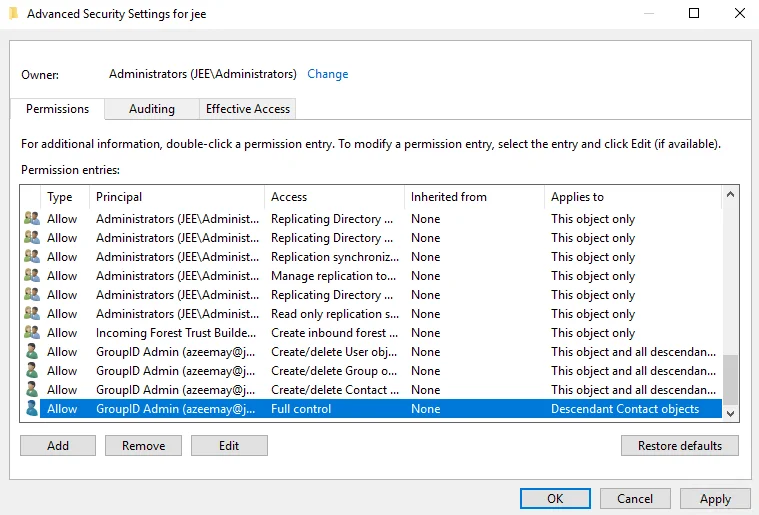
-
Repeat steps a – d for Descendant Group objects and Descendant User objects on the Permission Entry window.
The service account now has permissions to modify users, contacts, and groups. These permissions appear in the Advanced Security Settings window. It is as shown below:
-
-
Click OK.
Delegate Exchange Permissions to the New Account:
In addition to Active Directory permissions, the service account also needs access permissions for Exchange, when Exchange is configured as the messaging provider for the identity store.
Instructions for delegating permissions for each supported Exchange Server version are as follows.
For Exchange Server 2013/2016/2019:
Launch Exchange Management Shell and type the following command:
Add-RoleGroupMember "Recipient Management" -Member domain name\user
SQL Server Account and Database Permissions
See the Authentication Modes topic for information about the roles and permissions the SQL server and database accounts must have for SQL Server Authentication mode and for Windows Authentication mode.
See Also
Microsoft Entra ID vs. Active Directory Identity Stores
This topic discusses the differences between an Active Directory and Microsoft Entra ID identity store in GroupID.
Group Expiration Policy
Microsoft Entra ID offers limited options to define a default expiry policy for groups whereas GroupID provides a comprehensive Group Life Cycle policy. See the Manage Group Lifecycle Settings topic.
Since these policies are not integrated; you should either useMicrosoft Entra ID’s or GroupID’s expiration policy settings for groups in an Microsoft Entra ID identity store.
Group Naming Policy
The group naming policy defined in Microsoft Entra ID is not integrated with the Group Name Prefixes policy in GroupID. As a result:
- Microsoft Entra ID's group naming policy has no impact on groups created using GroupID.
- Using GroupID, you cannot modify the prefixes and suffixes that are applied to groups created directly in Microsoft Entra Admin Center.
To use the same prefixes for group names as are defined in Microsoft Entra Admin Center, the administrator should define the same prefixes in GroupID. See the Set Group Name Prefixes topic.
Dynamic Groups in Microsoft Entra ID
A dynamic group created in Microsoft Entra Admin Center will not be automatically upgraded to a Smart Group in GroupID. It will be displayed as a static (unmanaged) group. However, its membership will be managed dynamically in Microsoft Entra ID and displayed in GroupID.
You should apply a query to a group either in Microsoft Entra Admin Center or in GroupID. Do not manipulate the same object simultaneously from GroupID and Microsoft Entra Admin Center.
Multifactor Authentication Policy
The multifactor authentication (MFA) policy defined for Microsoft Entra Admin Center cannot be integrated with the multifactor authentication policy defined for a Microsoft Entra ID identity store in GroupID. MFA in Entra applies to Microsoft Entra Admin Center while MFA in GroupID applies while performing account unlock and password reset in the respective identity store.
User Roles in Microsoft Entra ID and GroupID
When a user, with a standard user role in Microsoft Entra Admin Center, is assigned an elevated role in GroupID, he or she can manipulate directory objects using GroupID that he or she cannot otherwise manipulate directly in Microsoft Entra Admin Center due to limited role permissions.
The actions that a user can perform in GroupID depend on the permissions assigned to his or her role in GroupID. These permissions may conflict with the permissions that the user has in Microsoft Entra Admin Center. For example, a user who does not have permissions to create groups in Microsoft Entra Admin Center will be able to create groups in Microsoft Entra ID using GroupID if his or her GroupID role has permissions to create new groups.
To avoid conflicts, GroupID administrators should grant permissions to security roles with discretion.
Groups in Microsoft Entra ID
-
To create security groups and Office 365 groups using GroupID, Office 365 must be set as the messaging provider for the identity store. Security groups cannot be mail-enabled. Use an Office 365 group as an alternative to a mail-enabled security group.
-
Microsoft Entra ID does not allow a group to be added to the membership of an Office 365 group. For this reason:
- An Office 365 group can only have user objects as its members.
- Even if the query for an Office 365 group returns different object types, only user objects are added to group membership.
- The nesting option in the Out of Bounds settings for an identity store will empty the membership of a Smart Group of the Office 365 type, because nested groups cannot be added as group members. See the Manage Group Membership Settingstopic.
- A Dynasty cannot be created as an Office 365 group.
-
You can create and manage distribution groups.
-
You can also create teams and channels in MS Teams.
-
You cannot create Office 365 connected Yammer groups and Planner groups using GroupID. These groups can be created from their respective portals. However, Yammer and Planner groups are displayed in the GroupID portal when their respective subscriptions are added to Office 365. When you update these groups using GroupID, your changes will be reflected on the Yammer, and Planner portals respectively.
-
Microsoft Entra ID supports multiple primary owners for a group. One primary owner is mandatory.
-
Only user objects can be set as primary owners.
-
When you expire an Office 365 group using GroupID, its member list is backed up in the database and then cleared from Office 365. The Microsoft Graph API does not allow for the modification and removal of the mail attribute; therefore, it is not possible to remove the group’s email and make it mail-disabled.
-
GroupID cannot manipulate directory-synced objects (objects that are synced from on-premises Active Directory to Microsoft Entra ID).
User and Contact Objects in Microsoft Entra ID
- You can create users (non mail-enabled) and mailboxes in a Microsoft Entra IDidentity store. The contact object type is not supported.
- The Photo attribute is only available for an Office 365 user (mailbox).
- The GroupID portal does not display the password expiry date of a user account in a Microsoft Entra ID identity store.
- The ‘block sign in’ option in Microsoft Entra Admin Center is enabled when a user's account is disabled or locked out in GroupID. For example, if a user is locked out due to the domain policy or disabled by the User Life Cycle schedule, block sign in will be enabled. The disabled/locked user will not be able to log into his or her workstation either.
Miscellaneous
- For a Microsoft Entra ID identity store, you must configure Office 365 as the messaging provider and SMTP server.
- The Recycle Bin does not display any data for a Microsoft Entra ID identity store.
- GroupID Management Shell cannot communicate directly or remotely with Microsoft Entra ID and Office 365.
- Smart Groups and Dynasties in a Microsoft Entra ID identity store use a device structured query language (and not an LDAP query) to update group membership.
- Only the Microsoft Entra ID attributes listed in the Microsoft Graph API v 3.26.0 schema file are available in GroupID.
- The company attribute in Microsoft Entra ID stores the name of the company registered in Microsoft Entra Admin Center, and cannot be manipulated using GroupID. A Microsoft Entra ID identity stores uses the OfficeLocation attribute as an alternative to the company attribute.
See Also
gMSA for Active Directory
GroupID enables you to use a Group Managed Service Account (gMSA) to connect an Active Directory identity store to the identity provider. To ensure that the gMSA can be configured and used effectively, verify the following:
- General Checks
- Required Permissions
- Allowed Principals
General Checks
-
Run the following cmdlet in Windows PowerShell on the GroupID server to verify the gMSA status as either true or false.
Test-ADServiceAccount -Identity <gMSA> -
In case a gMSA is configured for GroupIDAppPool11 or as a service account for identity store make sure the account name follows the format:
FQDN<gMSA>$)
Required Permissions
- The gMSA must have full permissions on the GroupID installation folder.
- It must be a member of the local administrator group (Administrators) on the GroupID server.
- It must be a member of the local IIS group (IIS_IUSRS) on the GroupID server.
Allowed Principals
-
The following principals must be allowed to retrieve the managed password for the gMSA that you use to connect an identity store to an identity provider:
- GroupID server (type: Computer)
- The account configured for the GroupID app pool (type: Service Account)
-
If any of these principals are not allowed to retrieve the managed password for the gMSA, do the following depending on the scenario:
- If a group is mentioned in the 'PrincipalsAllowedToRetrieveManagedPassword' parameter of
the New-ADServiceAccount cmdlet, add the missing principal (GroupID server and/or app pool
account) to the group.
Both these principals must be enlisted directly or indirectly in the 'PrincipalsAllowedToRetrieveManagedPassword' parameter. - If an individual principals are mentioned in the 'PrincipalsAllowedToRetrieveManagedPassword' parameter of the New-ADServiceAccount cmdlet, use the 'PrincipalsAllowedToRetrieveManagedPassword' parameter of the Set-ADServiceAccount cmdlet to add the missing principals (GroupID server and/or app pool account).
- If a group is mentioned in the 'PrincipalsAllowedToRetrieveManagedPassword' parameter of
the New-ADServiceAccount cmdlet, add the missing principal (GroupID server and/or app pool
account) to the group.
NOTE: Restart the GroupID server if you apply any of the above.
See Also
Service Accounts
To connect an Active Directory identity store to a domain, you must use a service account with elevated privileges. You can also use a Group Managed Service Account (gMSA) for this purpose.
See the following topics for details on these accounts:
Manage Local Replication Settings
You can manage the following replication settings for an identity store:
- Specify the object attributes that you want to use in the identity store. The Replication service
then replicates the selected attributes to Elasticsearch.
Attributes that you do not select for replication will not be available in the identity store and cannot be used in GroupID functions. - Force run the service at any given time to replicate object attributes.
- Restore object data to Elasticsearch for an identity store.
What do you want to do?
- Specify Object Attributes to Replicate
- Replicate a Custom Attribute
- Force Run the Replication Service (for Object Replication)
- Force Run the Replication Service (for Deleting Objects)
- Restore Object Data
Specify Object Attributes to Replicate
For an identity store, a few attributes have been specified for replication by default. You can modify the list as required.
To select object attributes:
-
In Admin Center, click Identity Stores in the left pane.
-
On the Identity Stores page, click the ellipsis button for an identity store and select Edit.
-
Click Replication under Settings in the left pane.
-
On the Replication page, the Attribute Name column displays a list of the object attributes that the Replication service replicates to Elasticsearch for the identity store.
- Use the search box to search for an attribute in the list.
Simply enter a search string in the box; attribute names containing the string will be displayed. - To remove an attribute from the list, click Remove for it.
- To reset to the default attribute listing, click Reset to Default.
- Use the search box to search for an attribute in the list.
-
Click Add Replication Attributes to add an attribute to the list.
-
The Select Replication Attributes dialog box displays a list of the schema attributes in the provider. Select the check boxes for the attributes you want to replicate for the identity store and click Save. The attributes are added to the Attribute Name column on the Replication page.
NOTE: If in a Microsoft Entra ID based identity store extension attributes are added, GroupID Schema Replication schedule fetches the latest schema at its next run and add the newly added extension attributes to the Select Replication Attributes list. See the Schema Replication Schedule for additional information.
Select the required extension attributes from the Select Replication Attributes list and add them to the attribute to replicate list. See the Specify Object Attributes to Replicate section of the Manage Local Replication Settings topic. -
Click Save
Replicate a Custom Attribute
By default, a custom attribute for any object type (user, group, computer, public folder) is not replicated for an identity store.
Let's assume you have a custom attribute, SerialNumber, for the user object in Active Directory. To replicate its value in the Elasticsearch repository, do the following:
- In Admin Center, click Identity Stores in the left pane.
- On the Identity Stores page, click the ellipsis button for an identity store and select Edit.
- Click Replication under Settings in the left pane.
- On the Replication page, click Add Replication Attributes to search, select, and add the required attribute (for example, SerialNumber) to the Attribute Name list.
- Click Save on the Replication page.
- Click Restore on the Restore Data card to restore object data to Elasticsearch for the
identity store.
To run replication from scratch for the object type the added attribute belongs to (i.e., user object in the example). empty the replication timestamp for the specific object type in the GroupID database.
NOTE: When a Smart Group, created with a custom attribute in a previous GroupID version, is upgraded using the Upgrade wizard, you will have to replicate the respective object type from scratch.
Force Run the Replication Service (for Object Replication)
By default, the Replication service runs every 10 minutes. However, you can force run it any time for an identity store to replicate object attributes to Elasticsearch.
Force-starting the service has no impact on the interval set for triggering the service on the Replication page. See the Specify a Replication Interval for Objectstopic.
You can force run the Replication service for an identity store in any of the following ways:
Method 1:
- In Admin Center, click Identity Stores in the left pane.
- On the Identity Stores page, click the ellipsis button for an identity store and select
Replicate Objects.
Any changes made to the values of attributes during the last and current run of the Replication service are replicated to Elasticsearch.
Method 2:
- In Admin Center, click Identity Stores in the left pane.
- On the Identity Stores page, click the ellipsis button for an identity store and select Edit.
- Click Replication under Settings in the left pane.
- On the Replication page, click Run on the Replication Service card to run the
Replication service instantly. Any changes made to the values of attributes during the last and
current run of the Replication service are replicated to Elasticsearch.
The card also displays the last run date and time of the service.
Force Run the Replication Service (for Deleting Objects)
Objects that are deleted from the directory must also be removed from Elasticsearch. By default, the interval for removing deleted objects from Elasticsearch is set to 60 minutes. You can, however, force run the Replication service for an identity store any time to remove deleted objects.
Force-starting the service has no impact on the interval set for triggering the service on the Replication page. See the Specify Interval for Deleting Tombstone Objects topic.
For an identity store, you can force run the Replication service (for deleting objects) in any of the following ways:
Method 1:
- In Admin Center, click Identity Stores in the left pane.
- On the Identity Stores page, click the ellipsis button for an identity store and select Replicate Deleted Objects. Any objects deleted in the directory between the last and current run of the Replication service will be removed from Elasticsearch.
Method 2:
- In Admin Center, click Identity Stores in the left pane.
- On the Identity Stores page, click the ellipsis button for an identity store and select Edit.
- Click Replication under Settings in the left pane.
- On the Replication page, click Run on the Deleted Objects Replication card to run the
Replication service instantly. Objects deleted from the directory between the last and current
run of the Replication service will be removed from Elasticsearch.
The card also displays the last run date and time of the service.
Restore Object Data
You may need to restore data for an identity store to Elasticsearch. The restore object data event restores the following for an identity store:
- the current attribute values of objects (group, user, contact, computer, and OU) from the provider (for example, Active Directory)
- the GroupID pseudo attributes of those objects from the GroupID database to Elasticsearch
To restore object data:
- In Admin Center, click Identity Stores in the left pane.
- On the Identity Stores page, click the ellipsis button for an identity store and select Edit.
- Click Replication under Settings in the left pane.
- On the Replication page, click Restore on the Restore Data card to restore object data for the identity store to Elasticsearch.
See Also
Clear-MessagingServer
The commandlet Clear-MessagingServer removes the configured messaging server from the specified identity store.
NOTE: This cmdlet will also clear the SMTP settings, notification settings, password expiry settings, membership lifecycle notification settings, and managed by notification settings for the identity store.
Syntax
Clear-MessagingServer
-IdentityStoreName <string>
[<CommonParameters>]
Required Parameter
- IdentityStoreName
Example 1:
This example clears configured messaging server for AdStore8 identity store.
Clear-MessagingServer -IdentityStoreName AdStore8
See Also
Clear-Notifications
The commandlet Clear-Notifications removes notifications settings from an identity store. The notifications settings can be removed individually or in sets.
Syntax
Clear-Notifications
-IdentityStoreName <string>
[-PrimaryRecepients]
[-CarbonCopy]
[-NotifyLoggedInUsers]
[-NotifyOwners]
[-NotifyModifiedObject]
[-NotifyPublicGroupOwner]
[-NotifyAddedMembers]
[-PasswordPortalUrl]
[-NotifyUserGroupJoinML]
[-NotifyUserGroupLeaveML]
[-XDaysBeforeLeaveNotificationML]
[-NotifyUserGroupJoinMB]
[-NotifyUserGroupLeaveMB]
[-XDaysBeforeLeaveNotificationMB]
[<CommonParameters>]
Clear-Notifications
-IdentityStoreName <string>
[-ClearSet {All | Recipients | PasswordExpiry | ML | MB}]
[<CommonParameters>]
Required Parameter
- IdentityStoreName
Example 1:
This example individually removes the Membership Lifecycle notification option – X days before user is going to leave the group for the AdStore9 identity store.
Clear-Notifications -IdentityStoreName AdStore9 -NotifyLoggedInUsers –XdaysBeforeLeaveNotificationML 10
Example 2:
This example removes recipients in sets mentioned under the Recipients section on the Notification page of AdStore9 identity store properties.
Clear-Notifications -IdentityStoreName AdStore9 -ClearSet Recipients
See Also
Clear-SmtpServer
The commandlet Clear-SmtpServer removes the SMTP server configurations from an identity store.
NOTE: This cmdlet will also clear the notification settings for the identity store recipients, password expiry group notifications, membership lifecycle notifications, and managed by notification options for the specified identity store.
Syntax
Clear-SmtpServer
-IdentityStoreName <string>
[<CommonParameters>]
Required Parameter
- IdentityStoreName
Example 1:
This example clears the configured SMTP server in AdStore9 identity store.
Clear-SmtpServer -IdentityStoreName AdStore9
See Also
Get-AvailableMessagingServers
The commandlet Get-AvailableMessagingServers retrieves the messaging server(s) available for the configured messaging provider.
Syntax
Get-AvailableMessagingServers
-IdentityStoreName <string>
-Provider {o365 | gsuite | exchange2013 | exchange2016 | exchange2019}
-UserName <string>
[-Password <string>]
<CommonParameters>]
Get-AvailableMessagingServers
-IdentityStoreName <string>
-Provider {o365 | gsuite | exchange2013 | exchange2016 | exchange2019}
-Credential <pscredential>
[<CommonParameters>]
Required Parameters
- IdentityStoreName
- Provider
- Credential
Example 1:
This example retrieves the available messaging server(s) configured in AdStore1 identity store for Exchange 2013 messaging provider.
Get-AvailableMessagingServers -IdentityStoreName AdStore1 -Provider exchange2013 -UserName administrator -Password webdir123R -Domain pucit.local
Example 2:
This example retrieves the available messaging server(s) configured in Adstore1 identity store for Office365 messaging provider.
Get-AvailableMessagingServers -IdentityStoreName AdStore1 -Provider o365 -UserName admin@mydomain.onmicrosoft.com -Password webdir123R -Domain mydomain.onmicrosoft.com -AppId 'eeeeeeee-aaaa-dddd-bbbb-cccccccccccc'
Example 3:
This example retrieves the available messaging server(s) in AdStore1 identity store for GSuite (Google Apps) messaging provider.
Get-AvailableMessagingServers -IdentityStoreName AdStore1 -Provider gsuite -UserName svcaccount@myproject-219211.iam.gserviceaccount.com -AdminUsername 'arslan@mydomain.com' -P12CertificatePath 'C:\Keys\gsuite\key.p12'
See Also
Get-Client
The commandlet Get-Client gets information about the GroupID clients such as Admin center, GroupID portal(s), management shell, GroupID services such as replication service, scheduler service, data service and so on. The information includes client name, client type, and its status whether enabled or disabled.
Syntax
Get-Client
[[-ClientName] <String>]
[-IdentityStoreId <Int32>]
[-SecurityToken <CustomClaimsPrincipal>]
[-Credential <PSCredential>]
[-WarningAction <ActionPreference>]
[-InformationAction <ActionPreference>]
[-WarningVariable <String>]
[-InformationVariable <String>]
[-PipelineVariable <String>]
[<CommonParameters>]
Required Parameter
- None
Example 1:
This example retrieves information about a client Admin Center.
Get-Client –ClientName ‘Admin Center’
Example 2:
This example retrieves information about two clients – ManagementShell <machine name> and
GroupIDPortal1 – through the pipeline operator.
‘ManagementShell <machine name>’, ‘GroupIDPortal1’ | Get-Client
Example 3:
This example lists all GroupID clients available on the GroupID machine.
Get-Client
See Also
Get-IdentityStore
The commandlet Get-IdentityStore retrieves information about the specified identity store or retrieves information of identity store(s) as per the given switches such as All, Connected, Enabled or Disabled.
The information includes identity store name, description, connection string, notification status, roles in identity store, and so on.
Syntax
Get-IdentityStore
  -IdentityStoreName <String>
  [-IdentityStoreId <Int32>]
  [-SecurityToken <CustomClaimsPrincipal>]
  [-Credential <PSCredential>]
  [-WarningAction <ActionPreference>]
  [-InformationAction <ActionPreference>]
  [-WarningVariable <String>]
  [-InformationVariable <String>]
  [-PipelineVariable <String>]
  [<CommonParameters>]
Get-IdentityStore
  -All
  [-IdentityStoreId <Int32>]
  [-SecurityToken <CustomClaimsPrincipal>]
  [-Credential <PSCredential>]
  [-WarningAction <ActionPreference>]
  [-InformationAction <ActionPreference>]
  [-WarningVariable <String>]
  [-InformationVariable <String>]
  [-PipelineVariable <String>]
 [<CommonParameters>]
Get-IdentityStore
  -Connected
  [-IdentityStoreId <Int32>]
  [-SecurityToken <CustomClaimsPrincipal>]
  [-Credential <PSCredential>]
  [-WarningAction <ActionPreference>]
  [-InformationAction <ActionPreference>]
  [-WarningVariable <String>]
  [-InformationVariable <String>]
  [-PipelineVariable <String>]
  [<CommonParameters>]
Get-IdentityStore
  -Enabled
  [-IdentityStoreId <Int32>]
  [-SecurityToken <CustomClaimsPrincipal>]
  [-Credential <PSCredential>]
  [-WarningAction <ActionPreference>]
  [-InformationAction <ActionPreference>]
  [-WarningVariable <String>]
  [-InformationVariable <String>]
  [-PipelineVariable <String>]
  [<CommonParameters>]
Get-IdentityStore
  -Disabled
  [-IdentityStoreId <Int32>]
  [-SecurityToken <CustomClaimsPrincipal>]
  [-Credential <PSCredential>]
  [-WarningAction <ActionPreference>]
  [-InformationAction <ActionPreference>]
  [-WarningVariable <String>]
  [-InformationVariable <String>]
  [-PipelineVariable <String>]
  [<CommonParameters>]
Required Parameter
- IdentityStoreName or a switch
{ All | Connected | Enabled | Disabled }
Example 1:
This example retrieves information of AdStore1 identity store.
Get-IdentityStore -IdentityStoreName AdStore1
Example 2:
This example retrieves information of two identity stores – AdStore1 and AdStore2 – through the pipeline operator.
'AdStore1','AdStore2' | Get-IdentityStore
Example 3:
This example retrieves information of all identity stores available on the GroupID machine.
Get-IdentityStore -All
Example 4:
This example retrieves information of identity store connected to the current instance of the GroupID Management Shell.
Get-IdentityStore -Connected
Example 5:
This example displays information of all enabled identity store(s).
Get-IdentityStore -Enabled
Example 6:
This example is for getting information of all disabled identity store(s).
Get-IdentityStore -Disabled
See Also
Get-IdentityStoreRoles
The commandlet Get-IdentityStoreRoles retrieves information about the security roles associated with an identity store. The information includes role name, role priority, role criteria and role permissions.
Syntax
Get-IdentityStoreRoles
[-IdentityStoreName] <String> [[-RoleName] <String>]
[[-Subset] <String>]
[-IdentityStoreId <Int32>]
[-SecurityToken <CustomClaimsPrincipal>]
[-Credential <PSCredential>]
[-WarningAction <ActionPreference>]
[-InformationAction <ActionPreference>]
[-WarningVariable <String>]
[-InformationVariable <String>]
[-PipelineVariable <String>]
[<CommonParameters>]
Required Parameter
- IdentityStoreName
Example 1:
This example retrieves information of customrole1 role in AdStore1 identity store.
Get-IdentityStoreRoles -IdentityStoreName AdStore1 -RoleName customrole1
Example 2:
This example provides information about all roles in adstore1 identity store.
Get-IdentityStoreRoles -IdentityStoreName adstore1
Example 3:
This example retrieves information about two security roles – customrole1 and customrole2 – in AdStore1 identity store through the pipeline operator.
'customrole1', 'customrole2' | Get-IdentityStoreRoles -IdentityStoreName AdStore1
See Also
Get-LogSettings
The commandlet Get-LogSettings provides information about the global log settings of the identity store connected with this instance of GroupID Management Shell.
Syntax
Get-LogSettings
[<CommonParameters>]
Required Parameter
- None
Example:
This example retrieves the log settings of the connected identity store.
Get-LogSettings
See Also
Get-RolePermissionNames
The commandlet Get-RolePermissionNames helps user to see the names of the permissions that can be assigned to / revoked from a security role in an identity store.
Syntax
Get-RolePermissionNames
[-IncludeEntityTypes]
[<CommonParameters>]
Required Parameter
- None
Example 1:
This example provides a list of permission names for a security role.
Get-RolePermissionNames
Example 2:
This example provides a list of permission names along with the category of a permission.
Get-RolePermissionNames -IncludeEntityTypes
See Also
Get-SchemaAttributes
The commandlet Get-SchemaAttribute enables you to retrieve comprehensive list of schema attributes available for an identity store.
This cmdlet can be used to enlist the names of schema attributes required for various cmdlets like cmdlets related to identity store roles etc.
Syntax
Get-SchemaAttributes
[-IdentityStoreName] <string>
[<CommonParameters>]
Required Parameter
- IdentityStoreName
Example:
This example retrieves a list of available schema attributes in alphabetical order for the AdStore9 identity store.
Get-SchemaAttributes -IdentityStoreName AdStore9
See Also
Get-SmsGateways
The commandlet Get-SmsGateways provides information of the SMS gateways configured in GroupID.
Syntax
Get-SmsGateways
[<CommonParameters>]
Required Parameter
- None
Example:
This example lists all the configured SMS gateways in GroupID.
Get-SmsGateways
See Also
Get-UserRole
The commandlet Get-UserRole displays information about the role of the specified user in an identity store.
If a user has different roles in different GroupID clients of an identity store; and ClientName parameter is not specified, this commandlet displays the highest priority role of the user. If the identity store name is not specified, the connected identity store is used by this cmdlet.
Syntax
Get-UserRole
[-Identity] <string>
[-IdentityStoreName <string>]
[-ClientName <string>]
[-All]
[<CommonParameters>]
Required Parameter
- Identity
Example 1:
This example provides role information of the user testingaccount in the Admin Center client of the AdStore1 identity store.
Get-UserRole -Identity testingaccount -IdentityStoreName AdStore1 -ClientName 'Admin Center'
Example 2:
This example displays the highest priority role information of the testingaccount@pucit.local user for all clients of AdStore1 identity store.
Get-UserRole -Identity testingaccount@pucit.local -IdentityStoreName AdStore1
Example 3:
This example displays role information of the testingaccount@pucit.local user in the
ManagementShell <machine name> client of the connected identity store.
Get-UserRole -Identity testingaccount@pucit.local -ClientName 'ManagementShell `<machine name>`'
Example 4:
This example retrieves the highest priority role of testingaccount user in the connected identity store. If the user has different roles in different GroupID clients, only the role having the highest priority is retrieved.
Get-UserRole -Identity testingaccount
Example 5:
This example retrieves information of all roles of testingaccount user in all client of the connected identity store.
Get-UserRole -Identity testingaccount -All
Example 6:
This example retrieves all roles of euser1 and euser2 users in the connected identity store through pipelining.
'euser1', 'euser2', 'testingaccount' | Get-UserRole -All
See Also
New-IdentityStore
The commandlet New-IdentityStore creates a new identity store. This commandlet requires valid credentials and connectivity before it creates the store. However, this behavior can be overridden by specifying the IgnoreConnectionFail parameter.
This cmdlet uses dynamic parameters based on the value of IdentityStoreType parameter. The parameters that become available depending on the values of IdentityStoreType are as follows:
-
IdentityStoreType: ActiveDirectory
Domain: The connection string / domain of the active directory.
-
IdentityStoreType: MicrosoftAzure
Domain: The domain of the Microsoft Entra ID / Office365 store.
AppId: The name of GroupID application registered in the Microsoft Entra ID admin panel.
-
IdentityStoreType: GoogleWorkspace
AdminUsername: The username of the administrator of the Google Workspace account.
P12CertificatePath: The path where the certificate file (.p12 extension) downloaded from Google Admin Console is placed (including the filename).
Syntax
New-IdentityStore
-IdentityStoreType <IdentityStoreType>
-IdentityStoreName <String>
-Credential <PSCredential>
[-Description <String>]
[-PassThru]
[-IgnoreConnectionFail]
[-IdentityStoreId <Int32>]
[-SecurityToken <CustomClaimsPrincipal>]
[-WarningAction <ActionPreference>]
[-InformationAction ActionPreference>]
[-WarningVariable <String>]
[-InformationVariable <String>]
[-PipelineVariable <String>]
[<CommonParameters>]
Required Parameters
- IdentityStoreType
- IdentityStoreName
- Credential
Example 1:
This example create a new Active Directory based identity store by explicitly specifying the credentials for the new identity store.
New-IdentityStore -IdentityStoreType ActiveDirectory -IdentityStoreName DemoAdStore2 -Credential $cred -Domain pucit.local
NOTE: For an Active Directory based identity store, Domain parameter is mandatory.
Example 2:
This example creates a new Active Directory based identity store by providing the secure credentials. Here $cred is an object of type PSCredential which was created by Get-Credential commandlet.
New-IdentityStore -IdentityStoreType ActiveDirectory -IdentityStoreName DemoAdStore2 -Credential $cred -Domain pucit.local
Example 3:
This example creates an Microsoft Entra ID based identity store.
New-IdentityStore -IdentityStoreType MicrosoftAzure -IdentityStoreName DemoAzStore1 -UserName admin@mydomain.onmicrosoft.com -Password webdir123R -Domain mydomain.onmicrosoft.com -AppId 'aaaaaaaa-bbbb-cccc-dddd-eeeeeeeeeeee'
NOTE: In case of an Microsoft Entra ID based identity store, Domain and AppId parameters are mandatory.
Example 4:
This example creates a Google Apps (Google Workspace) based identity store.
New-IdentityStore -IdentityStoreType GoogleWorkspace -IdentityStoreName DemoGStore1 -UserName svcacc@myproject-111222.iam.gserviceaccount.com -AdminUsername admin@mydomain.com -P12CertificatePath 'C:\Keys\gsuite\key.p12'
NOTE: For Google Apps based identity store, AdminUserName and P12CertificatePath parameters are mandatory. However, ‘Password’ parameter is ignored.
Example 5:
This example creates Google Apps (G-Suite) based identity store using secure credentials.
The $creds (an object of type PSCredential) object must contain the service account as username. The ‘Password’ property of this object can be anything but not empty.
New-IdentityStore -IdentityStoreType GoogleWorkspace -IdentityStoreName DemoGStore2 -Credential $creds -AdminUsername arslan@bibelotz.com -P12CertificatePath 'C:\Keys\gsuite\key.p12'
Example 6:
This example creates an Active Directory based identity store by ignoring the credential and connection details.
New-IdentityStore -IdentityStoreType ActiveDirectory -IdentityStoreName DemoAdStore3 -UserName nouser -Password wrongpwd -Domain nodomain.local -IgnoreConnectionFail
See Also
Remove-IdentityStore
The commandlet Remove-IdentityStore removes an identity store from GroupID.
Syntax
Remove-IdentityStore
[-IdentityStoreName] <String>
[-PassThru]
[-IdentityStoreId <Int32>]
[-SecurityToken <CustomClaimsPrincipal>]
[-Credential <PSCredential>]
[-WarningAction <ActionPreference>]
[-InformationAction <ActionPreference>]
[-WarningVariable <String>]
[-InformationVariable <String>]
[-PipelineVariable <String>]
[<CommonParameters>]
Required Parameter
- IdentityStoreName
Example 1:
This example removes an identity store named DemoAzStore1.
Remove-IdentityStore -IdentityStoreName DemoAzStore1
Example 2:
This example removes DemoGStore1 and DemoGStore2 identity stores through the pipeline operator.
'DemoGStore1', 'DemoGStore2' | Remove-IdentityStore
See Also
Send-TestNotification
The commandlet Send-TestNotification sends a test notification using the email addresses (specified From/To) through the SMTP server of the specified identity store. This cmdlet can be used to validate SMTP settings before configuring notifications or SMTP settings.
Syntax
Send-TestNotification
-IdentityStorename <string>
-SmtpServer <string>
-FromEmail <string>
-ToEmail <string>
-Port <int>
[-Credential <pscredential>]
[-UseSmptUserAuthentication]
[-SslEnabled]
[<CommonParameters>]
Required Parameters
- IdentityStoreName
- SmtpSesrver
- FromEmail
- Toemail
- Port
Example 1:
This example sends a test notification to euser1@pucit.local using the SMTP server configured on port 25 for user arsalanahmadsvm in AdStore1 identity store.
Send-TestNotification -IdentityStorename AdStore9 -SmtpServer arslanahmadsvm.pucit.local -Port 25 -FromEmail noreply@pucit.local -ToEmail euser1@pucit.local
See Also
Set-IdentityStore
The commandlet Set-IdentityStore modifies the identity store settings and configurations.
NOTE: Many parameters of this cmdlet require the user to specify schema attribute names. You can use Get-SchemaAttributes commandlet to retrieve a list of attributes available for an identity store.
Syntax
Set-IdentityStore
-IdentityStoreName <string>
-Credential <pscredential>
[-NewName <string>]
[-StoreDescription <string>]
[-StoreEnabled <bool>]
[-RoleOperation {add | remove | remove all}]
[-RoleName <string>]
[-RoleDescription <string>]
[-RolePriority <string>]
[-RoleCriteriaScope {Group | Container}]
[-RoleCriteriaDN <string>]
[-RoleCriteriaOperator {Or | And}]
[-RoleCriteriaFilters <string[][]>]
[-RolePermissions <string[]>]
[-RoleNameToCopy <string>]
[-DefaultAllowRolePermissions]
[-RoleReadonly]
[-RoleSystemOnly]
[-RoleDisabled]
[-GroupExpiryQuantity <string>]
[-GroupExpiryUnit {Never | Days | Weeks | Months | Years | Indefinite}]
[-GlmContainersPolicy {Exclude | Include}]
[-GlmContainers <string[]>]
[-GlmContainersOperation {add | remove | remove all}]
[-EnableSecurityGroupsExpiry]
[-DisableSecurityGroupsExpiry]
[-EnableExpiredGroupDeletion]
[-ExpiredGroupsDeletionInterval <string>]
[-DisableExpiredGroupDeletion]
[-EnableGUSLifecycle]
[-GroupExtensionPolicy {Extend | Reduce}]
[-GroupLifeDays <string>]
[-DisableGUSLifecycle]
[-EnableGroupAttestation]
[-DisableGroupAttestation]
[-DefaultApprover <string>]
[-GlmNotifyOwnersXDaysBeforeOperation {add | remove | remove all}]
[-GlmNotifyOwnersXDaysBefore <string[]>]
[-GlmEnableNotificationOfTodaysExpiry]
[-GlmDisableNotificationOfTodaysExpiry]
[-PrefixOperation {add | remove | remove all}]
[-Prefixes <string[]>]
[-HistoryTrackingOption {Nothing | All_Actions | Selected_Actions}]
[-HistoryActionsOperation {add | remove | remove all}]
[-HistorySelectedActions {OwnershipChange | AdditionalOwnerChange | ExpirationPolicyChange | GroupExpireRenew | QueryChange | SecurityTypeChange | ObjectCreated | ObjectDeleted | IdentityStoreHistory | SecurityRolesHistory | WorkflowsHistory}]
[-HistoryRetention {All | Last_30_Days | Last_60_Days | Last_90_Days | Last_120_Days | Last_6_Months | Last_1_Year | Last_2_Years | Last_5_Years}]
[-FileLoggingEvent {All | Debug | Info | Warn | Error | Off}]
[-WindowsLoggingEvent {FailureAudit | SuccessAudit | Info | Warn | Error}]
[-MaximumMembersPerGroup <string>]
[-WhenGroupMembershipThresholdReach {PreventUpdation | NestIntoChildGroups}]
[-EnableOrphanGroupsDeletion]
[-DisableOrphanGroupsDeletion]
[-EnableOutOfBoundsAlerts]
[-DisableOutOfBoundsAlerts]
[-MembershipCountThreshold <string>]
[-MembershipPercentageThreshold <string>]
[-ProfileValidationGroupDN <string>]
[-RegularProfileValidationLifecycle <string>]
[-EnableNewProfileValidationLifecycle]
[-DisableNewProfileValidationLifecycle]
[-NewProfileValidationLifecycle <string>]
[-ProfileValidationReminderOperation {add | remove}]
[-ProfileValidationReminders <string[][]>]
[-ProfileValidationExtensionPeriod <string>]
[-EnableAttributeUpdation]
[-DisableAttributeUpdation]
[-ProfileValidationAttributeName <string>]
[-ProfileValidationAttributeValue <string>]
[-EnableValidationDateRemoval]
[-DisableValidationDateRemoval]
[-ValidationDateRemovalInterval <string>]
[-EnrollmentEnabled <bool>]
[-AuthenticationTypeOperation {enable | disbale}]
[-AuthenticationType <string[]>]
[-QuestionOperation {add | remove | remove all}]
[-SecurityQuestions <string[]>]
[-PasswordExceptionOperation {add | remove | remove all}]
[-PasswordExceptions <string[][]>]
[-PasswordRuleOperation {add | remove | remove all}]
[-PasswordRules <string[]>]
[-DisallowingPasswordExceptionFilePath <string>]
[-EnableSWAuthenticationViaSecurityQuestions]
[-DisableSWAuthenticationViaSecurityQuestions]
[-SWAQuestionsOperation {add | remove}]
[-SWAQuestions <string[][]>]
[-EnableSWAuthenticationViaMobile]
[-DisableSWAuthenticationViaMobile]
[-SWAMobileAttribute <string>]
[- EnableSWAuthetnicationViaEmail]
[-DisableSWAuthenticationViaEmail]
[-SWEmailAttribute <string>]
[-SWAuthenticationFactor <string>]
[<CommonParameters>]
NOTE: You can use the Set-IdentityStore commandlet in a secure way by using the Credential parameter or by specifying the credentials through Username and Password parameters in plain text format which is not a secure way.
Required Parameters
- IdentityStoreName
- Credential / Username
Example 1:
This example changes name of AdStore9 identity store to AdStore9_renamed.
Set-IdentityStore -IdentityStoreName AdStore9 -NewName 'AdStore9_renamed' -Credential $creds -Domain pucit.local
Example 2:
This example enables the email verification authentication type for the AdStore9 identity store.
Set-IdentityStore -IdentityStoreName AdStore9 -Credential $creds -Domain pucit.local -AuthenticationTypeOperation enable -AuthenticationType 'Email Verification'
Example 3:
This example disables enrollment for the AdSore9 identity store.
Set-IdentityStore -IdentityStoreName AdStore9 -Credential $creds -Domain pucit.local -EnrollmentEnabled $false
Example 4:
This example modifies the group lifecycle expiry policy of the AdStore9 identity store to 21 days.
Set-IdentityStore -IdentityStoreName AdStore9 -Credential $creds -Domain pucit.local -GroupExpiryQuantity 21
Example 5:
This example modifies the group lifecycle expiration policy of AdStore9 identity store to 10 months.
Set-IdentityStore -IdentityStoreName AdStore9 -Credential $creds -Domain pucit.local -GroupExpiryQuantity 10 -GroupExpiryUnit Months
Example 6:
This example sets the group lifecycle expiration policy of the AdStore9 identity store to ‘never’ by setting value of the GroupExpiryUnit parameter to Indefinite. Even though the GroupExpiryQuantity parameter is set to any value.
Set-IdentityStore -IdentityStoreName AdStore9 -Credential $creds -Domain pucit.local -GroupExpiryQuantity 10 -GroupExpiryUnit Indefinite
Example 7:
This example Configures containers policy and add containers.
Set-IdentityStore -IdentityStoreName AdStore9 -Credential $creds -Domain pucit.local -GlmContainersPolicy Include -GlmContainersOperation add -GlmContainers 'OU=WorkingOU,DC=pucit,DC=local','OU=ArslanAhmadOU,OU=WorkingOU,DC=pucit,DC=local'
Example 8:
This example enables expiry of security groups, deletion of expired groups and sets interval of group deletion to 45 days.
Set-IdentityStore -IdentityStoreName AdStore9 -Credential $creds -Domain pucit.local -EnableSecurityGroupsExpiry -EnableExpiredGroupDeletion -ExpiredGroupsDeletionInterval 45
Example 9:
This example enables GUS lifecycle and reduces group’s life if not used within 25 days.
Set-IdentityStore -IdentityStoreName AdStore9 -Credential $creds -Domain pucit.local -EnableGUSLifecycle -GroupExtensionPolicy Reduce -GroupLifeDays 25
Example 10:
This example enables group attestation feature and sets the TestingAccoun@pucit.local user as the default approver for the AdStore9 identity store.
Set-IdentityStore -IdentityStoreName AdStore9 -Credential $creds -Domain pucit.local -EnableGroupAttestation -DefaultApprover 'CN=Testing Account,CN=Users,DC=pucit,DC=local'
Example 11:
This example sets the notifications (in number of days) before group expiry. It also enables today’s expiry reports as well as it enables the group attestation.
Set-IdentityStore -IdentityStoreName AdStore9 -Credential $creds -Domain pucit.local -EnableGroupAttestation -GlmNotifyOwnersXDaysBeforeOperation add -GlmNotifyOwnersXDaysBefore 1,3,10 -GlmEnableNotificationOfTodaysExpiry
Example 12:
This example creates a new role – DemoRole1 – for the AdStore9 identity store by specifying the minimum possible parameters.
NOTE: By default, all permissions are declined to the role created through this commandlet. Moreover, no criteria filters or scope (group / container) are added to the role.
Set-IdentityStore -IdentityStoreName AdStore9 -Credential $creds -Domain pucit.local -RoleOperation add -RoleName DemoRole1 -RolePriority 50 -RoleCriteriaScope Container
Example 13:
This example creates a new security role – DemoRole1 – in AdStore9 identity store and a container is set as its role criteria.
NOTE: By default, all permissions are declined to the role created through this commandlet.
Set-IdentityStore -IdentityStoreName AdStore9 -Credential $creds -Domain pucit.local -RoleOperation add -RoleName DemoRole1 -RolePriority 50 -RoleCriteriaScope Container -RoleCriteriaDN 'ou=workingou,dc=pucit,dc=local'
Example 14:
This example creates a new security role by specifying the container and criteria filters.
The value for RoleCriteriaFilters parameter is specified as 3-length arrays. At first index, specify the filter name which can be either ‘name’ or ‘type’. Second index holds the operator which is one of the ‘is exactly’ and ‘is not’ operator. The third index of the array holds the client name or client type depending upon whether ‘name’ or ‘type’ is specified at the first index.
Set-IdentityStore -IdentityStoreName AdStore9 -Credential $creds -Domain pucit.local -RoleOperation add -RoleName DemoRole4 -RolePriority 53 -RoleCriteriaScope Container -RoleCriteriaDN 'ou=workingou,dc=pucit,dc=local' -RoleCriteriaOperator Or -RoleCriteriaFilters @('name', 'is exactly', 'automate arslanahmadvm'), @('type', 'is not', 'managementshell')
Example 15:
This example creates a new security role by specifying the container, criteria filters and permissions. In this example, only Manage My Groups and Create User permissions are granted to the created role.
NOTE: By default, all the permissions except those specified in RolePermissions parameter are denied
to the role created through this commandlet.
The role permission names can be retrieved from Get-RolePermissionNames commandlet.
Set-IdentityStore -IdentityStoreName AdStore9 -Credential $creds -Domain pucit.local -RoleOperation add -RoleName DemoRole6 -RolePriority 55 -RoleCriteriaScope Container -RoleCriteriaDN 'ou=workingou,dc=pucit,dc=local' -RoleCriteriaOperator Or -RoleCriteriaFilters @('name', 'is exactly', 'automate arslanahmadvm'), @('type', 'is not', 'managementshell') -RolePermissions 'manage my groups', 'create user'
Example 16:
This example creates a new security role by specifying a role criterion as container, criteria filters and permissions.
By default, all the permissions except those specified in RolePermissions parameter are granted. This is due to the presence of DefaultAllowPermissions. In this example, only Manage my groups and Create user permissions are denied (and the remaining ones are granted) to the created role.
Set-IdentityStore -IdentityStoreName AdStore9 -Credential $creds -Domain pucit.local -RoleOperation add -RoleName DemoRole5 -RolePriority 54 -RoleCriteriaScope Container -RoleCriteriaDN 'ou=workingou,dc=pucit,dc=local' -RoleCriteriaOperator Or -RoleCriteriaFilters @('name', 'is exactly', 'automate arslanahmadvm'), @('type', 'is not', 'managementshell') -RolePermissions 'manage my groups', 'create user' –DefaultAllowRolePermissions
Example 17:
This example creates two group prefixes – dev and ment –at identity store level.
Set-IdentityStore -IdentityStoreName AdStore9 -Credential $creds -Domain pucit.local -PrefixOperation add -Prefixes 'dev', 'ment'
Example 18:
This example tracks history of the selected actions for the AdStore9 identity store. The selected actions are additional owner change, expiration policy change and renewal of group. History retention period is also specified as last 120 days.
Set-IdentityStore -IdentityStoreName AdStore9 -Credential $creds -Domain pucit.local -HistoryTrackingOption Selected_Actions -HistoryActionsOperation add -HistorySelectedActions AdditionalOwnerChange, ExpirationPolicyChange, GroupExpireRenew -HistoryRetention Last_120_Days
Example 19:
This example configures file and windows logging settings for the AdStore9 identity store. File logging is set to Debug level and windows logging to FailureAudit.
Set-IdentityStore -IdentityStoreName AdStore9 -Credential $creds -Domain pucit.local -FileLoggingEvent Debug -WindowsLoggingEvent FailureAudit
Example 20:
This example configures out of bounds settings for the AdStore9 identity store.
Maximum 500 members are allowed in each group and when the threshold reaches, the members will be nested into child groups. The orphan groups will be deleted. Do not update the membership and alert if the percentage in membership exceeds by more than 65% and either the current or new membership exceeds 200 members.
Set-IdentityStore -IdentityStoreName AdStore9 -Credential $creds -Domain pucit.local -MaximumMembersPerGroup 500 -WhenGroupMembershipThresholdReach NestIntoChildGroups -EnableOrphanGroupsDeletion -EnableOutOfBoundsAlerts -MembershipCountThreshold 200 -MembershipPercentageThreshold 65
Example 21:
This example configures profile validation settings. This example specifies that profile validation policies should be applied on group specified by distinguished name ‘CN=ProfileValidation1,OU=ArslanAhmadOU,OU=WorkingOU,DC=pucit,DC=local’. Regular profiles should be validated within 60 days. New profiles should also be validated within 15 days. Validation extension period should be 7 days.
Set-IdentityStore -IdentityStoreName AdStore9 -Credential $creds -Domain pucit.local -ProfileValidationGroupDN 'CN=ProfileValidation1,OU=ArslanAhmadOU,OU=WorkingOU,DC=pucit,DC=local' -RegularProfileValidationLifecycle 60 -EnableNewProfileValidationLifecycle -NewProfileValidationLifecycle 15 -ProfileValidationExtensionPeriod 7
Example 22:
This example configures profile validation settings. This example cmdlet adds two profile validation reminders. It also causes an attribute named ‘info’ to be updated with value ‘Validation expired’ when the profile validation is expired. It also causes the validation date to be removed after 5 days (after which the policies for new users are applied to the users).
Set-IdentityStore -IdentityStoreName AdStore9 -Credential $creds -Domain pucit.local -ProfileValidationReminderOperation add -ProfileValidationReminders @('fourth', 45), @('fifth', 60) -EnableAttributeUpdation -ProfileValidationAttributeName info -ProfileValidationAttributeValue 'Validation expired' -EnableValidationDateRemoval -ValidationDateRemovalInterval 5
Example 23:
This example adds two security questions in the AdStore9 identity store.
Set-IdentityStore -IdentityStoreName AdStore9 -Credential $creds -Domain pucit.local -QuestionOperation add -SecurityQuestions 'When was the first time you felt that it was raining even though it was not raining?', 'What would happen if there were no GroupID?'
Example 24:
This example configures password options.
This example enforces the following password policy: Do not allow passwords starting with either ‘webdir123R’ or containing ‘123R’ and allow only those passwords matching '^(?=.*[a-z])(?=.*[A-Z])(?=.*\d)(?=.*[^\da-zA-Z]).15$' regular expression pattern.
‘PasswordExceptions’ parameter accepts 2-Length arrays having at first index the operator and at second index the string. Allowed operators contain: ‘equals’; ‘startswith’; ‘endswith’; ‘contains’; and ‘regexp’.
Set-IdentityStore -IdentityStoreName AdStore9 -Credential $creds -Domain pucit.local -PasswordExceptionOperation add -PasswordExceptions @('startswith', 'webdir123R'), @('contains', '123R') -PasswordRuleOperation add -PasswordRules '^(?=.*[a-z])(?=.*[A-Z])(?=.*\d)(?=.*[^\da-zA-Z]).{8,15}$'
Example 25:
This example configures the second way authentication via security questions.
Set-IdentityStore -IdentityStoreName AdStore9 -Credential $creds -Domain pucit.local -EnableSWAuthenticationViaSecurityQuestions -SWAQuestionsOperation add -SWAQuestions @('when was the first time you felt that it is raining even though it was not raining?', 'info')
See Also
Set-IdentityStoreRole
Use the Set-IdentityStoreRole commandlet to modify properties of a security role in an identity store.
Syntax
Set-IdentityStoreRole
-RoleName <string>
-IdentityStoreName <string>
[-NewName <string>]
[-Description <string>]
[-Priority <int>]
[-Enabled <bool>]
[-CriteriaScope {Group | Container}]
[-DistinguishedName <string>]
[-Operator {Or | And}]
[-CriteriaFilters <string[][]>]
[-FilterOperation {Add | Remove | RemoveAll}]
[-Permissions <string[]>]
[-PermissionOperation {GrantAll | GrantExcept | Grant | Deny | DenyExcept | DenyAll}]
[<CommonParameters>]
Required Parameters
- RoleName
- IdentityStoreName
Example 1:
This example modifies properties of the DemoRole1 role in AdStore9 identity store. It renames the role to DemoRole1_Renamed and sets its priority to 45.
Set-IdentityStoreRole -RoleName DemoRole1 -IdentityStoreName AdStore9 -NewName DemoRole1_Renamed -Priority 45 -Enabled $True
Example 2:
This example modifies the DemoRole2 role in the AdStore9 identity store. The scope of the role is set to a container and removes filters specified in CriteriaFilters parameter.
Set-IdentityStoreRole -RoleName DemoRole2 -IdentityStoreName AdStore9 -CriteriaScope Container -DistinguishedName 'ou=workingou,dc=pucit,dc=local' -FilterOperation Remove -CriteriaFilters @('type', 'is not', 'managementshell')
Example 3:
This example modifies the permissions assigned to the DemoRole2 role. Two permissions Manage any group and Create Smart Group are being assigned.
Set-IdentityStoreRole -RoleName DemoRole2 -IdentityStoreName AdStore9 -PermissionOperation Grant -Permissions 'Manage any group', 'create smart group'
See Also
Set-MessagingServer
The commandlet Set-MessagingServer configures a messaging system in identity store. The SmtpServer parameter requires the server name of the messaging system to be specified. Get-AvailableMessagingServers commandlet can be used to retrieve the server names of the messaging systems.
This commandlet also has some parameters that appear depending on the value of the Provider parameter.
Syntax
Set-MessagingServer
-IdentityStoreName <string>
-Provider {o365 | gsuite | exchange2013 | exchange2016 | exchange2019}
-Credential <pscredential>
-SmtpServer <string>
[-Priority <int>]
[-Disabled]
[<CommonParameters>]
Set-MessagingServer
-IdentityStoreName <string>
-Provider {o365 | gsuite | exchange2013 | exchange2016 | exchange2019}
-UserName <string>
-SmtpServer <string>
[-Password <string>]
[-Priority <int>]
[-Disabled]
[<CommonParameters>]
Required Parameters
- IdentityStoreName
- Provider
- Credential
- SmtpServer
Example 1:
This example modifies the messaging system of the AsStore9 identity store to Microsoft Office 365.
Set-MessagingServer -IdentityStoreName AdStore9 -Provider o365 -UserName admin@mydomain.onmicrosoft.com -Password webdir123R -SmtpServer ps.outlook.com -Domain mydomain.onmicrosoft.com -AppId 'a1b2c3d4-e5f6-f6e5-d4c3-b2a1b2c3d4e5'
Example 2:
This example modifies the messaging system of the AdStore9 identity store to Exchange 2013.
Set-MessagingServer -IdentityStoreName AdStore9 -Provider exchange2013 -UserName administrator -Password webdir123R - SmtpServer arslanahmadsvm.pucit.local -Domain pucit.local
See Also
Set-Notifications
Use the Set-Notifications commandlet to modify the notification settings of an identity store.
Syntax
Set-Notifications
-IdentityStoreName <string>
[-PrimaryRecepients <string[]>]
[-CarbonCopy <string[]>]
[-NotifyLoggedInUsers <bool>]
[-NotifyOwners <bool>]
[-NotifyModifiedObject <bool>]
[-NotifyPublicGroupOwner <bool>]
[-NotifyAddedMembers <bool>]
[-PasswordPortalUrl <string>]
[-NotifyUserGroupJoinML <bool>]
[-NotifyUserGroupLeaveML <bool>]
[-XDaysBeforeLeaveNotificationML <int>]
[-NotifyUserGroupJoinMB <bool>]
[-NotifyUserGroupLeaveMB <bool>]
[-XDaysBeforeLeaveNotificationMB <int>]
[<CommonParameters>]
Required Parameter
- IdentitySoreName
Example 1:
This example sets the primary and carbon copy (CC) recipients of the notifications for the AdStore9 identity store. Additionally, it also sets the group owners / managers and public group owners as the notification recipients.
Set-Notifications -IdentityStoreName AdStore9 -PrimaryRecepients 'euser1@pucit.local', 'euser2@pucit.local' -CarbonCopy 'exmb1@pucit.local' -NotifyOwners $true -NotifyPublicGroupOwner $true
Example 2:
This example configures recipients for membership lifecycle notifications i.e. it notifies the user upon joining a group and intimates the user before 7 days it is removed as a member from the group.
Set-Notifications -IdentityStoreName AdStore9 -NotifyUserGroupJoinML $true -XDaysBeforeLeaveNotificationML 7
See Also
Set-SmtpServer
The Set-SmtpServer commandlet configures an SMTP server for an identity store.
Syntax
Set-SmtpServer
-IdentityStorename <string>
-SmtpServer <string>
-FromEmail <string>
-ToEmail <string>
-Port <int>
[-Credential <pscredential>]
[-UseSmptUserAuthentication]
[-SslEnabled]
<CommonParameters>]
Required Parameters
- IdentityStorename
- SmtpServer
- FromEmail
- ToEmail
- Port
Example 1:
This example configures arsalanahmadsvm.pucit.local SMTP server for AdStore9 identity store on port 25. Email address for sending notification is specified as noreply@pucit.local and euser1@pucit.local as recipient email address.
Set-SmtpServer -IdentityStorename AdStore9 -SmtpServer arslanahmadsvm.pucit.local -FromEmail noreply@pucit.local -ToEmail euser1@pucit.local -Port 25
Example 2:
This example configures smtp.office365.com SMTP server that is SSL (Secured Socket Layer) enabled for AdStore9 identity store. The SMTP server is configured on port 587 and it uses credentials stored in the $creds variable.
Set-SmtpServer -IdentityStorename AdStore9 -SmtpServer smtp.office365.com -FromEmail admin@mydomain.onmicrosoft.com -ToEmail admin@mydomain.onmicrosoft.com -Port 587 -UseSmptUserAuthentication -SslEnabled -Credential $creds
See Also