Exchange Mailbox
Use the Exchange Mailbox source to enable the crawling and classification of content stored in a single Exchange mailbox on the on-premises Exchange server or Exchange Online.
Step 1 – In Netwrix Data Classification management console, open the Sources view and click Add.
Step 2 – Select Exchange Mailbox source type and in the properties window specify the necessary settings.
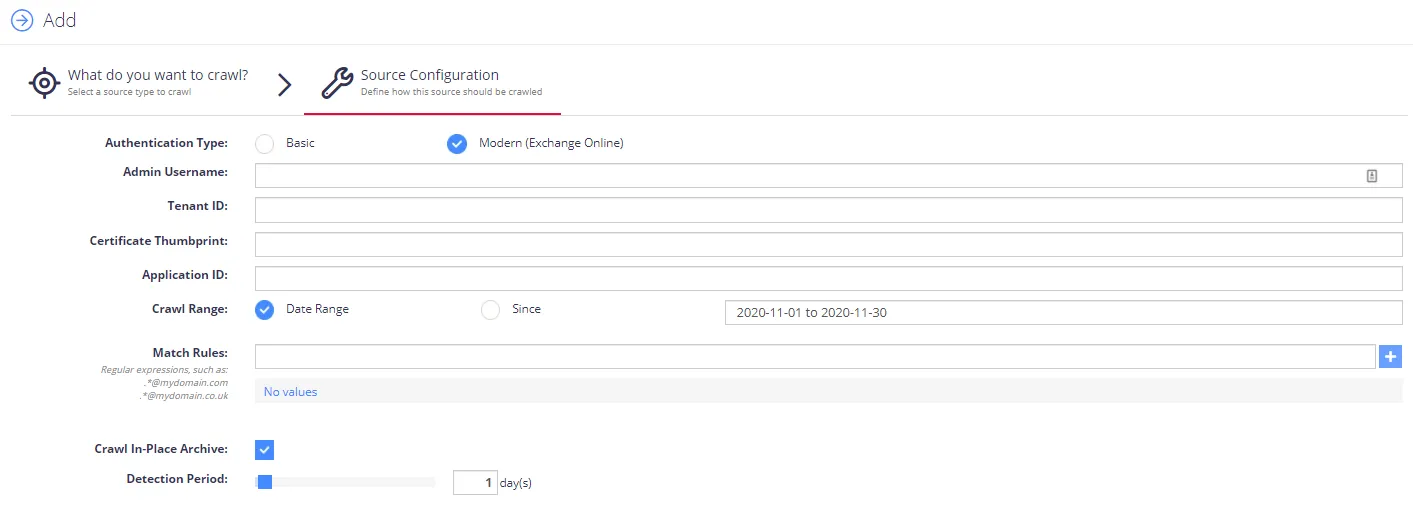
Authentication type: Modern authentication
If you plan to use this authentication type (available only for Exchange Online mailbox processing), specify the following:
| Option | Description |
|---|---|
| Authentication type | Select Modern (Exchange Online) |
| Admin Username | Specify the administrative account for the required Exchange Online organization. The user must have a mailbox connected to it in order to crawl Exchange. |
| Tenant ID | Enter the Tenant ID you obtained at Step 5: Obtain Tenant ID. |
| Certificate thumbprint | Enter the certificate thumbprint you prepared at Step 4: Configure Certificates & secrets. |
| Application ID | Enter the app ID you got at application registration at Step 2: Create and Register a new app in Azure AD (it can be found in the Azure AD app properties >Overview). |

Authentication type: Basic
If you plan to use this authentication type, you will need to specify the following:
| Option | Description | Comments |
|---|---|---|
| Email Address / Password | Administrator account that has been assigned both: 1. Impersonation right 2. Discovery Management role | See Configure Microsoft Exchange for Crawling and Classification for details on the rights assignment. |
Other configuration settings
By default, only basic settings are displayed. To view advanced options, click the "wrench" icon at Settings in the bottom.
| Option | Description | Comments |
|---|---|---|
| Basic settings | ||
| Mailbox | Mailbox to be crawled. | When using impersonation, the settings can be like the following example: - Email Address - administrative account granted Impersonation right, e.g. administrator@cs.com - Mailbox - target mailbox, e.g. test@cs.com. |
| Crawl Range | Define what portions of data should be retrieved from the Exchange server: - Select Date Range to crawl a static set of data within the required interval. - Select Since if you want to periodically re-crawl content from the specified date, taking into account the last crawl date for each object. | |
| Crawl In-Place Archive | Select this option if you want to crawl Exchange Online in-place archive mailboxes. | Applies to Exchange Online. |
| OCR Processing Mode | Set the processing mode for document images: - Disabled - document images will not be processed - Default - defaults to the source setting (if configuring a path) or the global setting (if configured on a source) - Normal - process the images with normal quality settings - Enhanced - upscale the images further to allow more accurate results. | The Enhanced mode will provide better accuracy but can lead to longer processing time if the images do not contain text. |
| Source Group | Select the source group (if any). | |
| Pause source on creation | Select if you want to make other configuration changes before data collection occurs. | |
| Advanced settings | ||
| Build Search Index | Select if you want search index to be created. | |
| Re-Index Period | Specify how often the source should be checked for changes. Default is 7 days. | Netwrix recommends using default values. |
| Priority | Set priority for this data source to be crawled. Select the priority level from the list values: - Highest - High - Normal - Low - Lowest | |
| Document Type | Specify a value which can be used to restrict queries when utilizing the Netwrix Data Classification search index. |
Exchange Mailbox
For the Exchange Mailbox source, you can configure the list of folders/emails to exclude from processing. Do the following:
-
In the management console, click Sources →Exchange Mailbox, then Collection Exclusion will be displayed.
-
To create an exclusion, click Add.
-

-
In the Details window, on the Filter tab enter the name of the entity to exclude. Consider the following:
- If you specify a folder name (e.g. “Drafts”) with no special characters, then any folders with that specific name will be excluded. Note that adding an exclusion of this type will match any folders with the name provided, wherever they are within the mailbox.
- Wrapping the exclusion in wildcard indicators (e.g. “*Deleted*”) will match any folder/email with “Deleted” somewhere in the title.
NOTE: You can optionally enter exclusion location in the Test Path field to verify the new filter, and click Test.
-
If needed, you can use metadata conditions to restrict when an exclusion filter should be applied. For that, click Condition tab and click Add. Then select how the exclusion conditions will work: it can check if metadata field of the document has any value, is not specified, or matches a specific metadata value.
Criteria Condition Comparison Compare a value in the document metadata field with the value set by condition. With this criteria selected, you will then need to specify: - Field name — document metadata field to check - Comparison — operator to use (for example, "does not contain") - Value — value to compare against For example, to exclude documents tagged with year 2018, set the condition as follows: - Field Name — DocYear - Comparison — equals - Value — 2018 Has any value Exclude the document if its metadata field has any value. With this criteria selected, specify Field Name. Has no values Exclude the document if metadata field value is not specified. With this criteria selected, specify Field Name. When finished, click Add.
-
Finally, click Save and close the window.