Configure Box for Crawling
Netwrix Data Classification connects to and crawls a Box source via a custom Box app, created within Box management portal.
Prerequisites
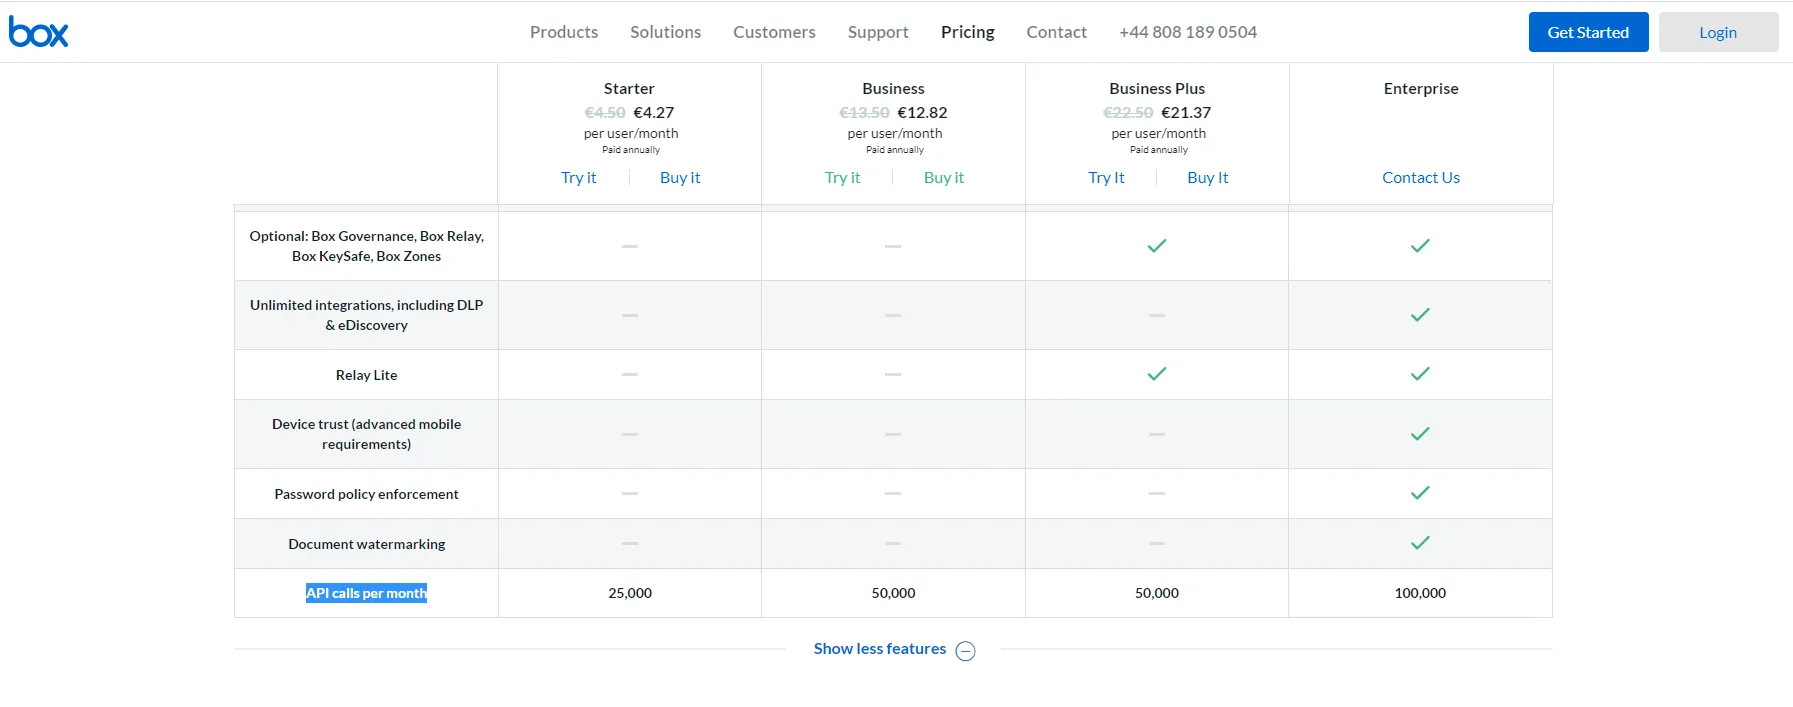
- Check if your Box license plan provides the capacity you need. Netwrix Data Classification uses API calls for content crawling (min one API call for a single file). Therefore, if you need to store and crawl a large amount of files in Box (e.g. 100, 000 files), then your selected plan should support a sufficient number of API calls per month. Otherwise, the solution will not be able to crawl your content in one month due to limited number of allowed API calls (e.g. with a Starter plan that provides only 25 000 calls per month). So, when selecting a Business subscription plan at https://www.box.com/pricing, remember to click Show more features in the bottom and examine the information on API calls per month supported by each plan.
- Make sure you have configured a valid Google account (with multi-factor authentication supported) and registered it as a Box Developer Account. This account is needed to create an app that Netwrix Data Classification will use for interaction with Box API. For more information on the custom apps and Box API, refer to this article.
NOTE: Account with multi-factor authentication will be required for private/public keys creation and usage, so if such authentication is not enabled, the program will display a warning message and suggest to configure the necessary settings.
Procedure Steps
There are four key stages in this procedure:
- Create an app.
- Authorize the app to access your organization’s data.
- Register the source with Netwrix Data Classification.
- Configure content for crawling within Box.
This section describes steps 1 and 2 that are performed on the Box side. Steps 3 and 4 are performed on the Netwrix Data Classification side and described in the Boxsection.
Step 1. Create the App
-
Log into your Box cloud-based storage facility using your Box Developer Account.
-
Open the Box developer's console endpoint:
https://app.box.com/developers/console. -
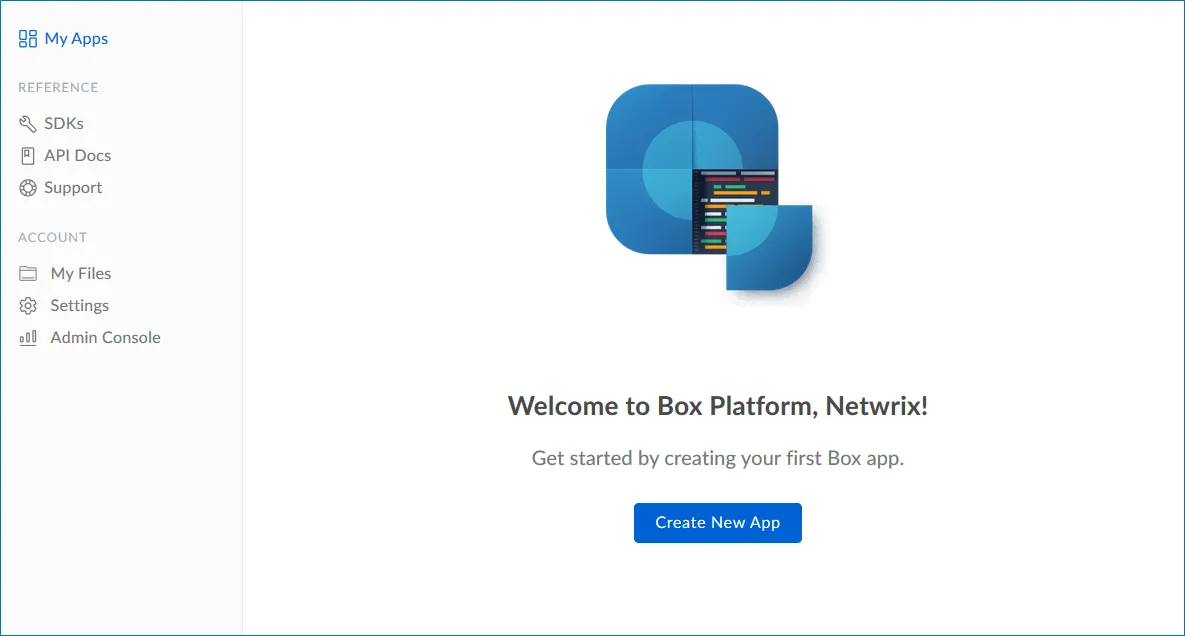
If you have not created an app before, you will see a screen similar to the one below:
-
Click Create New App.
-
Select Custom App.
-
Ensure that the Authentication Method is selected as OAuth 2.0 with JWT (Server Authentication).
-
Name the app appropriately, typically Netwrix Data Classification.
-
Select View Your App on the confirmation screen.
-
Open the Configuration window by clicking the related item on the left.
Navigate to Application Access and make sure that level is set to Enterprise. Click Save changes.
-
Navigate to Advanced Features and turn ON both switches: Perform Actions as User and Create User Access Token.
-
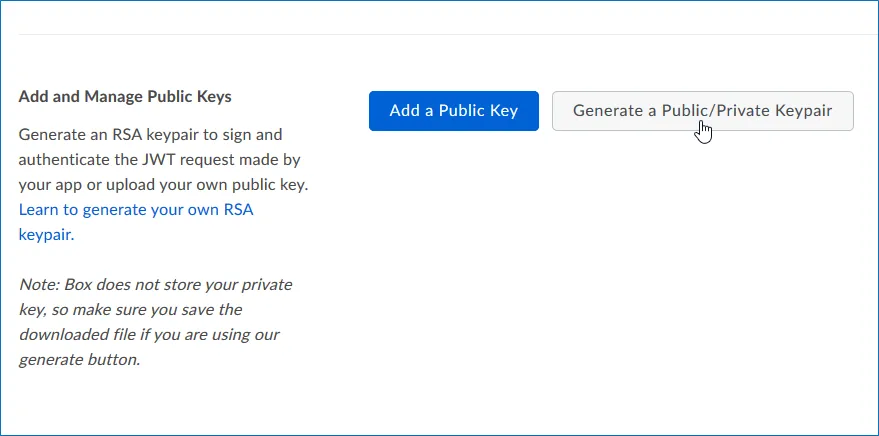
Then you should create a public/private key pair to authenticate the JWT requests made by your app. Navigate to Add and Manage Public Keys and select Generate a Public/Private Keypair.
NOTE: If you have not enabled two-factor authentication for the app account in advance, you will be prompted to do it. Click Settings, then in the Account Settings, navigate to Authentication. Select Require 2-step verification to protect your account, then provide the necessary information in the Enable Login Verification dialog and complete the verification. When finished, get back to the Configuration section, clicking the related item in the left pane.
-
You will be notified about downloading a JSON file with all configuration settings of your app.
IMPORTANT! Since Box does not store any private keys, this file contains the only copy of your private key, so store it securely.
Step 2. Authorize the App
- Go to the General section by clicking the item in the left pane.
- Navigate to App Authorization and click Submit for Authorization. In the dialog displayed, review the settings.
NOTE: If you are a Box administrator, copy the Client ID and store it to a safe location.
- Click Submit to send a request to Box administrator.
IMPORTANT! If any changes are made to the app configuration later, you will need to re-authorise the app.
If you are a Box administrator, you will receive an email with submitted request. Authorize it, as decribed in Box documentation. For instance, you can take these steps:
- Navigate to box.com and open the Admin Console.
- Click Apps on the left.
- Navigate to Custom Apps and select Authorise New App:
- Enter the Client ID of the app you received (the API Key in email).
- Click Authorize.
See also:
Box documentation at https://developer.box.com/guides/authentication/#section-advanced-features