title: Policy Templates Network Port Tracker sidebar_label: Network Monitoring description: Monitor network port changes using external scanning, NMAP, or local netstat commands to track TCP and UDP ports on ChangeTracker devices.
Policy Templates: Network Port Tracker
The Network Port Tracker is designed to detect track changes to the open network ports on either
a single device, or a range/group of devices. The Tracker uses a range of network-scanning
approaches, either probing a device externally via the network to determine whether TCP and UDP
ports are open or not, or using a local command on the device, such as netstat. Remote, external
scans are executed from a Netwrix Agent and utilizes an NMAP instance installed locally to the
Agent.
This means that there are three scanning options available:
- Self-Scan - Local Agent scans the local host using the local netstat. The same agent can run a full template including all other Tracker types.
- Remote Scan – A remote Agent scans the host/device. In this mode, the remote device is configured as a Proxied device for the Agent being used, and therefore for other Trackers to be run against the Proxied Device, credentials will be required e.g. Cisco Firewall running config can also be tracked if valid credentials are assigned.
- Network Scan – A Agent can be used to scan a range of devices. In this instance the ‘device’ is defined as ‘The Network’ or ‘New York Office LAN’, with the address range defined as ‘192.168.1.1-255, or 192.168.1.18 192.168.1.19 192.168.1.20-100’, i.e. individually specified addresses space separated, ranges defined using a -
The NMAP package must be installed to a default program file location (Windows: Program Files(x86)\Nmap), Linux: /usr/bin/)
![]()
The Network Port Tracker is configured by specifying port ranges to include and exclude from the scan. In addition, the protocol used for each range can also be selected, either TCP, UDP or both.
NOTE: As with any UDP scan, the non-acknowledged nature of UDP requires a more intensive, slower approach which may result in scan times exceeding 24 hours.
![]()
Network Scan
There are several steps required to configure and define a multi-device network scan.
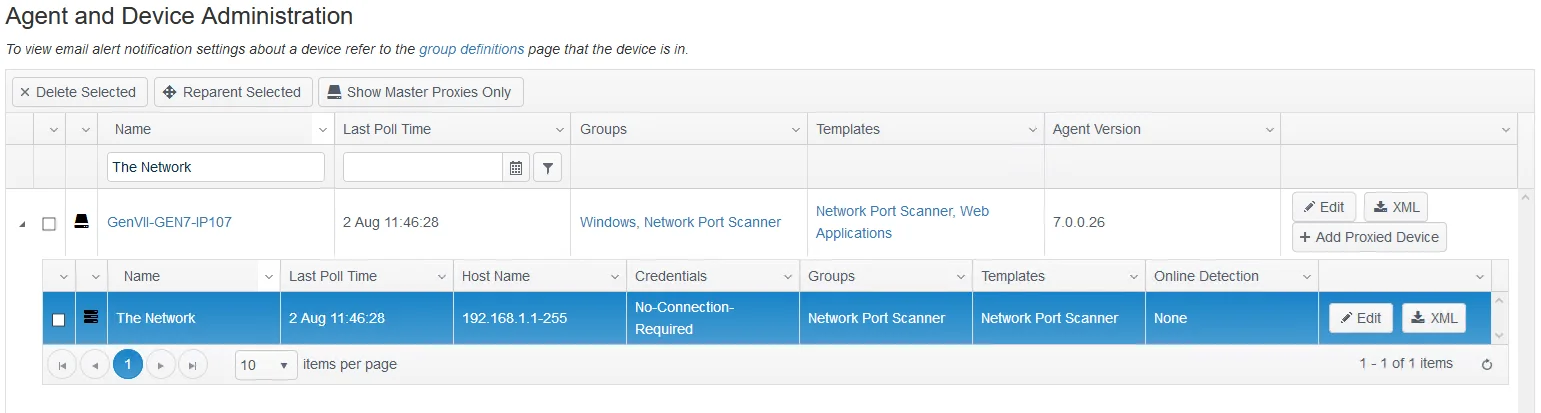
Step 1 – Define The Network device. Select the agent from which you would like the scan to run, usually the Agent installed on the Hub server, but any remote Agent or Agents can be used to run scans to their local subnet, thereby simplifying routing/firewall rules.
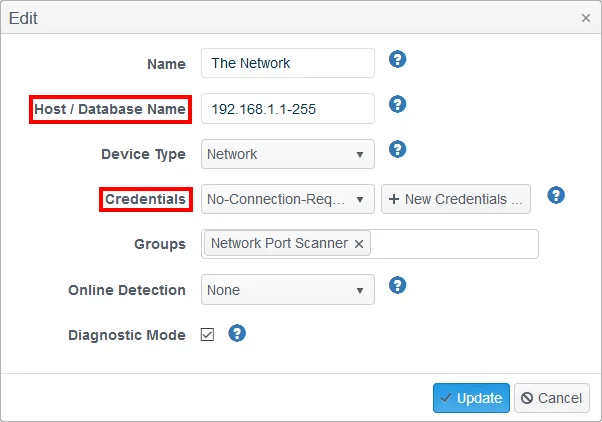
- Host/Database Name - Define the individual addresses and/or address range; use a space to separate multiple entries; use a 1-20 notation for an inclusive range.
- Credentials - For a multiple device/address port scan range, no credentials are required so a simple No-Connection-Required credential key is needed.
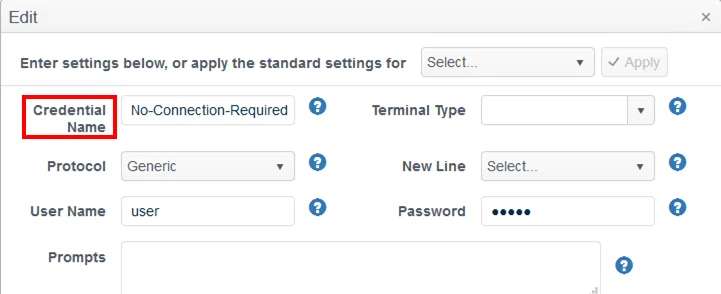
- Credential Name - Create a ‘No-Connection-Required’ credential key – a username and password will be required but these can be entered as dummy credentials.
Step 2 – The Network Port Tracker can then be scheduled to run like any other Tracker although due to the typically prolonged time needed to complete each scan, especially if UDP ports are included, we would advise that the Tracker is set to Polling frequency: run at ‘agent startup’ and repeat ‘No repeat’.
![]()
Step 3 – Once the initial poll has completed the duration will be required as a communications Event.

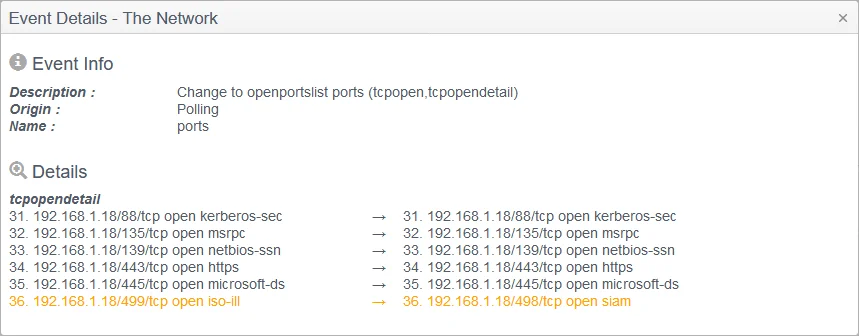
Step 4 – Provided you have specified within the Tracker template to Send Baseline Events then you will also be able to see both the full baseline/status for the Tracker results, as well as the usual change events. Similarly, you can also report on these, export the events, and receive alerts for any Planned and Unplanned changes.