Configure Virtual Appliance
Perform the following steps to configure your virtual appliance:
Step 1 – For Windows Server, the EULA will be displayed in the License terms page; read and accept the agreement.
Step 2 – Next, specify a password for the built-in administrator account. Then re-enter your password. Click Finish.
Step 3 – Log in to the virtual machine.
Step 4 – The Windows PowerShell opens and automatically runs the script. Press any key to read
the license agreement and then press Y to accept it.
Step 5 – Then you will be prompted to configure the virtual machine. Press Enter to start.
| Step | Description |
|---|---|
| Rename virtual machine | Specify a new name for the virtual machine (e.g., NA-Server). The computer name must be properly formatted. It may contain letters (a-z, A-Z), numbers (0-9), and hyphens (-), but no spaces and periods (.). The name may not consist entirely of digits and may not be longer than 15 characters. |
| Add additional input languages | Select Y if you want to specify additional input languages. Select N to proceed with English. |
| Configure network | - Select Y to use DHCP server to configure network settings automatically. - Select N to configure required parameters manually. In this case, you will be prompted to set up IP settings manually. |
| Join computer to the domain or workgroup | To join a domain Select Y. Specify the fully qualified domain name to join (e.g., corp.local). Then specify domain administrator name and password. For your convenience, the account specified will be added to the local Administrators group and set as account for collecting data from the target systems. Domain Users group will be removed from the local Users group after the machine with the appliance joins the domain. The script is starting to test your domain controller: by NETBIOS name first, then by DNS name and finally, using an IP address. If at least one of the tests is successful, the computer will be added to a domain. In case of failure, you will be prompted to do one of the following: - Re-try to joint to the selected domain. In this case, the script uses the DNS name of your domain controller. The name must be resolved. - Continue with Workgroup. See the procedure below on how to join the computer to a workgroup. - Cancel and Return to Main Menu. Select if you want to cancel the domain join and re-configure the machine. Press Enter and repeat menu section. You will return to step 5. To join a workgroup Select N. Specify the local administrator name and credentials. For your convenience, the account specified will be set as account for collecting data from the target systems. Netwrix Auditor is unable to work in a workgroup. Please confirm if you want to proceed. Otherwise, you will not be able to run reviews on data collected by Auditor. See the Access Reviews topic for additional information about integration with Access Reviews. |
| Configure SQL Server | The shell script automatically configures SQL Server instance. The sysadmin server role on SQL Server instance is granted automatically to the BUILTIN\Administrators group. |
In the example below, review how the shell script configures the new VM:
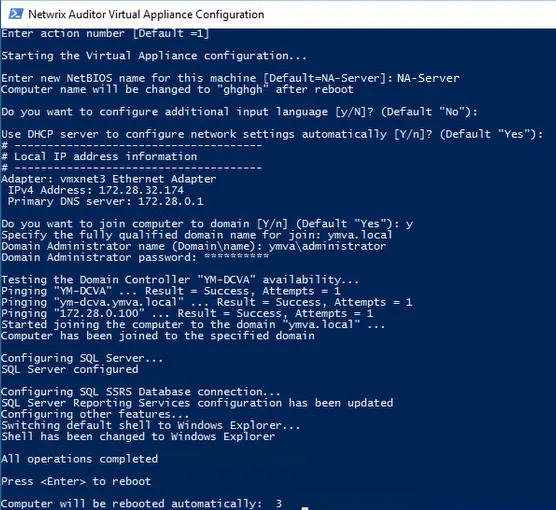
Step 6 – When the script execution completes, you will be prompted to reboot the virtual machine for the changes to take effect.
Step 7 – After reboot, log in to the virtual machine using the domain administrator credentials (for appliances joined to domain) or local administrator credentials (for appliances joined to workgroup).
For the first time, Auditor Client starts automatically. Later, you can always run it from the Start menu or launch it by double-clicking the Auditor shortcut on the desktop.
Do not close the Virtual Appliance Configuration window until the product configuration completes.
What Is Next
Now you can evaluate Auditor functionality. Review the table below for more information.
| To... | Run... | Get more info |
|---|---|---|
| - See a list of audit settings - See a list of rights and permissions required for data collecting account | — | - Supported Data Sources - Data Collecting Account |
| - Create a monitoring plan - Review data collection status - Configure the Long-Term Archive and the Audit Database settings - Assign roles and delegate control | Auditor Client | - Monitoring Plans - Netwrix Auditor Settings - Role-Based Access and Delegation |
| - Browse data with interactive search - Review diagrams - Generate reports - Configure report subscriptions - Create alerts | Auditor Client | - Reports - Subscriptions - Alerts |
| See the data collected by Auditor | Auditor Client | - Access Reviews |
NOTE: If any errors occur, please contact Netwrix technical support.
Import Virtual Machine from Image to Hyper-V
Perform the following steps to import a virtual machine:
Step 1 – On your Hyper-V server, unzip the virtual appliance package to the specified location.
Step 2 – Navigate to Start → All Apps → Hyper-V Manager.
Step 3 – In the Hyper-V Manager, navigate to Actions → Import virtual machine and follow the instructions of the wizard. Review the table below for more information.
| Step | Description |
|---|---|
| Locate Folder | Browse for the folder that contains extracted virtual appliance. |
| Select Virtual Machine | Select Netwrix Auditor. |
| Choose Import Type | Choose the import type that best suits your needs. |
| Choose Network Type | Select a virtual switch. |
| Summary | Review your virtual machine settings. Click Finish to exit the wizard. |
The newly created virtual machine named Netwrix Auditor will appear in the list of virtual machines. Right-click and select Start.
Import Virtual Machine from Image to VMware
Perform the following steps to import a virtual machine:
Step 1 – Connect to your vSphere infrastructure using vSphere Web client, right-click the object you need (datacenter, ESXi host, VM folder or resource pool) and select Deploy OVF Template.
Step 2 – If you are running VMware 6.0, connect to vSphere using the on-premises vSphere client and select File → Deploy OVF Template.
Follow the instructions in the table below:
| Step | Description |
|---|---|
| Source | Browse for the folder that contains the Auditor virtual appliance template. |
| OVF Template Details | Review information on this template. |
| Name and Location | Select a name for the new virtual machine (optional; default name is "Netwrix Auditor"). The name must be unique within the Inventory folder; it may contain up to 80 characters including spaces. |
| Resource Pool | Select a resource pool to deploy the virtual appliance. |
| Storage | Select the destination storage. |
| Disk Format | To optimize the disk space, it is recommended to select Thin Provision. |
| Network Mapping | If you have multiple networks on your ESXi Server, select the Destination network for a new virtual machine. |
| Ready to Complete | Review your virtual machine settings. Click Finish to complete the wizard. |
Select the newly created virtual machine and click Power On.
Deploy Virtual Appliance to VMware Cloud on AWS
Perform the following steps to deploy virtual appliance:
Step 3 – Import the NetwrixAuditor.ova file to a Content Library of VMware vSphere, as described in this VMware article: Import Items to a Content Library.
Step 4 – Start the New Virtual Machine… wizard.
Step 5 – On the Select a creation type step, select Deploy from template.
Step 6 – On the Select a template step, select NetwrixAuditor from your ContentLibrary.
Step 7 – Proceed with the wizard: select name and folder, resources and storage for the VM.
Virtual Deployment Overview
In addition to on-premises deployment, Netwrix Auditor offers the deployment option that can speed time-to-value by getting you up and running in less than 15 minutes.
Virtual appliance — If you run a Microsoft Hyper-V or VMware vSphere, you can deploy Auditor as a virtual appliance. Virtual appliance is a VM image file with installed Netwrix Auditor. The image is also configured to use Microsoft Edge as a default web browser.
Navigate to the Netwrix website at Netwrix Auditor Virtual Appliance and download the Virtual Appliance.
Review the following for additional information:
- Virtual Deployment
- Available Configurations
Virtual Deployment
This section explains how to import a virtual machine with installed Auditor to your virtual environment.
Review the following for additional information:
- Requirements to Deploy Virtual Appliance
- Import Virtual Machine from Image to VMware
- Import Virtual Machine from Image to Hyper-V
Available Configurations
The following virtual appliance configurations are available:
| Guest OS | SQL Server |
|---|---|
| Generalized Windows Server 2022 (180-day evaluation version) | Microsoft SQL Server 2019 Express Edition, with native Reporting Services installed |
| Generalized Windows Server 2019 (180-day evaluation version) | Microsoft SQL Server 2019 Express Edition, with native Reporting Services installed |
The virtual appliance also contains Access Information Center for Auditor version installed.
Considerations and Limitations
-
Consider Microsoft limits for evaluation versions of Windows Server. If your deployment is offline, you have 10 days to complete online activation, otherwise your Windows evaluation license expires, and Auditor virtual appliance will shut down every hour. If the OS has Internet access, it is granted 180 days trial.
Provide a valid license key for Windows Server, or go to Microsoft Licensing Activation Center to register your license online. Depending on the selected virtual appliance configuration, refer to one of the Microsoft articles for additional information:
Also, you can register you license by phone. See the following Microsoft article: Microsoft Licensing Activation Centers worldwide telephone numbers for additional information.
-
Microsoft SQL Server Express Edition is only recommended for evaluation, PoC or small deployments. For production deployment planning in bigger environments, refer to requirements and recommendations listed in the Requirements for SQL Server to Store Audit Data section.
Requirements to Deploy Virtual Appliance
This section lists supported virtualization platforms and default hardware configuration required for the virtual machine where Auditor virtual appliance will be deployed.
The requirements below are sufficient for evaluation purposes only. See the Requirements topic for additional information.
Supported Platforms
The table below lists supported virtualization platforms for the virtual appliance deployment:
| Virtual Infrastructure | Supported Version |
|---|---|
| VMware vSphere | - VMware server: ESXi 7.0, 6.7, 6.5, 6.0 - VMware workstation: 11 and 12 You can also add the Virtual Appliance to the Content Library of your VMware Cloud on AWS SDDC and then deploy this Virtual Appliance to the cloud-based ESXi host. |
| Microsoft Hyper-V | - Microsoft Windows Server 2019 - Microsoft Windows Server 2016 - Microsoft Windows Server 2022 |
Virtual Machine Hardware Requirements
When deploying Auditor virtual appliance, a pre-configured virtual machine will be created from the template. Below is the default hardware configuration for the VM where you plan to deploy the virtual appliance:
| Parameter | Value |
|---|---|
| General | |
| Processor | 4 cores |
| RAM | 16 GB |
| HDD | - Local Disk (C:) 100 GB - Data (D:) 300 GB |
| VMware only | |
| Total Video Memory | 16 MB |
| Network adapter | vmxnet3 |
| Other | Check and upgrade VMware Tools during power cycle. |