Assigning Application Permissions Using Manifest
Follow the steps to assign Exchange Online application permissions using manifest.
Step 1 – Under App registrations, select the newly created app.
Step 2 – Select Manifest on the left.
Step 3 – Locate the requiredResourceAccess property in the manifest and edit it with the following in the square brackets ([]).
Step 4 – Click Save.
Optionally, you can select Download to edit the manifest locally, and then click Upload to reapply it to your application.
Do one of the following:
-
For the clear installation of Netwrix Auditor, add roles as described below.
-
If you upgraded Netwrix Auditor from the version 10.0, replace all existing content under the requiredResourceAccess property.
{
    "resourceAppId": "00000002-0000-0ff1-ce00-000000000000",
    "resourceAccess": [
        {
            "id": "dc50a0fb-09a3-484d-be87-e023b12c6440",
            "type": "Role"
        }
    ]
},
{
    "resourceAppId": "00000003-0000-0000-c000-000000000000",
    "resourceAccess": [
        {
            "id": "693c5e45-0940-467d-9b8a-1022fb9d42ef",
            "type": "Role"
        },
        {
            "id": "1bfefb4e-e0b5-418b-a88f-73c46d2cc8e9",
            "type": "Role"
        },
        {
            "id": "7ab1d382-f21e-4acd-a863-ba3e13f7da61",
            "type": "Role"
        },
        {
            "id": "40f97065-369a-49f4-947c-6a255697ae91",
            "type": "Role"
        }
    ]
},
{
    "resourceAppId": "c5393580-f805-4401-95e8-94b7a6ef2fc2",
    "resourceAccess": [
        {
            "id": "594c1fb6-4f81-4475-ae41-0c394909246c",
            "type": "Role"
        }
    ]
}
Configure Exchange Online State-in-Time Modern Authentication Manually
This topic contains general requirements for Exchange Online State-in-Time and Auto Audit for mailboxes Modern Authentication, configuration steps, including the ExchangeOnlineManagement PowerShell module installation.
Review the following:
- Requirements for Exchange Online Modern Authentication
- Install the ExchangeOnlineManagement PowerShell Module
- Configure Exchange Online Modern Authentication Manually
Requirements for Exchange Online Modern Authentication
General Requirements
- Windows Management Framework for your OS: Windows Management Framework 5.1
- .NET Framework 4.7.1 and above: Download .NET Framework 4.7.1
NOTE: If you have the FIPS option enabled you should proceed to Manual Exchange Online pre-configuration. See the Configure Exchange Online Modern Authentication Manuallysection for additional information.
Follow the steps to enable Exchange Online Auto Audit for mailboxes with Modern Authentication (automatic mode).
Step 1 – Install the ExchangeOnlineManagement Powershell module and dependencies (Nget package provider). Refer to the following Microsoft article for more information: About the Exchange Online PowerShell V2 module.
Step 2 – Generate the self-signed certificate.
Step 3 – Install the certificate to the CurrentUser/My certificate folder for the Local System account.
Step 4 – Install the certificate to the Microsoft Entra ID cloud application
Install the ExchangeOnlineManagement PowerShell Module
This section will be helpful for any case below:
- You encountered errors related to the ExchangeOnlineManagement PowerShell module
- You have the FIPS policy enabled
- You want to install the module manually
Follow the steps to install the module.
Step 1 – Install the Windows Management Framework for your OS: Windows Management Framework 5.1
Step 2 – Install Nuget Package Provider version 3.1 and above. Open Windows PowerShell and execute the following command:
Install-PackageProvider Nuget -MinimumVersion 2.8.5.201 -Scope AllUsers
Step 3 – Install the ExchangeOnlineManagement Powershell module. Open Windows PowerShell and execute the following command:
Install-Module ExchangeOnlineManagement
Review the following Microsoft technical article for more information: About the Exchange Online PowerShell V2 module
See next: Configure Exchange Online Modern Authentication Manually
NOTE: If you encountered errors executing the Install-PackageProvider cmdlet try to force
PowerShell into TLS 1.2 mode and try again:
[System.Net.ServicePointManager]:SecurityProtocol = [System.Net.SecurityProtocolType] 'Ssl3 , Tls12'
NOTE: If you getting "No match was found for the specified search criteria..." message on the
Install-Module ExchangeOnlineManagement execution, try to register default repository:
Register-PSRepository -Default
Configure Exchange Online Modern Authentication Manually
If you encountered errors from Netwrix Auditor during the automatic configuration of the certificate, complete the following steps.
Step 1 – In Netwrix Auditor, find your Exchange Online monitoring plan.
Step 2 – Click Update to force data collection.
If the error still persists, or you want to pre-configure the work with certificate, follow the instructions below:
Follow the steps to install a certificate.
Step 1 – Get your certificate or generate a self-signed certificate. The name must be
_Netwrix_Auditor_MFA_<your*tenant_name>*
Step 2 – Save the certificate to the CurrentUser/My certificate folder for the Local System account.
Step 3 – Upload the certificate to the application selected in your monitoring plan or configure it automatically with Netwrix Auditor.
Follow the steps to generate a self-signed certificate.
Step 1 – Open Windows PowerShell as an Administrator and run the following commands:
# Create certificate
$mycert = New-SelfSignedCertificate -DnsName "example.com" -CertStoreLocation "cert:\LocalMachine\My" -NotAfter (Get-Date).AddYears(1) -KeySpec KeyExchange
# Export certificate to .pfx file
$mycert | Export-PfxCertificate -FilePath mycert.pfx -Password $(ConvertTo-SecureString -String "your_password" -Force -AsPlainText)
# Export certificate to .cer file
$mycert | Export-Certificate -FilePath mycert.cer
Step 2 – Replace the DnsName parameter value with your certificate name
(Netwrix_Auditor_MFA_<your_tenant_name>).
Follow the steps to install the certificate to the CurrentUser/My certificate folder.
Step 1 – Download PsExec to run Windows PowerShell session under the LocalSystem account;
Step 2 – Run Windows PowerShell as an Administrator, navigate to to PsExec.exe installation directory (use the 'CD' command), if necessary, and run the following command:
.\PsExec.exe -i -s powershell.exe
Step 3 – Verify that you are logged in as a Local System account. Run the following command:
whoami
Step 4 – Import the certificate. Run the following command:
Import-PfxCertificate -FilePath <path to your certificate> -CertStoreLocation
'Cert:\CurrentUser\My' -Password (ConvertTo-SecureString -String "your_password" -AsPlainText -Force)
Where path_to_certificate is the full path to the certificate file.
You can also install the certificate with the '.cer' extension to the Microsoft Entra ID Portal or Netwrix Auditor will set it automatically during establishing a PowerShell connection with Exchange Online.
Access Exchange Online Using Modern Authentication
Support for modern authentication will allow you to audit the organizations where MFA is enabled for all users, including service accounts.
This option is recommended for organizations that use modern authentication as the identity management approach, having multi-factor authentication (MFA) enabled for their user accounts. In this scenario, Netwrix Auditor will access the cloud-based infrastructure via Microsoft Graph and other modern APIs, being authenticated through a pre-configured Microsoft Entra ID application with appropriate access permissions.
If you plan to implement this scenario, you should register an Microsoft Entra ID app manually and provide its settings to Netwrix Auditor when configuring a monitored item.
Create and Register a New App in Microsoft Entra ID
You will need to create a dedicated app for each cloud-based data source you plan to audit:
- Microsoft Entra ID (formerly Azure AD)
- Exchange Online
- SharePoint Online
- MS Teams
If you plan to audit all of them, you need to create 4 apps.
Follow the steps to register a new Microsoft Entra ID application.
Step 1 – Sign into the Microsoft 365 Admin Center with your Global Administrator, Application Administrator or Cloud Application Administrator account and go to the Microsoft Entra ID admin center.
Step 2 – Under the App registrations section, select New registration.
Step 3 – In the Name field, enter the application name.
Step 4 – In the Supported account types select who can use this application – use the Accounts in this organizational directory only option.
Step 5 – Click the Register button. Application Redirect URI is optional, you can leave it blank.
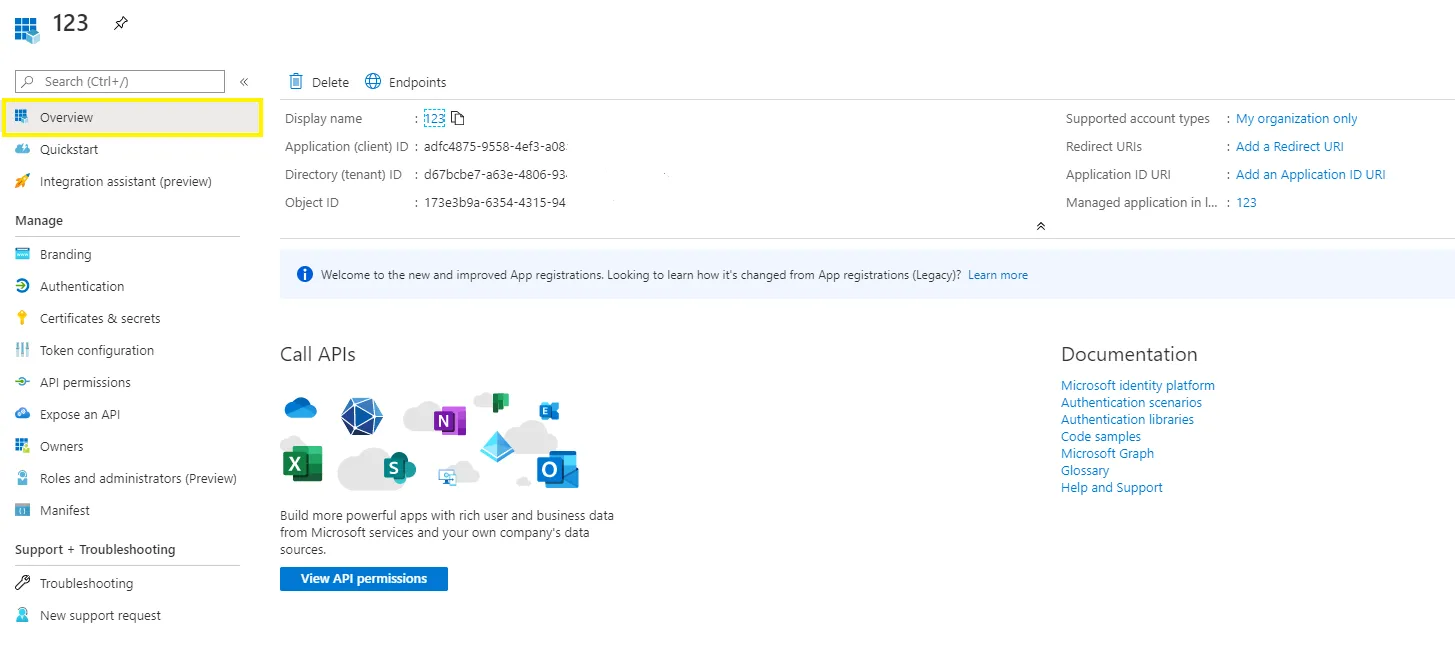
Step 6 – Your Application (client) ID is now available in the Overview section. Copy it to a safe location.
See the following Microsoft article for additional information on how to create an application and service principal using Microsoft Entra ID Admin portal: Create an Microsoft Entra ID application and service principal that can access resources.
Grant Required Permissions
You need to grant your new application the required API permissions. Microsoft Entra ID applications can be assigned Delegated or Application permissions:
- Delegated permissions require a signed-in user present who consents to the permissions every time an API call is sent.
- Application permissions are consented by an administrator once granted.
For the newly created app, you should use the Application permissions.
To grant required permissions, assign granular Application permissions required for Netwrix Auditor to collect data from the application. To do so, perform the following steps:
Step 1 – Go to the App registrations and open the app you created to assign Auditor permissions.
Step 2 – Go to Manage > API permissions and click Add a permission button.
Step 3 – Assign the required permissions.
Permission assignment will depend on the data you plan to collect:
- Activity data only
- Both activity and state-in-time data
| To... | Requirement | Comment |
|---|---|---|
| Collect audit data | Microsoft Entra ID app requires the following Application permissions: 1. Microsoft Graph - Directory.Read.All - Application.ReadWrite.All - Mail.ReadBasic.All - MailboxSettings.Read 2. Office 365 Management APIs - ActivityFeed.Read 3. Office 365 Exchange Online - Exchange.ManageAsApp | To learn how to assign required permissions, see the Access Exchange Online Using Modern Authentication section for additional information. |
| Roles | Exchange Administrator (Exchange Service Administrator) assigned to application service principal OR Global Administrator assigned to application service principal |
NOTE: You can also assign application permissions by editing Microsoft Entra app manifest. See the Access Exchange Online Using Modern Authentication topic for additional information on how to assign the required permissions. Information about manifest is also described in the following Microsoft article: Microsoft Entra app manifest.
Grant Admin Consent to a Tenant
Follow the steps to grant Admin consent to a tenant.
Go back to the Microsoft Entra ID admin center > Applications > App registrations >
API permissions and click Grant admin consent for <tenant name>. When prompted to
confirm, click Yes.
NOTE: For Office 365 permissions, go to Request API Permissions > APIs my organization users and type "Office 365" in the search bar.
See the following Microsoft article for additional information on how to create an application and service principal using Microsoft Entra ID Admin portal: Create an Microsoft Entra application and service principal that can access resources.
Grant Required Roles
Follow the steps to grant the required Microsoft Entra ID (formerly Azure AD) roles to the new application.
Step 1 – In the Entra portal, click View under Manage Azure Active Directory.
Step 2 – Select Roles and admins under Applications .
Step 3 – Select the Exchange Administrator or Global Administrator role.
Step 4 – On the Assignments page that appears, click Add assignments.
Step 5 – In the Add assignments flyout that appears, find and select the created application, and click Add.
See the following Microsoft article for additional information on how to create an application and service principal using Azure AD Admin portal: Create an Azure Active Directory application and service principal that can access resources.
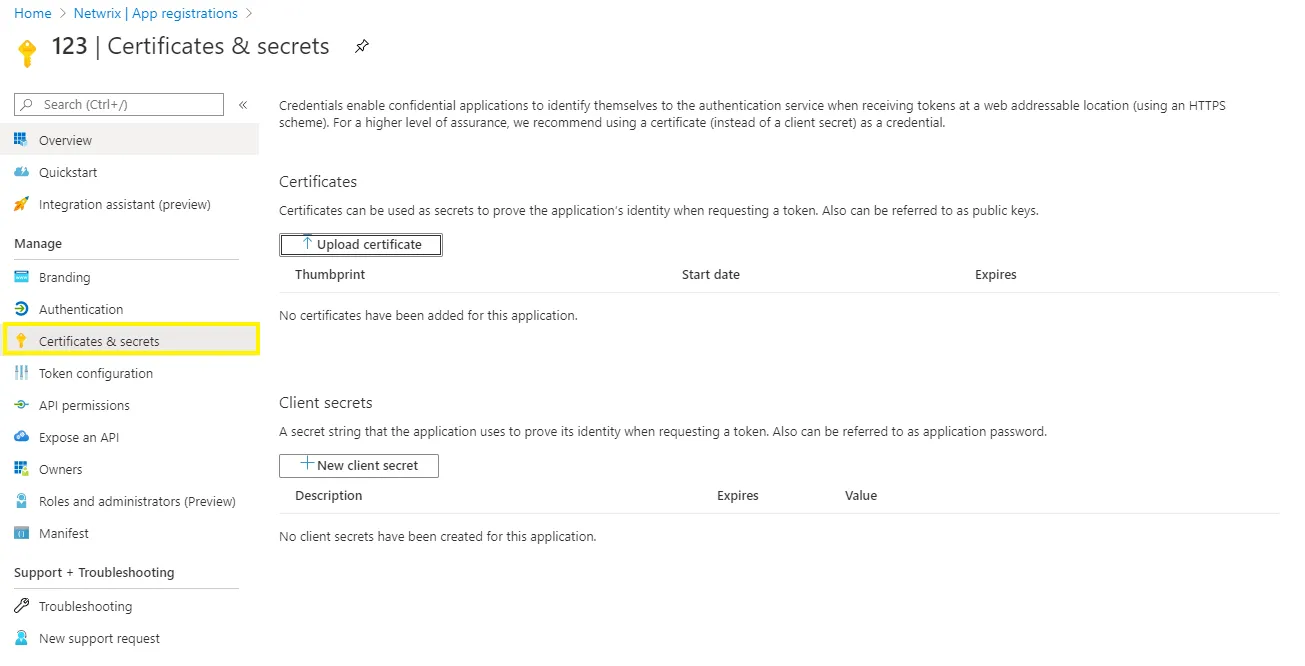
Configure Client Secret
Follow the steps to create a new client secret to be used by the app.
Step 1 – Go to Manage > Certificates & secrets and click New client secret.
Step 2 – Enter the description. From the expiration options select 24 months.
Step 3 – Click Add.
Step 4 – The new secret will be displayed in the list. Click Copy to clipboard icon on the "Value" parameter on the right side of the screen.
See the following Microsoft article for more information on how to add a client secret: Add a client secret.
Add an Exchange Online Monitoring Plan
Follow the steps to add Exchange Online monitoring plan in the Netwrix Auditor:
Step 1 – In the Monitoring Plans, click Add Plan button.
Step 2 – Create a monitoring plan with the Exchange Online data source.
Step 3 – Add the "Office 365 tenant" item.
Step 4 – Click Select.
Step 5 – Enter your tenant name.
Step 6 – Choose modern authentication.
Step 7 – Enter Application ID and Application secret you have created before.
Step 8 – Click Add.
Exchange Online monitoring plan has been added to Auditor and initial data collection has begun.
Obtain the Tenant Name
Follow the steps to obtain the tenant name.
Step 1 – Navigate to Microsoft Entra ID > Overview.
Step 2 – In the Tenant information locate the Primary domain field, copy its value and store to a safe location.
See the following Microsoft article for additional information on how to obtain tenant name: Locate important IDs for a user.
Then, create a corresponding monitoring plan in Netwrix Auditor and add an item (Office 365 tenant) to it. See the Microsoft Entra ID topic for additional information.
Exchange Online
Netwrix Auditor relies on native logs for collecting audit data. Therefore, successful change and access auditing requires a certain configuration of native audit settings in the audited environment and on the Auditor console computer. Configuring your IT infrastructure may also include enabling certain built-in Windows services, etc. Proper audit configuration is required to ensure audit data integrity, otherwise your change reports may contain warnings, errors or incomplete audit data.
CAUTION: Folder associated with Netwrix Auditor must be excluded from antivirus scanning. See the Antivirus Exclusions for Netwrix Auditor knowledge base article for additional information.
You can configure your IT Infrastructure for monitoring in one of the following ways:
-
Automatically through a monitoring plan – This is a recommended method. If you select to automatically configure audit in the target environment, your current audit settings will be checked on each data collection and adjusted if necessary.
-
Manually – Native audit settings must be adjusted manually to ensure collecting comprehensive and reliable audit data. You can enable Auditor to continually enforce the relevant audit policies or configure them manually:
NOTE: Unified audit log must be enabled for a Tenant. See the Microsoft Turn auditing on or off article for additional information.
If you plan to audit non-owner mailbox access within your Exchange Online organization, native audit logging must be enabled for user, shared, equipment, linked, and room mailboxes:
- Access types: administrator , delegate user
- Actions: Update, Move, MoveToDeletedItems, SoftDelete, HardDelete, FolderBind, SendAs, SendOnBehalf, Create
Perform the following configuration procedures:
- Prepare a Data Collecting Account as described in the Permissions for Exchange Online Auditing topic
- Configure required protocols and ports, as described in the Exchange Online Ports topic
Monitored Object Types and Attributes
See the full list of object types and attributes monitored by Exchange Online.
Mailboxes:
- UserMailbox
- SharedMailbox
- EquipmentMailbox
- LinkedMailbox
- RoomMailbox
Users:
- MailUser
- GuestMailUser
- User (Entity under UserMailbox or MailUser)
Groups:
- Role Group \ RoleGroup
- Mail-enabled security\MailUniversalSecurityGroup
- Dynamic distribution list\DynamicDistributionGroup
- Distribution list\MailUniversalDistributionGroup
- Microsoft 365 \ GroupMailbox
- ExchangeSecurityGroup
Folders:
- MailFolder
- Permissions:
- SendAs
- FullAccess
- ChangeOwner
- DeleteItem
- ExternalAccount
- ChangePermission
- ReadPermission
Azure:
- Group
Properties
Refer to the table to see Properties used in the Snapshot collection.
| Type | Properties |
|---|---|
| User Mailbox Shared Mailbox Equipment Mailbox Room Mailbox Linked Mailbox Mail-enabled security Dynamic distribution list Distribution list Microsoft 365 | Identity Name DisplayName DistinguishedName PrimarySmtpAddress Guid ArchiveGuid ExternalDirectoryObjectId ExchangeObjectId AuditEnabled AuditAdmin AuditDelegate AuditLogAgeLimit Type OwnerUPN ExchangeSecurityDescriptorSddl SendOnBehalfPrincipals Sid IsDirSynced SerializationData ForwardingAddress ForwardingSMTPAddress DeliverToMailboxAndForward |
| ExchangeSecurityGroup | RecipientTypeDetails ExchangeObjectId ExternalDirectoryObjectId ExternalDirectoryObjectId Name |
| RoleGroup | ExchangeObjectId Name Sid UserFriendlyName UserPrincipalName |
| MailUser GuestMailUser User | Identity Name DisplayName DistinguishedName SamAccountName UserPrincipalName ObjectCategory Id ExchangeObjectId ExternalDirectoryObjectId OrganizationId OriginatingServer RecipientType RecipientTypeDetails IsDirSynced Sid |
| MailFolder | ObjectType ObjectId DisplayName MailboxGuid SecurityDescriptorSddl ParentFolderId ChildFolderCount UnreadItemCount TotalItemCount WellKnownName Childs |
| SendAs permissions | Trustee AccessControlType AccessRights IsInherited InheritanceType IsValid ObjectState |
| Permissions: FullAccess ChangeOwner DeleteItem ExternalAccount ChangePermission ReadPermission | MailboxIdentity User UserSid IsOwner AccessRights IsInherited Deny InheritanceType |
Refer to the table to see Properties used in membership collection.
| Type | Properties |
|---|---|
| Azure group | Id Classification CreatedDateTime Description DisplayName GroupTypes Mail MailEnabled MailNickname OnPremisesLastSyncDateTime OnPremisesSecurityIdentifier OnPremisesSyncEnabled ProxyAddresses RenewedDateTime SecurityEnabled Visibility ResourceProvisioningOptions |
Monitored Actions
See the full list of actions monitored by Exchange Online.
Monitored Sign-In types:
- Delegate
- Admin
Delegate:
- A user who's been assigned the SendAs, SendOnBehalf, or FullAccess permission to another mailbox.
- An admin who's been assigned the FullAccess permission to a user's mailbox.
Admin:
-
The mailbox is searched with one of the following Microsoft eDiscovery tools:
- Content Search in the compliance portal.
- eDiscovery or eDiscovery (Premium) in the compliance portal.
- In-Place eDiscovery in Exchange Online.
• The mailbox is accessed by using the Microsoft Exchange Server MAPI Editor.
• The mailbox is accessed by an account impersonating another user. This occurs when the ApplicationImpersonation role is assigned to an account, such as an application, which is now actively accessing the data.
| Sign-In types | Action Types | Description |
|---|---|---|
| Delegate Admin | Update | A message or any of its properties was changed. |
| Admin | Copy | A message or any of its properties was changed. |
| Delegate Admin | Move | A message was moved to another folder. |
| Delegate Admin | MoveToDeletedItems | A message was deleted and moved to the Deleted Items folder. |
| Delegate Admin | SoftDelete | A message was permanently deleted or deleted from the Deleted Items folder. Soft-deleted items are moved to the Recoverable Items folder. |
| Delegate Admin | FolderBind | A mailbox folder was accessed. This action is also logged when the admin or delegate opens the mailbox. NOTE: Audit records for folder bind actions performed by delegates are consolidated. One audit record is generated for individual folder access within a 24-hour period. |
| Delegate Admin | SendAs | A message was sent using the SendAs permission. This permission allows another user to send the message as though it came from the mailbox owner. |
| Delegate Admin | SendOnBehalf | A message was sent using the SendOnBehalf permission. This permission allows another user to send the message on behalf of the mailbox owner. The message indicates to the recipient who the message was sent on behalf of and who actually sent the message. |
| Delegate Admin | Create | An item was created in the Calendar, Contacts, Draft, Notes, or Tasks folder in the mailbox (for example, a new meeting request is created). Creating, sending, or receiving a message isn't audited. Also, creating a mailbox folder isn't audited. |
Permissions for Exchange Online Auditing
Auditor allows you to audit Office 365 organizations that have established modern authentication as their identity management approach, including support for multi-factor authentication (MFA). To learn more about modern authentication, refer to the following Microsoft article: What is modern authentication.
In this scenario, Netwrix Auditor will access the cloud-based infrastructure via Microsoft Graph and other modern APIs, being authenticated through a pre-configured Microsoft Entra ID (formerly Azure AD) application with appropriate access permissions. So, you should register an Microsoft Entra ID app and provide its settings to Auditor when configuring a monitored item.
Configure the Microsoft Entra ID App for Auditing Exchange Online
Follow the steps to use a data collecting account with modern authentication.
Step 1 – Create a Microsoft Entra ID app that will be used for modern authentication. See the Create and Register a New App in Microsoft Entra ID topic for additional information.
NOTE: After you start a new monitoring plan and select a data source in the first step, you will be asked to enter a default data collection account. However, this step is not needed for Exchange Online as it cannot be used. Thus, there is no need to grant any permissions to this account. Instead, you will need to configure a modern authentication app and give the necessary permissions there.
Step 2 – Grant required permissions to that application. See the Grant Required Permissions topic for additional information.
Step 3 – Grant required roles to that application. See the Grant Required Roles topic for additional information.
Step 4 – Configure client secret for that application. See the Configure Client Secret topic for additional information.
Step 5 – Obtain tenant ID – you will need it when configuring a monitored item (Office 365 tenant) settings. See the Obtain the Tenant Name topic for additional information.
Non-owner Mailbox Access Audit Configuration
To prepare for non-owner mailbox access auditing in the Exchange Online organization, you will need to take several configuration steps, creating a Microsoft Entra ID app with the required permissions and instructing this app to automatically apply the necessary audit settings.
Follow the steps to configure a non-owner mailbox access audit.
Step 1 – Install the Exchange Online PowerShell V3 module. There are three versions in the repository: 3.0.0, 3.1.0 and 3.2.0.
NOTE: Make sure you are using the version specified in the App-only authentication for unattended scripts in Exchange Online PowerShell and Security & Compliance PowerShell Microsoft article.
Step 2 – In the Microsoft Entra ID admin center, create and register an Microsoft Entra ID app, as described in the related Connect to Exchange Online PowerShell Microsoft article.
Step 3 – At the top of the Request API permissions pane, click the APIs my organization uses tab and search for Office 365 Exchange Online.
Step 4 – Click on the Office 365 Exchange Online entry in the list of apps found.
Step 5 – Proceed with adding the permissions for this app: select Application permissions and then select Exchange.ManageAsApp.
Step 6 – Grant admin consent to the tenant (that is, for the Office 365 organization whose audit
data will be collected by the newly registered app). Go to the new app settings > API
permissions and click Grant admin consent for_<tenant name>_. When prompted to confirm
granting, click Yes.
Step 7 – Go to Azure Active Directory — Roles and administrators and assign Exchange Administrator role.
Step 8 – Download the PowerShell script for certificate creation, as provided in the Generate a self-signed certificate Microsoft article.
Step 9 – To create a self-signed certificate to be used by the app, run the following command:
.\Create-SelfSignedCertificate.ps1 -CommonName "MyCompanyName" -StartDate 2020-04-01 -EndDate 2022-04-01
where:
CommonName — specify "Netwrix Auditor"
StartDate — set to current date
EndDate — set to 2 years from now
Step 10 – When prompted to specify a password, click Enter.
Step 11 – Go to Manage > Certificates & secrets, click Upload certificate and upload the*.crt* file you have just created.
Step 12 – To create Exchange Online connection session, you can provide certificate file path or thumbprint. If you want to use a file path, run the following command:
Connect-ExchangeOnline -CertificateFilePath "full_path_to_certificate"
-AppID "yourAppId" -Organization "Office365_tenant_name"
Application (client ID) can be found in the Overview page.
For example:
Connect-ExchangeOnline -CertificateFilePath "C:\Path\MyCompanyName1.pfx"
-AppId "402b12a2-fb2b-4222-8f54-5596def1" -Organization "myorganization123.onmicrosoft.com"
You can use certificate thumbprint instead of file path. For that, import the certificate to the local certificate store, using the following command:
Import-PfxCertificate -FilePath "path_to_pfx_certificate" -CertStoreLocation Cert:\CurrentUser\My
Then run the command like following:
Connect-ExchangeOnline -CertificateThumbprint 6AEА5A82911ААА3F76FEE149B7B52А70DDFD88 -AppId a14a 822d-f228-412b-9222-281de23
-Organization myorganization123.onmicrosoft.com
Finally, run the following command to end the session:
Disconnect-ExchangeOnline -Confirm:$false
To automate the process described above, you can create a a script comprising the corresponding commands and schedule its launch.
Non-owner Mailbox Access Audit: Manual Configuration
If you plan to manually apply the audit settings required to audit non-owner mailbox access in Exchange Online organization, you will need to create a remote PowerShell session to Exchange Online. Follow the steps to do so.
Step 1 – Install the Exchange Online PowerShell V2 module as described in the About the Exchange Online PowerShell module Microsoft article.
Make sure to install the latest version.
Step 2 – Launch PowerShell and connect to Exchange Online, as described in the About the Exchange Online PowerShell module Microsoft article.
Step 3 – Run the cmdlet, depending on the mailboxes you plan to audit (all mailboxes or selected individual mailbox):
| For | Command |
| -------- | -------------------------------------------------------------------------------------------------------------------------------------------------------------------------------------------------------------------------------------------------------------------------------------------------------------------------------------------------------------------------------------------------------------------------------------------------------------------------------------------------------------------------------------------------------------------------------------------------------------------------------------------------------------------------------------------------------------------------------------------------------------------------------------------------------------------------------------------------------------------------------------------------------------------------------------------------------------------------------------------------------------------------------------------------------------------------------------- | ----------------------------------------------------------------------------------------------------------------------------------------------------------------------------------------------------------------------------------------------------- |
| All | Execute the following cmdlet: Get-ExoMailbox -PropertySets Minimum -RecipientTypeDetails UserMailbox,SharedMailbox,EquipmentMailbox,LinkedMailbox,RoomMailbox | Set-Mailbox -AuditEnabled $true –AuditAdmin Update,Copy,Move,MoveToDeletedItems,SoftDelete,HardDelete,FolderBind,SendAs,SendOnBehalf,Create –AuditDelegate Update,Move,MoveToDeletedItems,SoftDelete,HardDelete,FolderBind,SendAs,SendOnBehalf,Create |
| Selected | Execute the following cmdlet: Set-Mailbox -Identity {0} -AuditEnabled $true –AuditAdmin Update,Copy,Move,MoveToDeletedItems,SoftDelete,HardDelete,FolderBind,SendAs,SendOnBehalf,Create –AuditDelegate Update,Move,MoveToDeletedItems,SoftDelete,HardDelete,FolderBind,SendAs,SendOnBehalf,Create Where the {0} character must be replaced with any of the following: - Display Name. Example: "Michael Jones" - Domain\User. Example: enterprise.local\MJones - Email address. Example: analyst@enterprise.onmicrosoft.com - GUID. Example: {c43a7694-ba06-46d2-ac9b-205f25dfb32d} - LegacyExchangeDN. Example: /o=EnterpriseDev/ou=Exchange Administrative Group(FYDIBOHF23SPDLT)/cn=Recipients/cn=97da560450c942aba 81b2da46c60858a-analyst - SamAccountName. Example: MANAG58792-1758064122 - (DN) Distinguished name. Example: CN=MJones,CN=Users,DC=enterprisedc1,DC=enterprise,DC=local - User ID or User Principal Name. Example: MJones@enterprise.onmicrosoft.com If you are going to audit multiple individual mailboxes, run the cmdlet for each mailbox you need. |