Additional Configuration to Review Changes Made via Exchange Server
If you have an on-premises Exchange server in your Active Directory domain, consider that some changes can be made through this Exchange server. To be able to audit and report who made those changes, make sure that the account used for data collection meets one of the following requirements:
- Membership in the Organization Management or Records Management group
OR
- The Audit Logs management role (see the Assign Management Roles topic for additional information)
You will also need to configure Exchange Administrator Audit Logging (AAL) settings. See the Exchange Administrator Audit Logging Settings topic for additional information.
Additional Configuration for Domain Controller's Event Logs Auto-backup
The following is required if auto-backup is enabled for the domain controller event logs:
- Permissions to access the HKEY_LOCAL_MACHINE\System\CurrentControlSet\Services\EventLog\Security registry key on the domain controllers in the target domain. See the Assign Permission to Read the Registry Key topic for additional information.
- Membership in one of the following groups: Administrators, Print Operators, or Server Operators
- Read/Write share permission and Full control security permission on the logs backup folder.
Considerations for gMSA Account
If you are using gMSA for data collection, consider that AAL event data collection from your on-premise Exchange server will not be possible.
Thus, changes made to your Active Directory domain via that Exchange server will be reported with domain\Exchange_server_name$ instead of the initiator (user) name in the "Who" field of reports, search results and activity summaries.
Configure Manage Auditing and Security Log Policy
Perform this procedure only if the account selected for data collection is not a member of the Domain Admins group. Follow the steps:
Step 1 – Open the Group Policy Management console on any domain controller in the target domain: navigate to Start > Windows Administrative Tools (Windows Server 2016 and higher) or Administrative Tools (Windows 2012) Group Policy Management.
Step 2 – In the left pane, navigate to Forest: <forest_name> > Domains > <domain_name>
> Domain Controllers. Right-click the effective domain controllers policy (by default, it is the
Default Domain Controllers Policy), and select Edit from the pop-up menu.
Step 3 – In the Group Policy Management Editor dialog, expand the Computer Configuration node on the left and navigate to Policies > Windows Settings > Security Settings > Local Policies.
Step 4 – On the right, double-click the User Rights Assignment policy.
Step 5 – Locate the Manage auditing and security log policy and double-click it.
Step 6 – In the Manage auditing and security log Propertiesanage auditing and security log Properties dialog, click Add User or Group, specify the user that you want to define this policy for.
Step 7 – Run the following command to update group policy: gpupdate /force
Step 8 – Type repadmin /syncall command and press Enter for replicate GPO changes to other
domain controllers.
Step 9 – Ensure that new GPO settings applied on any audited domain controller.
Grant Permissions for Deleted Objects Container
Perform this procedure only if the account selected for data collection is not a member of the Domain Admins group. Follow the steps:
Step 1 – Log on to any domain controller in the target domain with a user account that is a member of the Domain Admins group.
Step 2 – Navigate to Start > Run and type cmd.
Step 3 – Input the following command: dsacls <deleted_object_dn> /takeownership
where deleted_object_dn is the distinguished name of the deleted directory object.
For example: dsacls "CN=Deleted Objects,DC=Corp,DC=local" /takeownership
Step 4 – To grant permission to view objects in the Deleted Objects container to a user or a group, type the following command:
dsacls <deleted_object_dn> /G <user_or_group>:<Permissions>
where deleted_object_dn is the distinguished name of the deleted directory object
and user_or_group is the user or group for whom the permission applies, and Permissions is the
permission to grant.
For example, dsacls "CN=Deleted Objects,DC=Corp,DC=local" /G Corp\jsmith:LCRP
In this example, the user CORP\jsmith has been granted List Contents and Read Property permissions for the Deleted Objects container in the corp.local domain. These permissions let this user view the contents of the Deleted Objects container, but do not let this user make any changes to objects in this container. These permissions are equivalent to the default permissions that are granted to the Domain Admins group.
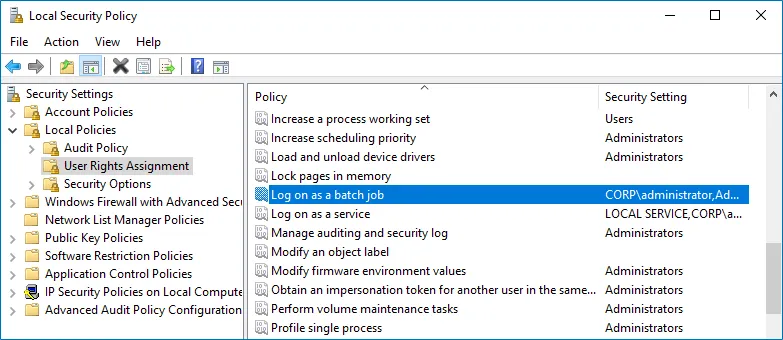
Define Log On As a Batch Job Policy
On monitoring plan creation, the Log on as a batch job policy is automatically defined for the Data Processing Account as a local security policy. However, if you have the "Deny a log on as a batch job" policy defined locally or on the domain level, the local "Log on as a batch job" policy will be reset. In this case, redefine the "Deny log on as a batch job" policy through the "Local Security Policy" console on your computer or on the domain level through the Group Policy Management console.
You can configure this policy via the Local Security Policy snap-in or using the Group Policy Management console.
Configure the Log On As a Batch Job policy via Local Security Policy Snap-in
Follow the steps to configure the Log On As a Batch Job policy via Local Security Policy snap-in.
Step 1 – On any domain controller in the target domain, open the Local Security Policy snap-in: navigate to Start > Windows Administrative Tools and select Local Security Policy.
Step 2 – In the Local Security Policy snap-in, navigate to Security Settings > Local Policies > User Rights Assignment and locate the Log on as a batch job policy.

Step 3 – Double-click the Log on as a batch job policy, and click Add User or Group. Specify the account that you want to define this policy for.
Configure the Log On As a Batch Job Policy Using the Group Policy Management Console
Perform this procedure only if the account selected for data collection is not a member of the Domain Admins group. Follow the steps:
Step 1 – Open the Group Policy Management console on any domain controller in the target domain: navigate to Start > Windows Administrative Tools (Windows Server 2016/2019) or Administrative Tools (Windows 2012 R2 and below) > Group Policy Management.
Step 2 – In the left pane, navigate to Forest: <forest name> > Domains > <domain name> >
Domain Controllers. Right-click the effective domain controllers policy (by default, it is the
Default Domain Controllers Policy), and select Edit.
Step 3 – In the Group Policy Management Editor dialog, expand the Computer Configuration node on the left and navigate to Policies > Windows Settings > Security Settings > Local Policies.
Step 4 – On the right, double-click the User Rights Assignment policy.
Step 5 – Locate the Log on as a batch job policy and double-click it.
Step 6 – In the Log on as a batch job Properties dialog, click Add User or Group and specify the user that you want to define this policy for.
Step 7 – Navigate to Start > Run and type cmd. Input the gpupdate /force command and press
Enter. The group policy will be updated.
Step 8 – Type repadmin /syncall command and press Enter for replicate GPO changes to other
domain controllers.
Step 9 – Ensure that new GPO settings applied on any audited domain controller.
Assign Permission to Read the Registry Key
This permission is required only if the account selected for data collection is not a member of the Domain Admins group.
This permission should be assigned on each domain controller in the audited domain, so if your domain contains multiple domain controllers, it is recommended to assign permissions through Group Policy, or automatically using Audit Configuration Assistant.
To assign permissions manually, use the Registry Editor snap-in or the Group Policy Management console.
Assign Permission Via the Registry Editor Snap-in
Follow the steps to assign permission via the Registry Editor snap-in:
Step 1 – On your target server, open Registry Editor: navigate to Start > Run and type "regedit".
Step 2 – In the left pane, navigate to HKEY_LOCAL_MACHINE\SYSTEM\CurrentControl Set\Services\EventLog\Security.
Step 3 – Right-click the Security node and select Permissions from the pop-up menu.
Step 4 – Click Add and enter the name of the user that you want to grant permissions to.
Step 5 – Check Allow next to the Read permission.
Step 6 – For auditing Logon Activity, you also need to assign the Read permission to the HKEY_LOCAL_MACHINE\SECURITY\Policy\PolAdtEv registry key.
To assign permission using the Group Policy Management console
Assign Permission Using the Group Policy Management Console
Follow the steps to assign permission using the Group Policy Management console:
Step 1 – Open the Group Policy Management console on any domain controller in the target domain: navigate to Start > Windows Administrative Tools (Windows Server 2016/2019) or Administrative Tools (Windows 2012 R2 and below) > Group Policy Management.
Step 2 – In the left pane, navigate to Forest: <forest name> > Domains > <domain name> >
Domain Controllers. Right-click the effective domain controllers policy (by default, it is the
Default Domain Controllers Policy), and select Edit .
Step 3 – In the Group Policy Management Editor dialog, expand the Computer Configuration node on the left and navigate to Policies > Windows Settings > Security Settings > Registry.
Step 4 – Right-click in the pane and select Add Key.
Step 5 – Navigate to HKEY_LOCAL_MACHINE\SECURITY\Policy\PolAdtEv and click OK.
Step 6 – Click Add and enter the name of the user that you want to grant permissions to and press Enter.
Step 7 – Check Allow next to the "Read" permission and click OK
Step 8 – In the pop-up window, select Propagate inheritable permissions to all subkeys and click OK.
Step 9 – Repeat the steps 4-8 for keys below:
HKEY_LOCAL_MACHINE\SYSTEM\CurrentControlSet\Control\SecurePipeServers\winreg;HKEY_LOCAL_MACHINE\SYSTEM\CurrentControlSet\Services\EventLog\Security.
Step 10 – Close the Group Policy Management console.
Step 11 – Navigate to Start > Run and type cmd. Input the gpupdate /force command and
press Enter. The group policy will be updated.
Step 12 – Type repadmin /syncall command and press Enter for replicate GPO changes to other
domain controllers.
Step 13 – Ensure that new GPO settings were applied to the domain controllers.
Active Directory Registry Key Configuration
Review the basic registry keys that you may need to configure for monitoring Active Directory with Netwrix Auditor. On the computer whereNetwrix Auditor Server is installed, navigate to Start > Run and type regedit.
| Registry key (REG_DWORD type) | Description / Value |
|---|---|
| HKEY_LOCAL_MACHINE\SOFTWARE\WOW6432Node\Netwrix Auditor\AD Change Reporter | |
| CleanAutoBackupLogs | Defines the retention period for the security log backups: - 0—Backups are never deleted from Domain controllers - [X]— Backups are deleted after [X] hours |
| IgnoreAuditCheckResultError | Defines whether audit check errors should be displayed in the Activity Summary footer: - 0—Display errors - 1—Do not display errors |
| IgnoreRootDCErrors | Defines whether to display audit check errors for the root domain (when data is collected from a child domain) in the Activity Summary footer: - 0—Display errors - 1—Do not display errors |
| MonitorModifiedAndRevertedBack | Defines whether the Activity Summary must display the attributes whose values were modified and then restored between data collections: - 0—These attributes are not displayed - 1—These attributes are displayed as "modified and reverted back" |
| ProcessBackupLogs | Defines whether to process security log backups: - 0—No - 1—Yes Even if this key is set to "0", the security log backups will not be deleted regardless of the value of the CleanAutoBackupLogs key. |
| HKEY_LOCAL_MACHINE\SOFTWARE\WOW6432Node\Netwrix Auditor\AD Change Reporter<monitoring plan name> | |
| CollectLogsMaxThreads | Defines the number of Domain Controllers to simultaneously start log collection on. |
| HKEY_LOCAL_MACHINE\SOFTWARE\WOW6432Node\Netwrix Auditor\Management Console\Database settings | |
| SqlOperationTimeout | Defines the timeout for executing SQL queries such as data selection, insertion or deletion (in seconds). |
| timeout | Defines the Audit Database connection timeout (in seconds). |
Adjust Active Directory Tombstone Lifetime (optional)
You can restore deleted Active Directory objects and their attributes using the Netwrix Auditor Object Restore for Active Directory tool shipped with Netwrix Auditor. The tool finds the information on deleted objects in the product snapshots (this data is stored in the Long-Term Archive, a local file-based storage of audit data) and AD tombstones.
To be able to restore deleted Active Directory objects longer, increase the Active Directory tombstone lifetime property (set by default to 180 days). Netwrix recommends setting it to 2 years (730 days). You can specify any number of days, but a selected value should not exceed the Long-Term Archive retention period.
Take into consideration that increasing tombstone lifetime may affect Active Directory performance and operability.
To perform this procedure, you will need the ADSI Edit utility.utility.
Follow the steps to change the tombstone lifetime attribute.
Step 1 – On any domain controller in the target domain, navigate to Start > Windows Administrative Tools > ADSI Edit.
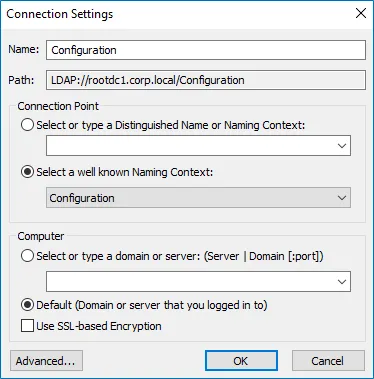
Step 2 – Right-click the ADSI Edit node and select Connect To. In the Connection Settings dialog, enable Select a well-known Naming Context and select Configuration from the drop-down list.

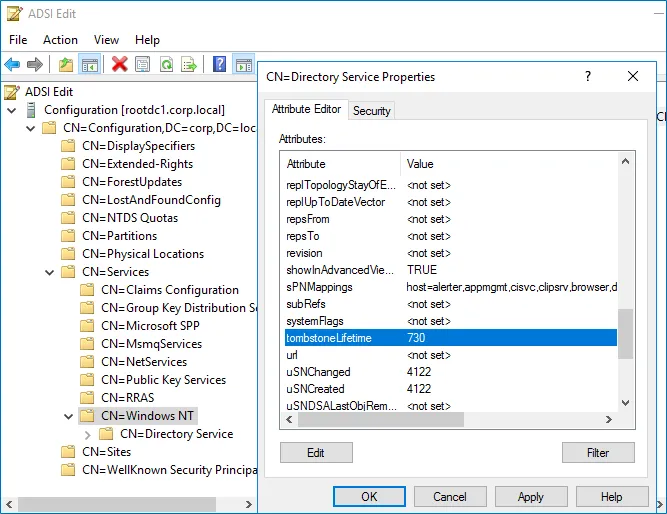
Step 3 – Navigate to Configuration <Your_Root_Domain_Name> →
CN=Configuration,DC=<name>,DC=<name> → CN=Services → CN=Windows NT → CN=Directory Service.
Right-click it and select Properties from the pop-up menu.
Step 4 – In the CN=Directory Service Properties dialog, locate the tombstoneLifetime attribute in the Attribute Editor tab.

Step 5 – Click Edit. Set the value to "730" (which equals 2 years).