About Netwrix Auditor
The About Netwrix Auditor tab contains complete information on the product:
| Option | Description |
|---|---|
| Netwrix Auditor | Review current version of Netwrix Auditor. |
| Check for updates | Select to check for available updates now. |
| Check for updates automatically and show notifications about new product versions | Netwrix Auditor periodically checks for updates so you don’t have to. When an update is available, a user is immediately noticed. |
| Getting Help | Click the link to visit Netwrix Auditor Help Center and access configuration guidelines and step-by-step instructions online. |
General
On the General tab you can configure global Netwrix Auditor settings, e.g., self-audit, tags, accounts and passwords.
Review the following for additional information:
| Option | Description |
|---|---|
| Self-audit | Select to enable data collection for product self-auditing. Self-audit allows tracking every change to monitoring plan, data source, and audit scope and details about it (before-after values) so that you know that scope of data to be audited is complete and changed only in line with workflows adopted by our organization. Review the following for additional information: - Netwrix Auditor Operations and Health |
| Netwrix Auditor usage statistics | It is optional on your part to help Netwrix improve the quality, reliability, and performance of Netwrix products and services. If selected, Netwrix collects statistical information on how the Licensee uses the product in accordance with applicable law. Visit Netwrix Corporation Software License Agreement for additional information about the program. You can review a sample piece of data if you are interested in data acquired by Netwrix. |
| Tags | Netwrix Auditor allows you to apply tags when creating an alert. With alerts, you can distinguish one alert from another, create groups of similar alerts, etc. The Tags page contains a complete list of alerts that were ever created in the product. See the Alerts topic for additional information. Currently, you cannot assign or create tags on this page. To apply tags to an alert, navigate to alert settings and locate the Apply tags section on the General tab. See the Create Alerts topic for additional information. |
| Account and passwords | Netwrix Auditor allows you to assign different accounts for monitoring plans. Click Manage to review the full list of accounts and associated auditing scope. You can also change accounts' password if necessary. |
| Access Reviews | Netwrix Auditor supports integration with Netwrix Auditor Access Reviews, which enables business owners to conduct resource and group reviews and recommend changes. See the Access Reviews topic for additional information. |
Investigations
By default, the Audit Database stores data up to 180 days. Once the retention period is over, the data is deleted from the Audit Database and becomes unavailable for reporting and search.
Depending on your company requirements you may need to investigate past incidents and browse old data stored in the Long-Term Archive. Netwrix Auditor allows importing data from the Long-Term Archive to a special "investigation" database. Having imported data there, you can run searches and generate reports with your past data.

To import audit data with the Archive Data Investigation wizard
NOTE: You must be assigned the Global administrator role to import investigation data. To view investigation data, you must be assigned the Global administrator or Global reviewer role. See Assign Roles topic for more information.
-
Navigate to Settings → Investigations.
-
Complete your SQL Server settings.
Option Description SQL Server Instance Specify the name of the SQL Server instance to import your audit data to. If you want to run searches and generate reports, select the same SQL Server instance as the one specified on Settings → Audit Database page. See Audit Database topic for more information. Database Select import database name. By default, data is imported to a specially created the Netwrix_ImportDB database but you can select any other. Do not select databases that already contain data. Selecting such databases leads to data overwrites and loss. Authentication Select the authentication type you want to use to connect to the SQL Server instance: - Windows authentication - SQL Server authentication User name Specify the account to be used to connect to the SQL Server instance. This account must be granted the database owner (db_owner) role and the dbcreator server role. Password Enter a password. Clear imported data Select to delete all previously imported data. To prevent SQL Server from overfilling, it is recommended to clear imported data once it is longer needed. -
Review your New investigation configuration. Click Configure to specify the import scope.
Option Description From... To... Specify the time range for which you want to import past audit data. Data sources Select data sources whose audit data you want to import to the Audit Database. Monitoring plans Select monitoring plans whose audit data you want to import to the Audit Database. Netwrix Auditor lists monitoring plans that are currently available in the product configuration. Select All to import audit data for all monitoring plans, including those that were removed from the product (or removed and then recreated with the same name—Netwrix Auditor treats them as different monitoring plans). For example, you had a monitoring plan corp.local used for auditing Active Directory. You removed this monitoring plan, but its audit data was preserved in the Long-Term Archive. Then, you created a new monitoring plan for auditing Exchange and named it corp.local again. Its data is also stored in the Long-Term Archive. Netwrix Auditor treats both corp.local monitoring plans—the removed and the current—as different. If you select corp.local in the monitoring plans list, only Exchange data will be imported to Audit Database (as it corresponds to the current monitoring plan configuration). To import Active Directory data from the removed monitoring plan, select All monitoring plans. -
Click Run.
Netwrix Privilege Secure
Starting with version 10.7, you can implement the integration between Netwrix Auditor and Netwrix Privilege Secure.
The integration can be configured for the following Auditor data sources:
-
Active Directory.
See the Use Netwrix Privilege Secure as a Data Collecting Account topic for additional information.
-
Group Policy.
See the Use Netwrix Privilege Secure as a Data Collecting Account topic for additional information.
-
Logon Activity.
See the Use Netwrix Privilege Secure as a Data Collecting Account topic for additional information.
-
Microsoft Entra ID.
See the How to Add Microsoft Entra ID Monitoring Plan Using Netwrix Privilege Secure topic for additional information.
-
Windows File Server.
See the Use Netwrix Privilege Secure as a Data Collecting Account topic for additional information.
-
Windows Server.
See the Use Netwrix Privilege Secure as a Data Collecting Account topic for additional information.
Software Requirements
| Component | Version |
|---|---|
| Netwrix Auditor | 10.7+ |
| Netwrix Privilege Secure | 4.2+ |
Enable and Configure Netwrix Privilege Secure Integration
Follow the steps to enable and configure Netwrix Privilege Secure integration.
Step 1 – In Netwrix Auditor, navigate to Settings in the upper right corner.
Step 2 – Select Netwrix Privilege Secure.
Step 3 – Click Set up Integration.
Step 4 – Specify the Privilege Secure URL.
Step 5 – Specify the application name and Netwrix Auditor client certificate. The following two options are available:
- New/Generate certificate – Create a new certificate.
- Select an existing certificate – Select an available certificate from the drop-down list.
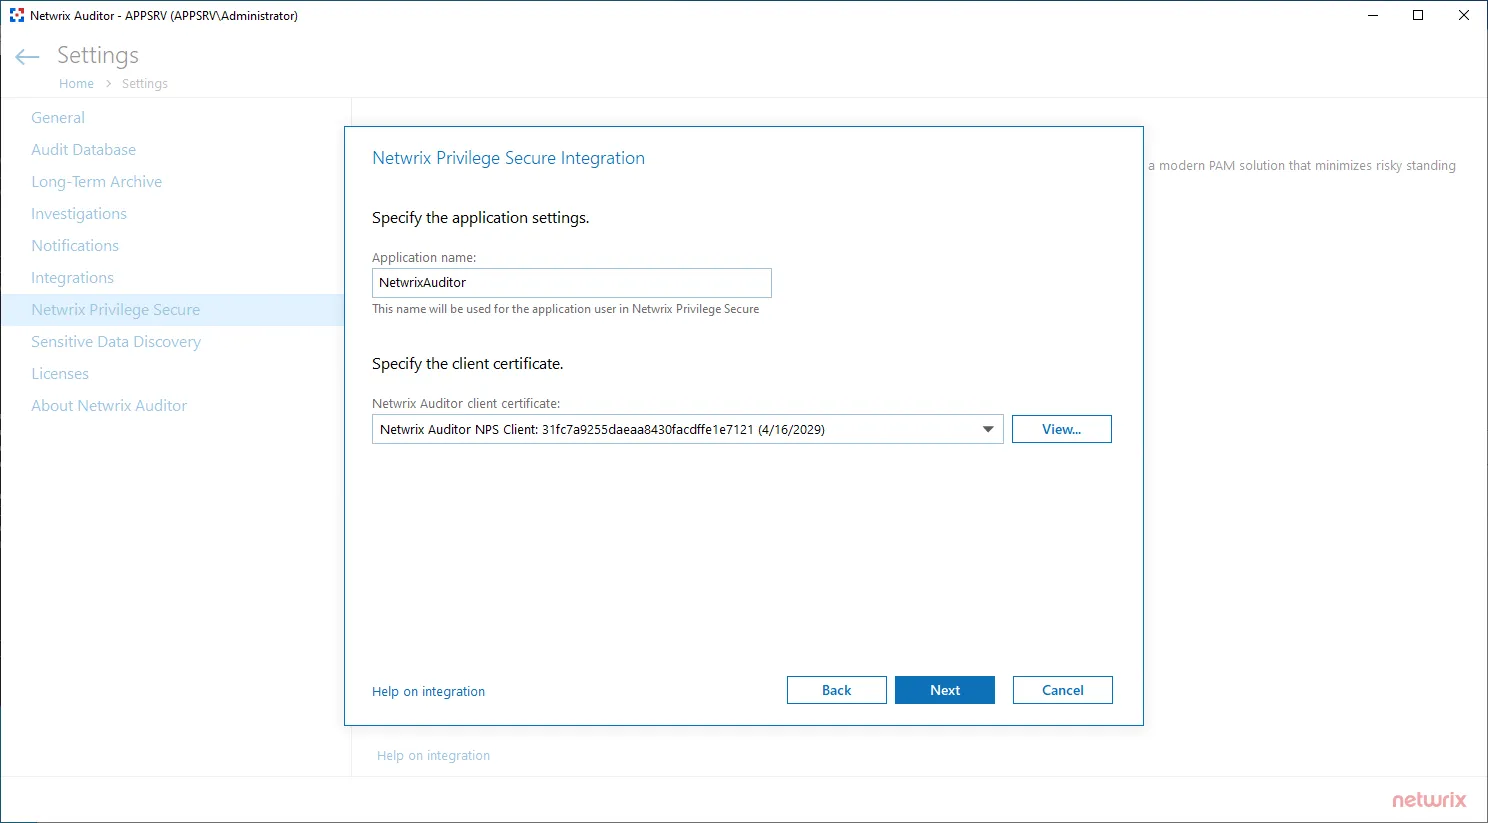
Step 6 – Click Next.
Step 7 – You need to manually export the Netwrix Auditor server certificate. To do so, follow the steps below:
- On the machine where Netwrix Auditor is installed, press the Windows key + R to open the Run dialog box. Type "mmc" in the box and click OK. This will open MMC (Microsoft Management Console).
- Click File > Add/Remove Snap-in... and locate Certificates icon.
- In the pop-up window, select the Computer account and click Next.
- Make sure that the Local Computer option is selected in the next window, then click Finish. The Certificates menu will appear.
- Go to Certificates (Local Computer) > Personal > Certificates >
{Certificate Name}and click Export. - After successful export, copy the certificate to the machine where Netwrix Privilege Secure is installed.
Step 8 – Install the certificate on the machine where Netwrix Privilege Secure is installed. To do so, follow the steps below:
- Right-click the imported certificate and select Install Certificate option.
- In the Certificate Import Wizard, select Local Machine as a Store Location and click Next.
- In the next menu, select Paste all certificates in the following store option, click Browse and select Trusted Root Certification Authorities folder in the pop-up menu.
- Click Finish.
Step 9 – Launch Netwrix Privilege Secure to create an application user for Netwrix Auditor with the Application name and Certificate Serial Number that you received. Refer to the Netwrix Privilege Secure documentation for additional instructions.
Step 10 – Provide the security key you got in Netwrix Privilege Secure.

Step 11 – Click Next.

Step 12 – After the validation, click Finish.
Integration between Netwrix Auditor and Netwrix Privilege Secure is established. Before using the Netwrix Privilege Secure for data collection in Netwrix Auditor, make sure that you created a dedicated Access Policy and Connection Profile in Netwrix Privilege Secure. Refer to the Netwrix Privilege Secure documentation for additional information.