Exchange Administrator Audit Logging Settings
To be able to audit and report who made changes to the Exchange servers in your on-premises infrastructure, or to Active Directory via the Exchange, ensure the Exchange Administrator Audit Logging (AAL) settings are configured as follows:
| Setting | Value | Comment |
|---|---|---|
| AdminAuditLogEnabled | True | Enables audit logging |
| AdminAuditLogAgeLimit | 30 | Determines how long audit log entries will be retained (default is 90 days) |
| AdminAuditLogCmdlets | * | Instructs the program to create a log entry for every cmdlet that is run. |
| LogLevel | Verbose | Sets logging level. |
| ExcludedCmdlets | *-InboxRule, *-MailboxAutoReplyConfiguration, Set-MailboxAuditBypassAssociation, Set-MailboxAutoReplyConfiguration, Set-MailboxCalendarConfiguration, Set-MailboxCalendarFolder, Set-MailboxFolderPermission, Set-MailboxJunkEmailConfiguration, Set-MailboxMessageConfiguration, Set-MailboxRegionalConfiguration, Set-MailboxSpellingConfiguration | This list of exclusions is set up as explained in step 3 of the procedure below. |
You can configure these settings automatically using Netwrix Auditor, as described in the Active Directory: Automatic Configuration topic.
To configure them manually, refer to the procedure described below.
You can perform this procedure on any of the Exchange servers, and these settings will then be replicated to all Exchange servers in the domain.
To configure Exchange Administrator Audit Logging settings
Step 1 – On the computer where the monitored Exchange server is installed, navigate to Start → Programs → Exchange Management Shell.
Step 2 – Execute the following command depending on your Exchange version:
-
Exchange 2019, 2016 and 2013
Set-AdminAuditLogConfig -AdminAuditLogEnabled $true -AdminAuditLogAgeLimit 30 -AdminAuditLogCmdlets * -LogLevel Verbose -
Exchange 2010
Set-AdminAuditLogConfig -AdminAuditLogEnabled $true -AdminAuditLogAgeLimit 30 -AdminAuditLogCmdlets *
Step 3 – To reduce server load, you can exclude the cmdlets listed in the table above from Exchange logging. For that:
-
On the computer where Netwrix Auditor is installed, browse to the %Netwrix Auditor Server installation folder%/Active Directory Auditing folder, locate the SetAALExcludedCmdlets.ps1 PowerShell script file and copy it to Exchange server.
-
In Exchange Management Shell, run this script using the command line:
<Path_To_SetAALExcludedCmdlets_File>.\SetAALExcludedCmdlets.ps1
Make sure your policies allow script execution.
Configure Exchange for Monitoring Mailbox Access
Netwrix Auditor allows tracking non-owner mailbox access in your Exchange organization.
It is recommended to select Adjust audit settings automatically option when setting up Exchange monitoring in Netwrix Auditor. See the Create a New Monitoring Plan topic for additional information.
However, in some scenarios users may need to apply required audit settings manually. For that, review the following procedures:
- Configuring mailbox access tracking for Exchange 2019, 2016 and 2013 manually
- Configuring mailbox access tracking for Exchange 2010 manually
Configuring mailbox access tracking for Exchange 2019, 2016 and 2013 manually
Perform the procedures below only if you do not want to enable the automatic audit configuration option when setting up monitoring in Netwrix Auditor.
You can configure auditing for:
- All mailboxes (User, Linked, Equipment, and Room mailbox)
- Selected mailboxes
| Track... | Steps... |
|---|---|
| All mailboxes | 1. On the computer where the monitored Exchange server is installed, navigate to Start → Programs → Exchange Management Shell. 2. Execute the following command: Get-MailboxDatabase -Server {0} | foreach { Get-Mailbox -RecipientTypeDetails UserMailbox,SharedMailbox,EquipmentMailbox,LinkedMailbox,RoomMailbox | Set-Mailbox -AuditEnabled $true -AuditAdmin Update,Copy,Move,MoveToDeletedItems,SoftDelete,HardDelete,FolderBind,SendAs,SendOnBehalf,MessageBind,Create -AuditDelegate Update,Move,MoveToDeletedItems,SoftDelete,HardDelete,FolderBind,SendAs,SendOnBehalf,Create } Where the {0} character must be replaced with your audited server FQDN name (e.g., stationexchange.enterprise.local). If you are going to audit multiple Exchange servers, repeat these steps for each audited Exchange server. |
| Selected mailbox | 1. On the computer where the monitored Exchange server is installed, navigate to Start → Programs → Exchange Management Shell. 2. Execute the following command: Set-Mailbox -Identity {0} -AuditEnabled $true -AuditAdmin Update,Copy,Move,MoveToDeletedItems,SoftDelete,HardDelete,FolderBind,SendAs,SendOnBehalf,MessageBind,Create -AuditDelegate Update,Move,MoveToDeletedItems,SoftDelete,HardDelete,FolderBind,SendAs,SendOnBehalf,Create Where the {0} character must be replaced with one of the following: - Display Name. Example: "Michael Jones" - Domain\User. Example: enterprise.local\MJones - GUID. Example: {c43a7694-ba06-46d2-ac9b-205f25dfb32d} - (DN) Distinguished name. Example: CN=MJones,CN=Users,DC=enterprisedc1,DC=enterprise,DC=local - User Principal Name. Example: MJones@enterprise.local If you are going to audit multiple individual mailboxes, repeat these steps for each mailbox on each Exchange server. |
Configuring mailbox access tracking for Exchange 2010 manually
Perform the procedure below only if you do not want to enable network traffic compression option when setting up Exchange monitoring in Netwrix Auditor.
Step 1 – On the computer where the monitored Exchange server is installed, navigate to Start → Programs → Exchange Management Shell.
Step 2 – Execute the following command:
Set-EventLogLevel "MSExchangeIS\9000 Private\Logons" –Level Low
Step 3 – Navigate to Start → Run and type "services.msc". In the Services snap-in, locate the Microsoft Exchange Information Store service and restart it.
Exchange
Netwrix Auditor relies on native logs for collecting audit data. Therefore, successful change and access auditing requires a certain configuration of native audit settings in the audited environment and on the Auditor console computer. Configuring your IT infrastructure may also include enabling certain built-in Windows services, etc. Proper audit configuration is required to ensure audit data integrity, otherwise your change reports may contain warnings, errors or incomplete audit data.
CAUTION: Folder associated with Netwrix Auditor must be excluded from antivirus scanning. See the Antivirus Exclusions for Netwrix Auditor knowledge base article for additional information.
You can configure your IT Infrastructure for monitoring in one of the following ways:
-
Automatically through a monitoring plan – This is a recommended method. If you select to automatically configure audit in the target environment, your current audit settings will be checked on each data collection and adjusted if necessary.
-
Manually – Native audit settings must be adjusted manually to ensure collecting comprehensive and reliable audit data. You can enable Auditor to continually enforce the relevant audit policies or configure them manually:
-
In the Exchange environment:
-
Install the ADSI Edit utility to the server from which configuration is performed if it is not a domain controller
-
The following policies must be set to "Success" for the effective domain controllers policy:
- Audit account management
- Audit directory service access
-
The Audit logon events policy must be set to "Success" (or "Success" and "Failure") for the effective domain controllers policy.
-
The Advanced audit policy settings can be configured instead of basic.
-
The Maximum Security event log size must be set to 4GB. The retention method of the Security event log must be set to “Overwrite events as needed.”
-
Auto archiving must be enabled to prevent audit data loss if log overwrites occur.
-
The Object-level audit settings must be configured for the Domain, Configuration and Schema partitions.
-
The AD tombstoneLifetime attribute must be set to "730".
-
If you have an on-premises Exchange server 2019, 2016, 2013 or 2010 in your Active Directory domain, consider that some changes can be made via that Exchange server. To be able to audit and report who made those changes, you should configure the Exchange Administrator Audit Logging (AAL) settings, as described in the Exchange Administrator Audit Logging Settings topic.
-
The Administrator Audit Logging settings must be configured (only required for Exchange 2019, 2016, 2013 or 2010). See the Exchange Administrator Audit Logging Settings topic for additional information.
-
In order to audit mailbox access, native audit logging must be enabled for user, shared, equipment, linked, and room mailboxes:
- Access types: administrator , delegate user
- Actions: Update, Move, MoveToDeletedItems, SoftDelete, HardDelete, FolderBind, SendAs, SendOnBehalf, Create
-
If you want to track non-owner access, configure mailbox monitoring. See the Configure Exchange for Monitoring Mailbox Access topic for additional information.
-
-
On the Auditor console computer:
-
If you have enabled automatic log backup for the Security log of your domain controller, you can instruct Auditor to clear the old backups automatically. For that, use the CleanAutoBackupLogs registry key, as described in the Active Directory Registry Key Configuration topic.
RECOMMENDED: Adjust retention period for the backup files accordingly (default is 50 hours). See the Adjust Security Event Log Size and Retention topic.
-
To provide for event data collection, the Secondary Logon service must be up and running . Open Administrative Tools > Services, right-click the Secondary Logon service and on the General tab make sure that Startup type for this service is other than Disabled.
-
-
Remember, for Exchange auditing, do the following:
- Configure Data Collecting Account, as described in the Data Collecting Account topic.
- Configure required protocols and ports, as described in the Exchange Ports topic.
Monitored Object Types, Actions, and Attributes
Netwrix Auditor tracks changes that have been made to all Exchange server object classes and attributes. The list of Exchange object classes is version-dependent.
- The list of schema changes for Exchange 2013 can be found in the following Microsoft article: https://learn.microsoft.com/en-us/exchange/exchange-2013-active-directory-schema-changes-exchange-2013-help
- The list of schema changes for Exchange 2016 can be found in the following Microsoft article: https://learn.microsoft.com/en-us/exchange/plan-and-deploy/active-directory/ad-schema-changes?view=exchserver-2016
- The list of schema changes for Exchange 2019 can be found in the following Microsoft article: https://learn.microsoft.com/en-us/exchange/plan-and-deploy/active-directory/ad-schema-changes?view=exchserver-2019
Non-Owner Mailbox Access
Netwrix Auditor can monitor non-owner access to mailboxes in on-premises Exchange organization. The following mailbox types will be monitored by default:
- UserMailbox
- EquipmentMailbox
- LinkedMailbox
- RoomMailbox
Here is the list of actions captured:
| Item | Action | Audited | How this change is reported by the product |
|---|---|---|---|
| Emails and Folders | New email | Yes | The message was created in \Drafts folder with subject <...> |
| A user with Send as or Send on behalf permissions tried to send an email | Yes | Message located in Root with subject <...> was queued for delivery to IPM.Message. | |
| Delete email | Yes | Message with subject <...> was moved from folder \Drafts to folder \Deleted Items. | |
| Move email to another folder | Yes | Message with subject <...> was moved from folder <...> to folder <...>. | |
| Create rules for emails | No | — | |
| Email read attempt | No | — | |
| New folder | No | — | |
| Open folder | Yes | The folder <...> was opened. | |
| Delete folder | Yes | Folder <...> was moved from folder <...> to folder \Deleted Items. | |
| Empty folder | Yes | The folder <...> was opened. | |
| Edit folder permissions | No | — | |
| Calendar | New event | Yes | Message was created in \Calendar with subject <...>. |
| Event read attempt | No | — | |
| Edit event | Yes | Message located in \Calendar with subject <...> was modified. | |
| Delete event | Yes | Message with subject <...> was moved from folder \Calendar to folder \Deleted Items. | |
| People | New contact | Yes | Message was created in \Contacts\Recipient Cache with subject <_contact name_>. |
| Contact read attempt | Yes | Folder \Contacts\Recipient Cache was opened. | |
| Edit contact | No | — | |
| Delete contact | Yes | Message with subject <...> was moved from folder \Contacts to folder \Deleted Items. | |
| Tasks | New task | Yes | Message was created in \Tasks with subject <...>. |
| Task read attempt | No | — | |
| Edit task | Yes | Message located in \Tasks with subject <...> was modified. | |
| Delete task | Yes | Message with subject <...> was moved from folder \Tasks to folder \Deleted Items. |
Permissions for Exchange Auditing
Before creating a monitoring plan to audit your Exchange server, you need to plan for the account that will be used for data collection. This account should meet the requirements listed below. You will specify this account in the monitoring plan wizard (or in the monitored item settings).
Account Requirements
The account used for data collection must meet the following requirements:
-
Member of the Domain Admins group on the target server.
NOTE: This covers all the required permissions below and is a mandatory setting if you want to use network traffic compression for data collection.
OR
-
The combination of the following rights and permissions if you plan to disable network traffic compression for your monitoring plan or, for some reasons, do not want to add this account to the Domain Admins group:
- The Manage auditing and security log policy must be defined for this account. See the Permissions for Active Directory Auditing topic for additional information.
- If you plan to process the Active Directory Deleted Objects container, Read permission on this container is required. See the Permissions for Active Directory Auditing topic for additional information.
- The account must belong to the Organization Management or Records Management group. See the Add Account to the Organization Management Group topic for additional information.
- Several management roles assigned: Audit Logs role, View-only Configuration role, Mail Recipients role, and Monitoring role. See the Add Account to the Organization Management Group topic for additional information on how to perform role assignment.
- Additional configuration if auto-backup is enabled for the domain controller event logs (see below).
Additional Configuration for Domain Controller's Event Logs Auto-backup
The following is required if auto-backup is enabled for the domain controller event logs:
- Permissions to access the HKEY_LOCAL_MACHINE\System\CurrentControlSet\Services\EventLog\Security registry key on the domain controllers in the target domain. See the Assign Permission to Read the Registry Key topic for additional information.
- Membership in one of the following groups: Administrators, Print Operators, Server Operators
- Read/Write share permission and Full control security permission on the logs backup folder
Add Account to the Organization Management Group
Follow the steps to add account to the Organization Management group.
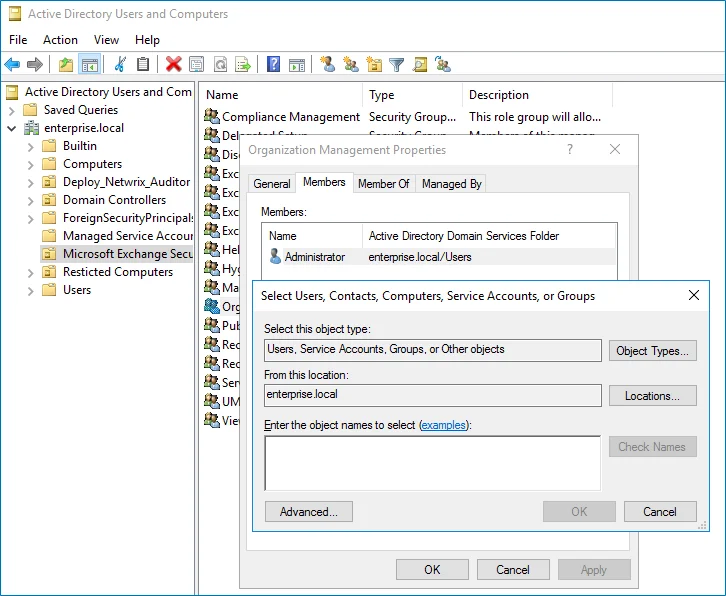
Step 1 – Navigate to Start > Active Directory Users and Computers on any domain controller in the root domain of the forest where Microsoft Exchange 2019, 2016, or 2013 is installed.
Step 2 – In the left pane, navigate to <domain_name> > Microsoft Exchange Security Groups.
Step 3 – On the right, locate the Organization Management group and double-click it.
Step 4 – In the Organization Management Properties dialog that opens, select the Members tab and click Add.
If for some reason you do not want this account to belong to the Organization Management group, you can add it to the Records Management group in the same way. The Records Management group is less powerful, and accounts belonging to it have fewer rights and permissions.
Assign Management Roles
Perform this procedure only if the account selected for data collection is not a member of the Organization Management or the Records Management group.
Follow the steps to assign management roles.
Step 1 – On the computer where Microsoft Exchange 2019, 2016, 2013 or is installed, open the Exchange Management Shell under an account that belongs to the Organization Management group.
Step 2 – Use the following syntax to assign the required management role to a user:
New-ManagementRoleAssignment -Name <assignment name> -User <UserName> -Role <role name>
For example:
New-ManagementRoleAssignment -Name "AuditLogsNetwrixRole" -User Corp\jsmith -Role "Audit Logs"
In this example, the user CORP\jsmith has been assigned the Audit Logs role.
Assign Permission to Read the Registry Key
This permission is required only if the account selected for data collection is not a member of the Domain Admins group.
This permission should be assigned on each domain controller in the audited domain, so if your domain contains multiple domain controllers, it is recommended to assign permissions through Group Policy, or automatically using Audit Configuration Assistant.
To assign permissions manually, use the Registry Editor snap-in or the Group Policy Management console.
Assign Permission Via the Registry Editor Snap-in
Follow the steps to assign permission via the Registry Editor snap-in.
Step 1 – On your target server, open Registry Editor: navigate to Start > Run and type "regedit".
Step 2 – In the left pane, navigate to HKEY_LOCAL_MACHINE\SYSTEM\CurrentControl Set\Services\EventLog\Security.
Step 3 – Right-click the Security node and select Permissions from the pop-up menu.
Step 4 – Click Add and enter the name of the user that you want to grant permissions to.
Step 5 – Check Allow next to the Read permission.
Step 6 – For auditing Logon Activity, you also need to assign the Read permission to the HKEY_LOCAL_MACHINE\SECURITY\Policy\PolAdtEv registry key.
Assign Permission Using the Group Policy Management Console
Follow the steps to assign permission using the Group Policy Management console.
Step 1 – Open the Group Policy Management console on any domain controller in the target domain: navigate to Start > Windows Administrative Tools (Windows Server 2016/2019) or Administrative Tools (Windows 2012 R2 and below) > Group Policy Management.
Step 2 – In the left pane, navigate to Forest: <forest name> > Domains > <domain name> >
Domain Controllers. Right-click the effective domain controllers policy (by default, it is the
Default Domain Controllers Policy), and select Edit .
Step 3 – In the Group Policy Management Editor dialog, expand the Computer Configuration node on the left and navigate to Policies > Windows Settings > Security Settings > Registry.
Step 4 – Right-click in the pane and select Add Key.
Step 5 – Navigate to HKEY_LOCAL_MACHINE\SECURITY\Policy\PolAdtEv and click OK.
Step 6 – Click Add and enter the name of the user that you want to grant permissions to and press Enter.
Step 7 – Check Allow next to the "Read" permission and click OK
Step 8 – In the pop-up window, select Propagate inheritable permissions to all subkeys and click OK.
Step 9 – Repeat the steps 4-8 for keys below:
HKEY_LOCAL_MACHINE\SYSTEM\CurrentControlSet\Control\SecurePipeServers\winreg;HKEY_LOCAL_MACHINE\SYSTEM\CurrentControlSet\Services\EventLog\Security.
Step 10 – Close Group Policy Management console.
Step 11 – Navigate to Start > Run and type "cmd". Input the gpupdate /force command and
press Enter. The group policy will be updated.
Step 12 – Type repadmin /syncall command and press Enter for replicate GPO changes to other
domain controllers.
Step 13 – Ensure that new GPO settings were applied to the domain controllers.
Exchange Registry Keys
Review the basic registry keys that you may need to configure for monitoring Exchange with Netwrix Auditor. Navigate to Start → Run and type "regedit".
| Registry key (REG_DWORD type) | Description / Value |
|---|---|
| HKEY_LOCAL_MACHINE\SOFTWARE\WOW6432Node\Netwrix Auditor\AD Change Reporter | |
| CleanAutoBackupLogs | Defines the retention period for the security log backups: - 0—Backups are never deleted from Domain controllers - [X]— Backups are deleted after [X] hours |
| IgnoreAuditCheckResultError | Defines whether audit check errors should be displayed in the Activity Summary footer: - 0—Display errors - 1—Do not display errors |
| IgnoreRootDCErrors | Defines whether to display audit check errors for the root domain (when data is collected from a child domain) in the Activity Summary footer: - 0—Display errors - 1—Do not display errors |
| MonitorModifiedAndRevertedBack | Defines whether the Activity Summary must display the attributes whose values were modified and then restored between data collections: - 0—These attributes are not displayed - 1—These attributes are displayed as "modified and reverted back" |
| ProcessBackupLogs | Defines whether to process security log backups: - 0—No - 1—Yes Even if this key is set to "0", the security log backups will not be deleted regardless of the value of the CleanAutoBackupLogs key. |
HKEY_LOCAL_MACHINE\SOFTWARE\WOW6432Node\Netwrix Auditor\AD Change Reporter\<monitoring plan name> | |
| CollectLogsMaxThreads | Defines the number of Domain Controllers to simultaneously start log collection on. |
| HKEY_LOCAL_MACHINE\SOFTWARE\WOW6432Node\Netwrix Auditor\Management Console\Database settings | |
| overwrite_datasource | Defines whether to overwrite the database connection settings (stored in the reports data source) if they differ from the SQL server settings specified when configuring the monitoring plan: - 0—No - 1—Yes |
| SqlOperationTimeout | Defines the timeout for executing SQL queries such as data selection, insertion or deletion (in seconds). |
| timeout | Defines the Audit Database connection timeout (in seconds). |