Create a Notification Policy
To monitor operations with files and folders on Nutanix File Server, you should configure a notification policy for the related events.
Monitored Operations
The list of supported operations is provided in the table below. Your notification policy can include any of them.
| To audit... | Operation name to specify at policy creation |
|---|---|
| Successful create operations | FILE_CREATE DIRECTORY_CREATE |
| Successful read operations | FILE_READ |
| Successful modify operations | FILE_WRITE RENAME SECURITY |
| Successful delete operations | FILE_DELETE DIRECTORY_DELETE |
| Failed read/modify/delete attempts* | FILE_OPEN |
* - Failed attempt to move/rename file are not audited.
Configuration Procedure
Notification policy creation procedure involves API requests usage. It is assumed that you have a good understanding of REST API concepts, as well as enough experience in working with JSON-formatted requests in any API client. To get acquainted with Nutanix REST API Explorer client, refer to Nutanix documentation.
To create a notification policy for Nutanix File Server via API:
-
Open the File Server REST API Explorer client using the following URL:
https://`<fileserver_ip>`:9440/api/nutanix/v3/api_explorer/index.html#/here
<fileserver_ip>- IP address of the Nutanix File Server to be audited.
If you select to launch the RestAPI Explorer from the Prism menu, the RestAPI Explorer for Prism client will be opened.
-
In the username and password fields, enter the credentials of the Create User Account to Access Nutanix REST API you have created.
-
Click Explore.
-
In the File Server REST API Explorer REST API client, locate the POST request for
notification_policies:POST /notification_policies -
In the request body, enter the following JSON-formatted structure:
{

"spec": {

"name": "<NAME_OF_NOTIFICATION_POLICY>",

"resources": {

"all_mount_targets" : true,

"protocol_type_list" : ["SMB"],

"file_operation_list" : [<LIST_OF_FILE_OPERATIONS>],

"partner_server_reference_list" : [{

"kind" : "partner_server",

"uuid" : "<UUID_OF_PARTNER_SERVER>"

}]

},

"description": "<optional_string>"

},

"api_version": "3.0",

"metadata": {

"kind": "notification_policy"

}

}
here:
"all_mount_targets" : true - instructs to notify on changes to all shares
"protocol_type_list" : ["SMB"] - instructs to track SMB shares (the only currently supported)
<NAME_OF_NOTIFICATION_POLICY> – enter the name of notification policy you want to create
<UUID_OF_PARTNER_SERVER> - enter the uuid of
Configure Partner Server
<LIST_OF_FILE_OPERATIONS> - enter the list of operations to be audited.
-
Send the request, clicking Try it out.
-
Get the response -
Response Codeshould be 200. In the response body, locate theuuidof the created notification policy. -
To check that a new policy was included in the list of existing policies, retrieve the list of policies, sending the POST request to the following endpoint:
POST /notification_policies/list. The request body must be empty - for that, enter empty brackets as the value for get_entities_request parameter :{ }
Auditing Specific Folders
If you want to audit only the certain folders on Nutanix File Server (mount targets), then do the following:
- Retrieve the list of existing mount targets using the
mount_target POST /mount_targets/listrequest with empty body, as described above. - In the response, locate the
uuidsof the target folders you want to audit. - In the notification policy creation request (described above) instead of
"all_mount_targets" : truein the request body enter the following JSON-formatted structure:
"mount_target_reference_list": [

{

"kind" : "mount_target",

"uuid" : "<UUID_OF_MOUNT_TARGET1>"

},

{

"kind" : "mount_target",

"uuid" : "<UUID_OF_MOUNT_TARGET2>"

},

]
here:
<UUID_OF_MOUNT_TARGET> – enter the uuid of target you want to audit.
Example
The JSON-formatted structure below is an example of the request body that can be used to create a notification policy named MOUNT_POINT_POLICY to audit the mount a share on Nutanix File Server with the uuid=378896fd-e829-4869-84a2-6c29268acfff. The following operations will be audited:
- "FILE_READ",
- "FILE_CREATE",
- "FILE_DELETE",
- "DIRECTORY_CREATE",
- "DIRECTORY_DELETE",
- "FILE_WRITE",
- "RENAME",
- "SECURITY",
- "FILE_OPEN"
JSON structure is as follows:
{

"spec": {

"name": "MOUNT_POINT_POLICY ",

"resources": {

"mount_target_reference_list": [

{

"kind" : "mount_target",

"uuid" : "378896fd-e829-4869-84a2-6c29268acfff”

}

],

"protocol_type_list" : ["SMB"],

"file_operation_list" :[

"FILE_READ",

"FILE_CREATE",

"FILE_DELETE",

"DIRECTORY_CREATE",

"DIRECTORY_DELETE",

"FILE_WRITE",

"RENAME",

"SECURITY",

"FILE_OPEN"

],

"partner_server_reference_list" : [

{

"kind" : "partner_server",

"uuid" : " d0bfb952-924b-459e-bd32-44c8b5a62838"

}

]

},

"description": "<optional_string>"

},

"api_version": "3.0",

"metadata": {

"kind": "notification_policy"

}

}
Nutanix
Netwrix Auditor relies on native logs for collecting audit data. Therefore, successful change and access auditing requires a certain configuration of native audit settings in the audited environment and on the Auditor console computer. Configuring your IT infrastructure may also include enabling certain built-in Windows services, etc. Proper audit configuration is required to ensure audit data integrity, otherwise your change reports may contain warnings, errors or incomplete audit data.
CAUTION: Folder associated with Netwrix Auditor must be excluded from antivirus scanning. See the Antivirus Exclusions for Netwrix Auditor knowledge base article for additional information.
You can configure your IT Infrastructure for monitoring in one of the following ways:
-
Automatically through a monitoring plan – This is a recommended method. If you select to automatically configure audit in the target environment, your current audit settings will be checked on each data collection and adjusted if necessary.
-
Manually – Native audit settings must be adjusted manually to ensure collecting comprehensive and reliable audit data. You can enable Auditor to continually enforce the relevant audit policies or configure them manually:
-
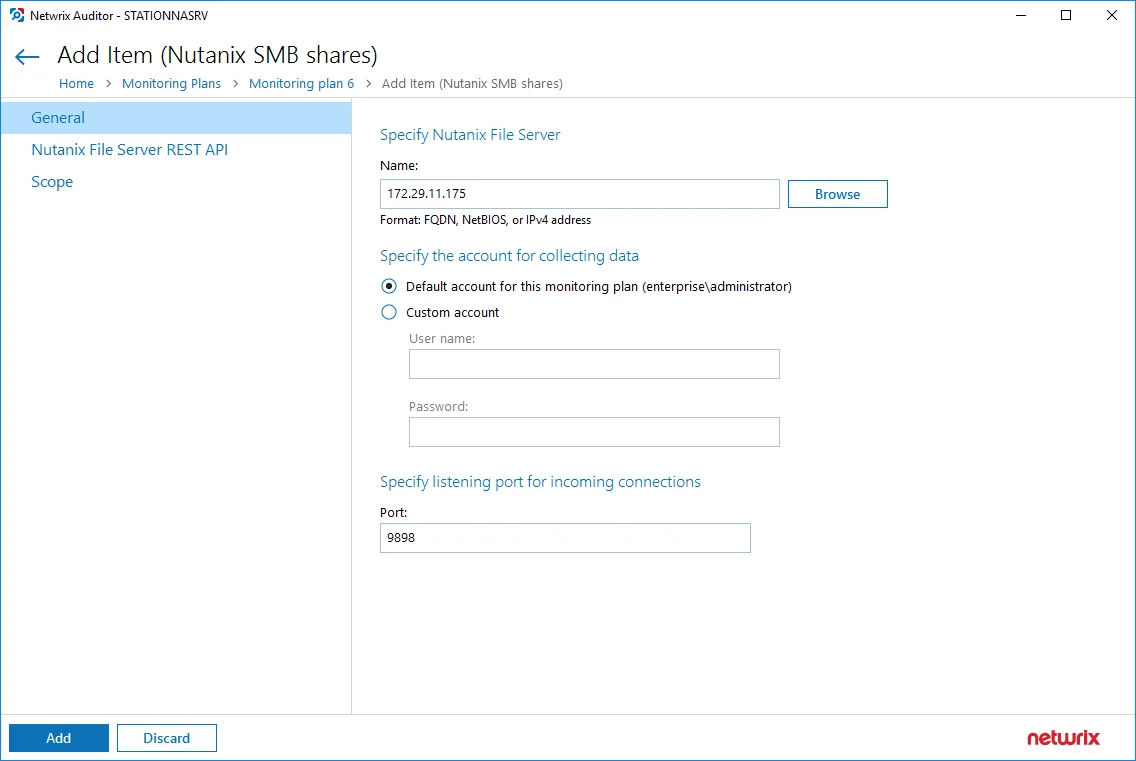
To allow inbound connections to Netwrix Auditor server from Nutanix File Server, a TCP port must be open:
- For the first Nutanix File Server you configure for auditing, the TCP 9898 port will be used.
- For each subsequent server, a new TCP port must be open.
-
Target Nutanix File Server must be located in the same subnet as Netwrix Auditor Server and must be configured as described in this section.
-
Manual Configuration
To configure your Nutanix File Server for monitoring SMB shares, you will need to do the following:
Step 1 – Create a user account to access the Nutanix REST API. See the Create User Account to Access Nutanix REST API topic for additional information.
Step 2 – Open a port for inbound connections. See the Nutanix Ports topic for additional information.
In addition, configure the Auditor console server as a partner server for Nutanix Files, and create a notification policy to make Netwrix Auditor aware of the Nutanix events. These operations can be performed in any of the following ways:
- Automatically when creating a monitoring plan. For that, you should select the Adjust audit settings automatically option in the monitoring plan wizard. See the Settings for Data Collection topic for additional information.
- Manually, as described in the corresponding topics:
Remember that in both cases (automatic or manual configuration) you will need to complete the steps above to ensure that the user account for accessing REST API is created and the listening port on Netwrix Auditor Server is open for inbound connections.
Nutanix Files
The following table lists the actions that can be performed with Nutanix Files:
| File | Folder | Share | |
|---|---|---|---|
| Added | + | + | + |
| Add (failed attempt) | + | + | – |
| Modified | + | + | + |
| Modify (failed attempt) | + | + | – |
| Moved | + | + | – |
| Move (failed attempt) | – | – | – |
| Read | + | + | – |
| Read (failed attempt) | + | + | – |
| Renamed | + | + | – |
| Renamed (failed attempt) | – | – | – |
| Removed | + | + | + |
| Remove (failed attempt) | + | + | – |
| Copied | – | – | – |
The following considerations refer to Nutanix Files auditing and reporting:
- All changes performed on Nutanix File Shares initiated from the machine(s) where Auditor Server resides, will not displayed in Netwrix search and reports because Nutanix Files unable to generate such Activity Records for Auditor.
- Auditing of NFS file shares in not supported due to known limitations.
- Currently, not every detail about permission and attribute changes may be provided by Nutanix Files, so they cannot be reported by Auditor.
- As for the state-in-time data collection, note that effective permissions (as a combination of NTFS and Shared permissions) are not calculated properly for the local Administrator group members.
Configure Partner Server
To start monitoring files and folders on Nutanix File Server, you should configure Netwrix Auditor Server as a partner server for Nutanix File Server.
This configuration procedure involves creation of API requests and assumes that you have an good understanding of REST API concept, as well as experience in working with JSON-formatted requests in some API client. To get acquainted with Nutanix REST API Explorer client, refer to Nutanix documentation
To create a partner server for Nutanix File Server via API:
-
Open the File Server REST API Explorer REST API client using the following URL:
https://`<fileserver_ip>`:9440/api/nutanix/v3/api_explorer/index.html#/here
<fileserver_ip>- IP address of the Nutanix File Server to be audited.
If you select to launch the RestAPI Explorer from the Prism menu, the RestAPI Explorer for Prism server will be opened.
-
In the username and password fields, enter the credentials of the Create User Account to Access Nutanix REST API you have created.
-
Click Explore.
-
Locate the POST request for partner_servers endpoint:
POST /partner_servers

- In the request body, enter the following JSON-formatted structure:
{
  "spec": {
    "name": "<NAME_OF_PARTNER_SERVER>",

    "resources": {
      "usage_type": "NOTIFICATION",

      "vendor_name": "netwrix",

      "server_info": {
        "server_type": "PRIMARY",

        "address": {
          "ip": "<IP_OF_THE_NETWRIX_AUDITOR>",

          "port": 9898
        }
      }
    }
  },

  "api_version": "3.0",

  "metadata": {
    "kind": "partner_server"
  }
}
here:
<NAME_OF_PARTNER_SERVER> - enter the Netwrix Auditor server name
<IP_OF_NETWRIX_AUDITOR> - enter the Netwrix Auditor server IP address
This address must be visible from the Nutanix File Server network.
-
Send the request, clicking Try it out.
-
Get the response -
Response Codeshould be 200. In the response body, locate theuuidof the created partner server. -
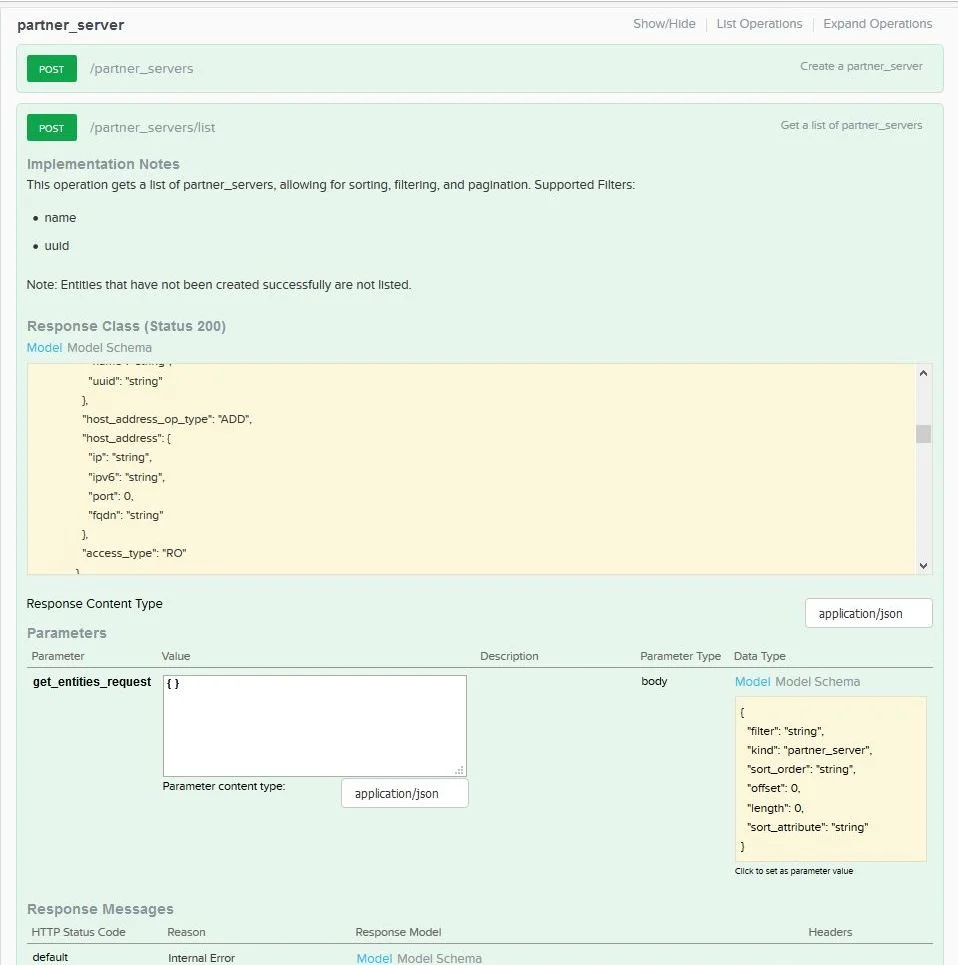
To check that a new partner server was included in the list of existing partner servers, retrieve the list of servers, sending the POST request to the following endpoint:
POST /partner_servers/list
The request body must be empty - for that, enter empty brackets as the value for
get_entities_request parameter: { }
 ix/api_partner_server_resquest.webp)
- The response body should contain the list of servers, including new partner server name and other settings.
Permissions for Nutanix Files Auditing
Before you start creating a monitoring plan to audit Nutanix Files, plan for the accounts that will be used for data collection. They should meet the requirements listed below.
Account for Accessing Nutanix File Server
First, you need an account that Netwrix Auditor will use to access Nutanix File Server. This account requires at least Read permission for the target SMB shares on the Nutanix File Server.
This is the account you will provide in the monitoring plan wizard at the Create a New Monitoring Plan step; it can be modified in the General tab of the monitored item settings.
This account must have a role with sufficient privileges on that server: File Server Admin (recommended) or Backup Admin role.
Account for Accessing REST API
You will also need an account that will be used to connect to Nutanix File Server REST API.
This account should be provided in the Nutanix File Server REST API tab of the monitored item (Nutanix SMB shares) settings.
 m_restapi.webp)
This account must be assigned the REST API access users role for Nutanix File Server you want to audit.
See the section below for the instructions on user role assignment.
Role Assignment Procedure
Before starting the role assignment, make sure your Nutanix File Server is included in the AD domain.
Follow the steps to assign the required roles to the corresponding accounts using Nutanix Prism.
Step 1 – Open Nutanix Prism web portal.
Step 2 – Select File Server category. In the list of servers, select the server you want to audit.
Step 3 – Click Manage roles.
Step 4 – In the Manage roles dialog locate the Add admins section and click +New user.
Step 5 – Enter the AD user account (to be used as data collection account) in the domain\name format and select the File Server Admin or Backup Admin role to assign
Step 6 – Click Save next to these cells to save the settings.
Step 7 – Next, in the REST API access users section click +New user.
Step 8 – Enter the local user account and password, then click Save next to these cells to save the settings.
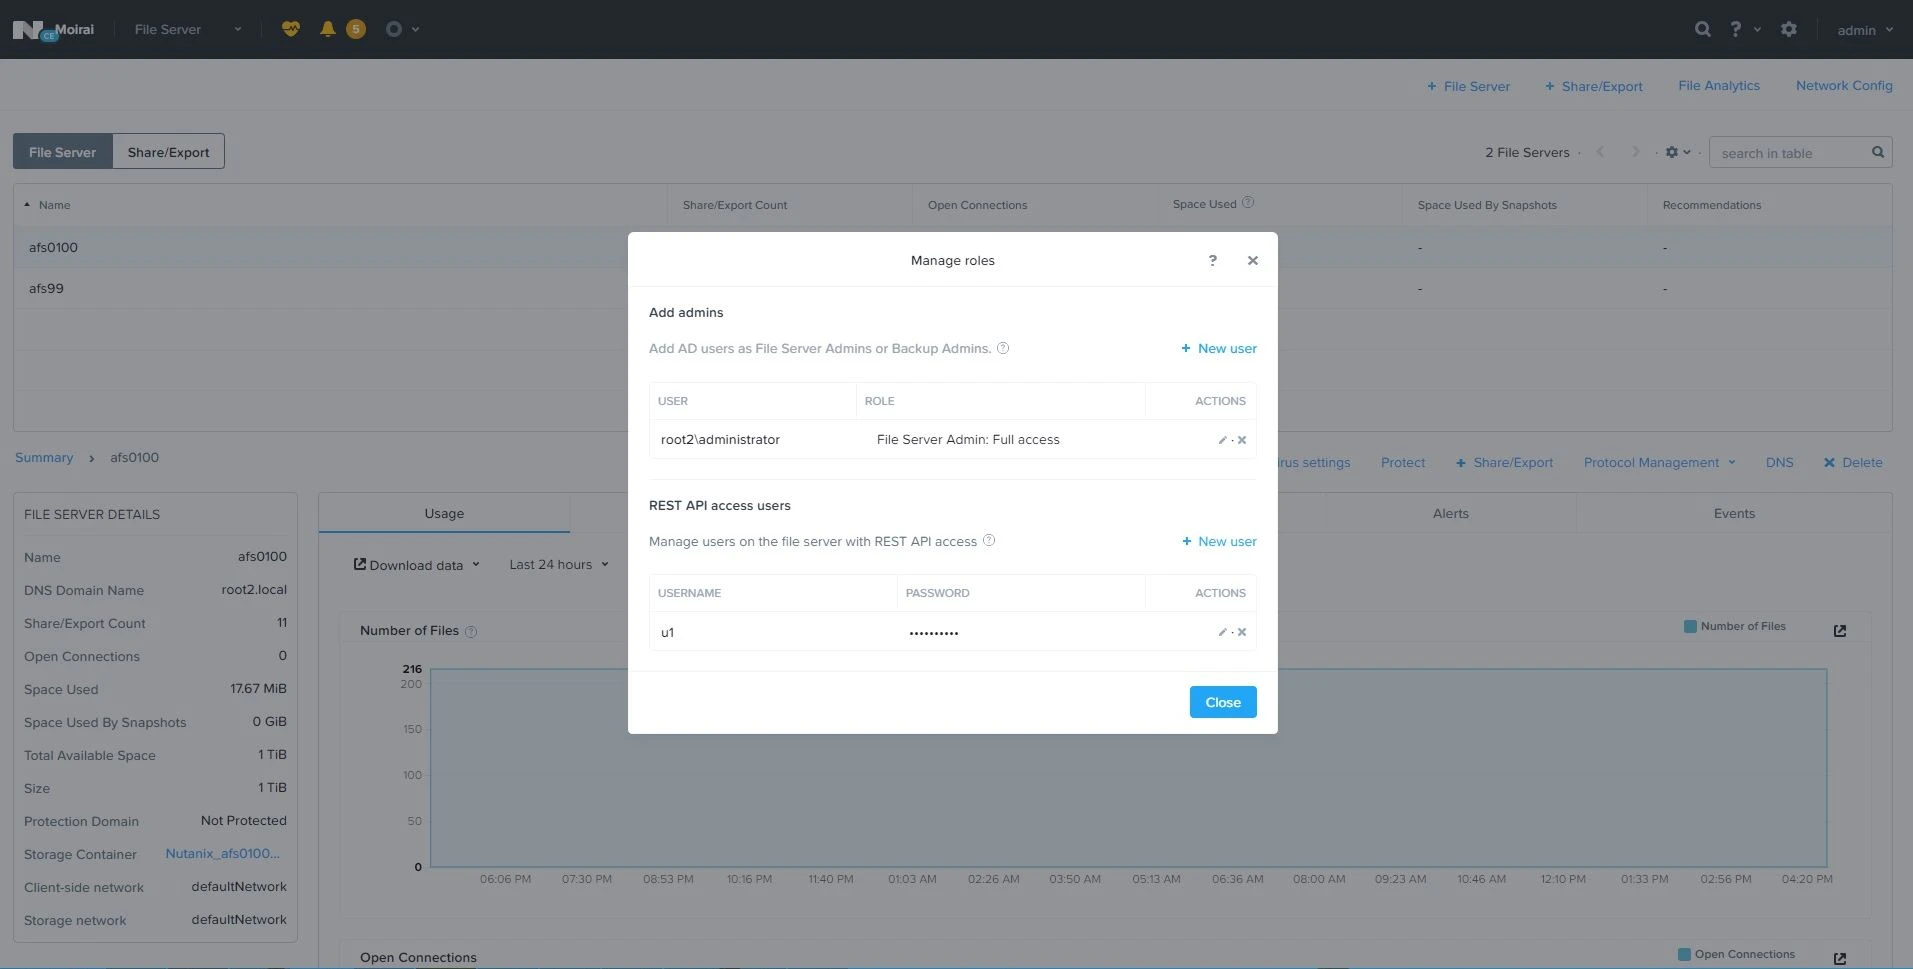
Step 9 – When finished, click Close.
See the following topics for additional information.
Create User Account to Access Nutanix REST API
To create a user account using the ncli utility:
-
Download and install the ncli (Nutanix command-line interface) on any server in your infrastructure, as described here.
-
Start the utility and establish a ncli session by the following command:
ncli -s management_ip_addr -u 'username' -p 'user_password'here:
management_ip_addr- the IP address of any Nutanix Controller VM in the clusterusername- user name to access that VM; if not specified, admin (default name) will be useduser_password- password to access that VM
-
Run the
fs listcommand in ncli to get the list of Nutanix Files servers. -
Locate the name of Nutanix Files server you want to audit; locate and save the following server parameters to a text file:
- Uuid - Nutanix Files server ID
-
Finally, create a new user and specify credentials that will be used to access this Nutanix Files server. For that, run the following command in ncli :
fs add-user uuid=<fs_uuid> user=<username> password=<password>here:
<fs_uuid>- Nutanix Files server ID (Uuid)<username>- user name<password>- password
To create a new user account with Nutanix Prism:
-
Open Nutanix Prism web portal.
-
Select File Server category. In the list of servers, select the server you want to audit.
-
Click Manage roles.
-
In the Manage roles dialog locate the REST API access user section and click +New user.
-
Enter local user account name and password, then click Save next to them to save the settings.
-
Click the Close button to close the Manage roles dialog.