Configure Audit Settings for CIFS File Shares
Netwrix Auditor can be configured to audit all access types, review the table below and select options that you want to track:
| Option | Description | |
|---|---|---|
| Changes | Successful | Use this option to track changes to your data. Helps find out who made changes to your files, including their creation and deletion. |
| Failed | Use this option to detect suspicious activity on your file server. Helps identify potential intruders who tried to modify or delete files, etc., but failed to do it. | |
| Read access | Successful | Use this option to supervise access to files containing confidential data intended for privileged users. Helps identify who accessed important files besides your trusted users. Enabling this option on public shares will result in high number of events generated on your file server and the amount of data written to the AuditArchive. |
| Failed | Use this option to track suspicious activity. Helps find out who was trying to access your private data without proper justification. Enabling this option on public shares will result in high number of events generated on your file server and the amount of data written to the AuditArchive. |
Actions reported by Netwrix Auditor vary depending on the file server type and the audited object (file, folder, or share). The changes include creation, modification, deletion, moving, renaming, and copying. To track the copy action, enable successful read access and change auditing. See the File Servers topic for additional information.
Do one of the following depending on the OS:
- To configure audit settings for the CIFS file shares from computers running pre-Windows Server 2012 versions
- To configure audit settings for the CIFS file shares from computers running Windows Server 2012 and above
To configure audit settings for the CIFS file shares from computers running pre-Windows Server 2012 versions
-
Navigate to the root share folder, right-click it and select Properties.
-
In the
<Share_Name>Properties dialog, select the Security tab and click Advanced.If there is no such tab, it means a wrong security style has been specified for the volume holding this file share.
-
In the Advanced Security Settings for
<Share_Name>dialog, navigate to the Auditing tab, click Edit.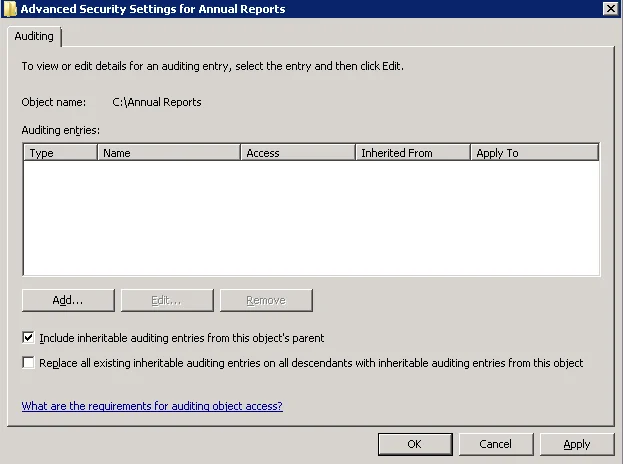
-
In a separate Advanced Security Settings for
<Share_Name>dialog, click Add to add a principal. You can also select Everyone (or another user-defined group containing users that are granted special permissions) and click Edit.You can specify any other user group, but in this case Netwrix Auditor will send emails with warnings on incorrect audit configuration. This will not affect the Reports functionality and the product will only audit user accounts that belong to the selected group.
-
Apply settings to your Auditing Entries depending on actions that you want to audit. If you want to audit all actions (successful reads and changes as well as failed read and change attempts), you need to add three separate Auditing Entries for each file share. Otherwise, reports will contain limited data and warning messages.
Auditing Entry Successful reads The Auditing Entry below shows Advanced Permissions for auditing successful reads only: - Apply onto—Select "Files only". - Check "Successful" and "Failed" next to List folder / read data. - Make sure that the Apply these auditing entries to objects and/or containers within this container only checkbox is cleared. Successful changes The Auditing Entry below shows Advanced Permissions for auditing successful changes only: - Apply onto—Select "This folder, subfolders and files". - Check "Successful" next to the following permissions: - Create files / write data - Create folders / append data - Write extended attributes - Delete subfolders and files - Delete - Change permissions - Take ownership - Make sure that the Apply these auditing entries to objects and/or containers within this container only checkbox is cleared. Failed read attempts The Auditing Entry below shows Advanced Permissions for auditing failed read attempts only: - Apply onto—Select "This folder, subfolders and files". - Check "Failed" next to List folder / read data. - Make sure that the Apply these auditing entries to objects and/or containers within this container only checkbox is cleared. Failed change attempts The Auditing Entry below shows Advanced Permissions for auditing failed change attempts only: - Apply onto—Select "This folder, subfolders and files". - Check "Failed" next to the following permissions: - Create files / write data - Create folders / append data - Write extended attributes - Delete subfolders and files - Delete - Change permissions - Take ownership - Make sure that the Apply these auditing entries to objects and/or containers within this container only checkbox is cleared.
To configure audit settings for the CIFS file shares from computers running Windows Server 2012 and above
-
Navigate to the root shared folder, right-click it and select Properties.
-
In the
<Share_Name>Properties dialog, select the Security tab and click Advanced.If there is no such tab, it means a wrong security style has been specified for the volume holding this file share.
-
In the Advanced Security Settings for
<Share_Name>dialog, navigate to the Auditing tab, click Edit.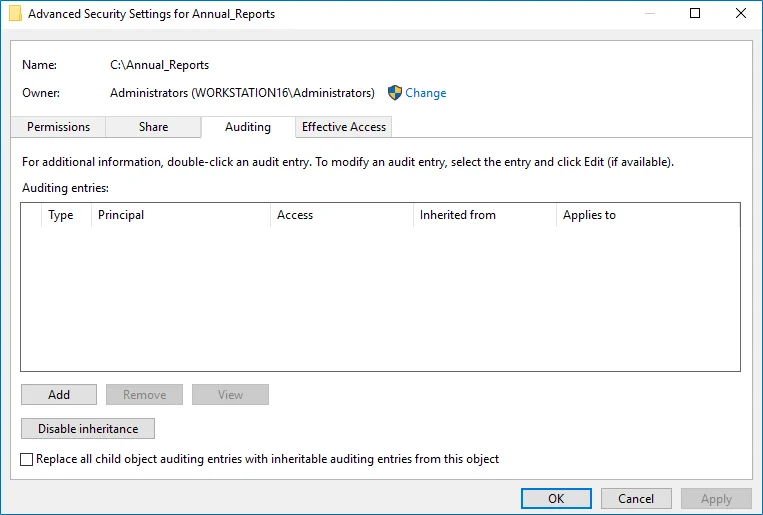
-
Click Add to add a new principal. You can also select Everyone (or another user-defined group containing users that are granted special permissions) and click Edit.
-
In the Auditing Entry for
<Folder_Name>dialog, click the Select a principal link and specify Everyone.You can specify any other user group, but in this case Netwrix Auditor will send emails with warnings on incorrect audit configuration. In this case, the product will only monitor user accounts that belong to the selected group.
-
Apply settings to your Auditing Entries depending on actions that you want to audit. If you want to audit all actions (successful reads and changes as well as failed read and change attempts), you need to add three separate Auditing Entries for each file share. Otherwise, reports will contain limited data and warning messages. Review the following for additional information:
- Successful reads
- Successful changes
- Failed read attempts
- Failed change attempts | Auditing Entry | | | --- | --- | | Successful reads | | | The
Auditing Entry below shows Advanced Permissions for auditing successful reads only:
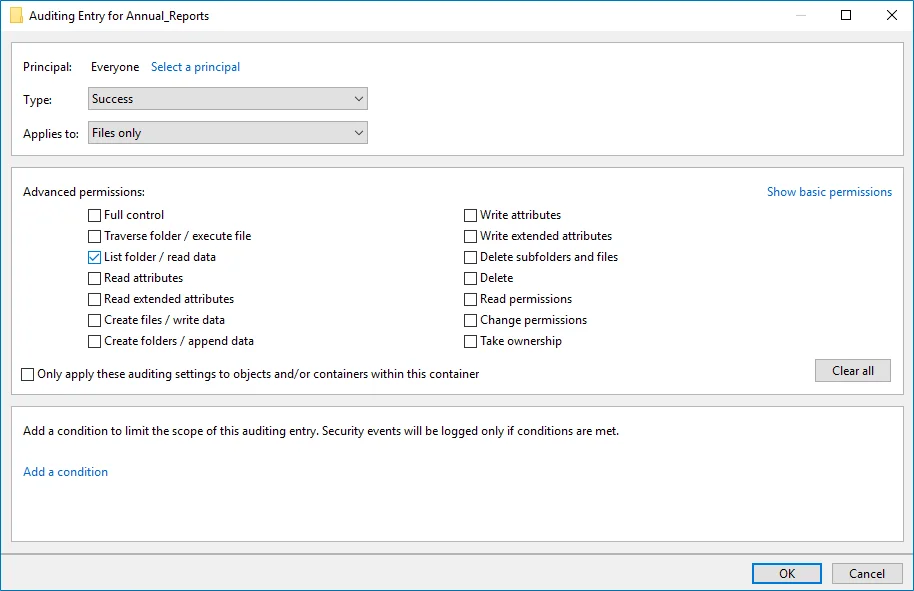 -
Type—Set to*"Success". - Applies to—Set to"Files only". - Advanced permissions—SelectList
folder / read data. - Make sure that theOnly apply these auditing settings to objects and/or
containers within this containercheckbox is cleared. | | | Successful changes | | | The
Auditing Entry below shows Advanced Permissions for auditing successful changes only:
-
Type—Set to*"Success". - Applies to—Set to"Files only". - Advanced permissions—SelectList
folder / read data. - Make sure that theOnly apply these auditing settings to objects and/or
containers within this containercheckbox is cleared. | | | Successful changes | | | The
Auditing Entry below shows Advanced Permissions for auditing successful changes only:
 -
Type—Set to"Success". - Applies to—Set to"This folder, subfolders and files". - Advanced
permissions: - Create files / write data - Create folders / append data - Write extended
attributes - Delete subfolders and files - Delete - Change permissions - Take ownership - Make
sure that theOnly apply these auditing settings to objects and/or containers within this
containercheckbox is cleared. | | | Failed read attempts | | | The Auditing Entry below shows
Advanced Permissions for auditing failed read attempts:
-
Type—Set to"Success". - Applies to—Set to"This folder, subfolders and files". - Advanced
permissions: - Create files / write data - Create folders / append data - Write extended
attributes - Delete subfolders and files - Delete - Change permissions - Take ownership - Make
sure that theOnly apply these auditing settings to objects and/or containers within this
containercheckbox is cleared. | | | Failed read attempts | | | The Auditing Entry below shows
Advanced Permissions for auditing failed read attempts:
 -
Type—Set to"Fail". - Applies to—Set to"This folder, subfolders and files". - Advanced
permissions—SelectList folder / read data. - Make sure that theOnly apply these auditing
settings to objects and/or containers within this containercheckbox is cleared. | | | Failed
change attempts | | | The Auditing Entry below shows Advanced Permissions for auditing failed
change attempts:
-
Type—Set to"Fail". - Applies to—Set to"This folder, subfolders and files". - Advanced
permissions—SelectList folder / read data. - Make sure that theOnly apply these auditing
settings to objects and/or containers within this containercheckbox is cleared. | | | Failed
change attempts | | | The Auditing Entry below shows Advanced Permissions for auditing failed
change attempts:
 -
Type—Set to"Fail". - Applies to—Set to"This folder, subfolders and files"*. - Advanced
permissions: - Create files / write data - Create folders / append data - Write extended
attributes - Delete subfolders and files - Delete - Change permissions - Take ownership - Make
sure that theOnly apply these auditing settings to objects and/or containers within this
containercheckbox is cleared. To audit successful changes on NetApp 8.x or earlier, also
selectWrite Attributesin theAdvanced permissionslist in the auditing entry settings. | |
-
Type—Set to"Fail". - Applies to—Set to"This folder, subfolders and files"*. - Advanced
permissions: - Create files / write data - Create folders / append data - Write extended
attributes - Delete subfolders and files - Delete - Change permissions - Take ownership - Make
sure that theOnly apply these auditing settings to objects and/or containers within this
containercheckbox is cleared. To audit successful changes on NetApp 8.x or earlier, also
selectWrite Attributesin theAdvanced permissionslist in the auditing entry settings. | |
Configure Event Categories and Log
Perform the following procedures to configure audit:
- To configure auditing state, event categories and log
- To configure logs retention period
To configure auditing state, event categories and log
Configure audit settings in the context of Cluster or Storage Virtual Machine (SVM). All examples in the procedure below apply to SVM.
To execute commands in the context of Cluster, add -vserver name, where name is your server
name.
-
Navigate to command prompt through the SSH/Telnet connection.
-
Log in as a cluster administrator and switch to the context of SVM from the cluster. For example to switch to the SVM called
svm1:cluster1::> vserver context -vserver svm1After a switch, you will be in the context of SVM:
svm1::> -
Create audit. For more information on audit configuration, refer to NetApp documentation. For example:
svm1::> vserver audit create -destination <path to the volume>In the example above, the
vserver audit create -destination /auditcommand executed on thesvm1SVM creates and enables audit on the volume/audit.Netwrix Auditor accesses audit logs via file shares. Make sure the volume you specified is mounted on SVM and shared (e.g.,
audit$is a share name and its path is/audit). -
Enable audit:
svm1::> vserver audit enable -
Add categories of events to be audited:
-
For ONTAPI 9.0 or later
svm1::> vserver audit modify -events file-ops, file-share -
For ONTAPI 8.3 and below
svm1::> vserver audit modify -events file-ops
-
-
Check the following options:
Option Setting Auditing StatetrueCategories of Events to Auditfile-opsOnly required if you use Clustered Data ONTAP 8.3, ONTAP 9.0, ONTAP 9.1 or later. You cannot select event categories if you use Clustered Data ONTAP 8.2. For ONTAP 9.0 and later, also check the following options:file-ops, file-share, audit-policy-change. For ONTAP 8.3, just checkfile-ops.Log Format "XML" or "EVTX" -
Modify the log file size limit—set to 300 MB. Execute:
svm1::> vserver audit modify -rotate-size 300MB
300MB is the recommended maximum log size proceeding from performance evaluations. Make sure there is enough disk space allocated for the security logs archives. Depending on the file access activity, audit data may grow rapidly, and the location specified for the security log (and security log auto archives) must be large enough to hold data until it is processed by Netwrix Auditor. You can customize your security log by configuring log rotation schedule. For detailed information, review the Planning the auditing configuration section in the Clustered Data ONTAP® 8.3 File Access Management Guide for CIFS.
-
After configuration, double-check your settings.
svm1::> vserver audit show -instanceAuditing State: true Log Destination Path: /audit Categories of Events to Audit: file-ops, cifs-logon-logoff Log Format: evtx Log File Size Limit: 300MB Log Rotation Schedule: Month: — Log Rotation Schedule: Day of Week: — Log Rotation Schedule: Day: — Log Rotation Schedule: Hour: — Log Rotation Schedule: Minute: — Rotation Schedules: — Log Files Rotation Limit: 0
NOTE: For ONTAP 9.0 and later, also check the following settings:
file-ops, file-share, audit-policy-change.
For ONTAP 8.3, just check file-ops.
To configure logs retention period
NOTE: This instruction is only effective for NetApp versions older than 8.2.1.
-
On the computer where Auditor Server resides, open Registry Editor: navigate to Start → Run and type "regedit".
-
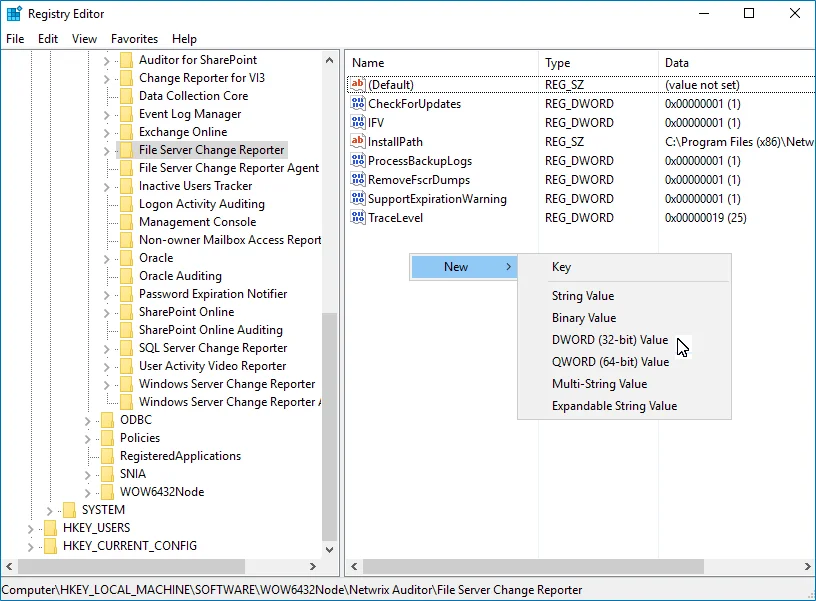
Navigate to HKEY_LOCAL_MACHINE → SOFTWARE → Wow6432Node → Netwrix Auditor → File Server Change Reporter.
-
In the right-pane, right-click and select New → DWORD (32-bit Value).
For the backup logs retention functionality to work properly, you need to specify the CleanAutoBackupLogs name for the newly created registry value.
-
Double-click CleanAutoBackupLogs. The Edit DWORD Value dialog will open.
-
This value defines the time period (in hours) after which security event logs archives will be automatically deleted. By default, it is set to "0" (decimal). Modify this value, if necessary, and click OK to save the changes.

-
NOTE: If the CleanAutoBackupLogs registry value is set to "0", you will have to remove the old logs manually, or you may run out of space on your hard drive.
NetApp Data ONTAP
Netwrix Auditor relies on native logs for collecting audit data. Therefore, successful change and access auditing requires a certain configuration of native audit settings in the audited environment and on the Auditor console computer. Configuring your IT infrastructure may also include enabling certain built-in Windows services, etc. Proper audit configuration is required to ensure audit data integrity, otherwise your change reports may contain warnings, errors or incomplete audit data.
CAUTION: Folder associated with Netwrix Auditor must be excluded from antivirus scanning. See the Antivirus Exclusions for Netwrix Auditor knowledge base article for additional information.
You can configure your IT Infrastructure for monitoring in one of the following ways:
-
Automatically through a monitoring plan – This is a recommended method. If you select to automatically configure audit in the target environment, your current audit settings will be checked on each data collection and adjusted if necessary.
- To use this option for NetApp Clustered Data ONTAP 8 or ONTAP 9, make sure that audit
configuration has been created (with
vserver audit createcommand) for the target system enabling audit configuration is optional.
- To use this option for NetApp Clustered Data ONTAP 8 or ONTAP 9, make sure that audit
configuration has been created (with
-
Manually – Native audit settings must be adjusted manually to ensure collecting comprehensive and reliable audit data. You can enable Auditor to continually enforce the relevant audit policies or configure them manually:
-
On the NetApp device:
-
CIFS Network Protocol support is required.
-
Qtree Security must be configured. The volume where the audited file shares are located must be set to the "ntfs" or "mixed" security style.
-
On Clustered Data ONTAP 8 and ONTAP 9:
-
External Web Services: true.RECOMMENDED: For security reasons, enable only SSL access.
-
Firewall policy for data interfaces must be configured to allow ONTAPI protocol connections.
-
Audit settings must be configured as follows:
Audit Setting Configuration Auditing State: true Log Destination Path /audit Categories of Events to Audit file-ops, cifs-logon-logoff Log Format evtx Log File Size Limit 300 MB
-
-
On Data ONTAP 7 and Data ONTAP 8 in 7-mode:
-
The
httpd.admin.enableor thehttpd.admin.ssl.enableoption must be set to "on". For security reasons, it is recommended to configure SSL access and enable thehttpd.admin.ssl.enableoption. -
The
cifs.audit.liveview.enableoption must be set to "off". -
The
cifs.audit.enableand thecifs.audit.file_access_events.enableoptions must be set to "on". -
Unless you are going to audit logon events, the
cifs.audit.logon_events.enableand thecifs.audit.account_mgmt_events.enableoptions must be set to "off". -
The Security log must be configured:
cifs.audit.logsize 300 000 000 (300 MB)cifs.audit.autosave.onsize.enable oncifs.audit.autosave.file.extension timestamp
-
-
Audit settings must be configured for CIFS File Shares. For a security principal (e.g., Everyone), the following options must be set to "Success" and "Fail" in the Advanced Security → Auditing settings for the audited shared folders:
- List Folder / Read Data (Files only)
- Create Files / Write Data
- Create Folders / Append Data
- Write Extended Attributes
- Delete Subfolders and Files
- Delete
- Change Permissions
- Take Ownership
-
-
On the Auditor console computer:
- If your file shares contain symbolic links and you want to collect state-in-time data for these shares, the local-to-local, local-to-remote, remote-to-local, and remote-to-remote symbolic link evaluations must be enabled on the computer that hosts Auditor Server.
-
See the following topics for additional information:
- Configure NetApp Clustered Data ONTAP 8 and ONTAP 9 for Monitoring
- Configure Audit Settings for CIFS File Shares
The following table lists the actions that can be performed on NetApp:
| File | Folder | Share | |
|---|---|---|---|
| Added | + | + | + |
| Add (failed attempt) | – | – | – |
| Modified | + | + | + |
| Modify (failed attempt) | + | + | – |
| Moved | +* | +* | – |
| Move (failed attempt) | +* | +* | – |
| Read | + | - | – |
| Read (failed attempt) | + | + | – |
| Renamed | +* | +* | – |
| Renamed (failed attempt) | +* | +* | – |
| Removed | + | + | + |
| Remove (failed attempt) | + | + | – |
| Copied | – | – | – |
Actions marked with an asterisks (*) are reported for NetApp Clustered Data ONTAP 8 and ONTAP 9 only.
Configure NetApp Clustered Data ONTAP 8 and ONTAP 9 for Monitoring
To configure Clustered Data ONTAP 8 and ONTAP 9 for monitoring, perform the following procedures:
- Prerequisites
- Configure ONTAPI\RESTAPI Web Access
- Configure System Service Firewall Policies
- Configure Service Policy
- Configure Event Categories and Log
Prerequisites
Netwrix assumes that you are aware of basic installation and configuration steps. If not, refer to the following administration and management guides.
| Version | Related documentation |
|---|---|
| Clustered Data ONTAP 8.2 | - Clustered Data ONTAP® 8.2 File Access and Protocols Management Guide - Clustered Data ONTAP® 8.2 System Administration Guide for SVM Administrators |
| Clustered Data ONTAP 8.3 | - Clustered Data ONTAP® 8.3 System Administration Guide for Cluster Administrators - Clustered Data ONTAP® 8.3 File Access Management Guide for CIFS |
| ONTAP 9.0 - 9.10 | - ONTAP 9 Documentation Center |
Perform the following steps before proceeding with the audit configuration.
Step 1 – Configure CIFS server and make sure it functions properly.
NOTE: NFS file shares are not supported.
Step 2 – Configure System Access Control List (SACL) on your file share. See Configure Audit Settings for CIFS File Shares topic for additional information.
Step 3 – Set the Security Style for Volume or Qtree where the audited file shares are located to the "ntfs" or "mixed".
Step 4 – Configure audit manually. For 8.3, review the Auditing NAS events on SVMs with FlexVol volumes section in Clustered Data ONTAP® 8.3 File Access Management Guide for CIFS.
NOTE: The current version of Netwrix Auditor does not support auditing of Infinite Volumes.
Permissions for NetApp Auditing
Before you start creating a monitoring plan to audit your NetApp file storage system, plan for the account that will be used for data collection – it should meet the requirements listed below.
If you want to authenticate with AD user account, you must enable it to access SVM through ONTAPI. See the Create Role on NetApp Clustered Data ONTAP 8 or ONTAP 9 and Enabling AD User Access section for additional information.
Review permissions for the account on the target server:
-
The account must be a member of the BUILTIN\Administrators group.
-
The account requires the following NTFS permissions:
- List folder / read data
- Read attributes
- Read extended attributes
- Read permissions
-
The account requires the following share permissions:
- Read
-
The account requires the following NTFS and share permissions:
- Read permission on the audit logs folder and its content.
- Delete permission on the audit log folder content.
-
To connect to NetApp Clustered Data ONTAP 8 or ONTAP 9, an account must be assigned a custom role (e.g., fsa_role) on SVM that has the following capabilities with access query levels:
- version - volume - vserver audit - vserver audit rotate-log - vserver cifs readonly readonly all all readonly
See Create Role on NetApp Clustered Data ONTAP 8 or ONTAP 9 and Enabling AD User Access section for additional information.
Remember, that you can also assign the built-in vsadmin role instead of the permissions above.
Create Role on NetApp Clustered Data ONTAP 8 or ONTAP 9 and Enabling AD User Access
NOTE: This article applies to NetApp 8.3.2 and later. You must be a cluster administrator to run the commands below.
Follow the steps to create a role for enabling AD user access:
Step 1 – Create a new role (e.g., netwrix_role for ONTAPI and netwrix_rest_role for RESTAPI) on your SVM (e.g., svm1). For example:
Create ONTAPI role:
security login role create -role netwrix_role -cmddirname version -access readonly -vserver svm1
security login role create -role netwrix_role -cmddirname volume -access readonly -vserver svm1
security login role create -role netwrix_role -cmddirname "vserver audit" -access all -vserver svm1
security login role create -role netwrix_role -cmddirname "vserver audit rotate-log" -access all -vserver svm1
NOTE: This option is required for auto audit configuration.
security login role create -role netwrix_role -cmddirname "vserver cifs" -access readonly -vserver svm1
Create RESTAPI role:
security login rest-role create -role netwrix_rest_role -api /api/svm/svms -access read_create_modify -vserver svm1
security login rest-role create -role netwrix_rest_role -api /api/protocols/audit -access read_create_modify -vserver svm1
security login rest-role create -role netwrix_rest_role -api /api/storage/volumes -access readonly -vserver svm1
security login rest-role create -role netwrix_rest_role -api /api/protocols/cifs/shares -access readonly -vserver svm1
NOTE: The commands in the first two lines above can be used on NetApp versions 9.11+. In earlier versions, use the following commands:
security login rest-role create -role netwrix_rest_role -api /api/svm/svms -access all -vserver svm1
security login rest-role create -role netwrix_rest_role -api /api/protocols/audit -access all -vserver svm1
Step 2 – The capabilities must be assigned one by one. To review currently applied capabilities, you can use the following command:
ONTAPI role:
security login role show -vserver svm1 -role netwrix_role
RESTAPI role:
security login rest-role show -vserver svm1 -role netwrix_rest_role
Step 3 – Create a login for the account that is going to authenticate and collect data from NetApp. If you want to use an AD account for collecting data, enable it to access SVM through ONTAPI. For example:
NOTE: In ONTAP 9.10 and higher, it is not possible to assign ONTAPI role (e.g. netwrix_role) and RESTAPI role (e.g. netwrix_rest_role) to one AD user. To allow a user access to both the ONTAPI and RESTAPI, you can use different AD groups by assigning roles to them and including the user in these groups.
Create login for ONTAPI role:
security login create -vserver svm1 -user-or-group-name domain\user -application ontapi -authmethod domain -role netwrix_role
Create login for RESTAPI role:
security login create -vserver svm1 -user-or-group-name domain\user -application http -authmethod domain -role netwrix_rest_role
where domain\user is your data collecting account.
Remember, that to be able to add event policy for NetApp, the role you set up for working with ONTAPI must have the following attributes:
- version readonly
- volume readonly
- vserver audit all (required for the product to adjust audit settings automatically)
- vserver audit rotate-log all
- vserver cifs readonly
The role you set up for working with RESTAPI must have the following attributes:
- /api/svm/svms read_create_modify
- /api/protocols/audit read_create_modify
- /api/storage/volumes readonly
- /api/protocols/cifs/shares readonly
Configure Service Policy
NOTE: This paragraph only applies to NetApp ONTAP version 9.10.1 and higher.
By default, the 'default-data-files' policy is applied to the SVM CIFS/SMB interface and HTTP/HTTPS options are not available. To make the ONTAPI available through HTTP/HTTPS ports on your SVM interface for Netwrix Auditor Server, configure the 'interface service'-policy. Below is an example of the configuration:
-
Navigate to your cluster command prompt through the SSH/Telnet connection.
-
Log in as a cluster administrator and review your current service-policy configuration. Run the following command:
cluster1::> network interface show -vserver svm1 -fields service-policy
Example output:
vserver lif service-policy
svm1 lif_svm1_126 default-data-files
svm1 lif_svm1_349 default-data-files
Where
svm1– is the name of your SVM,The
lif_svm1_126 and lif_svm1_349parameter is thesvm1logical interface.The
default-data-filesparameter is the service-policy applied to lif-s. -
To display the services available through the '
default-data-files' policy, run the following command:cluster1::> network interface service-policy show -vserver svm1 -policy default-data-files
Example output:
Vserver: svm1
Policy Name: default-data-files
Included Services: data-core, data-cifs, data-fpolicy-client, data-dns-server
Service: Allowed Addresses: data-core: 0.0.0.0/0
data-cifs: 0.0.0.0/0
data-fpolicy-client: 0.0.0.0/0
data-dns-server: 0.0.0.0/0
-
Set the advanced privilege level to be able to create and modify the service-policy. Run the following command:
cluster1::> set -privilege advanced
Remember, The command prompt should be changed to “
cluster1::*>” -
Clone the existing '
default-data-files' LIF policy to be able using shares with a new service-policy. Run the following command:cluster1::*> network interface service-policy clone -vserver svm1 -policy default-data-files -target-policy netwrix-policy -target-vserver svm1
Where the '
netwrix-policy' parameter is the name of new service-policy. -
Modify the new service-policy by adding services to access over http\https protocols. Run the following command:
cluster1::*> network interface service-policy add-service -vserver svm1 -policy netwrix-policy -service management-http
cluster1::*> network interface service-policy add-service -vserver svm1 -policy netwrix-policy -service management-https
-
Return to the administrator privilege level. Run the following command:
cluster1::*> set -privilege admin
-
Apply a new service-policy to the SVM LIFs. Run the following command:
cluster1::> network interface modify -vserver svm1 -lif lif_svm1_126 -service-policy netwrix-policy
cluster1::> network interface modify -vserver svm1 -lif lif_svm1_349 -service-policy netwrix-policy
NOTE: For better security, specify the allowed ip-addresses when adding the service. Double-check that your subnet is configured on the machine where Netwrix Auditor Server resides. Allowed-addresses are: 192.168.1.0/24.
-
Check the current interface service-policy using command from the step 2:
cluster1::> network interface show -vserver svm1 -fields service-policy
Example output:
vserver lif service-policy
svm1 lif_svm1_126 netwrix-policy
svm1 lif_svm1_349 netwrix-policy
Configure ONTAPI\RESTAPI Web Access
Netwrix Auditor uses ONTAPI to obtain the current CIFS audit configuration and force the audit data flush from the internal filer format to an MS Event Viewer compatible format. Netwrix Auditor supports both the SSL and non-SSL HTTP access, trying HTTPS first, and falling back to HTTP if it is unavailable.
Follow the steps to configure ONTAPI\RESTAPI Web Access.
Step 1 – Navigate to your cluster management command prompt through the SSH/Telnet connection.
Step 2 – Log in as a cluster administrator and review your current web access settings. Make sure that External Web Services are allowed. For example:
cluster1::> system services web show where 'cluster1' is the name of your NetApp ONTAP cluster. | |
| External Web Services: | true |
| Status: | online |
| HTTP Protocol Port: | 80 |
| HTTPs Protocol Port: | 443 |
| TLSv1 Enabled: | true |
| SSLv3 Enabled: | true |
| SSLv2 Enabled: | false |
If the result of the External Web Services command is 'false', execute the following:
cluster1::> system services web modify -external true
Step 3 – Enable ONTAPI access on the 'Storage VM' (SVM) where CIFS server is installed. Run the following command where svm1 is the name of your SVM:
cluster1::> vserver services web modify -vserver svm1 -name ontapi -enabled true
cluster1::> vserver services web show -vserver svm1.
| Vserver | Type | Service Name | Description | Enabled |
|---|---|---|---|---|
svm1 | data | ontapi | Remote Administrative API | true |
| Support | ||||
| svm1 | data | rest | Remote Administrative API | true |
Support |
To display the current settings of web services for SVM svm1, use the following command:
cluster1::> vserver services web show -vserver svm1
Step 4 – Review the Permissions for NetApp Auditing topic for additional information on how to create the role and enable AD user access.
Step 5 – Enable HTTP/HTTPS access. For example:
ONTAPI
cluster1::> vserver services web modify -vserver svm1 -name ontapi -enabled true
RESTAPI
cluster1::> vserver services web modify -vserver svm1 -name rest -enabled true
Step 6 – Enable only SSL access (HTTPS in Netwrix Auditor). For example:
ONTAPI
cluster1::> vserver services web modify -vserver svm1 -name ontapi -enabled true -ssl-only true
RESTAPI
cluster1::> vserver services web modify -vserver svm1 -name rest -enabled true -ssl-only true
Step 7 – Make sure that the custom role (e.g., netwrix_role for ONTAPI or netwrix_rest_role for RESTAPI) assigned to your account specified for data collection can access ONTAPI or RESTAPI. See Permissions for NetApp Auditing topic for additional information.
cluster1::> vserver services web access show -name ontapi -vserver svm1
cluster1::> vserver services web access show -name rest -vserver svm1
Vserver | Type | Service Name | Role |
-------------- | ------- | ------------ | --------------- |
svm1 | data | ontapi | netwrix_role |
svm1 | data | ontapi | vsadmin |
svm1 | data | ontapi | vsadmin-protocol |
svm1 | data | ontapi | vsadmin-readonly |
svm1 | data | ontapi | vsadmin-volume |
5 entries were displayed. |