Configuring Trace Logging
If trace logging is disabled in SQL Server, then changes will be reported in Netwrix Auditor as made by system. To detect actual change initiator, Netwrix Auditor needs native trace logs data. During every data collection, Netwrix Auditor will check if the internal SQL audit mechanism is enabled, and enable it if necessary. To read more, refer to this Netwrix Knowledge Base article.
CAUTION: Folder associated with Netwrix Auditor must be excluded from antivirus scanning. See the Antivirus Exclusions for Netwrix Auditor knowledge base article for additional information.
In some cases, however, you may need to disable trace logging on your SQL Server instance. For that, follow the procedure below.
If you enable monitoring of SQL logons, SQL trace for these logons will be created anyway.
Follow the steps to exclude SQL Server instance from turning trace logging on automatically.
Step 1 – On Netwrix Auditor server, go to the %Netwrix Auditor installation folder%\SQL Server Auditing folder.
Step 2 – Locate the omittracelist.txt file and open it for editing.
Step 3 – Specify SQL Server instances that you want to exclude from switching trace logging on
automatically. Syntax: server\instance name
Each entry must be a separate line. Lines that start with the # sign are treated as comments and will be ignored.
With trace logging disabled, the "Who", "Workstation" and "When" values will be not reported correctly by Netwrix Auditor (except for content changes).
By default, SQL Server trace logs will be stored in the predefined location (depending on the SQL
Server version). For example, SQL Server 2019 error logs are located at <drive>:\Program
Files\Microsoft SQL Server\MSSQL13.<InstanceName>\MSSQL\Log.
You can change this default location, using the pathstotracelogs.txt file.
Follow the steps to change trace log location.
Step 1 – On Netwrix Auditor server, go to %Netwrix Auditor installation folder%\SQL Server Auditing folder.
Step 2 – Locate the pathstotracelogs.txt file and open it for editing.
Step 3 – Specify SQL Server instance that you need to audit and enter a UNC path to the folder
where you want the trace logs to be stored. Syntax: SQLServer\Instance|UNC path
Each entry must be a separate line. Lines that start with the # sign are treated as comments and will be ignored.
Example:
SQLSRV01\MSSQL2016|C:\Logs\NA trace logs\
If you want to change trace logs location for multiple instances of one SQL server, make sure that specified UNC paths are unique across these instances.
Correct:
SQLSRV01\MSSQL2014|C:\Program Files\Microsoft SQL Server\MSSQL\LOG\
SQLSRV01\MSSQL2019|C:\Logs\SQL trace logs\
Incorrect:
SQLSRV01\MSSQL2014|C:\Logs\SQL trace logs\
SQLSRV01\MSSQL2019|C:\Logs\SQL trace logs\
SQL Server
Netwrix Auditor relies on native logs for collecting audit data. Therefore, successful change and access auditing requires a certain configuration of native audit settings in the audited environment and on the Auditor console computer. Configuring your IT infrastructure may also include enabling certain built-in Windows services, etc. Proper audit configuration is required to ensure audit data integrity, otherwise your change reports may contain warnings, errors or incomplete audit data.
CAUTION: Folder associated with Netwrix Auditor must be excluded from antivirus scanning. See the Antivirus Exclusions for Netwrix Auditor knowledge base article for additional information.
The IT Infrastructure for monitoring is configured automatically. Your current audit settings will be checked on each data collection and adjusted if necessary.
Checking for Primary Key
If you plan to audit an SQL Server for data changes and browse the results using 'Before' and 'After' filter values, make sure that the audited SQL database tables have a primary key (or a unique column). Otherwise, 'Before' and 'After' values will not be reported.
SQL Server Objects
Review a full list of all object and data types Netwrix Auditor can collect on SQL Server.
Monitored Object Types
The table below contains the full list of object types that Netwrix Auditor monitors on SQL Servers. The product reports on adding and removing of object types below (Application Roles, Database, Jobs, etc.) and modifying attributes of these objects (listed in the "Attributes" column).
As for logons, the product collects successful and failed logon attempts for Windows and SQL logons:
| Logon Type | Action |
|---|---|
| SQL logon | - Successful logon - Failed logon |
| Windows logon | - Successful logon - Failed logon |
Review the full list of monitored object types and their attributes:
The attributes marked with asterisk (*) are reported only for the SQL Server item, not for availability groups.
| Object type | Attributes |
|---|---|
| SQL Objects | |
| Application Role | - Date Created - Date Modified - Default Schema - Extended Properties - Id - Name - Owned Schemas |
| Backup | - Backup name - Description - Device name - logical_device_name - Size - Type |
| Column | - Allow nulls - ANSI Padding Status - Collation - Computed Text - Default Constraint - Full Text - ID - Identity - Identity increment - Identity seed - Is Computed - Length - Name - Not for replication - Numeric precision - Numeric scale - Primary Key - Rule - Rule Schema - System Type - XML Schema Namespace |
| Constraints | - Date Created - Date Modified - Definition - ID - Is system named - MS shipped - Name - Published - Schema published |
| Credentials* | - Id - Identity - Date Created - Date Modified - Name |
| Database | - Compatibility - Database Size - Database Space Available - Date Created - Date Modified - Extended Properties - File Id - File Group - File Name - Growth - Id - Name - Options - Owner - Permissions - Size - Usage |
| Database Role | - Date Created - Date Modified - Extended Properties - Id - Name - Owner - Owned Schemas - Role Members |
| Functions | - Date Created - Date Modified - Id - Name - Permissions - Type |
| Jobs* | - Automatically delete job - Category - Date Created - Date Modified - Description - Email notification - Email operator - Enabled - ID - Name - Net send notification - Net send operator - Owner - Page notification - Page operator - Schedules - Write to the Windows Application event log |
| Job Steps* | - ID - Name - On Failure - On Success - Output file - Process exit code of a successful command - Retry attempts - Retry interval (minutes) - Step - Type |
| Jobs Schedules* | - Date Created - Date Modified - Enabled - ID - Name - Owner - Schedule Type - Settings |
| Indexes | - Allow page locks - Name - Primary key - Ignore duplicate values - Unique constraint - Allow row locks - Type - Disabled - Included Columns - Fill factor - Data Space ID - Index Key Columns - Padded - Hypothetical - Unique |
| Keys | - Name - ID - Date Created - Date Modified - MS shipped - Published - Schema published - Disabled - Not for replication - Not trusted - Delete referential action - Update referential action - Is system named |
| Login* | - Date Created - Date Modified - Default Database - Default Language - Disabled - Enforce Password Expiration - Enforce Password Policy - Id - Name - Password Hash - Server Roles |
| Restore | - Type |
| Schema | - Date Created - Date Modified - Extended Properties - Id - Name - Owner - Permissions |
| Server Instance* | - Ad Hoc Distributed Queries - Affinity I/O Mask - Affinity Mask - Agent XPs - Allow Updates - Awe Enabled - Blocked Process Threshold - C2 Audit Mode - Clr Enabled - Collation - Cost Threshold For Parallelism - Cross Db Ownership Chaining - Cursor Threshold - Database Mail XPs - Date Modified - Default Full-text Language - Default Language - Default Trace Enabled - Disallow Results From Triggers - Fill Factor (%) - Ft Crawl Bandwidth (max) - Ft Crawl Bandwidth (min) - Ft Notify Bandwidth (max) - Ft Notify Bandwidth (min) - Id - In-doubt Xact Resolution - Index Create Memory (K) - Lightweight Pooling - Locks - Max Degree Of Parallelism - Max Full-text Crawl Range - Max Server Memory (M) - Max Text Repl Size (B) - Max Worker Threads - Media Retention - Min Memory Per Query (K) - Min Server Memory (M) - Name - Nested Triggers - Network Packet Size (B) - Ole Automation Procedures - Open Objects - Permissions - PH Timeout (s) - Precompute Rank - Priority Boost - Query Wait (s) - Query Governor Cost Limit - Recovery Interval (min) - Remote Admin Connections - Remote Login Timeout (s) - Remote Proc Trans - Remote Query Timeout (s) - Remote Access - Replication XPs - Scan For Startup Procs - Server Trigger Recursion - Set Working Set Size - Show Advanced Options - SMO And DMO XPs - SQL Mail XPs - Status - Transform Noise Words - Two Digit Year Cutoff - User Connections - User Instances Enabled - User Instance Timeout - User Options - Web Assistant Procedures - Xp_cmdshell |
| Server Role* | - Date Created - Date Modified - Id - Name - Role Members |
| Stored Procedure | - ANSI NULLs - Date Created - Date Modified - Encrypted - Execute as - FOR replication - Id - Name - Permissions - Quoted Identifier - Recompile - Schema |
| Table | - ANSI NULLs - Date Created - Date Modified - Filegroup - Id - Name - Partition scheme - Permissions - Schema - Table is partitioned - Table is replicated - Text filegroup |
| Triggers | Only DML table triggers are supported. - Date Created - Date Modified - Disabled - ID - Instead of trigger - MS shipped - Name - Not for replication |
| User | - Date Created - Date Modified - Default Schema - Extended Properties - Id - Name - Owned Schemas - Roles |
| View | - ANSI NULLs - Date Created - Date Modified - Encrypted - Id - Name - Permissions - Quoted Identifier - Schema - Schema bound |
| View Column | - Allow nulls - ANSI Padding Status - Collation - Computed Text - Default Constraint - Full Text - ID - Identity - Identity increment - Identity seed - Is Computed - Length - Name - Not for replication - Numeric precision - Numeric scale - Rule - Rule Schema - System Type - XML Schema Namespace - XML Schema Namespace schema |
| View Index | - Allow Page Locks - Allow Row Locks - ID - Data Space ID - Disabled - Fill Factor - Hypothetical - Ignore Dup Key - Name - Padindex - Primary Key - Schema Name - Type - Unique - Unique Constraint - View Name |
| View Index Column | - Column ID - ID - Included Column - Index ID - Key Ordinal - Name - Partition Ordinal - Schema Name - Sort Order - View Name |
Monitored Data Types
The following list contains the names of all data types monitored by Netwrix Auditor:
| bigint bit char cursor date datetime2 datetime datetimeoffset decimal | hierarchyid int float money nchar nvarchar numeric real smalldatetime | smallint smallmoney table time timestamp tinyint uniqueidentifier varchar xml |
Next Steps
Also remember to do the following:
- Configure Data Collecting Account as described in Permissions for SQL Server Auditing section.
- Configure ports as described in the SQL Server Ports section.
Permissions for SQL Server Auditing
Before you start creating a monitoring plan to audit your SQL Server, plan for the account that will be used for data collection – it should meet the requirements listed below. Then you will provide this account in the monitoring plan wizard.
Starting with version 9.96, you can use group Managed Service Accounts (gMSA) as data collecting accounts.
On the target SQL Server:
- To access SQL Server, Windows authentication will be used, so data collection account should be a
Windows account specified in the domain\user format (domain\user$ for Managed Service
Account).
SQL Server logins and authentication method are not supported. - The account must be assigned the System Administrator server role for this SQL Server. See Assigning 'System Administrator' Role section for more information.
- For auditing SQL Server availability on groups, the account must have the sysadmin server role granted on each server added to an availability group.
- If you plan to collect state-in-time data from SQL Server, in addition to requirements above the
account will also need:
- Local Administrator rights on the target SQL Server.
- If SQL Server is included in the Active Directory domain, the account should also be included in that domain.
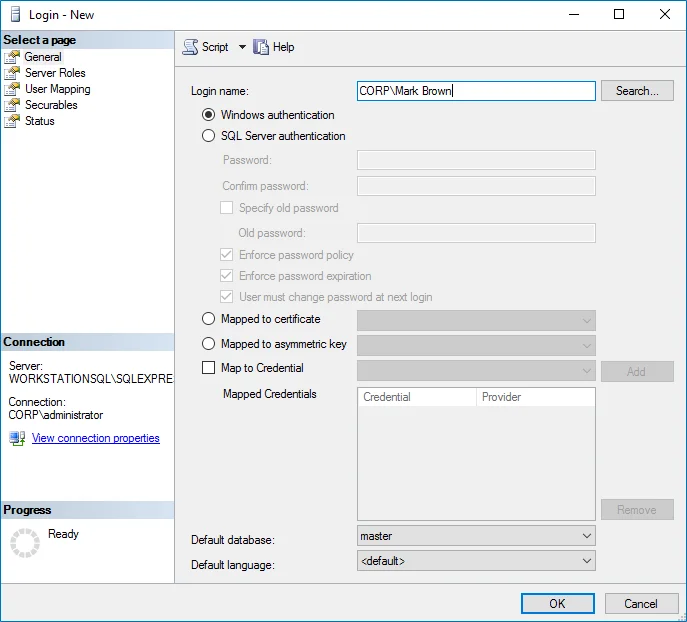
Assigning 'System Administrator' Role
-
On the computer where audited SQL Server instance is installed, navigate to Start → All Programs → Microsoft SQL Server → SQL Server Management Studio.
-
Connect to the SQL Server instance.
-
In the left pane, expand the Security node. Right-click the Logins node and select New Login from the pop-up menu.
-
Click Search next to Login Name and specify the user that you want to assign the sysadmin role to.
-
Specify the Server roles tab and assign the sysadmin role to the new login.