Dell Celerra & Dell VNX Activity Auditing Configuration
An Dell Celerra or VNX device can be configured to audit Server Message Block (SMB) protocol access events. All audit data can be forwarded to the Dell Common Event Enabler (CEE). The Activity Monitor listens for all events coming through the Dell CEE and translates all relevant information into entries in the Log files or syslog messages.
Complete the following checklist prior to configuring the Activity Monitor to monitor the host. Instructions for each item of the checklist are detailed within the following sections.
Checklist Item 1: Plan Deployment
-
Prior to beginning the deployment, gather the following:
-
DNS name of Celerra or VNX CIFS share(s) to be monitored
-
Data Mover or Virtual Data Mover hosting the share(s) to be monitored
-
Account with access to the CLI
-
Download the Dell CEE from:
-
Checklist Item 2: Install Dell CEE
-
Dell CEE can be installed on the same Windows server as the Activity Agent, or on a different server. If it is installed on the same host, the activity agent can configure it automatically.
RECOMMENDED: The latest version of Dell CEE is the recommended version to use with the asynchronous bulk delivery (VCAPS) feature.
-
Important:
- Open MS-RPC ports between the Dell device and the Windows proxy server(s) where the Dell CEE is installed
- Dell CEE 8.4.2 through Dell CEE 8.6.1 are not supported for use with the VCAPS feature
- Dell CEE requires .NET Framework 3.5 to be installed on the Windows proxy server
-
See the Install & Configure Dell CEE topic for instructions.
Checklist Item 3: Dell Device Configuration
- Configure the
cepp.conffile on the Celerra VNX Cluster - See the Connect Data Movers to the Dell CEE Server topic for instructions.
Checklist Item 4: Activity Monitor Configuration
-
Deploy the Activity Monitor Activity Agent, preferably on the same server where Dell CEE is installed
- After activity agent deployment, configure the Dell CEE Options tab of the agent’s Properties window within the Activity Monitor Console
Checklist Item 5: Configure Dell CEE to Forward Events to the Activity Agent
Install & Configure Dell CEE
Dell CEE should be installed on a Windows or a Linux server. The Dell CEE software is not a Netwrix product. Dell customers have a support account with Dell to access the download.
Remember, the latest version is the recommended version of Dell CEE.
RECOMMENDED: The Dell CEE package can be installed on the Windows server where the Activity Monitor agent will be deployed (recommended) or on any other Windows or Linux server.
Follow the steps to install the Dell CEE.
Step 1 – Obtain the latest CEE install package from Dell and any additional license required for this component. It is recommended to use the most current version.
Step 2 – Follow the instructions in the Dell Using the Common Event Enabler on Windows Platforms guide to install and configure the CEE. The installation will add two services to the machine:
- EMC Checker Service (Display Name: EMC CAVA)
- EMC CEE Monitor (Display Name: EMC CEE Monitor)
RECOMMENDED: The latest version of .NET Framework and Dell CEE is recommended to use with the asynchronous bulk delivery (VCAPS) feature.
See the CEE Debug Logs section for information on troubleshooting issues related to Dell CEE.
After Dell CEE installation is complete, it is necessary to Connect Data Movers to the Dell CEE Server.
Configure Dell Registry Key Settings
There may be situations when Dell CEE needs to be installed on a different Windows server than the one where the Activity Monitor activity agent is deployed. In those cases it is necessary to manually set the Dell CEE registry key to forward events.
Step 1 – Open the Registry Editor (run regedit).
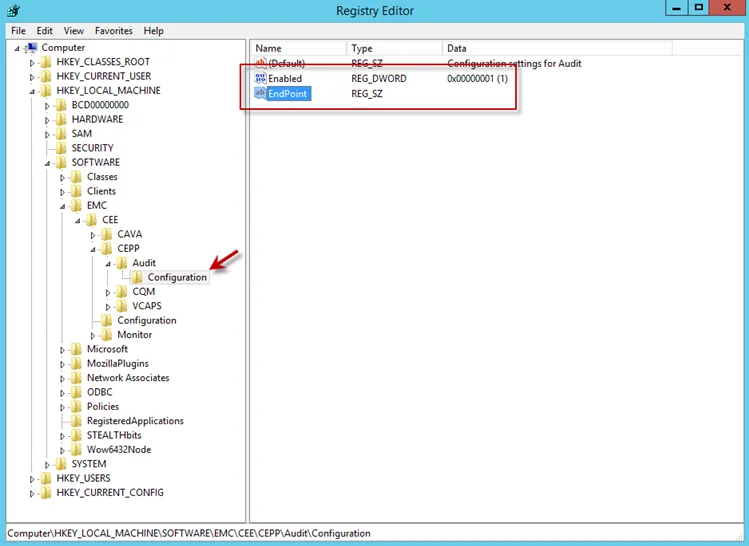
Step 2 – Navigate to following location:
HKEY_LOCAL_MACHINE\SOFTWARE\EMC\CEE\CEPP\AUDIT\Configuration
Step 3 – Right-click on Enabled and select Modify. The Edit DWORD Value window opens.
Step 4 – In the Value data field, enter the value of 1. Click OK, and the Edit DWORD Value window closes.
Step 5 – Right-click on EndPoint and select Modify. The Edit String window opens.
Step 6 – In the Value data field, enter the StealthAUDIT value with the IP Address for the Windows proxy server hosting the Activity Monitor activity agent. Use the following format:
StealthAUDIT@[IP ADDRESS]
Examples:
StealthAUDIT@192.168.30.15
Step 7 – Click OK. The Edit String window closes. Registry Editor can be closed.
Step 8 – Open Services (run services.msc). Start or Restart the EMC CEE Monitor service.
The Dell CEE registry key is now properly configured to forward event to the Activity Monitor activity agent.
Connect Data Movers to the Dell CEE Server
The cepp.conf file contains information that is necessary to connect the Data Movers to the Dell
CEE server. An administrator must create a configuration file which contains at least one event, one
pool, and one server. All other parameters are optional. The cepp.conf file resides on the Data
Mover.
Step 1 – Log into the Dell Celerra or VNX server with an administrator account. The administrative account should have a $ character in the terminal.
NOTE: Do not use a # charter.
Step 2 – Create or retrieve the cepp.conf file.
If there is not a cepp.conf file on the Data Mover(s), use a text editor to create a new blank
file in the home directory named cepp.conf. The following is an example command if using the text
editor ‘vi’ to create a new blank file:
$ vi cepp.conf
If a
cepp.conffile already exists, it can be retrieved from the Data Movers for modification with the following command:
$ server_file [DATA_MOVER_NAME] -get cepp.conf cepp.conf
Step 3 – Configure the cepp.conf file. For information on the cepp.conf file, see the Dell
Using the Common Event Enabler for Windows Platforms
guide instructions on how to add parameters or edit the values or existing parameters.
NOTE: The information can be added to the file on one line or separate lines by using a space
and a ”\” at the end of each line, except for the last line and the lines that contain global
options: cifsserver, surveytime, ft, and msrpcuser.
The Activity Monitor requires the following parameters to be set in the cepp.conf file:
-
pool name=- This should equal the name assigned to the configuration container. This container is composed of the server(s) IP Address or FQDN where the Dell CEE is installed and where the list of events to be monitored is located. It can be named as desired but must be a pool name.
-
servers=- This should equal the IP Address or FQDN of the Windows server where the Dell CEE is installed. If several servers are specified, separate them with the vertical bar (|) or a colon (:).
-
postevents=- The following events are required (separated with the vertical bar):
CloseModified|CloseUnmodified|CreateDir|CreateFile|DeleteDir|DeleteFile|RenameDir|RenameFile|SetAclDir|SetAclFile - If "Directory Read/List" operations are needed, append
OpenDirto the list.
- The following events are required (separated with the vertical bar):
-
msrpcuser=-
This should equal the domain account used to run the Dell CEE Monitor and Dell CAVA services on the Windows server. This parameter is a security measure used to ensure events are only sent to the appropriate servers.
All unspecified parameters use the default setting. For most configurations, the default setting is sufficient.
Example cepp.conf file format:
msrpcuser=[DOMAIN\DOMAINUSER]
pool name=[POOL_NAME] \
servers=[IP_ADDRESS1]|[IP_ADDRESS2]|... \
postevents=[EVENT1]|[EVENT2]|...
Example cepp.conf file format for the Activity Monitor:
msrpcuser=[DOMAIN\DOMAINUSER running CEE services]
pool name=[POOL_NAME for configuration container] \
servers=[IP_ADDRESS where CEE is installed]|... \
postevents=[EVENT1]|[EVENT2]|...
Example of a completed cepp.conf file for the Activity Monitor:
msrpcuser=example\user1
pool name=pool \
servers=192.168.30.15 \
postevents=CloseModified|CloseUnmodified|CreateDir|CreateFile|DeleteDir|DeleteFile|RenameDir|RenameFile|SetAclDir|SetAclFile
-
Step 4 – Move the cepp.conf file to the Data Mover(s) root file system. Run the following
command:
$ server_file [DATA_MOVER_NAME]‑put cepp.conf cepp.conf
NOTE: Each Data Mover which runs Celerra Event Publishing Agent (CEPA) must have a cepp.conf
file, but each configuration file can specify different events.
Step 5 – (This step is required only if using the msrpcuser parameter) Register the MSRPC user
(see Step 3 for additional information on this parameter). Before starting CEPA for the first time,
the administrator must issue the following command from the Control Station and follow the prompts
for entering information:
/nas/sbin/server_user server_2 -add -md5 -passwd [DOMAIN\DOMAINUSER for msrpcuser]
Step 6 – Start the CEPA facility on the Data Mover. Use the following command:
server_cepp [DATA_MOVER_NAME] -service –start
Then verify the CEPA status using the following command:
server_cepp [DATA_MOVER_NAME] -service –status
Once the cepp.config file has been configured, it is time to configure and enable monitoring with
the Activity Monitor. See the
Netwrix Activity Monitor Documentation
for additional information.
Validate Setup
Once the Activity Monitor agent is configured to monitor the Dell device, the automated configuration must be validated to ensure events are being monitored.
Validate Dell CEE Registry Key Settings
NOTE: See the Configure Dell Registry Key Settings topic for information on manually setting the registry key.
After the Activity Monitor activity agent has been configured to monitor the Dell device, it will configure the Dell CEE automatically if it is installed on the same server as the agent. This needs to be set manually in the rare situations where it is necessary for the Dell CEE to be installed on a different server than the Windows proxy server(s) where the Activity Monitor activity agent is deployed.
If the monitoring agent is not registering events, validate that the EndPoint is accurately set. Open the Registry Editor (run regedit). For the synchronous real-time delivery mode (AUDIT), use the following steps.
Step 1 – Navigate to the following windows registry key:
HKEY_LOCAL_MACHINE\SOFTWARE\EMC\CEE\CEPP\Audit\Configuration
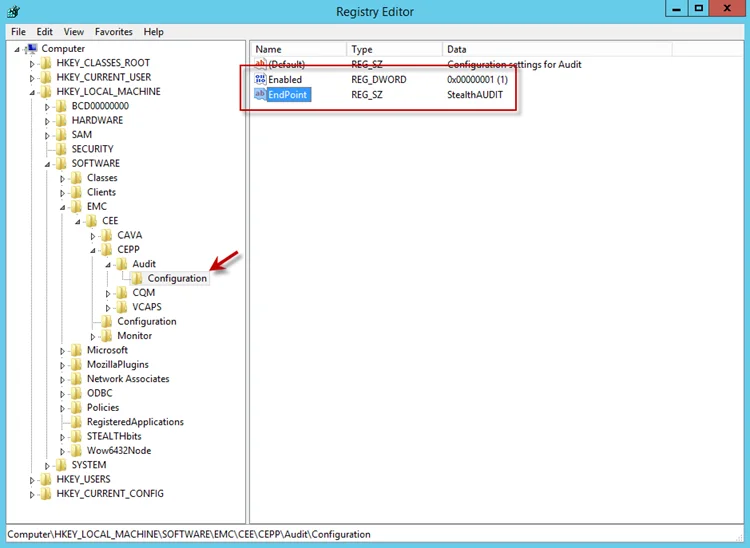
Step 2 – Ensure that the Enabled parameter is set to 1.
Step 3 – Ensure that the EndPoint parameter contains an address string for the Activity Monitor agent in the following formats:
-
For the RPC protocol,
StealthAUDIT@'ip-address-of-the-agent' -
For the HTTP protocol,
StealthAUDIT@http://'ip-address-of-the-agent':'port'
NOTE: All protocol strings are case sensitive. The EndPoint parameter may also contain values for other applications, separated with semicolons.
Step 4 – If you changed any of the settings, restart the CEE Monitor service.
For Asynchronous Bulk Delivery Mode
For the asynchronous bulk delivery mode with a cadence based on a time period or a number of events (VCAPS), use the following steps.
Step 1 – Navigate to the following windows registry key:
HKEY_LOCAL_MACHINE\SOFTWARE\EMC\CEE\CEPP\VCAPS\Configuration
Step 2 – Ensure that the Enabled parameter is set to 1.
Step 3 – Ensure that the EndPoint parameter contains an address string for the Activity Monitor agent in the following formats:
- For the RPC protocol,
StealthVCAPS@'ip-address-of-the-agent' - For the HTTP protocol,
StealthVCAPS@http://'ip-address-of-the-agent':'port'
NOTE: All protocol strings are case sensitive. The EndPoint parameter may also contain values for other applications, separated with semicolons.
Step 4 – Ensure that the FeedInterval parameter is set to a value between 60 and 600; the MaxEventsPerFeed - between 10 and 10000.
Step 5 – If you changed any of the settings, restart the CEE Monitor service.
Set the following values under the Data column:
- Enabled – 1
- EndPoint – StealthAUDIT
If this is configured correctly, validate that the Dell CEE services are running. See the Validate Dell CEE Services are Running topic for additional information.
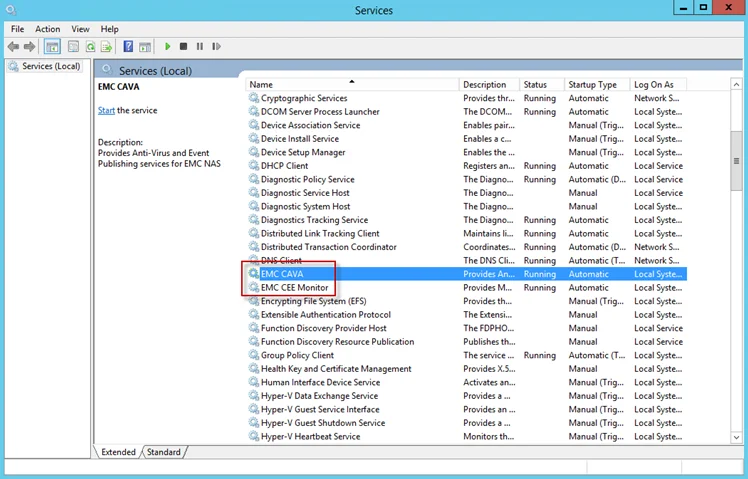
Validate Dell CEE Services are Running
After the Activity Monitor Activity Agent has been configured to monitor the Dell device, the Dell
CEE services should be running. If the Activity Agent is not registering events and the EndPoint is
set accurately, validate that the Dell CEE services are running. Open the Services (run
services.msc).
The following services laid down by the Dell CEE installer should have Running as their status:
- Dell CAVA
- Dell CEE Monitor
Dell CEE Debug Logs
If an issue arises with communication between the Dell CEE and the Activity Monitor, the debug logs need to be enabled for troubleshooting purposes. Follow the steps.
Step 6 – In the Activity Monitor Console, change the Trace level value in the lower right corner to Trace.
Step 7 – In the Activity Monitor Console, select all Dell hosts from the Monitored Hosts list and Disable monitoring.
Step 8 – Download and install the Debug View tool from Microsoft on the CEE server:
http://docs.microsoft.com/en-us/sysinternals/downloads/debugview
Step 9 – Open the Registry Editor (run regedit). Navigate to following location:
HKEY_LOCAL_MACHINE\SOFTWARE\EMC\CEE\Configuration
Step 10 – Right-click on Debug and select Modify. The Edit DWORD Value window opens. In the Value data field, enter the value of 3F. Click OK, and the Edit DWORD Value window closes.
NOTE: If the Debug DWORD Value does not exist, it needs to be added.
Step 11 – Right-click on Verbose and select Modify. The Edit DWORD Value window opens. In the Value data field, enter the value of 3F. Click OK, and the Edit DWORD Value window closes.
NOTE: If the Verbose DWORD Value does not exist, it needs to be added.
Step 12 – Run the Debug View tool (from Microsoft). In the Capture menu, select the following:
- Capture Win32
- Capture Global Win32
- Capture Events
Step 13 – In the Activity Monitor Console, select all Dell hosts from the Monitored Hosts list and Enable monitoring.
Step 14 – Generate some file activity on the Dell device. Save the Debug View Log to a file.
Step 15 – Send the following logs to Netwrix Support:
- Debug View Log (from Dell Debug View tool)
- Use the Collect Logs button to collect debug logs from the activity agent
RECOMMENDED: After the logs have been gathered and sent to Netwrix Support, reset these configurations.
Dell Isilon/PowerScale Activity Auditing Configuration
Dell Isilon/PowerScale can be configured to audit Server Message Block (SMB) and NFS protocol access events on the Dell Isilon/PowerScale cluster. All audit data can be forwarded to the Dell Common Event Enabler (CEE). The Activity Monitor listens for all events coming through the Dell CEE and translates all relevant information into entries in the log files or syslog messages.
Protocol auditing must be enabled and then configured on a per-access zone basis. For example, all SMB protocol events on a particular access zone can be audited, while only attempts to delete files on a different access zone can be audited.
The audit events are logged and stored on the individual OneFS nodes where the SMB/NFS client initiated the activity. The stored events are then forwarded by the node to the Dell CEE instance or concurrently to several instances. At this point, Dell CEE forwards the audit event to a defined endpoint, such as Activity Monitor agent.
Complete the following checklist prior to configuring Activity Monitor to monitor the host. Instructions for each item of the checklist are detailed within the following sections.
Checklist Item 1: Plan Deployment
-
Prior to beginning the deployment, gather the following:
-
DNS name of Isilon/PowerScale CIFS share(s) to be monitored
-
Access Zone(s) containing the CIFS shares to be monitored
-
Account with access to the OneFS UI or CLI
-
Download the Dell CEE from:
-
RECOMMENDED: You can achieve higher throughput and fault tolerance by monitoring the Isilon/PowerScale cluster with more than one pair of Dell CEE and Activity Monitor Agent. The activity will be evenly distributed between the pairs.
Checklist Item 2: Install Dell CEE
-
Dell CEE should be installed on a Windows or a Linux server.
RECOMMENDED: Dell CEE can be installed on the same server as the Activity Agent, or on a different Windows or Linux server. If CEE is installed on the same server, the Activity Agent can configure it automatically.
-
Important:
- Dell CEE 8.8 is the minimum supported version. It is recommended to use the latest available version.
- Dell CEE requires .NET Framework 3.5 to be installed on the Windows server
Checklist Item 3: Configure Auditing on the Dell Isilon/PowerScale Cluster
-
Select method:
-
RECOMMENDED: Allow the Activity Monitor to configure auditing automatically.
- Automation completed while the Activity Monitor is configured to monitor the Isilon/PowerScale device
- Automatically sets CEE Server with the IP Address of the server where CEE is installed
- Automatically sets Storage Cluster Name to exactly match the name known to the Activity Monitor
- Choose between monitoring all Access Zones or scoping to specific Access Zones
-
Manually Configure Auditing in OneFS
- After configuration, add the Isilon/PowerScale device to be monitored by the Activity Monitor
-
-
Important:
-
Value of the Storage Cluster Name field must exactly match the name entered for the monitored host in the Activity Monitor Console. If the Storage Cluster Name cannot be modified (for example, another 3rd party depends on it), you need to set the Host Aliases parameter in the Activity Monitor Console. Otherwise, if for some reason the Storage Cluster Name must be left empty, one can list OneFS cluster node names in the Host Aliases.
- If the Storage Cluster Name is not empty, set the Host Aliases parameter to its value
- If the Storage Cluster Name is empty, set the Host Aliases to a semicolon-separated list of OneFS node names
-
Include all Access Zones to be monitored in the auditing configuration
-
As soon as the first CEE is installed, Isilon/PowerScale will start to send all activity, including all previous audit events, to the agent. The start time can be modified to exclude previously recorded audit events to prevent the agent from becoming overloaded with data. It can be done using OneFS CLI only with isi audit modify command to edit the start time.
-
Start time command:
isi audit settings global modify --cee-log-time [Protocol@2021-04-23 14:00:00] -
View progress:
isi_for_array isi audit progress view -
See the Audit log time adjustment section of the Dell File System Auditing with Dell PowerScale and Dell Common Event Enabler documentation for additional information.
-
-
Checklist Item 4: Configure Dell CEE to Forward Events to the Activity Agent. See the Validate Setup topic for additional information.
Install Dell CEE
Dell CEE should be installed on a Windows or a Linux server. The Dell CEE software is not a Netwrix product. Dell customers have a support account with Dell to access the download.
Remember, the latest version is the recommended version of Dell CEE.
RECOMMENDED: The Dell CEE package can be installed on the Windows server where the Activity Monitor agent will be deployed (recommended) or on any other Windows or Linux server.
Follow the steps to install the Dell CEE.
Step 1 – Obtain the latest CEE install package from Dell and any additional license required for this component. It is recommended to use the most current version.
Step 2 – Follow the instructions in the Dell Using the Common Event Enabler on Windows Platforms guide to install and configure the CEE. The installation will add two services to the machine:
- EMC Checker Service (Display Name: EMC CAVA)
- EMC CEE Monitor (Display Name: EMC CEE Monitor)
RECOMMENDED: The latest version of .NET Framework and Dell CEE is recommended to use with the asynchronous bulk delivery (VCAPS) feature.
After installation, open MS-RPC ports between the Dell device and the Dell CEE server. See the Dell CEE Debug Logs section for information on troubleshooting issues related to Dell CEE.
Configure Dell Registry Key Settings
There may be situations when Dell CEE needs to be installed on a different Windows server than the one where the Activity Monitor activity agent is deployed. In those cases it is necessary to manually set the Dell CEE registry key to forward events.
Step 1 – Open the Registry Editor (run regedit).
Step 2 – Navigate to following location:
HKEY_LOCAL_MACHINE\SOFTWARE\EMC\CEE\CEPP\AUDIT\Configuration
Step 3 – Right-click on Enabled and select Modify. The Edit DWORD Value window opens.
Step 4 – In the Value data field, enter the value of 1. Click OK, and the Edit DWORD Value window closes.
Step 5 – Right-click on EndPoint and select Modify. The Edit String window opens.
Step 6 – In the Value data field, enter the StealthAUDIT value with the IP Address for the Windows proxy server hosting the Activity Monitor activity agent. Use the following format:
StealthAUDIT@[IP ADDRESS]
Examples:
StealthAUDIT@192.168.30.15
Step 7 – Click OK. The Edit String window closes. Registry Editor can be closed.
Step 8 – Open Services (run services.msc). Start or Restart the EMC CEE Monitor service.
The Dell CEE registry key is now properly configured to forward event to the Activity Monitor activity agent.
Manually Configure Auditing in OneFS
Manual configuration for auditing is optional for newer versions as the Activity Agent can configure the auditing automatically using the OneFS API. Follow the steps through the OneFS Storage Administration Console.
Step 1 – Navigate to the Cluster Management tab, and select Auditing.
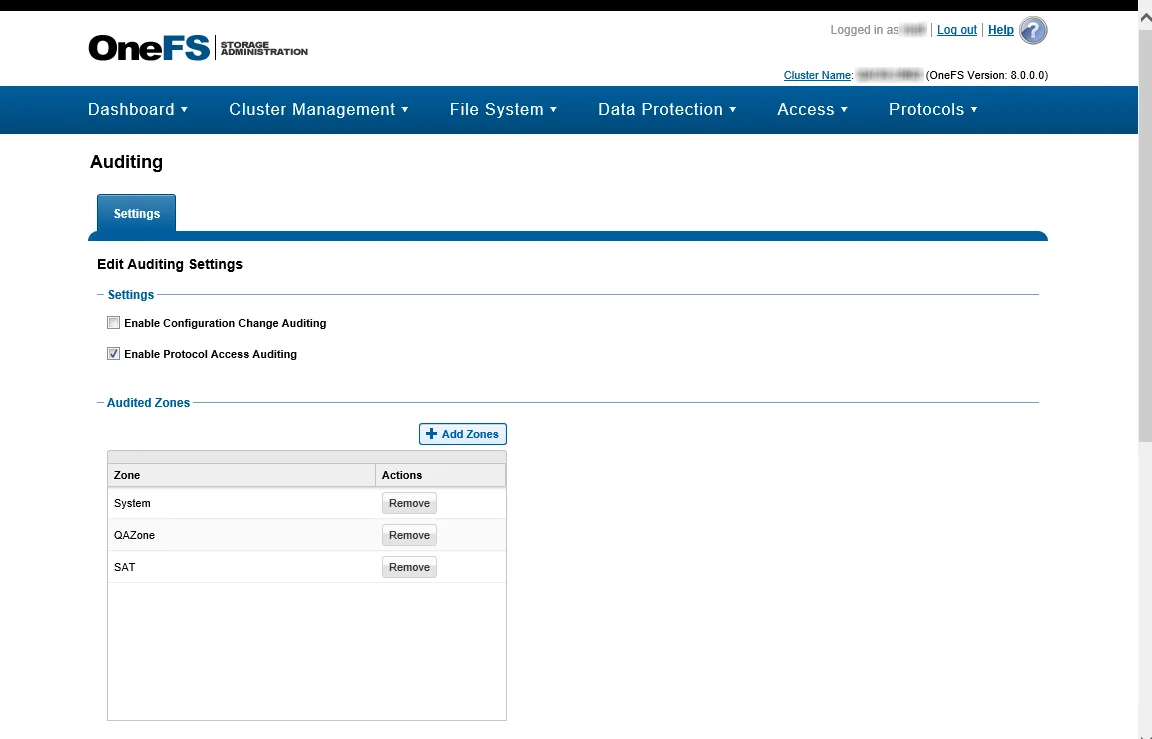
Step 2 – In the Settings section, check the Enable Protocol Access Auditing box.
Step 3 – In the Audited Zones section, add at least one zone to be audited. The System zone is typically used. If the CIFS or NFS shares are accessible through different zones on the OneFS cluster, include all relevant zones.
Ensure that OneFS collects only events you are interested in. By default, OneFS may monitor things like directory reads, which can take up a large amount of space. Configuring the OneFS events that need monitoring is not done through the Activity Monitor console. Configure OneFS event monitoring using OneFS CLI with the isi audit modify command for each access zone. Enabling monitoring for only what is needed for the environment will reduce the data load to the agent.
Activity Monitor monitors the following events: close_file_modified, close_file_unmodified,
create_file, create_directory, delete_file, delete_directory, rename_file,
rename_directory, set_security_file, set_security_directory, and open_directory (if you want
to monitor Directory List/Read events).
For each monitored access zone:
-
Use isi audit settings view
isi --zone ZONENAMEto check current settings. -
Disable reporting of failure and syslog audit events with:
isi audit settings modify --zone ZONENAME --clear-audit-failure --clear-syslog-audit-events
-
Set the success audit events with:
isi audit settings modify --zone ZONENAME --audit-success=close_file_modified,close_file_unmodified,create_file,create_directory,delete_file,delete_directory,rename_file,rename_directory,set_security_file,set_security_directory
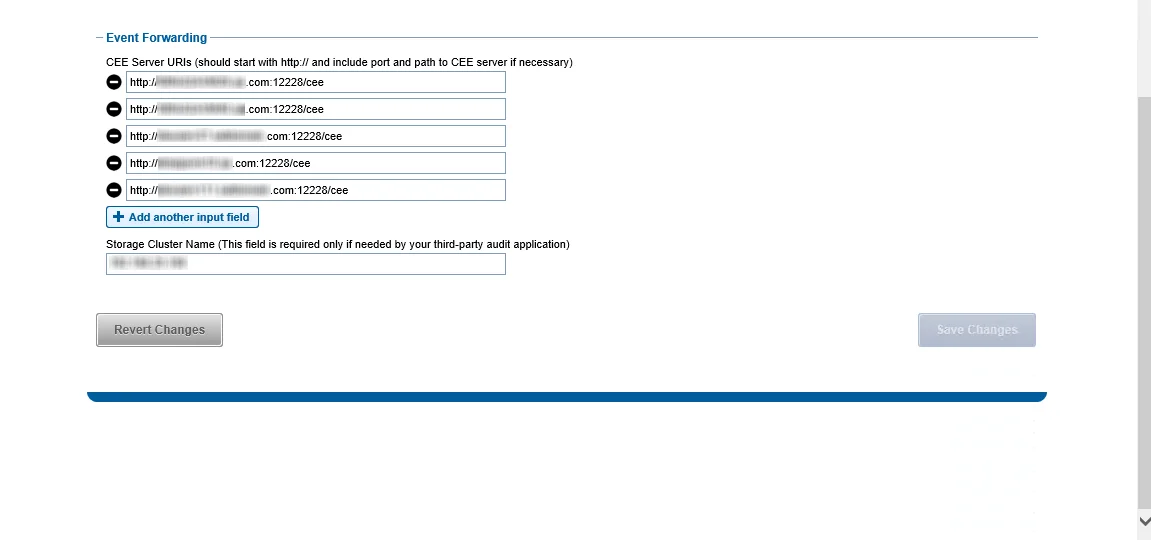
Step 4 – In the Event Forwarding section, add the CEE Server URI value for the Windows or Linux server hosting CEE. Use either of the following format:
http://[IP ADDRESS]:[PORT]/cee
http://[SERVER Name]:[PORT]/cee
RECOMMENDED: When deploying multiple Dell CEE instances at scale, it is recommended that an accommodating agent must be configured with each CEE instance. If multiple CEE instances send events to just one agent, it may create an overflow of data and overload the agent. Distributing the activity stream into pairs will be the most efficient way of monitoring large data sets at scale.
Step 5 – Also in the Event Forwarding section, set the Storage Cluster Name value. It must be an exact match to the name which is entered in the Activity Monitor for the Monitored Host list.
This name is used as a ‘tag’ on all events coming through the CEE. This name must exactly match what is in the Activity Monitor or it does not recognize the events.
RECOMMENDED: Use the CIFS DNS name for Dell OneFS.
NOTE: To use the Activity Monitor with Enterprise Auditor for Activity Auditing (FSAC) scans, the name entered here must exactly match what is used for Enterprise Auditor as a target host.
If the Storage Cluster Name cannot be modified (for example, another third-party depends on it), you need to set the Host Aliases parameter in the Activity Monitor Console:
- If the Storage Cluster Name is not empty, set the Host Aliases parameter to its value
- If the Storage Cluster Name is empty, set the Host Aliases to a semicolon-separated list of OneFS node names
Next, it is time to configure the monitoring agent on the Windows server to monitor the Isilon/PowerScale device.
Validate Setup
Once the Activity Monitor agent is configured to monitor the Dell device, the automated configuration must be validated to ensure events are being monitored.
Validate Dell CEE Registry Key Settings
After the Activity Monitor activity agent has been configured to monitor the Dell device, it will configure the Dell CEE automatically if it is installed on the same server as the agent. This needs to be set manually in the rare situations where it is necessary for the Dell CEE to be installed on a different server than the Windows proxy server(s) where the Activity Monitor activity agent is deployed.
If the monitoring agent is not registering events, validate that the EndPoint is accurately set. Open the Registry Editor (run regedit). For the synchronous real-time delivery mode (AUDIT), use the following steps.
Step 1 – Navigate to the following windows registry key:
HKEY_LOCAL_MACHINE\SOFTWARE\EMC\CEE\CEPP\Audit\Configuration
Step 2 – Ensure that the Enabled parameter is set to 1.
Step 3 – Ensure that the EndPoint parameter contains an address string for the Activity Monitor agent in the following formats:
-
For the RPC protocol,
StealthAUDIT@'ip-address-of-the-agent' -
For the HTTP protocol,
StealthAUDIT@http://'ip-address-of-the-agent':'port'
NOTE: All protocol strings are case sensitive. The EndPoint parameter may also contain values for other applications, separated with semicolons.
Step 4 – If you changed any of the settings, restart the CEE Monitor service.
For Asynchronous Bulk Delivery Mode
For the asynchronous bulk delivery mode with a cadence based on a time period or a number of events (VCAPS), use the following steps.
Step 1 – Navigate to the following windows registry key:
HKEY_LOCAL_MACHINE\SOFTWARE\EMC\CEE\CEPP\VCAPS\Configuration
Step 2 – Ensure that the Enabled parameter is set to 1.
Step 3 – Ensure that the EndPoint parameter contains an address string for the Activity Monitor agent in the following formats:
- For the RPC protocol,
StealthVCAPS@'ip-address-of-the-agent' - For the HTTP protocol,
StealthVCAPS@http://'ip-address-of-the-agent':'port'
NOTE: All protocol strings are case sensitive. The EndPoint parameter may also contain values for other applications, separated with semicolons.
Step 4 – Ensure that the FeedInterval parameter is set to a value between 60 and 600; the MaxEventsPerFeed - between 10 and 10000.
Step 5 – If you changed any of the settings, restart the CEE Monitor service.
Set the following values under the Data column:
- Enabled – 1
- EndPoint – StealthAUDIT
If this is configured correctly, validate that the Dell CEE services are running. See the Validate Dell CEE Services are Running topic for additional information.
Validate Dell CEE Services are Running
After the Activity Monitor Activity Agent has been configured to monitor the Dell device, the Dell
CEE services should be running. If the Activity Agent is not registering events and the EndPoint is
set accurately, validate that the Dell CEE services are running. Open the Services (run
services.msc).
The following services laid down by the Dell CEE installer should have Running as their status:
- Dell CAVA
- Dell CEE Monitor
Dell CEE Debug Logs
If an issue arises with communication between the Dell CEE and the Activity Monitor, the debug logs need to be enabled for troubleshooting purposes. Follow the steps.
Step 6 – In the Activity Monitor Console, change the Trace level value in the lower right corner to Trace.
Step 7 – In the Activity Monitor Console, select all Dell hosts from the Monitored Hosts list and Disable monitoring.
Step 8 – Download and install the Debug View tool from Microsoft on the CEE server:
http://docs.microsoft.com/en-us/sysinternals/downloads/debugview
Step 9 – Open the Registry Editor (run regedit). Navigate to following location:
HKEY_LOCAL_MACHINE\SOFTWARE\EMC\CEE\Configuration
Step 10 – Right-click on Debug and select Modify. The Edit DWORD Value window opens. In the Value data field, enter the value of 3F. Click OK, and the Edit DWORD Value window closes.
NOTE: If the Debug DWORD Value does not exist, it needs to be added.
Step 11 – Right-click on Verbose and select Modify. The Edit DWORD Value window opens. In the Value data field, enter the value of 3F. Click OK, and the Edit DWORD Value window closes.
NOTE: If the Verbose DWORD Value does not exist, it needs to be added.
Step 12 – Run the Debug View tool (from Microsoft). In the Capture menu, select the following:
- Capture Win32
- Capture Global Win32
- Capture Events
Step 13 – In the Activity Monitor Console, select all Dell hosts from the Monitored Hosts list and Enable monitoring.
Step 14 – Generate some file activity on the Dell device. Save the Debug View Log to a file.
Step 15 – Send the following logs to Netwrix Support:
- Debug View Log (from Dell Debug View tool)
- Use the Collect Logs button to collect debug logs from the activity agent
RECOMMENDED: After the logs have been gathered and sent to Netwrix Support, reset these configurations.
Linux CEE Debug Log
The debug log is stored in /opt/CEEPack/emc_cee_svc.log file. To enable verbose logging set Debug
and Verbose parameters under Configuration to 255 and restart the CEE.
NOTE: Debug logs should only be used for troubleshooting purposes. It's recommended to have Debug Logs disabled by default.
...
<CEEConfig>

<Configuration>

<CacheSize>100</CacheSize>

<Debug>255</Debug>

<HeartBeatIntervalSecs>10</HeartBeatIntervalSecs>

<InstrIntervalSecs>10</InstrIntervalSecs>

<NumberOfThreads>20</NumberOfThreads>

<Verbose>255</Verbose>

<HttpPort>12228</HttpPort>

<WatchDog>

<RestartCount>2</RestartCount>

<RestartDelay>5</RestartDelay>

<ResetRestartCountAfter>86400</ResetRestartCountAfter>

</WatchDog>

<LogFile>

<Path>/opt/CEEPack/</Path>

<MaxSize>100</MaxSize>

</LogFile>

</Configuration>

</CEEConfig>
NOTE: All protocol strings are case sensitive.
Dell PowerStore Activity Auditing Configuration
A Dell PowerStore device can be configured to audit Server Message Block (SMB) protocol access events. All audit data can be forwarded to the Dell Common Event Enabler (CEE). The Netwrix Activity Monitor listens for all events coming through the Dell CEE and translates all relevant information into entries in the TSV files or syslog messages.
If the service is turned off, a notification will be sent to the Dell CEE framework to turn off the associated Activity Monitor filter, but the policy will not be removed.
The Dell CEE Framework uses a “push” mechanism so a notification is sent only to the activity agent when a transaction occurs. Daily activity log files are created only if activity is performed. No activity log file is created if there is no activity for the day.
Configuration Checklist
Complete the following checklist prior to configuring activity monitoring of Dell PowerStore devices. Instructions for each item of the checklist are detailed within the following topics.
Checklist Item 1: Plan Deployment
-
Prior to beginning the deployment
-
See the Dell PowerStore: File Capabilities white paper for additional information.
-
Download the Dell CEE from:
-
Checklist Item 2: Install Dell CEE
-
Dell CEE should be installed on the Windows proxy server(s) where the Activity Monitor activity agent will be deployed
RECOMMENDED: The latest version of Dell CEE is the recommended version to use with the asynchronous bulk delivery (VCAPS) feature.
-
Important:
Open MS-RPC ports between the Dell device and the Windows proxy server(s) where the Dell CEE is installed
Checklist Item 3: Dell PowerStore Device Configuration
-
Enable auditing on the PowerStore device
- See the Enable Auditing for Dell PowerStore topic for additional information.
Checklist Item 4: Activity Monitor Configuration
-
Deploy the Activity Monitor activity agent to a Windows proxy server where Dell CEE was installed
-
After activity agent deployment, configure the Dell CEE Options tab of the agent’s Properties window within the Activity Monitor Console
- Automatically sets the Dell registry key settings
-
Checklist Item 5: Configure Dell CEE to Forward Events to the Activity Agent
NOTE: When Dell CEE is installed on Windows proxy server(s) where the Activity Monitor activity agent will be deployed, the following steps are not needed.
- Ensure the Dell CEE registry key has enabled set to 1 and has an EndPoint set to StealthAUDIT.
- Ensure the Dell CAVA service and the Dell CEE Monitor service are running.
Enable Auditing for Dell PowerStore
Follow the steps to enable auditing on Dell PowerStore.
- Create an Event Publishing Pool
- Create an Event Publisher
- Enable Event Publishing for the NAS Server OR Enable or Disable Event Publishing for File System
See the Dell PowerStore - File Capabilities white paper for additional information.
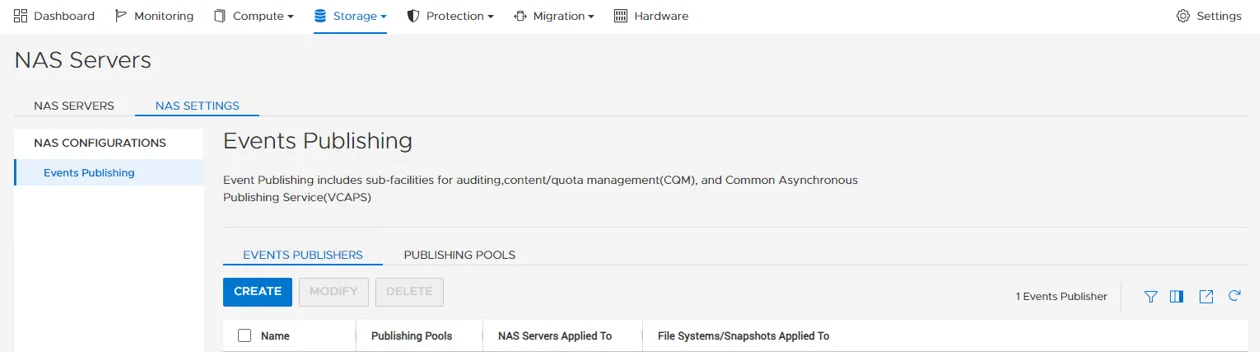
Create an Event Publishing Pool
Follow the steps tTo create a new event publishing pool.:
Step 1 – Select Storage > NAS Servers > NAS Settings > Publishing Pools.
Step 2 – Click Create and specify the name of the pool.
Step 3 – Specify CEE's address or addresses.
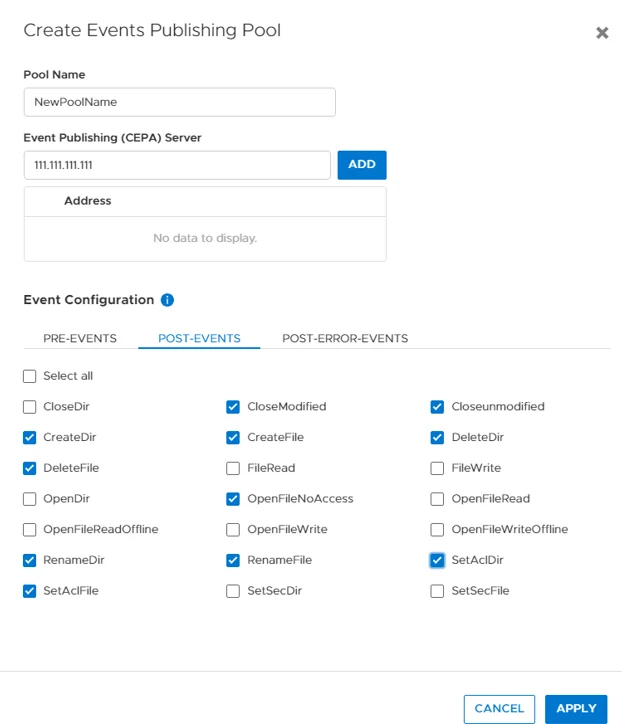
-
For SMB shares monitoring (CIFS) enable following Post-Events: –
- CloseModified
- CloseUnmodified
- CreateDir
- CreateFile
- DeleteDir
- DeleteFile
- OpenFileNoAccess
- RenameDir
- RenameFile
- SetAclDir
- SetAclFile
-
For NFS exports monitoring enable following Post-Events: –
- CloseModified,
- CloseUnmodified
- CreateDir
- CreateFile
- DeleteDir
- DeleteFile
- FileRead
- FileWrite
- OpenFileNoAccess
- RenameDir
- RenameFile
- SetAclDir
- SetAclFile
- SetSecDir
- SetSecFile
Step 4 – Click Apply.
Create an Event Publisher
Follow the steps tTo create a an event publisher.:
Step 1 – Select Storage > NAS Servers > NAS Settings > Events Publishers.
Step 2 – Click Create.
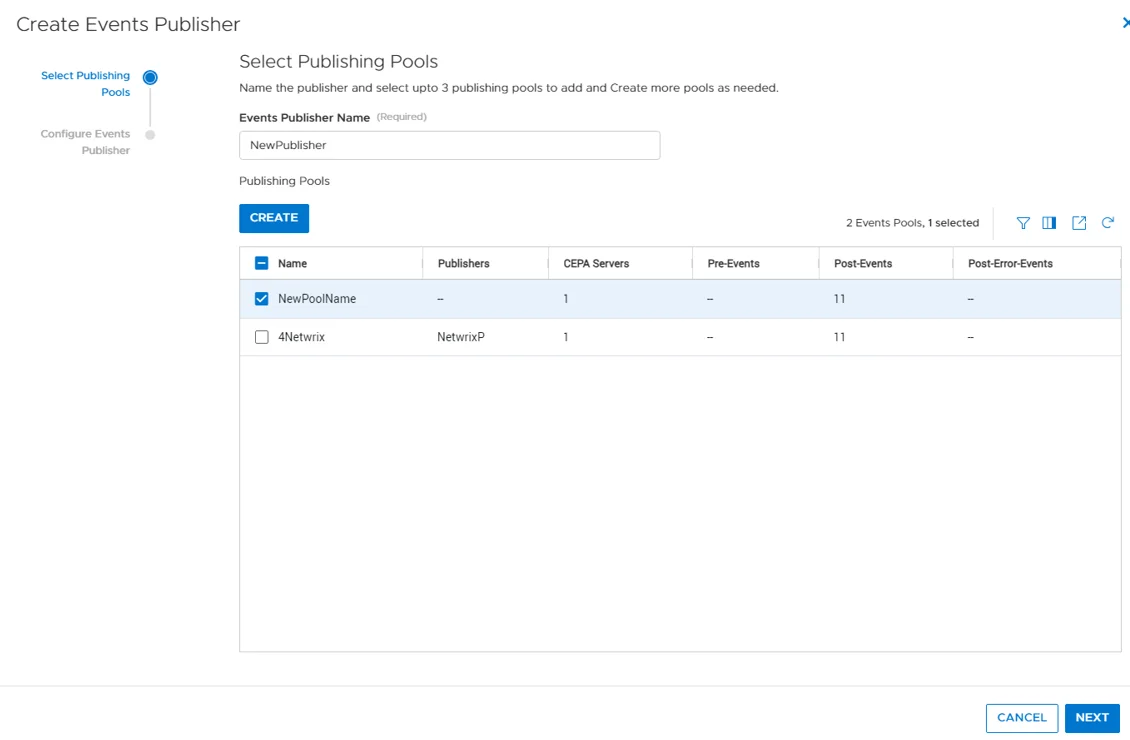
Step 3 – Specify the name of the publisher.
Step 4 – Select the pool and click Next.
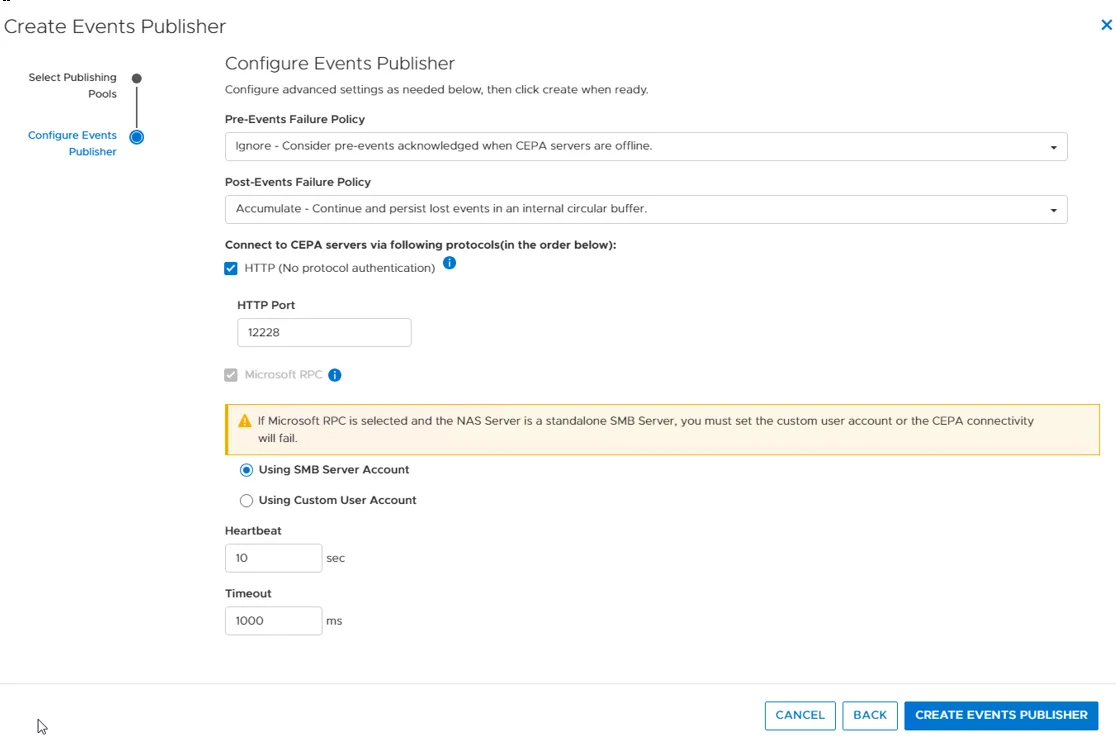
Step 5 – Specify Pre-Events Failure Policy as "Ignore - Consider pre-event acknowledged when CEPA servers are offline".
Step 6 – Specify Post-Events Failure Policy as "Accumulate - Continue and persist lost events in an internal circular buffer".
Step 7 – Click Create Events Publisher.
The events publisher is created.
Enable Event Publishing for the NAS Server
Follow the steps tTo enable or disable event publishing for the NAS Server.:
Step 1 – Select Storage > NAS Servers.
Step 2 – Go to [NAS SERVER] > Security & Events > Events Publishing.
Step 3 – Enable and select the publisher.
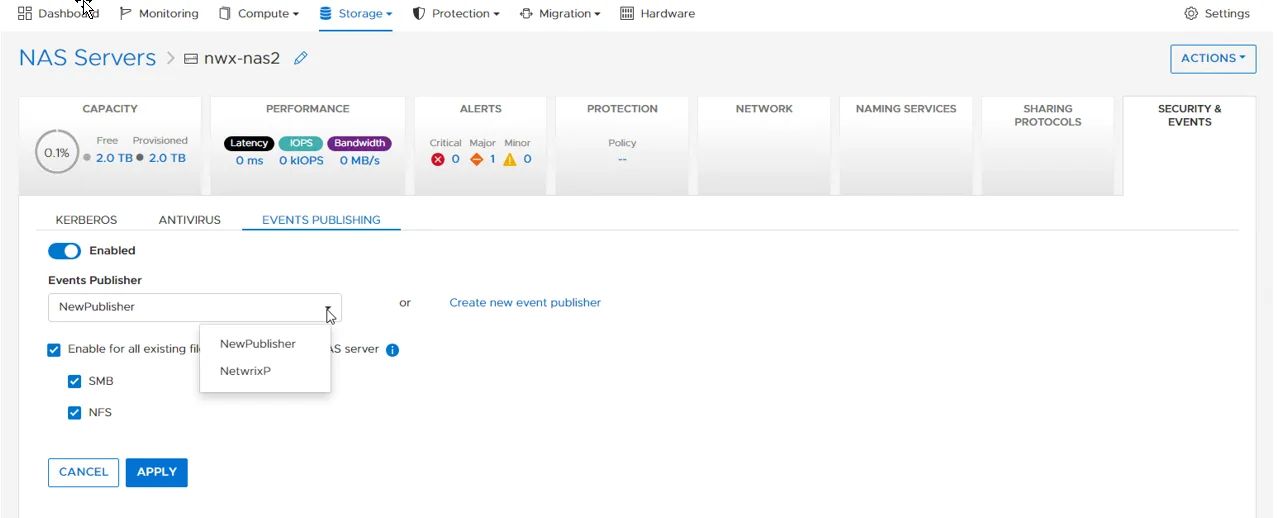
Step 4 – You can enable the event publishing for all file systems on the NAS by checking the box and selecting protocols.
Dell PowerStore is enabled for auditing.
Enable or Disable Event Publishing for File System
Follow the steps toYou can enable or disable the feature for each file system individually. using the following:
Step 1 – Select Storage > File Systems > [FILE SYSTEM] > Security & Events > Events Publishing.
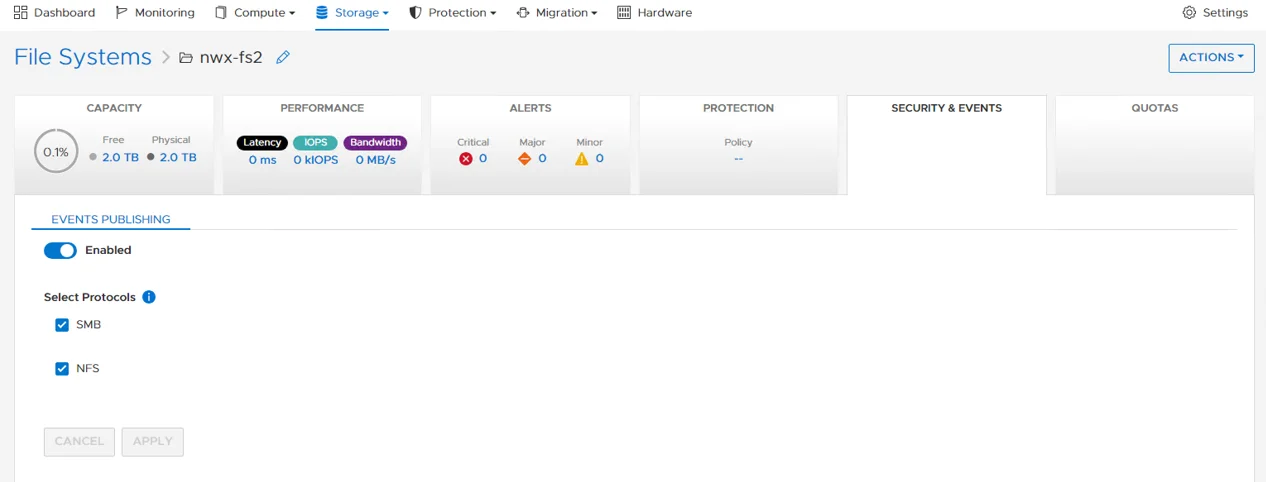
Step 2 – Enable and select protocols needed.
Dell PowerStore is enabled for auditing.
Install Dell CEE
Dell CEE should be installed on a Windows or a Linux server. The Dell CEE software is not a Netwrix product. Dell customers have a support account with Dell to access the download.
Remember, the latest version is the recommended version of Dell CEE.
RECOMMENDED: The Dell CEE package can be installed on the Windows server where the Activity Monitor agent will be deployed (recommended) or on any other Windows or Linux server.
Follow the steps to install the Dell CEE.
Step 1 – Obtain the latest CEE install package from Dell and any additional license required for this component. It is recommended to use the most current version.
Step 2 – Follow the instructions in the Dell Using the Common Event Enabler on Windows Platforms guide to install and configure the CEE. The installation will add two services to the machine:
- EMC Checker Service (Display Name: EMC CAVA)
- EMC CEE Monitor (Display Name: EMC CEE Monitor)
RECOMMENDED: The latest version of .NET Framework and Dell CEE is recommended to use with the asynchronous bulk delivery (VCAPS) feature.
Configure Dell Registry Key Settings
There may be situations when Dell CEE needs to be installed on a different Windows server than the one where the Activity Monitor activity agent is deployed. In those cases it is necessary to manually set the Dell CEE registry key to forward events.
Step 1 – Open the Registry Editor (run regedit).
Step 2 – Navigate to following location:
HKEY_LOCAL_MACHINE\SOFTWARE\EMC\CEE\CEPP\AUDIT\Configuration
Step 3 – Right-click on Enabled and select Modify. The Edit DWORD Value window opens.
Step 4 – In the Value data field, enter the value of 1. Click OK, and the Edit DWORD Value window closes.
Step 5 – Right-click on EndPoint and select Modify. The Edit String window opens.
Step 6 – In the Value data field, enter the StealthAUDIT value with the IP Address for the Windows proxy server hosting the Activity Monitor activity agent. Use the following format:
StealthAUDIT@[IP ADDRESS]
Examples:
StealthAUDIT@192.168.30.15
Step 7 – Click OK. The Edit String window closes. Registry Editor can be closed.
Step 8 – Open Services (run services.msc). Start or Restart the EMC CEE Monitor service.
The Dell CEE registry key is now properly configured to forward event to the Activity Monitor activity agent.
Dell Unity Activity Auditing Configuration
A Dell Unity device can be configured to audit Server Message Block (SMB) protocol access events. All audit data can be forwarded to the Dell Common Event Enabler (CEE). The Netwrix Activity Monitor listens for all events coming through the Dell CEE and translates all relevant information into entries in the TSV files or syslog messages.
If the service is turned off, a notification will be sent to the Dell CEE framework to turn off the associated Activity Monitor filter, but the policy will not be removed.
The Dell CEE Framework uses a “push” mechanism so a notification is sent only to the activity agent when a transaction occurs. Daily activity log files are created only if activity is performed. No activity log file is created if there is no activity for the day.
Configuration Checklist
Complete the following checklist prior to configuring activity monitoring of Dell Unity devices. Instructions for each item of the checklist are detailed within the following topics.
Checklist Item 1: Plan Deployment
-
Prior to beginning the deployment, gather the following:
-
Data Mover or Virtual Data Mover hosting the share(s) to be monitored
-
Account with access to the CLI
-
Download the Dell CEE from:
-
Checklist Item 2: Install Dell CEE
-
Dell CEE should be installed on the Windows proxy server(s) where the Activity Monitor activity agent will be deployed
RECOMMENDED: The latest version of Dell CEE is the recommended version to use with the asynchronous bulk delivery (VCAPS) feature.
-
Important:
- Open MS-RPC ports between the Dell device and the Windows proxy server(s) where the Dell CEE is installed
- Dell CEE 8.4.2 through Dell CEE 8.6.1 are not supported for use with the VCAPS feature
- Dell CEE requires .NET Framework 3.5 to be installed on the Windows proxy server
Checklist Item 3: Dell Unity Device Configuration
-
Configure initial setup for a Unity device
Checklist Item 4: Activity Monitor Configuration
-
Deploy the Activity Monitor activity agent to a Windows proxy server where Dell CEE was installed
-
After activity agent deployment, configure the Dell CEE Options tab of the agent’s Properties window within the Activity Monitor Console
- Automatically sets the Dell registry key settings
-
Checklist Item 5: Configure Dell CEE to Forward Events to the Activity Agent
NOTE: When Dell CEE is installed on Windows proxy server(s) where the Activity Monitor activity agent will be deployed, the following steps are not needed.
- Ensure the Dell CEE registry key has enabled set to 1 and has an EndPoint set to StealthAUDIT.
- Ensure the Dell CAVA service and the Dell CEE Monitor service are running.
- See the Validate Setup topic for instructions.
Install Dell CEE
Dell CEE should be installed on a Windows or a Linux server. The Dell CEE software is not a Netwrix product. Dell customers have a support account with Dell to access the download.
Remember, the latest version is the recommended version of Dell CEE.
RECOMMENDED: The Dell CEE package can be installed on the Windows server where the Activity Monitor agent will be deployed (recommended) or on any other Windows or Linux server.
Follow the steps to install the Dell CEE.
Step 1 – Obtain the latest CEE install package from Dell and any additional license required for this component. It is recommended to use the most current version.
Step 2 – Follow the instructions in the Dell Using the Common Event Enabler on Windows Platforms guide to install and configure the CEE. The installation will add two services to the machine:
- EMC Checker Service (Display Name: EMC CAVA)
- EMC CEE Monitor (Display Name: EMC CEE Monitor)
RECOMMENDED: The latest version of .NET Framework and Dell CEE is recommended to use with the asynchronous bulk delivery (VCAPS) feature.
After Dell CEE installation is complete, it is necessary to complete the Unity Initial Setup with Unisphere.
Configure Dell Registry Key Settings
There may be situations when Dell CEE needs to be installed on a different Windows server than the one where the Activity Monitor activity agent is deployed. In those cases it is necessary to manually set the Dell CEE registry key to forward events.
Step 1 – Open the Registry Editor (run regedit).
Step 2 – Navigate to following location:
HKEY_LOCAL_MACHINE\SOFTWARE\EMC\CEE\CEPP\AUDIT\Configuration
Step 3 – Right-click on Enabled and select Modify. The Edit DWORD Value window opens.
Step 4 – In the Value data field, enter the value of 1. Click OK, and the Edit DWORD Value window closes.
Step 5 – Right-click on EndPoint and select Modify. The Edit String window opens.
Step 6 – In the Value data field, enter the StealthAUDIT value with the IP Address for the Windows proxy server hosting the Activity Monitor activity agent. Use the following format:
StealthAUDIT@[IP ADDRESS]
Examples:
StealthAUDIT@192.168.30.15
Step 7 – Click OK. The Edit String window closes. Registry Editor can be closed.
Step 8 – Open Services (run services.msc). Start or Restart the EMC CEE Monitor service.
The Dell CEE registry key is now properly configured to forward event to the Activity Monitor activity agent.
Unity Initial Setup with Unisphere
Follow the steps to configure the initial setup for a Unity device with Unisphere.
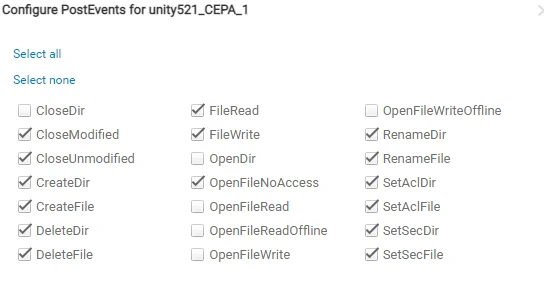
Step 1 – Edit the NAS Server > Protection and Events > Events Publishing > Select Pool settings:
- Add CEPA server – This is the server where CEE is installed. It is recommended that this is also the server were the Activity Monitor activity agent is deployed.
- Enable the following events for Post Events.
Required Unity events needed for CIFS Activity:
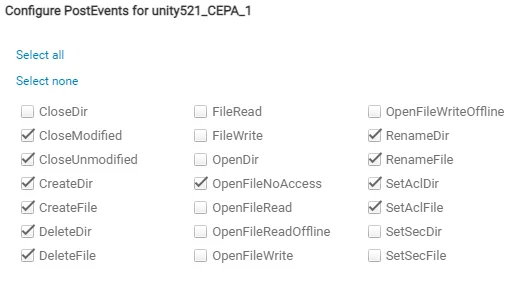
Required Unity events needed for NFS Activity:
Step 2 – Enable Events Publishing:
-
Edit the FileSystem > Advanced settings:
- NFS Events Publishing – Enabled (required for NFS protocol monitoring)
- SMB Events publishing – Enabled (required for SMB / CIFS protocol monitoring)
Once Unity setup is complete, it is time to configure and enable monitoring with the Activity Monitor.
Validate Setup
Once the Activity Monitor agent is configured to monitor the Dell device, the automated configuration must be validated to ensure events are being monitored.
Validate CEE Registry Key Settings
NOTE: See the Configure Dell Registry Key Settings topic for information on manually setting the registry key.
After the Activity Monitor activity agent has been configured to monitor the Dell device, it will configure the Dell CEE automatically if it is installed on the same server as the agent. This needs to be set manually in the rare situations where it is necessary for the Dell CEE to be installed on a different server than the Windows proxy server(s) where the Activity Monitor activity agent is deployed.
If the monitoring agent is not registering events, validate that the EndPoint is accurately set. Open the Registry Editor (run regedit). For the synchronous real-time delivery mode (AUDIT), use the following steps.
Step 1 – Navigate to the following windows registry key:
HKEY_LOCAL_MACHINE\SOFTWARE\EMC\CEE\CEPP\Audit\Configuration
Step 2 – Ensure that the Enabled parameter is set to 1.
Step 3 – Ensure that the EndPoint parameter contains an address string for the Activity Monitor agent in the following formats:
-
For the RPC protocol,
StealthAUDIT@'ip-address-of-the-agent' -
For the HTTP protocol,
StealthAUDIT@http://'ip-address-of-the-agent':'port'
NOTE: All protocol strings are case sensitive. The EndPoint parameter may also contain values for other applications, separated with semicolons.
Step 4 – If you changed any of the settings, restart the CEE Monitor service.
For Asynchronous Bulk Delivery Mode
For the asynchronous bulk delivery mode with a cadence based on a time period or a number of events (VCAPS), use the following steps.
Step 1 – Navigate to the following windows registry key:
HKEY_LOCAL_MACHINE\SOFTWARE\EMC\CEE\CEPP\VCAPS\Configuration
Step 2 – Ensure that the Enabled parameter is set to 1.
Step 3 – Ensure that the EndPoint parameter contains an address string for the Activity Monitor agent in the following formats:
- For the RPC protocol,
StealthVCAPS@'ip-address-of-the-agent' - For the HTTP protocol,
StealthVCAPS@http://'ip-address-of-the-agent':'port'
NOTE: All protocol strings are case sensitive. The EndPoint parameter may also contain values for other applications, separated with semicolons.
Step 4 – Ensure that the FeedInterval parameter is set to a value between 60 and 600; the MaxEventsPerFeed - between 10 and 10000.
Step 5 – If you changed any of the settings, restart the CEE Monitor service.
Set the following values under the Data column:
- Enabled – 1
- EndPoint – StealthAUDIT
If this is configured correctly, validate that the Dell CEE services are running. See the Validate Dell CEE Services are Running topic for additional information.
Validate Dell CEE Services are Running
After the Activity Monitor Activity Agent has been configured to monitor the Dell device, the Dell
CEE services should be running. If the Activity Agent is not registering events and the EndPoint is
set accurately, validate that the Dell CEE services are running. Open the Services (run
services.msc).
The following services laid down by the Dell CEE installer should have Running as their status:
- Dell CAVA
- Dell CEE Monitor
CEE Debug Logs
If an issue arises with communication between the Dell CEE and the Activity Monitor, the debug logs need to be enabled for troubleshooting purposes. Follow the steps.
Step 6 – In the Activity Monitor Console, change the Trace level value in the lower right corner to Trace.
Step 7 – In the Activity Monitor Console, select all Dell hosts from the Monitored Hosts list and Disable monitoring.
Step 8 – Download and install the Debug View tool from Microsoft on the CEE server:
http://docs.microsoft.com/en-us/sysinternals/downloads/debugview
Step 9 – Open the Registry Editor (run regedit). Navigate to following location:
HKEY_LOCAL_MACHINE\SOFTWARE\EMC\CEE\Configuration
Step 10 – Right-click on Debug and select Modify. The Edit DWORD Value window opens. In the Value data field, enter the value of 3F. Click OK, and the Edit DWORD Value window closes.
NOTE: If the Debug DWORD Value does not exist, it needs to be added.
Step 11 – Right-click on Verbose and select Modify. The Edit DWORD Value window opens. In the Value data field, enter the value of 3F. Click OK, and the Edit DWORD Value window closes.
NOTE: If the Verbose DWORD Value does not exist, it needs to be added.
Step 12 – Run the Debug View tool (from Microsoft). In the Capture menu, select the following:
- Capture Win32
- Capture Global Win32
- Capture Events
Step 13 – In the Activity Monitor Console, select all Dell hosts from the Monitored Hosts list and Enable monitoring.
Step 14 – Generate some file activity on the Dell device. Save the Debug View Log to a file.
Step 15 – Send the following logs to Netwrix Support:
- Debug View Log (from Dell Debug View tool)
- Use the Collect Logs button to collect debug logs from the activity agent
RECOMMENDED: After the logs have been gathered and sent to Netwrix Support, reset these configurations.