Securing the Access Information Center
There are two options for accessing the Access Information Center. You can either go to the Access Information Center website directly or you can access it via the Web Console. The Web Console uses an embedded website installed with Access Analyzer. It provides a consolidated logon for both Access Analyzer reports and the Access Information Center. See the URL & Login topic for additional information.
In order to secure the Access Information Center, it is first necessary to enable SSL for theAccess Information Center website. If you access the Access Information Center via the Web Console, then both websites must have SSL enabled with the same certificate. See the Securing the Web Console topic in the Netwrix Access Analyzer Documentation for additional information.
NOTE: SSL for the Access Information Center can be enabled during installation. See the Install the Access Information Center topic for additional information.
Enable SSL for the AIC Website
Enable Secure Sockets Layer (SSL) for secure, remote connections to the application web server.
NOTE: These configuration steps are for if you need to manually enable SSL after installing the Access Information Center. SSL can also be enabled via the Setup wizard when you first install or upgrade the Access Information Center. If SSL was enabled during installation, then this configuration is not required.
NOTE: Organizations typically have one or more system administrators responsible for Public Key Infrastructure (PKI) and certificates. To continue with this configuration, it will first be necessary to confer with the PKI administrator to determine which certificate method will conform to the organization’s security policies.
Follow the steps to enable SSL.
Step 1 – Create an SSL Binding.
Step 2 – Modify the AccessInformationCenter.Service.exe.Config File.
Step 3 – Update the URL in the AIC’s Desktop Icon Properties
The Access Information Center is now configured to use SSL for secure, remote connections.
Create an SSL Binding
You run a PowerShell command to create an SSL binding. The binding command has several environmental variables:
- The
$certHashvalue is theThumbprintvalue - The
$ipvalue of the IP addresses. In the example script below, the value [0.0.0.0] is set for all IP addresses. - The
$portvalue must be accurate for your environment. The HTTP default port is 81. The HTTPS default is 481. However, it can be customized during installation.
If you need to find the $certHash value of a certificate that was already created, run the
PowerShell dir command below on the certificate's drive. This will output the Thumbprint (Hash)
value and the certificate name:
dir cert:\localmachine\my
Replace the $certHash, $ip, and $port environmental variables in the example script below.
Then Run the PowerShell command to create an SSL binding:
$guid = "bdd5710f-7cbe-4f85-b8c1-da4bddf485a8" # This guid is the same for all installations
$certHash = "80F78FD2566793D2F39E748CDF6DED09B6F57A82" # Replace the example value between the quotes with your Thumbprint value
$ip = "0.0.0.0" # This means all IP addresses
$port = "481" # The default HTTPS port
"http add sslcert ipport=$($ip):$port certhash=$certHash appid={$guid}" | netsh
The next step is to modify the AccessInformationCenter.Service.exe.Config file.
Modify the AccessInformationCenter.Service.exe.Config File
Follow the steps to modify the Modify the AccessInformationCenter.Service.exe.Config file for
HTTPS.
Step 1 – Open the AccessInformationCenter.Service.exeWeb.config file in a text editor, such as
Notepad. The file is located in the Access Information Center installation directory:
…\Program Files\STEALTHbits\Access Information Center
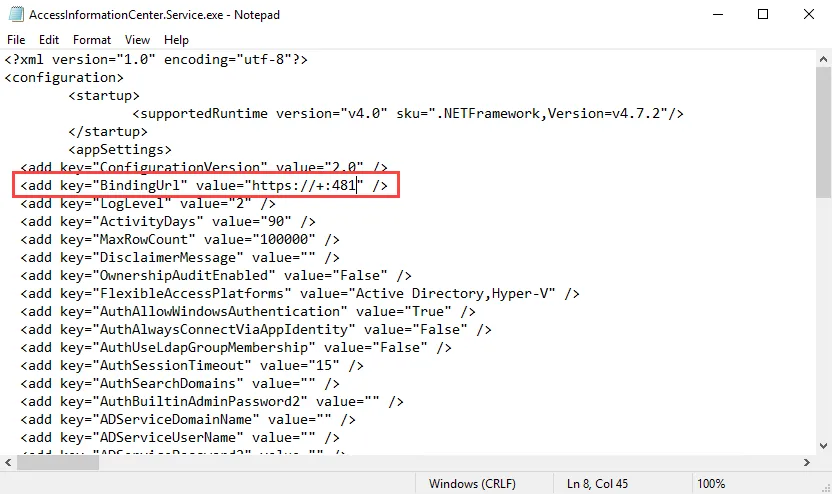
Step 2 – Change the BindingUrl key value to "https://+:481" (ensure the port number matches
the port number used in the PowerShell command run to create the SSL Binding).
Step 3 – Save and close the file.
Step 4 – Navigate to Services (services.msc). Restart the Netwrix Access Information Center
service.
The URL for the Access Information Center is now
https://[Fully Qualified Domain Name for the Machine]:481/v2/login (if port 481 was used when
creating the binding). For example, https://ENGLANDSRV10.NWXTech.com:481/v2/login.
Update the URL in the AIC’s Desktop Icon Properties
Follow the steps to update the AIC’s desktop icon's Access Information Center's Properties window.
Step 1 – Right click on the Access Information Center desktop shortcut and click Properties.
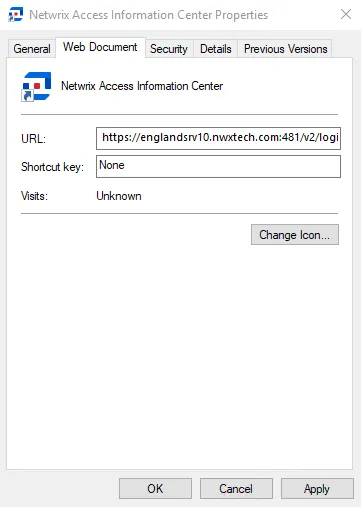
Step 2 – On the Web Document tab, enter the updated URL in the text box to:
https://[hostname.domain.com]:481/v2/login
Step 3 – Click Apply and then OK to exit.
The URL is now updated.
Enable Single Sign-On
The Access Information Center can be configured for Single Sign-On (SSO) using Windows authentication, to skip the opening login screen and authenticate automatically by passing the Active Directory credentials for the user’s current domain login session directly. If you are accessing the Access Information Center via the Web Console, single sign-on only needs to be configured for the Web Console. See the Enable Single Sign-On topic of the Netwrix Access Analyzer Documentation for additional information.
NOTE: The Access Information Center also supports using Microsoft Entra ID single sign-on. See the Microsoft Entra ID Single Sign-On topic for additional information.
Follow the steps to enable SSO for accessing the Access Information Center website directly.
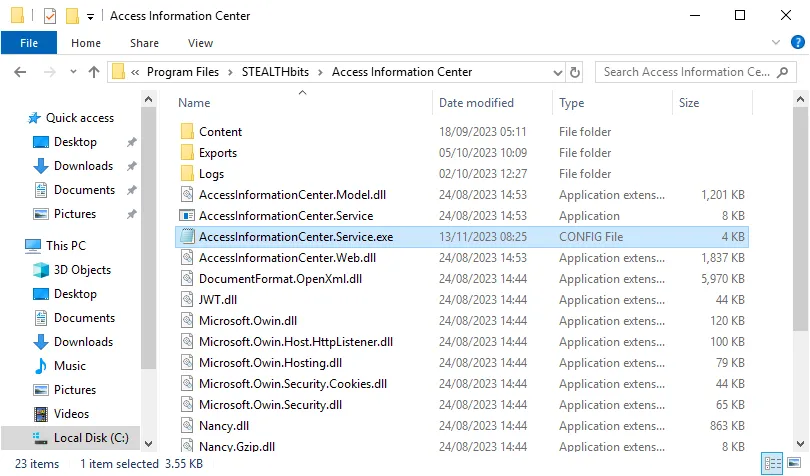
Step 1 – Open the AccessInformationCenter.Service.exe.config file in a text editor, such as
Notepad. The file is located in the Access Information Center installation directory:
…\Program Files\STEALTHbits\Access Information Center
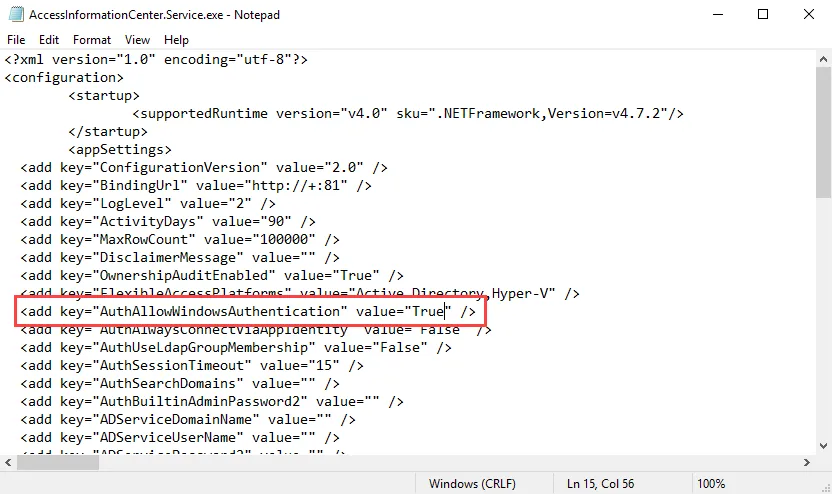
Step 2 – Locate the line containing the AuthAllowWindowsAuthentication parameter. By default,
the value will be set to False:
<add key="AuthAllowWindowsAuthentication" value="False" />
Change the value for the AuthAllowWindowsAuthentication parameter to:
<add key="AuthAllowWindowsAuthentication" value="True" />
Step 3 – Save and close the file.
Step 4 – Navigate to Services (services.msc). Restart the Netwrix Access Information Center
service.
The Access Information Center has been enabled for single sign-on.
Local Intranet Settings
Next, configure local intranet settings to enable SSO. This enables users to have authentication pass through Windows Authentication and bypass SSO configuration Prompts for credentials via Browser pop-up.
Follow the steps to configure local intranet settings.
Step 1 – Open Windows Internet Properties (Control Panel > Network and Internet > Internet Options).

Step 2 – Go to the Security tab, and select the Local Intranet option. Then, click the Sites button.
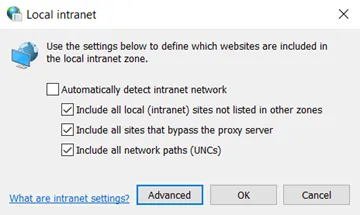
Step 3 – Click the Advanced button.

Step 4 – Enter a domain in the Add this website in the zone field. Ensure the fully
qualified domain name is in the following format: https://<server>.<domain>.com
Step 5 – Click the Add button. Close the Local intranet window.
Step 6 – On the Internet Properties window, click the Apply button.
Authentication will now pass through Windows Authentication and bypass SSO configuration Prompts for credentials via Browser pop-up
NOTE: A list of allowed authentication servers can also be configured using the AuthServerAllowList policy.