Notifications Page
The Access Information Center uses the Simple Mail Transfer Protocol (SMTP) to send email messages. SMTP server information and several messaging options can be set through the Configuration > Notifications page.

At the top, the SMTP server and email security settings are configured. The Notification options is where you configure the sender information, and other optional settings. The Reminders section is for configuring weekly reminders for owners with outstanding resource reviews or access requests.
Configure SMTP Server Settings
If the Access Information Center is installed on the same server as the Access Analyzer Console, SMTP server settings from Access Analyzer should be populated automatically. SMTP server information can be supplied and modified on the Notifications page. Follow the steps to configure or modify the SMTP settings.
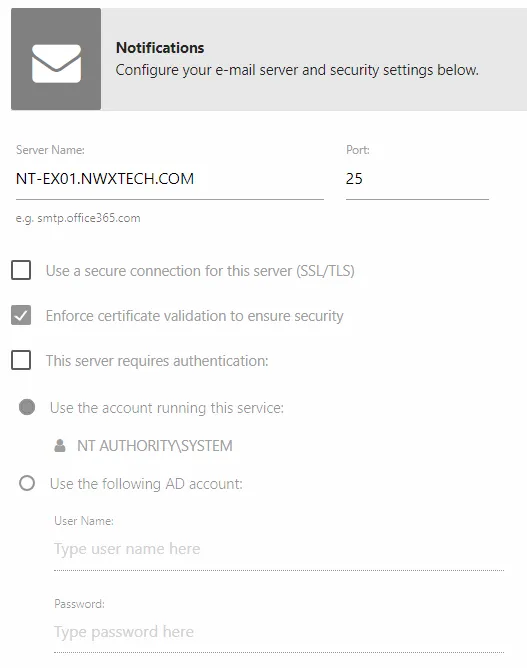
Step 1 – In the Configuration interface, select the Notifications page.
Step 2 – Enter the SMTP Server Name in the textbox. This should be the fully qualified domain name (mail.example.com) or IP Address.
Step 3 – If needed, modify the Port used by your SMTP server to listen for new messages. Historically, the default for SMTP has been port 25. However, if a secure connection is desired (SSL/TLS), the SMTPS port needs to be changed, traditionally 465. Alternately, environments with off-premises or outsourced email service, e.g. gmail.com, hotmail.com, etc., may have to supply a different submission port, traditionally port 587. Ultimately it is an organization’s email/messaging administrator who will know the proper value for the SMTP port.
Step 4 – SMTP security settings:
-
Use a secure connection for this server (SSL/TLS) – Allows for the use of a secure transport layer for message relay requests (submissions) and authentication requests
-
Enforce certificate validation to ensure security — Forces the use of certificate validation
-
This server requires authentication – Enable if the identified SMTP server requires authentication. Some SMTP servers traditionally have been configured to deny all but anonymous relay requests, i.e. an attempt to authenticate results in a denial, while an anonymous request is not denied. Select this checkbox, and then select one of the following radio buttons if authentication is required:
-
Use the account running this service
- To use this option, the SMTP server must be configured to use Integrated Windows Authentication (IWA).
- Select this radio button if the configured Active Directory service account will also be used to authenticate to the SMTP server.
- A group Managed Service Account (gMSA) can be used by configuring it to run the Netwrix Access Information Center service. See the Group Managed Service Account (gMSA) Configuration topic for additional information.
-
Use the following AD Account
- To use this option, the SMTP server must be configured to use Integrated Windows Authentication (IWA).
- Select this radio button to specify either domain account or a traditional SMTP account and password to authenticate to the SMTP server.
-

Step 5 – Click Test Settings to ensure a connection to the SMTP server. The Test Settings window opens. Enter a valid email address and click OK.

Step 6 – If the SMTP settings are configured correctly, you receive a successful message. Click OK to close the Testing your settings window. The test recipient should have recieved a test email.
Step 7 – Click Save. Then click OK to confirm.
NOTE: After the settings are saved, a re-authentication is required to continue using the Access Information Center.
The Access Information Center is now configured to send email. See the following topics for additional Notification options.
Notification Options
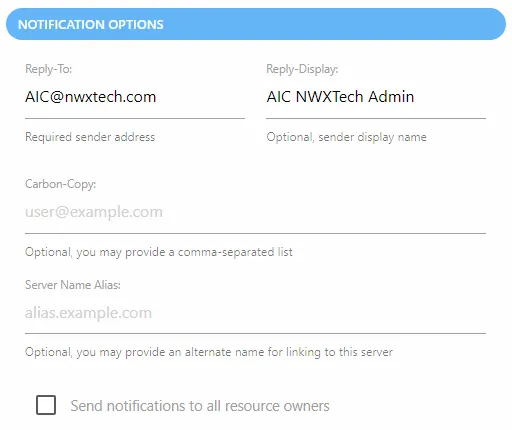
Once the SMTP server is configured, there are additional options. Only the Reply-To field must be populated:
-
Reply-To — The email address that receives responses to notifications sent by the application. This can be a “no reply” address.
-
Reply-Display — Optionally enter a display name for the sender
-
Carbon-Copy — Optionally set additional email addresses to be CC’d on all email messages sent
-
Server Name Alias — Optionally provide an alternate name for the URL link to the Access Information Center. By default, the URL is the hosting server name and port, e.g. NEWYORKSRV10:81. If you do not want the server name visible in the URL, provide an alias here, e.g. AIC.NWXTECH.com.
-
Send notifications to all resource owners — This option applies only to resources with multiple assigned owners. When unchecked, notifications are only sent to the Primary Owner. Check this option to send owner notifications to all assigned owners.
- This option is part of the Resources Reviews and Self-Service Access Requests workflows.
Remember, click Save after making modifications to the Notification settings. After the settings are saved, a re-authentication is required to continue using the Access Information Center.
Reminders
Resource Owners receive notification email when there are new pending tasks associated to their resources. You can also set up automated weekly reminders for outstanding pending tasks. Follow the steps to configure weekly reminders to resource owners.

Step 1 – In the Configuration interface, select the Notifications page and scroll down to the Reminders section.
Step 2 – Check the Send reminders to owners with pending events option.
Step 3 – Set the date and time for when the reminder will be sent:
- Day of the week – Select the day of the week from the drop-down menu
- Time of day – Click on the field to open a clock window. Set the time of day reminders will be sent, e.g. 12:00 AM
Step 4 – Click Save. Then click OK to confirm.
After the settings are saved, a re-authentication is required to continue using the Access Information Center. Assigned resource owners now receive weekly reminders of pending events. The Notifications were last sent on field will populate with the date timestamp for when the last set of reminders were sent.