Approval Process
After all owners assigned to a specific review have submitted their review, its status on the Manage Reviews page of the Resource Reviews interface changes to Responses awaiting review.
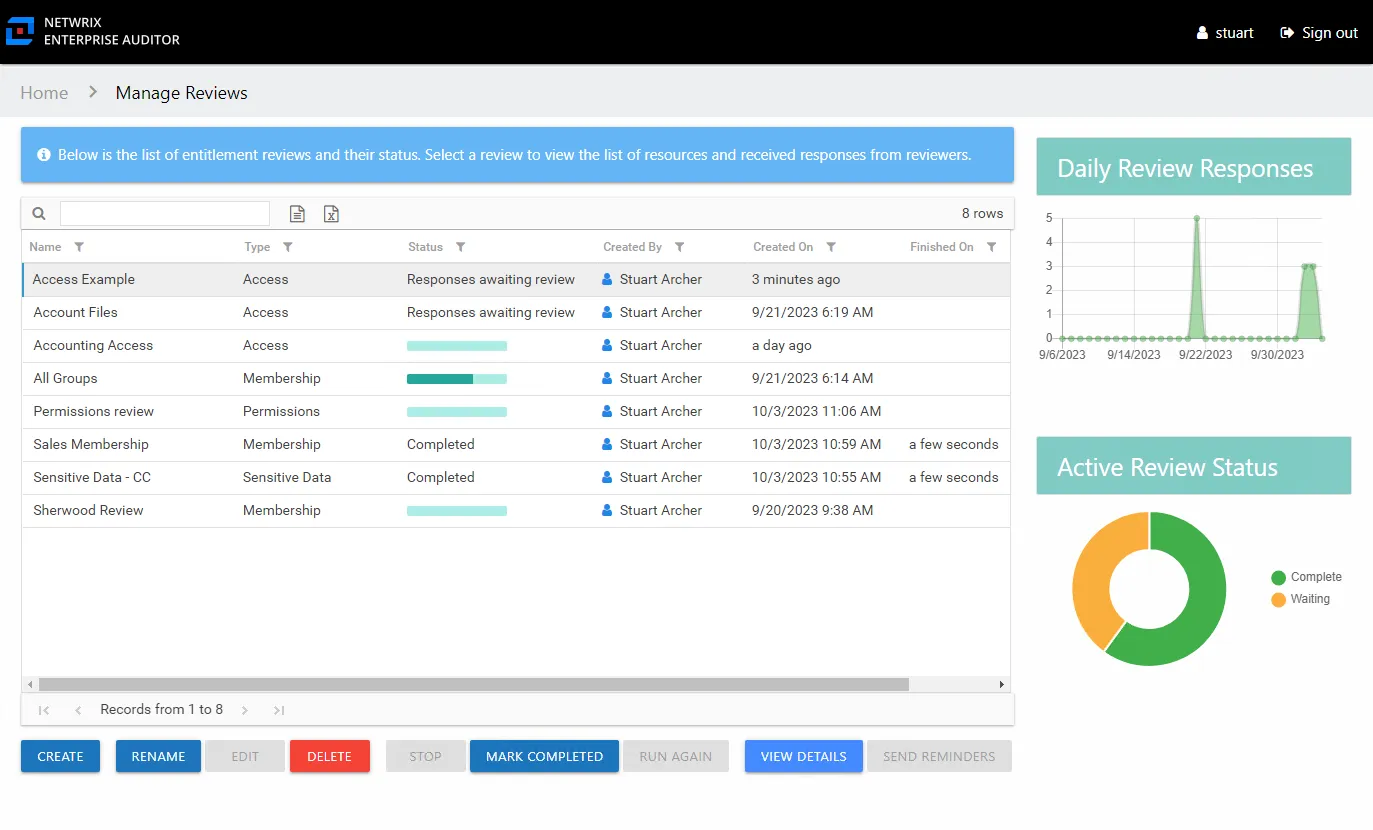
In the approval process, the Review Administrator looks at the owner-recommended changes and chooses to approve, deny, or defer the changes.
The Review Administrator may choose to model the requested changes to see how the user's overall access will be impacted. Change modeling is conducted through the Resource Audit interface. You can access this interface via the Resource Audit button on the Review Details Page. See the Model Changes in the AIC topic for additional information.
CAUTION: If the Access Information Center has been configured to commit changes to Active Directory and the automation prerequisites have been met for this type of review, this change will be committed when the review is complete.
If the Access Information Center automatically commits the approved change, it is immediately visible in Access Information Center reports. It is not necessary to rescan with Netwrix Access Analyzer (formerly Enterprise Auditor). If approved changes are being manually committed by your organization's IT team, it will be necessary to rescan the environment before the changes will be reflected in Access Information Center reports.
See the Process Owner Responses topic for instructions on how to perform a granular review of owner-recommended changes. See the Batch Processing topic for instructions on how to approve, decline, or defer all owner-recommended changes for a review.
Process Owner Responses
Follow the steps to perform a granular review of a resource owner's recommended changes.
CAUTION: If the Access Information Center has been configured to commit changes to Active Directory and the automation prerequisites have been met for this type of review, this change will be committed when the review is complete.
Step 1 – On the Manage Reviews page, select a review and click View Details. The Review Details page opens.
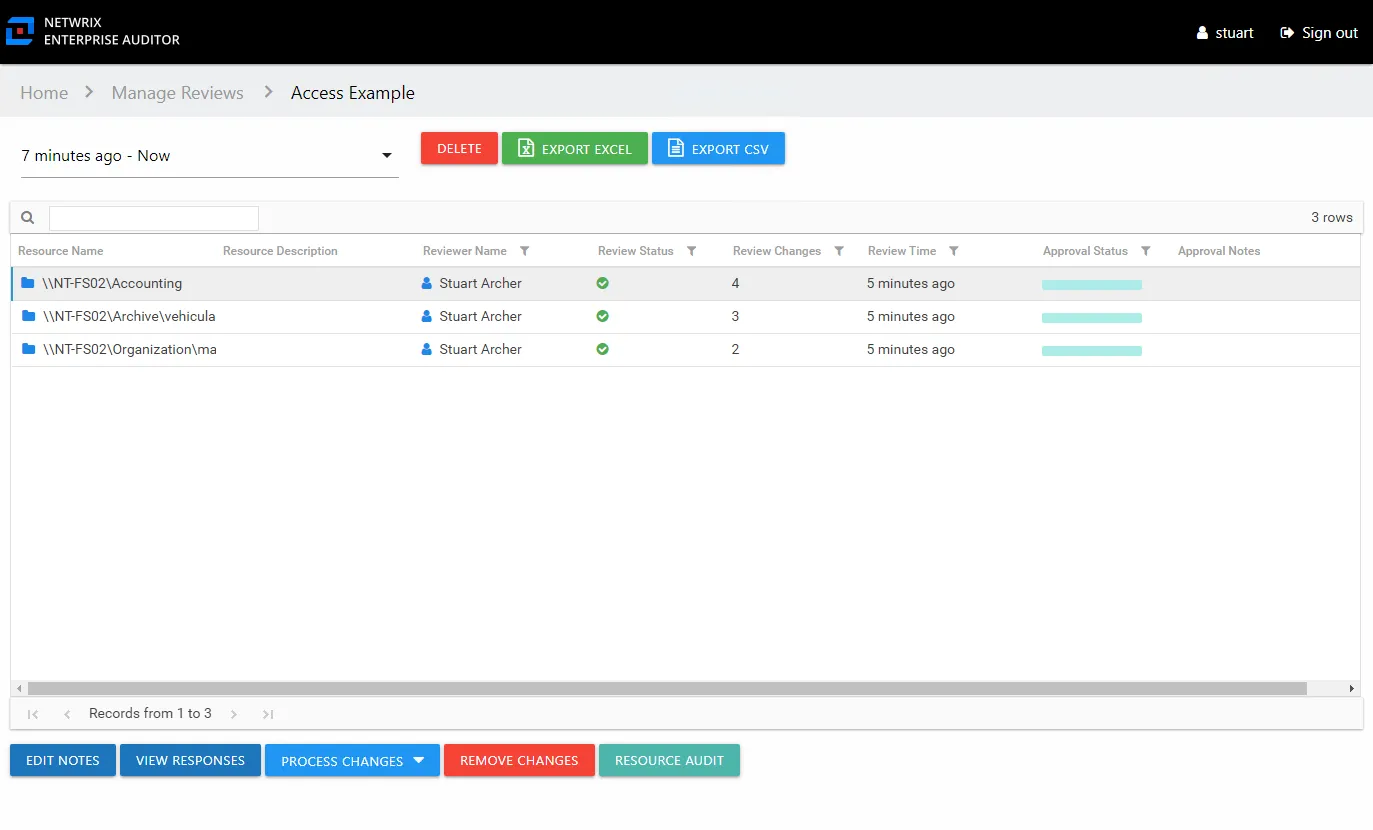
Step 2 – Select a resource in the list and click View Responses. The View Responses window opens.
Remember, the Resource Audit button opens the Resource Audit interface filtered to that resource's reports. This is where you can conduct change modeling.
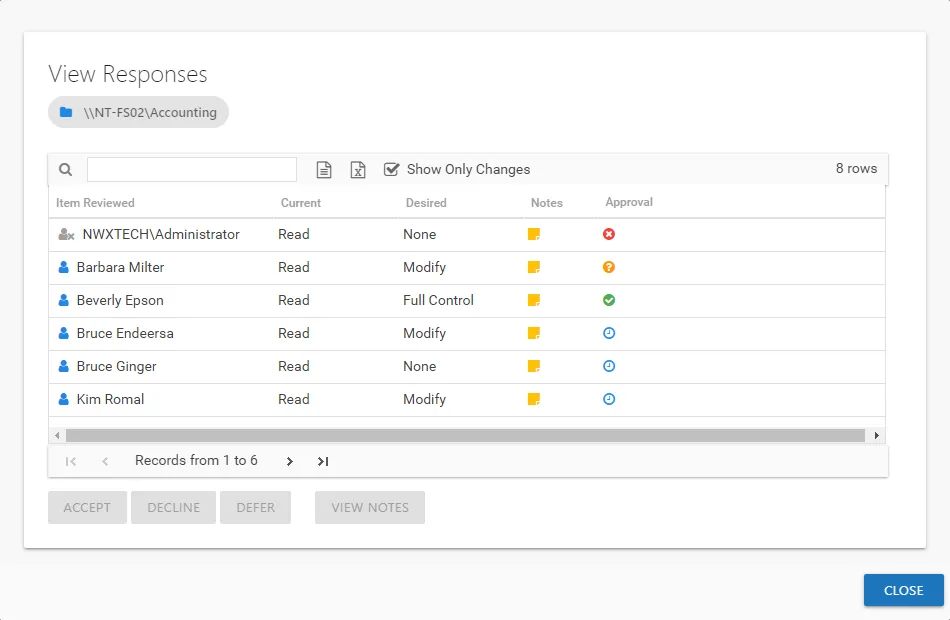
Step 3 – By default, the table displays only the recommended changes. Select an item and click the desired action button: Accept, Decline, or Defer. The Approval column icon updates. See the View Responses Window topic for additional information.
Step 4 – Repeat Step 3 until all changes have been processed. Then click Close. The View Responses window closes.
Step 5 – Repeat Steps 2-4 for each resource included in the review.
Step 6 – Remediation of the accepted changes can be done one of two ways:
- Automatic — If the Access Information Center has been configured to commit AD changes, accepted changes were implemented if the prerequisites were met. If this was a Sensitive Data review, you may need to export the approved changes and send those to your IT department. See the Automation Prerequisites topic for additional information.
- Manual — Accepted changes must be implemented outside of the application by your IT department. Use the Export Excel or Export CSV buttons to generate and download an export of accepted changes.
Step 7 – When remediation is complete, return to the Mange Reviews page (click on the breadcrumb). Select the review in the list and click Mark Completed.
The review remains marked as Completed until the next instance is started.
Batch Processing
Follow the steps to perform a batch processing of a resource owner's recommended changes.
CAUTION: If the Access Information Center has been configured to commit changes to Active Directory and the automation prerequisites have been met for this type of review, this change will be committed when the review is complete.
Step 1 – On the Manage Reviews page, select a review and click View Details. The Review Details page opens.
Step 2 – Select a resource in the list and open the Process Changes drop-down menu. You can also select multiple resources in the list to be processed at once using the Ctrl and Shift key and click combinations.
Remember, the Resource Audit button opens the Resource Audit interface filtered to that resource's reports. This is where you can conduct change modeling.
Step 3 – Select the desired action for all recommended changes: Accept, Decline, or Defer.
Remember, all recommended changes for the selected resource will be processed with the same resolution.
Step 4 – Repeat Steps 2-3 for each resource included in the review.
Step 5 – Remediation of the accepted changes can be done one of two ways:
- Automatic — If the Access Information Center has been configured to commit AD changes, accepted changes were implemented if the prerequisites were met. If this was a Sensitive Data review, you may need to export the approved changes and send those to your IT department. See the Automation Prerequisites topic for additional information.
- Manual — Accepted changes must be implemented outside of the application by your IT department. Use the Export Excel or Export CSV buttons to generate and download an export of accepted changes.
Step 6 – When remediation is complete, return to the Mange Reviews page (click on the breadcrumb). Select the review in the list and click Mark Completed.
The review remains marked as Completed until the next instance is started.
Resource Reviewed Email
If the Notify review creator when resources are reviewed option is selected for a review, the review creator receives an email notification when the resource owner submits their response for each resource included in the review.
This option can be selected by an Administrator or Security Team user when creating a new review with the Create Review Wizard, or when creating a new review instance using the Run Again option. You can also select the option for a pending review using the Edit Review wizard. See the Create Review Wizard and Edit Review Wizard topics for additional information.
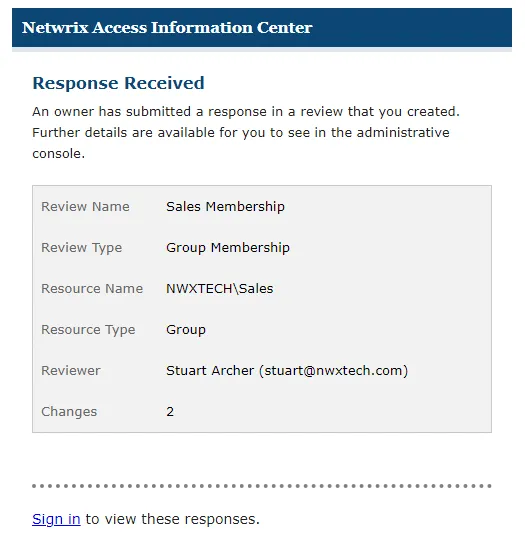
The email includes information about the review and the number of changes that have been submitted by the resource owner. Sign in to see the response and process the review. See the Approval Process topic for additional information.
Perform an Access Review
An Access review can be conducted for various types of data repository resources. Follow the steps to perform an Access review.
Step 1 – On the Pending Reviews page, select the resource with a pending Access review and click Begin Review. The Resource Review page opens to the 1 Make changes tab.
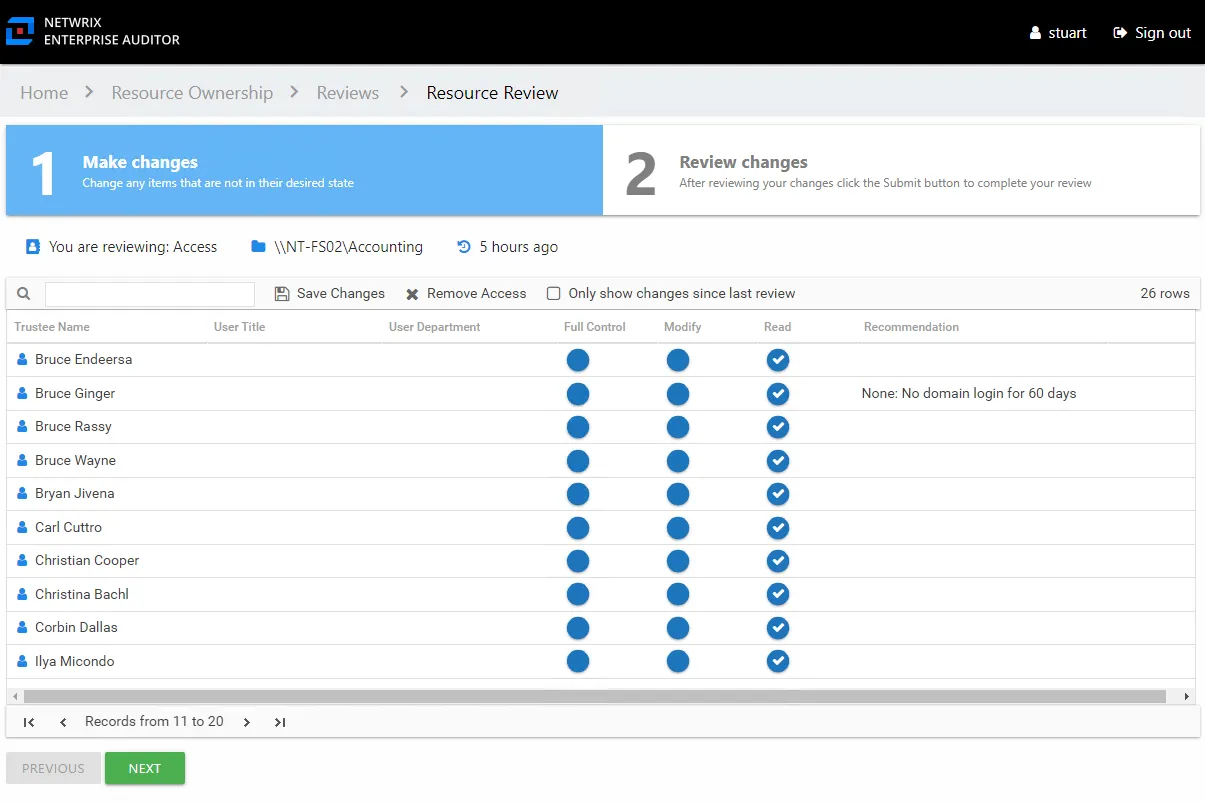
The table displays access information for the resource being reviewed:
- Trustee Name — Name of the trustee with access to this resource. If the trustee is a group, click the hyperlink to open the Group Membership window. See the Group Membership Window topic for additional information.
- User Title — Trustee's title as read from Active Directory
- User Department — Trustee's department as read from Active Directory
- User E-mail — Trustee's email address as read from Active Directory
- User Employee ID — Trustee's employee ID as read from Active Directory
- User Manager — Trustee's manager as read from Active Directory
- Access Level (Full Control, Modify, and Read) columns — Blue checkmark icon indicates current access level
- Recommendation — Any information known to the Access Information Center that might be helpful during this review is listed in this column
Step 2 – Recommend access changes for a trustee by clicking the icon for the desired access level (Full Control, Modify, or Read columns). A yellow checkmark icon indicates the new level of access you are recommending.
Step 3 – Recommend removing access by selecting one or more trustees and clicking the Remove Access button or by clicking on a checkmark icon. A blank yellow icon indicates you are recommending all access be removed; it appears in the column for the current level of access.
Remember, at any time you can save your recommendations and exit the review. It will remain pending until you submit all recommendations for this resource.
Step 4 – When the recommended changes are set as desired, click Next. The 2 Review changes tab opens in the Resource Review page.
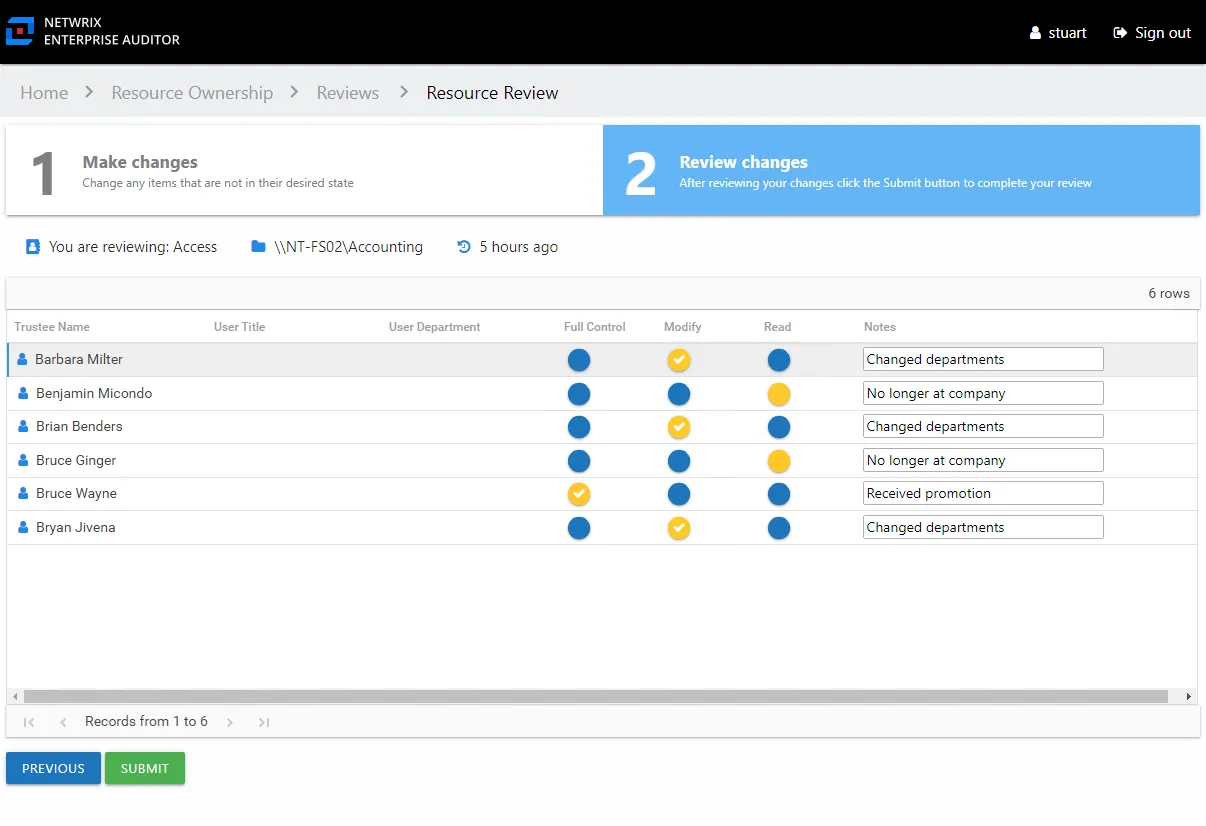
Step 5 – This tab displays a filtered table of trustees with recommended changes. Confirm your recommendations and optionally add notes to the Review Administrator. Owners are encouraged to leave notes explaining why the change is recommended.
NOTE: To make changes to your recommendations, you must return to the first tab. Click Previous.
Step 6 – When all recommendations are confirmed and the desire notes added, click Submit. A message displays stating that the review is complete. Click OK to close the message window.
The review for this resource is now complete. You will be redirected to the Pending Reviews page. Your recommended changes have been sent to the Review Administrator for approval and processing.
Perform a Membership Review
A Membership review is an evaluation of group membership. Follow the steps to perform a Membership review.
Step 1 – On the Pending Reviews page, select the resource with a pending Membership review and click Begin Review. The Resource Review page opens to the 1 Make changes tab.

The table displays membership information for the group being reviewed:
- Trustee Name — Name of the trustee with group membership. If the trustee is a group, click the hyperlink to open the Group Membership window. See the Group Membership Window topic for additional information.
- User Title — Trustee's title as read from Active Directory
- User Department — Trustee's department as read from Active Directory
- User E-mail — Trustee's email address as read from Active Directory
- User Employee ID — Trustee's employee ID as read from Active Directory
- User Manager — Trustee's manager as read from Active Directory
- Description — Trustee's description as read from Active Directory
- Member — Blue checkmark icon indicates current membership
- Recommendation — Any information known to the Access Information Center that might be helpful during this review is listed in this column
Step 2 – Recommend removing membership by selecting one or more trustees and clicking the Remove Access button or by clicking on a checkmark icon. A blank yellow icon indicates you are recommending the trustee be removed from the group.
Remember, at any time you can save your recommendations and exit the review. It will remain pending until you submit all recommendations for this resource.
Step 3 – When the recommended changes are set as desired, click Next. The 2 Review changes tab opens in the Resource Review page.
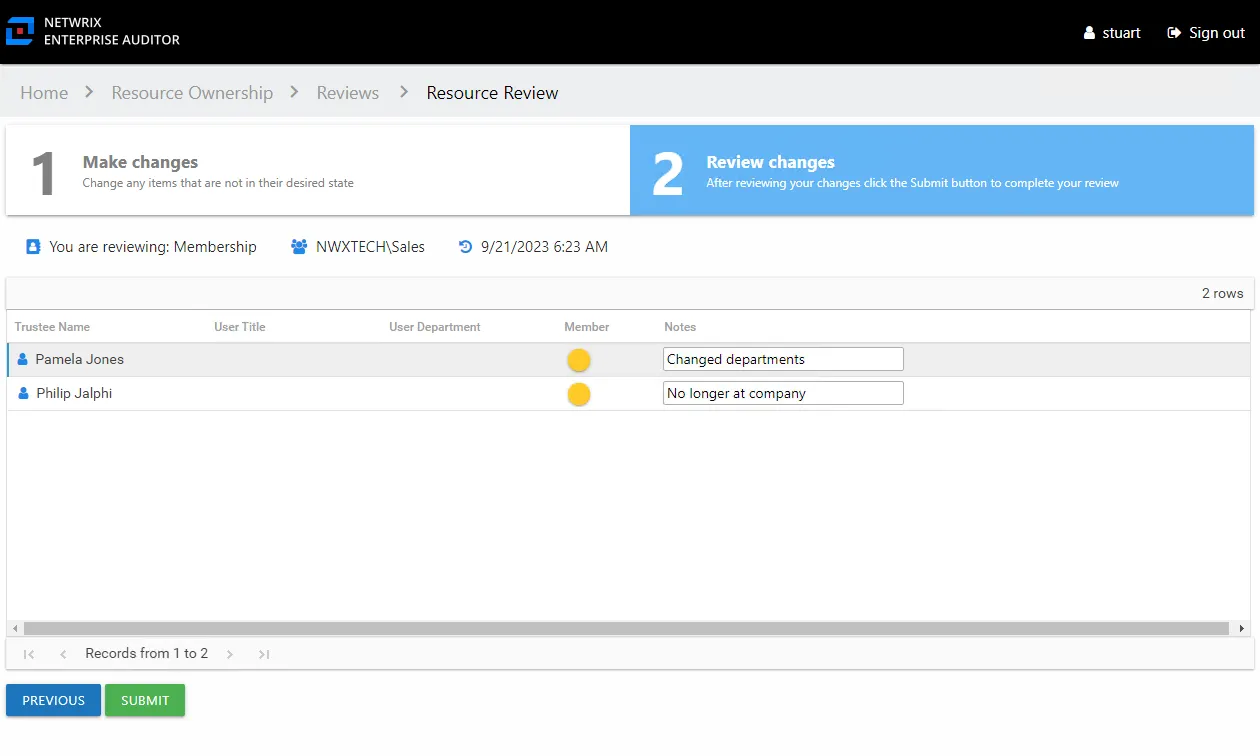
Step 4 – This tab displays a filtered table of trustees with recommended changes. Confirm your recommendations and optionally add notes to the Review Administrator. Owners are encouraged to leave notes explaining why the change is recommended.
NOTE: To make changes to your recommendations, you must return to the first tab. Click Previous.
Step 5 – When all recommendations are confirmed and the desire notes added, click Submit. A message displays stating that the review is complete. Click OK to close the message window.
The review for this resource is now complete. You will be redirected to the Pending Reviews page. Your recommended changes have been sent to the Review Administrator for approval and processing.
Perform a Permissions Review
A Permissions review can be conducted for various types of data repository resources. Follow the steps to perform a Permissions review.
Step 1 – On the Pending Reviews page, select the resource with a pending Permissions review and click Begin Review. The Resource Review page opens to the 1 Make Changes tab.
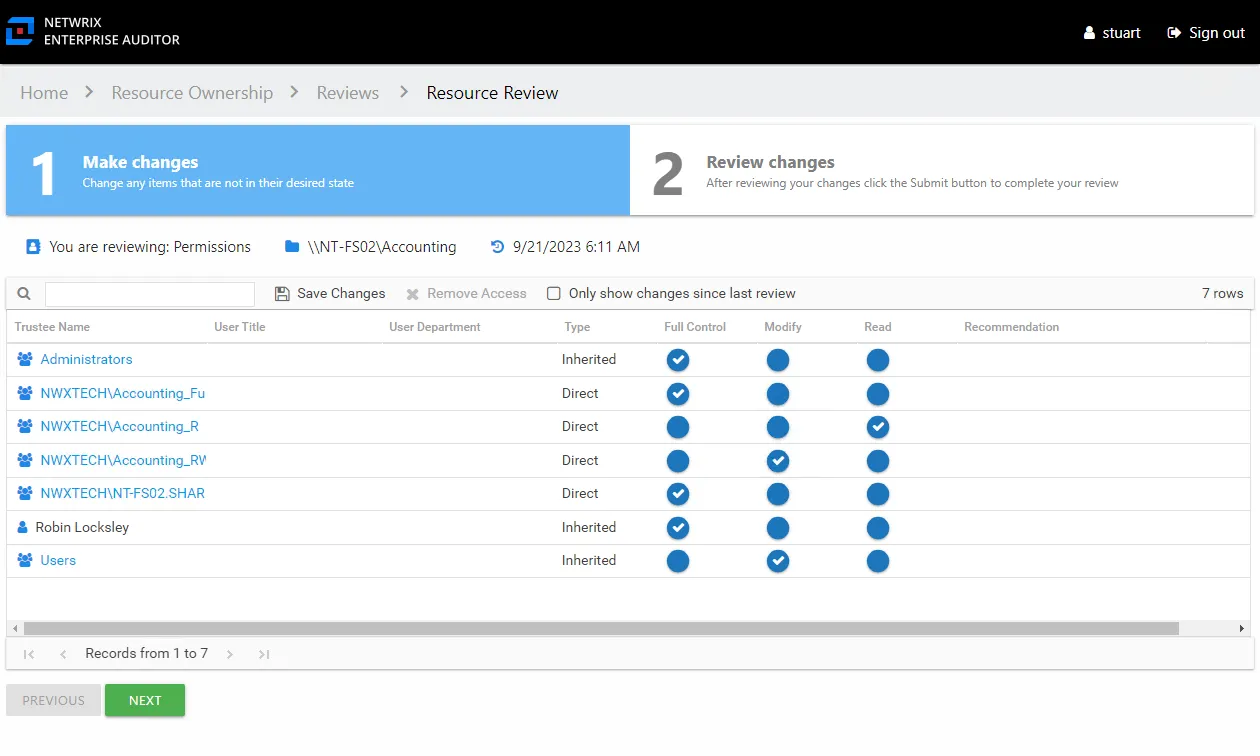
The table displays permission information for the resource being reviewed:
- Trustee Name — Name of the trustee. If the trustee is a group, click the hyperlink to open the Group Membership window. See the Group Membership Window topic for additional information.
- User Title — Trustee's title as read from Active Directory
- User Department — Trustee's department as read from Active Directory
- User E-mail — Trustee's email address as read from Active Directory
- User Employee ID — Trustee's employee ID as read from Active Directory
- User Manager — Trustee's manager as read from Active Directory
- Description — Trustee's description as read from Active Directory
- Managed By — Account that controls permissions on the trustee or group object
- Type — Indicates if the permission is inherited or directly applied
- Permission Level (Full Control, Modify, and Read) columns — Blue checkmark icon indicates current permission level
- Recommendation column — Any information known to the Access Information Center that might be helpful during this review is listed in this column
Step 2 – Recommend permission changes for a trustee by clicking the icon for the desired permission level (Full Control, Modify, or Read columns). A yellow checkmark icon indicates the new level of permission you are recommending.
Step 3 – Recommend removing permissions by selecting one or more trustees and clicking the Remove Access button or by clicking on a checkmark icon. A blank yellow icon indicates you are recommending all permissions be removed; it appears in the column for the current level of access.
Remember, at any time you can save your recommendations and exit the review. It will remain pending until you submit all recommendations for this resource.
Step 4 – When the recommended changes are set as desired, click Next. The 2 Review changes tab opens in the Resource Review page.
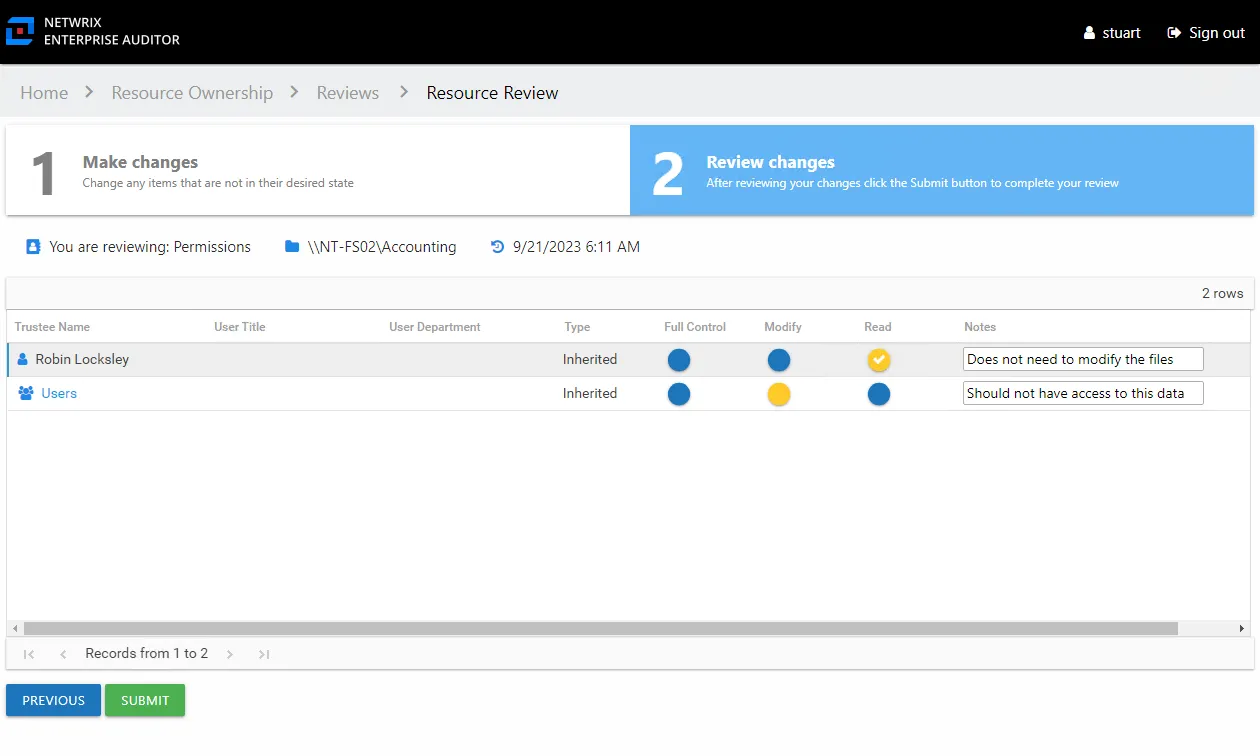
Step 5 – This tab displays a filtered table of trustees with recommended changes. Confirm your recommendations and optionally add notes to the Review Administrator. Owners are encouraged to leave notes explaining why the change is recommended.
NOTE: To make changes to your recommendations, you must return to the first tab. Click Previous.
Step 6 – When all recommendations are confirmed and the desire notes added, click Submit. A message displays stating that the review is complete. Click OK to close the message window.
The review for this resource is now complete. You will be redirected to the Pending Reviews page. Your recommended changes have been sent to the Review Administrator for approval and processing.
Perform a Sensitive Data Review
A Sensitive Data review can be conducted for various types of data repository resources. Follow the steps to perform a Sensitive Data review.
Step 1 – On the Pending Reviews page, select the resource with a pending Sensitive Data review and click Begin Review. The Resource Review page opens to the 1 Make Changes tab.
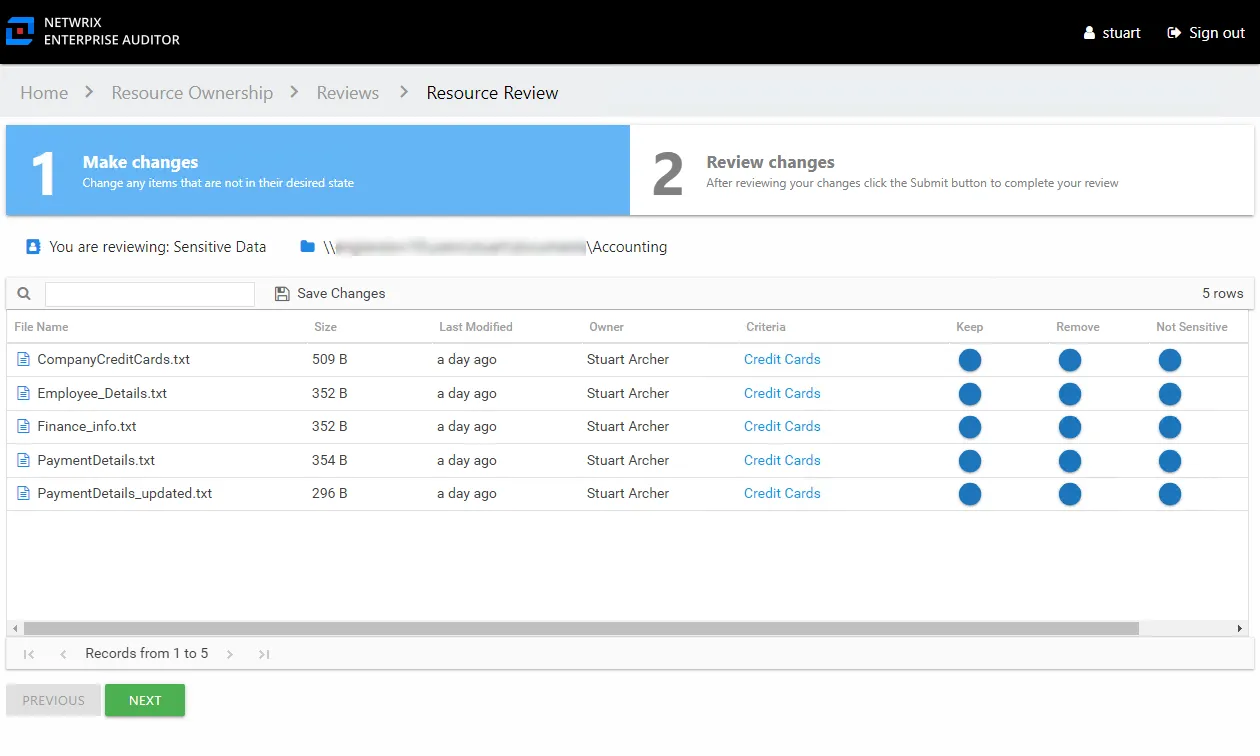
The table displays files where potentially sensitive data has been found on the resource being reviewed:
- File Name – Name of file with extension
- Size – Size of the file
- Last Modified – Last modified date timestamp of the file from scanned the file details
- Owner – Owner of the file from scanned the file details
- Criteria – Name of the criteria with match hits found within the file. The hyperlink opens the Criteria Matches window. See the Criteria Matches Window topic for additional information.
Step 2 – For each file listed, make a recommendation by clicking on the icon in either the Keep, Remove, or Not Sensitive column. Your selection is indicated by a yellow checkmark.
- Keep – Recommend no action should be taken
- Remove – Recommend that the file should be removed from the resource
- Not Sensitive – Recommend that the file does not contain sensitive data for the designated criteria
Remember, at any time you can save your recommendations and exit the review. It will remain pending until you submit all recommendations for this resource.
Step 3 – When the recommended changes are set as desired, click Next. The 2 Review changes tab opens in the Resource Review page.
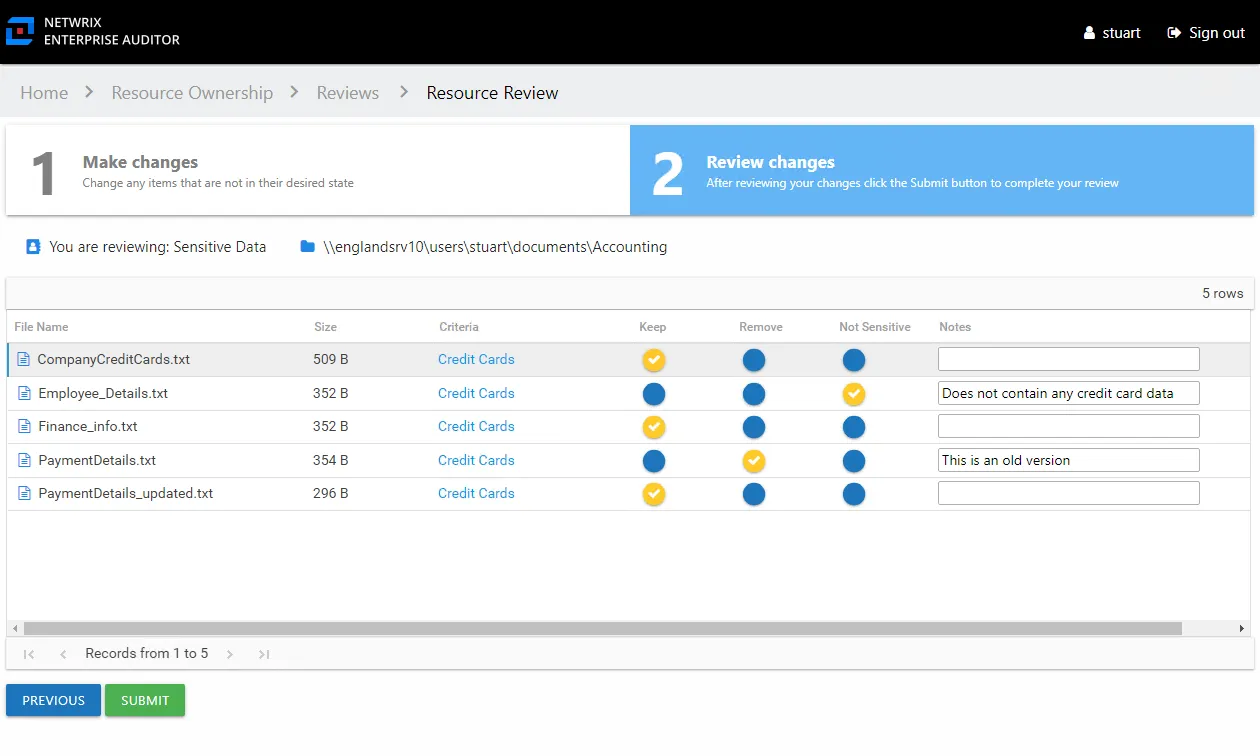
Step 4 – This tab displays the table of files with your recommendations. Confirm your recommendations and optionally add notes to the Review Administrator. Owners are encouraged to leave notes explaining why the change is recommended.
NOTE: To make changes to your recommendations, you must return to the first tab. Click Previous.
Step 5 – When all recommendations are confirmed and the desire notes added, click Submit. A message displays stating that the review is complete. Click OK to close the message window.
The review for this resource is now complete. You will be redirected to the Pending Reviews page. Your recommended changes have been sent to the Review Administrator for approval and processing.