Creating an Application and Attributes in Okta
Create an Access Analyzer Application in Okta Using the WS-Fed Template
Follow the steps to create an Access Analyzer Application in Okta Using the WS-Fed Template:
Step 1 – Log in to Okta.
Step 2 – In the left-pane menu, expand Applications and then click Applications.
Step 3 – Click Create App Integration.
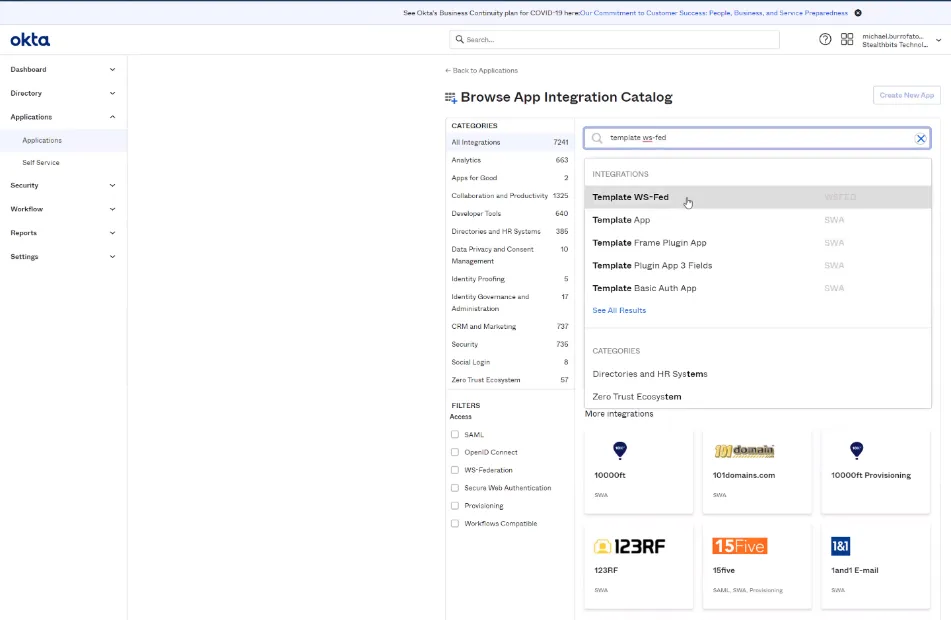
Step 4 – Browse the App Integration Catalog and select Template WS-Fed.
Step 5 – Click Create. Name the application Access Analyzer.
Retrieve the Values to Paste into the Access Analyzer WebServer.exe.config File
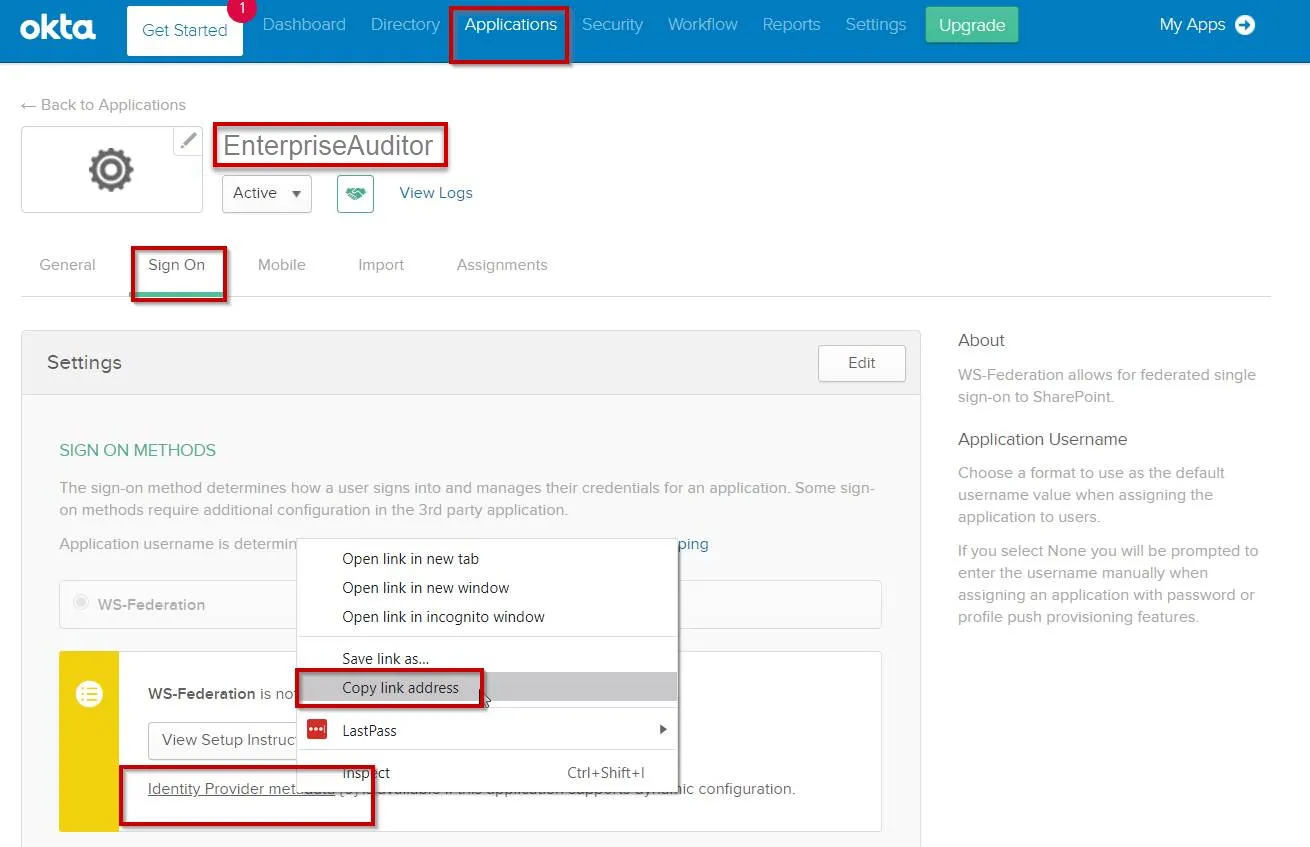
Step 1 – In the Access Analyzer application, click the Sign On tab.
Step 2 – Right click on the Identity Provider metadata link and select Copy Link Address to get the value for the WSFederationMetadata URL.
Step 3 – Click on the General tab to copy the value for the Realm. This value will be unique per tenant.
https://www.okta.com/<YOURVALUEHERE>
Step 4 – Construct the ReplytoURL using the FQDN of your Access Analyzer server:
https://FQDNofaccessanalyzerserver.com:8082/federation
Edit the WebServer.exe.config File
Follow the steps to edit the WebServer.exe.config file:
Step 1 – Open the WebServer.exe.config file with a text editor, such as Notepad++. It is located in the Web folder within the Access Analyzer installation.
Step 2 – Change the value for the BindingUrl parameter from http to https:
<add key="BindingUrl" value="https://+:8082" />
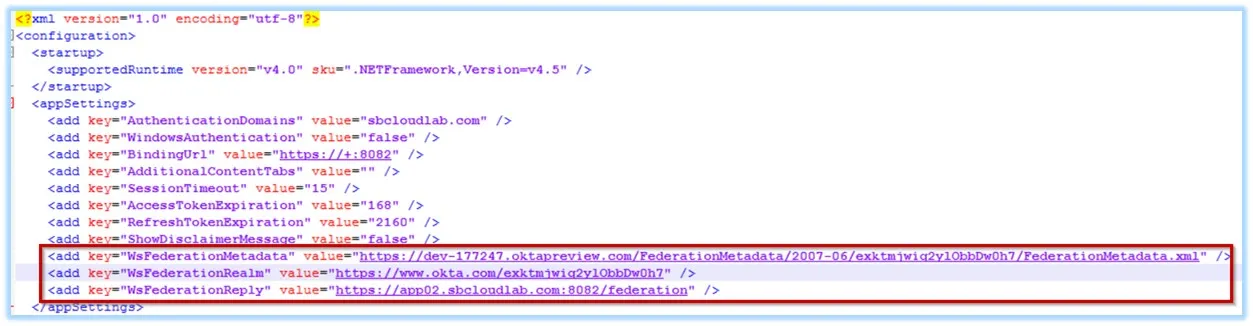
Step 3 – Update the following values in the WebServer.exe.config file with the values retrieved from the Access Analyzer Okta application.
CAUTION: These values are case sensitive. The values used here must match the values in the Access Analyzer Okta application.
-
WSFederationMetadata– Paste the copied link address into the WebServer.exe.config file as:<add key="WsFederationMetadata" value="INSERT URL HERE" /> -
WSFederationRealm– Paste the value for the Realm into the WebServer.exe.config file as:<add key="WsFederationRealm" value="INSERT URL HERE" /> -
WSFederationReply– Enter the value for the WSFederationReply based on the FQDN of the Access Analyzer server and port into the Webserver.exe.config file as:<add key="WsFederationMetadata" value="INSERT URL HERE" />
Step 4 – Restart the Access Analyzer Web Server.
Configure the App Settings for the StealthAUDIT Application
Step 1 – In the Access Analyzer application, navigate to the General Tab and click Edit to populate the following fields.
-
Web Application URL – This value should follow this format:
https://<FQDNofaccessanalyzerserver.com>:8082/ -
Realm – This value is unique per tenant and should follow this format:
https://www.okta.com/<YOURVALUEHERE> -
Audience Restriction – This value should match the value for the Realm
-
ReplyToURL – Enter the value from the WSFederationReply setting from the Webserver.exe.config file
https://FQDNofaccessanalyzerserver.com:8082/federation
-
Custom Attribute Statement – This value must match the following format, including case and bold areas:
http://schemas.microsoft.com/ws/2008/06/identity/claims/windowsaccountname|${user.__samaccountname__}|, http://schemas.xmlsoap.org/ws/2005/05/identity/claims/sid|${user.__SID__}|,http://schemas.xmlsoap.org/ws/2005/05/identity/claims/upn|${user.__upn__}|
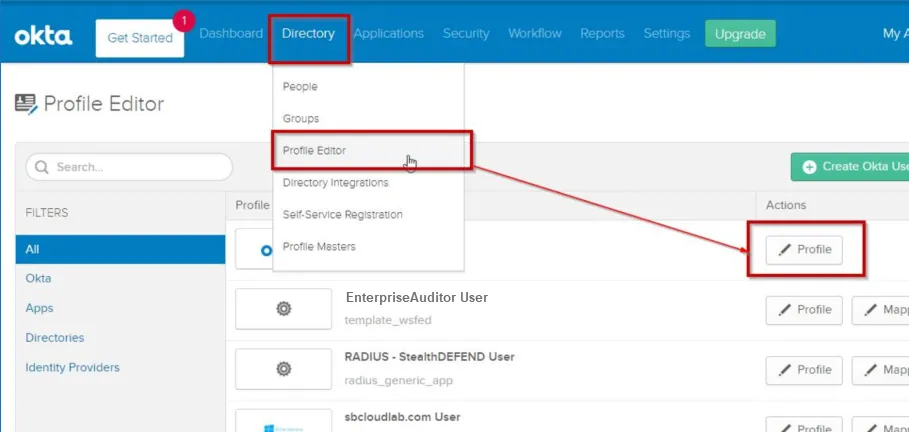
Step 2 – Navigate to the Directory menu and select Profile Editor from the drop-down menu. Click the Edit Profile button for the Access Analyzer application.

Step 3 – Click Add Attribute to open the Add Attribute window.
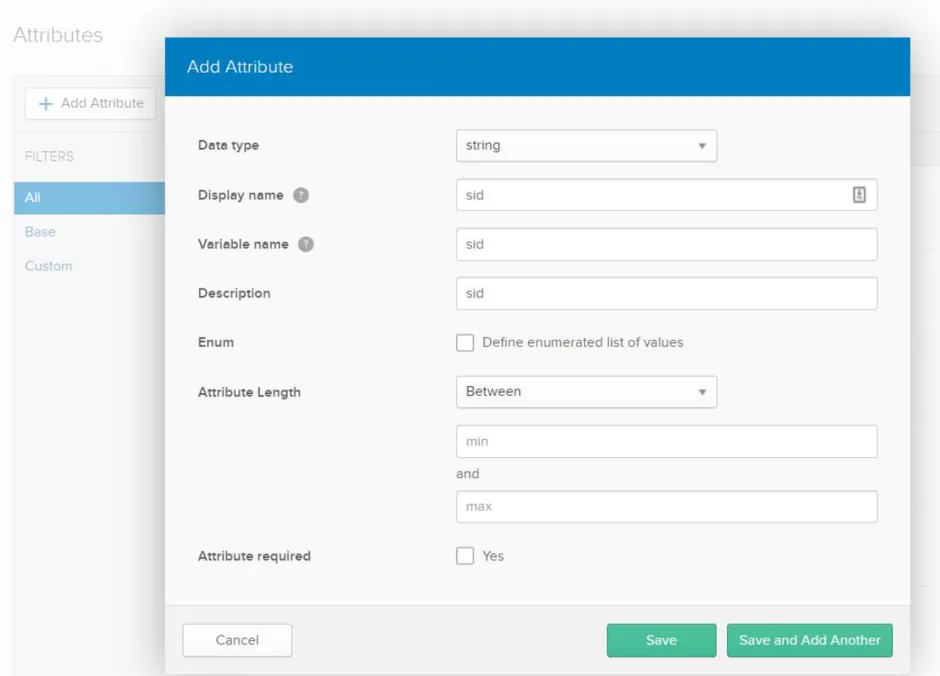
Step 4 – In the Add Attribute window, add the following attributes:
- Username
- SID
- samaccountname
- upn
- department
NOTE: The case of the attributes in bold must match the case used in the custom attribute.
Click Save to save the attribute details and close the Add Attribute window. To add another attribute, click Save and Add Another.
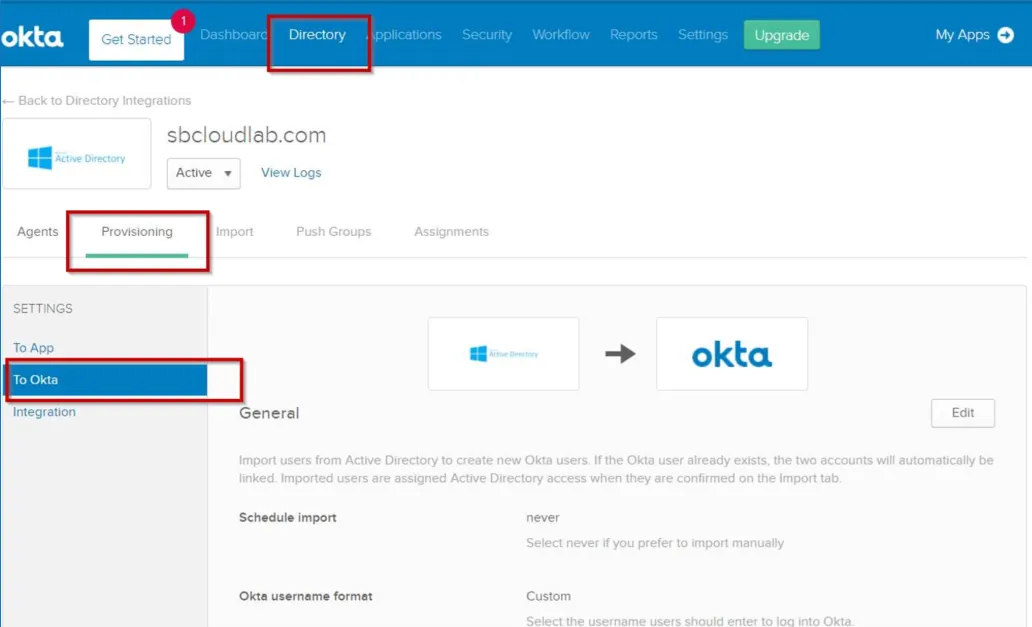
Step 5 – Navigate to the Directory menu and click on the Provisioning tab. Click To Okta.

Step 6 – Locate and map the attributes that were added for the profile by clicking the Pencil icon to edit attributes. To locate the attributes, scroll down and select Show Unmapped Attributes.

Step 7 – Click the pencil icon for SID, upn, and samAccountName to map the attributes. They will display in the mapped section.
Step 8 – Click Save and return to the Okta Attribute Mappings page.

Step 9 – On the Okta Attribute Mappings page, click Force Sync. The new attributes will display for any user under the profile.
To configure Okta Multi-Factor Authentication, see the Setting Up Multi-Factor Authentication topic for additional information.
Setting Up Multi-Factor Authentication
Follow the steps to configure multi-factor-authentication for Access Analyzer:

Step 1 – Navigate to the Sign On Policy page and click Add Rule. The App Sign On Rule opens. Configure the following options:
- Rule Name – Name of the rule
- Conditions – Select whether the rule applies to either the Users assigned to this app or The following groups and users.

Step 2 – Scroll down to the Access section. Check the Prompt for factor box and select Every Sign On. Click Save.
Multi-Factor Authentication is now configured for Access Analyzer.