AzureADInventory: Custom Attributes
Use the Custom Attributes wizard page to define custom attributes that will be used in the Microsoft Entra ID scan.
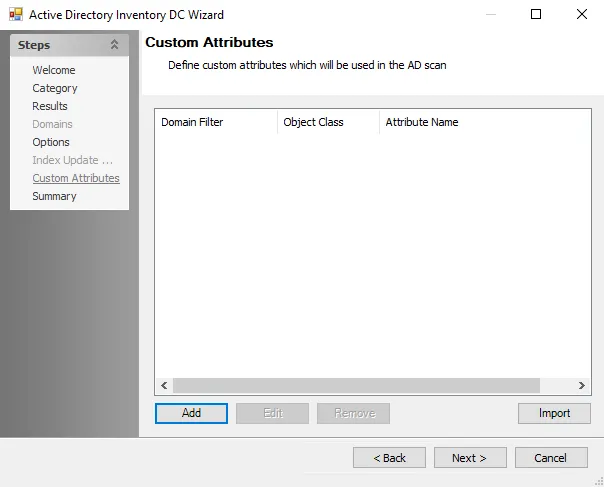
Configuration options for Custom Attributes include:
-
Collect Open Extensions – If enabled, data collector will perform a full scan and collect all extension attributes for Microsoft Entra ID objects
- Enabling this option will increase the time it takes for the data collector to complete the scan. Disabling this option will configure the data collector run a differential scan, which will only scan changes since the last scan was performed.
CAUTION: A full scan is required when new attributes are added or removed.
-
Add – Adds a manually entered attribute that is included in the scan. This option opens the Custom Attribute window.
-
Edit – Make changes to a previously added attribute. This option opens the Custom Attribute window.
-
Remove – Deletes the attribute from the table and therefore the scan
-
Import – Use the Azure Connection Profile credentials or manually inputted credentials to import custom attributes for the scan using a valid tenant name. This option opens up the Custom Attributes Import Wizard.
Use the Add, Edit, and Remove buttons at the bottom of the window to configure the custom attributes to be gathered by the scan. Use the Add button to open the Custom Attribute Window. The Import button opens the Custom Attributes Import Wizard.
Custom Attribute Window
Input custom attributes from Microsoft Entra ID environments using the Custom Attribute pop-up window.

The options on the Custom Attributes window are:
- Tenant Filter – Use a Tenant Name or wildcard to target the desired environment. Wildcards (*) can be used.
- Object Class – One or more object class for the attribute can be selected:
- User
- Group
- Contact
- Attribute Name – Microsoft Entra ID attribute name
- Collect all sub-attributes – Allows the collection of sub-attributes
- Sub-Attribute Name – Define the sub-attribute name. Wildcards (*) can be used.
Repeat this process until all desired Custom Attributes have been included. Click OK to save the attribute.
Custom Attributes Import Wizard
The Custom Attributes Import wizard adds a list of custom schema and application attributes from the targeted tenant environment into the AzureADInventory Data Collector configurations. Follow the steps to use this window:
Step 1 – On the Custom Attributes page of the Entra Inventory DC wizard, click Import. The Custom Attributes Import Wizard opens.
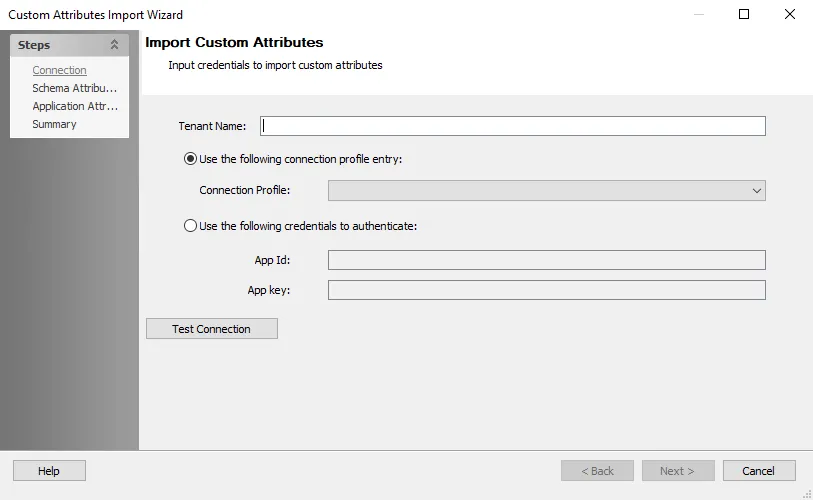
Step 2 – On the Connection page, enter the Tenant Name of the instance of Microsoft Entra ID to be targeted, and then select the method of supplying credentials for the specified tenant instance:
- Use the following connection profile entry – Select an Azure Connection Profile from the dropdown list
- Use the following credentials to authenticate – Enter the credentials to use
- App Id –Client ID
- App key – Client Secret Key
RECOMMENDED: Add a valid Azure Connection Profile to the Jobs > .Entra ID Inventory > Settings > Connection settings as a user defined profile. This ensures the connection profile displays in the dropdown menu.
See the Microsoft Entra ID Auditing Configuration or the Microsoft Entra ID Connection Profile & Host List topics for additional information.
Step 3 – Click Test Connection in order to connect to the tenant with the supplied credentials. If they are correct, the Schema Attributes and Application Attributes pages become available. Click Next to navigate to them.
 | |
| Schema Extended Attributes page | Application Extended Attributes page |
Step 4 – On the Schema and Application Attributes pages, the wizard populates with the available attributes from the Azure tenant. Expand the object classes and select the checkboxes next to the required attributes to import the custom attributes. Click Next to continue.
- Load More – Adds additional object classes from the Microsoft Entra ID tenant environment that are not located in the current list
- Refresh Nodes – Wipes selections from all object class folders
Step 5 – On the Summary page, review your selections and click Finish.
The selected attributes display on the Custom Attributes page of the Entra ID Inventory DC wizard.