Configure Network
Activity Monitor requires two communication channels for ONTAP monitoring:
- ONTAP API – Activity Monitor Agent connects to ONTAP on port 80 (http) or 443 (https) for access to ONTAP API (ONTAPI/ZAPI or REST API).
- FPolicy – Data LIFs of the SVM connect to Activity Monitor Agent on port 9999 for FPolicy notifications.
The following sections discuss network configuration required to enable API and FPolicy communication.
ONTAP API
The ONTAP API access is mandatory; without the API access the agent will not be able to receive and translate events from FPolicy. The agent uses the API to retrieve information about the SVM: CIFS settings, list of volumes, list of LIFs. Depending on the configuration, the agent can also retrieve the state of FPolicy to ensure it is enabled; configure FPolicy and register or unregister itself.
The API access is needed either through the SVM's LIF or through the cluster management LIF with vserver tunneling feature. If you want to use the vserver tunneling feature, specify the cluster management LIF's address in the "Management LIF" parameter in the host's settings in the Activity Monitor.
Both classic ONTAPI/ZAPI and the new REST API are supported. Starting with ONTAP 9.13.1, the product uses REST API by default if it is available. HTTP and HTTPS protocols are supported. For HTTPS, two modes are supported: strict and ignore errors. For the strict mode, the product allows you to disable the host name validation in case the agent cannot resolve the FQDN of the LIF.
Enabling the API access varies depending on ONTAP version. The following sections list common steps on enabling the API access. Please refer to the NetApp documentation for more details.
Management-http Service
Starting with ONTAP 9.6, data LIFs used for HTTPS communication with the Activity Monitor are
required to use a service policy that includes the management-https service. This service enables
HTTPS access to the LIF.
The following examples offer guidance for managing service policies, but may vary depending on the NetApp environment’s specific configuration and needs.
Step 1 – Display LIFs of the SVM. Take note of the service policy name used by the LIF you want to be used for API access.
network interface show -vserver [SVM] -instance
Step 2 – Check the services included in the SVM service policy
network interface service-policy show -policy [POLICY_NAME]
Step 3 – Add the management-https service if it is missing
set -privilege advanced
network interface service-policy add-service -service management-https -policy [POLICY_NAME] -vserver [SVM]
Example:
set -privilege advanced
network interface service-policy add-service -service management-https -policy default-data-files -vserver testserver
Firewall Policy
For ONTAP 9.5 and older, the following commands can be used to either create a new firewall policy or modify an existing policy if ONTAPI is blocked.
Create New Firewall HTTP Policy
Use the following commands with the Cluster Management LIF to create a new firewall HTTP policy:
system services firewall policy clone ‑policy data ‑vserver [ADMIN_SVM_NAME] ‑destination-policy [FIREWALL_POLICY_NAME] ‑destination-vserver [SVM_NAME]
system services firewall policy create ‑vserver [SVM_NAME] ‑policy [FIREWALL_POLICY_NAME] ‑service http ‑allow-list [IP_ADDRESS]/[NETMASK], [IP_ADDRESS]/[NETMASK]
Example:
system services firewall policy clone ‑policy data ‑vserver myontap ‑destination-policy enterpriseauditorfirewall ‑destination-vserver testserver
system services firewall policy create ‑vserver testserver ‑policy enterpriseauditorfirewall ‑service http ‑allow-list 192.168.30.15/32
Create New Firewall HTTPS Policy
Use the following commands with the Cluster Management LIF to create a new firewall HTTPS policy:
system services firewall policy clone ‑policy data ‑vserver [ADMIN_SVM_NAME] ‑destination-policy [FIREWALL_POLICY_NAME] ‑destination-vserver [SVM_NAME]
system services firewall policy create ‑vserver [SVM_NAME] ‑policy [FIREWALL_POLICY_NAME] ‑service https ‑allow-list [IP_ADDRESS]/[NETMASK], [IP_ADDRESS]/[NETMASK]
Example:
system services firewall policy clone ‑policy data ‑vserver myontap ‑destination-policy enterpriseauditorfirewall ‑destination-vserver testserver
system services firewall policy create ‑vserver testserver ‑policy enterpriseauditorfirewall ‑service https ‑allow-list 192.168.30.15/32
Apply Firewall Policy to SVM Data LIF
Use the following command to modify an existing firewall policy:
network interface modify ‑vserver [SVM_NAME] ‑lif [DATA LIF NAME] ‑firewall-policy [FIREWALL_POLICY_NAME]
Example:
network interface modify ‑vserver testserver ‑lif datal ‑firewall-policy enterpriseauditorfirewall
For more information about creating a firewall policy and assigning it to a LIF, read the Configure firewall policies for LIFs article.
Validate Firewall Policy
Run the following command to validate the firewall policy:
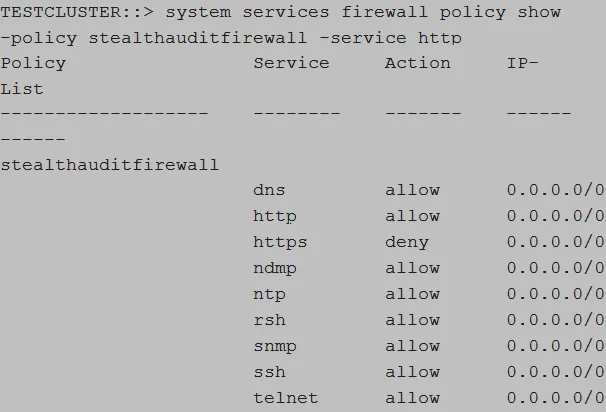
system services firewall policy show ‑policy [FIREWALL_POLICY_NAME] ‑service [HTTP_HTTPS]
Example:
system services firewall policy show ‑policy enterpriseauditorfirewall ‑service http
Verify that the output is displayed as follows:
FPolicy
The FPolicy framework enables the collection of audit events on the ONTAP side and their transfer to the agent(s) via the designated Data LIFs. Each LIF establishes its own connection with one or several agents and sends notifications as soon as the file transaction occurs. The FPolicy connection is asynchronous and buffered; both ONTAP and Activity Monitor have techniques in place to make sure that connections are alive and working. The connection can be secured using TLS with server or mutual authentication.
ONTAP cluster nodes connect to the agent on port 9999 by default. The port can be changed in the agent's settings. The agent adds this port to Windows Firewall exclusions automatically. Please ensure the port is not blocked by other firewalls between ONTAP and the agent.
Data-fpolicy-client Service
Starting with ONTAP 9.8, each data LIF of the SVM must have the data-fpolicy-client service included in its service-policy configuration. This service enables the FPolicy protocol for the LIF. Use the following commands to ensure that the service is included.
Step 1 – Display LIFs of the SVM. Take note of the service policy name used by the data LIFs.
network interface show -vserver [SVM] -instance
Step 2 – Check the services included in the SVM service policy
network interface service-policy show -policy [POLICY_NAME]
Step 3 – Add the data-fpolicy-client service if it is missing
set -privilege advanced
network interface service-policy add-service -service data-fpolicy-client -policy [POLICY_NAME] -vserver [SVM]
Example:
set -privilege advanced
network interface service-policy add-service -service data-fpolicy-client -policy default-data-files -vserver testserver