Validate Setup
Once the Activity Monitor agent is configured to monitor the Dell device, the automated configuration must be validated to ensure events are being monitored.
Validate CEE Registry Key Settings
NOTE: See the Configure Dell Registry Key Settings topic for information on manually setting the registry key.
After the Activity Monitor activity agent has been configured to monitor the Dell device, it will configure the Dell CEE automatically if it is installed on the same server as the agent. This needs to be set manually in the rare situations where it is necessary for the Dell CEE to be installed on a different server than the Windows proxy server(s) where the Activity Monitor activity agent is deployed.
If the monitoring agent is not registering events, validate that the EndPoint is accurately set. Open the Registry Editor (run regedit). For the synchronous real-time delivery mode (AUDIT), use the following steps.
Step 1 – Navigate to the following windows registry key:
HKEY_LOCAL_MACHINE\SOFTWARE\EMC\CEE\CEPP\Audit\Configuration
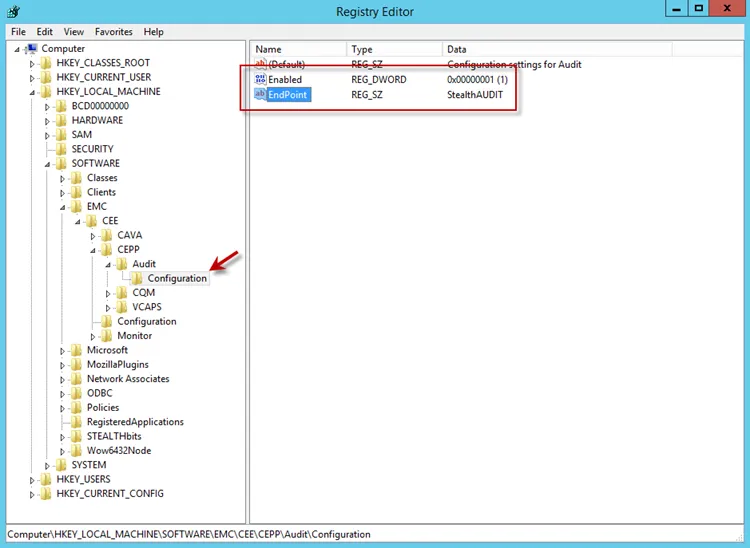
Step 2 – Ensure that the Enabled parameter is set to 1.
Step 3 – Ensure that the EndPoint parameter contains an address string for the Activity Monitor agent in the following formats:
-
For the RPC protocol,
StealthAUDIT@'ip-address-of-the-agent' -
For the HTTP protocol,
StealthAUDIT@http://'ip-address-of-the-agent':'port'
NOTE: All protocol strings are case sensitive. The EndPoint parameter may also contain values for other applications, separated with semicolons.
Step 4 – If you changed any of the settings, restart the CEE Monitor service.
For Asynchronous Bulk Delivery Mode
For the asynchronous bulk delivery mode with a cadence based on a time period or a number of events (VCAPS), use the following steps.
Step 1 – Navigate to the following windows registry key:
HKEY_LOCAL_MACHINE\SOFTWARE\EMC\CEE\CEPP\VCAPS\Configuration
Step 2 – Ensure that the Enabled parameter is set to 1.
Step 3 – Ensure that the EndPoint parameter contains an address string for the Activity Monitor agent in the following formats:
- For the RPC protocol,
StealthVCAPS@'ip-address-of-the-agent' - For the HTTP protocol,
StealthVCAPS@http://'ip-address-of-the-agent':'port'
NOTE: All protocol strings are case sensitive. The EndPoint parameter may also contain values for other applications, separated with semicolons.
Step 4 – Ensure that the FeedInterval parameter is set to a value between 60 and 600; the MaxEventsPerFeed - between 10 and 10000.
Step 5 – If you changed any of the settings, restart the CEE Monitor service.
Set the following values under the Data column:
- Enabled – 1
- EndPoint – StealthAUDIT
If this is configured correctly, validate that the Dell CEE services are running. See the Validate Dell CEE Services are Running topic for additional information.
Validate Dell CEE Services are Running
After the Activity Monitor Activity Agent has been configured to monitor the Dell device, the Dell
CEE services should be running. If the Activity Agent is not registering events and the EndPoint is
set accurately, validate that the Dell CEE services are running. Open the Services (run
services.msc).
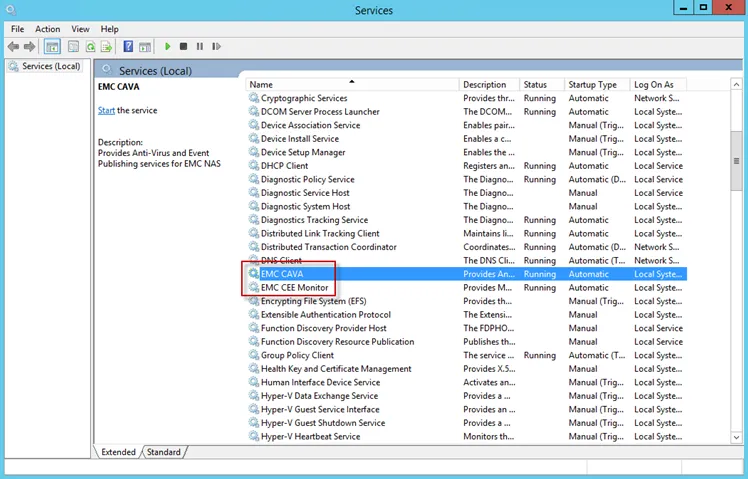
The following services laid down by the Dell CEE installer should have Running as their status:
- Dell CAVA
- Dell CEE Monitor
CEE Debug Logs
If an issue arises with communication between the Dell CEE and the Activity Monitor, the debug logs need to be enabled for troubleshooting purposes. Follow the steps.
Step 6 – In the Activity Monitor Console, change the Trace level value in the lower right corner to Trace.
Step 7 – In the Activity Monitor Console, select all Dell hosts from the Monitored Hosts list and Disable monitoring.
Step 8 – Download and install the Debug View tool from Microsoft on the CEE server:
http://docs.microsoft.com/en-us/sysinternals/downloads/debugview
Step 9 – Open the Registry Editor (run regedit). Navigate to following location:
HKEY_LOCAL_MACHINE\SOFTWARE\EMC\CEE\Configuration
Step 10 – Right-click on Debug and select Modify. The Edit DWORD Value window opens. In the Value data field, enter the value of 3F. Click OK, and the Edit DWORD Value window closes.
NOTE: If the Debug DWORD Value does not exist, it needs to be added.
Step 11 – Right-click on Verbose and select Modify. The Edit DWORD Value window opens. In the Value data field, enter the value of 3F. Click OK, and the Edit DWORD Value window closes.
NOTE: If the Verbose DWORD Value does not exist, it needs to be added.
Step 12 – Run the Debug View tool (from Microsoft). In the Capture menu, select the following:
- Capture Win32
- Capture Global Win32
- Capture Events
Step 13 – In the Activity Monitor Console, select all Dell hosts from the Monitored Hosts list and Enable monitoring.
Step 14 – Generate some file activity on the Dell device. Save the Debug View Log to a file.
Step 15 – Send the following logs to Netwrix Support:
- Debug View Log (from Dell Debug View tool)
- Use the Collect Logs button to collect debug logs from the activity agent
RECOMMENDED: After the logs have been gathered and sent to Netwrix Support, reset these configurations.