EWSMailbox: Category
The Category page identifies which type of EWSMailbox information is retrieved during the scan.
Identify the EWS mailbox information type using the following options:
-
Mailbox contents
- MailboxContent – Scan contents of mailboxes
-
Mailbox permissions
- MailboxPermissions – Scan permissions of mailboxes
-
Sensitive Data
- SDDScan – Scan mailboxes for sensitive data
-
Mailbox search
- MailboxSearchMailboxes – Search for mailboxes containing messages
- MailboxSearchFolders – Search for folders containing messages
- MailboxSearchMessages – Search for messages
EWSMailbox: Criteria
The Select DLP criteria for this scan page is where to select the criteria to use for the sensitive data scan are selected. It is a wizard page for the Sensitive Data category.
This page requires the Sensitive Data Discovery Add-On to be been installed on the Enterprise Auditor Console to define the criteria and enable the Criteria Editor. See the Sensitive Data Discovery Add-On Installation topic for additional information.
The options on the Criteria page are:
- Use Global Criterion Selection – Select this option to inherit sensitive data criteria settings from the Settings > Sensitive Data node. See the Sensitive Data topic for additional information.
- Use the following selected criteria – Select this option to use the table to select which sensitive data criteria to scan for
- Select All - Click Select All to enable all sensitive data criteria for scanning
- Clear All - Click Clear All to remove all selections from the table
- Select the checkboxes next to the sensitive data criteria options to enable it to be scanned for during job execution
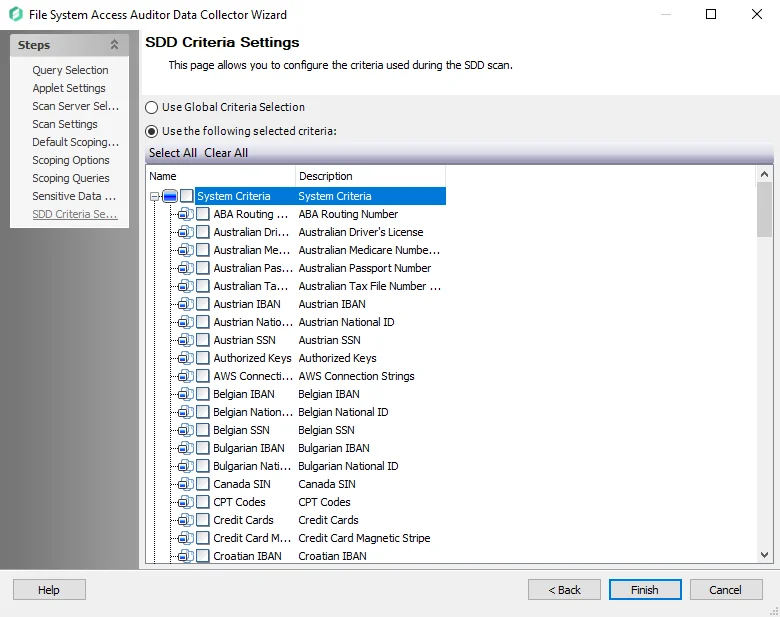
The table contains the following types of criteria:
NOTE: Until the Sensitive Data Discovery Add-On is installed, only the headers for the System Criteria and User Criteria nodes are visible in the table.
-
System Criteria – Lists pre-defined criteria
-
User Criteria – Lists user-defined criteria
Use the Sensitive Data Criteria Editor in Settings > Sensitive Data to create and edit user-defined criteria. See the Sensitive Data Criteria Editor topic for additional information.
EWSMailbox: Filter
The Filter settings page provides options to filter folders and attachments. It is a wizard page for the categories of:
- Mailbox Contents
- Mailbox permissions
- Sensitive data
All folders and attachments are scanned by default. Scope the scan for specific folders and attachments:
- Include Folders – Type the folder paths to filter the scan to specific mailbox folders
- Include Attachments – Type the attachment file names to filter to specific attachments
- Exclude Folders – Type the folder paths to exclude mailbox folders from the scan
- Exclude Attachments – Type the file names for the attachments to exclude attachments from the scan
Use * and ? for matching wildcard and single characters.
- Limit message size to [numerical value] – Select to limit message size and define the threshold for maximum size of a message. The default value is 20000 KB.
- Limit attachments size to [numerical value] – Select to limit attachment size and define a threshold for maximum size of an attachment returned in the scan. The default value is 20000 KB.
EWSMailbox FW: BodyOptions
Use the BodyOptions page to select the size unit of messages.

Select the desired message size unit:
- KB
- MB
- GB
EWSMailbox FW: Folder Conditions
Use the Folder Conditions page to apply folder-related filter criteria to the search.
Customize folder search conditions using the following options:
-
Select conditions – To add it to the search, select any of the following conditions:
- with specific folder type
- with search terms in the folder name
-
Edit Conditions – Click an underlined value, if present, in the Edit Conditions box to modify any of the template conditions
NOTE: The values present depends on the selections made in the Select conditions box.
- Click specific in the Edit conditions box to open the Folder Type Window. See the Folder Type Window topic for additional information.
- Click search terms to open the Search Terms Window. See the Search Terms Window topic for additional information.
Folder Type Window
Use the Folder Type window to determine folder types to search for. The Folder Type window opens if specific is selected in the Edit Conditions box on the Folder Conditions page.

Select the checkbox next to any folder type to include it in the search filter.
Search Terms Window
Use the Search Terms window to determine terms for the search. The Search Terms window opens if search terms is selected in the Edit Conditions box.

Determine terms for the search using the following options:
-
Type the desired term into the upper text box and click Add to add the term to the lower text box, which adds the term to the search
-
Select a term in the lower text box, and click Remove to remove the term from the search
-
Click Clear to clear all terms from the lower box
-
Select the desired qualifier option:
- Contains ALL of the following search terms (And) – Search only returns results containing all of the search terms
- Contains ANY of the following search terms (Or) – Search returns results containing any one or more of the search terms
-
Click Import CSV to open a file explorer window to select an appropriate CSV file containing search terms
EWSMailbox FW: Message Conditions
Use the Message Conditions page to apply filters to the message category part of the search.
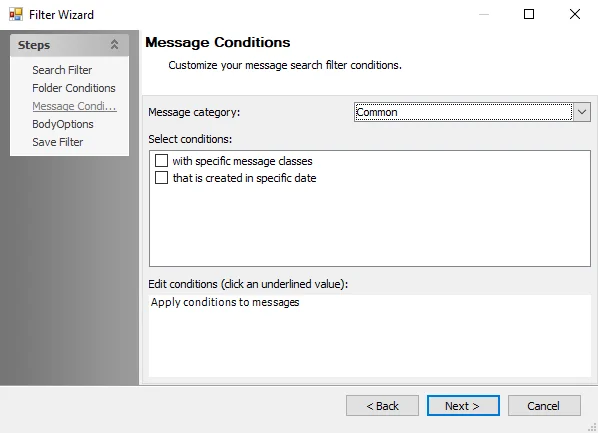
Customize message search filter conditions using the following options:
-
Message category – Select a message category using the dropdown menu from the following:
- Common
- Appointment
- Schedule
- Contact
- Task
- Journal
- Note
- Post
- RSS Feed
- Unified Messaging
-
Select conditions – To add it to the search, select any of the following conditions:
NOTE: The conditions that are available in the Select Conditions box depends on the selected Message category.
- with specific message classes
- that is created in specific date
- with search terms in the subject
- with search terms in the body
- with search terms in the subject or body
- with search terms in the message header
- with search terms in the recipient’s address
- with search terms in the sender’s address
- that has an attachment
- that is received in specific date
- with specific Message ID
- that occurs in specific date
-
Edit Conditions – Click an underlined value, if present, in the Edit Conditions box to modify any of the template conditions
NOTE: The values present depends on the selections made in the Select conditions box.
- Click specific to open the MessageClasses Window. See the MessageClasses Window (Message Conditions) topic for additional information.
- Click in specific date to open the Date Range Selection Window. See the Date Range Selection Window topic for additional information.
- Click search terms to open the Search Terms Window. See the Search Terms Window (Message Conditions) topic for additional information.
- Click has attachment(s) to convert the condition to has no attachment(s) and vice versa
MessageClasses Window (Message Conditions)
Use the MessageClasses window to alter criteria related to message class. The Message Classes window opens if specific is clicked in the Edit Conditions box on the Message Conditions page.

Determine MessageClass-related criteria using the following options:
-
To add a class, click Add
-
Enter the desired Message Class in the corresponding textbox
-
Click Exact Match to reveal a dropdown menu of other search criteria under Matching Strategy and select the preferred option:
- Exact Match
- Starts With
- Contains
-
To remove a message class, select it and click Remove
-
Click Import CSV to open a file explorer window to select an appropriate CSV file containing search terms
Date Range Selection Window
Use the Date Range Selection window to select a time period or range for the search. The Date Range Selection window opens if in specific date is clicked in the Edit Conditions box on the Message Conditions page.

Determine the time period or range of the search using the following options:
- Over [Number] [Time Period] ago
- Last [Number] [Time Period]
- Before [Date]
- After [Date]
- Between [Date] and [Date]
Search Terms Window (Message Conditions)
Use the Search Terms window to determine terms for the search. The Search Terms window opens if search terms is selected in the Edit Conditions box.
Determine terms for the search using the following options:
-
Type the desired term into the upper text box and click Add to add the term to the lower text box, which adds the term to the search
-
Select a term in the lower text box, and click Remove to remove the term from the search
-
Click Clear to clear all terms from the lower box
-
Select the desired qualifier option:
- Contains ALL of the following search terms (And) – Search only returns results containing all of the search terms
- Contains ANY of the following search terms (Or) – Search returns results containing any one or more of the search terms
-
Click Import CSV to open a file explorer window to select an appropriate CSV file containing search terms
EWSMailbox FW: Save Filter
Use the Save Filter Page to name and describe the custom filter created in the wizard.

Label the custom filter using the following options:
- Enter a name for the filter in the Filter Name textbox
- Enter any desired description for the filter in the Description textbox
EWSMailbox FW: Search Filter
Use the Search Filter page to choose a filter template for the search.

Customize folder search conditions using the following options:
-
Select template – Select any of the following template options:
- Blank
- All non-archived items over 90 days ago
- All calendar items that contains attachment that occurred over 90 days ago
-
Edit Conditions – Click an underlined value, if present, in the Edit Conditions box to modify any of the template conditions
NOTE: The values present depends on the selections made in the Select conditions box.
- Click either IPM.Note or IPM.Appointment, to open the MessageClasses Window with IPM.Note or IPM.Appointment class populated, respectively. See the MessageClasses Window topic for additional information.
- Click over 90 Day ago to open the Date Range Selection Window. See the Date Range Selection Window topic for additional information.
- Click has attachment(s) to convert the condition to has no attachment(s) and vice versa
MessageClasses Window
Use the MessageClasses window to alter criteria related to message class. The Message Classes window opens if Ipm.Note or Ipm.Appointment is clicked in the Edit Conditions box on the Search Filter page.

Determine MessageClass-related criteria using the following options:
-
To add a class, click Add
-
Enter the desired Message Class in the corresponding textbox
-
Click Exact Match to reveal a dropdown menu of other search criteria under Matching Strategy and select the preferred option:
- Exact Match
- Starts With
- Contains
-
To remove a message class, select it and click Remove
-
Click Import CSV to open a file explorer window to select an appropriate CSV file containing search terms
Date Range Selection Window
Use the Date Range Selection window to select a time period or range for the search. The Date Range Selection window opens if over 90 Day ago is clicked in the Edit Conditions box on the Search Filter page.

Determine the time period or range of the search using the following options:
- Over [Number] [Time Period] ago
- Last [Number] [Time Period]
- Before [Date]
- After [Date]
- Between [Date] and [Date]
EWSMailbox: Options
The Scan options page provides general scan options. It is a wizard page for all categories.
Select the checkboxes to apply any desired scan options:
-
Ignore certificate errors – Ignores certificate errors when connecting to Exchange Web Services
-
Match job host against autodiscovered host – Matches the name of the job host against the host name returned from autodiscover
RECOMMENDED: Use this option when scanning multiple Exchange environments with a single job and the Connection Profile has multiple credentials in it.
-
Scan options
- Scan archives – Scans for archived mailbox data
- Scan recoverable items – Scans for recoverable items
-
Authentication – Select an Authentication type from the drop down:
- Negotiate
- Basic
- NTLM
- Kerberos
- Digest
EWSMailbox Data Collector
The EWSMailbox Data Collector provides configuration options to scan mailbox contents, permissions, and sensitive data, and is preconfigured within the Exchange Solution. Both this data collector and the solution are available with a special Enterprise Auditor license. See the Exchange Solution topic for additional information.
Protocols
- HTTPS
- ADSI
- LDAP
Ports
- TCP 389
- TCP 443
Permissions
- Exchange Admin Role
- Discovery Management Role
- Application Impersonation Role
- Exchange Online License
Sensitive Data Discovery Considerations
The Sensitive Data Discovery Add-On must be installed on the Enterprise Auditor Console server, which enables Sensitive Data criteria for scans. If running Sensitive Data Discovery (SDD) scans, it will be necessary to increase the minimum amount of RAM. Each thread requires a minimum of 2 additional GB of RAM per host. For example, if the job is configured to scan 8 hosts at a time , then an extra 16 GB of RAM are required (8x2=16).
EWSMailbox Query Configuration
The EWSMailbox Data Collector is configured through the Exchange Mailbox Data Collector Wizard, which contains the following wizard pages:
NOTE: The Category selected may alter the subsequent steps displayed by the wizard.
- EWSMailbox: Category
- EWSMailbox: Options
- EWSMailbox: Scope
- EWSMailbox: Scope Select
- EWSMailbox: SDD Options
- EWSMailbox: Criteria
- EWSMailbox: Filter
- EWSMailbox: Search Filter
- EWSMailbox: Results
- EWSMailbox: Summary
EWSMailbox: Results
Use the Results page to select which properties are gathered out of those available for the category. It is a wizard page for all of the categories.
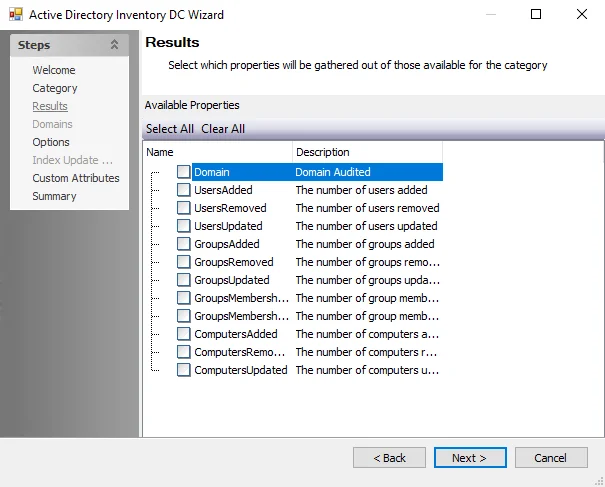
Select criteria using the following options:
-
Select the checkbox of any property to include it in the summary. All selected properties will be gathered.
NOTE: Available properties vary based on the category selected.
-
Click Select All to select all properties
-
Click Clear All to clear all selected properties
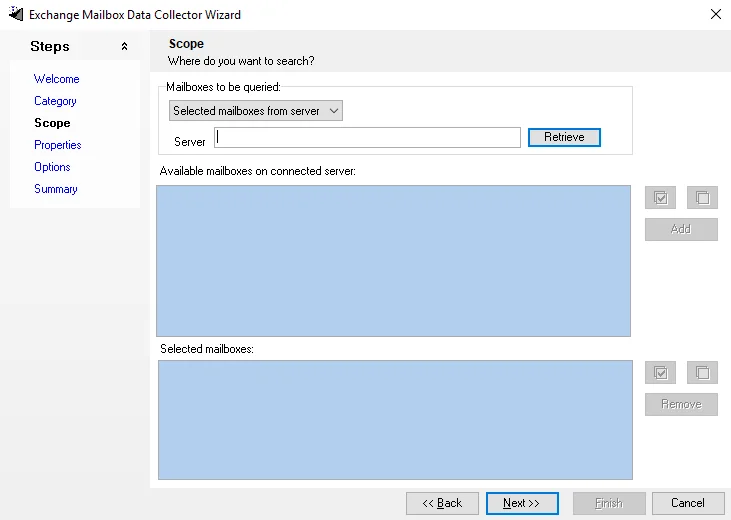
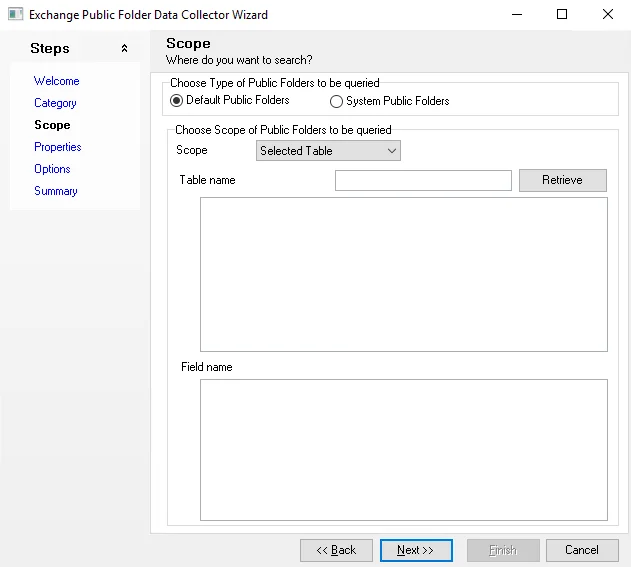
EWSMailbox: Scope
The Mailbox scope settings page is used to select which mailboxes are searched by the scan. It is a wizard page for all categories.
Select an option to specify which mailboxes are searched:
- All mailboxes – Search all mailboxes
- Select mailboxes from list – Search only specific selected mailboxes. This option enables the EWSMailbox: Scope Select page.
EWSMailbox: Scope Select
The Scope select page is used to select specific mailboxes to scan. It is a wizard page for all categories when the Select mailboxes from list option is selected on the EWSMailbox: Scope page.
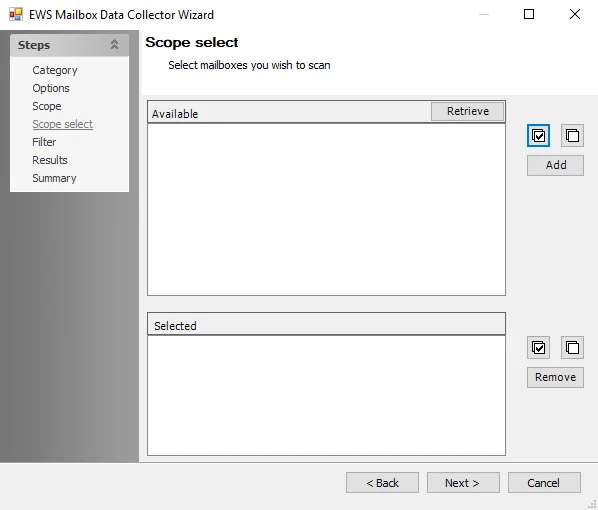
Use the following options to scope the scan to specific mailboxes:
- Retrieve – Loads the list of mailboxes available for scanning in the Available box
- Add – Select mailboxes from the Available list and click to add them to the Selected box to be scanned
- Select All – Selects all mailboxes in the list
- Deselect All – Deselects all selected mailboxes from the list
- Remove – Select mailboxes from the Selected box and click to remove them from the list
EWSMailbox: SDD Options
The Sensitive data scan options page is where options to be used for discovering sensitive data are configured. It is a wizard page for the Sensitive Data category.
The Sensitive Data Discovery Add-on is required to use the sensitive data collection option. See the Sensitive Data Discovery Add-On Installation topic for additional information.
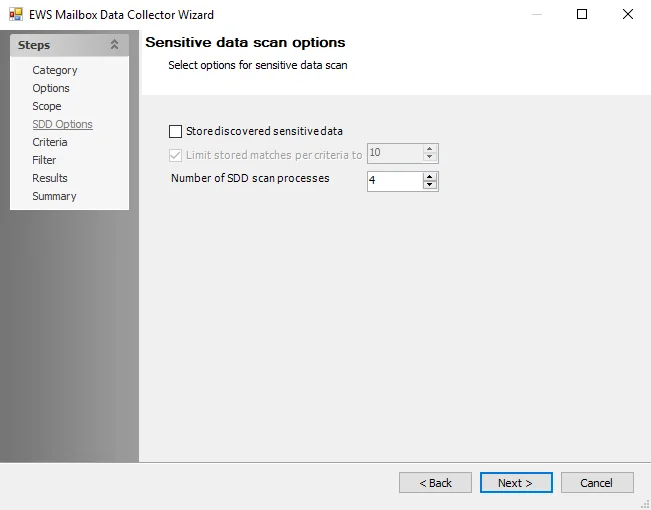
Select the applicable Sensitive data scan options:
-
Store discovered sensitive data – Stores discovered sensitive data in the database
-
Limit stored matches per criteria to [number] – Limits database storage of matches per criteria for discovered sensitive data
NOTE: This option is only available if Store discovered sensitive data is selected.
EWSMailbox: Search Filter
The Search filter settings page applies a filter used to search mailboxes in the environment. It is a wizard page for the Mailbox Search categories.
Click Add Filter to open the Filter Wizard.
EWSMailbox Filter Wizard (FW)
The Filter Wizard manages properties of the search filter. The Filter Wizard pages are:
- EWSMailbox FW: Search Filter
- EWSMailbox FW: Folder Conditions
- EWSMailbox FW: Message Conditions
- EWSMailbox FW: BodyOptions
- EWSMailbox FW: Save Filter
EWSMailbox: Summary
The Summary page displays a summary of the configured query. It wizard page for all categories.
Click Finish to save configuration changes. If no changes were made, it is a best practice to click Cancel to close the EWS Mailbox Data Collector Wizard to ensure that no accidental clicks are saved.
EWSPublicFolder: Category
The Category page contains the following Exchange Web Service categories to search:
Select which type of EWS public folder information to retrieve from the following:
-
Public Folder contents
- PublicFolderContent – Scan contents of public folders
-
Public Folder permissions
- PublicFolderPermissions – Scan permissions of public folders
-
Sensitive Data
- SDDScan – Scan public folders for sensitive data
-
Public folder search
- PublicFolderSearchFolders – Search for folders containing messages
- PublicFolderSearchMessages – Search for messages
EWSPublicFolder: Critieria
Use the Select DLP criteria for this scan page to select criteria for the sensitive data scan. It is a wizard page for the Sensitive Data category.
The Sensitive Data Discovery Add-on is required to use the sensitive data collection option and enable the Criteria Editor. See the Sensitive Data Discovery Add-On Installation for additional information.
The options on the Criteria page are:
- Use Global Criterion Selection – Select this option to inherit sensitive data criteria settings from the Settings > Sensitive Data node. See the Sensitive Data topic for additional information.
- Use the following selected criteria – Select this option to use the table to select which sensitive data criteria to scan for
- Select All - Click Select All to enable all sensitive data criteria for scanning
- Clear All - Click Clear All to remove all selections from the table
- Select the checkboxes next to the sensitive data criteria options to enable it to be scanned for during job execution
The table contains the following types of criteria:
NOTE: Until the Sensitive Data Discovery Add-On is installed, only the headers for the System Criteria and User Criteria nodes are visible in the table.
-
System Criteria – Lists pre-defined criteria
-
User Criteria – Lists user-defined criteria
Use the Sensitive Data Criteria Editor in Settings > Sensitive Data to create and edit user-defined criteria. See the Sensitive Data Criteria Editor topic for additional information.
EWSPublicFolder: Filter
The Filter settings page provides options to filter folders and attachments. It is a wizard page for the categories of:
- Public Folder contents
- Public Folder permissions
- Sensitive Data
All folders and attachments are scanned by default. Scope the scan for specific folders and attachments:
- Include Folders – Type the folder paths to filter the scan to specific mailbox folders
- Include Attachments – Type the attachment file names to filter to specific attachments
- Exclude Folders – Type the folder paths to exclude mailbox folders from the scan
- Exclude Attachments – Type the file names for the attachments to exclude attachments from the scan
Use * and ? for matching wildcard and single characters.
- Limit message size to [numerical value] – Select to limit message size and define the threshold for maximum size of a message. The default value is 20000 KB.
- Limit attachments size to [numerical value] – Select to limit attachment size and define a threshold for maximum size of an attachment returned in the scan. The default value is 20000 KB.
Public folders can also be included or excluded from the scan by retrieving a list of public folders and selecting the desired folders.
Follow the steps to filter the scan by selecting public folders from a list.
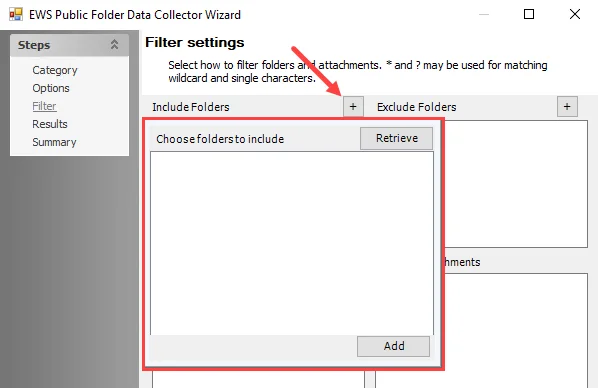
Step 1 – Click the + button to the right of the Include Folders or Exclude Folders box to open the Choose folders to include or Choose folders to exclude window.
Step 2 – Click Retrieve to load the list of public folders that can be selected.
Step 3 – Select the desired public folders and click Add to add the folders to the Include Folders or Exclude Folders list.
After the configuration changes are saved, scans are filtered by the selected public folders.
EWSPublicFolder FW: BodyOptions
The BodyOptions page is where the size of messages is selected.
Select the desired message size unit:
- KB
- MB
- GB
EWSPublicFolder FW: Folder Conditions
The Folder Conditions page is where folder-related filter criteria can be applied to the search.
Customize folder search conditions using the following options:
-
Select conditions – To add it to the search, select any of the following conditions:
- with specific folder type
- with search terms in the folder name
-
Edit Conditions – Click an underlined value, if present, in the Edit Conditions box to modify any of the template conditions
NOTE: The values present depends on the selections made in the Select conditions box.
- Click specific in the Edit conditions box to open the Folder Type Window. See the Folder Type Windowtopic for additional information
- Click search terms to open the Search Terms Window. See the Search Terms Window topic for additional information
Folder Type Window
Use the Folder Type window to determine folder types to search for. The Folder Type window opens if specific is selected in the Edit Conditions box on the Folder Conditions page.
Select the checkbox next to any folder type to include it in the search filter.
Search Terms Window
Use the Search Terms window to determine terms for the search. The Search Terms window opens if search terms is selected in the Edit Conditions box.
Determine terms for the search using the following options:
-
Type the desired term into the upper text box and click Add to add the term to the lower text box, which adds the term to the search
-
Select a term in the lower text box, and click Remove to remove the term from the search
-
Click Clear to clear all terms from the lower box
-
Select the desired qualifier option:
- Contains ALL of the following search terms (And) – Search only returns results containing all of the search terms
- Contains ANY of the following search terms (Or) – Search returns results containing any one or more of the search terms
-
Click Import CSV to open a file explorer window to select an appropriate CSV file containing search terms
EWSPublicFolder FW: Message Conditions
Use the Message Conditions page to apply filters to the message category part of the search.
Customize message search filter conditions using the following options:
-
Message category – Select a message category using the dropdown menu from the following:
- Common
- Appointment
- Schedule
- Contact
- Task
- Journal
- Note
- Post
- RSS Feed
- Unified Messaging
-
Select conditions – To add it to the search, select any of the following conditions:
NOTE: The conditions that are available in the Select Conditions box depends on the selected Message category.
- with specific message classes
- that is created in specific date
- with search terms in the subject
- with search terms in the body
- with search terms in the subject or body
- with search terms in the message header
- with search terms in the recipient’s address
- with search terms in the sender’s address
- that has an attachment
- that is received in specific date
- with specific Message ID
- that occurs in specific date
-
Edit Conditions – Click an underlined value, if present, in the Edit Conditions box to modify any of the template conditions
NOTE: The values present depends on the selections made in the Select conditions box.
- Click specific to open the MessageClasses Window. See the MessageClasses Window topic for additional information.
- Click in specific date to open the Date Range Selection Window. See the Date Range Selection Window topic for additional information.
- Click search terms to open the Search Terms Window. See the Search Terms Window topic for additional information.
- Click has attachment(s) to convert the condition to has no attachment(s) and vice versa
MessageClasses Window
Use the MessageClasses window to alter criteria related to message class. The Message Classes window opens if specific is clicked in the Edit Conditions box on the Message Conditions page.
Determine MessageClass-related criteria using the following options:
-
To add a class, click Add
-
Enter the desired Message Class in the corresponding textbox
-
Click Exact Match to reveal a dropdown menu of other search criteria under Matching Strategy and select the preferred option:
- Exact Match
- Starts With
- Contains
-
To remove a message class, select it and click Remove
-
Click Import CSV to open a file explorer window to select an appropriate CSV file containing search terms
Date Range Selection Window
Use the Date Range Selection window to select a time period or range for the search. The Date Range Selection window opens if in specific date is clicked in the Edit Conditions box on the Message Conditions page.
Determine the time period or range of the search using the following options:
- Over [Number] [Time Period] ago
- Last [Number] [Time Period]
- Before [Date]
- After [Date]
- Between [Date] and [Date]
Search Terms Window
Use the Search Terms window to determine terms for the search. The Search Terms window opens if search terms is selected in the Edit Conditions box.
Determine terms for the search using the following options:
-
Type the desired term into the upper text box and click Add to add the term to the lower text box, which adds the term to the search
-
Select a term in the lower text box, and click Remove to remove the term from the search
-
Click Clear to clear all terms from the lower box
-
Select the desired qualifier option:
- Contains ALL of the following search terms (And) – Search only returns results containing all of the search terms
- Contains ANY of the following search terms (Or) – Search returns results containing any one or more of the search terms
-
Click Import CSV to open a file explorer window to select an appropriate CSV file containing search terms
EWSPublicFolder FW: Save Filter
Use the Save Filter Page to name and describe the custom filter created in the wizard.
Label the custom filter using the following options:
- Enter a name for the filter in the Filter Name textbox
- Enter any desired description for the filter in the Description textbox
EWSPublicFolder FW: Search Filter
Use the Search Filter page to choose a filter template for the search.
Customize folder search conditions using the following options:
-
Select template – Select any of the following template options:
- Blank
- All non-archived items over 90 days ago
- All calendar items that contains attachment that occurred over 90 days ago
-
Edit Conditions – Click an underlined value, if present, in the Edit Conditions box to modify any of the template conditions
NOTE: The values present depends on the selections made in the Select conditions box.
- Click either IPM.Note or IPM.Appointment, to open the MessageClasses Window with IPM.Note or IPM.Appointment class populated, respectively. See the MessageClasses Window topic for additional information.
- Click over 90 Day ago to open the Date Range Selection Window. See the Date Range Selection Window
- Click has attachment(s) to convert the condition to has no attachment(s) and vice versa
MessageClasses Window
Use the MessageClasses window to alter criteria related to message class. The Message Classes window opens if Ipm.Note or Ipm.Appointment is clicked in the Edit Conditions box on the Search Filter page.
Determine MessageClass-related criteria using the following options:
-
To add a class, click Add
-
Enter the desired Message Class in the corresponding textbox
-
Click Exact Match to reveal a dropdown menu of other search criteria under Matching Strategy and select the preferred option:
- Exact Match
- Starts With
- Contains
-
To remove a message class, select it and click Remove
-
Click Import CSV to open a file explorer window to select an appropriate CSV file containing search terms
Date Range Selection Window
Use the Date Range Selection window to select a time period or range for the search. The Date Range Selection window opens if over 90 Day ago is clicked in the Edit Conditions box on the Search Filter page.
Determine the time period or range of the search using the following options:
- Over [Number] [Time Period] ago
- Last [Number] [Time Period]
- Before [Date]
- After [Date]
- Between [Date] and [Date]
EWSPublicFolder: Options
The Scan options page provides general scan options. It is a wizard page for all of the categories.
Select any desired scan options:
-
Ignore certificate errors – Ignores certificate errors when connecting to Exchange Web Services
-
Match job host against autodiscovered host – Matches the name of the job host against the host name returned from autodiscover
RECOMMENDED: Use this option when scanning multiple Exchange environments with a single job and the Connection Profile has multiple credentials in it.
-
Authentication – Select an Authentication type from the drop down:
- Negotiate
- Basic
- NTLM
- Kerberos
- Digest
EWSPublicFolder Data Collector
The EWSPublicFolder Data Collector provides configuration options to extract public folder contents, permissions, and sensitive data, and is preconfigured within the Exchange Solution. Both this data collector and the solution are available with a special Enterprise Auditor license. See the Exchange Solution topic for additional information.
Protocols
- HTTPS
- ADSI
- LDAP
Ports
- TCP 389
- TCP 443
Permissions
- Exchange Admin Role
- Discovery Management Role
- Application Impersonation Role
- Exchange Online License with a mailbox
Sensitive Data Discovery Considerations
The Sensitive Data Discovery Add-On must be installed on the Enterprise Auditor Console server, which enables Sensitive Data criteria for scans. If running Sensitive Data Discovery (SDD) scans, it will be necessary to increase the minimum amount of RAM. Each thread requires a minimum of 2 additional GB of RAM per host. For example, if the job is configured to scan 8 hosts at a time , then an extra 16 GB of RAM are required (8x2=16).
EWSPublicFolder Query Configuration
The EWSPublicFolder Data Collector is configured through the Exchange Public Folder Data Collector Wizard. The wizard contains the following pages:
NOTE: The Category selected may alter the subsequent steps displayed by the wizard.
- EWSPublicFolder: Category
- EWSPublicFolder: Options
- EWSPublicFolder: SDD Options
- EWSPublicFolder: Critieria
- EWSPublicFolder: Filter
- EWSPublicFolder: Search Filter
- EWSPublicFolder: Results
- EWSPublicFolder: Summary
EWSPublicFolder: Results
The Results page is used to select which properties will be gathered out of those available for the category. It is a wizard page for all of the categories.
Select criteria using the following options:
-
Select the checkbox of any property to include it in the summary. All selected properties will be gathered.
NOTE: Available properties vary based on the category selected.
-
Click Select All to select all properties
-
Click Clear All to clear all selected properties
EWSPublicFolder: SDD Options
Use the Sensitive data scan options page to configure options to for discovering sensitive data. It is a wizard page for the Sensitive Data category.
The Sensitive Data Discovery Add-on is required to use the sensitive data collection option. See the Sensitive Data Discovery Add-On Installation topic for additional information.
Select the applicable Sensitive data scan options:
-
Store discovered sensitive data – Stores discovered sensitive data in the database
-
Limit stored matches per criteria to [number] – Limits database storage of matches per criteria for discovered sensitive data
NOTE: This option is only available if Store discovered sensitive data is selected.
EWSPublicFolder: Search Filter
The Search filter settings page applies a filter used to search mailboxes in the environment. It is a wizard page for the category of:
- PublicFolder search
Click Add Filter to open the Filter Wizard
EWSPublicFolder Filter Wizard (FW)
The Filter Wizard manages properties of the search filter. The Filter Wizard pages are:
- EWSPublicFolder FW: Search Filter
- EWSPublicFolder FW: Folder Conditions
- EWSPublicFolder FW: Message Conditions
- EWSPublicFolder FW: BodyOptions
- EWSPublicFolder FW: Save Filter
EWSPublicFolder: Summary
The Summary page displays a summary of the configured query. It wizard page for all categories.
Click Finish to save configuration changes. If no changes were made, it is a best practice to click Cancel to close the EWS Public Folder Data Collector Wizard to ensure that no accidental clicks are saved.
Exchange2K: Category
The Exchange2K Data Collector contains the following query categories, sub-divided by auditing focus:
-
Exchange Organization
- Organization – Exchange organization properties
- Administrative Groups
- Exchange Servers
- Storage Groups
- Exchange 2007/2010 Users – User properties from PowerShell commands
- Users – Mail-enabled and mailbox-enabled user
- Groups – Mail-enabled groups
- Contacts
- QBDGs – Query-Based Distribution Groups
-
Exchange Server Configuration
- Recipient Update Services
- Message Delivery – System-wide message settings
- Instant Messaging – Instant messaging settings
- Exchange Mailbox Store Logons – The users currently logged on to Microsoft Exchange 2007 and 2010
-
Exchange 2007/2010 Hub Transport Configuration
- Accepted Domains
- Remote Domains
- Transport Rules
- Journaling
-
Exchange 2007 CCR/SCR
- Server Status
- CCR Storage Group Status
- SCR Storage Group Status
- Replication Health
-
Exchange 2007/2010 Unified Messaging
- Dial plans
- IP gateways
- Mailbox policies
- Auto attendants
-
Exchange 2010 DAG
- Exchange 2010 Mailbox Database Copy Status
- Exchange 2010 Data Availability Group
- Replication Health
-
Connectors
- SMTP Connectors
- Exchange 2007/2010 Receive Connectors
- Exchange 2007/2010 Send Connectors
- Routing Group Connectors
- TCPX 400 Connectors
- X25X 400 Connectors
-
Protocols
- HTTP Virtual Servers
- IMAP4 Virtual Servers
- NNTP Virtual Servers
- POP3 Virtual Servers
- SMTP Virtual Servers
- X400 Protocol
- Exchange 2007/2010 IMAP4 protocol
- Exchange 2007/2010 POP3 protocol
- Exchange 2007/2010 ActiveSync Protocols
-
Queues
- Exchange Queues
- Exchange 2007/2010 Queries
-
Policies
- Recipient Policies
- Exchange Server Policies
- Exchange 2007/2010 Email Policies
- Mailbox Store Policies
- Public Store Policies
- Exchange 2007/2010 ActiveSync Mailbox Policies
- Exchange 2010 Throttling Policies
-
Address Lists
- Address Lists
- Global Address Lists
- Offline Address Lists
-
Internet Message Formats
-
Mailbox Stores
-
Public Stores
-
Public Folders
-
Anti-Virus Software
-
OrphanedMailboxes
-
OrphanedPublicFolders
-
Exchange 2007/2010 ActiveSync Mobile Devices
Exchange2K: MAPI Settings
The MAPI Settings page is used to enter configurations to connect to target Exchange servers. By default, Enterprise Auditor connects to Exchange using System Attendant. For Exchange 2010 and 2013, a mailbox and a client access server need to be entered in order to make a MAPI connection. These settings only need to be configured if not configured at the Global Settings level. It is a wizard page for the categories of:
- Exchange Organization > Users
- Mailbox Stores
- Public Folders
- OrphanedMailboxes
- OrphanedPublicFolders
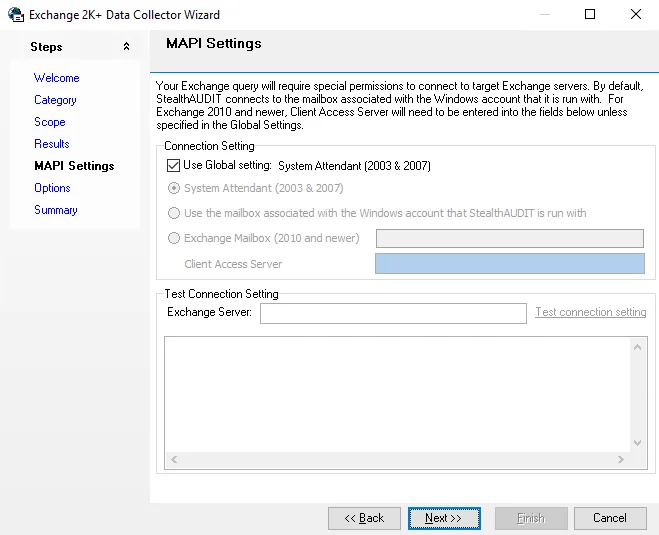
Configure the Connection Setting by selecting from the following:
- Use Global settings:
- System Attendant (2003 & 2007)
- Use the mailbox associated with the Windows account that Enterprise Auditor is run with
- Exchange Mailbox (2010 and newer)
- Client Access Server
Enter a server to Test Connection Setting:
- Exchange Server – Enter the Exchange Mailbox Server to use to test the connection setting to make sure that there is access to the server entered
- Test connection setting – Click to test the connection to the Exchange server
The box at the bottom of the page displays information regarding the test connection in progress.
Exchange2K: Options
The Options page provides additional configuration options for the query. Available options vary depending on the category selected. It is a wizard page for all of the categories.
Configure the Options step using the following options:
-
How to format collected – Select how the table will be formatted according to the return data
- Return data as collected
- Return each value of the following property in a separate row – Enabled for specific properties selected on the Results page
- Return data in a separate row for each property set in the following group – Enabled for specific properties selected on the Results page
-
How to return multi-valued properties – Select how the table will be formatted when the return data contains multi-valued properties
-
Concatenated – Return the data in a continuous string without gaps
- Delimiter – Enter the desired delimiter to be used between values
-
First-value only – Only display the first value
-
-
Message size units – Available for the Exchange Organization > Users, Mailbox Stores, and Public Stores categories. Choose between:
- KB
- MB
- GB
Exchange2K Data Collector
The Exchange2K Data Collector extracts configuration details from Exchange organizations for versions 2003 and later. This is a MAPI-based data collector which requires the Settings > Exchange node to be enabled and configured. See the Exchange topic for additional information.
The Exchange2K Data Collector has been preconfigured within the Exchange Solution. Both this data collector and the solution are available with a special Enterprise Auditor license. See the Exchange Solution topic for additional information.
Protocols
- LDAP
- MAPI
- PowerShell
- RPC
- WMI
Ports
- TCP 135-139
- Randomly allocated high TCP ports
- TCP 389
- Optional TCP 445
Permissions
- Member of the Exchange Administrator group
- Domain Admin for AD property collection
- Public Folder Management
Exchange2K Query Configuration
The Exchange2K Data Collector is configured through the Exchange 2K+ Data Collector Wizard, which contains the following wizard pages:
- Welcome
- Exchange2K: Category
- Exchange2K: Scope
- Exchange2K: Results
- Exchange2K: MAPI Settings
- Exchange2K: Options
- Exchange2K: Summary
The Welcome page can be hidden by selecting the Do not show this page the next time checkbox when the wizard is open and configuration settings are saved.
Exchange2K: Results
The Results page is where properties that will be gathered are selected. It is a wizard page for all.
Properties can be selected individually or the Check All, Uncheck All, or Reset Defaults buttons can be used. All Selected properties will be gathered. Click Expand All to expand all properties, or Collapse All to collapse all properties. Available properties vary based on the category selected.
Exchange2K: Scope
The Scope page is used to define where to search. It is a wizard page for the categories of:
- Exchange Organization > Users
- Exchange Organization > Groups
- Exchange Organization > Contacts
- Exchange Organization > QBDGs
Select where to connect for the search and click Connect to add the domain or server:
- Default domain – Select this option to search the default domain
- This domain or server – Click the ellipsis to open the Browse for Domain window and select a domain or server.
Click Add to add the OUs highlighted in the top box to the scope. Click Remove to remove the selected OU.
Exchange2K: Summary
The Summary page displays a summary of the configured query. It is a wizard page for all of the categories.
Click Finish to save configuration changes. If no changes were made, it is a best practice to click Cancel to close the Exchange 2K+ Data Collector Wizard to ensure that no accidental clicks are saved.
ExchangeMailbox: Category
The Exchange Mailbox Data Collector contains the following Exchange Mailbox categories for searching:
The Category page contains a list of objects the query searches for:
-
Mailboxes
-
Mailbox contents
-
Mailbox permissions
-
Mailbox sensitive data discovery
-
Mailbox search – Enables the Return data options:
- Per mailbox
- Per folder
ExchangeMailbox: Options
The Options page provides different configuration options for the search. It is a wizard page for the following categories:
- Mailboxes
- Mailbox contents
- Mailbox permissions
- Mailbox sensitive data discovery
The following options can be configured:
NOTE: Options available vary based upon the category selected.
-
Message size units:
- KB
- MB
-
Folders
-
All Folders – Select to include all folders in the query. When deselected, the other options of the category become available.
-
Include root folder – Include root folders of the selected folders in the query
-
- – Enter the name of a folder to include and click + to add it to the list of included folders
-
- – Select a folder from the list of included folders ad click – to remove it
-
-
Include subfolders in message counters – Include messages contained in subfolders of the selected folders in the message count
-
-
Attachment Types
-
Count attachment types – Counts attachment types as part of the query. When selected, this enables the following options:
- Add New – Adds another line to the list of attachment types which is manually edited
- Load Defaults – Reverts the list to default attachment types
- Remove – Remove selected attachment type from the list
-
-
Large Attachment Threshold (KB) – Default is 500
ExchangeMailbox Data Collector
The ExchangeMailbox Data Collector extracts configuration details from the Exchange Store to provide statistical, content, permission, and sensitive data reporting on mailboxes. This is a MAPI-based data collector which requires the Settings > Exchange node to be enabled and configured. See the Exchange topic for additional information.
The ExchangeMailbox Data Collector is available with a special Enterprise Auditor license. See the Exchange Solution topic for additional information.
Protocols
- MAPI
- RPC
Ports
- TCP 135
- Randomly allocated high TCP ports
Permissions
- Member of the Exchange Administrator group
- Organization Management
- Discovery Management
Sensitive Data Discovery Considerations
The Sensitive Data Discovery Add-On must be installed on the Enterprise Auditor Console server, which enables Sensitive Data criteria for scans. If running Sensitive Data Discovery (SDD) scans, it will be necessary to increase the minimum amount of RAM. Each thread requires a minimum of 2 additional GB of RAM per host. For example, if the job is configured to scan 8 hosts at a time , then an extra 16 GB of RAM are required (8x2=16).
ExchangeMailbox Query Configuration
The ExchangeMailbox Data Collector is configured through the Exchange Mailbox Data Collector Wizard, which contains the following wizard pages:
- Welcome
- ExchangeMailbox: Category
- ExchangeMailbox: Scope
- ExchangeMailbox: Properties
- ExchangeMailbox: SDD Criteria
- ExchangeMailbox: Options
- ExchangeMailbox: Summary
The query requires special permissions to connect to target Exchange servers. Assign these permissions on the Welcome page.
Connection Setting
Select one of the following options for the connection setting:
-
Use Global setting – The configured Global Setting is displayed next to this checkbox. Select the checkbox to use the global setting.
-
System Attendant (2003 & 2007) – Enabled when the Use Global Setting checkbox is not selected. Select this option to use System Attendant (2003 & 2007) for the connection.
-
Use the mailbox associated with the Windows account that Enterprise Auditor is run with – Enabled when the Use Global Setting checkbox is not selected. Select this option to use the mailbox associated with the Windows account that Enterprise Auditor is run with for the connection.
-
Exchange Mailbox (2010 and newer) – Enabled when the Use Global Setting checkbox is not selected. Select this option to use an Exchange Mailbox (2010 and newer) for the connection. The Client Access Server must be entered unless specified in the Global Settings.
- Client Access Server – A private store server is needed if the Exchange server only has public stores
Test Connection Setting
Enter a server to test the connection string:
- Exchange Server – Enter the Exchange Mailbox Server to use to test the connection setting to make sure that there is access to the server entered
- Test – Click Test to test the connection to the Exchange server
The box at the bottom of the page displays information regarding the test connection in progress.
ExchangeMailbox: Properties
The Properties page is where properties that will be gathered are selected. The available properties depend on the category selected. It is a wizard page for all of the categories.
Properties can be selected individually or you can use the Select All, Clear All, and Reset All buttons. All selected properties will be gathered. Click Message Classes to open the Message classes filters window.

The wildcard (*) returns all message class filters. Enter the name of the class filter and click
Add to add it to the list. Delete will remove the selected class filter from the list. The
Load defaults option will restore the class filter default settings.
ExchangeMailbox: Scope
The Scope page is used to define which mailboxes are to be queried. It is a wizard page for all of the categories.
At the top, configure the mailboxes to be queried. The selected option changes how the mailboxes are identified for scoping.
-
All mailboxes – Searches all mailboxes
-
Selected mailboxes from server – Retrieves all mailboxes in the Exchange organization, making them visible within the Available mailboxes on connected server list. The following options display:
- Retrieve – Enter the server and select Retrieve to display the list of mailboxes on that server
- Add – Select the desired mailboxes to add to the query. The added mailboxes display in the Selected mailboxes list.
- Remove – Deletes selected mailboxes from the list
- Select All – Click the Select All icon to select all mailboxes in the list
- Clear All – Click the Clear All icon to clear all current selections in the list
-
Selected table – Populates the Available tables list with tables from the Enterprise Auditor database
- Table – Filters this list by tables. Select the table which hosts the list of mailboxes for which this query will be scoped.
- Field containing EmailAddressDNs – This list will be populated with columns from the selected table. Select the appropriate column from the list.
ExchangeMailbox: SDD Criteria
The SDD Criteria page is where criteria to be used for discovering sensitive data are configured. It is a wizard page for the Mailbox sensitive data discovery category. This page requires the Sensitive Data Discovery Add-On to be been installed on the Enterprise Auditor Console to define the criteria and enable the Criteria Editor. See the Sensitive Data Discovery Add-On Installation topic for additional information.
Select the checkbox for the criteria to be used to search for sensitive data. Criteria can also be selected using the Select All and Select None buttons.
The table contains the following types of criteria:
-
System Criteria – Lists pre-defined criteria
-
User Criteria – Lists user-defined criteria
NOTE: Until the Sensitive Data Discovery Add-On is installed, only the headers for the System Criteria and User Criteria nodes will be visible in the table.
-
Edit – Click this button to access the Criteria Editor where user-defined criteria can be created or customized. See the Sensitive Data Criteria Editor topic for additional information.
-
Store discovered sensitive data – Stores the potentially sensitive data that matches the selected criteria in the Enterprise Auditor database. Select this checkbox to store a copy of the criteria match data. This copy can be used to check for false positives, data that matches the selected criteria but is not actually sensitive.
-
Limit stored matches per criteria to [number] – Identifies the number of potentially sensitive data matches that are copied to the database. The default is 5 matches. This option is only available if the Store discovered sensitive data option is selected.
ExchangeMailbox: Summary
The Summary page displays a summary of the configured query. It wizard page for all categories.
Click Finish to save configuration changes. If no changes were made, it is a best practice to click Cancel to close the Exchange Mailbox Data Collector Wizard to ensure that no accidental clicks are saved.
ExchangeMetrics: Category
The Category page is used to identify the type of Exchange Metrics information to retrieve.
The ExchangeMetrics Data Collector contains the following query categories:
-
Exchange Metrics Queries
- Server Volume – Summary metrics by server for all messages sent and received inside and outside of the Exchange organization
- Internal Traffic Summary – Summary metrics by server for all messages sent and received inside of the Exchange organization
- Internet Traffic Summary – Summary metrics by external domain for messages sent and received outside of the Exchange organization
- Delivery Time – Summary metrics by server for all messages delivered within specified delivery time window
- Delivery Time Custom – Summary metrics by server for all messages delivered within delivery time windows
- User Statistics – Summary metrics by user for all messages sent and received by each user
- DL Statistics – Summary metrics by distribution list (DL) for all messages received by each DL
- Hour Statistics – Summary metrics by server for all messages delivered within specified hour slot
- Message Size Statistics – Summary metrics by server for all messages of specified sizes
- Message Size Statistics Custom – Summary metrics by serer for message size windows
- User’s Message Activity – Message activity per user
- User’s Message Activity Per Hour – Message activity per user per hour
-
Exchange Metrics Applet Maintenance
- Deploy or Change Applet Settings – Deploys a data collector applet to an Exchange Server, or update its settings
- Check Applet State – Information about a deployed data collector applet
- Remove Applet Settings – Removes a deployed data collector applet from an Exchange Server
ExchangeMetrics: Collect Mode
The Collect Mode page is where to set the collection mode. It is a wizard page for the categories of:
- Server Volume
- Internal Traffic Summary
- Internet Traffic Summary
- Delivery Time
- Delivery Time Custom
- User Statistics
- DL Statistics
- Hour Statistics
- Message Size Statistics
- Message Size Statistics Custom
- User’s Message Activity
- User’s Message Activity Per Hour
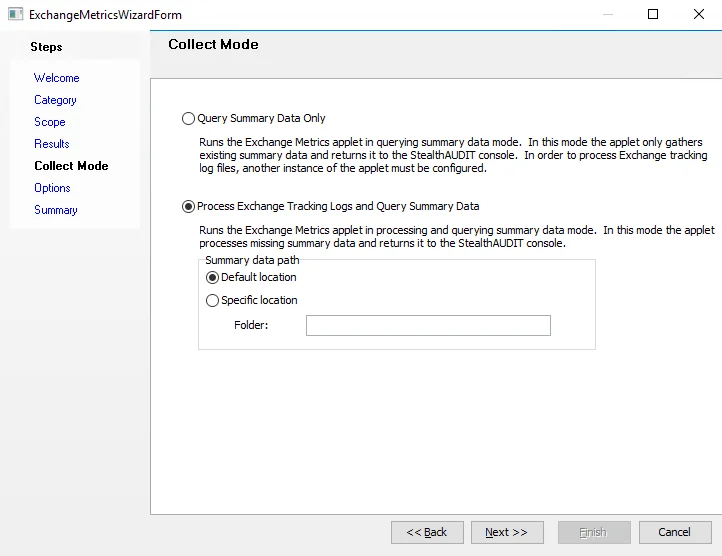
There are two types of collection modes:
-
Query Summary Data Only – In this mode, the applet gathers only existing summary data and returns it to the Enterprise Auditor Console. In order to process Exchange tracking log files, another instance of the applet must be configured.
-
Process Exchange Tracking Logs and Query Summary Data – In this mode, the applet processes missing summary data and returns it to the Enterprise Auditor Console. This mode includes an additional setting for Summary data path. Choose between:
- Default location
- Specific location – Specify the folder location
ExchangeMetrics: Message Activity Filter
The Message Activity Filter page configures which domains the data collector should return mail flow
from specific senders and to specific recipients. For example, if @netwrix.com is entered in the
Senders list and @netwrix.com in the Recipients list, message activity will be returned only for
mail sent to and received from an @netwrix.com address. It is a wizard page for the categories of:
- User’s Message Activity
- User’s Message Activity Per Hour
Configure the Message Activity Filter using the following options:
-
Add – To add a filter to the desired category, click Add in the desired category to add an entry to that category
-
Select Exact Match in the added filter to reveal a drop-down list with the following condition options:
- Exact matches
- Contains
- Begins with
- Ends with
-
Kind – Select (Custom…) to open the Custom Filter menu. The Custom Filter menu provides options to create and configure other filters.
-
Value – Type the filter to be applied
The columns in the entry tables can be sorted and or filtered, using the same sorting and filtering methods of Enterprise Auditor data grids. The Remove option will delete a selected filter.
ExchangeMetrics: Message Sizes
The Message Sizes page is used to configure message size frames for which to return summary metrics by server. It is a wizard page for the category of:
- Message Size Statistics Custom.
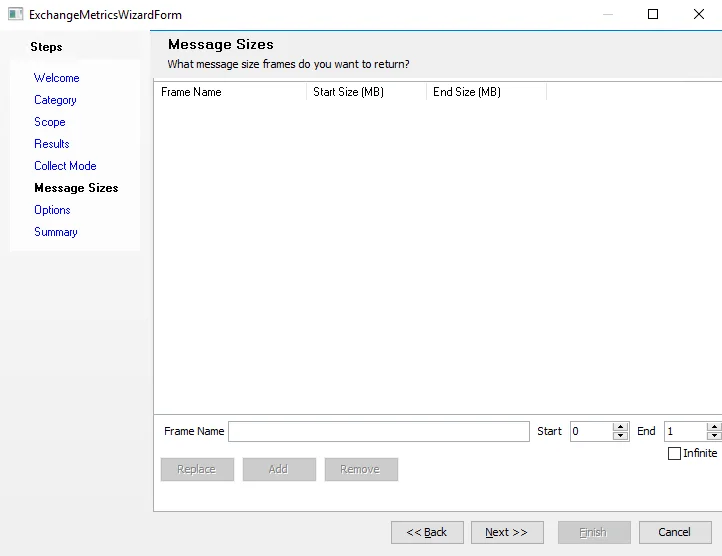
Configure the desired message size frames using the following options:
- Frame name – Name the configured message size parameters. Can either be entered manually or a default will populate when query limits are set.
- Start – Specify the lower limit of the message sizes (in MB)
- End – Specify the upper limit of the message sizes (in MB)
For example, a Start value of 1 and an End value of 2 returns messages between 1 and 2 megabytes.
- Infinite – Select the checkbox to remove the End value from the scan. For example, a Start value of 5 with the Infinite checkbox selected retrieves all messages which are 5 megabytes or larger.
Once the frame is configured, click Add. The configured message size frame will appear in the list. Multiple frames can be configured. Select a frame and click Replace to modify an existing frame. Use Remove to delete an existing frame.
ExchangeMetrics: Options
The Options page provides additional configuration options for the query. Options vary depending on the category selected. It is a wizard page for the categories of:
- Server Volume
- Internal Traffic Summary
- Internet Traffic Summary
- Delivery Time
- Delivery Time Custom
- User Statistics
- DL Statistics
- Hour Statistics
- Message Size Statistics
- Message Size Statistics Custom
- User’s Message Activity
- User’s Message Activity Per Hour
- Deploy or Change Applet Settings
- Remove Applet Settings
Select the checkbox of any of the following options to configure the query:
NOTE: Available options vary depending on Category selected.
-
Host-side Cleanup
- Remove applet after task is completed
- Remove all summary data after task is completed (Not recommended)
- Remove summary data older than [number] days
- Remove AD database after task is completed
-
Applet Logging
-
Enable Logging – Enables the applet to log
-
Applet log level – Select the desired log level using the dropdown list:
- None
- Debug
- Information
- Warning
- Error
-
Set Default – Returns the Applet log level to the default of Error
-
-
Applet History
- Enable Persistent Log State – Search the log from where the previous search left off. A state file is created for each host configured in the query. State files can be viewed within Enterprise Auditor and are named by the query GUID. State files display the record the previous search left off on, the event log, and the date of the last entry.
-
AD Database Creation
- Recreate AD DB if existing DB is older than [number] days
- Create AD DB locally
ExchangeMetrics Data Collector
The ExchangeMetrics Data Collector collects Mail-Flow metrics from the Exchange Message Tracking Logs on the Exchange servers. Some examples of this include server volume and message size statistics. This data collector runs as an applet over RPC connection to process and collect summarized metrics from the Message Tracking Log. See the Exchange Support and Permissions Explained topic for a complete list of supported platforms.
The ExchangeMetrics Data Collector has been preconfigured within the Exchange Solution. Both this data collector and the solution are available with a special Enterprise Auditor license. See the Exchange Solution topic for additional information.
Protocols
- RPC
- WMI
Ports
- TCP 135
- Randomly allocated high TCP ports
Permissions
- Member of the local Administrator group on the targeted Exchange server(s)
See the Exchange Mail-Flow Permissions topic for additional information.
ExchangeMetrics Query Configuration
The ExchangeMetrics Data Collector is configured through the Exchange Metrics Data Collector Wizard, which contains the following wizard pages:
-
Welcome
-
NOTE: Pages available vary depending on the Category selected.
The Welcome page can be hidden by checking the Do not display this page the next time box when the wizard is open and configuration settings are saved.
ExchangeMetrics: Results
The Results page is where properties that will be gathered are selected. It is a wizard page for all of the categories.
Properties can be selected individually or the Check All, Uncheck All, or Reset Defaults buttons can be used. Click Expand All to expand all property categories. All selected properties will be gathered. Available properties vary based on the category selected.
ExchangeMetrics: Scope
The Scope page is used to define where to search. It is a wizard page for the categories of:
- Server Volume
- Internal Traffic Summary
- Internet Traffic Summary
- Delivery Time
- Delivery Time Custom
- User Statistics
- DL Statistics
- Hour Statistics
- Message Size Statistics
- Message Size Statistics Custom
- User’s Message Activity
- User’s Message Activity Per Hour
- Deploy or Change Applet Settings
Define the scope of the query using the following options:
-
Return data for section – Select the time period for which data will be collected. GMT time is used by Exchange Metrics to calculate the result.
- Today
- Yesterday
- This Week (from last Sunday till today)
- Last Week (from Sunday till Saturday)
- This Month
- Last Month
- Last [number] days
- Within time frame:
- From [calendar date] to [calendar date] – Use the drop-down arrows to select calendar dates.
-
Return results section – Select the table design for the collected data
-
One row for – Use the drop-down list to select one of the following options:
- All period
- Day
- Week
- Month
-
Add summary values as last row – Select this checkbox to add summary values as the last row. This option is enabled when Day, Week, or Month are selected.
-
ExchangeMetrics: Summary
The Summary page displays a summary of the configured query. It is a wizard page for all of the categories.
Click Finish to save configuration changes. If no changes were made, it is a best practice to click Cancel to close the Exchange Metrics Data Collector Wizard to ensure that no accidental clicks are saved.
ExchangeMetrics: Time Frames
The Time Frames page is used to configure message delivery time frames for which to return summary metrics by server. It is a wizard page for the category of:
- Delivery Time Custom.
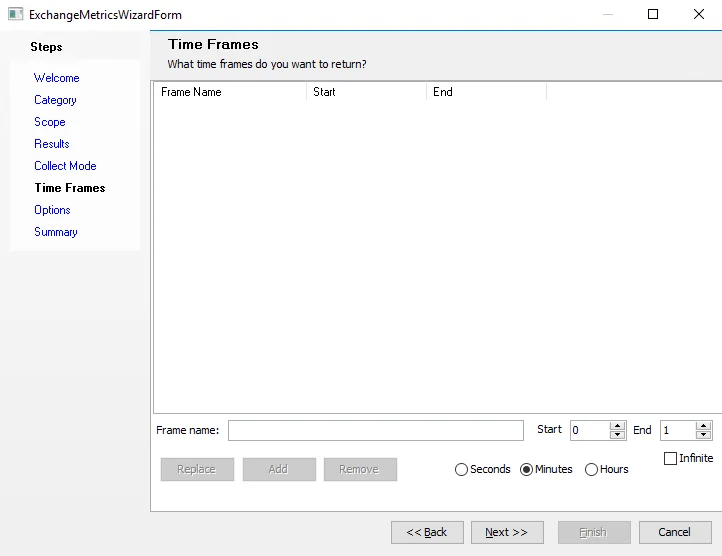
Configure the desired time frames using the following options:
-
Frame name – Name the configured time frame. Can either be entered manually or a default will populate when frame limits are set.
-
Start – Specify the lower limit of the delivery time frame
-
End – Specify the upper limit of the delivery time frame
-
Select the time unit of the time frame:
- Seconds
- Minutes
- Hours
For example, a Start value of 1 and an End value of 2 with the Minutes unit selected returns messages delivered in 1 to 2 minutes.
- Infinite – Select the checkbox to eliminate the End value from the scan. For example, a Start value of 2 with the Infinite checkbox selected retrieves all messages that took 2 seconds/minutes/hours or longer to deliver.
Once the frame is configured, click Add. The configured message time frame will appear in the list. Multiple time frames can be configured. Select a frame and click Replace to modify an existing frame. Use Remove to delete an existing frame.
ExchangePS: Category
The Category page contains a connection section where connection options are defined. It is also where the query category is selected. The available query categories are sub-divided by auditing focus.
Connection
In the Connection section, select the method for connecting to the target Exchange environment:
-
Use Global setting – Reads from the global configuration from the Settings > Exchange node, specifically the Client Access Server (CAS) field
- See the Exchange topic for additional information on these settings
-
Use specific server – Use a different server from what is set in core
-
Exchange 2010 Servers – Can use the CAS server set in the global configuration (Settings > Exchange node)
-
Exchange 2013 & 2016 – Require an actual CAS server name:
- If the Settings > Exchange node was configured for MAPI over HTTP, then an actual CAS server name was supplied and will be used by the ExchangePS Data Collector
- If the Settings > Exchange node was configured for MAPI over HTTPS, then the global configuration will have a web address instead of an actual server. Therefore, each query requires the CAS server to be set as the specific server on the Category page.
-
-
Use Office 365 – Connect to Office 365
-
Use pipelined PowerShell – Processes each mailbox object in turn. When selected, the data collector streams data to the database instead of transferring batches of data.
- This option uses less memory but is more sensitive to network conditions
- Only available for Exchange 2013+ target environments
Query Categories
The ExchangePS Data Collector contains the following query categories, sub-divided by auditing focus:
-
Mailbox Information
-
Mailboxes – Collects mailbox information
-
Mailbox Permissions – Collects permissions on mailbox folders (Exchange 2010 or later)
-
Mailbox Databases – Collects information on mailbox databases
NOTE: This option is not available for Office 365 target environments
-
Mailbox Rights – Collects information on mailbox rights
-
Mailbox AD Rights – Collects information on mailbox Active Directory rights
-
Mailbox Search – Search mailboxes (Exchange 2010 or later)
-
Mailbox Access Logons – Collects information on mailbox access logons
-
-
Exchange Organization
- Exchange Users – Collects Exchange user properties
-
Exchange ActiveSync
- Exchange ActiveSync Mobile Devices – Collects Exchange ActiveSync for mobile devices
-
Public Folder Information
- Public Folder Content – Collects general statistics and sizing for the public folder environment
- Public Folder Permissions – Collects permission information for the public folder environment
-
Office 365 – Only available for Office 365 target environments
- Mail Flow Metrics – Collects information about mail flow in the Exchange Online environment
-
Domain Information
- Domains – Collects information about Domains in the Exchange environment
Each category has specific requirements and capabilities per auditing focus:
- Mailbox Information
- Exchange Organization
- Exchange ActiveSync
- Public Folder Information
- Office 365
- Domain Information
Mailbox Information
Mailbox Information audit focus contains the following categories:
Mailboxes
This category gathers high-level statistics about the Mailboxes in the environment. It can be run with quick properties or all properties. The quick properties are the first 14 properties and significantly reduce the time it takes to return the information. The PowerShell queries this category runs are as follows:
Get-Mailbox
Get-MailboxStatistics
Get-MailboxDatabase
When this category is selected, the following ExchangePS Data Collector Wizard pages are available for configuration:
- ExchangePS: Scope
- ExchangePS: Results
- ExchangePS: Options
- ExchangePS: Error Logging
- ExchangePS: Summary
Mailbox Permissions
This category returns Mailbox Folder permissions and folder level statistics about the mailboxes. The PowerShell queries this category runs are as follows:
Get-Mailbox
Get-MailboxFolderPermission
Get-MailboxStatistics
Get-MailboxDatabase
When this category is selected, the following ExchangePS Data Collector Wizard pages are available for configuration:
- ExchangePS: Scope
- ExchangePS: Results
- ExchangePS: Options
- ExchangePS: Error Logging
- ExchangePS: Summary
Mailbox Databases
This category returns information about the Mailbox Databases which reside in the organization. The PowerShell query this category runs is as follows:
Get-MailboxDatabase
When this category is selected, the following ExchangePS Data Collector Wizard pages are available for configuration:
- ExchangePS: Scope
- ExchangePS: Results
- ExchangePS: Options
- ExchangePS: Error Logging
- ExchangePS: Summary
Mailbox Rights
This category returns Mailbox Rights assigned to each Mailbox, such as Full Mailbox Access. The PowerShell query this category runs is as follows:
Get-MailboxDatabase
When this category is selected, the following ExchangePS Data Collector Wizard pages are available for configuration:
- ExchangePS: Scope
- ExchangePS: Results
- ExchangePS: Options
- ExchangePS: Error Logging
- ExchangePS: Summary
Mailbox AD Rights
This category returns information about the Mailbox Databases which reside in the organization. The PowerShell query this category runs is as follows:
Get-MailboxDatabase
When this category is selected, the following ExchangePS Data Collector Wizard pages are available for configuration:
- ExchangePS: Scope
- ExchangePS: Results
- ExchangePS: Options
- ExchangePS: Error Logging
- ExchangePS: Summary
Mailbox Search
This category provides the capability to search the Mailbox for any criteria configured inside the data collector. The PowerShell queries this category runs are as follows:
Search-Mailbox
Get-Mailbox
Get-MailboxDatabase
When this category is selected, the following ExchangePS Data Collector Wizard pages are available for configuration:
- ExchangePS: Scope
- ExchangePS: Filter by Message
- ExchangePS: Results
- ExchangePS: Options
- ExchangePS: Error Logging
- ExchangePS: Summary
Mailbox Access Logons
This category returns the Mailbox Access Auditing log details. Mailbox Access Auditing does need to be enabled on the Mailboxes in order for this job to return any information. The PowerShell queries this category runs are as follows:
Search-MailboxAuditLog
Get-Mailbox
When this category is selected, the following ExchangePS Data Collector Wizard pages are available for configuration:
- ExchangePS: Scope
- ExchangePS: Mailbox Logons
- ExchangePS: Results
- ExchangePS: Options
- ExchangePS: Error Logging
- ExchangePS: Summary
Exchange Organization
Exchange Organization audit focus contains the following category:
Exchange Users
This category returns information about the Mail-Enabled Users in the Exchange environment. The PowerShell queries this category runs are as follows:
Get-User
Get-CASMailbox
Get-Mailbox
Get-ThrottlingPolicyAssociation
When this category is selected, the following ExchangePS Data Collector Wizard pages are available for configuration:
- ExchangePS: Scope
- ExchangePS: Results
- ExchangePS: Options
- ExchangePS: Error Logging
- ExchangePS: Summary
Exchange ActiveSync
Exchange ActiveSync audit focus contains the following category:
Exchange ActiveSync Mobile Devices
This category returns ActiveSync device properties and the Exchange Mailboxes they are associated to. The PowerShell queries this category runs are as follows:
Get-ActiveSyncDeviceStatistics
Get-Mailbox
When this category is selected, the following ExchangePS Data Collector Wizard pages are available for configuration:
- ExchangePS: Scope
- ExchangePS: Results
- ExchangePS: Options
- ExchangePS: Error Logging
- ExchangePS: Summary
Public Folder Information
Public Folder Information audit focus contains the following categories:
Public Folder Content
This category returns general statistics and sizing for the public folder environment. When it is selected, the following ExchangePS Data Collector Wizard pages are available for configuration:
- ExchangePS: Scope
- ExchangePS: Results
- ExchangePS: Options
- ExchangePS: Error Logging
- ExchangePS: Summary
Public Folder Permissions
This category returns permissions information for the public folder environment. When it is selected, the following ExchangePS Data Collector Wizard pages are available for configuration:
- ExchangePS: Scope
- ExchangePS: Results
- ExchangePS: Options
- ExchangePS: Error Logging
- ExchangePS: Summary
Office 365
Office 365 audit focus contains the following category:
Mail Flow Metrics
This category returns information about mail flow in the target Exchange Online environment. When it is selected, the following ExchangePS Data Collector Wizard pages are available for configuration:
- ExchangePS: Scope
- ExchangePS: Mail Flow
- ExchangePS: Results
- ExchangePS: Options
- ExchangePS: Error Logging
- ExchangePS: Summary
Domain Information
Domain Information audit focus contains the following category:
Domains
This category returns information about domains in the Exchange environment. When it is selected, the following ExchangePS Data Collector Wizard pages are available for configuration:
- ExchangePS: Scope
- ExchangePS: Results
- ExchangePS: Options
- ExchangePS: Error Logging
- ExchangePS: Summary
Exchange Custom Connection Profile & Host List
The ExchangePS Data Collector requires a custom Connection Profile and host list to be created and assigned to the job conducting the data collection. The host inventory option during host list creation makes it necessary to configure the Connection Profile first.
NOTE: It is not possible to target both Exchange Online and on-premises Exchange environments from the same job. Therefore, the Connection Profile should only contain the credentials for one type of environment.
Exchange On-Premises
This section describes the process to configure the Connection Profile and host list for Exchange on-premises environments.
Exchange On-Premise Credential for a Connection Profile
The provisioned credential used should be an Active Directory account. Create a Connection Profile and set the following information on the User Credentials window:
-
Select Account Type – Active Directory Account
-
Domain – Drop-down menu with available trusted domains will appear. Either type the short domain name in the textbox or select a domain from the menu.
-
User name – Type the user name
-
Password Storage – Choose the for credential password storage:
- Application – Uses the configured Profile Security setting as selected at the Settings > Application node
- CyberArk – Uses the CyberArk Enterprise Password Vault
-
Password – Type the password
-
Confirm – Re-type the password
Exchange On-Premise Host List
The ExchangePS Data Collector should be set to run against:
- Local host
Exchange Online
This section describes the process to configure the Connection Profile and custom host list for Exchange Online.
Exchange Online Credential for a Connection Profile
The provisioned credential must be created with the Exchange Modern Authentication account type. Create a Connection Profile and set the following information on the User Credentials window:
- Select Account Type – Exchange Modern Authentication
- Password Storage – Application (Uses the configured Profile Security setting as selected at the Settings > Application node. See the Application topic for additional information.)
- Organization – The primary domain name of the Microsoft Entra tenant being leveraged to make the connection. See the Identify the Tenant's Name topic for additional information.
- Email Address – The email address for the mailbox to be leveraged in Exchange Online environment scans. The mailbox must belong to the primary domain used in the Organization field.
- AppID – Application (client) ID of the Enterprise Auditor application registered with Microsoft Entra ID. See the Identify the Client ID topic for additional information.
- Certificate Thumbprint – The thumbprint value of the certificate uploaded to the Microsoft Entra ID application. See the Upload Self-Signed Certificate topic for additional information.
Exchange Online Host List
Exchange Online requires a custom host list. The host list should include the tenant name of the Microsoft Entra tenant used to connect to Exchange Online.
- The host name must be the domain name of the tenant, for example
company.onmicrosoft.com. See the Identify the Tenant's Name topic for additional information.
See the Add Hosts topic for instructions on creating a custom host list.
ExchangePS: Error Logging
The Error Logging page is used to configure how long to keep the PowerShell logs. It is a wizard page for all of the categories.
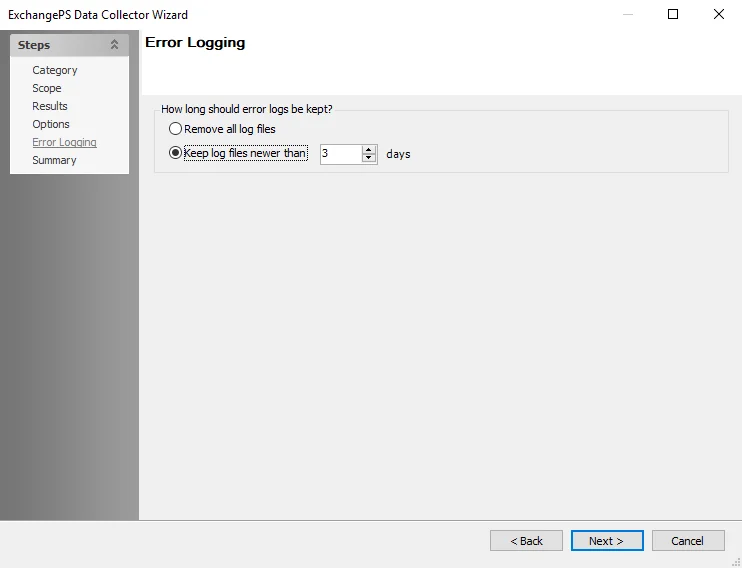
Select from the following options:
- Remove all log files – Removes the PowerShell logs when data collection completes
- Keep log files newer than [number] days – Removes PowerShell logs older than the specified age when data collection completes
These log files are stored in the following location on the target host:
…\STEALTHbits\StealthAUDIT\ExchangePS
ExchangePS: Filter by Message
The Filter by Message page is used to define the filter conditions of the search. It is a wizard page for the category of:
- Mailbox Search
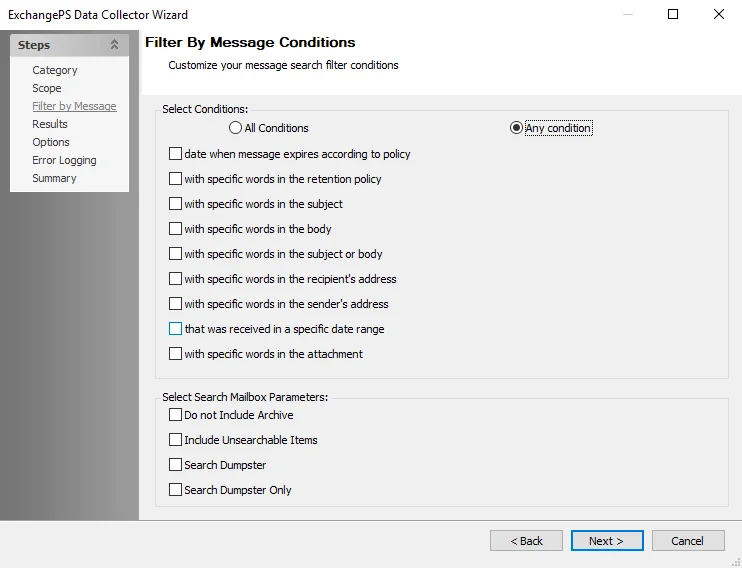
In the Select Conditions section, choose the filter logic:
- All Conditions – All selected conditions must be met
- Any condition – Any of the selected conditions must be met
Available conditions to select from include:
- date when message expires according to policy – If selected, specify date range through the Date Range Selection window
- with specific words in the retention policy – If selected, specify words through the Words window
- with specific words in the subject – If selected, specify words through the Words window
- with specific words in the body – If selected, specify words through the Words window
- with specific words in the subject or body – If selected, specify words through the Words window
- with specific words in the recipient’s address – If selected, specify words through the Words window
- with specific words in the sender’s address – If selected, specify words through the Words window
- that was received in a specific date range – If selected, specify date range through the Date Range Selection window
- with specific words in the attachment – If selected, specify words through the Words window
See the Date Range Selection Window and Words Window topics for additional information.
In the Select Search Mailbox Parameters section, select the desired filter parameters:
- Do not Include Archive
- Include Unsearchable Items
- Search Dumpster
- Search Dumpster Only
Date Range Selection Window
The Date Range Selection window is opened by the Specify Date Range... option for a date related filter on the Filter by Message page.

Select the range category on the left and configure the range setting in the enabled fields:
- Over – Select the number and time units. The available time units are: Days, Months, or Years.
- Last – Select the number and time units. The available time units are: Days, Months, or Years.
- Before – Drop-down menu opens a calendar selection view, choose the end date
- After – Drop-down menu opens a calendar selection view, choose the start date
- Between (Date) – Drop-down menus open calendar selection view, choose the start and end dates
- Between – Select the numbers for the lower and upper range boundary, and the desired time units. The available time units are: Days, Months, or Years.
When the date range is specified, click OK. The selected date range shows as a filter on the Filter by Message page. Click the filter to open the Date Range Selection window to modify the date range.
Words Window
The Words window is opened by the Specify words... option for a word related filter on the Filter by Message page.

In the Search property section, choose the filter logic:
- All Words – All selected word filters must be met
- Any Words – Any of the selected word filters must be met
Then, configure the required words in the filter list. Enter the word in the textbox and click Add. To delete a word from the filter list, select the word and click Remove.
When the word list is complete, click OK. The specified words show as a filter on the Filter by Message page. Click the filter to open the Words window to modify the list.
ExchangePS: Mailbox Logons
The Mailbox Logons page is used to define the type of mailbox logon events to return, as well as the date range to be returned. It is a wizard page for the category of Mailbox Information > Mailbox Access Logons.
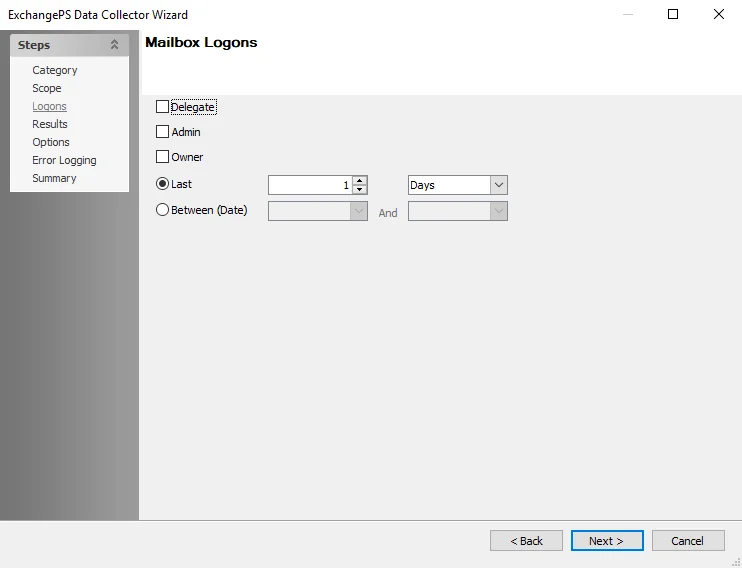
Select the desired checkboxes to indicate which logons to audit:
- Delegate
- Admin
- Owner
Specify the date range for the logons:
-
Last – Select the number and time units
NOTE: Available units are Days, Months, or Years.
-
Between (Date) – Use the drop-down menus to open calendars to select the start and end dates
ExchangePS: Mail Flow
The Mail Flow page returns permissions information for the public folder environment. It is a wizard page for the category of:
- Office 365 > Mail Flow Metrics
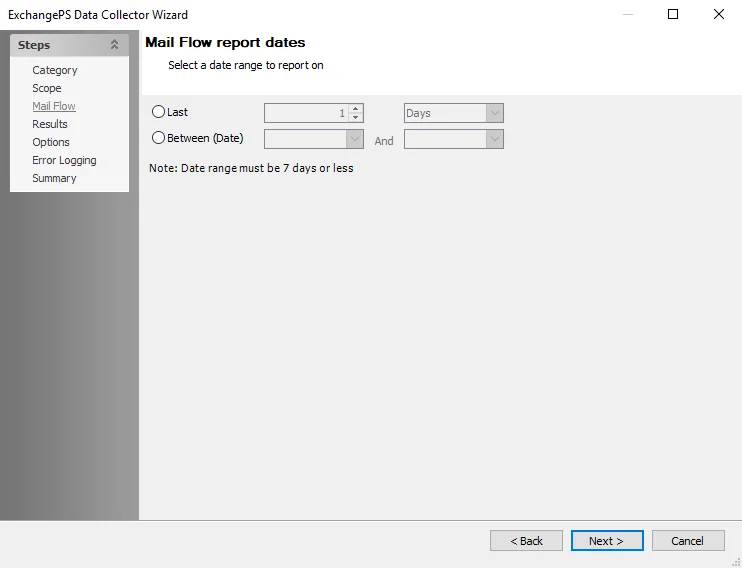
Select and configure a date range from the following options:
NOTE: Date range must be 7 days or less.
- Last – Select the number of days
- Between (Date) – Use the drop-down menus to open the calendar selection view to choose the start and end dates
ExchangePS: Options
The Options page is used to configure additional options. It is a wizard page for all of the categories.
The following options can be configured:
-
Message size units - Select the message size for the query:
- KB
- MB
- GB
-
How to format collected results – Select how table will be formatted according to the return data:
- Return data as collected
- Return each value of the following property in a separate row – Enabled for specific properties selected on the Results page
- Return data in a separate row for each property set in the following group – Enabled for specific properties selected on the Results page
-
How to return multi-valued properties – Select how the table will be formatted when the return data contains multi-valued properties:
-
Concatenated
- Delimiter – Enter the desired delimiter to be used between values
-
First-value only
-
ExchangePS Data Collector
The ExchangePS Data Collector utilizes the Exchange CMDlets to return information about the Exchange environment utilizing PowerShell. This data collector has been designed to work with Exchange 2010 and newer. The ExchangePS Data Collector has been preconfigured within the Exchange Solution. Both this data collector and the solution are available with a special Enterprise Auditor license. See the Exchange Solution topic for additional information.
Protocols
- PowerShell
Ports
- TCP 135
- Randomly allocated high TCP ports
Permissions
-
Remote PowerShell enabled on a single Exchange server
-
Windows Authentication enabled for the PowerShell Virtual Directory on the same Exchange server where Remote PowerShell has been enabled
-
View-Only Organization Management Role Group
-
Discovery Search Management Role Group
-
Public Folder Management Role Group
-
Mailbox Search Role
-
Discovery Management Role
-
Organization Management Role
See the Exchange PowerShell Permissions topic for additional information.
Remote PowerShell
The ExchangePS Data Collector will utilize Remote PowerShell when connecting to Exchange 2010 or newer. This behavior simulates what the Exchange Management Shell does when loading. The below PowerShell syntax is an example of how the connection is loaded through PowerShell.
$JobUserName = '{insert domain\username}'
$JobPassword = '{insert password}'
$secpasswd = ConvertTo-SecureString $JobPassword -AsPlainText -Force
$JobCredential = New-Object System.Management.Automation.PSCredential ($JobUserName, $secpasswd)
$relaxed=New-PSSessionOption -SkipCACheck -SkipCNCheck -SkipRevocationCheck
$sess=New-PSSession -ConnectionUri 'https://{exchangeserver}/powershell?serializationLevel=Full' -ConfigurationName 'Microsoft.Exchange' -AllowRedirection -Authentication Negotiate -Credential $JobCredential -SessionOption $relaxed
Import-PSSession $sess
See the Exchange PowerShell Permissions topic for instructions on enabling Remote PowerShell.
The Exchange Applet
The Exchange Applet will run on the Exchange server by the ExchangePS Data Collector in the following circumstances:
- An actual Client Access Server (CAS) server is not specified either in the global configuration (Settings > Exchange node) or on the Category page of the ExchangePS Data Collector Wizard
- Remote PowerShell has not been enabled for targeting Exchange 2010
The following Exchange Snap-in is used when the applet is utilized:
- Add-pssnapin Microsoft.Exchange.Management.Powershell.E2010
ExchangePS Query Configuration
The ExchangePS Data Collector is configured through the ExchangePS Data Collector Wizard, which contains the following wizard pages:
- ExchangePS: Category
- ExchangePS: Scope
- ExchangePS: Scope by DB
- ExchangePS: Scope by Mailboxes
- ExchangePS: Scope by Public Folders
- ExchangePS: Filter by Message
- ExchangePS: Mailbox Logons
- ExchangePS: Results
- ExchangePS: Options
- ExchangePS: Error Logging
- ExchangePS: Summary
Available pages vary according to selections made throughout the wizard.
ExchangePS: Results
The Results page is where properties that will be gathered are selected. It is a wizard page for all of the categories.
Properties can be selected individually or the Select All and Clear All buttons can be used. All selected properties will be gathered. Available properties vary based on the category selected.
ExchangePS: Scope
The Scope page establishes how mailboxes are scoped. It is a wizard page for all of the categories.
Available scoping options vary based on the category selected. Scoping options include:
-
No Scoping Target Host: Local Host – Returns all results for the entire targeted Exchange Organization
- If this option is selected, then the data collector should be run against the host specified on the Summary page. See the ExchangePS: Summary topic for additional information.
- When using the applet, the data collector gathers information about the Exchange Forest in which the Enterprise Auditor Console currently resides
- For Remote PowerShell, the data collector gathers information about the Exchange Organization to which the Remote PowerShell connection was made. This refers to the server entered in the Client Access Server (CAS) field of the global configuration from the Settings > Exchange node or on the this page.
-
Scope by Database Target Host: Local Host – Scope query to return results for specific databases. If this option is selected, the Scope by Database page is enabled in the wizard. See the ExchangePS: Scope by DB topic for additional information.
-
Scope by Mailbox Target Host: Local Host – Scope query to return results for specific mailboxes. If this option is selected, the Scope by Mailboxes page is enabled in the wizard. See the ExchangePS: Scope by Mailboxes topic for additional information.
-
Scope by Server Target Host: Exchange MB Server – Scope query to return results for specific servers selected in the job’s Configure > Hosts node
- When using the applet, the data collector deploys a process to the targeted host to run the PowerShell on that server
- For Remote PowerShell, the data collector does not deploy anapplet and utilizes the WinRM protocol to gather information about the objects on that server. See the Remote PowerShell and The Exchange Applet topics for additional information.
-
Scope by Public Folder – Scope query to return results for specific Public Folders. If this option is selected, the Scope by Public Folders page is enabled in the wizard. See the ExchangePS: Scope by Public Folders topic for additional information.
-
View entire forest when querying for objects – Select this checkbox to scan the entire forest when querying for objects
ExchangePS: Scope by DB
The Scope by Databases page is used to define specific databases to search. This page is enabled when Scope by Database Target Host: Local Host option is selected on the Scope page. See the ExchangePS: Scope topic for additional information.
When using the applet, the data collector returns databases for the Exchange Organization in which the Enterprise Auditor Console currently resides, and only returns information about those databases. For Remote PowerShell, the data collector returns databases for the Exchange Forest and only returns information about those databases.

Click Retrieve to return all databases in the Exchange Organization and populate them in the Available Databases list. Select the desired databases from Available Databases and click Add. The selected databases are added in the Selected Databases list. To remove undesired databases from Selected Databases, select them and click Remove. The Select All and Clear All buttons can be used for quick selection.
ExchangePS: Scope by Mailboxes
The Scope by Mailboxes page is used to define specific mailboxes to search. This page is enabled when the Scope by Mailbox Target Host: Local Host option is selected on the Scope page. See the ExchangePS: Scope topic for additional information.
When using the applet, the data collector will return mailboxes for the Exchange Forest in which the Enterprise Auditor Console currently resides, and only return information about those mailboxes. For Remote PowerShell, the data collector will return mailboxes for the Exchange Forest as well as return information about those mailboxes.
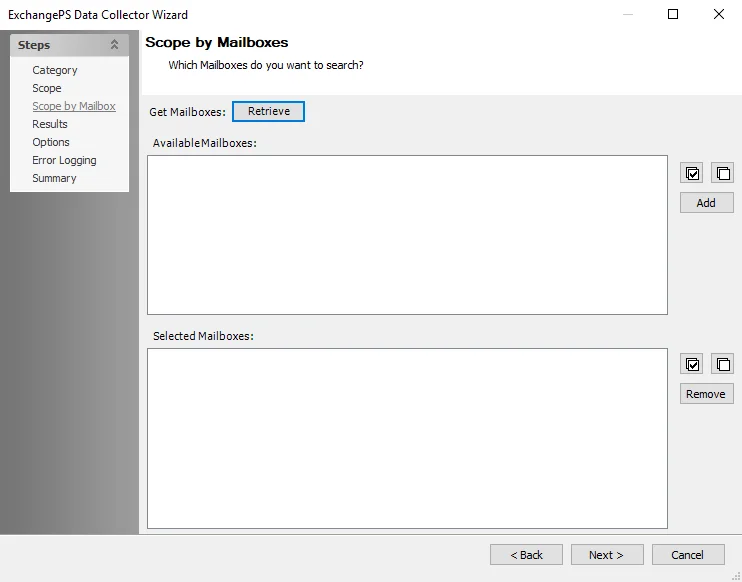
Click Retrieve to return all mailboxes in the Exchange Organization and populate them in the Available Mailboxes list. Select desired mailboxes from the Available Mailboxes list and click Add. The selected mailboxes are added in the Selected Mailboxes list. To remove undesired mailboxes from Selected Mailboxes, select them and click Remove. The Select All and Clear All buttons can be used for quick selection.
ExchangePS: Scope by Public Folders
The Scope by Public Folders page is used to define specific public folders to search. This page is enabled when the Scope by Public Folder option is selected on the Scope page. See the ExchangePS: Scope topic for additional information.
Configure the Scope option using the drop-down. The available options are:
- Selected Public Folder
- Selected Table
The option selected changes how the public folders are identified for scoping.
Selected Public Folder
The Selected Public Folders scope option retrieves all public folders in the Exchange organization, populating them in the Available list.
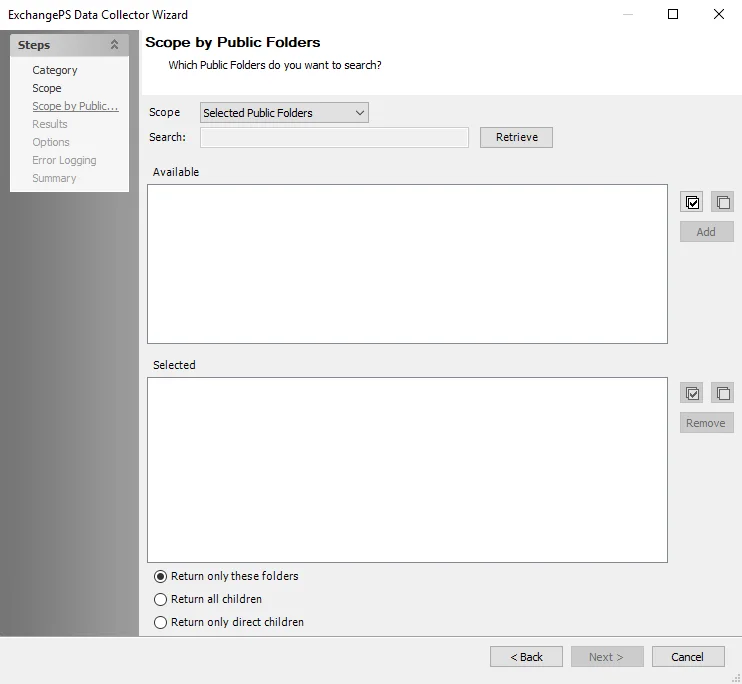
The Search feature filters this list. Select the desired public folders and click Add. The selected public folders are added to the Selected list. Use the Remove option to delete selected public folders from the list. The Select All or Deselect All buttons can be used for quick selection. Additional scoping options include:
- Return only these folders – Audits only the selected public folders
- Return all children – Audits the selected public folders and all sub-folders
- Return only direct children – Audits the selected public folders and one folder deeper
Selected Table
The Selected Table scope option populates the Available tables list with tables from the Enterprise Auditor database.
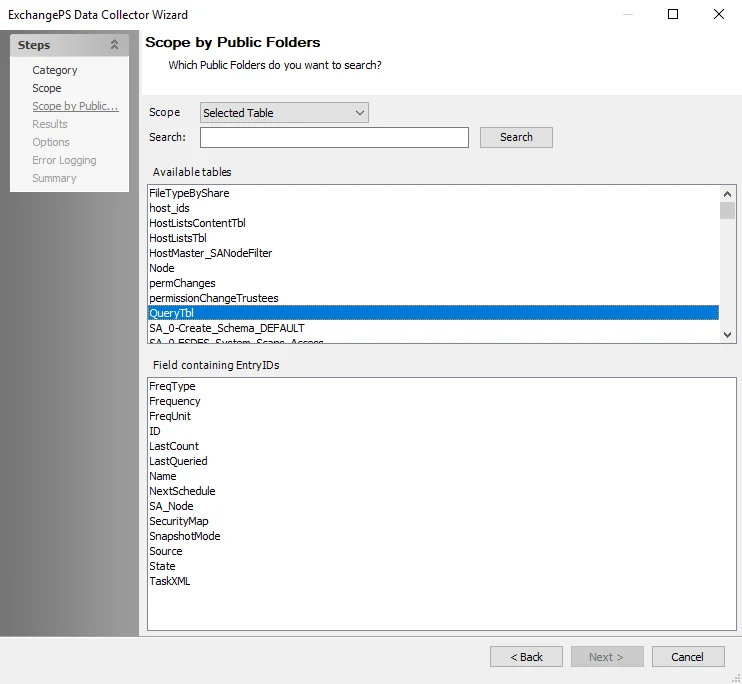
The Search feature filters this list. Select the table that houses the list of public folders for which this query will be scoped. The Field containing EntryIDs list is populated with columns from the selected table. Select the appropriate column from the list.
ExchangePS: Summary
The Summary page is where configuration settings are summarized. It is a wizard page for all of the categories.
Click Finish to save configuration changes. If no changes were made, it is a best practice to click Cancel to close the ExchangePS Data Collector Wizard to ensure that no accidental clicks are saved.
ExchangePublicFolder: Category
The Category page is used to select the objects to search.
The ExchangePublicFolder Data Collector contains the following query categories:
- Contents – Returns information on the contents of each folder within the scope
- Permissions – Returns permissions on the each folder within the scope
- Ownership – Returns trustees which have the owner permission role
- Replicas – Returns a listing for each folder within the scope, including the replicas
ExchangePublicFolder: Options
The Options page provides additional configuration options for the query. It is a wizard page for all of the categories. Available options vary based on the category selected.
The Options page contains the following options:
-
Process folders that physically reside on the target server only – This option will limit extraction to only the subset of public folders which reside on this server when selected. Clear this option if targeting the Exchange 2010 Public Folder Server. The ability to scope to the targeted server is not available for Exchange 2010. The entire public folder hierarchy is returned.
-
Message size units:
- KB
- MB
-
Include subfolders in message counters – This option is only available for the Contents category. When this option is selected, it will include subfolders in message counters, according to the Scope page settings. See the ExchangeMetrics: Scope topic for additional information.
-
Large attachment threshold (Kb) – Configure the desired size limit for attachments. The default value is 500.
In the Attachment types section, configure attachment count types.
- Count attachment types – Selecting this option enables the Content Types settings
- Add New – Add classifications and provide the file extensions for those classifications
- Load Defaults – Resets the Attachment types configuration to its original settings
- Remove – Deletes a selected classification from the filter list
ExchangePublicFolder Data Collector
The ExchangePublicFolder Data Collector audits an Exchange Public Folder, including contents, permissions, ownership, and replicas. This is a MAPI-based data collector which requires the Settings > Exchange node to be enabled and configured. See the Exchange topic for additional information.
The ExchangePublicFolder Data Collector has been preconfigured within the Exchange Solution. Both this data collector and the solution are available with a special Enterprise Auditor license. See the Exchange Solution topic for additional information.
Protocols
- MAPI
- RPC
Ports
- TCP 135
- Randomly allocated high TCP ports
Permissions
- Member of the Exchange Administrator group
- Organization Management
Sensitive Data Discovery Considerations
The Sensitive Data Discovery Add-On must be installed on the Enterprise Auditor Console server, which enables Sensitive Data criteria for scans. If running Sensitive Data Discovery (SDD) scans, it will be necessary to increase the minimum amount of RAM. Each thread requires a minimum of 2 additional GB of RAM per host. For example, if the job is configured to scan 8 hosts at a time , then an extra 16 GB of RAM are required (8x2=16).
ExchangePublicFolder Query Configuration
The ExchangePublicFolder Data Collector is configured through the Exchange Public Folder Data Collector Wizard, which contains the following wizard pages:
- Welcome
- ExchangePublicFolder: Category
- ExchangePublicFolder: Scope
- ExchangePublicFolder: Properties
- ExchangePublicFolder: Options
- ExchangePublicFolder: Probable Owner
- ExchangePublicFolder: Summary
The query requires special permissions to connect to target Exchange servers. Configure these permissions on the Welcome page.
In the Connection Setting section, choose to either maintain the global inheritance, or configure query specific settings.
The Use Global setting option specifies what setting is being inherited. Clear this option to break inheritance, and then select one of the following options:
- System Attendant (2003 & 2007)
- Use the maibox associated with the Windows account that Enterprise Auditor is run with
- Exchange Mailbox (2010 and newer) – Enter the Exchange mailbox
- Client Access Server – Enter the CAS
See the Exchange topic for additional information.
In the Sampling server section, enter the Exchange server in the textbox to be used to test the connection settings. Click Test sampling server to ensure there is access to the server. The box at the bottom of the page displays information regarding the test connection in progress.
ExchangePublicFolder: Probable Owner
The Probable Owner Settings page provides configuration options to determine an owner. It is enabled when the Probable Owner property is selected on the Properties page. See the ExchangePublicFolder: Properties topic for additional information.
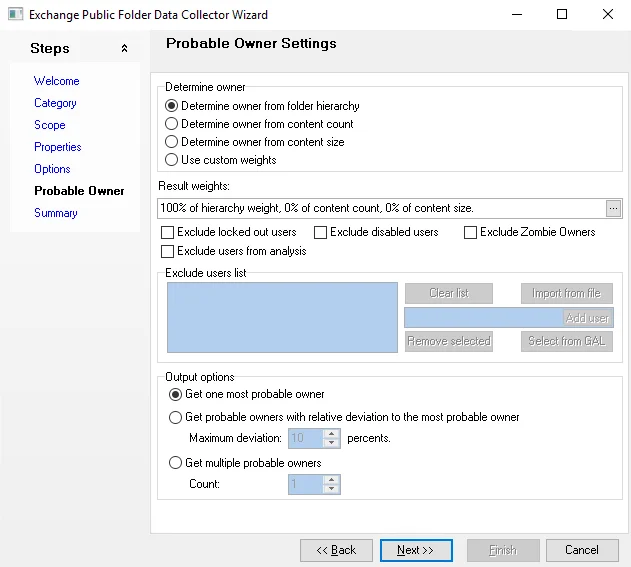
In the Determine owner section, select the desired option to specify what setting to use to determine an owner:
-
Determine owner from folder hierarchy – Select to determine the probable owner with a weight of one hundred percent on file hierarchy
-
Determine owner from content count – Select to determine the probable owner with a weight of one hundred percent of content count
-
Determine owner from content size – Select to determine the probable owner with weight of 100 percent on content size
-
Use custom weights – Select to enable the Result weights option to assign custom weights to the ownership categories

-
Result weights – This option is enabled when the Use custom weights option is selected. Click the ellipses to open the Probable Owner Settings window and assign ownership weights to distribute between the parameters.
In the Exclusions section, select one or more of the following checkboxes to specify exclusions:
-
Exclude locked out users
-
Exclude disabled users
-
Exclude Zombie Owners
-
Exclude users from analysis – Select this checkbox to enable the Exclude users list and add users for exclusion.
- Add user – Enter a user in the box and click Add user to add the user to the exclusion list
- Import from file – Click Import from file to open the Import File Dialog page and browse for a file to import
- Select from GAL – Click Select from GAL to select a user from the Global Address Book
- Clear list – Click Clear list to remove all users from the Exclude users list
- Remove selected – Select a user or users to remove from the Exclude users list and click Remove selected to remove the users
In the Output Options section, select the desired output option:
-
Get one most probable owner – Return one probable owner
-
Get probable owners with relative deviation to the most probable owner – Return probable owners based on the deviation from percentage from the most probable owner
- Maximum deviation [number] percents – Use the arrow buttonss to enter the desired percent of deviation from the most probable owner from which to return probable owners
-
Get multiple probable owners – Return multiple probable owners
- Count – Use the arrow buttons to enter the desired number of probable owners to return
ExchangePublicFolder: Properties
The Properties page is where properties that will be gathered are selected. It is a wizard page for all of the categories.
Properties can be selected individually or you can use the Select All, Clear All, or Reset All buttons. All selected properties will be gathered. The Message Classes button opens the Message classes filters window.
The wildcard (*) returns all message class filters. Enter the name of a class filter and click
Add to add it to the list. Delete will remove the selected class filter from the list. The
Load defaults option will restore the class filter default settings.
ExchangePublicFolder: Scope
The Scope page is used to define which folders will be included will be searched by this query. It is a wizard page for all of the categories.
In the Choose Type of Public Folders to be queried section, select either:
- Default Public Folders – User can access these folders directly with client applications such as Microsoft Outlook. In its default configuration, Exchange System Manager displays these folders when a public folder tree is expanded.
- System Public Folders – Users cannot access these folders directly. Client applications, such as Microsoft Outlook, use these folders to store information such as free and busy data, offline address lists, and organizational forms. Other folders hold configuration information that is used by custom applications or by Exchange itself. The Public Folders tree contains extra system folders, such as the EFORMS REGISTRY folder, that do not exist in general-purpose public folder trees.
In the Choose Scope of Public Folders to be queried section, select one of the following options:
-
All Public Folders – Returns all public folders within the targeted environment
-
Selected Public Folders – Returns only those public folders specified on the Scope page of the query
- See the Scope to the Selected Public Folders topic for additional information
-
Selected Table – Returns only those public folders within the table and field name specified on the Scope page of the query
- See the Scope to Selected Table topic for additional information.
Scope to the Selected Public Folders
When Scope to Selected Public Folders is selected on the Scope page, the options to specify the desired folders are enabled.
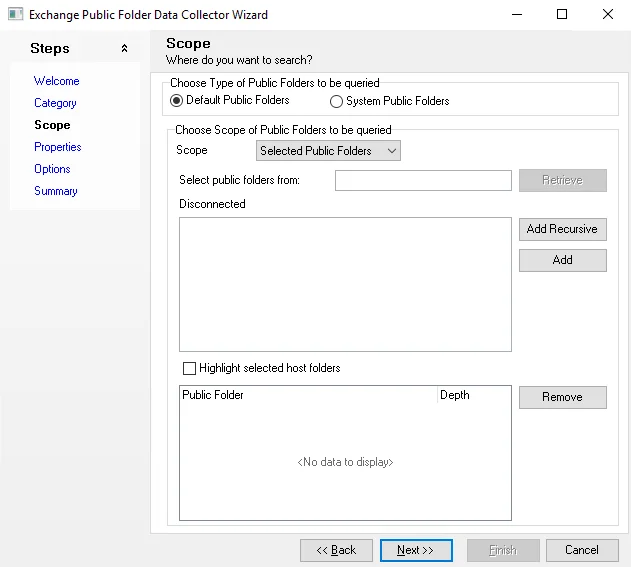
Configure the scope of the selected public folders to be queried:
- Select public folders from – Enter the name of the server hosting the desired public folders and click Retrieve. The box will populate with available public folders.
- Add – Adds the selected folders
- Add Recursive – Adds the selected folders and all child folders. Not adding recursive folders will add only the selected folder without its child folders.
- Highlight selected host folders – Highlights all the folders that are physically housed on the selected host. If enabled, physically housed folders show in bold text in the list that is returned after clicking Retrieve.
The selected public folders are added in the table at the bottom. Click Remove to delete a selected word from the filter list.
Scope to Selected Table
When Scope to Selected Table is selected on the Scope page, the options to specify the desired tables are enabled.
Configure the selected tables to be queried:
-
Table Name – retrieves the list of selected public folders from a Enterprise Auditor database table. Click Retrieve to populate the Table name box with all available tables within the database.
- The Table name box can be filtered by entering a name in the textbox and clicking Retrieve
-
Field name – Select the desired table and the available fields will populate the Field names box. Select the field containing the public folder names.
ExchangePublicFolder: Summary
The Summary page displays a summary of the configured query. It is a wizard page for all of the categories.
Click Finish to save configuration changes. If no changes were made, it is a best practice to click Cancel to close the Exchange Public Folder Data Collector Wizard to ensure that no accidental clicks are saved.